5 Tips for a Successful Software Migration to the Latest and Best Tools

Photo by Startup Stock Photos from Pexels

Businesses need to stay on the cutting edge of technology. That’s why it’s essential to use the most advanced tools. Your business is only as good as your data. Moreover, if you’re running outdated, unresponsive data-handling software, you should consider scheduling a software migration to the latest and best tools.

What we mean by that is that you need to move your data over to software that has the capacity, security, and functionality you need. If you don’t, your old software will put you behind your competition and cost you money.

However, getting the best software systems for your business isn’t cheap, and data migration is challenging. But industry experts are clear—the total cost of operating old technology rises sharply over time and outpaces the return on investment. For your business to stay relevant in today’s marketplace, your technology infrastructure needs to offer the right performance, scale, and flexibility for your expanding needs. Think of new software as an investment rather than an expense.

Recently, we helped a company that does porta-potty rentals in Dallas to transition their systems. The process was tough, but we made our deadline, and the results were worth waiting for. Here’s what we learned during the process. We hope our software migration experience helps make yours a success.

Give Yourself Plenty of Time

Software migration is complex, and you still have a business to run. Moreover, transition time varies considerably based on factors like the quality of source data, hardware capability, and the compatibility of data fields between the old system and the new.

It’s nearly inevitable that something will go wrong. However, because that’s not unexpected, you can compensate for it by starting sooner rather than later. Nick-of-time timelines don’t cut it. Be patient and prepare for what is to come.

RELATED ARTICLE: SOME USEFUL TIPS FOR BUYING THE PERFECT HR SOFTWARE FOR YOUR BUSINESS

Build a Migration Dream Team

With data, it’s garbage in, garbage out. So if you’re using your staff instead of hired help, it pays to choose the most qualified individuals to assist with the transition. Databases are always more disorganized than anyone expects them to be. On the other hand, one of the benefits of a software migration is that incorrect or corrupt data can be culled.

The best candidates to work on the project are those who know how to retrieve information from your current system effectively. These people will recognize bad data. What’s more, they can clean it up before they migrate it over to the new system.

Software migration is a big project. That means there are roles for team members from testing to data entry. To lead the charge, choose tech-savvy people who are willing to learn the new software first and teach others the ropes. For leaders, make sure your software provider offers comprehensive support.

Know the Process

Learn, do, teach, lead—it’s an educator’s mantra, and it will help you better navigate your transition. Software migration is a top-down project, and training everyone on the new system is a priority. However, no matter the size of your company, its leaders need to learn the process, practice it, and be able to demonstrate it to others before rolling it out.

Ensuring that a solid training schedule is in place to bring your team up to speed with the new software minimizes costly downtime and errors. However, if you’re ready to take point, you can quickly mobilize an entire team and confidently delegate responsibility to others. This concept is especially critical if you’ve made changes in data-handling procedures to reflect the change in software.

Consider Auto-Migration Options

A significant part of the cost of software migration is the time it takes to do the job. It’s painstaking work. Moreover, if your staff is too busy taking care of your customers or they’re not knowledgeable enough to be useful helpers in the transition process, it’s worth considering auto-migration.

Auto-migration is an automated process that transfers the bulk of data for you. But not all business software providers offer that option. Also, there may be technological barriers, including deep software incompatibilities and poor-quality legacy data. The cost of auto-migration may be higher upfront depending on the complexity of the systems. However, it relieves some of the pressure on staff. What’s more, in some cases, it may be a more economical option.

Hire Help for Your Software Migration

In our recent migration effort, we weren’t able to use company staff because of their responsibilities. But even when auto-migration is an option, you’ll still need extra hands to address hardware interface issues. Additionally, legacy data might not transfer to the new system correctly. In any case, you’ll need to educate staff about the new system.

A software migration can disrupt business-as-usual. But hiring help with the right expertise and credentials smooths the transition.

Data handling technology has evolved markedly in the past decade, but going forward, it will advance by leaps and bounds. Businesses that fail to adapt will be left behind. Information is a strategic asset that needs to be harnessed and used to its fullest potential. Using the latest and best tools makes the job easier and more profitable.

The post 5 Tips for a Successful Software Migration to the Latest and Best Tools appeared first on Business Opportunities.


via Business Opportunities Weblog
5 Tips for a Successful Software Migration to the Latest and Best Tools

Check Out These 5 Brilliantly Simple Woodworking Hacks, That Actually Are Hacks

Everyone loves shop tips and time saving ideas. Not all of these ideas qualify for the overly used word “hacks” , however, I feel like Glen from the youtube channel DIY Creators really nailed it with this one.

I started watching this, totally expecting the typical hyperbole associated with “hacks” and as I watched I was totally surprised. I didn’t think the milk jug on the circular saw would work, but he shows it working over and over, and I’m totally going to do this on mine.  The janky caulk gun is ridiculous but I could see actually using this in a pinch. Fantastic job Glen!

via MAKE Magazine
Check Out These 5 Brilliantly Simple Woodworking Hacks, That Actually Are Hacks

Laravel Eloquent Collection Tutorial With Example | Laravel 5.8 Guide

Laravel Eloquent Collection Tutorial Example

Laravel Eloquent Collection Tutorial With Example is today’s topic. The Eloquent collection object extends the Laravel base collection, so it naturally inherits the dozens of methods used to work with an underlying array of Eloquent models fluently. All multi-result sets returned by Eloquent are instances of an Illuminate\Database\Eloquent\Collection object, including results retrieved via the get method or accessed via a relationship.

Laravel Eloquent Collection Tutorial

We will start this tutorial by installing fresh Laravel. Right now, Laravel 5.8 is the latest version of Laravel. If you are new to Laravel 5.8, then check out my Laravel 5.8 CRUD tutorial for starters. Install Laravel using the following command.

composer create-project --prefer-dist laravel/laravel blog

Okay, now set up the database inside the .env file.

DB_CONNECTION=mysql
DB_HOST=127.0.0.1
DB_PORT=3306
DB_DATABASE=blog
DB_USERNAME=root
DB_PASSWORD=root

Next step is to migrate the tables inside the database using the following command.

php artisan migrate

Seed Database

Laravel includes the simple method of seeding your database with test data using seed classes. All the seed classes are stored in the database/seeds directory. Seed classes may have any name you want but probably it should follow some sensible convention, such as UsersTableSeeder, etc. By default, the DatabaseSeeder class is defined for you. From this class, you can use the call() method to run other seed classes, allowing you to control the seeding order.

Create a UsersTableSeeder.php file using the following command.

php artisan make:seeder UsersTableSeeder

We will use Model factories to generate fake data.

Now, write the following code inside the UsersTableSeeder.php file.

<?php

// UsersTableSeeder.php

use Illuminate\Database\Seeder;
use Illuminate\Support\Str;

class UsersTableSeeder extends Seeder
{
    /**
     * Run the database seeds.
     *
     * @return void
     */
    public function run()
    {
        $faker = Faker\Factory::create();
        for($i=0;$i<50;$i++) {
            \App\User::create([
                'name' => $faker->name,
                'email' => $faker->unique()->safeEmail,
                'email_verified_at' => now(),
                'password' => '$2y$10$TKh8H1.PfQx37YgCzwiKb.KjNyWgaHb9cbcoQgdIVFlYg7B77UdFm', // secret
                'remember_token' => Str::random(10),
            ]);
        }
    }
}

So, it will generate 50 random users records in the database.

Now, we need to modify the DatabaseSeeder.php file.

<?php

// DatabaseSeeder.php

use Illuminate\Database\Seeder;

class DatabaseSeeder extends Seeder
{
    /**
     * Seed the application's database.
     *
     * @return void
     */
    public function run()
    {
        $this->call(UsersTableSeeder::class);
    }
}

Before you seed the file, we need to regenerate the Composer’s autoloader using the dump-autoload command.

composer dump-autoload

Okay, now go to the terminal and run the seed file using the following command.

php artisan db:seed

It will generate fake data in the users table.

Laravel Eloquent Collection Tutorial


So now, we have test data to work with, and we can query the database using Laravel Eloquent Collection.

Query Data using Laravel Eloquent Collection

Now, write the following code inside the routes >> web.php file.

<?php

// web.php

Route::get('/', function () {
    $users = \App\User::all();
    foreach ($users as $user) {
        echo '<pre>';
        echo $user->name;
        echo '</pre>';
    }
});

In the above code, we are displaying only the name of the users in preformatted HTML view.

If you go to the root route, then you will see something like below image. Of course, the data will be different because the faker library randomly generates it. It will be 50 names.


Laravel 5.8 Guide

All collections also serve as the iterators, allowing us to loop over them as if they were simple PHP arrays.

The collections are much more potent than arrays and expose the variety of map / reduce operations that may be chained using the intuitive interface.

Laravel chunk() Collection Method

The chunk() method breaks a collection into multiple, smaller collections of the given size.

Write the following code inside the web.php file.

<?php

// web.php

Route::get('/', function () {
    $users = \App\User::all();
    $chunks = $users->chunk(2);
    $data = $chunks->toArray();
    echo '<pre>';
    print_r($data);
    echo '</pre>';
});

The output of the above code is following.


Laravel chunk() Collection Method

The chunk() method is especially useful in views when working with the grid system such as Bootstrap.

Laravel Custom Collections

If you need to use the custom Collection object with your extension methods, you may override the newCollection method on your model. See the following example of the User.php model.

<?php

// User.php

namespace App;

use Illuminate\Notifications\Notifiable;
use Illuminate\Contracts\Auth\MustVerifyEmail;
use Illuminate\Foundation\Auth\User as Authenticatable;
use App\CustomCollection;

class User extends Authenticatable
{
    use Notifiable;

    /**
     * The attributes that are mass assignable.
     *
     * @var array
     */
    protected $fillable = [
        'name', 'email', 'password',
    ];

    /**
     * The attributes that should be hidden for arrays.
     *
     * @var array
     */
    protected $hidden = [
        'password', 'remember_token',
    ];

    /**
     * The attributes that should be cast to native types.
     *
     * @var array
     */
    protected $casts = [
        'email_verified_at' => 'datetime',
    ];

    /**
     * Create a new Eloquent Collection instance.
     *
     * @param  array  $models
     * @return \Illuminate\Database\Eloquent\Collection
     */
    public function newCollection(array $models = [])
    {
        return new CustomCollection($models);
    }
}

Once you have defined the newCollection method, you will receive an instance of your custom collection anytime Eloquent returns the collection instance of that model. If you would like to use the custom collection for every model in your application, you should override a newCollection method on the base model class that is extended by all of your models. In the above example, we have override inside the User.php model class.

Okay, now create a CustomCollection.php file inside the app folder.

<?php

// CustomCollection.php

namespace App;

use Illuminate\Support\Collection;

class CustomCollection extends Collection 
{
    public function gotAllUsers()
    {
	dd($this->items);
    }
}

Here, $this->items have all the users records. We can access these records inside the CustomCollection class.

Finally, write the following code inside the web.php file.

<?php

// web.php

Route::get('/', function () {
    $users = \App\User::get();
    $users->gotAllUsers();
});

Refresh the root route, and the output is following. It is up to 50 records.


Laravel Custom Collections

Finally, Laravel Eloquent Collection Tutorial With Example is over.

The post Laravel Eloquent Collection Tutorial With Example | Laravel 5.8 Guide appeared first on AppDividend.

via Planet MySQL
Laravel Eloquent Collection Tutorial With Example | Laravel 5.8 Guide

Laravel 5.8 Form Validation Tutorial With Example

Laravel 5.8 Validation Tutorial


Laravel 5.8 Form Validation Tutorial With Example is today’s topic. Laravel  Framework provides many different approaches to validate your application’s form data. By default, Laravel’s base controller class uses the ValidateRequests trait which provides the convenient method to validate incoming HTTP request with a variety of powerful validation rules. We can use the Validation differently in Laravel. We can either use inside the controller’s method or create a FormRequest class to validate the incoming requests. In this tutorial, we will all ways to validate Laravel.

Laravel 5.8 Form Validation Tutorial

Okay, now the first step is to install Laravel 5.8. If you are new to Laravel 5.8, then check out my Laravel 5.8 CRUD tutorial on this blog. So, install the Laravel 5.8 using the following command. Right now, Laravel 5.8 is the latest version. So in the future, you may need to specify the version while installing the Laravel 5.8.

composer create-project --prefer-dist laravel/laravel blog

Okay, now go inside the project folder and open the project in the code editor.

Now, create a MySQL database and also connect that database to Laravel 5.8. Write the database credentials inside the .env file.

DB_CONNECTION=mysql
DB_HOST=127.0.0.1
DB_PORT=3306
DB_DATABASE=blog
DB_USERNAME=root
DB_PASSWORD=root

Create a FormController.php file using the following command.

php artisan make:controller FormController

Create two methods inside the FormController.php file.

<?php

// FormController.php

namespace App\Http\Controllers;

use Illuminate\Http\Request;

class FormController extends Controller
{
    public function create()
    {

    }

    public function store(Request $request)
    {
        
    }
}

Now, write the two routes inside the routes >> web.php file.

// web.php

Route::get('form', 'FormController@create')->name('form.create');
Route::post('form', 'FormController@store')->name('form.store');

Now, create a model and migration file using the following command.

php artisan make:model Form -m

Write the following code inside the [timestamp]_create_forms_table.php file.

// create_forms_table.php

public function up()
{
        Schema::create('forms', function (Blueprint $table) {
            $table->bigIncrements('id');
            $table->string('item_name');
            $table->string('sku_no');
            $table->integer('price');
            $table->timestamps();
        });
}

Now, create a table using the following command.

php artisan migrate

Also, to prevent mass assignment exception, add the $fillable property.

<?php

// Form.php

namespace App;

use Illuminate\Database\Eloquent\Model;

class Form extends Model
{
    protected $fillable = ['item_name', 'sku_no', 'price'];
}

Inside the views folder, create layout.blade.php file and add the following code.

<!DOCTYPE html>
<html lang="en">
<head>
  <meta charset="UTF-8">
  <meta name="viewport" content="width=device-width, initial-scale=1.0">
  <meta http-equiv="X-UA-Compatible" content="ie=edge">
  <title>Laravel 5.8 Form Validation Example Tutorial</title>
  <link href="" rel="stylesheet" type="text/css" />
</head>
<body>
  <div class="container">
    @yield('content')
  </div>
  <script src="" type="text/js"></script>
</body>
</html>

Now, in the same folder, create one file called create.blade.php and add the following code.

<!-- create.blade.php -->

@extends('layout')

@section('content')
<style>
  .uper {
    margin-top: 40px;
  }
</style>
<div class="card uper">
  <div class="card-header">
    Add Item
  </div>
  <div class="card-body">
    @if ($errors->any())
      <div class="alert alert-danger">
        <ul>
            @foreach ($errors->all() as $error)
              <li></li>
            @endforeach
        </ul>
      </div><br />
    @endif
      <form method="post" action="">
          <div class="form-group">
              @csrf
              <label for="name">Item Name:</label>
              <input type="text" class="form-control" name="item_name"/>
          </div>
          <div class="form-group">
              <label for="price">SKU Number :</label>
              <input type="text" class="form-control" name="sku_no"/>
          </div>
          <div class="form-group">
              <label for="quantity">Item Price :</label>
              <input type="text" class="form-control" name="price"/>
          </div>
          <button type="submit" class="btn btn-primary">Create Item</button>
      </form>
  </div>
</div>
@endsection

Now, write the FormController’s create() function.

// FormController.php

public function create()
{
    return view('create');
}

Now, you can access the form on this URL: http://localhost:8000/form.


Laravel 5.8 Form Validation Tutorial With Example

Writing The Validation Logic

Okay, now we can write the validation logic inside FormController’s store() function.

// FormController.php

public function store(Request $request)
{
        $validatedData = $request->validate([
            'item_name' => 'required|max:255',
            'sku_no' => 'required|alpha_num',
            'price' => 'required|numeric',
        ]);
        \App\Form::create($validatedData);

        return response()->json('Form is successfully validated and data has been saved');
}

As you can see, we have passed the desired validation rules into the validate() method. Again, if the validation fails, the proper response will automatically be generated. If the validation passes, our controller will continue executing normally and save the data in the database, and we get the json response.

If we submit the form without filling any values, then we get the error response like the following.


Laravel 5.8 Form Validation Tutorial With Example | Custom Validation

Stopping On First Validation Failure

Sometimes you may have requirement to stop running validation rules on an attribute after the first validation failure. To do so, assign the bail rule to the attribute.

// FormController.php

$validatedData = $request->validate([
      'item_name' => 'bail|required|max:255',
      'sku_no' => 'required|alpha_num',
      'price' => 'required|numeric',
 ]);

In this example, if the max rule on the item_name attribute fails, the max rule won’t checked. Rules will be validated in the order they are assigned.

Displaying Validation Errors

Laravel will automatically redirect the user back to their previous location. Also, all of the validation errors will automatically be flashed to a session.

Notice that we did not have to explicitly bind the error messages to a view in our GET route. It is because Laravel will check for the errors in the session data, and automatically bind them to the view if they are available.

In our example, we have iterated the $errors array variable inside the create.blade.php file. That is why we user can see the errors.

@if ($errors->any())
      <div class="alert alert-danger">
        <ul>
            @foreach ($errors->all() as $error)
              <li></li>
            @endforeach
        </ul>
      </div><br />
@endif

Form Request Validation in Laravel 5.8

In the above example, we have written the validation rules inside the controller function. We can also create a separate file to write the validation rules. For more complex validation scenarios, you may wish to create a “form request.” Form requests are the custom request classes that contain validation logic. To create a form request class, use the make: request Artisan CLI command.

php artisan make:request FieldRequest

It will create a file inside the app >> Http >> Requests folder called FieldRequest.php file.

Let’s add a few validation rules inside the rules method.

// FieldRequest.php

public function rules()
{
    return [
         'item_name' => 'bail|required|max:255',
         'sku_no' => 'required|alpha_num',
         'price' => 'required|numeric',
    ];
}

Also, you need to return true from the authorize() method inside the FieldRequest.php file. If you plan to have an authorization logic in another part of your application, return true from the authorize() method.

// FieldRequest.php

public function authorize()
{
        return true;
}

So, now, you do not need to re-write these rules inside the FormController.php’s store() function.

You need to import the FieldRequest namespace inside the FormController.php file and pass the FormRequest as a dependency injection to the store function.

<?php

// FormController.php

namespace App\Http\Controllers;

use Illuminate\Http\Request;
use App\Http\Requests\FieldRequest;

class FormController extends Controller
{
    public function create()
    {
        return view('create');
    }

    public function store(FieldRequest $request)
    {
        $validatedData = $request->validated();
        \App\Form::create($validatedData);

        return response()->json('Form is successfully validated and data has been saved');
    }
}

If the validation fails, the redirect response will be generated to send a user back to their previous location. The errors will also be flashed to a session, so they are available for display.

Customizing The Error Messages

You may customize the error messages used by the form request by overriding the messages method. This method should return an array of attribute/rule pairs and their corresponding error messages.

// FieldRequest.php 

  /**
   * Get the error messages for the defined validation rules.
   *
   * @return array
   */
    public function messages()
    {
        return [
            'item_name.required' => 'An Item Name is required',
            'sku_no.required'  => 'An SKU NO is required',
            'price.required'  => 'The price is required',
        ];
    }

Save the file and again submit the form without any values and you will see these error messages instead of default error messages.


Customizing The Error Messages in Laravel

Manually Creating Validators

If you do not want to use a validate() method on the request, you may create the validator instance manually using the Validator facade. The make method on the facade generates a new validator instance.

// FormController.php

use Validator;

public function store(Request $request)
{
    $validatedData = Validator::make($request->all(), [
        'item_name' => 'bail|required|max:255',
        'sku_no' => 'required|alpha_num',
        'price' => 'required|numeric',
    ])->validate();

     \App\Form::create($validatedData);

     return response()->json('Form is successfully validated and data has been saved');
}

It will also give us the same output. If you would like to create the validator instance manually but still take advantage of the automatic redirection offered by the requests to validate() method, you may call the validate() method on an existing validator instance.

For more validation, you can check out Laravel 5.8’s official documentation.

Finally, Laravel 5.8 Form Validation Tutorial With Example is over.

The post Laravel 5.8 Form Validation Tutorial With Example appeared first on AppDividend.

via Planet MySQL
Laravel 5.8 Form Validation Tutorial With Example

Laravel 5.8 CRUD Tutorial With Example For Beginners

laravel 5.8 crud tutorial example


Laravel 5.8 CRUD Tutorial With Example For Beginners is today’s topic. You can upgrade your Laravel’s 5.8 version by going to this link. Laravel 5.8 continues the improvements made in Laravel 5.7 by introducing the following features.

  1. has-one-through Eloquent relationships.
  2. Improved email validation.
  3. convention-based automatic registration of authorization policies.
  4. DynamoDB cache and session drivers.
  5. Improved scheduler timezone configuration.
  6. Support for assigning multiple authentication guards to broadcast channels.
  7. PSR-16 cache driver compliance, improvements to the artisan serve command.
  8. PHPUnit 8.0 support.
  9. Carbon 2.0 support.
  10. Pheanstalk 4.0 support, and a variety of other bug fixes and usability improvements.

You can find the detailed guide on Laravel 5.8 releases.

Server Requirements

The following are the server requirements.

  1. PHP >= 7.1.3
  2. OpenSSL PHP Extension
  3. PDO PHP Extension
  4. Mbstring PHP Extension
  5. Tokenizer PHP Extension
  6. XML PHP Extension
  7. Ctype PHP Extension
  8. JSON PHP Extension
  9. BCMath PHP Extension

Laravel 5.8 CRUD Tutorial

You can install Laravel 5.8 via global installer or using the Composer Create-Project command.

composer create-project --prefer-dist laravel/laravel laravel58crud


Laravel 5.8 CRUD Tutorial With Example For Beginners

Now, go inside the project and open the project in your favorite editor.

cd laravel58crud
code .

Step 1: Configure the MySQL Database

Now, first, in MySQL, you need to create the database, and then we need to connect that database to the Laravel application. You can also use phpmyadmin to create the database.

I have created a MySQL database called laravel58crud and now write the MySQL credentials inside the .env file.

DB_CONNECTION=mysql
DB_HOST=127.0.0.1
DB_PORT=3306
DB_DATABASE=laravel58crud
DB_USERNAME=root
DB_PASSWORD=root

So now you will be able to connect the MySQL database.

Laravel always ships with migration files, so you can able to generate the tables in the database using the following command.

php artisan migrate


Configure the MySQL Database

We will create a CRUD operation on Books. So the user can create, read, update, and delete the books from the database. So, let’s create a model and migration files.

Step 2: Create a model and migration files.

Type the following command to create a model and migration files.

php artisan make:model Book -m

It will create a Book.php file and [timestamp]create_books_table.php migration file.

Now, open the migration file inside the database >> migrations >> [timestamp]create_books_table file and add the following schema inside it.

public function up()
{
     Schema::create('books', function (Blueprint $table) {
        $table->bigIncrements('id');
        $table->string('book_name');
        $table->string('isbn_no');
        $table->integer('book_price');
        $table->timestamps();
     });
}

Now, create a table in the database using the following command.

php artisan migrate


Laravel 5.8 CRUD Tutorial With Example For Beginner

So, in the database, the table is created successfully.

Now, add the fillable property inside Book.php file.

// Book.php

<?php

namespace App;

use Illuminate\Database\Eloquent\Model;

class Book extends Model
{
    protected $fillable = ['book_name', 'isbn_no', 'book_price'];
}

Step 3: Create routes and controller

First, create the BookController using the following command.

php artisan make:controller BookController --resource

Now, inside routes >> web.php file, add the following line of code.

<?php

// BookController.php

Route::get('/', function () {
    return view('welcome');
});

Route::resource('books', 'BookController');

Actually, by adding the following line, we have registered the multiple routes for our application. We can check it using the following command.

php artisan route:list


Laravel 5.8 CRUD Tutorial

Okay, now open the BookController.php file, and you can see that all the functions declarations are there.

<?php

// BookController.php

namespace App\Http\Controllers;

use Illuminate\Http\Request;

class BookController extends Controller
{
    /**
     * Display a listing of the resource.
     *
     * @return \Illuminate\Http\Response
     */
    public function index()
    {
        //
    }

    /**
     * Show the form for creating a new resource.
     *
     * @return \Illuminate\Http\Response
     */
    public function create()
    {
        //
    }

    /**
     * Store a newly created resource in storage.
     *
     * @param  \Illuminate\Http\Request  $request
     * @return \Illuminate\Http\Response
     */
    public function store(Request $request)
    {
        //
    }

    /**
     * Display the specified resource.
     *
     * @param  int  $id
     * @return \Illuminate\Http\Response
     */
    public function show($id)
    {
        //
    }

    /**
     * Show the form for editing the specified resource.
     *
     * @param  int  $id
     * @return \Illuminate\Http\Response
     */
    public function edit($id)
    {
        //
    }

    /**
     * Update the specified resource in storage.
     *
     * @param  \Illuminate\Http\Request  $request
     * @param  int  $id
     * @return \Illuminate\Http\Response
     */
    public function update(Request $request, $id)
    {
        //
    }

    /**
     * Remove the specified resource from storage.
     *
     * @param  int  $id
     * @return \Illuminate\Http\Response
     */
    public function destroy($id)
    {
        //
    }
}

Step 4: Create the views

Inside resources >> views folder, create one folder called shares.

Inside that folder, create the following three files.

  1. create.blade.php
  2. edit.blade.php
  3. index.blade.php

But inside views folder, we also need to create a layout file. So create one file inside the views folder called layout.blade.php. Add the following code inside the layout.blade.php file.

<!-- layout.blade.php -->

<!DOCTYPE html>
<html lang="en">
<head>
  <meta charset="UTF-8">
  <meta name="viewport" content="width=device-width, initial-scale=1.0">
  <meta http-equiv="X-UA-Compatible" content="ie=edge">
  <title>Laravel 5.8 CRUD Example Tutorial</title>
  <link href="" rel="stylesheet" type="text/css" />
</head>
<body>
  <div class="container">
    @yield('content')
  </div>
  <script src="" type="text/js"></script>
</body>
</html>

So basically, this file is our main template file, and all the other view files will extend this file. Here, we have already included the Bootstrap 4 by adding the app.css.

Next step would be to code the create.blade.php file. So write the following code inside it.

<!-- create.blade.php -->

@extends('layout')

@section('content')
<style>
  .uper {
    margin-top: 40px;
  }
</style>
<div class="card uper">
  <div class="card-header">
    Add Book
  </div>
  <div class="card-body">
    @if ($errors->any())
      <div class="alert alert-danger">
        <ul>
            @foreach ($errors->all() as $error)
              <li></li>
            @endforeach
        </ul>
      </div><br />
    @endif
      <form method="post" action="">
          <div class="form-group">
              @csrf
              <label for="name">Book Name:</label>
              <input type="text" class="form-control" name="book_name"/>
          </div>
          <div class="form-group">
              <label for="price">Book ISBN Number :</label>
              <input type="text" class="form-control" name="isbn_no"/>
          </div>
          <div class="form-group">
              <label for="quantity">Book Price :</label>
              <input type="text" class="form-control" name="book_price"/>
          </div>
          <button type="submit" class="btn btn-primary">Create Book</button>
      </form>
  </div>
</div>
@endsection

Okay, now we need to open the BookController.php file, and on the create function, we need to return a view, and that is the create.blade.php file.

// BookController.php

public function create()
{
   return view('create');
}

Save the file and start the Laravel development server using the following command.

php artisan serve

Go to the http://localhost:8000/books/create. 

You can see something like this.


Create the views

Step 5: Add Validation rules and save data

Now, the first step inside the BookController.php is that import the namespace of Book model inside the BookController.php file.

// BookController.php

<?php

namespace App\Http\Controllers;

use Illuminate\Http\Request;
use App\Book;

Now, write the following code inside the BookController.php file’s store() function.

// BookController.php

public function store(Request $request)
{
    $validatedData = $request->validate([
         'book_name' => 'required|max:255',
         'isbn_no' => 'required|alpha_num',
         'book_price' => 'required|numeric',
     ]);
     $book = Book::create($validatedData);

     return redirect('/books')->with('success', 'Book is successfully saved');
}

Here, what we have done is first check for all three fields of the form.

If any of the rules are failed by the incoming data, then it will directly go to the form with the error messages.

We need to loop through that error messages inside the create.blade.php file which we have already done it.

If you leave all the form fields empty, then you will find an error message like this image.


Laravel 5.8 validation example

Now, if you fill the form fields correctly, then it will create a new row in the database. I have created a new book.


Laravel Create Example

Step 6: Display the data.

Now, we need to write the BookController’s index function to return the index view with the data fetched from the database. Write the following code inside the index() function.

// BookController.php

public function index()
{
     $books = Book::all();

     return view('index', compact('books'));
}

Okay, now create the file called index.blade.php inside the views folder and add the following code.

<!-- index.blade.php -->

@extends('layout')

@section('content')
<style>
  .uper {
    margin-top: 40px;
  }
</style>
<div class="uper">
  @if(session()->get('success'))
    <div class="alert alert-success">
        
    </div><br />
  @endif
  <table class="table table-striped">
    <thead>
        <tr>
          <td>ID</td>
          <td>Book Name</td>
          <td>ISBN Number</td>
          <td>Book Price</td>
          <td colspan="2">Action</td>
        </tr>
    </thead>
    <tbody>
        @foreach($books as $book)
        <tr>
            <td></td>
            <td></td>
            <td></td>
            <td></td>
            <td><a href="" class="btn btn-primary">Edit</a></td>
            <td>
                <form action="" method="post">
                  @csrf
                  @method('DELETE')
                  <button class="btn btn-danger" type="submit">Delete</button>
                </form>
            </td>
        </tr>
        @endforeach
    </tbody>
  </table>
<div>
@endsection

Here, we have looped through the books array and display the data in the tabular format.

Also, we have added two buttons for edit and delete operation.

Step 7: Create Edit and Update Operation

First, we need to add the following code inside the BookController.php file’s edit function.

// BookController.php

public function edit($id)
{
    $book = Book::findOrFail($id);

    return view('edit', compact('book'));
}

Now, create a new file inside the views folder called edit.blade.php and add the following code.

<!-- edit.blade.php -->

@extends('layout')

@section('content')
<style>
  .uper {
    margin-top: 40px;
  }
</style>
<div class="card uper">
  <div class="card-header">
    Edit Book
  </div>
  <div class="card-body">
    @if ($errors->any())
      <div class="alert alert-danger">
        <ul>
            @foreach ($errors->all() as $error)
              <li></li>
            @endforeach
        </ul>
      </div><br />
    @endif
      <form method="post" action="">
          <div class="form-group">
              @csrf
              @method('PATCH')
              <label for="name">Book Name:</label>
              <input type="text" class="form-control" name="book_name" value=""/>
          </div>
          <div class="form-group">
              <label for="price">Book ISBN Number :</label>
              <input type="text" class="form-control" name="isbn_no" value=""/>
          </div>
          <div class="form-group">
              <label for="quantity">Book Price :</label>
              <input type="text" class="form-control" name="book_price" value=""/>
          </div>
          <button type="submit" class="btn btn-primary">Update Book</button>
      </form>
  </div>
</div>
@endsection

In this file, you can show the values of the particular row using its unique id inside the form fields.

So, when you hit this URL: http://localhost:8000/books/1/edit, you will see something like below image.


Edit Functionality in Laravel

Now, add the following code inside the BookController’s update() function.

// BookController.php

public function update(Request $request, $id)
    {
        $validatedData = $request->validate([
            'book_name' => 'required|max:255',
            'isbn_no' => 'required|alpha_num',
            'book_price' => 'required|numeric',
        ]);
        Book::whereId($id)->update($validatedData);

        return redirect('/books')->with('success', 'Book is successfully updated');
    }

So now, you can edit and update the data into the database successfully.

Step 8: Create Delete Functionality

Write the following code inside the BookController’s destroy function.

// BookController.php

public function destroy($id)
    {
        $book = Book::findOrFail($id);
        $book->delete();

        return redirect('/books')->with('success', 'Book is successfully deleted');
    }

Now, go to this URL: http://localhost:8000/books and try to delete the book.

You can see that you have successfully deleted the book.

So, our complete BookController.php code looks like below.

<?php

// BookController.php

namespace App\Http\Controllers;

use Illuminate\Http\Request;
use App\Book;

class BookController extends Controller
{
    /**
     * Display a listing of the resource.
     *
     * @return \Illuminate\Http\Response
     */
    public function index()
    {
        $books = Book::all();

        return view('index', compact('books'));
    }

    /**
     * Show the form for creating a new resource.
     *
     * @return \Illuminate\Http\Response
     */
    public function create()
    {
        return view('create');
    }

    /**
     * Store a newly created resource in storage.
     *
     * @param  \Illuminate\Http\Request  $request
     * @return \Illuminate\Http\Response
     */
    public function store(Request $request)
    {
        $validatedData = $request->validate([
            'book_name' => 'required|max:255',
            'isbn_no' => 'required|alpha_num',
            'book_price' => 'required|numeric',
        ]);
        $book = Book::create($validatedData);

        return redirect('/books')->with('success', 'Book is successfully saved');
    }

    /**
     * Display the specified resource.
     *
     * @param  int  $id
     * @return \Illuminate\Http\Response
     */
    public function show($id)
    {
        //
    }

    /**
     * Show the form for editing the specified resource.
     *
     * @param  int  $id
     * @return \Illuminate\Http\Response
     */
    public function edit($id)
    {
        $book = Book::findOrFail($id);

        return view('edit', compact('book'));
    }

    /**
     * Update the specified resource in storage.
     *
     * @param  \Illuminate\Http\Request  $request
     * @param  int  $id
     * @return \Illuminate\Http\Response
     */
    public function update(Request $request, $id)
    {
        $validatedData = $request->validate([
            'book_name' => 'required|max:255',
            'isbn_no' => 'required|alpha_num',
            'book_price' => 'required|numeric',
        ]);
        Book::whereId($id)->update($validatedData);

        return redirect('/books')->with('success', 'Book is successfully updated');
    }

    /**
     * Remove the specified resource from storage.
     *
     * @param  int  $id
     * @return \Illuminate\Http\Response
     */
    public function destroy($id)
    {
        $book = Book::findOrFail($id);
        $book->delete();

        return redirect('/books')->with('success', 'Book is successfully deleted');
    }
}

So, we have completed a Laravel 5.8 CRUD operations tutorial with the example from scratch.

I have put this code on Github so you can check it out as well.

GITHUB CODE

The post Laravel 5.8 CRUD Tutorial With Example For Beginners appeared first on AppDividend.

via Planet MySQL
Laravel 5.8 CRUD Tutorial With Example For Beginners

Salesforce at 20 offers lessons for startup success

Salesforce is celebrating its 20th anniversary today. The company that was once a tiny irritant going after giants in the 1990s Customer Relationship Management (CRM) market, such as Oracle and Siebel Systems, has grown into full-fledged SaaS powerhouse. With an annual run rate exceeding $14 billion, it is by far the most successful pure cloud application ever created.

Twenty years ago, it was just another startup with an idea, hoping to get a product out the door. By now, a legend has built up around the company’s origin story, not unlike Zuckerberg’s dorm room or Jobs’ garage, but it really did all begin in 1999 in an apartment in San Francisco, where a former Oracle executive named Marc Benioff teamed with a developer named Parker Harris to create a piece of business software that ran on the internet. They called it Salesforce .com.

None of the handful of employees who gathered in that apartment on the company’s first day in business in 1999 could possibly have imagined what it would become 20 years later, especially when you consider the start of the dot-com crash was just a year away.

Party like it’s 1999

It all began on March 8, 1999 in the apartment at 1449 Montgomery Street in San Francisco, the site of the first Salesforce office. The original gang of four employees consisted of Benioff and Harris and Harris’s two programming colleagues Dave Moellenhoff and Frank Dominguez. They picked the location because Benioff lived close by.

It would be inaccurate to say Salesforce was the first to market with Software as a Service, a term, by the way, that would not actually emerge for years. In fact, there were a bunch of other fledgling enterprise software startups trying to do business online at the time including NetLedger, which later changed its name NetSuite, and was eventually sold to Oracle for $9.3 billion in 2016.

Other online CRM competitors included Salesnet, RightNow Technologies and Upshot. All would be sold over the next several years. Only Salesforce survived as a stand-alone company. It would go public in 2004 and eventually grow to be one of the top 10 software companies in the world.

Co-founder and CTO Harris said recently that he had no way of knowing that any of that would happen, although having met Benioff, he thought there was potential for something great to happen. “Little did I know at that time, that in 20 years we would be such a successful company and have such an impact on the world,” Harris told TechCrunch.

Nothing’s gonna stop us now

It wasn’t entirely a coincidence that Benioff and Harris had connected. Benioff had taken a sabbatical from his job at Oracle and was taking a shot at building a sales automation tool that ran on the internet. Harris, Moellenhoff and Dominguez had been building salesforce automation software solutions, and the two visions meshed. But building a client-server solution and building one online were very different.

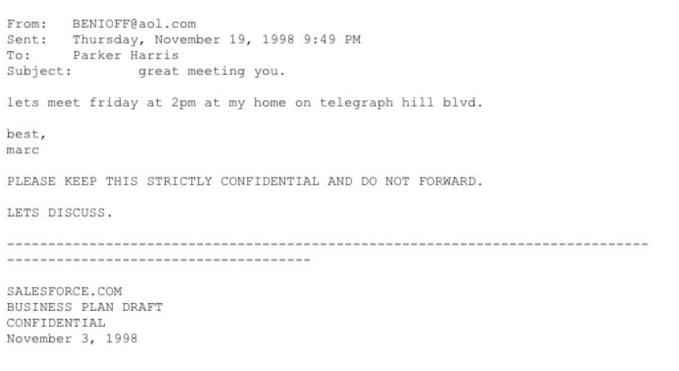
Original meeting request email from Marc Benioff to Parker Harris from 1998. Email courtesy of Parker Harris.

You have to remember that in 1999, there was no concept of Infrastructure as a Service. It would be years before Amazon launched Amazon Elastic Compute Cloud in 2006, so Harris and his intrepid programming team were on their own when it came to building the software and providing the servers for it to scale and grow.

“I think in a way, that’s part of what made us successful because we knew that we had to, first of all, imagine scale for the world,” Harris said. It wasn’t a matter of building one CRM tool for a large company and scaling it to meet that individual organization’s demand, then another, it was really about figuring out how to let people just sign up and start using the service, he said.

“I think in a way, that’s part of what made us successful because we knew that we had to, first of all, imagine scale for the world.” Parker Harris, Salesforce

That may seem trivial now, but it wasn’t a common way of doing business in 1999. The internet in those years was dominated by a ton of consumer-facing dot-coms, many of which would go bust in the next year or two. Salesforce wanted to build an enterprise software company online, and although it wasn’t alone in doing that, it did face unique challenges being one of the early adherents.

“We created a software that was what I would call massively multi-tenant where we couldn’t optimize it at the hardware layer because there was no Infrastructure as a Service. So we did all the optimization above that — and we actually had very little infrastructure early on,” he explained.

Running down a dream

From the beginning, Benioff had the vision and Harris was charged with building it. Tien Tzuo, who would go on to be co-founder at Zuora in 2007, was employee number 11 at Salesforce, starting in August of 1999, about five months after the apartment opened for business. At that point, there still wasn’t an official product, but they were getting closer when Benioff hired Tzuo.

As Tzuo tells it, he had fancied a job as a product manager, but when Benioff saw his Oracle background in sales, he wanted him in account development. “My instinct was, don’t argue with this guy. Just roll with it,” Tzuo relates.

Early prototype of Salesforce.com. Photo: Salesforce

As Tzuo pointed out, in a startup with a handful of people, titles mattered little anyway. “Who cares what your role was. All of us had that attitude. You were a coder or a non-coder,” he said. The coders were stashed upstairs with a view of San Francisco Bay and strict orders from Benioff to be left alone. The remaining employees were downstairs working the phones to get customers.

“Who cares what your role was. All of us had that attitude. You were a coder or a non-coder.” Tien Tzuo, early employe

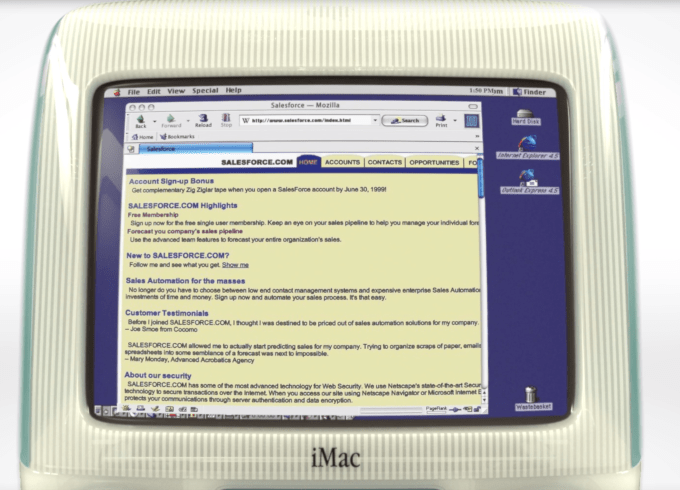
The first Wayback Machine snapshot of Salesforce.com is from November 15, 1999, It wasn’t fancy, but it showed all of the functionality you would expect to find in a CRM tool: Accounts, Contacts, Opportunities, Forecasts and Reports with each category represented by a tab.

The site officially launched on February 7, 2000 with 200 customers, and they were off and running.

Prove it all night

Every successful startup needs visionary behind it, pushing it, and for Salesforce that person was Marc Benioff. When he came up with the concept for the company, the dot-com boom was in high gear. In a year or two, much of it would come crashing down, but in 1999 anything was possible and Benioff was bold and brash and brimming with ideas.

But even good ideas don’t always pan out for so many reasons, as many a failed startup founder knows only too well. For a startup to succeed it needs a long-term vision of what it will become, and Benioff was the visionary, the front man, the champion, the chief marketer. He was all of that — and he wouldn’t take no for an answer.

Paul Greenberg, managing principal at The 56 Group and author of multiple books about the CRM industry including CRM at the Speed of Light (the first edition of which was published in 2001), was an early user of Salesforce, and says that he was not impressed with the product at first, complaining about the early export functionality in an article.

A Salesforce competitor at the time, Salesnet, got wind of Greenberg’s post, and put his complaint on the company website. Benioff saw it, and fired off an email to Greenberg: “I see you’re a skeptic. I love convincing skeptics. Can I convince you?” Greenberg said that being a New Yorker, he wrote back with a one-line response. “Take your best shot.” Twenty years later, Greenberg says that Benioff did take his best shot and he did end up convincing him.

“I see you’re a skeptic. I love convincing skeptics. Can I convince you?” Early Marc Benioff email

Laurie McCabe, who is co-founder and partner at SMB Group, was working for a consulting firm in Boston in 1999 when Benioff came by to pitch Salesforce to her team. She says she was immediately impressed with him, but also with the notion of putting enterprise software online, effectively putting it within reach of many more companies.

“He was the ringmaster I believe for SaaS or cloud or whatever we want to call it today. And that doesn’t mean some of these other guys didn’t also have a great vision, but he was the guy beating the drum louder. And I just really felt that in addition to the fact that he was an exceptional storyteller, marketeer and everything else, he really had the right idea that software on prem was not in reach of most businesses,” she said.

Take it to the limit

One of the ways that Benioff put the company in the public eye in the days before social media was guerrilla marketing techniques. He came up with the idea of “no software” as a way to describe software on the internet. He sent some of his early employees to “protest” at the Siebel Conference, taking place at the Moscone Center in February, 2000. He was disrupting one of his major competitors, and it created enough of a stir to attract a television news crew and garner a mention in the Wall Street Journal. All of this was valuable publicity for a company that was still in its early stages.
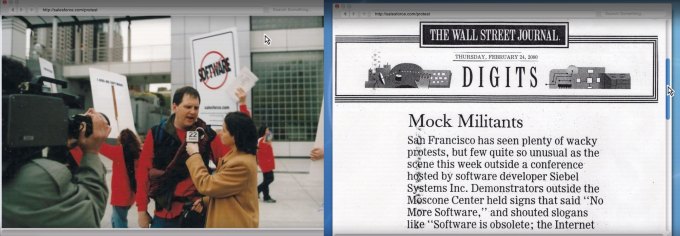
Photos: Salesforce

Brent Leary, who had left his job as an industry consultant in 2003 to open his current firm, CRM Essentials, said this ability to push the product was a real differentiator for the company and certainly got his attention. “I had heard about Salesnet and these other ones, but these folks not only had a really good product, they were already promoting it. They seemed to be ahead of the game in terms of evangelizing the whole “no software” thing. And that was part of the draw too,” Leary said of his first experiences working with Salesforce.

Leary added, “My first Dreamforce was in 2004, and I remember it particularly because it was actually held on Election Day 2004 and they had a George W. Bush look-alike come and help open the conference, and some people actually thought it was him.”

Greenberg said that the “no software” campaign was brilliant because it brought this idea of delivering software online to a human level. “When Marc said, ‘no software’ he knew there was software, but the thing with him is, that he’s so good at communicating a vision to people.” Software in the 90s and early 2000s was delivered mostly in boxes on CDs (or 3.5 inch floppies), so saying no software was creating a picture that you didn’t have to touch the software. You just signed up and used it. Greenberg said that campaign helped people understand online software at a time when it wasn’t a common delivery method.

Culture club

One of the big differentiators for Salesforce as a company was the culture it built from Day One. Benioff had a vision of responsible capitalism and included their charitable 1-1-1 model in its earliest planning documents. The idea was to give one percent of Salesforce’s equity, one percent of its product and one percent of its employees’ time to the community. As Benioff once joked, they didn’t have a product and weren’t making any money when they made the pledge, but they have stuck to it and many other companies have used the model Salesforce built.

Image: Salesforce

Bruce Cleveland, a partner at Wildcat Ventures, who has written a book with Geoffrey Moore of Crossing the Chasm fame called Traversing the Traction Gap, says that it is essential for a startup to establish a culture early on, just as Benioff did. “A CEO has to say, these are the standards by which we’re going to run this company. These are the things that we value. This is how we’re going to operate and hold ourselves accountable to each other,” Cleveland said. Benioff did that.

Another element of this was building trust with customers, a theme that Benioff continues to harp on to this day. As Harris pointed out, people still didn’t trust the internet completely in 1999, so the company had to overcome objections to entering a credit card online. Even more than that though, they had to get companies to agree to share their precious customer data with them on the internet.

“We had to not only think about scale, we had to think about how do we get the trust of our customers, to say that we will protect your information as well or better than you can,” Harris explained.

Growing up

The company was able to overcome those objections, of course, and more. Todd McKinnon, who is currently co-founder and CEO at Okta, joined Salesforce as VP of Engineering in 2006 as the company began to ramp up becoming a $100 million company, and he says that there were some growing pains in that time period.

Salesforce revenue growth across the years from 2006-present. Chart: Macro Trends

When he arrived, they were running on three mid-tier Sun servers in a hosted co-location facility. McKinnon said that it was not high-end by today’s standards. “There was probably less RAM than what’s in your MacBook Pro today,” he joked.

When he came on board, the company still had only 13 engineers and the actual infrastructure requirements were still very low. While that would change during his six year tenure, it was working fine when he got there. Within five years, he said, that changed dramatically as they were operating their own data centers and running clusters of Dell X86 servers — but that was down the road.

Before they did that, they went back to Sun one more time and bought four of the biggest boxes they sold at the time and proceeded to transfer all of the data. The problem was that the Oracle database wasn’t working well, so as McKinnon tells it, they got on the phone with Larry Ellison from Oracle, who upon hearing about the setup, asked them straight out why they were doing that? The way they had it set up simply didn’t work.

They were able to resolve it all and move on, but it’s the kind of crisis that today’s startups probably wouldn’t have to deal with because they would be running their company on a cloud infrastructure service, not their own hardware.

Window shopping

About this same time, Salesforce began a strategy to grow through acquisitions. In 2006, it acquired the first of 55 companies when it bought a small wireless technology company called Sendia for $15 million. As early as 2006, the year before the first iPhone, the company was already thinking about mobile.

Last year it made its 52nd acquisition, and the most costly so far, when it purchased Mulesoft for $6.5 billion, giving it a piece of software that could help Salesforce customers bridge the on-prem and cloud worlds. As Greenberg pointed out, this brought a massive change in messaging for the company.

“With the Salesforce acquisition of MuleSoft, it allows them pretty much to complete the cycle between back and front office and between on-prem and the cloud. And you notice, all of a sudden, they’re not saying ‘no software.’ They’re not attacking on-premise. You know, all of this stuff has gone by the wayside,” Greenberg said.

No company is going to be completely consistent as it grows and priorities shift,  but if you are a startup looking for a blueprint on how to grow a successful company, Salesforce would be a pretty good company to model yourself after. Twenty years into this, they are still growing and still going strong and they remain a powerful voice for responsible capitalism, making lots of money, while also giving back to the communities where they operate.

One other lesson that you could learn is that you’re never done. Twenty years is a big milestone, but it’s just one more step in the long arc of a successful organization.


via TechCrunch
Salesforce at 20 offers lessons for startup success

Bagisto E-commerce Platform

via Laravel News
Bagisto E-commerce Platform

3 Biggest Mistakes Concealed Carry Permit Holders Make

The truth is, as a concealed carry permit holder, you can carry your gun and do everything “right” in response to an attack and still be killed. By the same token, you could do everything wrong and walk away.

Concealed carry is a game of playing the odds. The better prepared you are, the greater your chances of surviving a defensive gun use. Just how much thought and training you put into carrying your guns is up to you. But here are three common concealed carry mistakes that those who carry a firearm for personal defense can and should avoid if at all possible.

1. Not carrying a gun

You’ve no doubt heard it before: the first rule of winning a gunfight is…have a gun. I know plenty of permit holders who only carry some of the time. They pack a gun when they’re going downtown. Or when they’re carrying something valuable. Or when they’re going out with their family.

It’s not up to you when a bad guy attacks. They make that call. And they don’t make appointments. While bump-in-the-night dangerous situations get a lot of attention — and generate lots of shotgun sales — plenty of assaults happen in broad daylight in “safe places.” This is not a lesson concealed carry permit holders want to learn the hard way.

The obvious solution: carry your gun. All day, every day. That’s right, carry it at home, too.

If everyday carry seems like too much of a PITA, chances are you have the wrong carry handgun. Or the wrong holster. The easiest solution to concealed carry hesitance (at least for men): pocket carry a small, thin, light firearm in a pocket holster. No, they’re not ideal for self-defense, but they satisfy the aforementioned first rule of gunfighting.

2. Not practicing your draw

Gun owners tend to focus, naturally enough, on the gun. Why not? Guns are fascinating. Cool. Fun. But when it comes to armed self-defense, your ability to quickly and efficiently present your gun is more important than the type of firearm you carry. Americans defend themselves with guns over 1 million times each year, the great majority of the time without ever pulling the trigger.

Plenty of gun gurus will tell you that the shooter who hits first is the most likely to win. Which makes the speed of presentation of your carry pistol more important than the speed of firing. Think of it this way: the faster you get the gun out, the more time you have to aim and shoot, so the more accurate you’ll be.

First, make sure you have a concealed carry holster that enables a quick draw. There or dozens of quality holsters out there; IWB and OWB, both Kydex and leather, so find one that works well for your carry pistol.

Truth be told, concealed carry is a compromise. But no matter which holster type and gun you carry (even if you usually pocket carry), practice your draw. You can do it any time you like in the privacy of your own home (and you can combine it with dry fire practice, too).

Be sure to ALWAYS unload your carry gun, safety check it and put the ammo outside the room when you practice. Just make sure to do it, and do it often until you develop the muscle memory needed and your draw becomes second-nature.

3. Talking too much to the police after a defensive gun use

If you’re involved in a defensive gun use, law enforcement will pump you for information. How many shots did you fire? Where were you standing? How did you know he was trying to attack you? Did you give a verbal warning?

As you know from watching TV, you have the right to remain silent. Use that right. Remain silent. That said, there is some basic information you should provide.

Before you say anything, say this: “I was in fear for my life.” Get that out there immediately, before you answer any questions or provide any information. “Are you OK?” the will ask. “I was in fear for my life,” you reply. Those seven words will form your defense. Period.

Then tell the police officer your name. Point out any witnesses or evidence they might miss. Describe any attacker(s) that may have fled. Other than that, say only, “I’ll be glad to provide a full statement after I speak to my lawyer. I want to speak to my lawyer.” Then say nothing else.

Again, there’s a whole lot you can do to prepare for an armed confrontation, from adjusting your level of situational awareness to getting proper training and learning to shoot and move effectively. But if you avoid these three common mistakes, you’ll dramatically increase your odds of survival, before, during and after a defensive gun use.

via The Truth About Guns
3 Biggest Mistakes Concealed Carry Permit Holders Make