Oracle Cloud Infrastructure (OCI) is Oracle’s second-generation cloud infrastructure. These new datacenters were built with the latest high-performance servers (Oracle’s X7 Servers) and were designed to eliminate network and CPU oversubscription. Due to high-performance systems and the multiple availability domains (ADs) in each region, these are the preferred environments for deploying MySQL. Since MySQL deploys on Compute services (IaaS), look for “Oracle Cloud Infrastructure Compute” (not Classic) on this region map.
Beyond the benefits of the second-generation datacenters, why deploy MySQL on Oracle’s cloud? Here’s a few of reasons people are choosing MySQL on OCI:
- No vendor lock-in: pay minimal or no egress charges and directly access your binary data files. Getting your data out of other clouds can be tedious and expensive.
- Consistency: use the same database on-premise as on-cloud. It’s the MySQL Enterprise Edition, the same version available from the website. Use the same monitor for both on-premise and cloud.
- Support: rely on database support from the team that develops MySQL
As a new platform, extra steps are required to install the MySQL Cloud Service. Otherwise, the install will default to OCI-Classic and you’ll miss the benefits of the second-generation datacenters.
If you don’t have an Oracle Cloud account, get started for free: https://docs.oracle.com/en/cloud/get-started/subscriptions-cloud/csgsg/sign-free-oracle-cloud-promotion.html
LOGGING IN AND SETTING UP YOUR ENVIRONMENT
Sign in to your Cloud Account (cloud.oracle.com) and go to My Services Dashboard. Click the Navigation menu icon navigation menu in the top left corner of the My Services Dashboard and then click Compute.


This will bring you to the OCI, Oracle Cloud Infrastructure, console.
- CREATE A COMPARTMENT
Create a compartment called “demo”.
- Click Identity. From left menu, choose Compartments and Create Compartment
- Name your compartment “Demo”.
2. CREATE A NETWORK
Then, create a virtual cloud network with three public subnets, which will span 3 Availability Domains (AD). Although it includes a built-in firewall to prevent intrusion, a more secure network should be used for production systems ( see VCNs and Subnets ).
- Click Networking, Virtual Cloud Networks
- Click Create Virtual Cloud Network
Complete the following fields:
- Create In Compartment: Demo
- IMPORTANT: Select option: Create Virtual Cloud Network plus related resources
- Click Create Virtual Cloud Network
3. ENABLE PLATFORM AS A SERVICE (PaaS) ACCESS
This next step enables the MySQL Cloud Service to access the underlying compute and storage resources.
- From left menu, select the dropdown for compartment list and select your root compartment.
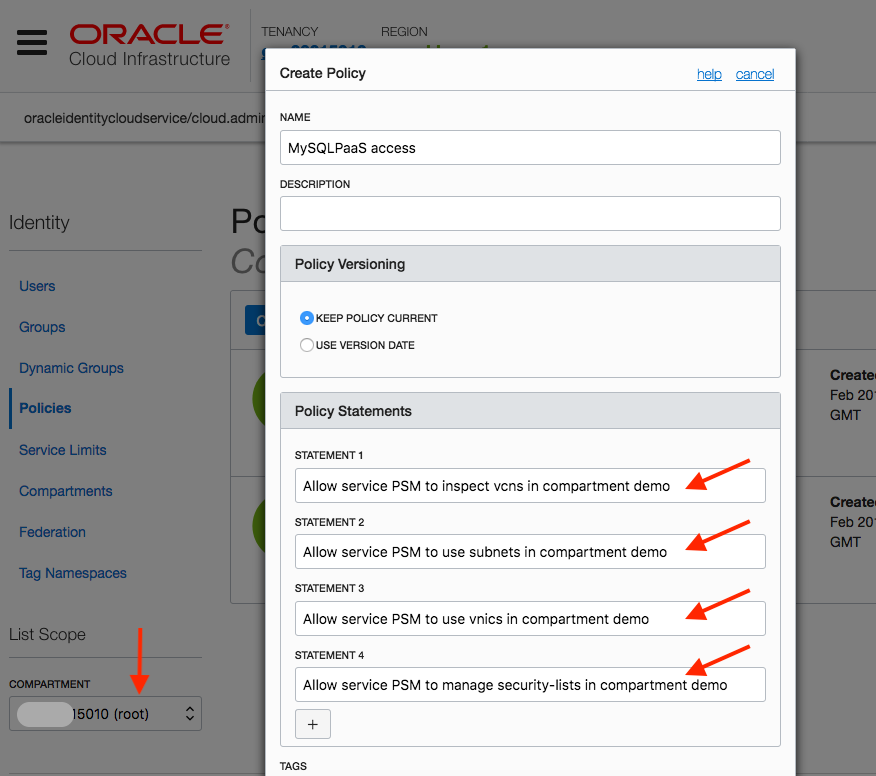
- From top menu, click Identity, Policies and Create Policy.
- Name: I chose “MySQLPaaS access”
- Add four Policy Statements exactly like the following:
[ note: if you chose a different compartment name than demo, substitute accordingly in the following statements]
Allow service PSM to inspect vcns in compartment demo
Allow service PSM to use subnets in compartment demo
Allow service PSM to use vnics in compartment demo
Allow service PSM to manage security-lists in compartment demo
- Select Create

4. CREATE A BUCKET FOR OBJECT STORAGE
- Click Storage, Object Storage
- Switch compartment (bottom left menu) to “Demo”
- Chose Create Bucket
- BucketName: MySQLBackups
- Create Bucket
Next, create a swift password to authenticate to the object storage. This will be required when setting up MySQL.
- Click Identity, Users
- For your user, choose the elipses on right and select View User Details
- On left menu, choose “Auth Tokens”
- Generate Token Important: Write down this token. It’s unavailable after it’s created.
- While your here, write down the user name for which you’ve created this token. It should be something like: myadminaccount@email.com. You’ll need this later.
If you have issues, the above steps are well-documented here.
Before continuing to the next step, please write down the following from the current OCI console. You’ll need this info for the next steps.
- User name: Choose Identity, Users. This should be the user for whom you generated the Authentication Token in the previous step.
- Tenancy and region: Noted at top of screen
- Bucketname. Choose Storage, Object Storage. Note the name of the bucket that you created
5. DEPLOY THE MYSQL CLOUD SERVICE
First, navigate from OCI (Oracle Cloud Infrastructure) to the MyServices console. On the very top menu, click My Services. This should bring you back to the MyServices Dashboard.

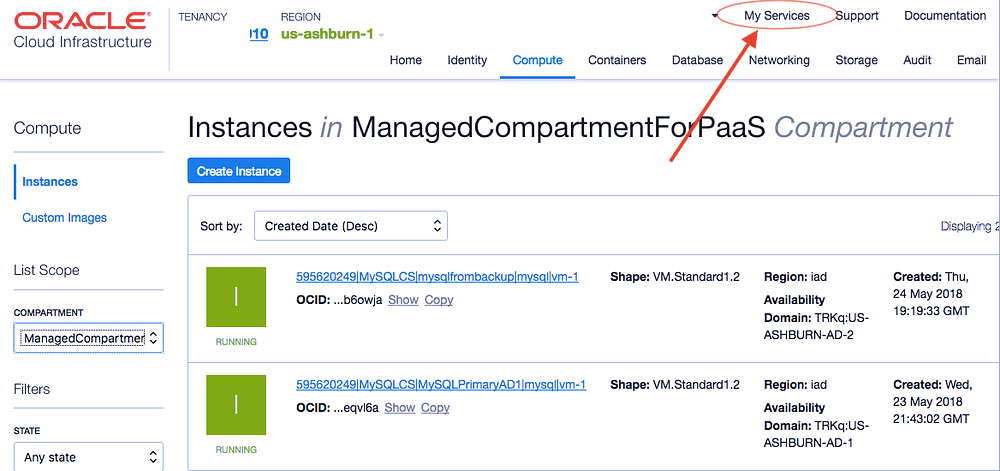
To view the MySQL Cloud Service, either click Customer Dashboard” or click the navigation menu ( three parallel lines) in upper left corner.
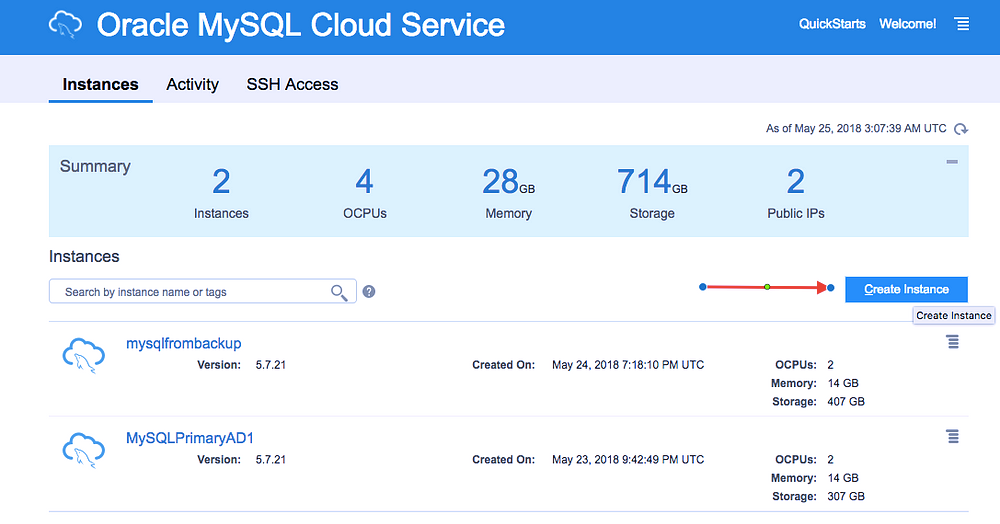
Click MySQL and choose Open Service Console and then Create Instance.

The following screenshots show appropriate field entries. Once you select “Region”, additional fields will display:


Availability Domain: Select AD1
Subnet: This was setup in step #2.
Click Next and complete Service Details.

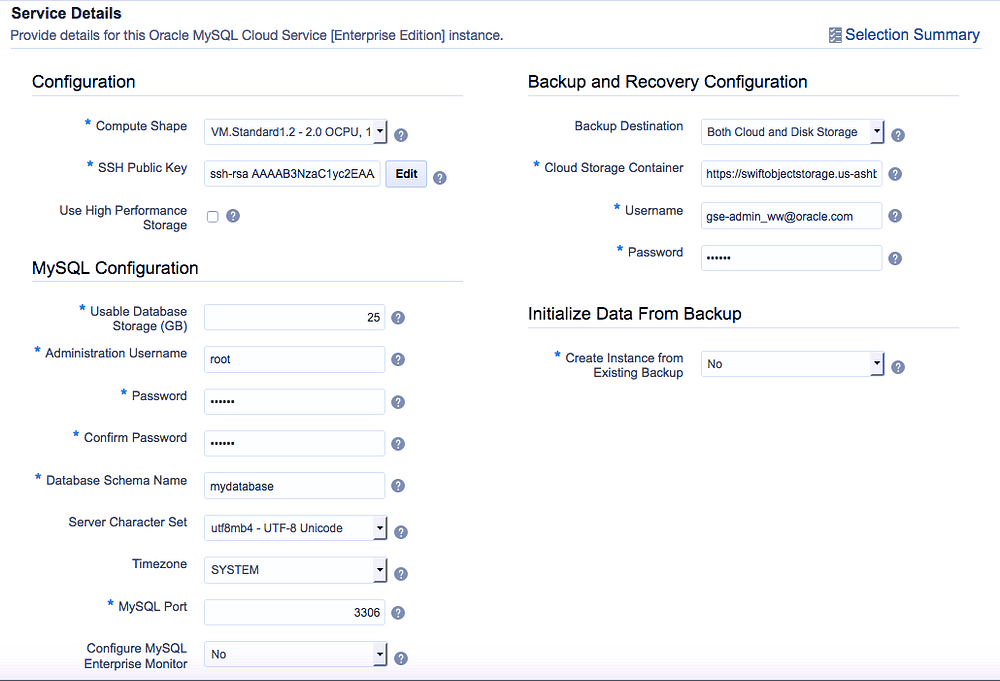
A full explanation of fields are available in the online documentation. However, Backup and Recovery Configuration requires further explanation.
Cloud Storage Container: The OCI format is https://swiftobjectstorage.<region>.oraclecloud.com/v1/<namespace>/<container>
For me, the region is us-ashburn-1, but this may vary depending on your location and your account. The namespace is the tenancy and it’s the name of your oracle account (hint: it’s in your current URL: https://psm-<tenancy>.console.oraclecloud.com). We named our container MySQLBackups. In my case, the URL is https://swiftobjectstorage.us-ashburn-1.oraclecloud.com/v1/015010/MySQLBackups. You will need to change the tenancy (015010) and possibly the AD (us-ashburn-1).
Username: This is the user for which we created a token when setting up OCI. It’s not the name for which you sign into your MyService Dashboard.
Password: This is the authentication token created in Step #4.
COMPLETION
Click Next and Create. After a few minutes, your MySQL instance will be running. This process has deployed MySQL onto an Oracle Compute instance (similar to EC2 instance) on the next generation datacenter. Once it’s created, identify the public IP address and ssh into the instance. Use ssh opc@xxxxxx to log into the instance. From here, you have full control of your instance.
NEXT STEPS
Of course, that’s a lot of steps to create a MySQL Cloud Service. Further automation is in development. In future blogs, I’ll include terraform automation instructions. Additionally, with multiple AD’s, we can set up replication for high availability.
Thanks for reading. I hope this was helpful.
via Planet MySQL
Deploy MySQL on Oracle’s High-Performance Cloud (Step-by-step Guide)