A perfect storm has basically made cheap ammunition as scarce as hen’s teeth:
The state and federal threats to our gun rights is driving people to buy more ammunition to keep in reserve. COVID-19 is limiting the number of employees able to make ammunition and a wave of millions of new gun owners that need to feed their recent firearms purchases for purposes of training and carry are all eating up or holding back the supply lines.
Ammunition manufacturers customarily have a pretty good handle on how much of each type of ammunition they are going to sell annually. Knowing this, they tool up and crank out x number of rounds of say, .22 LR. They then retool and make y number of rounds of 9mm, then z rounds of .223, etc. The perfect storm has thrown a monkey wrench into those calculations and the industry is trying desperately to catch up to the exploding demand. See this related article “How Much Ammunition is Produced for the United States Market?“.
Even components for reloading are in short supply.
Where Can I Find Ammunition That is Cheap?
ROFL! Good luck on that cheap part. If you do find some cheap ammo at 2019 prices, you might also stumble on a unicorn or two in your backyard.
Barrels of Ammunition XM855
OK, OK. Where Can I Find Ammunition, Even If Pricey?
Fortunately, the free market can help. When a commodity is in short supply vs demand, the price of that commodity tends to rise, which helps lower demand, and keeps the product at least available to those who need it and are willing to pay extra to have it.
There are three places I go to look for the best prices and availability on ammunition:
AmmoLand’s Gun Deal (go to the “Daily Deals Page” to see the deals and it links you to the seller’s website for that item)
AmmoSeek at www.ammoseek.com (links each deal to the seller’s website for that item)
Virginia Gun Trader at www.vaguntrader.com (the ammunition section has private sellers, with their locality, in Virginia who have ammunition they want to sell – there are often good deals to be had this way)
Good luck and happy hunting!
Editors Note: Lots of folks are looking for 9mm ammunition check out these fast links for checking select ammunition retailers’ inventory online.
About Virginia Citizens Defense League, Inc. (VCDL):
Virginia Citizens Defense League, Inc. (VCDL). VCDL is an all-volunteer, non-partisan grassroots organization dedicated to defending the human rights of all Virginians. The Right to Keep and Bear Arms is a fundamental human right.
Cyber Monday deal: get up to 43% off Anker charging accessories for iPhone, iPad, and Mac
https://ift.tt/3fNwPwC
Now’s the time to make sure you never run out of charge on your iPhone, iPad, or even your Mac, as Anker chargers and cables are on sale for Cyber Monday.
Apple devices are now featuring longer battery life than before, but it would still be great if we didn’t have to keep charging them, or if we could just forget about charging. We’re not there yet, but get an Anker battery charging accessor and you’ll be close.
Your iPhone has run out of power at a key moment, and so have the iPhones of everyone you know. So now is the time to fix that for yourself by taking advantage of Anker’s Cyber Monday sale. Once you’ve got yours, you could stock up on Christmas presents for everyone else, too
Anker chargers for iPhone and iPad
The greatest saving in Anker’s Cyber Monday sale is on its Anker PowerCore 26800 Portable Charger. This is now $37.49 instead of $65.98 — a saving of 43%.
Charge up this device once and it can then recharge your iPhone more than six times. Alternatively, it can recharge certain iPads at least twice.
The PowerCore 26800 Portable Charger has with three USB ports so you can recharge multiple devices at once. You also get a micro USB cable for charging the PowerCore, and a travel pouch.
Also in the Cyber Monday sale is Anker’s PowerCore Slim 10000 PD, USB-C Power Bank (18W). Usually $29.99, the black version is on sale for $19.99, or a 33% saving.
It’s is a slimline charger, handy for travelling, which can still recharge two devices at once. Anker claims that it will recharge, for example, an iPhone XS, more than twice – and provide almost a full charge for an 11-inch iPad Pro.
Anker chargers for iPhone, iPad — and Mac
Plug the Anker USB C Fast Charger into a power adapter and you can simultaneously recharge four devices — including your USB-C-powered Mac. The Anker USB C Fast Charger is on sale for Cyber Monday at $39.99, a 31% saving on its regular price of $57.99.
It’s another slimline Anker charger, this time meant to be used at your desk instead of travelling, and offers 45W via its USB-C port for the Mac, or 18W for iPhones and iPads.
Anker cables
If you can never have enough power, you also can never have enough power cables. Anker is offering its twin-pack of USB-C to Lightning cables for $19.99.
That’s a 43% saving on its usual price of $34.99, and both cables are the full 6ft long.
In this tutorial, we will explore numerous examples of using the BeautifulSoup library in Python. For a better understanding let us follow a few guidelines/steps that will help us to simplify things and produce an efficient code. Please have a look at the framework/steps that we are going to follow in all the examples mentioned below:
Inspect the HTML and CSS code behind the website/webpage.
Import the necessary libraries.
Create a User Agent (Optional).
Send get() request and fetch the webpage contents.
Check the Status Code after receiving the response.
Create a Beautiful Soup Object and define the parser.
Implement your logic.
❖Disclaimer: This article considers that you have gone through the basic concepts of web scraping. The sole purpose of this article is to list and demonstrate examples of web scraping. The examples mentioned have been created only for educational purposes. In case you want to learn the basic concepts before diving into the examples, please follow the tutorial at this link.
Without further delay let us dive into the examples. Let the games begin!
Example 1: Scraping An Example Webpage
Let’s begin with a simple example where we are going to extract data from a given table in a webpage. The webpage from which we are going to extract the data has been mentioned below:
The code to scrape the data from the table in the above webpage has been given below.
# 1. Import the necessary LIBRARIES
import requests
from bs4 import BeautifulSoup

# 2. Create a User Agent (Optional)
headers = {"User-Agent": "Mozilla/5.0 (Linux; U; Android 4.2.2; he-il; NEO-X5-116A Build/JDQ39) AppleWebKit/534.30 ("
                         "KHTML, like Gecko) Version/4.0 Safari/534.30"}

# 3. Send get() Request and fetch the webpage contents
response = requests.get("https://shubhamsayon.github.io/python/demo_html.html", headers=headers)
webpage = response.content

# 4. Check Status Code (Optional)
# print(response.status_code)

# 5. Create a Beautiful Soup Object
soup = BeautifulSoup(webpage, "html.parser")

# 6. Implement the Logic.
for tr in soup.find_all('tr'):
    topic = "TOPIC: "
    url = "URL: "
    values = [data for data in tr.find_all('td')]
    for value in values:
        print(topic, value.text)
        topic = url
    print()
Output:
TOPIC:  __str__ vs __repr__ In Python
URL:  https://blog.finxter.com/python-__str__-vs-__repr__/

TOPIC:  How to Read a File Line-By-Line and Store Into a List?
URL:  https://blog.finxter.com/how-to-read-a-file-line-by-line-and-store-into-a-list/

TOPIC:  How To Convert a String To a List In Python?
URL:  https://blog.finxter.com/how-to-convert-a-string-to-a-list-in-python/

TOPIC:  How To Iterate Through Two Lists In Parallel?
URL:  https://blog.finxter.com/how-to-iterate-through-two-lists-in-parallel/

TOPIC:  Python Scoping Rules – A Simple Illustrated Guide
URL:  https://blog.finxter.com/python-scoping-rules-a-simple-illustrated-guide/

TOPIC:  Flatten A List Of Lists In Python
URL:  https://blog.finxter.com/flatten-a-list-of-lists-in-python/
VideoWalkthrough of The Above Code:
Example 2: Scraping Data From The Finxter Leaderboard
This example shows how we can easily scrape data from the Finxter dashboard which lists the elos/points. The image given below depicts the data that we are going to extract from https://app.finxter.com.
The code to scrape the data from the table in the above webpage has been given below.
# import the required libraries
import requests
from bs4 import BeautifulSoup

# create User-Agent (optional)
headers = {"User-Agent": "Mozilla/5.0 (CrKey armv7l 1.5.16041) AppleWebKit/537.36 (KHTML, like Gecko) "
                         "Chrome/31.0.1650.0 Safari/537.36"}

# get() Request
response = requests.get("https://app.finxter.com/learn/computer/science/", headers=headers)

# Store the webpage contents
webpage = response.content

# Check Status Code (Optional)
print(response.status_code)

# Create a BeautifulSoup object out of the webpage content
soup = BeautifulSoup(webpage, "html.parser")
# The logic
for table in soup.find_all('table',class_='w3-table-all',limit=1):
    for tr in table.find_all('tr'):
        name = "USERNAME: "
        elo = "ELO: "
        rank = "RANK: "
        for td in tr.find_all('td'):
            print(name,td.text.strip())
            name = elo
            elo = rank
        print()
Output: Please download the file given below to view the extracted data as a result of executing the above code.
Data scraping can prove to be extremely handy while automating searches on Job websites. The example given below is a complete walkthrough of how you can scrape data from job websites. The image given below depicts the website whose data we shall be scraping.
In the code given below, we will try and extract the job title, location, and company name for each job that has been listed. Please feel free to run the code on your system and visualize the output.
import requests
from bs4 import BeautifulSoup

# create User-Agent (optional)
headers = {"User-Agent": "Mozilla/5.0 (CrKey armv7l 1.5.16041) AppleWebKit/537.36 (KHTML, like Gecko) "
                         "Chrome/31.0.1650.0 Safari/537.36"}

# get() Request
response = requests.get("http://pythonjobs.github.io/", headers=headers)

# Store the webpage contents
webpage = response.content

# Check Status Code (Optional)
# print(response.status_code)

# Create a BeautifulSoup object out of the webpage content
soup = BeautifulSoup(webpage, "html.parser")

# The logic
for job in soup.find_all('section', class_='job_list'):
    title = [a for a in job.find_all('h1')]
    for n, tag in enumerate(job.find_all('div', class_='job')):
        company_element = [x for x in tag.find_all('span', class_='info')]
        print("Job Title: ", title[n].text.strip())
        print("Location: ", company_element[0].text.strip())
        print("Company: ", company_element[3].text.strip())
        print()
Output:
Job Title: Software Engineer (Data Operations)
Location:  Sydney, Australia / Remote
Company:  Autumn Compass

Job Title: Developer / Engineer
Location:  Maryland / DC Metro Area
Company:  National Institutes of Health contracting company.

Job Title: Senior Backend Developer (Python/Django)
Location:  Vienna, Austria
Company:  Bambus.io
Video Walkthrough Of Above Code:
Example 4: Scraping Data From An Online Book Store
Web scraping has a large scale usage when it comes to extracting information about products from shopping websites. In this example, we shall see how we can extract data about books/products from alibris.com.
The image given below depicts the webpage from which we are going to scrape data.
# import the required libraries
import requests
from bs4 import BeautifulSoup

# create User-Agent (optional)
headers = {"User-Agent": "Mozilla/5.0 (Linux; U; Android 4.2.2; he-il; NEO-X5-116A Build/JDQ39) AppleWebKit/534.30 (KHTML, like Gecko) Version/4.0 Safari/534.30"}

# get() Request
response = requests.get(
    "https://www.alibris.com/search/books/subject/Fiction", headers=headers)

# Store the webpage contents
webpage = response.content

# Check Status Code (Optional)
# print(response.status_code)

# Create a BeautifulSoup object out of the webpage content
soup = BeautifulSoup(webpage, "html.parser")

# The logic
for parent in soup.find_all('ul',{'class':'primaryList'}):
    for n,tag in enumerate(parent.find_all('li')):
        title = [x for x in tag.find_all('p', class_='bookTitle')]
        author = [x for x in tag.find_all('p', class_='author')]
        price = [x for x in tag.find_all('a', class_='buy')]
        for item in title:
            print("Book: ",item.text.strip())
        for item in author:
            author = item.text.split("\n")
            print("AUTHOR: ",author[2])
        for item in price:
            if 'eBook' in item.text.strip():
                print("eBook PRICE: ", item.text.strip())
            else:
                print("PRICE: ", item.text.strip())
        print()
Output: Please download the file given below to view the extracted data as a result of executing the above code.
Until now we have seen examples where we scraped data directly from a webpage. Now, we will find out how we can extract data from websites that have hyperlinks. In this example, we shall extract data from https://codingbat.com/. Let us try and extract all the questions listed under the Python category in codingbat.com.
The demonstartion given below depicts a sample data that we are going to extract from the website.
I hope you enjoyed the examples discussed in the article. Please subscribe and stay tuned for more articles and video contents in the future!
Where to Go From Here?
Enough theory, let’s get some practice!
To become successful in coding, you need to get out there and solve real problems for real people. That’s how you can become a six-figure earner easily. And that’s how you polish the skills you really need in practice. After all, what’s the use of learning theory that nobody ever needs?
Practice projects is how you sharpen your saw in coding!
Do you want to become a code master by focusing on practical code projects that actually earn you money and solve problems for people?
Then become a Python freelance developer! It’s the best way of approaching the task of improving your Python skills—even if you are a complete beginner.
It might seem like zooming around the galaxy with Baby Yoda is all action and adventure. The Mandalorian’s Din Djarin explains how much work it is to take care of a 50-year-old poop machine in this clip that we’re sure many parents can relate to. A fun and charming fan parody from the guys at The Warp Zone.
How to Add Stripe One-Time Payment Form to Laravel Project
https://ift.tt/35JYmvE
Payments are one of the most typical elements of any web-project, and Stripe is a payment provider that is really easy to install in Laravel projects. In this article, we will add a payment form to the page.
As an example, we will take a Product Show page from our QuickAdminPanel Product Management module, but you can follow the same instructions and add Stripe form to ANY Laravel project page.
The plan will consist of 8 steps:
Install Laravel Cashier
Run Cashier migrations
Stripe Credentials in .env
User Model should be Billable
Controller: Form Payment Intent
Blade Page: Form, Styles, and Scripts
Controller: Post Payment Processing
After Successful Purchase: Send Product
Let’s begin!
1. Install Laravel Cashier
Run this command:
composer require laravel/cashier
Notice: Currently, the latest version of Cashier is v12. If you’re reading this article when the newer version has arrived, please read its upgrade guide. But personally, I doubt that any fundamentals will change.
2. Run Cashier migrations
Cashier package registers its own database migration directory, so remember to migrate your database after installing the package:
php artisan migrate
Those migrations are not in database/migrations folder, they are inside /vendor. Here are the contents.
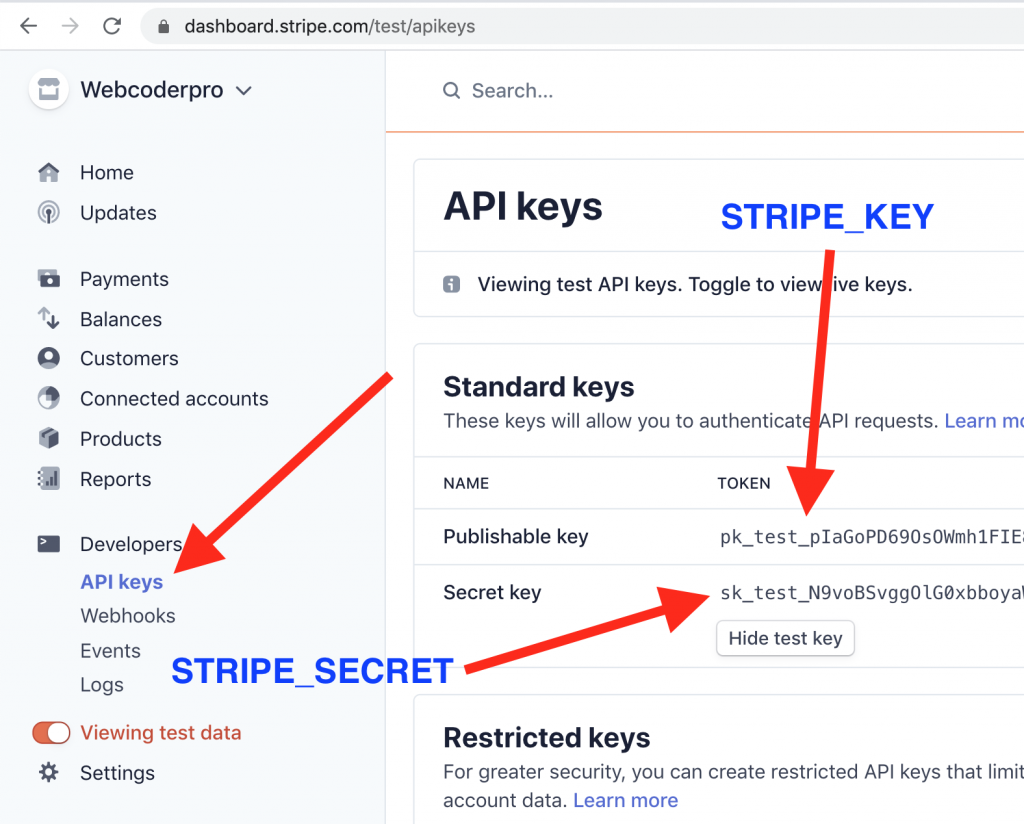
Where to get those “key” and “secret”? In your Stripe Dashboard:
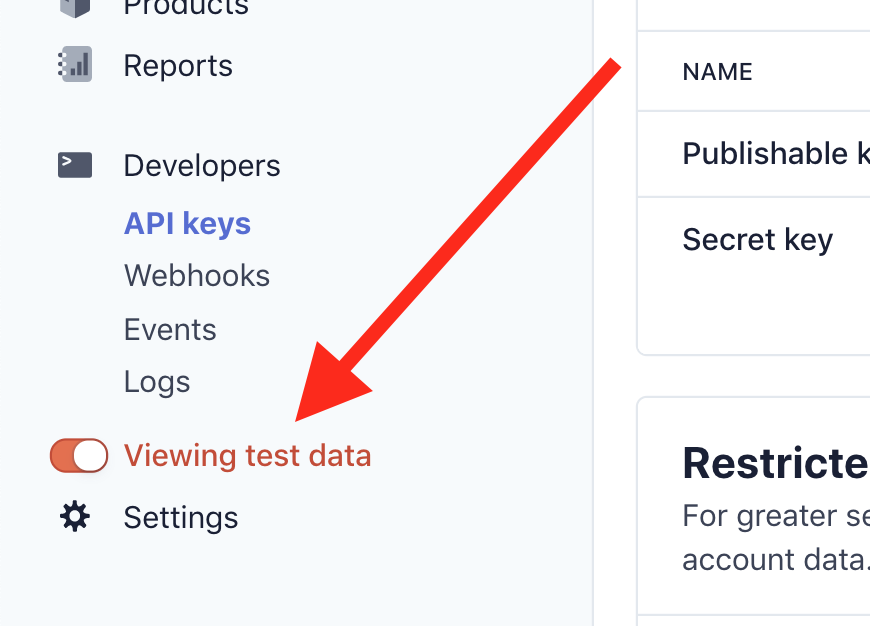
Keep in mind, there are two “modes” of Stripe keys: testing and live keys. While on your local or testing servers, please remember to use TESTING keys, you can view them by toggling “View Testing Data” on the left menu:
Another way to know if you’re using testing/live keys: the testing keys start with sk_test_ and pk_test_, and live keys start with sk_live_ and pk_live_. Also, live keys won’t work without SSL certificate enabled.
Notice: if you work in a team, when you add new variables, it’s a very good practice to also add them with empty values in .env.example. Then your teammates will know what variables are needed on their server. Read more here.
4. User Model should be Billable
Simple step: in your User model, add Billable trait from Cashier:
app/Models/User.php:
// ...
use Laravel\Cashier\Billable;

class User extends Authenticatable
{
    use HasFactory, Billable;
5. Controller: Form Payment Intent
To enable the Stripe payment form, we need to create a thing called “payment intent” and pass it to the Blade.
In this case, we will add it to ProductController method show():
class ProductController extends Controller
{
    // ...

    public function show(Product $product)
    {
        $intent = auth()->user()->createSetupIntent();

        return view('frontend.coupons.show', compact('product', 'intent'));
    }
Method createSetupIntent() comes from the Billable trait that we added just above in User model.
6. Blade Page: Form, Styles, and Scripts
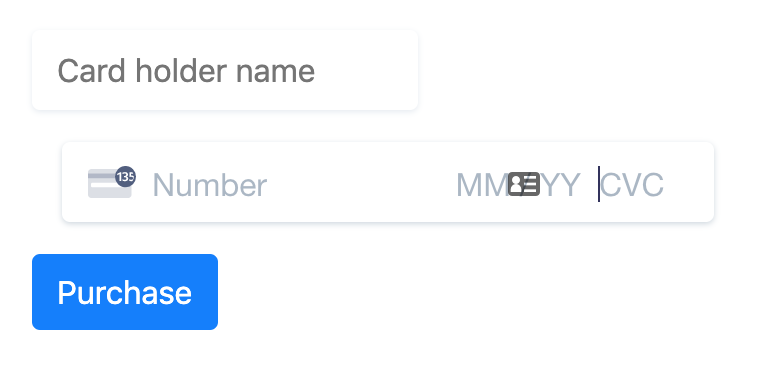
This is the form that we will add from Stripe, with cardholder name, card number, expiry month/year, CVV code, and ZIP code.
Luckily, Stripe documentation tells us exactly what HTML/JavaScript/CSS code should be added.
All the input variables are exactly as Stripe suggests it, the only element that you would need to change is the route, where the form would be posted, so this:
route('products.purchase', $product->id)
We will create that route and Controller method in the next step.
Meanwhile, we also need to include Stripe’s Styles and JavaScript.
Let’s imagine that in your main Blade file, you have @yield sections for styles and scripts, like this:
1. We’re getting payment_method from the form (Stripe handles it in the background for us)
2. Then we call the Cashier methods to get/create the customer, set their payment method, and charge them.
3. Finally, we redirect back with success result
3b. If something goes wrong, try/catch block handles it and redirects back with an error.
Notice: variable $product->price is the price for your product, and we need to multiply it by 100 because Stripe charge is happening in cents.
To show the success message or errors, in your Blade file, you need to add something like this:
After the customer paid for the product, you need to deliver the order. Of course, it depends on what they purchased and that code is very individual, but I will show you where to put it.
In fact, there are two ways. Easier but less secure, or harder and more secure.
Easy, right? The problem with that method is that it’s happening in sync, which means that $user->charge() may not be actually successfully finished, by the time you fulfill the order. In theory, it may cause false order deliveries with unsuccessful charges.
Option 2. Stripe Webhooks
Or, a more reliable method, is to catch so-called Stripe Webhooks. They ensure that the charge happened successfully, in the correct way. Whenever something happens in Stripe, they send a POST request to your server’s URL that you provide in the Stripe dashboard.
For that, I would recommend using a package called Laravel Stripe Webhooks, I’ve shot a separate video about it:
So if you want to catch more events, and not only charge success, I advise you to use Stripe Webhooks. Keep in mind they won’t (easily) work on your local computer, you need to set up a real domain that Stripe would call.
That’s it! Wish you to receive a lot of successful payments in your projects.
We’ve been shoveling ourselves out of average snowstorms and heavy nor’easters with the True Temper 18-Inch Ergonomic Mountain Mover every winter since 2013. It’s the best snow shovel for most people looking to clear walkways, steps, and small driveways. No other shovel matches its unique blend of ideal size, ergonomics, durability, and availability.
technology
via Wirecutter: Reviews for the Real World https://ift.tt/36ATBn1


 Video Walkthrough of The Above Code: