Best Gaming DealsThe best deals on games, consoles, and gaming accessories from around the web, updated daily.
Right now, Twitch Prime subscribers can get up to a year of Nintendo Switch Online benefits, including online play, access to classic NES games, and other benefits thanks to Twitch Prime.
Here’s how it works: You can claim the 3-months membership offer now by linking your Twitch and Nintendo accounts, then come back to claim the 9-month individual membership when it unlocks later.
MailEclipse is a mailable editor package for your Laravel applications to create and manage mailables using a web UI. You can use this package to develop mailables without using the command line, and edit templates associated with mailables using a WYSIWYG editor, among other features.
You can even edit your markdown mailable templates:
When creating a mailable template, you can pick from existing themes provided by this package:
The best way to get an idea of what this package does is to install it and try it out or check out this five-minute demo from the author:
Note: the video doesn’t provide sound, but does give an excellent overview and demo of MailEclipse features.
At the time of writing this package is a work in progress and under active development. Part of being under active development means that if you’re interested, you’re encouraged to try this package out and provide feedback.
So over the years, we all learn more and more about what we like and use often in MySQL. Currently, I step in and out of a robust about of different systems. I love it being able to see how different companies use MySQL. I also see several aspect and settings that often get missed. So here are a few things I think should always be set and they not impact your MySQL database. At a high level:
>Move the Slow log to a table
Set report_host_name
Set master & slaves to use tables
Turn off log_queries_not_using_indexes until needed
Side note — USE ALGORITHM=INPLACE
Side note — USE mysql_config_editor
Side note — USE mysql_upgrade –upgrade-system-tables
Move the Slow log to a table
This is a very simple process with a great return. YES you can use Percona toolkit to analyze the slow logs. However, I like being able to query against the table and find duplicate queries or by times and etc with a simple query call.
mysql> select count(*) from mysql.slow_log; +----------+ | count(*) | +----------+ | 0 | +----------+ 1 row in set (0.00 sec)
Now you can truncate it or dump it or whatever you like to do with this data easily also. Note variable values into your my.cnf file to enable upon restart.
Set report_host_name
This is a simple my.cnf file edit in all my.cnf files but certainly the slaves my.cnf files. On a master.. this is just set for when it ever gets flipped and becomes a slave.
report_host = <hostname> <or whatever you want to call it>
mysql> show variables like '%repository';
+---------------------------+-------+
| Variable_name              | Value |
+---------------------------+-------+
| master_info_repository     | FILE   |
| relay_log_info_repository | FILE   |
+---------------------------+-------+
mysql_slave> stop slave;
    mysql_slave> SET GLOBAL master_info_repository = 'TABLE';
    mysql_slave> SET GLOBAL relay_log_info_repository = 'TABLE';
    mysql_slave> start slave;
Make sure you add to my.cnf to you do not lose binlog and position at a restart. It will default to FILE otherwise.
master-info-repository =TABLE
relay-log-info-repository =TABLE
mysql> show variables like '%repository';
---------------------+-------+
| Variable_name              | Value |
+---------------------------+-------+
| master_info_repository     | TABLE |
| relay_log_info_repository | TABLE |
+---------------------------+-------+
All data is available in tables now and easily stored with backups
mysql> desc mysql.slave_master_info; +------------------------+---------------------+------+-----+---------+-------+ | Field | Type | Null | Key | Default | Extra | +------------------------+---------------------+------+-----+---------+-------+ | Number_of_lines | int(10) unsigned | NO | | NULL | | | Master_log_name | text | NO | | NULL | | | Master_log_pos | bigint(20) unsigned | NO | | NULL | | | Host | char(64) | YES | | NULL | | | User_name | text | YES | | NULL | | | User_password | text | YES | | NULL | | | Port | int(10) unsigned | NO | | NULL | | | Connect_retry | int(10) unsigned | NO | | NULL | | | Enabled_ssl | tinyint(1) | NO | | NULL | | | Ssl_ca | text | YES | | NULL | | | Ssl_capath | text | YES | | NULL | | | Ssl_cert | text | YES | | NULL | | | Ssl_cipher | text | YES | | NULL | | | Ssl_key | text | YES | | NULL | | | Ssl_verify_server_cert | tinyint(1) | NO | | NULL | | | Heartbeat | float | NO | | NULL | | | Bind | text | YES | | NULL | | | Ignored_server_ids | text | YES | | NULL | | | Uuid | text | YES | | NULL | | | Retry_count | bigint(20) unsigned | NO | | NULL | | | Ssl_crl | text | YES | | NULL | | | Ssl_crlpath | text | YES | | NULL | | | Enabled_auto_position | tinyint(1) | NO | | NULL | | | Channel_name | char(64) | NO | PRI | NULL | | | Tls_version | text | YES | | NULL | | | Public_key_path | text | YES | | NULL | | | Get_public_key | tinyint(1) | NO | | NULL | | +------------------------+---------------------+------+-----+---------+-------+ 27 rows in set (0.05 sec)
mysql> desc mysql.slave_relay_log_info; +-------------------+---------------------+------+-----+---------+-------+ | Field | Type | Null | Key | Default | Extra | +-------------------+---------------------+------+-----+---------+-------+ | Number_of_lines | int(10) unsigned | NO | | NULL | | | Relay_log_name | text | NO | | NULL | | | Relay_log_pos | bigint(20) unsigned | NO | | NULL | | | Master_log_name | text | NO | | NULL | | | Master_log_pos | bigint(20) unsigned | NO | | NULL | | | Sql_delay | int(11) | NO | | NULL | | | Number_of_workers | int(10) unsigned | NO | | NULL | | | Id | int(10) unsigned | NO | | NULL | | | Channel_name | char(64) | NO | PRI | NULL | |
Turn off log_queries_not_using_indexes until needed
This was shown above also. This is a valid variable .. but depending on application it can load a slow log with useless info. Some tables might have 5 rows in it, you use it for some random drop down and you never put an index on it. With this enabled every time you query that table it gets logged. Now.. I am a big believer in you should put an index on it anyway. But focus this variable when you are looking to troubleshoot and optimize things. Let it run for at least 24hours so you get a full scope of a system if not a week.
mysql> SET GLOBAL log_queries_not_using_indexes=0; Query OK, 0 rows affected (0.00 sec)
To turn on
mysql> SET GLOBAL log_queries_not_using_indexes=1;
Query OK, 0 rows affected (0.00 sec)
Note variable values into your my.cnf file to enable upon restart. Side note — USE ALGORITHM=INPLACE
OK this is not a variable but more of a best practice. You should already be using EXPLAIN before you run a query, This shows you the query plan and lets you be sure all syntax is valid. I have seen more than once a Delete query executed without an WHERE by mistake. So 1st always use EXPLAIN to double check what you plan to do. Not the other process you should always do is try to use an ALGORITHM=INPLACE or ALGORITHM=COPY when altering tables.
mysql_config_editor set  --login-path=local --host=localhost --user=root --password
Enter password:
# mysql_config_editor print --all
[local]
user = root
password = *****
host = localhost
 # mysql
ERROR 1045 (28000): Access denied for user 'root'@'localhost' (using password: NO)
 # mysql  --login-path=local
 Welcome to the MySQL monitor.
 # mysql  --login-path=local -e 'SELECT NOW()';
Side note — USE mysql_upgrade –upgrade-system-tables
Don’t forget to use mysql_upgrade after you actually upgrade.
This is often forgotten and leads to issues and errors at start up. You do not have to run upgrade across every table that exists though. The focus of most upgrade are the system tables. So at the very least focus on those.
MySQL 8.0 brings a lot of new features. These features make MySQL database much more secure (like new authentication, secure password policies and management, …) and fault tolerant (new data dictionary), more powerful (new redo log design, less contention, extreme scale out of InnoDB, …), better operation management (SQL Roles, instant add columns), many (but really many!) replication enhancements and native group replication… and finally many cool stuff like the new Document Store, the new MySQL Shell and MySQL InnoDB Cluster that you should already know if you follow this blog (see these TOP 10 for features for developers and this TOP 10 for DBAs & OPS).
Not anymore a drop in replacement !
We saw in this previous post how to migrate from MariaDB 5.5 (default on CentOS/RedHat 7) to MySQL. This was a straight forward migration as at the time MariaDB was a drop in replacement for MySQL…but this is not the case anymore since MariaDB 10.x !
Lets get started with the migration to MySQL 8.0 !
Options
Two possibilities are available to us:
Use logical dump for schemes and data
Use logical dump for schemes and transportable InnoDB tablespaces for the data
Preparing the migration
Option 1 – full logical dump
It’s recommended to avoid to have to deal with mysql.* tables are they won’t be compatible, I recommend you to save all that information and import the required entries like users manually. It’s maybe the best time to do some cleanup.
As we are still using our WordPress site to illustrate this migration. I will dump the wp database:
# mysqldump -B wp > wp.sql
MariaDB doesn’t provide mysqlpump, so I used the good old mysqldump. There was a nice article this morning about MySQL logical dump solutions, see it here.
These operation above need to be repeated for all the tables ! If you have a large amount of table I encourage you to script all these operations.
Replace the binaries / install MySQL 8.0
Unlike previous version, if we install MySQL from the Community Repo as seen on this post, MySQL 8.0 won’t be seen as a conflicting replacement for MariaDB 10.x. To avoid any conflict and installation failure, we will replace the MariaDB packages by the MySQL ones using the swap command of yum:
This new yum command is very useful, and allow other dependencies like php-mysql or postfix for example to stay installed without breaking some dependencies
The result of the command will be something similar to:
Now the best is to empty the datadir and start mysqld:
# rm -rf /var/lib/mysql/*
# systemctl start mysq
This will start the initialize process and start MySQL.
As you may know, by default MySQL is now more secure and a new password has been generated to the root user. You can find it in the error log (/var/log/mysqld.log):
2019-03-26T12:32:14.475236Z 5 [Note] [MY-010454] [Server]
A temporary password is generated for root@localhost: S/vfafkpD9a
At first login with the root user, the password must be changed:
# mysql -u root -p
mysql> set password='Complicate1#'
Adding the credentials
Now we need to create our database (wp), our user and its credentials.
Please, note that the PHP version used by default in CentOS might now be yet compatible with the new default secure authentication plugin, therefor we will have to create our user with the older authentication plugin, mysql_native_password. For more info see these posts:
Yes, this is required for all tables, this is why I encourage you to script it if you choose this option.
Conclusion
So as you could see, it’s still possible to migrate from MariaDB to MySQL but since 10.x, this is not a drop in replacement anymore and requires several steps including logical backup.
While working on a completely different project I discovered something curious on Amazon. That product was moldable thermoplastic pellets. Shaped in balls like smaller-than-usual airsoft pellets, moldable thermoplastic melts at just 140F, can be formed like clay, and then increases in hardness as it approaches room temperature. There are seemingly endless uses for this product, but I had a pet… more
via Recoil Make Gun Tools That Don’t Exist with Moldable Thermoplastic
Laravel 5.8 is recently released with many improvements so we’ll be learning, throughout this tutorial how to create an example CRUD application from scratch. The application we’ll be building is a simple CRM with a MySQL database.
You can see this Upgrade Guide for instructions on how to upgrade an existing web application from Laravel 5.7 to Laravel 5.8
Tutorial Prerequisites
This tutorial has some prerequisites
You have at least PHP 7.1.3 installed on your development machine,
Working experience of PHP. The OpenSSL, PDO, Mbstring, Tokenizer, XML, Ctype, JSON and BCMath PHP extensions installed with your PHP version.
The MySQL database management system,
Composer (A PHP dependency management for PHP) installed on your machine. You can head to the official website for instructions how to download install it.
If you have these prerequisites, let’s get started by creating our first Laravel 5.8 project.
Creating a Laravel 5.8 Project with PHP Composer
Let’s use Composer to create a project based on Laravel 5.8. Open a new terminal and run the following command:
$ composer create-project –prefer-dist laravel/laravel laravel-crud
This command will automatically start installing the latest version of Laravel provided that you have the required dependencies of PHP for Laravel 5.8 installed on your system:
After finishing the installation process, navigate to the project’s folder:
$ cd ./laravel-crud
Next, serve your application using the artisan serve command:
$ php artisan serve
This will start a Laravel development server on the http://127.0.0.1:8000. Just leave it open as any changes we’ll be making will automatically get reloaded.
Configuring the MySQL Database
We’ll be using MySQL, the most popular database system used by PHP and Laravel developers so make sure you have created a database for your project. You can simply use the mysql client. Open a new terminal window and run the following command:
$ mysql -u root -p
You will get prompted for a password. Enter the one you submitted when you configured your MySQL installation and hit Enter.
When the mysql clients starts, enter the following SQL instruction to create a database:
mysql> create database l58db;
Note: You can also use phpMyAdmin to create and work with MySQL databases. phpMyAdmin is a free web interface tool created in PHP, intended to handle the administration of MySQL over the Web. It’s beginners friendlier tool that’s commonly used by PHP developers.
Now, let’s let Laravel know about our created database. Open the .env file in the root of your project and update the MySQL credentials with your own values: DB_CONNECTION=mysql DB_HOST=127.0.0.1 DB_PORT=3306 DB_DATABASE=l58db DB_USERNAME=root DB_PASSWORD=<YOUR_DATABASE_PASSWORD>
This will allow your application to connect to your MySQL database.
You can also configure the database connection in the config/database.php.
The database configuration for your application is located at config/database.php. In this file you may define all of your database connections, as well as specify which connection should be used by default. Examples for most of the supported database systems are provided in this file. The official docs
Next, let’s create the database tables using the following command:
$ php artisan migrate
Note: Until now, we didn’t create any models but Laravel makes use of multiple tables so we need to run the previous command to create them in our database. After we create our own models, we can run the artisan migrate command again to update the database structure.
This is the output of the command:
Migration table created successfully.
Migrating: 2014_10_12_000000_create_users_table
Migrated: 2014_10_12_000000_create_users_table
Migrating: 2014_10_12_100000_create_password_resets_table
Migrated: 2014_10_12_100000_create_password_resets_table
You can see that our project has already the users and password_resets tables.
The Application We’ll Be Building
We’ll be building a simple CRM application that allows sales managers to manage contacts, accounts, leads, opportunities, tasks and related activities. For the sake of simplicity we’ll try to add few interfaces as we can in our application. The main interface is a dashboard which contains the table of contacts and their status (lead, opportunity and customer). We’ll not add login and authentication in this tutorial as we’ll be the subject of another tutorial.
In our CRM database we’ll be making use of the following tables:
contacts — contains information about contacts/customers such as name, address, company/account, ,
activities — contains activities (phone calles, meetings and emails etc.) about the contacts,
accounts — contains information about contact companies,
users — contains information about the application users
We’ll also be using the following JOIN tables:
contact_status — contains contact status such as lead, opportunity or customer which indicates the stage in the sales cycle
activity_status — the activity status can be either pending, ongoing or completed,
contact_source — contains contact source.
The contacts table has the following fields:
id
title,
first name,
last name,
email,
phone,
address,
source_id,
date of first contact,
account_id,
status_id,
user_id,
The contact_status table has the following fields:
id,
status = (lead, proposal, customer, archived)
The contact_source table:
id,
name
The accounts table has the following fields:
id,
name,
description
The activities table has the following fields:
id,
date,
description,
contact_id
status_id The activity_status table has the following fields:
id,
status
Creating Laravel 5.8 Models
According to the database structure above, we’ll need to create the followng Eloquent models:
Contact
Account
Activity
ContactStatus
ContactSource
ActivityStatus
Head back to your terminal and run the following commands:
$ php artisan make:model Contact –migration
$ php artisan make:model Account –migration
$ php artisan make:model Activity –migration
$ php artisan make:model ContactStatus –migration
$ php artisan make:model ContactSource –migration
$ php artisan make:model ActivityStatus –migration
This will create models with the corresponding migrations files. The models exist in the app folder and you can find the migration files in the database/migrations folder.
The -m flag will also create the corresponding migration file for the model.
Next, in your terminal, run the following command to create the base tables:
$ php artisan migrate
You will get the following output:
Migration table created successfully.
Migrating: 2019_03_12_223818_create_contacts_table
Migrated: 2019_03_12_223818_create_contacts_table
Migrating: 2019_03_12_223832_create_accounts_table
Migrated: 2019_03_12_223832_create_accounts_table
Migrating: 2019_03_12_223841_create_activities_table
Migrated: 2019_03_12_223841_create_activities_table
Migrating: 2019_03_12_223855_create_contact_statuses_table
Migrated: 2019_03_12_223855_create_contact_statuses_table
Migrating: 2019_03_12_223904_create_contact_sources_table
Migrated: 2019_03_12_223904_create_contact_sources_table
Migrating: 2019_03_12_223912_create_activity_statuses_table
Migrated: 2019_03_12_223912_create_activity_statuses_table
In Laravel, you can specify the structure (table fields) in the migration files. Let’s start with the contacts table. Open the database/migrations/2019_03_12_223818_create_contacts_table.php file (the date prefix for the file will be different for you) and add the following changes:
public function up()
{
Schema::create(‘contacts’, function (Blueprint $table) {
$table->bigIncrements(‘id’);
$table->timestamps();
$table->string(‘title’);
$table->string(‘first_name’);
$table->string(‘last_name’);
$table->string(’email’);
$table->string(‘phone’);
$table->string(‘address’);
$table->date(‘date’);
$table->biginteger(‘user_id’)->unsigned(); $table->foreign(‘user_id’)->references(‘id’)->on(‘users’); });
}
Next, open the database/migrations/<YOUR_TIMESTAMP>_create_accounts_table.php file and change accordingly:
public function up()
{
Schema::create(‘accounts’, function (Blueprint $table) {
$table->bigIncrements(‘id’);
$table->timestamps();
$table->string(‘name’);
$table->description(‘description’); });
}
Next, open the database/migrations/<YOUR_TIMESTAMP>_create_activities_table.php file and change accordingly:
public function up()
{
Schema::create(‘activities’, function (Blueprint $table) {
$table->bigIncrements(‘id’);
$table->timestamps();
$table->string(‘description’);
});
}
Next, open the database/migrations/<YOUR_TIMESTAMP>_create_contact_statuses_table.php file and change accordingly:
public function up()
{
Schema::create(‘contact_statuses’, function (Blueprint $table) {
$table->bigIncrements(‘id’);
$table->timestamps();
$table->string(‘status’);
});
}
Next, open the database/migrations/<YOUR_TIMESTAMP>_create_contact_sources_table.php file and change accordingly:
public function up()
{
Schema::create(‘contact_sources’, function (Blueprint $table) {
$table->bigIncrements(‘id’);
$table->timestamps();
$table->string(‘name’);
});
}
Next, open the database/migrations/<YOUR_TIMESTAMP>_create_activity_statuses_table.php file and change accordingly:
public function up()
{
Schema::create(‘activity_statuses’, function (Blueprint $table) {
$table->bigIncrements(‘id’);
$table->timestamps();
$table->string(‘status’); });
}
You can see that we didn’t create any foreign keys between the tables. That’s because we need to avoid any issues to creating a foreign key to a table that doesn’t exist yet. The order of the migrations is important so you either make sure that the tables that are being referenced are created first or create the tables without any foreign keys and then add a migration to update the tables with the required relationships after the tables are created. Now, let’s create the update_contacts_table migration by running the following command:
$ php artisan make:migration update_contacts_table –table=contacts
Created Migration: 2019_03_12_235456_update_contacts_table
Open the database/migrations/<YOUR_TIMESTAMP>_update_contacts_table.php file and update accordingly:
public function up()
{
Schema::table(‘contacts’, function (Blueprint $table) {
$table->biginteger(‘source_id’)->unsigned(); $table->foreign(‘source_id’)->references(‘id’)->on(‘contact_sources’); $table->biginteger(‘account_id’)->unsigned(); $table->foreign(‘account_id’)->references(‘id’)->on(‘accounts’); $table->biginteger(‘status_id’)->unsigned(); $table->foreign(‘status_id’)->references(‘id’)->on(‘contact_statuses’);
});
}
We create three foreign key relationships to the contact_sources, accounts and contact_statuses tables.
Next, let’s create the update_activities_table migration by running the following command:
$ php artisan make:migration update_activities_table –table=activities
Created Migration: 2019_03_13_002644_update_activities_table
Open the database/migrations/<YOUR_TIMESTAMP>_update_activities_table.php file and update accordingly:
public function up()
{
Schema::table(‘activities’, function (Blueprint $table) {
$table->biginteger(‘contact_id’)->unsigned(); $table->foreign(‘contact_id’)->references(‘id’)->on(‘contacts’); $table->biginteger(‘status_id’)->unsigned(); $table->foreign(‘status_id’)->references(‘id’)->on(‘activity_statuses’); });
}
We create two foreign keys to the contacts and activity_statuses table.
Now, run the following command to migrate your database:
$ php artisan migrate
Implementing the Models
The Eloquent ORM included with Laravel provides a beautiful, simple ActiveRecord implementation for working with your database. Each database table has a corresponding "Model" which is used to interact with that table. Models allow you to query for data in your tables, as well as insert new records into the table. The official docs
We can interact with our database tables using the corresponding Eloquent models so we need implement the required methods in each model.
Defining the Relationships between Models
A contact belongs to a source, a status, an account and to a user and has many activities.
An account belongs to a user (i.e created by a user) and has many contacts.
An activity belongs to a status, a contact and to a user.
A contact status has many contacts.
A contact source has many contacts.
An activity status has many activities
Open the app/Account.php file and change accordingly:
<?php
namespace App;
use Illuminate\Database\Eloquent\Model;
class Account extends Model
{
public function contacts(){
return $this->hasMany(‘App\Contact’);
}
public function user(){
return $this->belongsTo(‘App\User’);
}
}
Next, open the app/Activity.php file and change accordingly:
<?php
namespace App;
use Illuminate\Database\Eloquent\Model;
class Activity extends Model
{
public function contact(){
return $this->belongsTo(‘App\Contact’);
}
public function status(){
return $this->belongsTo(‘App\ActivityStatus’);
}
public function user(){
return $this->belongsTo(‘App\User’);
}
}
Next, open the app/ActivityStatus.php file and change accordingly:
<?php
namespace App;
use Illuminate\Database\Eloquent\Model;
class ActivityStatus extends Model
{
public function activities(){
return $this->hasMany(‘App\Activiy’);
}
}
Next, open the app/Contact.php file and update accordingly:
<?php
namespace App;
use Illuminate\Database\Eloquent\Model;
class Contact extends Model
{
protected $fillable = [
‘title’,
‘first_name’,
‘last_name’,
’email’,
‘phone’,
‘address’,
‘date’ ];
public function source(){
return $this->belongsTo(‘App\ContactSource’);
}
public function status(){
return $this->belongsTo(‘App\ContactStatus’);
}
public function account(){
return $this->belongsTo(‘App\Account’);
}
public function user(){
return $this->belongsTo(‘App\User’);
}
public function activities(){
return $this->hasMany(‘App\Contact’);
}
}
Next, open the app/ContactSource.php file and update accordingly:
<?php
namespace App;
use Illuminate\Database\Eloquent\Model;
class ContactSource extends Model
{
public function contacts(){
$this->hasMany(‘App\Contact’);
}
}
Next, open the app/ContactStatus.php file and update accordingly:
<?php
namespace App;
use Illuminate\Database\Eloquent\Model;
class ContactStatus extends Model
{
//
public function contacts(){
$this->hasMany(‘App\Contact’);
}
}
Finally, open the app/User.php file and update as follows:
<?php
namespace App;
use Illuminate\Notifications\Notifiable;
use Illuminate\Contracts\Auth\MustVerifyEmail;
use Illuminate\Foundation\Auth\User as Authenticatable;
class User extends Authenticatable
{
use Notifiable;
/**
* The attributes that are mass assignable.
*
* @var array
*/
protected $fillable = [
‘name’, ’email’, ‘password’,
];
/**
* The attributes that should be hidden for arrays.
*
* @var array
*/
protected $hidden = [
‘password’, ‘remember_token’,
];
/**
* The attributes that should be cast to native types.
*
* @var array
*/
protected $casts = [
’email_verified_at’ => ‘datetime’,
];
public function contacts(){
$this->hasMany(‘App\Contact’);
}
public function activities(){
return $this->hasMany(‘App\Activiy’);
}
public function accounts(){
return $this->hasMany(‘App\Account’);
}
}
Next we’ll be creating the REST API controllers.
via Planet MySQL Laravel 5.8 REST CRUD API Tutorial – Build a CRM [PART 1]: Eloquent Models and Relationships
DocuSign, best known for its digital signature business, is releasing new tools that focus on the entire process of drawing up and completing agreements.
It’s part of a broader effort by the company to expand beyond its core offering of e-signatures, in the face of growing competition in that space from Adobe and other rivals. Going forward, DocuSign wants to convince customers it is more than just an e-signature company, a move that opens up new fronts of competition against global companies like Oracle as well as Pacific Northwest startups like Icertis, all while attempting to get on a path of long-term profitability.
The three new tools are part of an ongoing evolution to owning what the company calls the “agreement cloud.” By providing tools to not only sign documents but create and manage them, DocuSign believes it will double its market opportunity, CEO Dan Springer said in an interview with GeekWire.
“E-signature was the first step to unlocking the modernization and automation of (customers’) system of agreement,” Springer said. “But now we are coming to what feels like the natural fruition of the start of that journey by saying we have a full agreement cloud solution. You can go back through your entire system as a customer and modernize that and automate that process and get rid of the paper and get rid of the manual processes to allow you to have a much more cost efficient and effective system that’s also a lot friendlier for the environment.”
DocuSign originally started in Seattle and later relocated its headquarters to the San Francisco Bay Area, though more than a third of the company’s 3,100 employees remain in its original hometown. With 1,074 employees and contractors, the Seattle office is DocuSign’s largest, followed by San Francisco with 816 people.
DocuSign leaders celebrate the company’s debut on Wall Street in April. (Nasdaq Photo)
Here is a look at the new tools, which will debut in DocuSign’s ’19 Release:
DocuSign Gen for Salesforce, available on Salesforce AppExchange, lets sales reps and other users automatically generate signature-ready contracts within Salesforce with a few clicks.
DocuSign Click lets organizations set up a single-click process for getting consent on standard agreement terms on websites, such as a privacy policy.
DocuSign ID Verification digitizes and automates verifying government identification in sensitive transactions, like opening a bank account, which would normally require someone to present a physical ID.
In addition to these new tools, DocuSign continues to invest in document creation and storage through the integration of SpringCM, the Chicago-based company that DocuSign acquired for $220 million last year.
Springer compared DocuSign’s evolution to when Salesforce branched out beyond sales to focus on broader services approximately a decade ago. He downplayed competition in the company’s new realm, arguing that no one else is providing services to shake up the entire agreement process, and instead said the biggest challenge is getting customers to recognize that DocuSign is not just a signature company.
DocuSign pegged the value of its original market of e-signatures at roughly $25 billion. But the market opportunity in the full system of agreement is twice as large, at $50 billion, the company says.
(Google Finance Chart)
DocuSign, which was the long-time leader on the GeekWire 200 list of the top Pacific Northwest startups, went public last April. Its stock shot up 30 percent out of the gate, with investors showing serious appetite for the enterprise software company. The stock has since climbed 43 percent, rising faster than the Nasdaq Stock Exchange it is listed on, though it is down 5.7 percent today.
DocuSign’s surge on the public markets is part of an interesting trend of unprofitable growth companies faring much better among investors than companies that focus more on profits. DocuSign did eek out a small non-GAAP profit for the first time last year, though it has traditionally prioritized growth over profit.
Springer expects DocuSign to post operating profits of about 20 to 25 percent in three to five years, up from the 5 percent profits projected for this year. Springer thinks the company’s focus on growth and scale will ramp up profits in the coming years.
“If we find choices and tradeoffs, we are growth company, so we will make the investments in growth and not have the increased profitability come as fast,” said Springer. “But at this current point we believe we’ll be doing both, keeping the high growth point and improving profitability.”
DocuSign CEO Dan Springer at the Nasdaq opening bell ceremony. (Nasdaq Photo)
DocuSign capped its first year as a public company by besting analyst expectations for revenue and profits in the fourth quarter. For the full year, DocuSign posted $701 million in revenue, up 35 percent over year-over-year. This year, the company expects revenue of $910 million to $915 million, which would represent 29.8 to 30.5 percent growth over last year. DocuSign finished the year with 477,000 customers.
Infrastructure remains one of DocuSign’s largest costs as it delves further into the “agreement cloud.” Rather than working with a public cloud provider like Amazon or Microsoft, DocuSign has its own “rings” of data centers, with three a piece in the U.S. and Europe.
Springer says DocuSign has very high standards for redundancy and making sure its systems are always running smoothly. He gave an example of a customer using its e-signature services, T-Mobile, to show the importance of reliability and why it runs its own data centers.
“Whether you go into a store, whether you call into a call center, whether you go onto the website, every route you go it goes through DocuSign,” Springer said. “So if we were down, they are down for business.”
The cloud is capable of hosting virtually any application. However, certain development and design considerations can help optimize cloud deployment in a way that facilitates present performance and future growth. Therefore, both cloud providers and application owners must have a clear picture of what a cloud-ready application looks like. They can then facilitate the services and infrastructure needed to maximize performance.
Building a cloud-ready application isn’t something every techie inherently understands. Instead, it’s a skill that requires meticulous planning and seamless execution. When developers don’t build cloud applications for the cloud, those applications fail to deliver the value they should. Fortunately, programmers can easily learn how to create applications that are a perfect fit for the cloud.
Here are three of the most
important tips you should consider when building a cloud-ready application.
1.
A Collection of Services
Don’t build a cloud application as a monolith. Instead, deploy it as an aggregation of APIs. Therefore, start by defining the data. Next, create the cloud services needed to manage this data. Finally, combine these APIs into either higher-level composite services or complete compound applications. This, in a nutshell, is the principle of service-based application architecture.
While this is a widely understood concept in the developer community, a surprising number of programmers still create unwieldy, tightly coupled software. Moreover, their designs seem more focused on a spectacular user interface than they are on efficiently blending the underlying services. However, API-based and loosely coupled applications make it easier to tap into the distribution power of cloud infrastructure.
Additional advantages of API-based software include the potential for reuse by other applications and much better granularity. Granularity can be especially handy where an application is made up of hundreds or thousands of underlying services that can be readily isolated. That way, application developers don’t have to reinvent the wheel each time they set out to create a new application.
Perhaps the best example of how convenient API
reuse can be is the credit-check service that a wide range of applications use.
If you have this as a reusable API, you can cut down on your development time.
2.
Decoupling the Data
Decoupling an application’s components is one thing. However, decoupling the data is another. Moreover, the latter is every bit as important as the first. That’s because when your data is too deeply tied into an application, it won’t be a good fit for the cloud. Application architecture that separates data and processing will be more at home in cloud environments.
Moreover, when you decouple data, you gain the ability to store and process it on a server instance of your choosing. For instance, some organizations prefer that their data remain on their local in-house servers while the applications run in the cloud. This would be hard to do if the developer hasn’t sufficiently decoupled the data from the application.
All the same, developers must balance decoupling against performance requirements. If there’s too large a gap between the data and the software, latency could weigh down overall performance. Ultimately, developers must make sure data remains separate from the application but that it does not sit too far away for the application to easily leverage it.
One way to do that is to employ a caching system. This can bolster performance by storing locally the most commonly accessed data sets. Therefore, this reduces the number of read requests that have to be relayed back to the database. However, caching systems must be built into the application itself and tested for efficiency.
3.
Model for Scale
One of the main reasons a growing number of governments and large corporations have opted to run their applications in the cloud is the ease of scaling. Additionally, some cloud providers offer auto-scaling provisioning to accommodate rapid changes in network, database, and application loads. But such scaling capacity won’t matter much if the applications themselves aren’t built from the ground up with scaling in mind.
Designing for scaling means thinking about how the application performs under a growing load. Do the application and the back-end database behave the same way irrespective of whether 10 or 1,000 users simultaneously log into it? If such perfectly consistent behavior isn’t possible, is the deterioration in performance small enough to go largely unnoticed by end users?
Building an application that’s ready for cloud scaling means understanding its regular workload and defining a path for scaling it during workload surges. Such architecture must go hand-in-hand with robust monitoring mechanisms that leverage the appropriate performance and access management tools.
Building a Cloud-Ready Application Requires Attention to Detail
Building a cloud-ready application requires you to pay attention to several aspects of the architecture. However, the above three are the most important. If you haven’t tried to build a cloud-ready application before, you can expect to make a couple of mistakes at the beginning. However, with practice you’ll eventually understand what works.
No IFAK, Go Bag, or Range Bag is complete without a tourniquet.
Period.
Whether you’re prepping for when SHTF, or simply looking to build a comprehensive first-aid kit for your home, you’ll need tourniquets.
But knowing what type to get and which model isn’t as easy as it should be. That’s why we’re going to take a hard look at tourniquets!
A collection of CAT Tourniquets
There seems to be a lot of myths regarding tourniquets out there, including the risks they involve, how they are used, and which the best ones. Today, we’re going to set the record straight and explain what you need to know about this handy, life-saving tool.
Are Tourniquets Dangerous?
It’s a common myth that tourniquets are unsafe to use. The truth is–no, not if they are applied correctly. A modern tourniquet is very safe to use. There seems to be a debate that goes back and force regarding nerve damage and tourniquets.
However, if you are deploying a tourniquet nerve damage is one of the last things you need to worry about. Someone dying from blood loss likely won’t mind some nerve damage from a tourniquet if it means surviving.
The only way a TQ is dangerous is if you attach it to the neck to stop the bleeding of a head wound. For obvious reasons, this will cause other significant complications, like asphyxiation.
The Big Two TQs
Tourniquets have been around for hundreds of years, and they’ve evolved considerably from early versions. While many people are familiar with the old belt-and-stick survivalist-type of tourniquet, the reality is that a professional-grade TQ just isn’t that hard to carry and can easily be on hand.
Just because you can use a rag and a stick to stop the bleeding doesn’t mean you’ve got to.
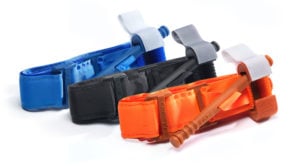
Now the trick is to find which tourniquet is the right one for you to carry. If anyone knows about using a TQ it’s the guys in tactical and emergency medicine–who all suggest two tourniquets and two tourniquets only: the CAT and the SOFTT.
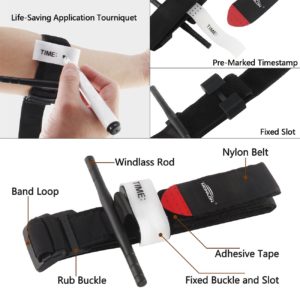
The features of a CAT tourniquet.
Both tourniquets are similar in design, and both are in use by the United States military. They also are both designed to be used with one hand, which is critical when it comes to self-care.
Let’s take a closer look at both designs, and discuss the pros and cons of each.
By far one of the most popular tourniquet options out there, CAT stands for Combat Application Tourniquet. These TQs typically cost anywhere from 26 to 35 dollars, making them an affordable addition to your just-in-case supplies.
The CAT uses an adjustable strap that latches down and is secured by plenty of velcro, as well as a plastic windlass that is easily rotated to tighten the TQ to stop the bleeding.
This type of tourniquet also features a red tip to make the end of the velcro strap easy to find and a white velcro strap that serves double duty to secure the windlass and provide a place to write the time down that the tourniquet was applied.
Writing the application time directly onto the TQ allows hospitals to identify how long the tourniquet has been there and will help them prioritize treatment.
The windlass locks into one of two hooks on the side of the TQ, which is then secured by that white strap.
CAT tourniquets are compact, foldable, and easy to apply to yourself or another person with only one hand. For this reason, they’re incredibly popular with civilian first-aid kits, emergency medical staff, and the military.
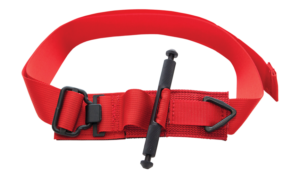
If you’re looking for an alternative to the CAT, the SOFTT by Tactical Medical Solutions is a great one. It’s very similar to the CAT in the sense that it can be applied with one hand. Older SOFTT models had some issues, but the modern SOFTT Wide model has solved much of these and become standard.
Unlike the CAT, the SOFTT uses a metal windlass that is heavily textured. A metal windlass is able to stand up to more abuse than a plastic windlass so it’s a great choice for durability. The heavily textured handle is also beneficial if you’re wearing gloves or are covered in blood.
A great benefit to the SOFTT is a metal latch on the strap that makes it easier to open and place around a trapped arm or leg. The adjusting strap has a friction buckle to prevent the strap from loosening–which would obviously defeat the point of a TQ.
The Red Cross trains with SOFTT tourniquets.
The SOFTT also has a safety set screw that allows the user to lock the windlass down completely. This will prevent the TQ from becoming loose when moving the patient. The SOFTT is an excellent tourniquet and is gaining ground in the tactical medicine world.
Beware of Frauds
As with any popular product, there are knockoffs of the leading TQ brands which can look more appealing than they really are. Let’s face it–when your life is on the line, you don’t want to see your cheap TQ fail. There’s a reason to invest in getting the real thing.
If you want tactical medicine effectiveness, you have to make sure you get the TQs tactical medics actually use!
Unfortunately, the internet is full of fake or low-quality tourniquets, especially when it comes to the CAT’s design. If you’re checking out your favorite online mega-retailer for a TQ, be sure to check the prices. A $14 “CAT” tourniquet is a dead giveaway that you’re looking at a fake.
Don’t forget to take a look at the manufacturer, as well. North American Rescue makes CAT tourniquets and Tactical Medical Solutions is the favorite maker of SOFTT tourniquets. Both types will cost more than $25 per tourniquet–which is well worth it in a life or death situation.
How To Use One
Before you can save a life with your tourniquet, you have to learn to use it! Here’s a video from Mass General Hospital showing you just how to apply a tourniquet to a limb.
While you can learn how to use a tourniquet from a video, nothing beats hands-on instruction. If you’re interested in learning how to apply tourniquets and perform other life-saving emergency first-aid, it’s well worth the investment to take a class.
Check out the Red Cross training site to see what first-aid classes are offered in your area!
Practice Applying your TQ
Once you’ve learned how to apply a tourniquet, it’s important to continue to practice the technique. If a tourniquet is needed, you have a matter of seconds to act, so you need to keep your skills sharp.
When it comes to saving lives, practice is key.
While you can train with your emergency TQ, you might want to get one specifically for practice. Repeated use of your tourniquet can wear it out, and you want your tourniquet to be in great condition and ready to use when you need it.
There are purpose-built training TQs, but you also can use a cheap knock off to practice. Just don’t forget to mark it in some way so you know at a glance which is which.
Best Tourniquet Holders
Carrying a TQ as part of your EDC is pretty easy. Unlike a gun or even a knife, you don’t have to conceal it. It doesn’t matter if someone sees your TQ. You can shove one in your pocket, but a belt pouch is likely the better choice.
There are many ways to carry a tourniquet–including a variety of different holder and pouch styles.
Companies like Wilder tactical, HSGI, and North American Rescue all produce high-quality belt mounted TQ pouches, so you have lots of options. You also can stash one in your vehicle, backpack, or medical kit easily.
Wherever you choose to carry your tourniquet, be sure you can access it very quickly. It doesn’t do you any good if you need to dig around just to find the thing–not to mention get it out, on the injured person, and secured.
Here are a few different TQ carriers to keep your tourniquet accessible and ready to rock when you need it.
5.11 Tactical 3×6 Med Kit
A combination tourniquet holder and med kit, this option is a great way to securely carry your TQ and other necessary medical supplies–without getting in your way.
A convenient, simple method to attach your tourniquet to a MOLLE system. It’s designed to work with CAT and SOFTT tourniquets and can be attached to the top of the Blue Force Gear IFAK kits.
Wilder Evolution Series Universal Tourniquet Pouch
This system is available with a number of attachment options, including MOLLE, Tek-Lok, and Quick Clips, and works with both CAT and SOFTT tourniquets.
North American Rescue Rigid Gen 7 C-A-T Tourniquet Case
Made by one of the leading CAT tourniquet manufacturers, this case is a durable holder for your CAT tourniquet. It easily attaches to a belt with the Blade-Tech Telkom Belt Attachment.
Are tourniquets a must have? I think so. About 50% of combat deaths were due to blood loss in wars past, and I would hazard a guess that too many people in the civilian world have died due to a preventable hemorrhage.
A TQ is a very cheap investment and for less than $50, you have a potentially life-saving tool. Of course, it’s useless if you don’t learn how to use it.
Brushing up on your emergency first-aid knowledge with a class can be a little costly, but if it means you have the knowledge and practice to save your own life or the life of another, it’s well worth the price.
What are your experiences with tourniquets? Do you feel like the RATs or the ratcheting tourniquets are good to go? If so let us know below. Don’t forget to check out our reviews of the best IFAK kits out there to keep building your emergency medical kit.
John Wick seemingly cashes in all of his goodwill while being given more heads and torsos to destroy at point-blank range in the second trailer for John Wick: Chapter 3 – Parabellum. Premieres 5/17/19.
 Best Gaming DealsThe best deals on games, consoles, and gaming accessories from around the web, updated daily.


 While working on a completely different project I discovered something curious on Amazon. That product was moldable thermoplastic pellets. Shaped in balls like smaller-than-usual airsoft pellets, moldable thermoplastic melts at just 140F, can be formed like clay, and then increases in hardness as it approaches room temperature. There are seemingly endless uses for this product, but I had a pet…