http://img.youtube.com/vi/uEBHJVK-Ibg/0.jpgIn the new PHP 8.1 version, you can use Enum classes. How would they work in Laravel? Let me show you an example.Laravel News Links
Laravel Livewire for Beginners – Full 2021 Guide
If you’ve been coding with Laravel for some time, you must have heard about the ‘magical’ Laravel Livewire package. Livewire is a truly awesome (and almost magic) way to create interactive interfaces and communicate ‘realtime’ with your Laravel backend. And it does this all in a very simple way. In this article I’ll show you the basics of Laravel Livewire, so that you will be up-and-running with Livewire in no-time🚀
The combination of simplicity and power is what makes Laravel Livewire so awesome and why it is used by so many developers. It is especially a good alternative to the Laravel + Inertia + Vue combination, in particular if you’re still used to the ‘Vue-magic’, but feel that Vue is too much of a hassle to set up.
The basics of Livewire
The first thing you should know is that Livewire works with so-called components. That means that you can have a search component, an edit component, you name it. Each Livewire component consists of (in most cases) two files:
- The component class file
- The Blade file with the markup (the HTML)
Additionally, you could also have a test for each component, but that’s something you should care about later (but don’t forget it!😄).
Installing Livewire
First, you need to install Laravel Livewire. To do so, run the following composer command:
composer require livewire/livewireNext, you need to load a Livewire JavaScript file and a Livewire CSS file. Without loading those files on a page, you cannot use Livewire. Luckily, Livewire makes this really easy for us. All you need to do is adding the below two Blade directives in your Blade files and make sure that these directives are loaded on every page.
The best place to put them is normally in your layouts/app.blade.php file:
<html>
   <head>
      ...
      @livewireStyles
   </head>
   <body>
      ...
      @livewireScripts
   </body>
</html>
Creating Livewire components
Now it’s time to create our first Livewire component! The best way to create a Livewire component is to run the following artisan command, similar to the regular Laravel artisan commands:
php artisan make:livewire ComponentNameThis will create two files, the file with the Livewire logic and the Blade layout:
- App\Http\Livewire\ComponentName.php
- resources/views/livewire/component-name.blade.php
You can also create a Livewire component in a namespace:
php artisan make:livewire Dashboard/ComponentNameThe above command creates the following two files:
<?php

namespace App\Http\Livewire;

use Livewire\Component;

class ComponentName extends Component
{
    public function render()
    {
        return view('livewire.component-name');
    }
}
<div>
</div>With just these two files you can create great interactive Livewire components!
Creating a Livewire search component
So, what’s so special about Livewire? The special ‘magic’ thing about Livewire is that it allows (almost) realtime communication between your server (the backend) and the frontend. This means that you could have a variable, change it in your PHP and the frontend automatically updates with the new values.
Imagine that you have a page in your Laravel app with tabs. You could have a variable that holds the name of the current tab. In your frontend Blade files, you could do an @if() condition to show the correct markup. Changing the variable for example on click, the markup would automatically change without reloading the page!🤯
The Livewire website has a great example on their homepage that shows the power of Livewire, so let’s start with that.
use Livewire\Component;

class SearchUsers extends Component
{
    public $search = '';

    public function render()
    {
        return view('livewire.search-users', [
            'users' => User::where('username', $this->search)->get(),
        ]);
    }
}
<div>
<input wire:model="search" type="text" placeholder="Search users..."/>
<ul>
@foreach($users as $user)
<li></li>
@endforeach
</ul>
</div>So, what do we see here? We see that we have a variable in our Livewire component, called $search. Every variable (or property or attribute) that you declare as public on the Livewire class, is available to the frontend and it updates realtime.
The frontend has an <input> element where people enter their search query. The value of this input element is ‘connected’ to the value of the public $search property. And the $users variable that is passed to the frontend, depends on the public $search. So if the value of public $search changes, the value of $users changes and the frontend also updates – without a page reload. Magic, right?
Make sure your template file has one <div> root element
A thing that’s good to know is that your Blade template file may only contain a single <div> als root element. This means that all your own code is always inside a single <div>. I’m saying it here, before you find yourself debugging this issue.
PS: you are not restricted to a
<div>element, but a div is the most common one. As long as it’s only one root element.
How to display a Livewire component
Now that you’ve got an idea of how a Livewire component looks like, you might be wondering how to display it on a page. There are multiple ways to display a component, so you can choose one of the following ways to include a Livewire component in a Blade file:
<livewire:search-users />

@livewire('search-users')

@livewire(App\Http\Livewire\SearchUsers::class)
You can also add data to each Livewire component:
@livewire('search-users', [ 'company' => $company ])// Add the following public property to your SearchUsers component. Livewire will map the $company automatically to the correct property.
public Company $company;
// If you want more control over how the properties are stored, you can also accept them in the mount() method:
public Company $myCompany;
public function mount(Company $company) {
$this->myCompany = $company;
}You can also use Livewire as a full-page component. That means that this would work:
use App\Http\Livewire\SearchUsers;

Route::get('/{organization}/users/search', SearchUsers::class);
public function render()
{
return view('livewire.search-users', [
'users' => User::where('username', $this->search)->get(),
])->extends('layouts.app');
}Checkout the Livewire docs for more information if you’re interested in using fullpage components.
Using Actions
Another very handy thing is the use of Livewire actions. Livewire actions mean you can define a public function on your component and call this action from the frontend. For example, if a user clicks on a button.
This example comes from the docs and I think that it’s a great example that shows the power of Livewire really well:
class ShowPost extends Component
{
   public Post $post;

   public function like()
   {
       $this->post->addLikeBy(auth()->user());
   }
}
<div>
<button wire:click="like">Like Post</button>
</div>As a summary, Livewire will now call the like() function every time the users click the <button>. You can add a wire:click="" directive to every element you want, so it is not limited to buttons and <a href="">s.
Using forms with Laravel Livewire
Next, I would like to talk about forms in Livewire. The way Livewire handles forms might classify as one of the most powerful Livewire features. It wouldn’t surprise me if it is one of the most commonly used features.
Let’s see how it works.
First, we have the Blade file. Just like in ‘regular’ non-Livewire HTML, each form is wrapped in a <form> tag. The big difference is that a Livewire form doesn’t have the action="", type="" and method="" tags.
So how do we tell Livewire where to send the information to?
We can do so with the wire:submit.prevent attribute. Adding this attribute to the <form> looks like this: <form wire:submit.prevent="save"> . It tells Livewire: ‘when the form is submitted, prevent the normal submit action and call the save() function instead.
Let’s see this in action. We start by modifying our Blade file so that it contains a very simple form, asking for just an e-mailaddress.
<div>
    <form wire:submit.prevent="save">

        <input type="email" wire:model="email" placeholder="Email">

        <button type="submit">Submit form</button>

    </form>
</div>
Next, let’s add the function save() to the Livewire component:
public function save()
{
    $this->validate();

    $user = User::create([
        'email' => $this->email,
    ]);

    dump('User created successfully!');
}
Let’s also add a public property called $email and make sure to set a default value like an empty string, '' . If the field is optional, you can also make the variable type nullable by adding a ? before the type and assigning a default value of null.
public string $email = '';
public ?string $email = null; // Optional field
This property will always contain the value of the input field, because we bind these values together with the wire:model="email" attribute on the input.
You see that we’re using the $this->validate() method. This should always be the first method in your save() function, because it will run all the validation rules. If the validation fails, it stops the flow of the code.
So how do we define those rules?
To do so, add a protected $rules property to the Livewire component. (See the power of favouring convention over configuration?)
protected $rules [
   'email' => 'required|email'
];
Now, we are almost ready to start using our first Livewire component. We only need a place to display potential error messages.
You can use the @error directive for that. Now our Blade file should look like this:
<div>
    <form wire:submit.prevent="save">

        <input type="email" wire:model="email" placeholder="Email">
        @error('email') <span class="error"></span> @enderror

        <button type="submit">Submit form</button>

    </form>
</div>
If you want to customize the error messages or the attribute names, checkout the documentation.
Realtime form validation & Livewire lifecycle hooks
Another cool feature I want to show you, is the realtime validation feature. How is that possible?
Livewire allows you to add specific function to the component, like updatedVARIABLENAME(), updatingVARIABLENAME(). Those functions are called lifecycle hooks. You can add them for each variable, and each time that variable is updated, this function will run.
So if we want to validate the $email input every it changes – realtime as the user is typing – we can use a lifecycle hook for that:
public function updatedEmail($value)
{
    $this->validateOnly('email');
}
You can also use a more generic lifecycle hook, which runs on every property update. This is in particular handy if you have long forms and you don’t want ten functions all doing the same validation over and over.
public function updated($propertyName)
{
    $this->validateOnly($propertyName);
}
Next steps
As you’ve seen, Livewire allows PHP-developers to implement pretty amazing interactivity in their Laravel-apps, without developers needing to write a single line of JavaScript.
For developers like me, who have much more feeling with PHP then with JavaScript, Livewire saves so much time.
Now that you know the basics of Livewire, I’d recommend to start using it as much as possible, in order to experience the full power of Livewire. There’s so much more I didn’t tell here, so start using it, take a dive in the documentation later and enjoy!⚡️
Laravel News Links
An Easier Way to Navigate: Company Gives Every Location on Earth a Three-Word Code
https://s3files.core77.com/blog/images/1235230_81_111998_fvwb6ugBw.jpg
Unless you drive a new Ford, Mercedes-Benz, Tesla, Land Rover or Lamborghini, you may not be aware that those automakers have embraced a new, easier and more precise way to navigate by voice. All five companies have incorporated or are incorporating what3words technology.
To explain, what3words is a company that simply "divided the world into 3 metre squares and gave each square a unique combination of three words," they write. "It’s the easiest way to find and share exact locations."


"Street addresses weren’t designed for 2022. They aren’t accurate enough to specify precise locations, such as building entrances, and don’t exist for parks and many rural areas. This makes it hard to find places and prevents people from describing exactly where help is needed in an emergency."

You say the three words representing your destination aloud, and the car punches that precise spot into the nav. You can also download what3words as an app. It’s not limited to just English, either; it’s available in 50 languages and they’re working on more.

I think it’s a brilliant idea. I’m a native New Yorker, and could ask my native friends to meet me in Manhattan on the northwest corner of 37th and 5th. But newcomers to the city would be flummoxed by such directions, which also happen to be a mouthful. To be able to boil it down to three short words and have the phone figure out the rest would be tremendously helpful.
In a rural situation, too. My wife and I now live on a 47-acre farm in the South. She’s also a native New Yorker and down here, we are the ones at a disadvantage; we struggle to describe specific locations on the property, whereas the locals fluently use ground features, tree species and natural conformations as descriptive landmarks. It would be much easier if I could tell my wife that I’m off to clear the fallen tree at Pancake Monkey Zilch.

As for how to discover the three words for a given location, you must first look it up on the map in their app the conventional way, then click on the desired square to learn the words. Then you can save the location, or remember or write the words down.


Years and years ago, I was in Manhattan and waiting for the light at the northeast corner of Lafayette and Houston. A woman had come out of the nearby subway and was clearly lost. She pulled out her cell phone and called someone. "I don’t know where I am," she said. "Can you find me? …But I don’t know where I am!"
Across the street was a gigantic billboard for the then-popular video game, Grand Theft Auto.
"I’m in front of Grand Theft Auto," the girl said into the phone.
If I was a genius, I’d have been inspired by the moment, and started what3words first. Instead, I am a blogger writing about them.
Core77
You Can Use ‘Hey Siri’ to Cast Harry Potter Spells
https://i.kinja-img.com/gawker-media/image/upload/c_fill,f_auto,fl_progressive,g_center,h_675,pg_1,q_80,w_1200/c53f59140c2e2c5377f3cd95481c9ac5.jpg
There’s no substitute for a letter from Hogwarts, but in lieu of actual magic, Harry Potter fans can pretend to be witches and wizards wielding their iPhones as wands. Apple’s Siri has three spells built in and a handful more that you can set up using Shortcuts.
First, make sure “Hey Siri” is enabled on your phone. Go to Settings > Siri & Search and toggle “Listen for ‘Hey Siri’” on. Turn on “Allow Siri When Locked” to use spell commands from your lock screen.
(“Accio” activates with a regular side-button press, but “Lumos” and “Nox” do not, so you have to have “Hey Siri” turned on. Spells set up using Shortcuts should work either way.)
How to use built-in Hey Siri spells on your iPhone
There are three Harry Potter spells you can start casting via Hey Siri right away, and they’re actually somewhat useful:
- “Lumos”: This spell turns on your iPhone flashlight.
- “Nox”: Pronounced “knocks,” this spell turns off your iPhone flashlight.
- “Accio”: This spell opens apps on your iPhone. Say “Accio [app name]” to launch your desired app—you’ll have to use Face ID or enter your passcode if you start from the lock screen.
Google Assistant also has “Lumos” and “Nox” built in, so you can turn your Android flashlight or Nest-connected smart bulbs in your home off and on via spell as well.
How to set up custom Hey Siri spells using Shortcuts
While Siri automatically recognizes the three default spells, you have a whole host of options for pairing other charms to certain actions with your phone using the Shortcuts function. Gadget Hacks has a handy guide, including the following:
- “Lumos Maxima”: turning your flashlight or smart lights to maximum brightness
- “Silencio”: turning on Do Not Disturb
- “Muffliato”: turning down your iPhone volume while turning up Background Sounds
- “Sonorus”: turning up maximum volume
- “Quietus”: turning down your volume
To set up these up, open your Shortcuts app and tap the “plus” symbol in the upper-right corner. Tap Add Action and search for the function you want—for example, typing “flashlight” into the search bar pulls up the option to Set Flashlight, and then you can select specific action and the brightness. Type the command you want Siri to listen for in the top toolbar.
Note that you could also do this with your smart speaker, using custom commands to open apps or control your smart home devices.
Lifehacker
3 Advanced Data Structures Every Programmer Should Know
https://static1.makeuseofimages.com/wordpress/wp-content/uploads/2022/01/pexels-negative-space-160107-_1_.jpeg
You’ll find that using data structures is a pretty common occurrence as a programmer, so being proficient with basic data structures like binary trees, stacks, and queues is vital to your success.
But if you want to improve your skills and stand out from the crowd, you’re going to want to get familiar with advanced data structures as well.
Advanced data structures are an essential component of data science, and they help clear up inefficient management and provide storage for large sets of data. Software engineers and data scientists constantly make use of advanced data structures to design algorithms and software.
Read on as we discuss the advanced data structures every developer should know about.
1. Fibonacci Heap
If you’ve put some time into learning data structures already, you must be familiar with binary heaps. Fibonacci heaps are pretty similar, and it follows the min-heap or max-heap properties. You can think of a Fibonacci heap as a collection of trees where the minimum or maximum value node is always at the root.
The heap also fulfills the Fibonacci property such that a node n will have at least F(n+2) nodes. Within a Fibonacci heap, the roots of each node are linked together, usually through a circular doubly linked list. This makes it possible to delete a node and concatenate two lists in just O(1) time.
MAKEUSEOF VIDEO OF THE DAY
Related: A Beginner’s Guide to Understanding Queues and Priority Queues
Fibonacci heaps are much more flexible than binary and binomial heaps, making them useful in a wide range of applications. They’re commonly used as priority queues in Dijkstra’s algorithm to improve the algorithm’s running time significantly.
2. AVL Tree
AVL (Adelson-Velsky and Landis) trees are self-balancing binary search trees. Standard Binary Search Trees can get skewed and have a worst-case time complexity of O(n), making them inefficient for real-world applications. Self-balancing trees automatically change their structure when the balancing property is violated.
In an AVL tree, each node contains an extra attribute that contains its balancing factor. The balance factor is the value obtained by subtracting the height of the left subtree from the right subtree at that node. The self-balancing property of the AVL tree requires the balance factor always to be -1, 0, or 1.
If the self-balancing property (balance factor) is violated, the AVL tree rotates its nodes to preserve the balance factor. An AVL tree uses four main rotations—right rotate, left rotate, left-right rotate, and right-left rotate.
The self-balancing property of an AVL tree improves its worst-case time complexity to just O(logn), which is significantly more efficient compared to the performance of a Binary Search Tree.
3.Red-Black Tree
A Red-Black tree is another self-balancing binary search tree that uses an extra bit as its self-balancing property. The bit is usually referred to as red or black, hence the name Red-Black tree.
Each node in a Red-Black is either red or black, but the root node must always be black. There cannot be two adjacent red nodes, and all leaf nodes must be black. These rules are used to preserve the self-balancing property of the tree.
Related: Algorithms Every Programmer Should Know
In contrast to Binary Search trees, Red-Black trees have approximately O(logn) efficiency, making them far more efficient. However, AVL trees are much more balanced due to a definitive self-balancing property.
Improve Your Data Structures
Knowing advanced data structures can make a big difference in job interviews and could be the factor that separates you from the competition. Other advanced data structures that you should look into include n-Trees, Graphs, and Disjoint Sets.
Identifying an ideal data structure for a given scenario is part of what makes a good programmer great.
6 Data Structures Every Programmer Should Know
Data structures are a staple in software engineering. Here are some important data structures every programmer should know.
Read Next
About The Author
M. Fahad Khawaja
(93 Articles Published)
Fahad is a writer at MakeUseOf and is currently majoring in Computer Science. As an avid tech-writer he makes sure he stays updated with the latest technology. He finds himself particularly interested in football and technology.
MUO – Feed
8 Data Engineer and Data Architect Certifications to Upgrade Your Skills
https://static1.makeuseofimages.com/wordpress/wp-content/uploads/2022/01/Data-engineer-courses.jpg
Technology is evolving at a rapid pace, and programming has become a part of every IT professional’s repertoire. In order to stay abreast of these changes, it’s essential for analysts to upgrade their skill sets. From data engineering courses to cloud-specific specializations, there’s a certification for everyone out there.
If you’re looking to upgrade your skills, check out these data engineer and data architect certifications, each of which is tailor-made for regular industry professionals.
Amazon Web Services (AWS) Certified Data Analytics – Specialty
Amazon Web Services is an umbrella term that blankets numerous cross-disciplinary tools, workflows, services, and technologies. They serve everything from server virtualization technology to data center management and SDLC frameworks, analytics toolchains, and more.
The AWS Certified Data Analytics course is a specialized certification offering accreditation, which has become a basic essential for every data analyst.
Related: Get Your AWS DevOps Engineer Certification Easily
Certification in AWS data engineering and analytics can help your career trajectory move towards more advanced roles with hands-on AWS data life-cycle and analytics. The certificate is ideal for anyone with two or more years of practical AWS exposure.
Registration link: AWS Certified Data Analytics ($300)
2. Cloudera Data Platform Generalist Certification
Cloudera seeks to accredit data engineers who are already familiar with its cloud data platform. You can opt for the CDP generalist certification, primarily if you’re a CDP platform specialist and have a basic working knowledge of its tools and utilities.
MAKEUSEOF VIDEO OF THE DAY
Aspirants can undertake this training course to understand the standardized CDP Generalist syllabus. The course lays the foundation for advanced data governance and management roles.
If you have more than two to three years of prior experience within the data engineering field, rest assured your experience in the CDP toolchain will add beneficial skills to your repertoire.
The certification test covers 60 questions, each of which needs to be answered within 90 minutes.
Registration link: Cloudera ($300)
3. Data Science Council of America (DASCA) Associate Big Data Engineer
The DASCA Associate Big Data Engineer offers a role-defined certification program for people looking to build a career in Big Data analytics, architecture, orchestration, and governance.
DASCA recommends having a degree in IT, CSE, or a diploma in computer programming. While these are not mandatory requirements, they’re good-to-have prerequisites.
This certificate is ideal if you have a working knowledge of Core Java and a grasp on SQL queries for data manipulation.
The ABDE certificate is best for data professionals who can leverage the listed prerequisites to maintain multi-cloud ecosystems.
Registration Link: DASCA Associate Big Data Engineer ($585)
4. Data Science Council of America (DASCA) Senior Big Data Engineer
The Senior Big Data Engineer certificate from DASCA is the next logical step for data specialists after the ABDE certificate.
This secondary certification is made for experts working in data operation roles, such as monitoring, management, connectivity, security, governance, etc. Some prerequisites of the role include hands-on experience in core Java, SQL, PERL, Ruby, Linux, and Unix environments.
The course can significantly benefit engineers with a minimum experience of four-five years in the field. The registration will run you a few hundred dollars and includes a course material kit and credentials.
Registration Link: DASCA Senior Big Data Engineer ($620)
5. Google Professional Data Engineer
As an enterprise data personnel, you are responsible for collecting, transforming, and publishing data. The Google Professional Data Engineer certification validates your data engineering skills with the Google brand name attached, offering you an excellent opportunity to enhance your skills.
The course also offers you a chance to hone your skills in Google’s data platform toolchain and workflows.
As a part of the course certification, you will design data processing systems, drive solution QAs, and develop ML-powered data processing models. Additionally, you’ll also master the orchestration of Google’s data platform tools for driving better security, compliance, and end-to-end governance standards.
Such is the reliability and fidelity large-scale enterprises demand in their data operations. This certification will help you prepare for those roles to implement a combination of robust Google cloud data science and engineering concepts.
Registration Link: Google Professional Data Engineer ($200)
6. IBM Certified Solution Architect – Cloud Pak for Data v4.x
IBM has been another prominent bastion in IT and computer sciences for decades. Their Certified Solution Architect paves the way for aspiring Big Data analysts and experts to solidify their hybrid cloud data ecosystems knowledge.
Related: Tech Giants Are Offering Free IT Upskilling Courses Online
This certification goes a long way in helping you prove your mettle in the domain of Machine Learning Ops for Big Data analytics, governance, and associated sciences.
It’s comprised of 63 questions, out of which you need to answer 42 questions correctly in 90 minutes to achieve a minimum passing grade.
Registration Link: IBM Certified Solution Architect – Cloud Pak for Data v4.x ($200)
7. IBM Certified Solution Architect – Data Warehouse V1
Individuals with prior knowledge of IBM’s cloud-based data pipeline architecture deployment will find the IBM Certified Solution Architect suitable for their needs.
The Cloud Pak for Data v4.x is a stipulated secondary certification for data engineers and architects intent on an IBM-certified curriculum vitae (CV).
As a prerequisite, you should have relevant on-the-job experience before enrolling for IBM’s Big Data specialist certifications.
To ace this test, you’ll need to have a working knowledge of data governance, processing models, storage and virtualization, Business Intelligence tooling, SQL query syntax, data sciences, AI, and multidimensional modeling.
Registration Link: IBM Certified Solution Architect – Data Warehouse V1 ($200)
8. SAS Certified Big Data Professional
The SAS Big Data platform is responsible for some of the most versatile and battle-tested analytics tooling in the modern data engineer’s arsenal.
The Certified Big Data Professional certification consolidates your knowledge of Machine Learning and Artificial Intelligence, Internet of Things (IoT), marketing analytics, and other assorted SAS products and solutions.
Respondents must have practical knowledge of the program and be able to manipulate data on an ad-hoc basis using SAS, Hadoop, and Dive. It helps assuage modern enterprise data challenges in data management, fraud and security intelligence, risk management, etc.
This certification also proves to any future employers that you can derive critical insights from custom visualizations and implement data quality and analytical reporting improvements.
There are two exams that you can opt for in this regard:
- SAS Big Data Preparation, Statistics, and Visual Exploration Exam
- The SAS Big Data Programming and Loading Exam
A minimal 6-months hands-on experience in SAS platform tools is best before pursuing this certification.
Registration Link: SAS Certified Big Data Professional ($180 per exam)
Data Engineer and Data Architect Certifications for Every IT Professional
Even though data engineering certifications have become the talk of the town, there’s a lot more to look forward to within the IT field. While having tons of options to choose from may seem overwhelming, you get to pick and choose which ones you think have the best shot at helping advance your career.
If you’re a professional IT person looking to make a career in network engineering, there are a few good certifications out there for you as well.
11 Certifications Every Network Engineer Needs to Succeed
Looking to get into networking? It’s a great career with endless opportunities, and getting some certs under your belt can help when you start out.
Read Next
About The Author
Gaurav Siyal
(30 Articles Published)
Gaurav Siyal has two years of writing experience, writing for a series of digital marketing firms and software lifecycle documents.
MUO – Feed
I don’t think this meme makes the point they want it to make
https://gunfreezone.net/wp-content/uploads/2022/01/FJgyZvLX0AIDtDM.jpeg
I’ve seen this meme posted several times online:

The point is always the same. It’s not fair that the Red area is represented by eight senators and the green represented by two senators.
So the conclusion they draw is that we must abolish the Senate.
Because the Left already controls the House of Representatives, they need to attack the Senate.
I look at this and come to a different conclusion.
The population density of NYC is 27,000 per square mile. The average for the United States is 94 per square mile.
New York City is 288 times more dense as the average.
Cities like NYC are unnatural and unsustainable.
They can’t grow enough food to feed their population or have landfill space to dispose of their garbage.
Clearly before we abolish the Senate we have to abolish the megacities.
5 best examples of eCommerce dashboards to help you take control of your business
https://www.noupe.com/wp-content/uploads/2022/01/mark-konig-Tl8mDaue_II-unsplash-1-1024×576.jpg

Being an entrepreneur means you must keep a lot of things under control. You have to always know what is going on in sales, marketing, finance, inventory, and other aspects of your business.
Moreover, you probably use a myriad of tools to run them. Switching between a CRM, marketing automation software, Google Analytics, Accounting System and your eCommerce back-end won’t provide a clear picture of how your business is doing.
Wouldn’t it be great to have one screen showing the most important information about your business? eCommerce dashboards are here to give you this opportunity.
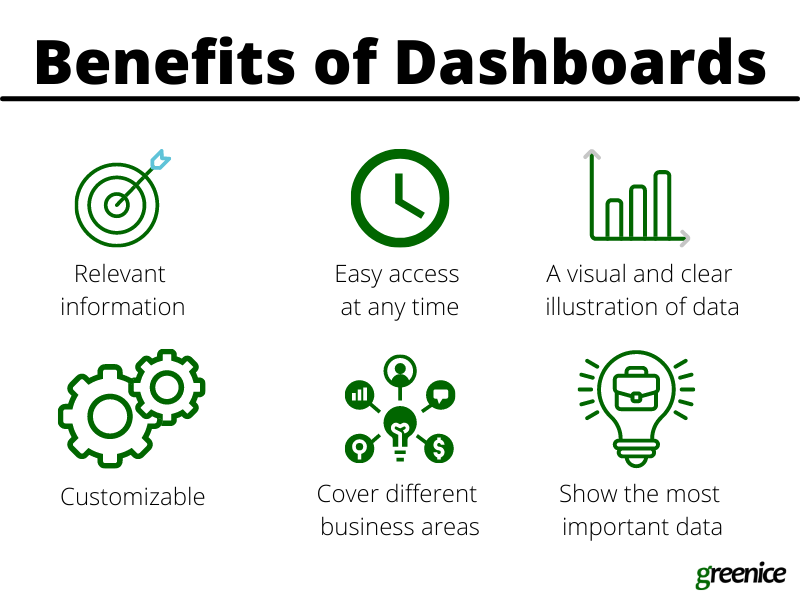
What is a dashboard and why do you need it?
eCommerce dashboard is a visual representation of up-to-date data (metrics and KPIs) important for the business. It helps to analyze the main indicators to improve the results. Dashboards are different from other analytics tools because they give insights on the most vital data. Thanks to dashboards you can check the vitals of your business any time you want and not just during your monthly reports.
This becomes possible because they accumulate real-time (or near real-time) data. With the help of a well-tuned dashboard, you can quickly spot and fix problems and see if your company is effective or not. It takes less time and effort to check a dashboard than to dig into monthly reports and collect info manually.
Dashboards provide statistics on different areas of your online store, including, but not limited to monthly sales, website traffic, and marketing campaigns. You can compare data by any period of time: days, months, or even years.
Let’s look at the most popular examples of dashboards for eCommerce.
5 eCommerce dashboards examples
We’ve prepared five examples of dashboards that will help you run your store. Keep in mind that there are no universal solutions that can fit everyone. The best solution for you depends on the complexity and scale of your business: are you going to create a marketplace or a small online store? How many product categories and markets are you going to cover? All of this will impact the types and number of KPIs you will have to track.
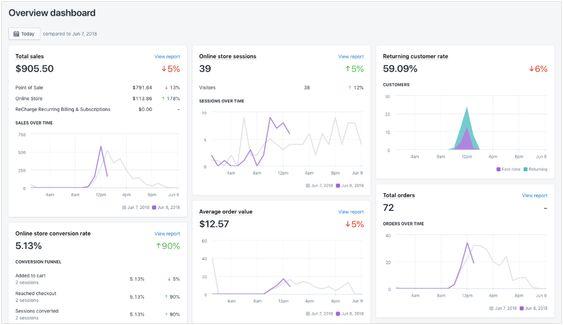
Store overview
The overview dashboard shows the performance of the store across all major areas of the business like sales, marketing, inventory, and others. This type of dashboards enables you to see the most important metrics of your business on one screen.
Goal: to get a snapshot of your store performance.
KPI examples:
- Total sales
- Sales by product, marketing channel, geography, etc.
- Traffic
- Average order value
- Conversion rate
- Repeat customer rate
- Customer Lifetime Value
Dashboard Example:
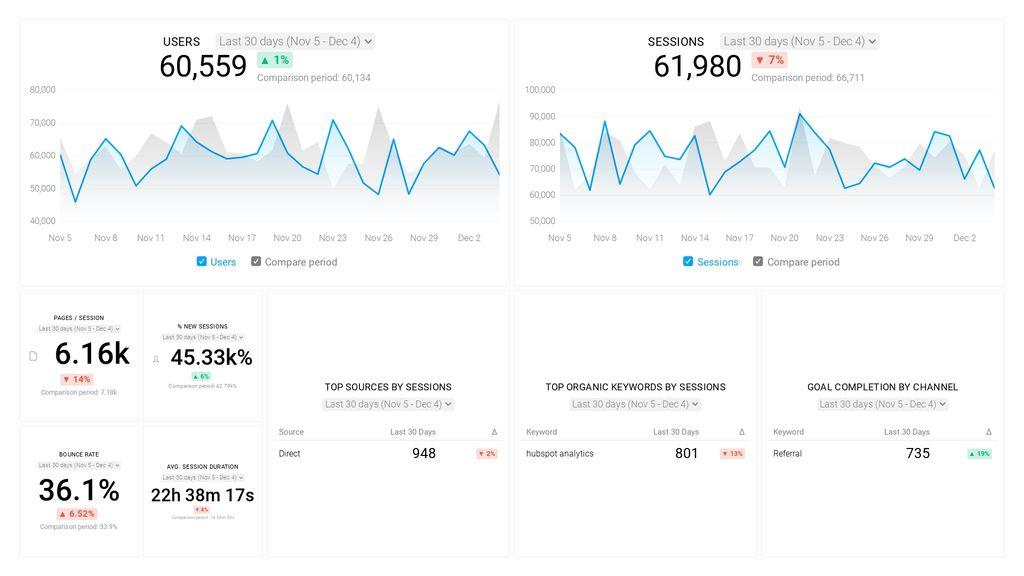
Google Analytics for eCommerce
Google Analytics is the number one tool for analyzing website traffic. It also provides a lot of information which makes it difficult to digest. That is why you need a Google Analytics eCommerce dashboard that will show only the most meaningful data for your online store.
Goal: to check your website’s most current statistics.
KPI examples:
- Unique visitors
- Average session duration
- Bounce rate
- Time on site
- Goal completions
- Traffic sources
- Top pages
- Top keywords
Dashboard Example:
Sales
eCommerce sales dashboard shows KPIs like total sales, as well as sales by product, marketing channel, location etc. This is a functional strategic tool that allows getting an instant overview of your sales to pinpoint any problem as soon as it occurs. It organizes the most precise and recent data related to commercial success.
Goal: to see current sales performance and compare it to your sales target.
KPI examples:
- Total sales
- Sales target
- Average order value
- Lead conversion rate
- Up-sell and cross-sell rates
- Profit margin per product
Dashboard Example:

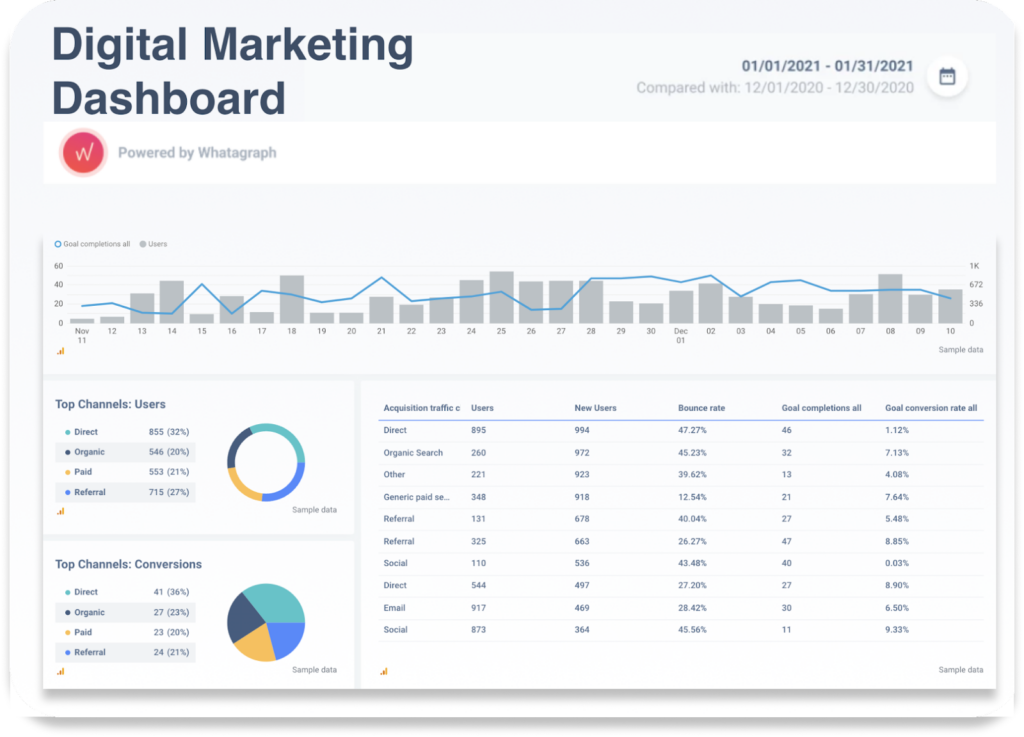
Marketing
eCommerce marketing dashboards present vital KPIs in digital marketing to track channel and campaign results in real-time. These KPIs include traffic sources, macro and micro conversions, leads, ROI of marketing channels and campaigns, etc. The information is collected from such channels: Google Analytics, email marketing tools, CRM, social media, and others.
Goal: to see how effective your marketing is in real-time.
KPI examples:
- Traffic
- Leads
- Sales
- Conversion rate
- Conversions by channel
- Customer acquisition cost (total and by channel)
Dashboard Example:
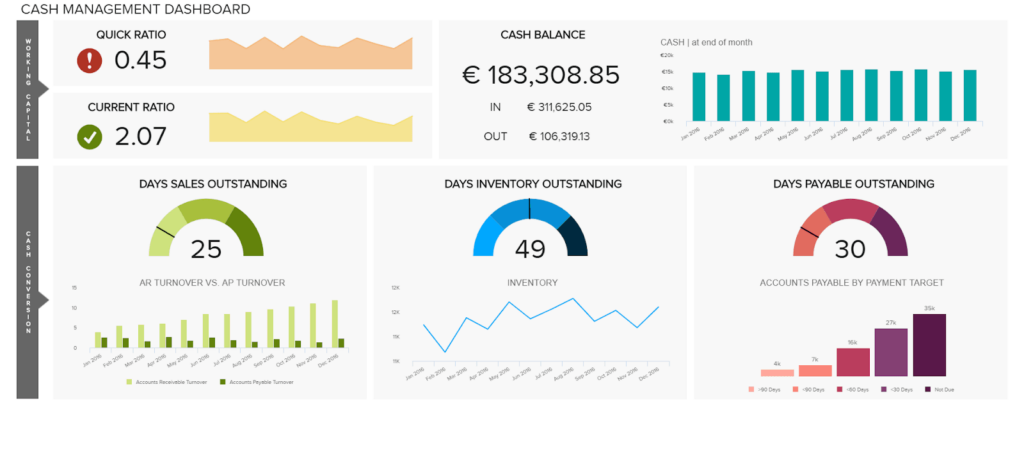
Finance
This dashboard focuses on your budget and analyzes existing assets, profit and expenses, cash flow, income, and other financial indicators. It allows you to see the current figures and financial details to get helpful insights and increase the cost-efficiency of your business.
Goal: to see the current financial state and overall profitability of the business.
KPI examples:
- Revenue
- Net profit
- Gross / Net profit margin
- Cash balance
- Working capital
- Cost of goods sold
Dashboard Example:
Wrapping up
To sum up, eCommerce metrics dashboards are useful tools that help track your business performance on a daily basis. They can either provide an overview of the entire business or may cover different areas from SEO to finances.
The fundamental advantage is that you can check your KPIs any time, not just once a month when you prepare your reports. This will help to detect and fix problems almost on the spot. Another advantage is that dashboards are visual tools that allow you to digest information easily. Additionally, they are customizable and can show the indicators which you need the most.
In this article, we shed some light on what dashboards are and why they matter. We also gave examples of dashboards that might be helpful for your eCommerce business. Give these tools a try and get a clearer picture of how your store is doing.
The post 5 best examples of eCommerce dashboards to help you take control of your business appeared first on noupe.
noupe
Intel Plans $20 Billion Factory in Ohio to Accelerate Domestic Chip Manufacturing
https://i.kinja-img.com/gawker-media/image/upload/c_fill,f_auto,fl_progressive,g_center,h_675,pg_1,q_80,w_1200/3787c630fdec3fa4696d761a591e5947.jpg
Intel will invest $20 billion in a sprawling new processor manufacturing facility outside Columbus, Ohio, according to an announcement from the tech giant early Friday. The plant, billed as the single largest private-sector investment in Ohio’s history, is expected to create 3,000 jobs, based on the company’s projections, not including at least 7,000 temporary construction jobs.
Construction on the facility is scheduled to begin in late 2022, with production coming online around 2025. Intel is billing the first two plants as just the beginning of a much larger project on the roughly 1,000 acres the company has acquired in Licking County.
Intel has also pledged $100 million in education funds for the region in an effort to create the workforce needed for the chip-making facility. The money will fund collaborative research projects with universities in the area, as well as help develop curricula specific to semiconductors for undergraduate programs.
The CEO of Intel, Pat Gelsinger, is scheduled to appear at the White House with President Joe Biden via video link to formally announce the project on Friday. The $52 billion CHIPS Act, which passed in the Senate but has stalled in the House, will likely provide funding for at least some of Intel’s long-term venture. The CHIPS Act is an attempt to spur chip-manufacturing in the U.S. to make the country less dependent on its adversary in the New Cold War, China.
“The impact of this mega-site investment will be profound,” Keyvan Esfarjani, Intel senior vice president of Manufacturing, Supply Chain and Operations, said in a statement.
G/O Media may get a commission
57% off
iMazing iOS Backup Software
Take control of your iOS backups
This software allows you to choose your backup location, export, save, and print iMessages, individual third party app data, and restore your iPhone with ease.
“A semiconductor factory is not like other factories. Building this semiconductor mega-site is akin to building a small city, which brings forth a vibrant community of supporting services and suppliers,” Esfarjani continued.
“Ohio is an ideal location for Intel’s U.S. expansion because of its access to top talent, robust existing infrastructure, and long history as a manufacturing powerhouse. The scope and pace of Intel’s expansion in Ohio, however, will depend heavily on funding from the CHIPS Act.”
Did you catch that last part? Intel will pony up for the first couple of factories, but if you really want to see a huge facility, the U.S. government will need to get the CHIPS Act done.
The company also says it expects other suppliers to pop up in the region to help support the new facility:
In addition to Intel’s presence in Ohio, the investment is expected to attract dozens of ecosystem partners and suppliers needed to provide local support for Intel’s operations – from semiconductor equipment and materials suppliers to a range of service providers. Investments made by these suppliers will not only benefit Ohio but will have a significant economic impact on the broader U.S. semiconductor ecosystem. As part of today’s announcement, Air Products, Applied Materials, LAM Research and Ultra Clean Technology have indicated plans to establish a physical presence in the region to support the buildout of the site, with more companies expected in the future.
“Today’s investment marks another significant way Intel is leading the effort to restore U.S. semiconductor manufacturing leadership,” CEO Gelsinger said in a press release.
“Intel’s actions will help build a more resilient supply chain and ensure reliable access to advanced semiconductors for years to come,” Gelsinger continued. “Intel is bringing leading capability and capacity back to the United States to strengthen the global semiconductor industry.”
“These factories will create a new epicenter for advanced chipmaking in the U.S. that will bolster Intel’s domestic lab-to-fab pipeline and strengthen Ohio’s leadership in research and high tech.”
CEO Gelsinger also plans to hold a dedicated press conference at 2:30 p.m. ET/ 11:30 a.m. PT on Friday to discuss the company’s plans for a “globally balanced” supply chain. Keyvan Esfarjani, Intel senior vice president and general manager of Manufacturing, Supply Chain and Operations will also be on the webcast, according to the company.
Gizmodo
Laracon Online Winter will be free this year!
https://laravelnews.imgix.net/images/laracon-online-winter2022.jpg?ixlib=php-3.3.1
Join us on February 9th, 2022, for this year’s Laracon Online winter edition. It will be free for everyone!
For the first time ever, we’ll be streaming Laracon for free on YouTube, allowing us to reach the entire Laravel community. This is a huge moment (and experiment) for us. Thank you to the following incredible partners for helping us achieve this!
Gold Sponsors
Silver Sponsors
Community Sponsors
If your company would like to partner for the event, we still have a few spots left.
Schedule
Here is the schedule for the day, all times are EST (GMT-4):
- 8:55 AM – Opening – Ian Landsman
- 9:00 AM – Actions are a Dev’s Best Friend – Luke Downing
- 9:40 AM – Modularising the Monolith – Ryuta Hamasaki
- 10:20 AM – Digital Nomadding in the Time of COVID – Polly Washburn
- 10:35 AM – Typing In and Out of Laravel – Craig Morris
- 10:50 AM – Everything Flex – Shruti Balasa
- 11:20 AM – Dealing with Criticism – Kristin Collins
- 12:00 PM – A Little Bit More Lambda – Aaron Francis
- 12:40 PM – Web 3.0 and Laravel – Marcel Pociot
- 1:40 PM – Laravel Update – Taylor Otwell
- 2:40 PM – How to do API integrations in Laravel – Steve McDougall
- 3:20 PM – Building Awesome Blade Components With Alpine – Caleb Porzio
- 4:30 PM – Discovering Route Discovery – Freek Van der Herten
- 4:35 PM – The Art of Programming – Erika Heidi
- 4:50 PM – Using Lando for local Development – Rory McDaniel
- 5:05 PM – The Jigsaw Challenge – Zuzana Kunckova
- 5:30 PM – Laravel for millions and some… – Ashley Hindle
- 6:00 PM – Keep Thinking Like a Hacker – Stephen Rees-Carter
Can’t watch it live? No problem, all talks will be recorded and available online for viewing at your convenience shortly after the conference ends.
Mark your calendar for February 9th, 2022, and join the conference for free live on Youtube! For complete details, check out Laracon Online and subscribe to the YouTube channel.
PS: If you want some sweet desktop images from the art we have them here:
Laravel News