https://media.notthebee.com/articles/6568ab08cfa946568ab08cfa95.jpg
Why didn’t the fathers of these stunning and brave citizens teach them how to drive a manual?
Not the Bee
Just another WordPress site
https://media.notthebee.com/articles/6568ab08cfa946568ab08cfa95.jpg
Why didn’t the fathers of these stunning and brave citizens teach them how to drive a manual?
Not the Bee
https://theawesomer.com/photos/2023/11/1980s_mcnuggets_training_video_t.jpg

There was lots to love about the 1980s, like Max Headroom, VHS tape boxes, and this McDonald’s training video, created to familiarize the crew with Chicken McNuggets and their sauces. What we got was a hilariously surreal short film with googly-eyed Big Macs and french fries welcoming their new friends to the menu. Brought to you by Tony Pepperoni.
The Awesomer
https://i.kinja-img.com/image/upload/c_fill,h_675,pg_1,q_80,w_1200/b2f6d8cbcbcb26633528968529ecc571.jpg
How best can you display the advances in technology over the years? Let’s take a PC like the landmark original 1984 Apple Macintosh—later rebranded the Macintosh 128K—and shrink it by more than half. Then, boost its processing capability and memory by a factor of thousands or even tens of thousands—AKA modern mobile gaming standards. That’s what Ayaneo is doing with its upcoming Mini PC AM01, a pint-sized homage to the all-in-one computing system that weighs a little more than a pound.
Like It or Not, Your Doctor Will Use AI | AI Unlocked
Ayaneo first shared images and a few scant details of its Mini PC earlier this month, but the company launched its funding campaign Retro Mini PC Tuesday and shared full PC specs on its Indiegogo page.
It seems the “Little Mac,” as we at Gizmodo have taken to calling it, is pretty powerful for its size. The Mini PC will come with either an AMD Ryzen 3 3200U at 3.5 GHz or a Ryzen 7 5700U at 4.3 GHz. The “U” signifies they’re the low-power versions of the CPU, but it is plenty powerful to run most web-based applications. It will also sport up to 64GB of DDR4 memory, plus an integrated Vega or RDNA2 video card. It means the Mini PC might have a good deal of function for its petite size. The 3200U version will start at a $149 baseline for those going in early on the crowdfunding campaign, while the 5700U will shoot upwards of $219. The retail price will be $199 and $259 for the less and more powerful CPUs at base.
Novelty is surely a factor, but it only weighs less than 466 grams, or a little more than 1 pound. The box itself measures 5.2 by 5.2 inches and is a little more than 2 inches deep, meaning it is plenty portable even though you’re going to be missing out on any sort of display. The Mini PC supports Wi-Fi 6 or 5, and it contains three USB 3.2 ports, a USB-C (only for data transfer), and an HDMI 2.0 and DisplayPort 1.4 to connect to other displays.
The big sticking point may be memory or, more, the lack of it. The bare system does not contain HDD or SSD, so you’ll have to pay more for 256 GB, 512 GB, or 2 TB of internal storage. It has a PCIe 3.0 slot to support a VMe or SATA SSD, plus a SATA 3.0 interface without the bracket.
The system comes pre-installed with Windows 11, and as a handheld console maker, Ayaneo is trying to share how it could be used for gaming. However, you can also install Linux, Ubuntu, and Debian and gaming-based operating systems like Steam OS. Videocardz also offered a nice rundown of the specs and compared them to the original $2,495 Macintosh released back in ‘84.
When the company first revealed the Mini PC, it displayed it next to a few small, extremely cute game cartridges, but the company confirmed with Gizmodo all that was just set dressing. In effect, the PC is much akin to the new wave of portable gaming consoles, though the starting price on a Mini PC is far, far lower than even the $399 LCD Steam Deck with 256 GB of storage, let alone the newer OLED Steam Decks. Without a screen, the Mini PC offers a different kind of portability, so long as you have controls and a monitor to hook it up to.
So no, it’s not a device meant to play physical media, and the slot on the original Macintosh is instead just a bar to house the power button. There’s also no in-built monochrome screen like the Macintosh 128K, but there is a cheeky nod on the black bar to Apple’s original Finder logo.
It’s a shame nobody outside Ayaneo has had the chance to test out the Mini PC, and we can’t advise anybody to drop money on a crowdfunding campaign when nobody has had the chance to put it through its paces. That doesn’t stop the retro throwback from looking absolutely adorable.
Ayaneo, the China-based handheld PC brand that’s been making waves since 2020, has a penchant for crafting devices that not-so-gently scratch at tech nostalgia. The company is also gearing up to release the Ayaneo Slide, a portable PC that resembles the Nokia Sidekick thanks to the slideout screen hiding a keyboard underneath.
Gizmodo
https://www.ammoland.com/wp-content/uploads/2023/11/Smith-Wesson-MP-9-500×472.jpg

Smith & Wesson Brands, Inc.(NASDAQ Global Select: SWBI), a leader in firearm manufacturing and design, today announces the release of its latest Spec Series Kit with the new Performance Center M&P9 Metal M2.0.
True to its design, this pistol not only sets a new benchmark for the Spec Series line but also places a heightened focus on performance, ensuring users encounter the pinnacle of what Smith & Wesson’s Performance Center models have to offer.

|
Smith & Wesson M&P9 M2.0 Compact 9mm |
Brownells.com |
$ 629.99 $ 499.99 |
|

|
SMITH & WESSON M&P9 M2.0 METAL COMPETITOR |
Guns.com |
$ 949.00 |
|

|
SMITH & WESSON M&P9 M2.0 9mm 5" 17rd Ported Pistol w/ Crimson Trace Red Dot – Black |
KYGUNCO |
$ 845.24 |
|

|
Smith & Wesson M&P9 M2.0 Metal 9MM Optic Ready Pistol – 4.25" |
Rainier Arms |
$ 849.95 |
|
Upgraded features integrated into this Spec Series pistol include a built-in Faxon compensator to mitigate felt recoil and muzzle rise, custom lightening cuts in the slide to reduce weight and improve reliability while being compensated, an enhanced sear for a lighter, crisp trigger let-off, suppressor height sights, and a sharp OD Green Cerakote© finish. Within its sleek new look lies a testament to durability – a robust all-metal frame that can withstand the elements while still maintaining a well-balanced feel in the hand.
“Our M&P polymer handguns have long been recognized for their reliability and ergonomic design. By combining these trusted attributes with the durability of the Metal M2.0 platform and adding modern performance upgrades, we were able to elevate the Spec Series to next level. This design is a bridge between tradition and progress, and offers a distinct edge across today’s dynamic shooting environments,” said Corey Beaudreau, Product Manager.
The PC M&P9 Metal M2.0 Spec Series ships in a custom hardcase and includes two 23-round magazines, two 17-round magazines, C.O.R.ETM plate system for mounting optics, a karambit style knife, and custom M&P Spec Series Challenge Coin. The MSRP for this kit is $999.
For more information on the Performance Center M&P9 Metal M2.0 Spec Series, visit https://www.smith-wesson.com/.
Smith & Wesson Releases New Performance Center M&P9 Metal M2.0 Spec Series by AmmoLand Shooting Sports News on Scribd
About Smith & Wesson Brands, Inc.
Smith & Wesson Brands, Inc. (NASDAQ Global Select: SWBI) is a U.S.-based leader in firearm manufacturing and design, delivering a broad portfolio of quality handgun, long gun, and suppressor products to the global consumer and professional markets under the iconic Smith & Wesson® and Gemtech® brands. The company also provides manufacturing services including forging, machining, and precision plastic injection molding services. For more information call (844) 363-5386 or visit smithwesson.com.
![]()
AmmoLand Shooting Sports News
https://theawesomer.com/photos/2023/11/star_wars_plasma_blaster_irl_t.jpg
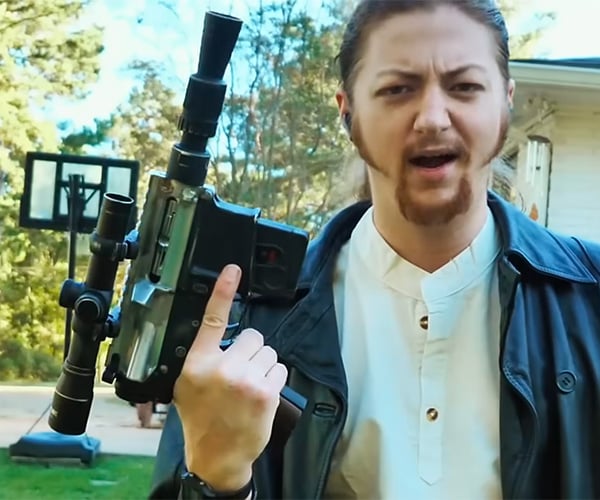
The blasters in Star Wars supposedly fire bolts of plasma energy held together with a magnetic field. This sounds like pure science fiction, but Jake Makes wanted to see if he could create the same effect with a real-world weapon. While he came up with an approach that looks pretty accurate, it’s not technically the same idea at all.
The Awesomer
https://theawesomer.com/photos/2023/11/japan_coin_factory_t.jpg

While the use of physical currency continues to dwindle, there’s still a need for coins to be produced. Process X takes us on an in-depth tour of Japan’s only coin factory for a look at how they make coins. The Osaka mint produces six kinds of coins, from aluminum 1 yen coins to the copper, nickel, and zinc 500 yen coins shown in the video.
The Awesomer
https://photos5.appleinsider.com/gallery/57420-116906-000-lead-Waddingham-promo-xl.jpgTed Lasso — or at least star Jason Sudeikis — is back in a new role as taxi driver to Hannah Waddingham, ahead of her Apple TV+ Christmas special.
 Jason Sudeikis (left) and Hannah Waddingham (right)
"Ted Lasso" was the first breakout hit for Apple TV+, and when it officially concluded after three seasons, its stars including co-creator Jason Sudeikis have both hoped and hinted at a future return for the character.
Read more…AppleInsider News
https://cdn0.thetruthaboutguns.com/wp-content/uploads/2019/08/do-something.jpg

The mid to late 20th century was the peak era of gun control in America. The violence and unrest of the 1960s kicked it all off with the the Gun Control Cct of 1968, the Firearm Owners Protection Act of 1986, the Brady Law of 1993 and finally the Clinton “assault weapons” ban of 1994.
Few states allowed concealed carry in any form, while a number of western states only allowed open carry. Even Texas, despite its gun-friendly reputation, was very restrictive from the time of Reconstruction until the 1990s. Even in states that allowed open carry, it was common to face police harassment and social shunning for daring to carry.
As you can see, things began to slowly change quickly starting in the late 1980s. A wave of “shall issue” carry laws took hold in places where carry was either banned or permits were only issued to the wealthy and/or well-connected. After most states had a process where normal people could get a permit to carry a gun, the next wave of constitutional (permitless) carry began to sweep the United States. That process is ongoing today with 27 states having some form of permitless carry more still possible (Louisiana, South Carolina).
Every time anything threatened to change for the better on the map above, the story was always exactly the same. At hearings in state legislatures, the defenders of the restrictive status quo always showed up raise the alarm and claim the policy of limiting gun rights is better and more reasonable. If the legislature changed the law to give people more freedom, the warned, there would be dire consequences. Blood would run ankle-deep in the streets, fender-bender shootouts would erupt, robberies and murders would rise, and the fabric of the social order would be frayed.
Somehow, though, that never happened. There are lying statisticians who play games with the numbers, but the objective and honest ones have been able to show a rise in crime that could be attributed to letting law-abiding citizens carry firearms.
If anything, there’s good evidence that crime falls after gun control laws are relaxed. To pro-gun people, the reasons are obvious — criminals carried guns regardless of the law, and now law-abiders are carrying, too. Law-abiding gun owners engage in very little crime as a group, but the very fact that they’re armed suppresses the activities of criminals to a certain extent.
This dynamic played out again and again, yet the gun control industry never learned their lesson. Over and over, states decided to respect the right to keep and bear arms, removing carry restrictions. and the fools continue to predict more murder and mayhem. Yet it never came to pass.
When the Supreme Court told deep-blue states that they had to start issuing carry permits without applying bureaucratic discretion, the same dynamic went into overdrive. Once again, a great wave of crime was predicted. Here’s Brady’s dire predictions issued the day the Bruen decision was handed down . . .
“The court’s actions…will assuredly result in more gun violence immediately.”
If you poke around on the internet, other anti-gun groups made the same kind of prediction. But to paraphrase Mark Twain, what the gun control industry thought they knew just wasn’t so.
Recent data from the FBI (even though it’s being run by the Biden Administration now) shows, once again, that lowering the restrictions on gun ownership and carry wasn’t the disaster it was predicted to be.
According to The Hill . . .
The FBI’s annual crime report, released Monday, found that violent crime in the U.S. last year decreased while property crime is on the rise. Overall, violent crime dropped 1.7 percent, including a 6.1 percent decrease in murder and non-negligent manslaughter.
Overall, the rate of violent crime in 2022 — 380.7 per 100,000 people — is slightly below what was recorded before the pandemic in 2019 when it was 380.8 per 100,000 people. While violent crime is on a downward trend, property crime remains on the rise, with a 7.1 percent increase in 2022.
What seems fairly obvious here is that criminals are now more afraid to victimize people directly. There’s more of a chance that their victims can and will fight back.
Instead, they’ve switching to property crimes like auto theft and burglary of unattended properties. The few violent crimes that have risen are all based on getting the drop on people, including carjackings, but other forms of violent crime are below what they were even in 2019.
While it sucks to have packages stolen from your porch or your car broken into, or even to have someone steal your car from your driveway, all of those things can be replaced. We can’t replace our lives and having the ability to deter an attack on ourselves or our families — wherever we may be — is critical. So, this is definitely the trend line I’d rather be on.
The Truth About Guns
https://gehri.dev/images/blog/pestdocs-header.png

In this tutorial we are going to build a Laravel application using the new OpenAI Assistants API.
The goal of the application is to build a tool which answers questions about the Pest Testing framework based on the current state of the Pest documentation.
One of the benefits of using the Assistants API is that you can provide data which is then used by the AI. This way we can provide the latest version of the documentation instead of only using the outdated knowledge of the base model.
To achieve our goal we are going to use the OpenAI PHP Client for Laravel developed by me and Nuno Maduro.
If you are using any other PHP framework you can use the underlying OpenAI PHP Client directly.
All the source for this tutorial is available at GitHub.
If you are not familiar with the Assistants API yet, here is a brief overview of the API and what we need to do in order to achieve our goal.
The basic structur of the Assistants API is as follows:
For more in-depth information visit the OpenAI documentation.
If you want to follow along you need to have an OpenAI account and an API key. You can create an account at https://openai.com/.
We start by creating a new application using the Laravel installer.
laravel new pest-docs-bot
Next we install the OpenAI PHP Client for Laravel.
Note: You need to install the latest (beta) version of the package.
composer require openai-php/laravel:^0.8.0-beta.2`
Before we can upload the documents to OpenAI, we have to prepare them, as the documentation consists of several files and OpenAI has a limit of 20 files per assistant.
Therefore, we will merge all doc files into a single file. Furthermore, we are going to exclude some files as they do not contain any useful information for our goal.
First we create a new command.
php artisan make:command PrepareDocs
We are fetching a list of all the files in the PestDoc repository using the GitHub REST API.
Then we are looping through all the files and filter out files which do not have a download url or the ones we want to exclude.
Finally, we retrieve the contents of the individual files and merge them into a single file. Then we save the file locally.
<?php

namespace App\Console\Commands;

use Illuminate\Console\Command;
use Illuminate\Support\Facades\Http;
use Illuminate\Support\Facades\Storage;

class PrepareDocs extends Command
{
    private static array $FILES_TO_IGNORE = [
        'LICENSE.md',
        'README.md',
        'announcing-pest2.md',
        'documentation.md',
        'pest-spicy-summer-release.md',
        'video-resources.md',
        'why-pest.md',
    ];

    protected $signature = 'app:prepare-docs';

    protected $description = 'Create one file containing the full Pest documentation';

    public function handle()
    {
        $files = Http::get('https://api.github.com/repos/pestphp/docs/contents')->collect();

        $fullDocs = $files->filter(fn (array $file) => $file['download_url'] !== null)
            ->filter(fn (array $file) => ! in_array($file['name'], self::$FILES_TO_IGNORE))
            ->map(fn (array $file) => Http::get($file['download_url'])->body())
            ->implode(PHP_EOL.PHP_EOL);

        Storage::disk('local')->put('full-pest-docs.md', $fullDocs);
    }
}
Now we are ready to upload the docs to OpenAI. We are going to use the upload() method of the Files resource in a new UploadDocs command.
The file to upload has to be a resource stream. Therefore, we are using the readStream() method of the Storage facade.
As purpose we are using assistants as we want to use the file for an assistant.
As a result we get a File object which contains the id of the uploaded file. We are going to use this id later on when we create the assistant.
I would suggest to store this id somewhere in your application, for example in a AssistantFile model to keep track of your uploaded files.
For simplicity we are here just going to output the id to the console.
<?php

namespace App\Console\Commands;

use Illuminate\Console\Command;
use Illuminate\Support\Facades\Storage;
use OpenAI\Laravel\Facades\OpenAI;

class UploadDocs extends Command
{
    protected $signature = 'upload-docs';

    protected $description = 'Uploads the docs to OpenAI';

    public function handle()
    {
        $uploadedFile = OpenAI::files()->upload([
            'file' => Storage::disk('local')->readStream('full-pest-docs.md'),
            'purpose' => 'assistants',
        ]);

        $this->info('File ID: '.$uploadedFile->id);
    }
}
Then we run the command:

Now we need to create the assistant. We are going to use the create() method of the Assistants resource in a new CreateAssistant command.
We are giving the assistant a name, pass the id of the uploaded file from before and add the retrieval tool.
The Knowledge Retrieval tool is used to extract information from the uploaded file. For more information about the tool visit the OpenAI documentation.
Next we instruct the AI to use the uploaded file to answer questions. And set the model to gpt-4-1106-preview.
Note: The regular gpt-4 model does not work with the retrieval tool.
Finally, we output the id of the created assistant to use it later.
namespace App\Console\Commands;

use Illuminate\Console\Command;
use OpenAI\Laravel\Facades\OpenAI;

class CreateAssistant extends Command
{
    protected $signature = 'create-assistant {file_id}';

    protected $description = 'Creates the PestDocs assistant.';

    public function handle()
    {
        $assistant = OpenAI::assistants()->create([
            'name' => 'Pest Chat Bot',
            'file_ids' => [
                $this->argument('file_id'),
            ],
            'tools' => [
                [
                    'type' => 'retrieval',
                ],
            ],
            'instructions' => 'Your are a helpful bot supporting developers using the Pest Testing Framework.
                               You can answer questions about the framework, and help them find the right documentation.
                               Use the uploaded files to answer questions.',
            'model' => 'gpt-4-1106-preview',
        ]);

        $this->info('Assistant ID: '.$assistant->id);
    }
}
Then we run the command:

Now we are ready to create the interface. We are going to use the Livewire package to create a simple interface.
First we install livewire.
composer require livewire/livewire
Then we create a new Livewire component and a layout file.
php artisan make:livewire DocBot

php artisan livewire:layout
In our routes file routes/web.php we are registering the home route to the DocBot component.
Route::get('/', \App\Livewire\DocBot::class);
To style the component we are using Tailwind CSS with the Forms and Typography plugins.
All installation instructions can be found in the docs.
We are going to create a simple interface where the user can enter a question and the AI will answer it.
Because this tutorial isn’t about Livewire, here a brief list of the relevant parts:
wire:model directive to bind the input field to the $question property.wire:submit.prevent directive to call the ask() method on form submit.wire:loading directive to show a spinner while the AI is working.spatie/laravel-markdown library.This is what the blade part of the component does look like. All the classes have been removed to keep it simple. You can find the full code at GitHub.
<div>
    <div>
        <h3>PEST Documentation Assistant</h3>
        <div>
            <p>Enter you question, and I will try to find an answer in the current Pest documentation.</p>
        </div>
        <form wire:submit.prevent="ask">
            <div>
                <label for="question">Question</label>
                <input type="text"
                       name="question"
                       wire:model="question"
                       placeholder="How to run a single test?"
                >
            </div>
            <button type="submit">
                <span wire:loading.class="invisible">Ask</span>
                <x-spinner class="absolute invisible" wire:loading.class.remove="invisible" />
            </button>
        </form>
        @if($answer)
            <h3 class="mt-8 mb-1 text-base font-semibold leading-6 text-gray-900">My answer</h3>
            <div class="mb-2 prose">
                <x-markdown>{!! $answer !!}</x-markdown>
            </div>
        @endif
    </div>
</div>
This gives us the following interface:

In the class part of the Livewire component we have two properties to store the user question and the AI answer and one more to store the error if necessary.
The ask() function is executed when the user submits the form. For now, it is empty. We are going to fill it in the next step.
<?php

namespace App\Livewire;

use Livewire\Component;
use OpenAI\Laravel\Facades\OpenAI;
use OpenAI\Responses\Threads\Runs\ThreadRunResponse;

class DocBot extends Component
{
    public string $question = '';
    public ?string $answer = null;
    public ?string $erro = null;

    public function ask()
    {
        // ...
    }

    public function render()
    {
        return view('livewire.doc-bot');
    }
}
When the user submits a question the ask() function does two things.
First it creates a new Thread and runs it, and then it loads the answer from the given run.
public function ask()
{
    $threadRun = $this->createAndRunThread();

    $this->loadAnswer($threadRun);
}
Let’s start with the createAndRunThread() function. We are going to use the createAndRun() method of the Threads resource.
This endpoint allows us to create a new thread and run it in a single request. As an alternative we could also create a thread first and then run it in a next step. This is handy you want to prepare the thread synchronously but execute the run asynchronously.
We are passing the id of the assistant we created before and the question the user entered as the only message in the thread.
 private function createAndRunThread(): ThreadRunResponse
{
    return OpenAI::threads()->createAndRun([
        'assistant_id' => 'asst_6VzQhp0uC0ZouIRJlxhfxI0a',
        'thread' => [
            'messages' => [
                [
                    'role' => 'user',
                    'content' => $this->question,
                ],
            ],
        ],
    ]);
}
As a result we get a ThreadRunResponse object which contains the ids of the thread and the run. Besides that it has other properties like the status of the run.
At this point the status is always queued as the AI has not processed the thread yet.
Currently, there is no way yet to get the answer directly. Additionally, it is not possible to stream the request unlike the Chat API.
The only thing we can do is to periodically check the status of the run and wait until it is done.
OpenAI already announced that they are working on a streaming and notification options. So, this will change in the future.
Now we are going to implement the loadAnswer() function. We are going to use the retrieve() method of the ThreadsRuns resource to get the updated status of the run.
In a while loop we are fetching the run until the status is not queued or in_progress anymore.
Then we check if the run has terminated successfully. If not, we set the error message, which by the way is not handled in the GUI for simplicity.
When the run has completed successfully we are going to fetch the messages of the thread. The AI has added the result of the run as a new message.
Because new messages are added at the beginning of the list, we can access the answer at index 0.
Each message contains an array of content objects. These are either text or image objects. In our case there is always only one text object.
This text object has a text property which has a property value containing the actual answer we are interested in.
So, we are going to store this value in the $answer property of the component.
private function loadAnswer(ThreadRunResponse $threadRun)
{
    while(in_array($threadRun->status, ['queued', 'in_progress'])) {
        $threadRun = OpenAI::threads()->runs()->retrieve(
            threadId: $threadRun->threadId,
            runId: $threadRun->id,
        );
    }

    if ($threadRun->status !== 'completed') {
        $this->error = 'Request failed, please try again';
    }

    $messageList = OpenAI::threads()->messages()->list(
        threadId: $threadRun->threadId,
    );

    $this->answer = $messageList->data[0]->content[0]->text->value;
}
That’s all we have to do. Now we can ask the AI questions about the Pest documentation and see the result.

Regular ChatGTP models are currently not able to answer this question correctly because throwsUnless has been added to Pest after the models have been trained.
In this tutorial we have seen how to use the new OpenAI Assistants API in a Laravel application.
We have seen how to upload files, create an assistant, create a thread and run it, and how to get the result.
Of course there is a lot more you can do with the Assistants API. For example, you can use the AI to analyse your data and draw a graph or extend the capabilities of the AI by giving it access to your software through tools.
If you want to learn more about the Assistants API visit the OpenAI documentation.
Additionally, we did not cover topics like error handling or testing. You can learn more about this in the PHP Client documentation.
I would love to hear your feedback. You can reach me on X / Twitter or by using the contact form.
If you like this tutorial I wouldn’t mind if you share it with your friends and colleagues. Thank you!
Laravel News Links
https://theawesomer.com/photos/2023/11/airplane_tiny_house_t.jpg

Unless you score Business Class seats, it’s pretty hard to sleep on an airplane. That is, unless it’s this old Douglas DC-6 that’s been converted into a home. Tiny House Giant Journey visits with homeowners and flight trainers Jon and Stephanie, who turned the airplane into a 2 BR, 1 BA Airbnb with a kitchen, a wing deck, and a flight simulator in the cockpit.
The Awesomer