https://assets.amuniversal.com/2f2280d0b1d401396577005056a9545d
Thank you for voting.
Hmm. Something went wrong. We will take a look as soon as we can.
Dilbert Daily Strip
Just another WordPress site
https://assets.amuniversal.com/2f2280d0b1d401396577005056a9545d
Thank you for voting.
Hmm. Something went wrong. We will take a look as soon as we can.
Dilbert Daily Strip
http://img.youtube.com/vi/YVs-Suu-ljE/0.jpg
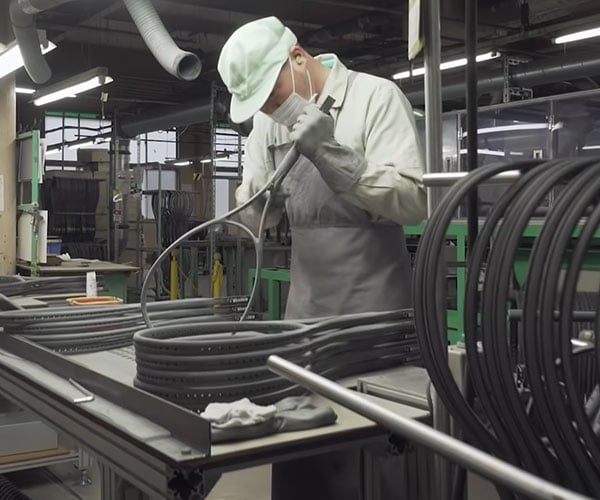
Yonex is one of the most respected brands in tennis, and their rackets are the choice of many pro players. Tennis Warehouse takes us inside the Japanese company’s warehouse for a look at their production process, which seamlessly blends a human and robotic workforce.
The Awesomer
https://i.kinja-img.com/gawker-media/image/upload/c_fill,f_auto,fl_progressive,g_center,h_675,pg_1,q_80,w_1200/3f215c88231ce9686e4b107e68becf22.jpg
My sustainable homestead is evolving—and the new addition to the ever-growing project involves using rain barrels to provide my chickens with drinking water, irrigate my garden, and keep my compost pile moist.
Luckily for me, my local municipality teamed up with our state college to offer residents classes and incentives to help grow our community’s conservation effort (you can check with your local government to see if they offer anything similar). Through the program, I was able to purchase a 55-gallon rain barrel for just $37—a deal so good I opted to purchase three barrels. The barrels were guaranteed to be food-grade, which meant I avoided the toxic residuals that might have been lurking in any old barrel. Instead, my barrel had been used exclusively to store juice, so it was actually designed to withstand both the pressure and weight of 55 gallons of liquid, which weighs roughly just under 500 pounds.
The sweet juice residuals meant I needed to clean the barrel out with a solution, though. You can use a solution of one ounce of bleach to five gallons of water or, as I did, opt for a vinegar and baking soda alternative. However you get the job done, you’ll want to make sure the barrel is fresh and clean before you start collecting water in it.
Here are a few things I’ve learned throughout the process:
The build itself is rather simple: Rain barrels have inlets into which you direct a water source—you can direct the water from your gutter system by modifying your downspout to pour directly into the inlet, for example. Add another hole toward the top of the barrel for overflow and plan to direct that water away from your foundation—or into another barrel.
Next, you’ll need to cut a hole toward the bottom of the barrel and install a spigot. From the spigot, you can use a garden hose to direct the water to wherever you want it to go. How high you place the barrel will determine how much pressure you are going to get.
G/O Media may get a commission
Lifehacker
https://www.thefirearmblog.com/blog/wp-content/uploads/2021/06/hr1-180×180.jpg
 TFB recently reporting on the announcement of a safety recall for certain lots of Winchester and Browning 9mm ammunition. The 115-grain rounds in question, manufactured for these brands in East Alton, Illinois by the Olin Corporation, are subject to a factory defect causing the powder to burn improperly. This can cause what is known as […]
The post Another Recall: Herter’s 9mm Lots Added to List of Defective Ammo appeared first on The Firearm Blog.
The Firearm Blog
https://s3files.core77.com/blog/images/1197497_81_109313_WaOdEJNif.jpg
After years of living in NYC, Jean and Joe moved to Minneapolis, where they could afford to build a house. But one thing that wasn’t in their budget was the freestanding garage required by local housing ordinances. They took bids from contractors, and the price for building a garage from scratch came in at $30,000. Their story was captured by Fair Companies in the video below.
To summarize the garage story: After doing some research, Jean found a company in Canada that manufacturers Quonset huts to custom sizes. While she doesn’t mention the company by name, I looked at several fitting that description and believe they went with Mississauga-based Metal Pro Buildings.


MPB cranks out prefabricated sheet metal arches to whatever dimensions you need. They’re shipped to you in pieces, and all you need to do is bolt each arch together, stand them up, bolt them to each other, then bolt the end pieces on.


By going with the prefabricated Quonset hut approach and DIY assembly, Jean and Joe paid just $6,000, versus the $30,000 cost of a stick-built garage. (One thing they don’t mention in the video is the cost of the concrete slab, which they apparently did have in their budget.)


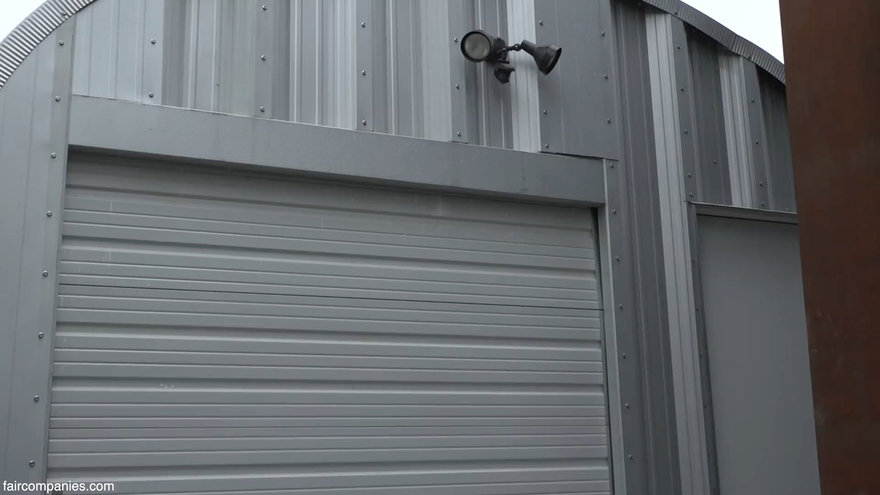
While the "shotgun"-style layout dictated by their plot seems inconvenient, I’m amazed that you can get a two-car garage for six grand. If you’re seeking a similarly cheap outbuilding, you can check out MPD’s different Quonset models (it looks like Jean and Joe went with the S-Series, but there are five styles total) here.

Core77
https://ashallendesign.ams3.digitaloceanspaces.com/public/blog/23/using-the-strategy-pattern-in-laravel.png
In software and web development, it’s always important to write code that is maintainable and extendable. The solution that you first create will likely change over time. So, you need to make sure you write your code in a way that doesn’t require a whole rewrite or refactor in the future.
The strategy pattern can be used to improve the extendability of your code and also improve the maintainability over time.
This post is written for Laravel developers who have an understanding of how interfaces work and how to use them to decouple your code. If you’re a little unsure about this subject, check out my post from last week that discusses using interfaces to write better PHP code.
It’s also strongly advised that you have an understanding of dependency injection and how the Laravel service container works.
Refactoring Guru defines the strategy pattern as a “behavioral design pattern that lets you define a family of algorithms, put each of them into a separate class, and make their objects interchangeable.”. This might sound a bit scary at first, but I promise that it’s not as bad as you think. If you want to read more into design patterns, I’d highly recommend checking out Refactoring Guru. They do a great job of explaining the strategy pattern in depth as well as other structural patterns.
The strategy pattern is basically a pattern that helps us to decouple our code and make it super extendable. In fact, you probably use it every day with Laravel without even noticing whenever you use the Storage and Cache facades (and a few other places too). Let’s say that you use this code:
Cache::put('name', 'Ash Allen', 600);
The code above is resolving a class from the service container by using the facade. I won’t get into how facades work as it’s not really the purpose of this article, but the important bit to know is that the Cache facade here is binding an interface (Illuminate\Contracts\Cache\Factory to be specific) to a class and using it. It is then storing the word ‘Ash Allen’ under the key ‘name’ for 10 minutes.
As you’ll have probably noticed in the Laravel documentation and in your project’s config, Laravel supports a few different drivers for caching, including: Redis, DynamoDB, Memcached and the database. So, for example, if we were to set our cache driver in our .env file to CACHE_DRIVER=redis, when we run our code snippet above, the data would be stored in our Redis cache. However, if we were to change the driver to be CACHE_DRIVER=database, this would result in data being stored in the database instead.
Each different cache driver has it’s own respective class that deals with how the framework interacts with the cache. So, when we change the driver in our .env, Laravel needs to know which driver to use. This is where the strategy pattern steps in. Under the hood, whenever we use the Cache facade, Laravel is actually resolving an Illuminate\Contracts\Cache\Factory interface from the service container. It does this by checking the config value (e.g. redis, database, etc.) and then mapping that interface to a class. For example, whenever we have our cache driver set to CACHE_DRIVER=redis and we try to resolve the Factory interface, we will get a class that specifically interacts with the Redis cache and nothing else.
As you can see, the strategy pattern can improve the extendability of your code. For example, if we wanted to create our own custom cache driver, we could just create the implementation and then let Laravel know that it is available for using. For a bit more context, check out the Laravel documentation to see an example of how you can add your own driver.
Now that we have a basic idea of what the strategy pattern is, let’s look at how we can use it ourselves in our own Laravel application.
Let’s imagine that we have a Laravel application that users can use for getting exchange rates and currency conversions. Now, let’s say that our app uses an external API (exchangeratesapi.io) for getting the latest currency conversions.
We could create this class for interacting with the API:
class ExchangeRatesApiIO
{
    public function getRate(string $from, string $to): float
    {
        // Make a call to the exchangeratesapi.io API here and fetch the exchange rate.

        return $rate;
    }
}
Now, let’s use this class in a controller method so that we can return the exchange rate for a given currency. We’re going to use dependency injection to resolve the class from the container:
class RateController extends Controller
{
    public function __invoke(ExchangeRatesApiIO $exchangeRatesApiIO): JsonResponse
    {
        $rate = $exchangeRatesApiIO->getRate(
            request()->from,
            request()->to,
        );

        return response()->json(['rate' => $rate]);
    }
}
This code will work as expected, but we’ve tightly coupled the ExchangeRatesApiIO class to the controller method. This means that if we decide to migrate over to using a different API, such as Fixer, in the future, we’ll need to replace everywhere in the codebase that uses the ExchangeRatesApiIO class with our new class. As you can imagine, in large projects, this can be a slow and tedious task sometimes. So, to avoid this issue, instead of trying to instantiate a class in the controller method, we can use the strategy pattern to bind and resolve an interface instead.
Let’s start by creating a new ExchangeRatesService interface:
interface ExchangeRatesService
{
    public function getRate(string $from, string $to): float;
}
We can now update our ExchangeRatesApiIO class to implement this interface:
class ExchangeRatesApiIO implements ExchangeRatesService
{
    public function getRate(string $from, string $to): float
    {
        // Make a call to the exchangeratesapi.io API here and fetch the exchange rate.

        return $rate;
    }
}
Now that we’ve done that, we can update our controller method to inject the interface rather than the class:
class RateController extends Controller
{
    public function __invoke(ExchangeRatesService $exchangeRatesService): JsonResponse
    {
        $rate = $exchangeRatesService->getRate(
            request()->from,
            request()->to,
        );

        return response()->json(['rate' => $rate]);
    }
}
Of course, we can’t instantiate an interface; we want to instantiate the ExchangeRatesApiIO class. So, we need to tell Laravel what to do whenever we try and resolve the interface from the container. We can do this by using a service provider. Some people prefer to keep things like this inside their AppServiceProvider and keep all of their bindings in one place. However, I prefer to create a separate provider for each binding that I want to create. It’s purely down to personal preference and whatever you feel fits your workflow more. For this example, we’re going to create our own service provider.
Let’s create a new service provider using the Artisan command:
php artisan make:provider ExchangeRatesServiceProvider
We’ll then need to remember to register this service provider inside the app/config.php like below:
return [

    'providers' => [
        // ...
        \App\Providers\ExchangeRatesServiceProvider::class,
        // ...
    ],

]
Now, we can add our code to the service provider to bind the interfaces and class:
class ExchangeRatesServiceProvider extends ServiceProvider
{
    public function register(): void
    {
        $this->app->bind(ExchangeRatesService::class, ExchangeRatesApiIO::class);
    }
}
Now that we’ve done all of this, when we dependency inject the ExchangeRatesService interface in our controller method, we’ll receive an ExchangeRatesApiIO class that we can use.
Now that we know how to bind an interface to a class, let’s take things a bit further. Let’s imagine that we want to be able to decide whether to use the ExchangeRatesAPI.io or the Fixer.io API whenever we’d like just by updating a config field.
We don’t have a class yet for dealing with the Fixer.io API yet, so let’s create one and make sure that it implements the ExchangeRatesService interface:
class FixerIO implements ExchangeRatesService
{
    public function getRate(string $from, string $to): float
    {
        // Make a call to the Fixer API here and fetch the exchange rate.

        return $rate;
    }
}
We’ll now create a new field in our config/services.php file:
return [

    //...

    'exchange-rates-driver' => env('EXCHANGE_RATES_DRIVER'),

];
We can now update our service provider to change which class will be returned whenever we resolve the interface from the container:
class ExchangeRatesServiceProvider extends ServiceProvider
{
    public function register(): void
    {
        $this->app->bind(ExchangeRatesService::class, function ($app) {
            if (config('services.exchange-rates-driver') === 'exchangeratesapiio') {
                return new ExchangeRatesApiIO();
            }

            if (config('services.exchange-rates-driver') === 'fixerio') {
                return new FixerIO();
            }

            throw new Exception('The exchange rates driver is invalid.');
        });
    }
}
Now if we set our exchanges rates driver in our .env to EXCHANGE_RATES_DRIVER=exchangeratesapiio and try to resolve the ExchangeRatesService from the container, we will receive an ExchangeRatesApiIO class. If we set our exchanges rates driver in our .env to EXCHANGE_RATES_DRIVER=fixerio and try to resolve the ExchangeRatesService from the container, we will receive an FixerIO class. If we set driver to anything else accidentally, an exception will be thrown to let us know that it’s incorrect.
Due to the fact that both of the classes implement the same interface, we can seamlessly change the EXCHANGE_RATES_DRIVER field in the .env file and not need to change any other code anywhere.
Is your brain fried yet? If it is, don’t worry! Personally, I found this topic pretty difficult to understand when I first learnt about it. I don’t think I started to really understand it until I put it into practice and used it myself. So, I’d advise spending a little bit of time experimenting with this yourself. Once you get comfortable with using it, I guarantee that you’ll start using it in your own projects.
Hopefully, this article has given you an overview of what the strategy pattern is and how you can use it in Laravel to improve the extendability and maintainability of your code.
If you found this post useful, I’d love to hear about it in the comments.
Keep on building awesome things! 🚀
Laravel News Links
https://photos5.appleinsider.com/gallery/42899-83392-Apex-Thunderbolt-xl.jpg
Anker has launched a new Thunderbolt 4 dock that’s equipped with 12 total ports, including a 90-watt power pass-through slot and legacy options.
The Anker Apex Thunderbolt 4 dock sports the same general design as previous products in Anker’s work-from-home lineup, but sports a broader selection of ports.
Those ports include a 90W Thunderbolt 4 port that can power any M1 MacBook model, though it isn’t compatible with M1 desktops. There are also a pair of 4K HDMI ports, three USB-C ports, four USB-A ports, a Gigabit Ethernet port, a 3.5mm audio interface, and an SD card slot.
The Apex is compatible with a range of specifications, including USB4, DisplayPort, and PCI Express. The dock will be able to handle a single 8K display at 30Hz, a 4K display at 120Hz, or various other display combinations at 4K 60Hz. It can power up to three external monitors simultaneously, though only for Windows or Mac devices equipped with Intel chips.
Anker’s Apex Thunderbolt 4 dock is available for $299.99 at Amazon. It’s slated to start shipping on July 1.
Keep up with everything Apple in the weekly AppleInsider Podcast — and get a fast news update from AppleInsider Daily. Just say, “Hey, Siri,” to your HomePod mini and ask for these podcasts, and our latest HomeKit Insider episode too.
If you want an ad-free main AppleInsider Podcast experience, you can support the AppleInsider podcast by subscribing for $5 per month through Apple’s Podcasts app, or via Patreon if you prefer any other podcast player.
AppleInsider News
https://www.futurity.org/wp/wp-content/uploads/2021/06/water-harvesting-humidity-24-hours-1600.jpg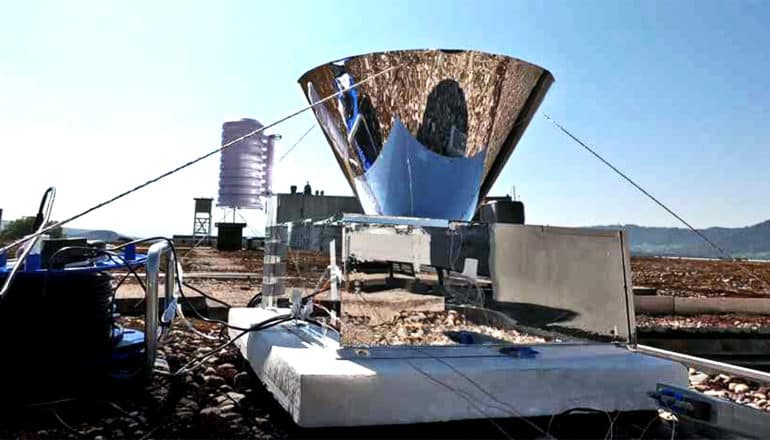
Researchers have developed a condenser for countries where water is in short supply.
Theirs is the first zero-energy solution for harvesting water from the atmosphere throughout the 24-hour daily cycle. It relies on a self-cooling surface and a special radiation shield.
Fresh water is scarce in many parts of the world and getting it comes at great expense. Communities near the ocean can desalinate sea water for this purpose, but doing so requires a large amount of energy.
Further away from the coast, often the only remaining option is to condense atmospheric humidity through cooling, either through processes that similarly require high energy input or by using “passive” technologies that exploit the temperature swing between day and night.
With current passive technologies, such as dew-collecting foils, however, water can only be extracted at night. This is because the sun heats the foils during the day, which makes condensation impossible.
The new technology, for the first time, allows researchers to harvest water 24 hours around the clock, with no energy input, even under the blazing sun.
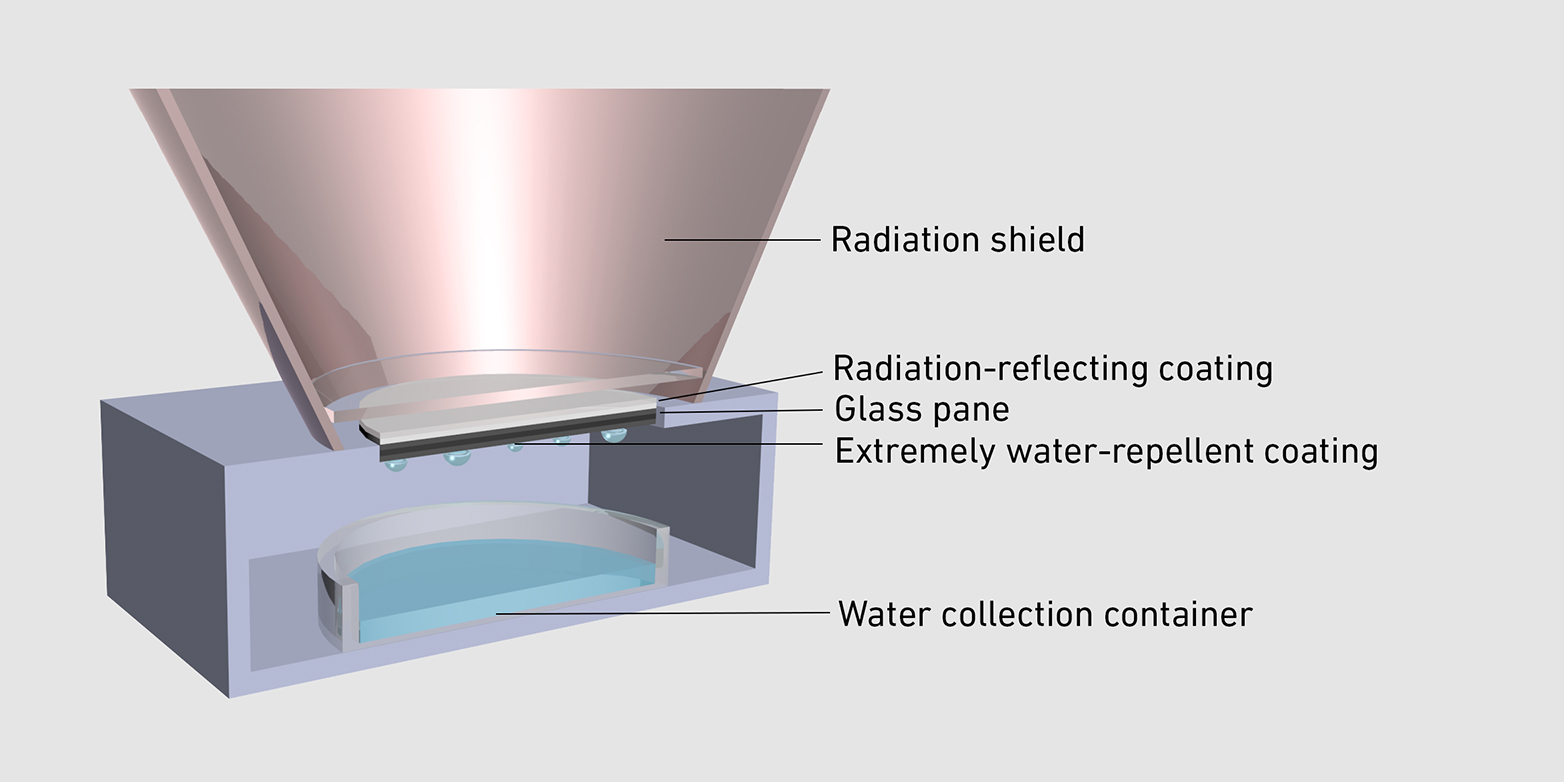
The new device essentially consists of a specially coated glass pane, which both reflects solar radiation and also radiates away its own heat through the atmosphere to the outer space. It thus cools itself down to as much as 15 degrees Celsius (59 degrees F) below the ambient temperature. On the underside of this pane, water vapor from the air condenses into water. The process is the same as can be observed on poorly insulated windows in winter.
The scientists coated the glass with specifically designed polymer and silver layers. This special coating approach causes the pane to emit infrared radiation at a specific wavelength window to the outer space, with no absorption by the atmosphere nor reflection back onto the pane.
Another key element of the device is a novel cone-shaped radiation shield. It largely deflects heat radiation from the atmosphere and shields the pane from incoming solar radiation, while allowing the device to radiate the aforementioned heat outward and thus self-cool, fully passively.
As tests of the new device under real-world conditions on the roof of a building in Zurich showed, the new technology can produce at least twice as much water per area per day as the best current passive technologies based on foils: the small pilot system with a pane diameter of 10 centimeters (about 3.94 inches) delivered 4.6 milliliters (0.155 ounces) of water per day under real-world conditions. Larger devices with larger panes would produce more water accordingly.
The scientists were able to show that, under ideal conditions, they could harvest up to 0.53 deciliters (1.79 ounces) of water per square meter of pane surface per hour.
“This is close to the theoretical maximum value of 0.6 deciliters per hour, which is physically impossible to exceed,” says Iwan Hächler, a doctoral student in the group of Dimos Poulikakos, professor of thermodynamics at ETH Zurich.
Other technologies usually require the condensed water to be wiped from a surface, which requires energy. Without this step, a significant portion of the condensed water would cling to the surface and remain unusable while hindering further condensation. The researchers applied a novel superhydrophobic (extremely water-repellent) coating to the underside of the pane in their water condenser. This causes the condensed water to bead up and run or jump off on its own accord.
“In contrast to other technologies, ours can really function without any additional energy, which is a key advantage,” Hächler says.
The researchers’ goal was to develop a technology for countries with water scarcity and, in particular, for developing and emerging countries. Now, they say, other scientists have the opportunity to further develop this technology or combine it with other methods, such as water desalination, to increase their yield.
The production of the coated panes is relatively simple and building water condensers that are larger than the current pilot system ought to be possible. Similar to the way solar cells feature several modules set up next to each other, several water condensers could also be positioned side by side to piece together a large-scale system.
The research appears in Science Advances.
Source: ETH Zurich
The post Device harvests water from humidity 24 hours a day appeared first on Futurity.
Futurity
Here’s a cheat sheet to run MySQL in a Docker container in your Windows or Mac laptop in a few minutes. In this brief how-to you will:
You can download Docker Desktop for Windows or Mac from https://docs.docker.com/desktop/. Install like any other application and you’re ready to move to the next step. As you can read from the docs, Docker Desktop will install several things like Docker Compose or Kubernetes. We’ll use both in advanced examples in future posts.
Now you can pull the MySQL Server image. You have two options. You can download the image maintained by Oracle MySQL (find the description here https://dev.mysql.com/doc/refman/8.0/en/linux-installation-docker.html)
docker pull mysql/mysql-server:latestOr you can download the image maintained by Docker Inc. You can find a description together with examples here: https://hub.docker.com/_/mysql
docker pull mysql The differences? Oracle MySQL image runs over Oracle Linux, whereas Docker Inc. image runs over Debian. And if you have a MySQL subscription, you will get Support for the Oracle MySQL Docker image if in trouble.
You can list the brand new MySQL image here. Pay attention to the IMAGE ID field, you will need it (I have downloaded both images, Oracle MySQL and Docker Inc. in the following output).
docker images
REPOSITORY           TAG       IMAGE ID       CREATED       SIZE
mysql                latest    5c62e459e087   6 days ago    556MB
mysql/mysql-server latest 1504607f1ce7 6 weeks ago 391MBYou can start the container, and choose a:
mysql_cnt in the example)docker run --name=mysql_cnt -e MYSQL_ROOT_PASSWORD="Password1*" --restart on-failure -d 5c62e459e087Find additional information to configure the instance in the corresponding image documentation, shared before.
Make sure the container is up.
docker ps -a
CONTAINER ID   IMAGE          COMMAND                  CREATED         STATUS         PORTS                 NAMES
30f6e1462b9e 5c62e459e087 "docker-entrypoint.s…" 4 minutes ago Up 4 minutes 3306/tcp, 33060/tcp mysql_cntIf the container has not started, you can check logs. In this case, all is working.
docker logs mysql_cnt

[...]
2021-06-28T13:46:43.873232Z 0 [System] [MY-010931] [Server] /usr/sbin/mysqld: ready for connections. Version: '8.0.25' socket: '/var/run/mysqld/mysqld.sock' port: 3306 MySQL Community Server - GPL.Stop your container:
docker stop mysql_cnt
mysql_cnt
Verify it’s stopped:
docker ps -a
CONTAINER ID   IMAGE          COMMAND                  CREATED         STATUS                    PORTS     NAMES
30f6e1462b9e   5c62e459e087   "docker-entrypoint.s…"   5 minutes ago   Exited (0) 1 second ago             mysql_cnt
And restart it:
docker start mysql_cnt
mysql_cntAs easy as stopping it and running:
docker rm mysql_cnt
mysql_cntIn order to authenticate, you need to have the mysql command line client installed, or even better, MySQL Shell:
docker exec -it mysql_cnt mysql -uroot -p
Enter password:
Welcome to the MySQL monitor.  Commands end with ; or \g.
Your MySQL connection id is 8
Server version: 8.0.25 MySQL Community Server - GPL

Copyright (c) 2000, 2021, Oracle and/or its affiliates.

Oracle is a registered trademark of Oracle Corporation and/or its
affiliates. Other names may be trademarks of their respective
owners.

Type 'help;' or '\h' for help. Type '\c' to clear the current input statement.

mysql>In case you would like to install things or edit the my.cnf:
docker exec -it mysql_cnt bash
root@10b5e2727ef3:/#
Note that if you installed a Debian based release, you will be able to install stuff like:
apt-get update
apt-get install vim
If you installed the Oracle MySQL image, it comes with Oracle Linux installed. Then use:
microdnf update
microdnf install vim
You are now able to setup Docker in your laptop, download your favorite MySQL image, start it in a container and stop it and also capable of installing packages in the Linux distribution. You can configure and optimize MySQL as usual, using SET PERSIST (recommended over editing the configuration file manually, when possible).
If you are curious and would like to explore running MySQL containerized services, you may want to read the official documentation. You will find several hints to use networking or taking backups.
The post MySQL in a Docker Container cheat sheet appeared first on mortensi.
Planet MySQL
https://laravelnews.imgix.net/images/laravelexamples.jpg?ixlib=php-3.3.1

Laravel Examples is a catalog of code examples, structured by topic and by the project.
The post Laravel Examples appeared first on Laravel News.
Join the Laravel Newsletter to get Laravel articles like this directly in your inbox.
Laravel News