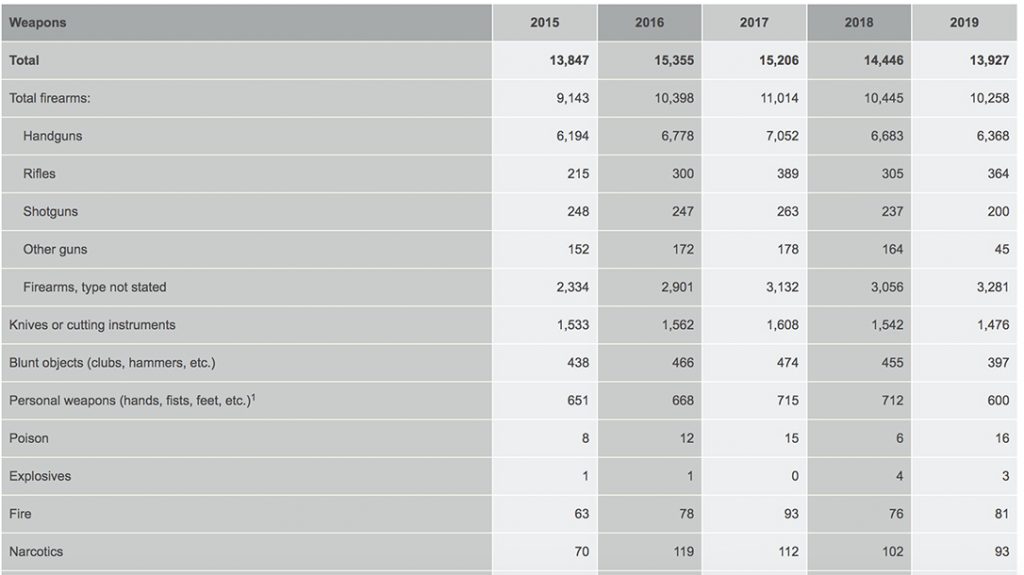
MySQL 101: Tuning MySQL After Upgrading Memory
https://ift.tt/30jNwcH

 In this post, we will discuss what to do when you add more memory to your instance. Adding memory to a server where MySQL is running is common practice when scaling resources.
First, Some Context
Scaling resources is just adding more resources to your environment, and this can be split in two main ways: vertical scaling and horizontal scaling.
Vertical scaling is increasing hardware capacity for a given instance, thus having a more powerful server, while horizontal scaling is adding more servers, a pretty standard approach for load balancing and sharding.
As traffic grows, working datasets are getting bigger, and thus we start to suffer because the data that doesn’t fit into memory has to be retrieved from disk. This is a costly operation, even with modern NVME drives, so at some point, we will need to deal with either of the scaling solutions we mentioned.
In this case, we will discuss adding more RAM, which is usually the fastest and easiest way to scale hardware vertically, and also having more memory is probably the main benefit for MySQL.
How to Calculate Memory Utilization
First of all, we need to be clear about what variables allocate memory during MySQL operations, and we will cover only commons ones as there are a bunch of them. Also, we need to know that some variables will allocate memory globally, and others will do a per-thread allocation.
For the sake of simplicity, we will cover this topic considering the usage of the standard storage engine: InnoDB.
We have globally allocated variables:
key_buffer_size: MyISAM setting should be set to 8-16M, and anything above that is just wrong because we shouldn’t use MyISAM tables unless for a particular reason. A typical scenario is MyISAM being used by system tables only, which are small (this is valid for versions up to 5.7), and in MySQL 8 system tables were migrated to the InnoDB engine. So the impact of this variable is negligible.
query_cache_size: 0 is default and removed in 8.0, so we won’t consider it.
innodb_buffer_pool_size: which is the cache where InnoDB places pages to perform operations. The bigger, the better. 🙂
Of course, there are others, but their impact is minimal when running with defaults.
Also, there are other variables that are allocated on each thread (or open connection):
read_buffer_size, read_rnd_buffer_size, sort_buffer_size, join_buffer_size and tmp_table_size, and few others. All of them, by default, work very well as allocation is small and efficient. Hence, the main potential issue becomes where we allocate many connections that can hold these buffers for some time and add extra memory pressure. The ideal situation is to control how many connections are being opened (and used) and try to reduce that number to a sufficient number that doesn’t hurt the application.
But let’s not lose the focus, we have more memory, and we need to know how to tune it properly to make the best usage.
The most memory-impacting setting we need to focus on is innodb_buffer_pool_size, as this is where almost all magic happens and is usually the more significant memory consumer. There is an old rule of thumb that says, “size of this setting should be set around 75% of available memory”, and some cloud vendors setup this value to total_memory*0.75.
I said “old” because that rule was good when running instances with 8G or 16G of RAM was common, so allocating roughly 6G out of 8G or 13G out of 16G used to be logical.
But what if we run into an instance with 100G or even 200G? It’s not uncommon to see this type of hardware nowadays, so we will use 80G out of 100G or 160G out of 200G? Meaning, will we avoid allocating something between 20G to 40G of memory and leave that for filesystem cache operations? While these filesystem operations are not useless, I don’t see OS needing more than 4G-8G for this purpose on a dedicated DB. Also, it is recommended to use the O_DIRECT flushing method for InnoDB to bypass the filesystem cache.
Example
Now that we understand the primary variables allocating memory let’s check a good use case I’m currently working on. Assuming this system:
$ free -m
      total      used     free    shared    buff/cache    available
Mem: 385625    307295    40921         4         37408        74865
So roughly 380G of RAM, a nice amount of memory. Now let’s check what is the maximum potential allocation considering max used connections.
*A little disclaimer here, while this query is not entirely accurate and thus it can diverge from real results, we can have a sense of what is potentially going to be allocated, and we can take advantage of performance_schema database, but this may require enabling some instruments disabled by default:
mysql > show global status like 'max_used_connections';
+----------------------+-------+
| Variable_name        | Value |
+----------------------+-------+
| Max_used_connections |    67 |
+----------------------+-------+
1 row in set (0.00 sec)
So with a maximum of 67 connections used, we can get:
mysql > SELECT ( @@key_buffer_size
-> + @@innodb_buffer_pool_size
-> + 67 * (@@read_buffer_size
-> + @@read_rnd_buffer_size
-> + @@sort_buffer_size
-> + @@join_buffer_size
-> + @@tmp_table_size )) / (1024*1024*1024) AS MAX_MEMORY_GB;
+---------------+
| MAX_MEMORY_GB |
+---------------+
| 316.4434      |
+---------------+
1 row in set (0.00 sec)
So far, so good, we are within memory ranges, now let’s see how big the innodb_buffer_pool_size is and if it is well sized:
mysql > SELECT (@@innodb_buffer_pool_size) / (1024*1024*1024) AS BUFFER_POOL_SIZE;
+------------------+
| BUFFER_POOL_SIZE |
+------------------+
| 310.0000         |
+------------------+
1 row in set (0.01 sec)
So the buffer pool is 310G, roughly 82% of total memory, and total usage so far was around 84% which leaves us around 60G of memory not being used. Well, being used by filesystem cache, which, in the end, is not used by InnoDB.
Ok now, let’s get to the point, how to properly configure memory to be used effectively by MySQL. From pt-mysql-summary we know that the buffer pool is fully filled:
Buffer Pool Size | 310.0G
Buffer Pool Fill | 100%
Does this mean we need more memory? Maybe, so let’s check how many disk operations we have in an instance we know with a working dataset that doesn’t fit in memory (the very reason why we increased memory size) using with this command:
mysqladmin -r -i 1 -c 60 extended-status | egrep "Innodb_buffer_pool_read_requests|Innodb_buffer_pool_reads"
| Innodb_buffer_pool_read_requests | 99857480858|
| Innodb_buffer_pool_reads         | 598600690  |
| Innodb_buffer_pool_read_requests | 274985     |
| Innodb_buffer_pool_reads         | 1602       |
| Innodb_buffer_pool_read_requests | 267139     |
| Innodb_buffer_pool_reads         | 1562       |
| Innodb_buffer_pool_read_requests | 270779     |
| Innodb_buffer_pool_reads         | 1731       |
| Innodb_buffer_pool_read_requests | 287594     |
| Innodb_buffer_pool_reads         | 1567       |
| Innodb_buffer_pool_read_requests | 282786     |
| Innodb_buffer_pool_reads         | 1754       |
Innodb_buffer_pool_read_requests: page reads satisfied from memory (good)
Innodb_buffer_pool_reads: page reads from disk (bad)
As you may notice, we still get some reads from the disk, and we want to avoid them, so let’s increase the buffer pool size to 340G (90% of total memory) and check again:
mysqladmin -r -i 1 -c 60 extended-status | egrep "Innodb_buffer_pool_read_requests|Innodb_buffer_pool_reads"
| Innodb_buffer_pool_read_requests | 99937722883 |
| Innodb_buffer_pool_reads         | 599056712   |
| Innodb_buffer_pool_read_requests | 293642      |
| Innodb_buffer_pool_reads         | 1           |
| Innodb_buffer_pool_read_requests | 296248      |
| Innodb_buffer_pool_reads         | 0           |
| Innodb_buffer_pool_read_requests | 294409      |
| Innodb_buffer_pool_reads         | 0           |
| Innodb_buffer_pool_read_requests | 296394      |
| Innodb_buffer_pool_reads         | 6           |
| Innodb_buffer_pool_read_requests | 303379      |
| Innodb_buffer_pool_reads         | 0           |
Now we are barely going to disk, and IO pressure was released; this makes us happy – right?
Summary
If you increase the memory size of a server, you mostly need to focus on innodb_buffer_pool_size, as this is the most critical variable to tune. Allocating 90% to 95% of total available memory on big systems is not bad at all, as OS requires only a few GB to run correctly, and a few more for memory swap should be enough to run without problems.
Also, check your maximum connections required (and used,) as this is a common mistake causing memory issues, and if you need to run with 1000 connections opened, then allocating 90% of the memory of the buffer pool may not be possible, and some additional actions may be required (i.e., adding a proxy layer or a connection pool).
From MySQL 8, we have a new variable called innodb_dedicated_server, which will auto-calculate the memory allocation. While this variable is really useful for an initial approach, it may under-allocate some memory in systems with more than 4G of RAM as it sets the buffer pool size = (detected server memory * 0.75), so in a 200G server, we have only 150 for the buffer pool.
Conclusion
Vertical scaling is the easiest and fastest way to improve performance, and it is also cheaper – but not magical. Tuning variables properly requires analysis and understanding of how memory is being used. This post focused on the essential variables to consider when tuning memory allocation, specifically innodb_buffer_pool_size and max_connections. Don’t over-tune when it’s not necessary and be cautious of how these two affect your systems.
technology
via Planet MySQL https://ift.tt/2iO8Ob8
September 30, 2020 at 11:34AM