How to run MacOS 7 and MacOS 8 in your browser, today

https://photos5.appleinsider.com/gallery/47743-93278-000-lead-Mac-OS-emulator-xl.jpg

Step back in time to the Macintosh of the 1990s, and run complete, virtual installations of System 7 and Mac OS 8 in a browser window.

There is a single flaw in the new virtual versions of 1990s Mac software, and it’s that they run at the speed of Macs in the 2020s. What you see is straight up Mac SE/30 or Quadra 700, but everything is as fast as Apple Silicon can make it.

You could do actual work in these simulated OSes, they even come with the ability to drag documents or files in and out from macOS Monterey. But whether it’s for some practical purposes or more likely for the sheer fun of it, here’s how to do it.

Some background

The new versions operate the same way whether you choose System 7 or OS 8, and they work in a browser window. This means they can be run without any prior setup — and it also means they can be run full screen.

It’s still a 1990s Mac with assumptions about screen size, so you won’t fill a 27-inch iMac’s monitor side to side, but you can greatly expand upon what was available before.

When you do so, you’ll see all of the once-familiar screen furniture, like windows without any tabs. Or the grey close box in a grey header.

Note that there are errors. Some included apps, such as Microsoft Word version 5.1a, will display error messages because certain files are not present in the emulator.

However, the app loads and works as normal. Plus, this is a faithful reproduction of the 1990s, you’ve got to have some errors in Microsoft Word.

How to run System 7 or Mac OS 8

That’s it. A Mac with System 7.5.3 from 1995, or Mac OS 8.1 from 1997, is running in your browser. You can’t alter the size of the emulated Mac directly, but you can resize your browser window.

When you do, the emulated Mac snaps forward into the largest form it can display. It’s mildly tricky to do this, as it’s very easy to find that the emulated Mac is displaying off the top of your browser window.

You can’t scroll or drag to move around the emulated Mac’s screen, but you can drag and resize the browser window.

What you can do in the emulator

Although you can’t resize or move the screen around, you can drag icons across it, and you can resize windows in the emulator. You will wonder where all of the launch speed has gone, though, as at first it can seem unresponsive when you’re clicking on a window’s slider to move it.

That’s not an emulator bottleneck, though. It’s years of being used to how OS X and now macOS Monterey do things.

Once you remember that you can only resize a window from the bottom right, also realise that keyboard shortcuts won’t work. Do command-N to open a new folder in System 7’s Finder and you’ll get a new browser window instead.

You do get used to it, however. And when you do, take a look through the files and folders included. There are classics here, like Word, and games like Dark Castle.

Doing real work in the emulator

You probably won’t. This is just deep and nostalgic fun. But if you want to try, the productivity apps included in the emulators work just fine.

Even though the emulator is in your browser, you can drag files into it.

There is an issue, of course, that this is in a browser. So if you lose your internet connection, you could lose your work.

Your work is not confined to the browser, though. Drag any file from your Mac onto the browser window, and it is loaded onto the Mac.

It appears in a special Downloads folder in the emulator – and there is an Uploads one, too. Within the emulator, drag any document to Uploads, and your browser will download it to your Mac.

AppleInsider News

Optimize your Laravel Application for Production


Published
in Laravel, PHP
on Mar 25, 2022

When deploying a Laravel application always make sure that you are caching and optimizing during your deployment to ensure your application runs as fast and efficiently as possible.

Here are commands that I add as part of every deployment

Laravel Optimization

Optimize will cache Laravel’s bootstrap files, while the other two commands will cache events, listeners and compile Blade templates.

php artisan event:cache
php artisan view:cache
php artisan optimize
 // optimize: will execute the following two commands
 // php artisan config:cache
 // php artisan route:cache

Pro Tip: Different packages may have some additional cache optimizations, always check the documentation. As a quick lookup you can run this command to get a dump of commands dealing with cache.

php artisan | grep cache

Composer Optimization

For composer make sure to optimize your autoloader, more information can be found here.

composer install --no-dev --optimize-autoloader

For automated deployments you can run

composer install --no-interaction --no-dev --no-ansi --no-plugins --no-progress --no-scripts --optimize-autoloader

Laravel News Links

Smashing Coconuts by Hand

https://theawesomer.com/photos/2022/03/coconut_smasher_t.jpg

Smashing Coconuts by Hand

Link

Opening a coconut is best achieved with a machete or a hammer and chisel. But there are some people out there who can open a coconut bare-handed. Abheesh P. Dominic is an overachiever, and in 2017 he broke the Guinness World Record for most coconuts smashed in a minute by cracking 122 of the tough nuts using only his fist.

The Awesomer

Laravel Valet 3 Released With Multi-Version PHP Support

https://laravelnews.imgix.net/images/valet-featured.png?ixlib=php-3.3.1

The Laravel team released the next major version of Laravel Valet (3.0), which introduces running multiple versions of PHP in Valet applications side-by-side.

Previously, you could specify which version of PHP Valet used to serve applications locally using valet use php@7.2, but now you can do so on a per-site (including a default) basis using the following commands:

1cd path/to/app

2 

3# Isolate the current project

4valet isolate php@7.4

5 

6# Isolate a site by name

7# This command will also install the PHP version

8# if it's not already installed.

9valet isolate php@8.0 --site=laravel9x

After isolating a site, you can see that my local Valet install is serving projects using various isolated PHP versions:

Laravel valet with a PHP 7.4 app

And another application using the default installed version of PHP (v8.1):

Laravel valet with a PHP 8.1 app

Another challenge you might run into with this setup is running commands on the CLI with the matching PHP version. What I do is create a symlink to the brew version of PHP somewhere in my path:

1ln -s $(brew --prefix php@7.4)/bin/php $HOME/bin/php74

2 

3php74 --version

4PHP 7.4.28 (cli) (built: Mar 3 2022 06:26:49) ( NTS )

5...

Using this version of PHP, you can prefix commands to composer, etc.:

1php74 $(which composer) install

You might also need to symlink other binaries like pecl in the same way to install extensions.

PHP Monitor

Off the heels of PHP Monitor 5.0 for macOS, the author released PHP Monitor 5.2 with support for Valet 3, making management of isolated PHP versions a breeze:

For further details, check out the PHP Monitor 5.2 release post, which includes information on how to source multiple versions of PHP from the command line using a CLI helper provided by phpmon.

Upgrade Today

To upgrade to Valet 3, you can run the following composer command to update and install the latest version of Valet (hat tip to @jakebathman):

1composer global require "laravel/valet:^3.0"

Afterward, be sure to run valet install to finish installing. Congratulations to all the contributors, especially Nasir Uddin Nobin, Matt Stauffer, and everyone else involved in working on Valet 3!

Laravel News

How Long Will This Go On

Before we can start working on the Rules of Three and preparing, we
need to look at the time frame we are dealing with. This is true for
every stage of the process.

Survival schools teach the 4/4/40 levels.

  • 1 to 4 days: Short term
  • 4 to 40 days: Medium term
  • 40+ days: Long term

The skills and resources you need to survive for a day or two are
completely different from the skills and resources you need to survive
for 4 to 40 days which is completely different again from the skills
and resources you need to survive long term.

And, you need to add to that your long term goal…

To live and live well

Living is much different from surviving. I can survive in a three
season tent with tarp thrown over it, huddling for warmth, trying to
find enough food to stay alive. I would much rather live in my house
with a wood cooking stove with the family sleeping in the kitchen in
the winter.

Short Term

“Short term” is considered to be anything less than 4 days. We hear
stories about this sort of survival all the time. You are probably
familiar with:

  • the guy that was trapped in his car for 3 days and survived on
    nothing but Taco Bell hot sauce. (And the extra weight he carried
    with him.)
  • the people that were trapped on I95 in the winter of 2021-2022. Some
    were there for more than 24 hours.

This is sometimes the easiest to deal with. This is the “spend money
and it’s done” level of preparing. A 72 hour bar for each person and a
few liters of water and you have the food and water covered. Medical
is a bit different, but not that bad. You should carry a couple of days
worth of your daily medications with you.

These types of emergencies are often the result of weather or single
point failure. They are not systemic in nature. And often they are of
a limited nature.

Examples:

  • Weather takes down the power lines and you are without power for a
    few days.
  • You can’t get home from the office because of road conditions.
  • You got lost in the woods but were able to call for rescue.
  • The creek done rose and the bridge is under water.
  • The excavator took out all services to your block

In most of these situations, a little bit of planning will get you
through. That and following the biggest rule of them all: Don’t
Panic

A few years ago I came back into the house after spending a few hours
tilling the field. It wasn’t late, the sun was still up. When I got
into the living room it looked like a cheap romantic flick set.

The power had gone out, about 2 hours earlier. One of my family had
started the wood cook stove and it was up to temperature to cook
dinner. But the other members had gone into panic mode. There were 2
or 3 dozen candles in the living room/dining room plus 4 oil lamps.
And all of them were burning.

The only light source they hadn’t used was my Coleman lantern, and
that was because they couldn’t find it. (Yeah, I did hide some things
from them.)

It was still light outside, but the panic they felt led them to
light all those candles and lamps. Panic caused them to use resources that
were unneeded and which could have been difficult to replace.

Medium Term

For medium term survival, we do need some actual preparation. For
a long week without any travel, the food you have in your
refrigerator, freezer and pantry should take you through. A 72 hour
bar and a few liters of water in your car is more than enough.

But what if it is for a week?

After a whole week without power, the food in your fridge will
probably go bad. You’ll use up your eggs and butter. Your bread will
either be almost gone or going moldy. You need to have some
preparations in place to make it through.

This is the place where you can spend a whole lot of money to get what
you need for your 40 days. “Survival food buckets” run from around
$100 to north of $250. And the price per meal varies even more. The
nice thing is that it is easy. Spend your dollars, and you have your 30 day
supply of food.

Water becomes a bigger issue. You can easily store enough water for 4
days. You should consider a gallon a day per person. So four days
without water for a family of four is just over 12 gallons. 3 five
gallon jerry cans will do it. A six pack of water bricks would do it.

But in the medium term you need to be able to collect, transport, and
clean your water to make it potable. This is a different problem from
just storing and using water.

Your medication requirements change, too. You might have a 7 day supply
of your daily medication with you at all times. But do you have a 30
day supply? What if you are just about at the end of this month’s
supply?

Huddling around a indoor-safe heater for three or four days is very
doable. Handling 3 or 4 weeks? Or 10 weeks? That’s a bit different.
Do you have enough fuel on hand to keep your heat going for 1 to 10
weeks?

Do you have an auxiliary source of heat that uses a different type of
fuel?

And do you know how to use all the tools and resources you have? And
can you do it?

Example: You have five gallon jerry cans. You have a fresh water
source only a half mile from your location. Have you ever tried to
carry 80 lbs a half mile? Can you still do it? Hanging from your
hand? Have you tried using a wheelbarrow to transport your cans? A
dolly? Your bicycle?

Long Term

This is where you are transitioning from what you have stored, to
hunting/gathering. What is available for you to gather? Gathering can
mean standing in line at the FEMA line to get your 1000Kcal meal for
the day. It could mean bread lines or trading unskilled labor for
meat.

It means being able to plant crops and bring them up. It means being
able to raise livestock. For food (eggs, milk, and later meat), for
shelter (hides into clothing or tarps, fur into yarn and cloth). It
means having skills that people want and are willing to trade for.

And it means being able to keep all the goods you have. That raider
that just wants your last “survival bucket” doesn’t care that you are
the guy that is fixing all the broken machinery in town. All he wants
is that bucket, and if you and yours end up dead so he and his aren’t
hungry that night, that’s okay with him.

There is a famous Dilbert cartoon on disaster planning. Dilbert
explains what he has to Alice. Alice replies with, “I’m preparing
too. I have your home address and I noticed that your preparations
are light on defensive weaponry.” pause “Can you add some protein
bars to the shopping list?”

I was part of a prepping group for a while. I left when I realized
that the loudest member was a raider. He was never interested in any
part of preparing except the weapons. He was always trying to get
information from other members on what they had.

He has learned enough that he has stated explicitly that our part of
the state is a no-go zone for his people. We have proven to him that
we are a hard target.

Note, a hard target doesn’t mean that you can’t be cracked. It just
means that it is easier, cheaper and safer to take on other targets.

Medical

The 4/4/40 layout applies to medical as well. Except we aren’t
talking about days, but instead minutes and hours. Medical is about
keeping a person alive for the next 4 minutes. Then keeping them
alive until EMS arrives in the next 40 minutes.

And all of that is much different from keeping somebody alive for 40
hours without full up medical services.

Thanks

Thank you to Capt CJ in the comments for pointing me at the 4/4/40.
This is the method we have been using but I had not seen it broken
down this way before. It is helpful to have a formalized way of
looking at time issues.


First

Previous — Next

Gun Free Zone

Tying a Knot in Steel Rebar

https://theawesomer.com/photos/2022/03/steel_rebar_knot_t.jpg

Tying a Knot in Steel Rebar

Link

Steel rebar is a stiff metal bar typically used to reinforce concrete. But like any metal, with enough force, you can bend it to your whim. Metalsmith Gavin Clark shows us a series of maneuvers he used to tie a length of 1/2″ rebar into a clove hitch knot. We’re impressed that he did it without applying heat.

The Awesomer

Using Docker to Containerize Laravel Apps for Development and Production

https://www.honeybadger.io/images/pull_image.png

In the past 5 years, both Docker and Laravel have exploded in popularity. In this step-by-step tutorial, we will dive into how to dockerize an existing Laravel app to run it on local and then make it ready to run on a production environment. We will also deploy it to Google Cloud Run without getting into Kubernetes or any YAML configs. Let’s get started

What are containers?

Containers simply put, are a way of packaging an application in a way that in addition to the application code and its dependencies the whole stack including the language, file system, and operating system can be shipped together. Another added bonus of this form of packaging is the specific version of the language and operating system can be specified in each build.

There are multiple ways to define what containers and containerization are and how they operate. But without going to the details of virtualization and hypervisors the above way to understand them is simpler.

Shipping containers analogy

Photo by Ian Taylor on Unsplash

If you want to refer to the shipping containers analogy, be my guest. The benefits of using containers include small size, speed, efficiency, and portability.

To oversimplify things, you can think of containers as an improved virtual machine that is smaller, faster, and more resource-efficient.

What is docker?

So if containers enable us to ship the whole stack on each deployment after a successful build of course, where does this Docker thing come into play? Docker is an open-source platform (and a company Docker Inc) that enables software engineers to package applications into containers.

Docker logo with whale and shipping containers

Therefore, Docker is a software that lets us build, package and run our applications as containers. But it is not the only option.

Think of Docker as the AWS of the container world in terms of popularity, there is another container platform called rocket (rkt) which can be considered something like Vultr in this analogy.

The open container initiative looks at the standardization and governance of container runtimes.

Next up we will park these terms and theory here and jump into running some commands in the command line to meet our goal of creating development and production-ready containers for an existing Laravel application.

Prerequisites

Before we dive into the code and docker commands, it would be great to make sure of the following things:

  1. You have docker and docker-compose running on your machine
  2. A general familiarity with how Laravel works will be needed
  3. You are aware of how containers work and the need to build them and push them to a container registry.
  4. To deploy the application you will need a Google cloud account.

Time to go deeper into dockerizing the Laravel app.

Example application

For this post as we want to dockerize an existing Laravel application, we will use the Student CRUD app built with Laravel by Digamber Rawat. The application is open source and he has a great tutorial explaining how the app was built.

It is a relatively simple Laravel 8 application using MySQL as the database. We will fork this application and dockerize it to run it on production not only on the dev environment. I would like to thank him for his amazing work on this application.

Dockerize for local dev environment with Laravel sail

First, we will use Laravel Sail to run the application locally on our dev environment. There are unofficial Docker environments for Laravel like Laradock but Sail is the official docker dev environment for Laravel. Sail is is a wrapper on top of docker compose.

To Sail-ize our existing student CRUD app, we will run the following command after cloning the repository:

cd laravel-crud-app
cp .env.example .env
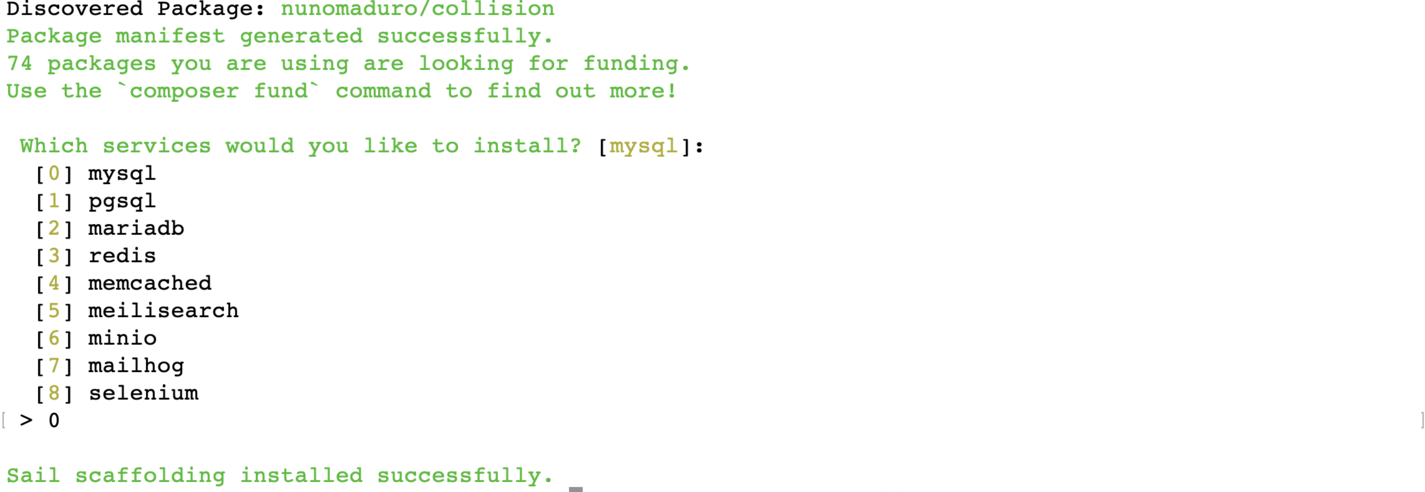
composer require laravel/sail --dev && php artisan sail:install

After the command ran, we should select 0 for MySQL to install MySQL as part of the docker-compose file created by Laravel sail as seen below:

In Laravel sail prompt select 0 for MySQL

At this point, make sure we have the docker-compose.yml file created at the root of the project. If the file is created, we can run the following command to build and run the needed containers:

COMPOSE_DOCKER_CLI_BUILD=1 DOCKER_BUILDKIT=1 ./vendor/bin/sail build

As Laravel Sail is a wrapper on top of Docker compose, what I have done here is instructed docker-compose to build the needed containers with BuildKit.

Docker BuildKit is build enhancement available in the newer versions of Docker that makes the docker build faster and efficient. We will see the following output when the build process is done:

Laravel sail built with docker buildkit enabled

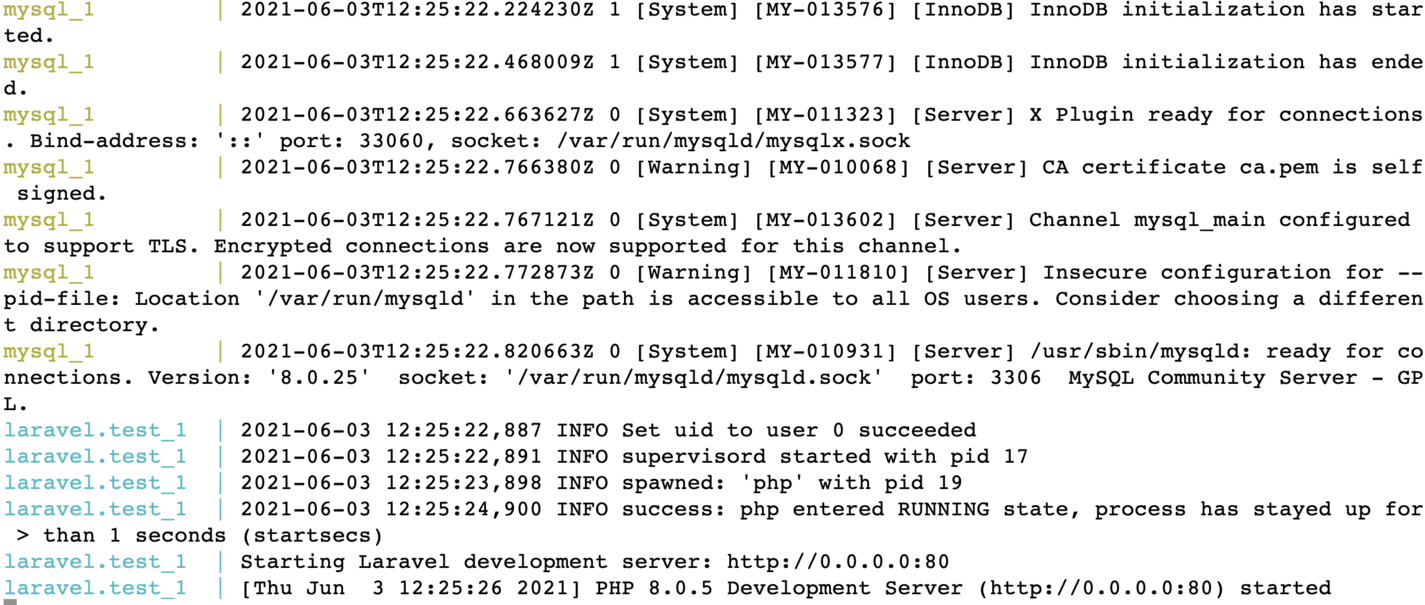
Even with Docker BuildKit enabled the build process will take 5-10 minutes depending on the internet speed. To run the containers we will run the following command:

We will see an output towards the end of the command as follows:

Laravel sail run project with sail up

We will have to add the APP key in the .env running the following command after the container are running:

./vendor/bin/sail artisan key:generate

We will also need to change the database credentials in the .env file like below to make the app work.

DB_CONNECTION=mysql
DB_HOST=mysql
DB_PORT=3306
DB_DATABASE=laravel
DB_USERNAME=root
DB_PASSWORD=

By default, the MySQL container has a root user with no password, the above configuration will work. After that to create the database structure we will need to run the migrations with:

./vendor/bin/sail artisan migrate --force

Next, when we hit http://localhost/students we should see the empty list, we can go in and add a student to have an output that looks similar to below:

Laravel project running with sail locally

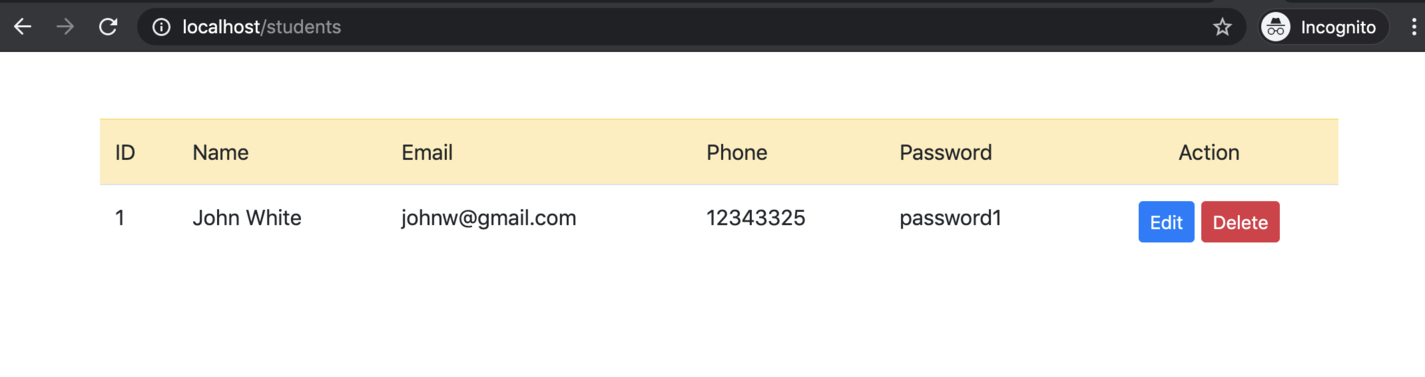
Congrats! Our app is running locally with Laravel sail. Time to check production readiness for the Laravel sail container.

Is Laravel sail’s docker image ready for production

A quick check on the image size with docker images | grep sail reveals that the docker image is 732 MB.

Laravel sail docker image is very big at 732 MB

It is not only the size on a deeper inspection of the Docker file at ./vendor/laravel/sail/runtimes/8.0/Dockerfile it reveals that the supervisor file is using:

command=/usr/bin/php -d variables_order=EGPCS /var/www/html/artisan serve --host=0.0.0.0 --port=80 user=sail

That does not look like a production-ready web server, it is good for local development but running PHP as a production web server is not a good idea.
The images is built on top of an Ubuntu image not the official PHP docker image. It also has Node.js 15 (not a LTS version of Node.js), yarn and composer that will not be needed for a lean production image. It has been built with the development usecase in mind.

Therefore we will create a new Dockerfile and a new docker-compose file to test out a production-ready Docker image for Laravel. As the next step we will rename the current docker-compose.yml to docker-compose-dev-sail.yml with:

mv docker-compose.yml docker-compose-dev-sail.yml

Similarly, the sail up command will change to:

./vendor/bin/sail -f docker-compose-dev-sail.yml up

And if we hit the URL http://localhost/students again it should work as it was working earlier. All the changes done till now are in this pull request for your reference. Next up we will create a production-ready docker file and a docker-compose file to make it easy to test.

Dockerize the application to be production-ready

To dockerize our Student CRUD app built on Laravel we will work on the following assumptions:

  1. For a production environment we will be using a database as a service something like AWS RDS or Google Cloud SQL. For this demo, I will use a free remote MySQL database.
  2. We will only use official docker images to avoid any compatibility issues or security risks.
  3. The official PHP Apache image will be used to keep the complexity low and avoid having multiple containers.
  4. We will be using PHP 8.0 with opcache and Just In Time JIT for speed.
  5. Docker multi-stage build and BuildKit will be used to make images smaller and build faster.
  6. The database credentials are “open” for this demo in .env.prod file, it would be best to use environment variables to fill them up on runtime.

As the assumption are clear, we can jump to adding the docker file.

Production friendly Dockerfile for Laravel app

We can start by adding a Dockerfile like below on the root of the project:

FROM composer:2.0 as build
COPY . /app/
RUN composer install --prefer-dist --no-dev --optimize-autoloader --no-interaction

FROM php:8.0-apache-buster as production

ENV APP_ENV=production
ENV APP_DEBUG=false

RUN docker-php-ext-configure opcache --enable-opcache && \
    docker-php-ext-install pdo pdo_mysql
COPY docker/php/conf.d/opcache.ini /usr/local/etc/php/conf.d/opcache.ini

COPY --from=build /app /var/www/html
COPY docker/000-default.conf /etc/apache2/sites-available/000-default.conf
COPY .env.prod /var/www/html/.env

RUN php artisan config:cache && \
    php artisan route:cache && \
    chmod 777 -R /var/www/html/storage/ && \
    chown -R www-data:www-data /var/www/ && \
    a2enmod rewrite

Let’s have a look at how the image will be built using this multi-stage dockerfile.

First off, we use the official composer 2.0 image as the build stage. In this stage, we copy the whole application to /app of the container. Then we run composer install with parameters like --no-dev and --optimize-autoloader which are well suited for a production build. The production stage doesn’t have composer as we don’t need composer to run our application, we need it to install dependencies only.

Consequently, in the next stage named production, we start from the official PHP 8.0 apache image. After setting the two environment variables, APP_ENV to “production” and APP_DEBUG to false, we enable opcache with the following configuration placed at ./docker/php/conf.d/opcache.ini:

[opcache]
opcache.enable=1
opcache.revalidate_freq=0
opcache.validate_timestamps=0
opcache.max_accelerated_files=10000
opcache.memory_consumption=192
opcache.max_wasted_percentage=10
opcache.interned_strings_buffer=16
opcache.jit_buffer_size=100M

Opcache improves PHP performance by storing precompiled script bytecode in shared memory. This means the same PHP sprint does not need to be loaded and parsed on each request. As it is a cache, it will speed up the response but it will be a problem if used in development as the changes won’t reflect until the cache is refreshed.

Subsequently, we copy the whole app and its composer dependencies downloaded in the build stage to the production stage at /var/www/html the default document root for the official PHP Apache docker image. After that, we copy the Apache configuration from ./docker/000-default.conf to /etc/apache2/sites-available/000-default.conf inside the container. The Apache configuration we copied in the container looks like below:

<VirtualHost *:80>

  ServerAdmin webmaster@localhost
  DocumentRoot /var/www/html/public/

  <Directory /var/www/>
    AllowOverride All
    Require all granted
  </Directory>

  ErrorLog ${APACHE_LOG_DIR}/error.log
  CustomLog ${APACHE_LOG_DIR}/access.log combined

</VirtualHost>

Next, we copy the .env.prod file that has the configs and credentials we need to run the application. We have used MySQL configuration from a database at Remote Mysql.

Test out the Dockerfile with docker-compose

At this juncture, we can test our docker file. A way to do it is with a docker build command and pass lots of parameters. To make our lives easy, we will use the following docker-compose file and we can run docker-compose build or docker-compose up and not worry about remembering all the lengthy docker build parameters. Our ./docker-compose.yml file looks like below:

version: '3'
services:
  app:
    build:
      context: ./
    volumes:
      - .:/var/www/html
    ports:
      - "80:80"
    environment:
      - APP_ENV=local
      - APP_DEBUG=true

Great! We have the docker-compose file ready too. We are using version 3 of the docker-compose definition. We have a single service called app which builds from the docker file at ./. We are adding all the files from the current directory to /var/www/html this will sync the files. Next up we are exposing the docker port 80 to our local machine’s port 80. To debug things, we are setting up two environment variables APP_ENV as local and APP_DEBUG as true.

Before we build and run our docker container, let’s not forget about .dockerignore.

Don’t forget the Docker ignore

Same as .gitigore the .dockerigore is also a very handy docker feature. Similar to git ignore file a docker ignore file will ignore files from the local machine or build environment to be copied to the docker container when building the container. Our small docker ignore file looks like below:

Depending on your need you can add more things to the docker ignore file. I will leave that decision up to you on what should not land up in the docker image. People tend to ignore the Dockerfile and docker-compose.yml too, it is a choice.

File changes in this pull request.

Build and run on prod mode locally

As we have all the needed files in place, we can build our production-ready Laravel docker container with the following command:

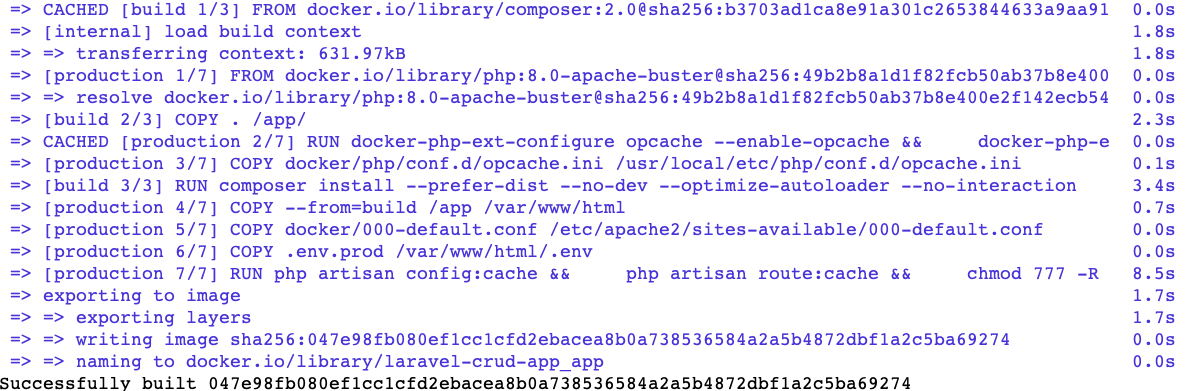
COMPOSE_DOCKER_CLI_BUILD=1 DOCKER_BUILDKIT=1 docker-compose build

It will give us an output that looks something like below after some minutes depending on your internet speed:

Build the producion ready Laravel docker image having PHP and Apache with docker-compose

As the next step, we can check how big is the image that we just created with docker images | grep app. In my case it was 457 MB compared to 732 MB for the sail one:

Production ready Laravel docker image is much smaller at 457 MB

Of course, the image is not very small at 457 MB. Still, it is much smaller than the sail one. If your concern is the image size, it would be great to explore using alpine base images with FPM and serve the application with Nginx. For the scope of this tutorial, we will not venture into that path that has two containers.

As the container is built, we can run it with the following command:

It will give us the following output:

Test the production Laravel docker image locally

One important thing to note here is the database migrations have already been run on the database we are working on. In case they were not run, we would need to run the following so that the tables are created:

docker-compose exec app php artisan migrate --force

This will run the database migration inside the container. It can also be executed with a simple docker run.

We can choose from multiple ways to run this migration. As this is an idempotent action, we can run it as part of the start script of the container, but it would be better to put it as part of the deployment process with docker run. If you plan to deploy this app on Kubernetes, the migration can be set up as an init container too.

Deploy it on Google Cloud Run

Creating a production-ready container and running it only locally would not be much interesting for us. So we will deploy our Dockerized Laravel Student CRUD app on Google Cloud Run. Cloud Run is a service to deploy containers in a serverless way. Yes, we can deploy containers that can scale up to 1000 instances without hearing the words Kubernetes and Pods. Below is a quick way to run our app on production:

  1. Make sure you are logged into your Google Cloud Account. If you don’t have one, get one with $300 credit for 90 days at $0.
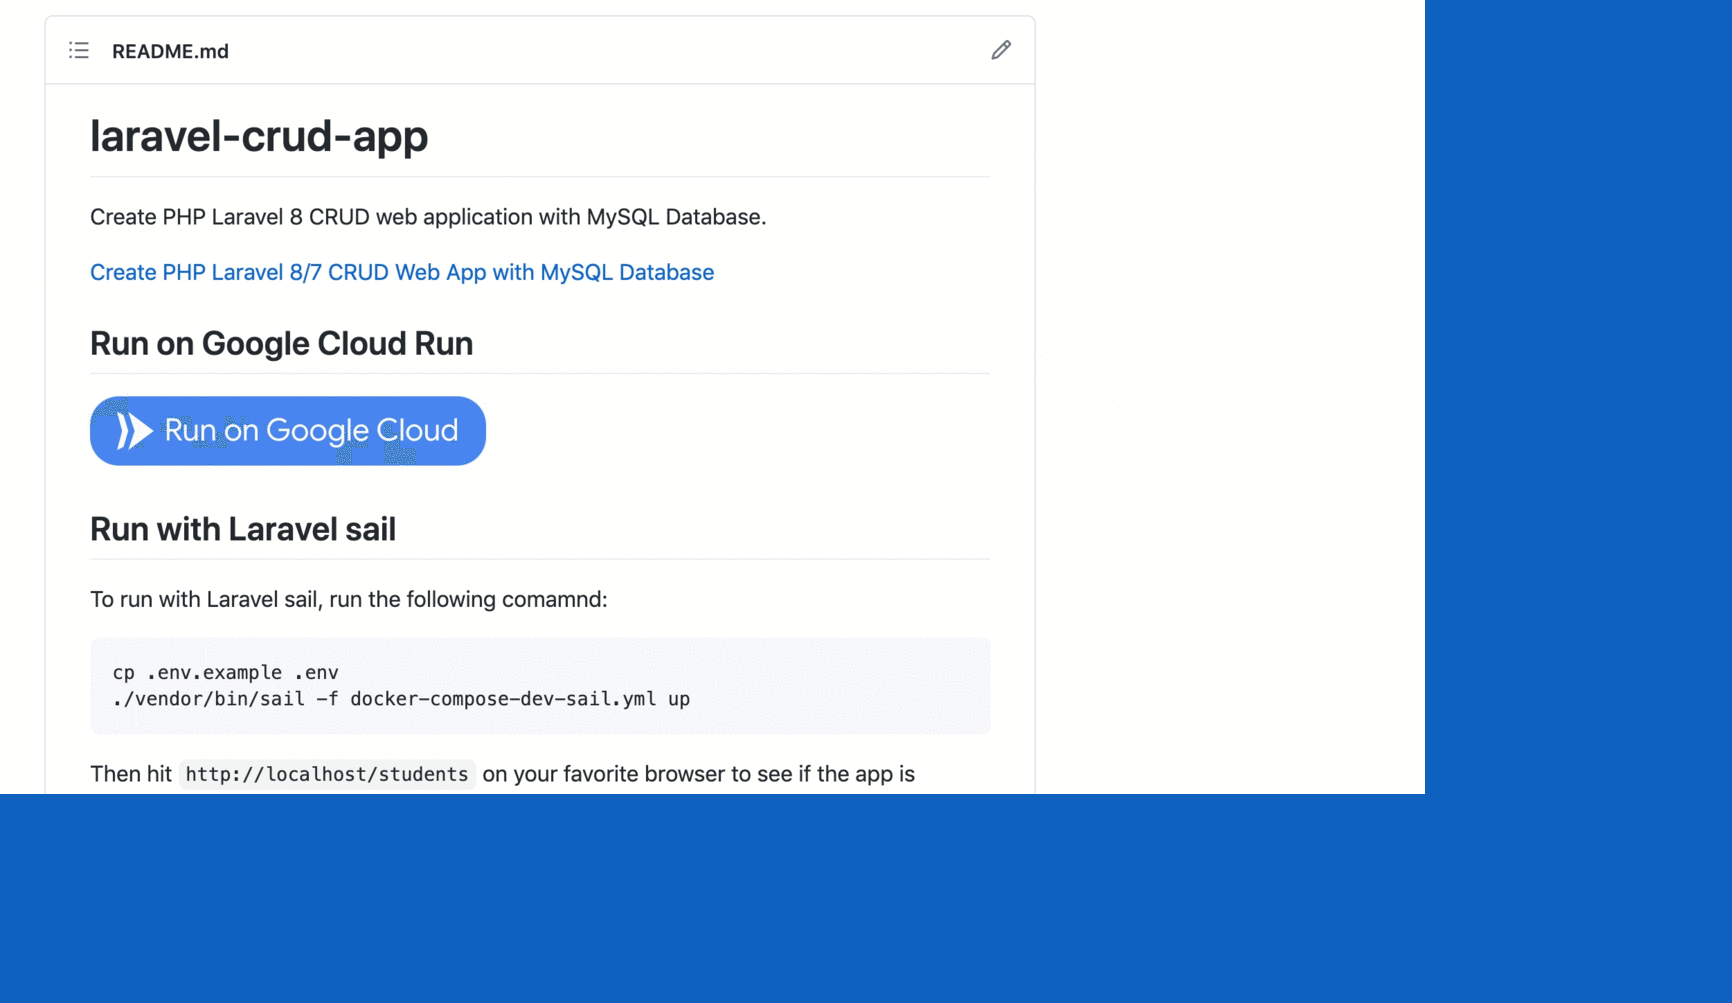
  2. Go to https://github.com/geshan/laravel-crud-app
  3. Click on the “Run on Google Cloud” – that big blue button
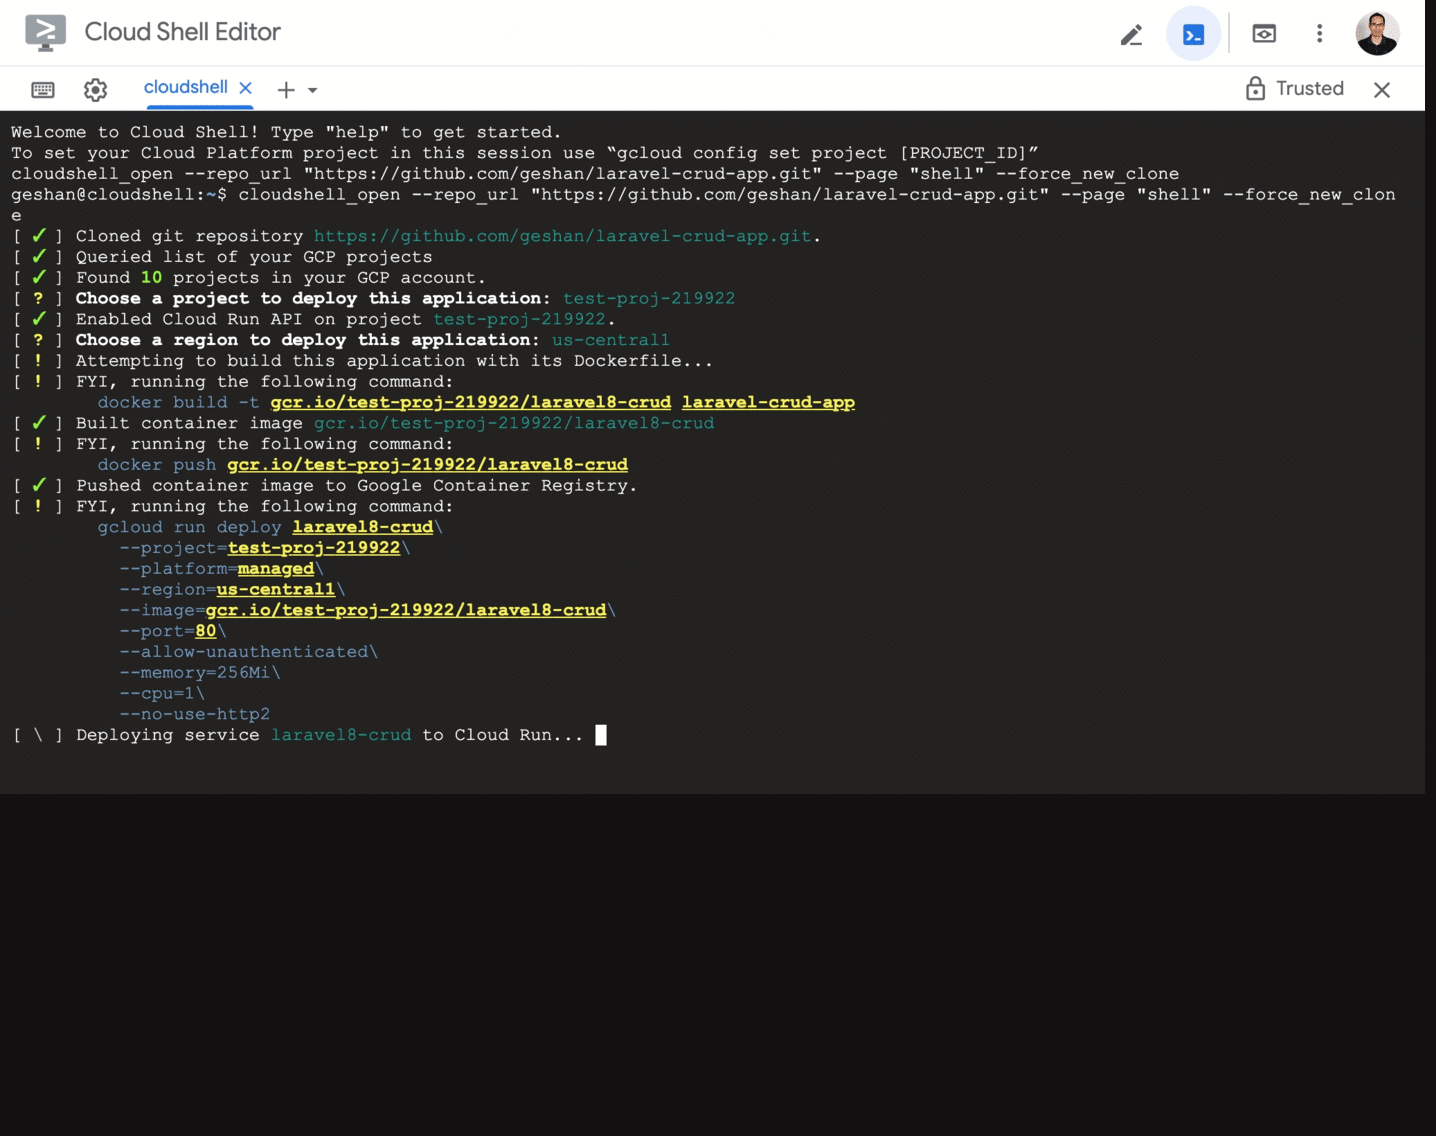
  4. It will open up Google Cloud Shell
  5. Check the trust checkbox and then click confirm – image 09:54
  6. It might take a bit for the cloud shell to warm up, it will ask us to authorize the gcloud command, click Authorize
  7. Then we will need to select the Project of Google cloud
  8. After that we will need to select the region, I generally go with us-central-1

The process will look like below till now:

Deploying the Laravel app with docker container using deploy on Google Cloud run button

  • It will take some time for the container to build and push it to the Google Container Registry (GCR)
  • Consequently, it will deploy the container for us on Google Cloud Run using gcloud CLI.
  • After the whole process is done, it will print the URL of our new cloud run service in green which ends in a.run.app. We can click it and see our app running on Cloud Run.

The process for the last three steps will look like below:

Laravel with production ready docker deployed on Google Cloud run

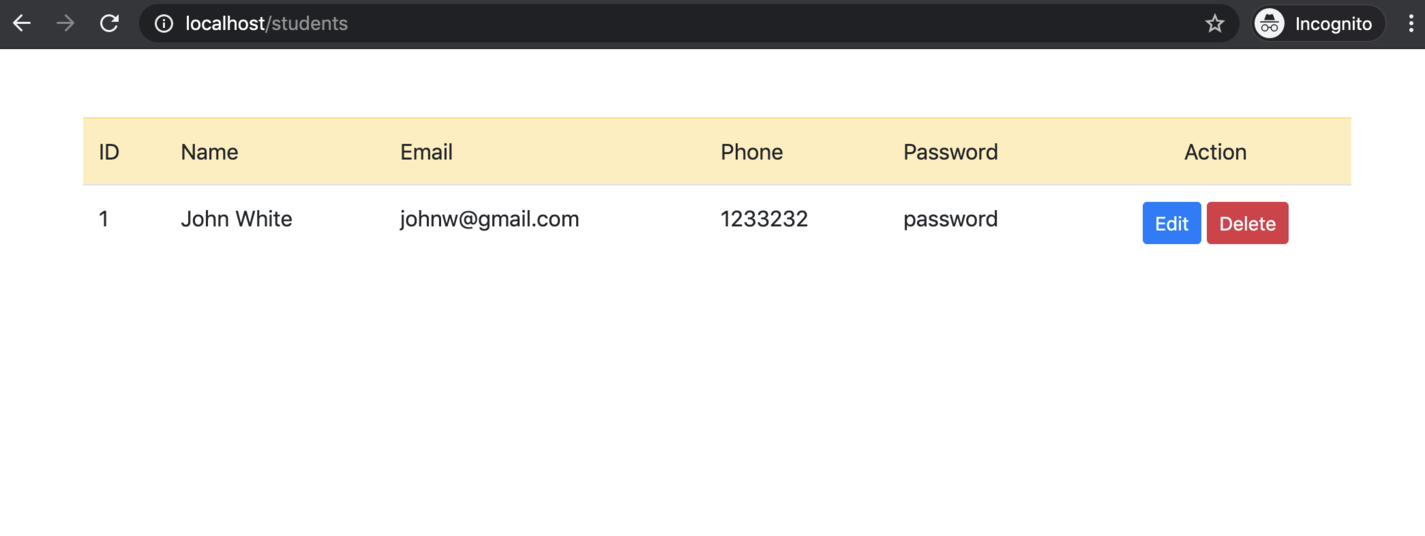
Then if we hit the service URL in green with /students added to it we will see our Laravel App running on Google Cloud Run like below:

Laravel with production ready docker running on Google Cloud run

Congrats! There we have it, a Laravel app dockerized and then running on Google Cloud Run. It is time for you to explore Google Cloud Run a bit more.

Explore Google Cloud Run a bit more

Cloud Run is very simple and efficient in managing serverless containers.

Autoscaling, redundancy, security, HTTPS URL, and custom domains are some of the amazing features of Cloud Run you can surely leverage upon.

If you are interested in how it can be deployed so easily on cloud run, please do have a look at this pull request which uses the deploy to Cloud Run button.

Other things to consider

It is great that your containerized Laravel app is deployed on a Google cloud service without writing a single line of YAML configuration. Since this is a demo tutorial we can surely make it better. One of the things that can be much better is surely secret management with proper environment variables for better security.

Other things that can be better for performance are using Gzip compression and HTTP caching headers on Apache. Again these are things that will be for you to explore further.

Conclusion

We have seen how to dockerize a Laravel application for local development with Laravel sail. Then we re-dockerized the same application to be much more production-oriented. Finally, we deployed the app on super scalable and feature-rich Google Cloud Run which is surely ready for prime time. If Cloud run can handle IKEA’s workload it can surely handle yours, kudos to serverless containers.

Honeybadger has your back when it counts.

We’re the only error tracker that combines exception monitoring, uptime monitoring, and cron monitoring into a single, simple to use platform. Our mission: to tame production and make you a better, more productive developer.

Learn more

Laravel News Links

True dat

https://blogger.googleusercontent.com/img/a/AVvXsEj9nzQoSlNuDi7OS4lJt0-2k1dy0NNqBESYWOX6PCE0Sph1FwXiVWDMxEq-uY7kbtWRZmujMTg67-0LxzU9_zrI8C2y8Lpv6Kg543r_obdREC5qx6z6YQvMk4OJMUzZXOnrzoX5Sbf3rRKw1oswvcN7kYZhsTOK26kVpHtjQTY11S7TR4LmpTJ1BvdQ=w361-h400


Found on MeWe this morning (clickit to biggit):

Based on very personal, very bitter experience in several Third World countries over many years, I’m here to tell you, that meme is exactly right.  Civilized society and peaceful life, in the general context of human history, is indeed an anomaly that can – and frequently does – end at any time.

Imagine you were a Ukrainian couple in Kyiv this time last year.  Would you have predicted the invasion of your country, the bombardment of your city, and the possible destruction of your home, your job, your schools and hospitals, and everything else that made up what was "normal" in your life?  You probably wouldn’t . . . but welcome to 2022.

You say that can’t happen here, because the USA isn’t the third world?  I have news for you.  We’re importing the Third World by the millions across our southern border every year, with the blessing and permission of the Biden administration.  More than two million of them every year (perhaps more; we don’t know, and we can’t trust the "official figures – it could be double that) are spreading throughout the USA like a cancer.  They can’t help but drag down the societies into which they try to integrate, not out of malice, but because they don’t know any better.  That’s not a racist statement;  it’s cold, hard fact.  Ask anyone who’s had extensive experience in the Third World (and I don’t mean staying in first world hotels in a third world capital;  I mean boots on the ground among the people, with nothing to insulate them from the reality of that society).

Add that to the existing crime and violence problem in our cities, and things are going to get steadily worse in places like that.  As I’ve said many times before, if you live in or near one of America’s big cities, you’ll be well advised to get the hell out of there as quickly as possible, before it’s too late – because the Third World is coming to your doorstep, and it won’t stop there.  It’ll try to force its way inside your home, so you’d better have the means to stop it – or else.

Peter

Bayou Renaissance Man