Building A Saas App With Laravel Permission And Cashier (Subscription) 🚀

https://kbouzidi.com/img/containers/assets/laravel-saas-app-permission-cashier-subscription.jpeg/ffa5ee46ec4fd568502fee9dc65bab3d.jpeg

How Do SaaS Subscriptions Work

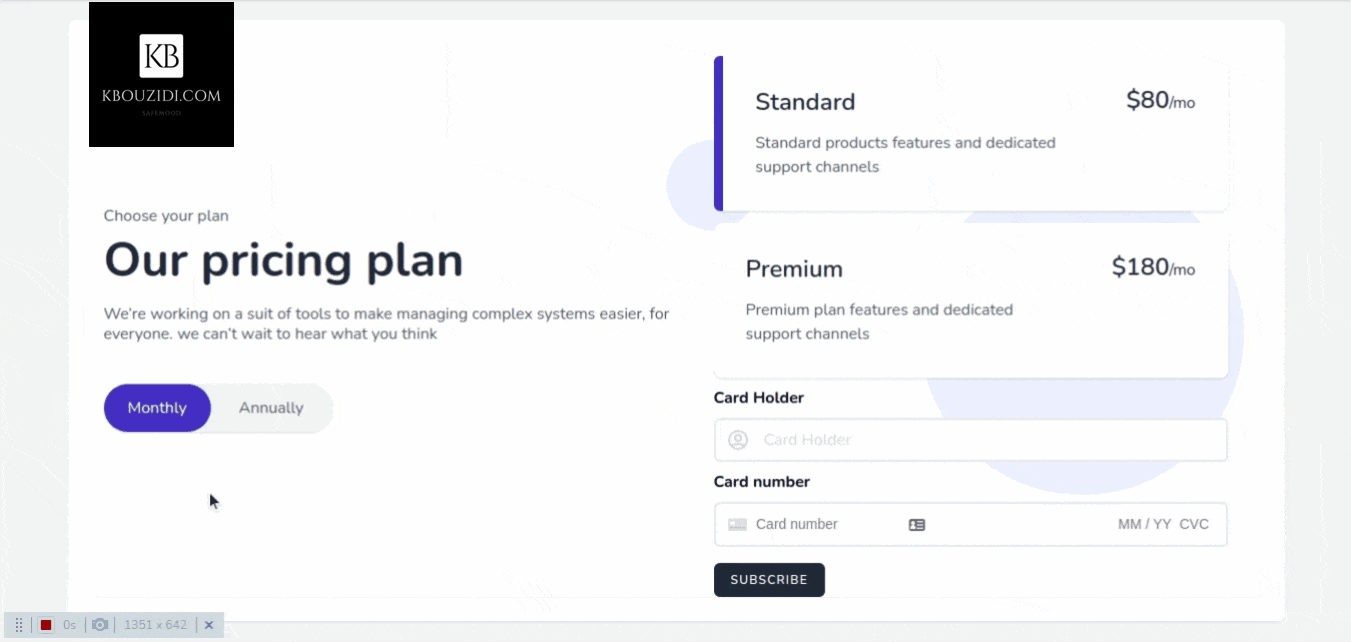
Most SaaS applications have plans that users can subscribe to, such as “Standard Plan” and “Premium Plan” and those plans can be on a yearly or monthly base. The idea is that when a user subscribes to a plan we give them the permission to access our restricted content or service so they can use it.

How We Will Approach That

Let’s say we have two plans in our application “Standard Plan” and “Premium Plan” then we will make two roles, one for standard customers and another for premium customers.

When our user buys a subscription, we give him that role so he can access the features associated with it.

Lets Code

First Part: Roles based access

composer require laravel/breeze --dev

php artisan breeze:install
 
npm install && npm run dev

php artisan migrate
 composer require spatie/laravel-permission

Let’s add these to our $routeMiddleware array inside app/Http/Kernel.php

protected $routeMiddleware = [
    // ...
    'role' => \Spatie\Permission\Middlewares\RoleMiddleware::class,
    'permission' => \Spatie\Permission\Middlewares\PermissionMiddleware::class,
    'role_or_permission' => \Spatie\Permission\Middlewares\RoleOrPermissionMiddleware::class,
];

use Spatie\Permission\Traits\HasRoles;

class User extends Authenticatable
{
    use HasRoles;

    // ...
}

For more details check laravel-permission docs.

Users have roles and roles have permissions so first, let’s start with creating permissions.

There are two features “tasks” and “events”.

php artisan make:seeder PermissionSeeder
 $permissions = [
            'list tasks',
            'edit tasks',
            'create tasks',
            'delete tasks',
            'list events',
            'edit events',
            'create events',
            'delete events',
        ];


        foreach ($permissions as $permission) {
            Permission::create(['name' => $permission]);
        }

There are two roles: standard-user and premium-user.

php artisan make:seeder UserSeeder
// create "standard-user" Role
$standardUserRole = Role::create(['name' => 'standard-user']);

$standardPlanPermissions = array([
  'list tasks',
  'edit tasks',
  'create tasks',
  'delete tasks',
]);

// assign permissions to "standard-user" role
$standardUserRole->syncPermissions($standardPlanPermissions);

// create standard user
$standardPlanUser = User::create([
  'name' => 'Standard Plan User', 'email' => 'standardplan@kbouzidi.com',
  'password' => bcrypt('123456')
]);
// assign "standard-user" to the standard user
$standardPlanUser->assignRole([$standardUserRole->id])

$premiumUserRole = Role::create(['name' => 'premium-user']);

// premium-user has more more features
$premiumPlanPermissions = array([
  ...$standardPlanPermissions,
  'list events',
  'edit events',
  'create events',
  'delete events',
]);

$premiumUserRole->syncPermissions($premiumPlanPermissions);

$premiumPlanUser = User::create([
  'name' => 'Premium Plan User', 'email' => 'premiumplan@kbouzidi.com',
  'password' => bcrypt('123456')
]);

$premiumPlanUser->assignRole([$premiumUserRole->id]);
Route::get('/dashboard', function() {
  return view('dashboard', ['intent' => auth()->user()->createSetupIntent()]);
})->middleware(['auth', 'isSubscribed'])->name('dashboard');

Route::post('/subscribe', [SubscriptionController::class, 'subscribe'])
    ->middleware(['auth'])
    ->name('subscribe');

Route::name('subscribed.')
    ->middleware(['auth', 'role:standard-user|premium-user'])
    ->group(function() {
      Route::view('subscribed/dashboard', 'subscribed.dashboard')
          ->name('dashboard');
});

This is a custom middleware to check if a user is subscribed then we will redirect him to his section.

php artisan make:middleware RedirectIfSubscribed

Inside the handle method we will add this code :

if ($request->user() &&
    ($request->user()->subscribed('standard') ||
     $request->user()->subscribed('premium'))) {
  return to_route('subscribed.dashboard');
}

Register the middleware in app\Http\kernel.php likewise :

   protected $routeMiddleware = [
 	 //
        'isSubscribed' => RedirectIfSubscribed::class,
    ];

in AuthenticatedSessionController in the store method add

$request->authenticate();

$request->session()->regenerate();
// add this
if ($request->user()->hasRole('standard-user') ||
    $request->user()->hasRole('premium-user')) {
  return redirect()->intended(route('subscribed.dashboard'));
}

return redirect()->intended(RouteServiceProvider::HOME);

folder structure

Second part: Subscription Billing

composer require laravel/cashier
php artisan migrate
use Spatie\Permission\Traits\HasRoles;
use Laravel\Cashier\Billable;
 
class User extends Authenticatable
{
    use Billable,HasRoles
}
STRIPE_KEY=your-stripe-key
STRIPE_SECRET=your-stripe-secret

First, create some products, you can do that from the stripe dashboard, check this guide (link).

make sure to choose recurring prices.

You should have two plans, premium and standard each plan has two recurring prices yearly ad monthly.

Now we can set up a controller to accept user subscriptions.

php artisan make:controller SubscriptionController
// you can move this to a database table
private $plans = array(
    'standard_monthly' => 'price_1KpyUHEpWs7pwp46NqoIW3dr',
    'standard_annually' => 'price_1KpyUHEpWs7pwp46bvRJH9lM',
    'premium_monthly' => 'price_1KpyYdEpWs7pwp46q31BU6vT',
    'premium_annually' => 'price_1KpyYdEpWs7pwp46iGRz3829',
);

public function subscribe(Request $request) {
  // this is a demo make sure to add some validation logic

  $user = auth()->user();


  $planeName =
      in_array($request->planId, ['standard_monthly', 'standard_annually']) ?
      'standard' :
      'premium';

  // check if the user already have subscribed to the plan
  if ($user->subscribed($planeName)) {
    return response()->json(
        ['message' => 'You have already subscribed to this plan!'], 403);
  }


  // get plan priceId
  $planPriceId = $this->plans[$request->planId];


  // It does what it says :p
  $user->createOrGetStripeCustomer();

  try {
    // subscribe user to plan
    $subscription = $user->newSubscription($planeName, $planPriceId)
                        ->create($request->paymentMethodId);


    if ($subscription->name == 'standard') {
      $user->assignRole('standard-user');

    } else {
      $user->assignRole('premium-user');
    }

    return response()->json(
        ['message' => 'Subscription was successfully completed!'], 200);


  } catch (IncompletePayment $exception) {
    return response()->json(['message' => 'Opps! Something went wrong.'], 400);
  }
}

I did use this Tailwindcss snippet Template with a bit of AlpineJs magic 🪄 we got this.

pricing view

 <script src="https://js.stripe.com/v3/"></script>
<script>
        const stripe = Stripe('{ {env("STRIPE_KEY")} }');

        const elements = stripe.elements();	
        const cardElement = elements.create('card');

        const cardButton = document.getElementById('card-button');
        const clientSecret = cardButton.dataset.secret;
        const cardHolderName = document.getElementById('card-holder-name');

        cardElement.mount('#card-element');
</script>
<input id="card-holder-name" class="..."
type="text" name="card_holder" placeholder="Card Holder" />
<div class="..." id="card-element"></div>
Route::get('/dashboard', function () {
    return view('dashboard',[
        'intent' => auth()->user()->createSetupIntent()
    ]);
})->middleware(['auth','isSubscribed'])->name('dashboard');

Here we are passing it as a button attribute “data-secret”

<x-button x-text="processing ? 'Processing...' : 'Subscribe'" @click="subscribe"
class="mt-4" id="card-button" data-secret="">
  Subscribe
</x-button>

When the button is clicked we will call the subscribe method which will use the stripe SDK to call the confirmCardSetup method with the clientSecret as an argument so we can check the card information without they hit our server 🔒.

Stripe will then return a setupIntent if the card is valid, then we will be able to access the user payment_method id that we will send to our back-end to charge the customer.

async subscribe() {
  this.processing = true
  const {setupIntent, error} = await stripe.confirmCardSetup(clientSecret, {
    payment_method:
        {card: cardElement, billing_details: {name: cardHolderName.value}}
  });

  if (error) {
    this.errorMessage = error.message
    return;
  }
	
  let response = axios.post('', {
    'paymentMethodId': setupIntent.payment_method,
    'planId': this.selectedPlanId,
    '_token': '',
  });

  response.then(response => {
    this.successMessage = response.data.message
    location.reload()
  })

  response.catch(({response}) => {this.errorMessage = response.data.message})

  response.finally(() => this.processing = false)
}

After the post request to the subscribe route, we will trigger location.reload() to redirect the user to the appropriate section with the help of the isSubscribed middleware.

demo laravel sass cashier

Last Part: Add Features

We have two features, standard users can manage tasks and premium users can manage tasks and events.

php artisan make:model Task -crmf

php artisan make:model Event -crmf

ℹ️ : f will generate a model factory

I used factories to seed data and I made a simple API CRUD for tasks and events nothing fancy you can check the code and my GitHub repo.

Route::name('subscribed.')
    ->middleware(['auth', 'role:standard-user|premium-user'])
    ->group(function() {
      Route::view('subscribed/dashboard', 'subscribed.dashboard')
          ->name('dashboard');

      Route::resource('tasks', TaskController::class)->middleware([
        'permission:list tasks|edit tasks|create tasks|delete tasks'
      ]);

      Route::resource('events', EventController::class)->middleware([
        'permission:list events|edit events|create events|delete events'
      ]);
    });

We are protecting these features with permissions check using laravel-permission middleware.

We’ll just talk about how to list tasks and events, you can add more features.

@can('list tasks')
<div x-data ="{
  tasks: [],
  async init() {
  this.tasks = await (await fetch('/tasks')).json()
  }
}" class='basis-1/2''
  <ul>
     <template x-for='task in tasks' :key='task.id'>
        <li x-text='task.name'></li>
     </template>
  </ul>
</div>
@endcan
@can('list events')
<div x-data ="{
  events: [],
  async init() {
  this.events = await (await fetch('/events')).json()
  }
}" class='basis-1/2''
  <ul>
     <template x-for='event in events' :key='event.id'>
        <li x-text='event.name'></li>
     </template>
  </ul>
</div>
@endcan

Now you can check if the user has that permission or not you can also use policies to have more control: like limiting standard users to create a certain number of tasks like 3 or 5 or whatever you got the idea 😉.

Youpi 🎉🥳 now have your own saas app.

Before you go to LinkedIn and start writing CEO / Mister Big Boss / Ninja …
make sure to listen to this Podcast from Jeffrey way first 10 Business Tips When Launching Your First App.

The demo project will be on my GitHub Safemood.

I’m willing to make a demo project for every article so subscribe to my newsletter for more 🚀.

If you have a question or even a tip for me, you can find me on Twitter or LinkedIn.

Laravel News Links

Creating an AWS RDS Replica for MySql

https://www.howtoforge.com/images/featured/aws-mysql-replica.pngAmazon RDS is an easy-to-set up AWS-managed database service. In this guide, we will see how to create a read replica of a MySql RDS database instance.Planet MySQL

Domain Driven Design with Laravel 9

https://www.hibit.dev/images/social/2022/preview/laravel_ddd.png

Modern web frameworks teach you to take one group of related concepts and split it across multiple places throughout your codebase. Laravel is a robust framework with a big community behind it. Usually it’s standard structure is enough for most starting projects.

Building scalable applications, instead, requires a different approach. Have you ever heard from a client to work on controllers or review the models folder? Probably never – they ask you to work on invoicing, clients management or users. These concept groups are called domains.

Let’s make a practical exercise applying Domain Driven Design. Our goal is to create a boilerplate to be used universally as base of any Laravel project. Take advantage of the framework power at the same time we meet complex business requirements.

Prerequisites

Understanding of Domain Driven Design and some basic concepts:

We are going to use a fresh Laravel 9 installation for this guide, take a look on how to create your first Laravel project. To run Laravel locally a PHP setup is also required.

Keep in mind

We must keep in mind some important points planning the architecture of our software:

  • Clean-code design plays a key role in building highly scalable applications.
  • Follow unified business language that everyone in the company (not only developers) will understand and that will be used in our business/product development process.
  • Decoupling the application from the framework can be exhausting and pointless. We want to use the power of the framework having the code as much decoupled as possible.
  • Carefully choose your third-party services, otherwise, they might cause operational failure.

Architecture layers

There are several ways in which the Laravel framework can be organized to serve as a template for large-scale projects. We will focus on the app (aka src) folder while keeping the framework features almost intact .

Initially, Laravel is structure looks as below:

ddd_laravel_files.png

With modified codebase structure, we are able to follow Domain Driven Design  within our Laravel project which will support the future growth of our software. We also will be ready for the upcoming framework upgrades. We want it to be easy to upgrade to the next versions.

In first place, we should create a folder for each DDD layer:

  • app/Domain
  • app/Application
  • app/Infrastructure
  • app/UserInterface

Domain

Since this layer is where abstractions are made, the design of interfaces are included in the domain layer. It will also contain aggregates, value objects (VOs), data transfer objects (DTOs), domain events, entities, models, etc…

The only exception would be anything related to eloquent models. Eloquent makes very easy to interact with databases, tables and rows but the reality is that it’s not a DDD model. It’s an ambiguous definition of the concept of model with implementation of database connection. Does it mean that we can not use Eloquent? Yes we can, it can be used as repository implementation (infrastructure layer). We do have a significant advantage with this approach: we are no longer dependent on Laravel’s method names and we can use some naming that reflects the language of the domain.

Actually we have nothing in domain layer so we will keep it empty.

ddd_laravel_layer_domain.png

Application

Application layer provides the required base to use and manipulate the domain in a user-friendly way. It is where business process flows are handled, commands are executed and reactions to domain events are coded.

Actually we have nothing in application layer so we will keep it empty.

ddd_laravel_layer_application.png

Infrastructure

Infrastructure layer is responsible for communication with external websites, access to services such as database (persistence), messaging systems and email services.

We are going to treat Laravel as a third-party service for our application. So all the framework files are going to be grouped inside the infrastructure folder.

What does it imply:

Note: make sure to update namespaces when moving files.

The final result look as following:

ddd_laravel_layer_infra.png

User Interface (UI)

User interface layer is the part where interaction with external world happens. The responsible of displaying information to the user and accepting new data. It could be implemented for web, console or any presentation technology.

Actually we have nothing in user interface layer so we will keep it empty.

ddd_laravel_layer_ui.png

Binding interfaces

One last thing that our architecture is lacking: the connection of concrete implementations with interfaces within our domain, e.g. repository interfaces.

For each module on the domain layer, we need a matching module in the infrastructure layer which takes responsibility for what the domain layer cannot afford to care about.

We recommend using EventServiceProvider.php to make these bindings:

ddd_laravel_binding.png

Here you can define the abstract interface and the concrete implementation. It will be kind of class wiring configuration.

Bonus

As a small bonus, we’ve included shared domain VOs for basic types.

ddd_laravel_layer_domain_shared.png

That classes provide an abstraction and shared methods for the final VO definition. An example of usage:

<?php namespace App\Domain\Post\ValueObject;

use App\Domain\Shared\ValueObject\StringValueObject;

class Message extends StringValueObject
{
}

Note: constructor, getters and additional shared methods can be included in the parent StringValueObject.

Conclusion

Note that so far nothing has changed in the way we use Laravel. We still have our Kernels, Providers, Exception Handlers, Rules, Mails and more inside the app folder.

Implementing Domain-Driven Design is always going to be a challenge no matter what framework we use, there is no unique way of defining things. Almost everything depends on the specific project you’re working on and it probably makes sense to apply a different structure or architecture in other cases.

Domain Drive Design is a continuous process that must be carried out according to specific needs that can be adapted over time. Also it’s a trade off: investing time on having a perfect structure or creating a starting base and improving with the time.

Credits

Official GitHub: https://github.com/hibit-dev/laravel9-ddd

Laravel News Links

19 Laravel Ecosystem Explained

http://img.youtube.com/vi/gg8gjO5pLps/0.jpgI have created a video to explain Laravel ecosystem items on the website with good visualizations.
It was becoming so long, so I decided to publish the first part for now.Laravel News Links

How to download Apple’s iPhone repair manuals

https://photos5.appleinsider.com/gallery/48125-93981-000-lead-Repair-Manuals-xl.jpg

Whether you’re planning to fix your iPhone screen, or you’re just curious to see what the new Self Service Repair program entails, you can now download Apple’s instructions to get all of the details.

Apple has launched its promised Self Service Repair program for iPhones, and if nothing else, it’s going to tell people just how involved repairing these devices is. In practice, it’s unlikely that many regular consumers will go through the process of repairing their devices.

But even if they don’t, it’s now possible for everyone to see what they’re paying for when they take an iPhone in to be fixed. It’s fascinating how detailed Apple’s instructions are, right down to when you cannot re-use a screw you’ve just taken out of an iPhone.

So whether it’s for actual, practical need because you’re going to do this, or it’s for a quite incredible look inside how finely engineered iPhones are, Apple has two new sets of documentation for you.

Both can be read online, but they are in PDF form so they can also be downloaded from the same link. In Safari, hover your cursor over the bottom middle of the page on screen, and controls including a download button appear.

Apple’s repair overview

Apple runs this new service, and it is promoting this ahead of any possible future legislation that requires manufacturers to provide a Right to Repair service. But it’s also distancing itself from the process.

So there’s no big banner headline on Apple’s official site about how you can save on repairs this way. Apple’s also running the whole operation through a new company.

In keeping with that slight distancing, the first documentation of the two that Apple has released spends much time telling you to use Apple Stores to get your repairs done.

“We believe customers should have access to safe and reliable service and repairs that do not compromise their security, their privacy, or the functionality of their device,” says Apple in its new “Expanding Access to Service and Repairs for Apple Devices” document.

“We also know that a repair is more likely to be done correctly when it’s performed by skilled, trained professionals,” it continues, “using genuine Apple parts engineered for quality and safety, and tools designed for the repair.”

Then it does undermine some of this by trying to make it sound impressive that every Apple repair technician has had “more than a dozen hours” of training.

Nonetheless, this manual is a wide-ranging guide to what Apple is doing, and how it’s hoping the service will be used. For a deeper, more specifically focused look, there’s the actual self repair service manual.

Apple Repair Manuals

The direct and store links both take you to the same list of all Apple manuals, whether for repair or not. Currently there are 130 listed, and they range from the Mac Studio Quick Start Guide, to the iPhone 13 Pro Repair Manual.

At present, there are nine such repair manuals, all for the iPhones that are included in the Self Service Repair program:

  • iPhone 12
  • iPhone 12 mini
  • iPhone 12 Pro
  • iPhone 12 Pro Max
  • iPhone 13
  • iPhone 13 mini
  • iPhone 13 Pro
  • iPhone 13 Pro Max
  • iPhone SE (3rd generation)

Each is broken down into sections starting a basic overview of the iPhone in question, followed by one about safety during repairs. Finally there are the procedures for conducting repairs, ranging from changing the battery or replacing a screen, to fixing cameras and the Taptic Engine.

Once you get into these procedures, you see detailed step-by-step instructions for the repair. And each step is accompanied by an annotated photo illustration.

Every step is illustrated, and there are very many warnings along the way

With around 80 pages per repair manual, a lot of the steps are the same or very similar across the different models. So if you are just curious to see what a repair entails, you could really read any of them.

Whereas, naturally, if you’re going to do such a repair, you need to find precisely the right manual, and study it.

“Read the entire manual first,” says Apple in the introduction to every repair manual. “If you’re not comfortable performing the repairs as instructed in this manual, don’t proceed.”

AppleInsider News

Working With Large PostgreSQL Databases

https://www.percona.com/blog/wp-content/uploads/2022/04/Working-With-Large-PostgreSQL-Databases-200×105.pngWorking With Large PostgreSQL Databases

It’s a funny thing when the topic of database sizes comes up. Calling one small, medium, large, or even huge isn’t as straightforward as you’d think. Distinguishing the size of a database is based upon a number of factors whose characteristics can be classified as either “tangible”, things that you can measure in an objective manner, or “intangible”, those attributes best expressed using the catch-all phrase “it depends”. For example, a 2TB database is, to many people, a large database. On the other hand, a veteran DBA could describe a PostgreSQL database cluster as large when it enters the realm of Peta-Bytes.

Here’s a recap of some of PostgreSQL’s basic capabilities:

database size

unlimited

number of databases

4,294,950,911

relations per database

1,431,650,303

table size

32TB

rows per table, defined by the number
of tuples that can fit onto the page

4,294,967,295 pages

field per table

1,600

field size

1GB

identifier length

63 bytes

indexes per table

unlimited

columns per index

32

partition keys

32

NB: Despite possible physical constraints one faces when creating large numbers of schema, there is no theoretical limitation to the number created in postgres.

I’ve come to differentiate a small database from a large one using the following caveats. And while it is true that some of the caveats for a large database can be applied to a small one, and vice-versa, the fact of the matter is that most of the setups out there in the wild follow these observations:

  1. Small databases are often administered by a single person
  2. Small databases can be managed manually.
  3. Small databases are minimally tuned.
  4. Small databases can typically tolerate production inefficiencies more than large ones.
  5. Large databases are managed using automated tools.
  6. Large databases must be constantly monitored and go through an active tuning life cycle.
  7. Large databases require rapid response to imminent and ongoing production issues to maintain optimal performance.
  8. Large databases are particularly sensitive to technical debt.

Large databases often bring up the following questions and issues:

  • Is the system performance especially sensitive to changes in production load?
  • Is the system performance especially sensitive to minor tuning effects?
  • Are there large amounts of data churn?
  • Does the database load system saturate your hardware’s capabilities?
  • Do the maintenance activities, such as logical backups and repacking tables, take several days or even more than a week?
  • Does your Disaster Recovery Protocol require having a very small Recovery Point Objective (RPO) or Recovery Time Objective (RTO)?

The key difference between a small vs large database is how they are administered:

  1. Whereas it is common that small databases are manually administered, albeit it’s not best practice, using automation is the industry default mode of operation in many of these situations for large databases.
  2. Because circumstances can change quickly, large databases are particularly sensitive to production issues.
  3. Tuning is constantly evolving; while it is true that newly installed architectures are often well-tuned, circumstances change as they age and large databases are especially vulnerable.

Good planning is your friend: addressing potential issues for a large database by anticipating future conditions is the goal i.e. testing the entire infrastructure before it goes into production. 

Scripting your build environment using tools such as Ansible, Puppet, Terraform, etc. mitigates human error when provisioning the underlying infrastructure. It’s important to be able to build in a consistent and repeatable manner.

Once a database is in production it must be monitored and wired with alerts for the various critical thresholds. Aside from the standard errors, consider configuring your monitoring solution to follow the “Rule Of Three”. Select and watch only three metrics that track and alert for a specific “change of state”. This is not to be confused with following a particular issue, rather it is meant to inform you that you should pay attention to your system in order to understand that something has changed from what is considered normal behavior. Depending on your preferences you may want to watch for known production issues or when the system is stable you might be more interested in trending alerts such as query performance which have slowed below a predefined threshold.

In regards to system tuning: while small databases can, after a fashion, perform in a satisfactory manner using the default values large databases cannot. Configuring initial tuning parameters such as the shared_buffers etc is de rigueur but you should also monitor the environment in order to trend issues such as for example bloat and long-term query performance. Remember, the most common problem experienced by an otherwise stable and well-thought-out architecture is table and index bloat. Addressing bloat by tuning the autovacuum characteristics is essential.

Monitoring, especially before and after maintenance windows, is required because they can catch potential problems to the update before becoming production issues.

Pay close attention to following the regular maintenance activities during the life-cycle of your system:

  • Logical backups and misc database redundancies
  • Architectural evolution:
    • application stack updates, upgrades, and rollbacks
    • application/database scaling
  • PostgreSQL server upgrades:
    • minor
    • major
  • Database migrations
  • Hardware upgrades
  • Scaling the cluster by adding and removing server nodes

Maintenance activities such as logical backups and PostgreSQL minor upgrades are performed at regular intervals.

Plan for space utilization requirements of logical dumps and WAL archives.

In regards to logical backups: it can be difficult to justify backing up an entire database when it can take a week. Alternatively, differential backups are a potential solution. Backing up tables that are updated and deleted regularly can be archived at a faster frequency than the slower changing tables which can be stored without changes for a longer period of time. This approach however requires the appropriate architectural design considerations such as using table partitioning. 

An alternative to logical backups is to consider Copy On Write (COW), or stacked file systems, such as ZFS and BTRFS. Environments within containers for example can leverage snapshots and clones allowing for near-instant recoveries in a disaster recovery scenario.

Complex operations, such as hardware and database scaling, encompass many sub-activities and can often involve working with several teams at the same time. In this case, maintaining reference documentation is critical. Activities such as these are best tracked and planned in a Kanban, or Scrum, environment.

In regards to Disaster Recovery (DR) consider automating the following operations:

  • Recovery via Logical backups
  • Failover of a PRIMARY to a REPLICA
  • Dropping/Building a new REPLICA
  • Point In Time Recovery (PITR): rebuilding a cluster to a point in time

As an aside to PITR: instead of rebuilding an entire data cluster from scratch to a particular point in time, one can instead create a STANDBY host that is replicated on a delay and can be recovered to a particular point in time or promoted in its current state. Refer to run-time parameter recovery_min_apply_delay for more information.

In conclusion, while small databases can be managed by administrating in an ad hoc manner, the administration of a large database must always be performed using a more rigorous and conscientious approach. And what you learn from administering a large database can be carried over to administering a small one.

REFERENCES:

Percona Database Performance Blog

The Ultimate Guide to Laravel Performance Optimization in 2022

https://www.bacancytechnology.com/blog/wp-content/uploads/2022/04/Laravel-Performance-Optimization-min-1.jpg

Quick Summary:

If you have landed on this blog post, that means you are looking for assistance to improve and enhance the performance of your existing Laravel application to get the best out of it. This blog post has covered the pro tips and tricks from the industry’s best Laravel developers and how to overcome the performance laybacks.

This blog post contains the ultimate Laravel performance optimization guide to go easy on your disillusioned mind and waver all the dark clouds of poor Laravel app performance. Read in-depth to learn about how to boost Laravel application performance and enhance the security of your existing application.

Introduction

We are working on a heavy Laravel website with many requests and structured query language/eloquent calls. There is high-CPU VPS and high memory still, we feel that there is a lot of room for performance improvement.

Laravel has become the first and foremost choice for building business-focused applications, including eCommerce platforms and information management systems.

We agree Laravel has grown by leaps and bounds, and it’s consistent finetune performance has again made it the best PHP framework of 2022. Laravel is a one-stop PHP development framework from simple web applications to complex APIs. A quick development approach, MVC architectural pattern, and a set of libraries make it convenient to build well-structured beautiful code.

As per Google Trends, Laravel has remained the most used and popular PHP framework over the last few years.

Google trends report

The framework has some outstanding functionalities that have made developers’ life easy. As you use Laravel in your project development, you must learn the tactics and tricks for PHP Laravel performance optimization in your application to get the maximum potential.

Laravel app optimizes easily, and that’s the best part of using this framework, as you can optimize your application whenever you feel it is needed to enhance its performance.

Importance of Website Speed

You might be wondering how it would matter if your website loads a second faster. It counts as much as a gold coin! Even a fraction of second matters if you want to hold on to your visitors for converting them into your clients.

Importance of Website Speed

The UI, search rankings, conversations, etc., make a difference in your website’s Google rankings. If your customers and visitors face a lag in performance over time, they will gradually stop using your site.

How to Ensure the Security of your Laravel Website?

The below provided Laravel website security best practices will ensure that you are safe from any threat.

Choose A Secure Server for Hosting

You should keep a regular backup of your website, use strong passwords, and complete authorization. Your website contains your users’ sensitive information; hence, you should not use shared servers. Before choosing your web server, you should check with your provider if they provide a secure connection, use SSH protocol and authentication, FTPS, SSL, private networks, and VPNs.

Update Your Website with The Latest Versions

Do not miss any improvements that the latest Laravel version brings out. Make sure that you use the most upgraded version of Laravel for your website. The latest version is Laravel 9. If you don’t upgrade, you might lack the essential features for your Laravel website.

Also, check out what’s new in Laravel 9 for more details about the fixes on bugs, security improvisations, and new features.

Update Modules, Packages, and Plugins

One thing is that you should use only the modules, plugins, and packages that your project requires and discard the others. Just updating your Laravel website to the latest version is not enough. You need to update all your project modules, packages, and plugins.

Check Firewall Settings

Your Laravel website should, very importantly, have a web application firewall that works as a filter and monitor for your HTTP application. Your web application firewall should be either a cloud-based solution or installed on your system.

Check Firewall Settings

Image Source: GitHub

You shall attain numerous benefits by having a firewall, such as protection from brute-force attacks, spambots, backdoor, SQL injection, DDOS, and other protections.

Make Use of HTTPS

When your web application uses HTTP, all your website information transmits in plain text, which is vulnerable to hackers and attacks.

Hence, it would help if you used HTTPS over HTTP, which will ensure your website’s information security.

Want to make your existing application Scalable and SEO Optimized?
Hire Laravel developer from us to get the secure, digitally scalable, and highly tuned application.

Use In-built Laravel Security Features

Why search outside when you’ve got it inside? Yes, Laravel comes with an in-built authentication system to secure your website information. The Laravel framework takes care of the user authentication and gives only the needed access to each user.

Your website’s sensitive information remains confined to the users and does not go public. Secure it from SQL Injections User inputs like server variables, cookies, and input values like ‘GET’ and ‘POST’ can raise the vulnerability of SQL query injection.

To overcome this, you should use the Eloquent ORM of Laravel, which uses PDO binding to avoid SQL injection.

Validate and Filter Data

Before sending user data to your system in the form of queries, you must always filter and validate the data to prevent SQL injections firsthand.

Take Precautions during Mass Assignments

Mass assignments are a convenient feature when you want to enter a long list of variables.

However, we do not recommend it because cyber attackers can alter the data from the client-side, which is extremely vulnerable. You can either use $fillable or $guarded property but very cautiously without forgetting to add new fields to your model.

Reduce Laravel Vulnerabilities from CSRF Cross-Site Request Forgery

Laravel uses the CSRF tokens to assure no fake requests and that there is no intrusion.

Each user has their own CSRF token, and when the user makes any request, the Laravel system matches it with the previous user session token. Hence, you must add a hidden CSRF field while writing your HTML application.

add a hidden CSRF field

Image Source: GitHub

To see all the above and some additional Laravel security tips in real action, check out this video from WebDevMatics. You will thoroughly enjoy it.

After getting a deep understanding of key points to consider to keep your application secure, now it’s time to understand why to focus on laravel performance optimization in 2022 and top Laravel performance optimization tips.

Why Focus on Laravel Performance Optimization?

You have surely created a Laravel application where the Laravel developers have used the PHP framework and essential libraries to bring out the maximum potential of your project idea. But, there’s always room for perfection and enhancements.

Mostly, businesses use Laravel to build their business information system, and hence the performance of their business is critically related to the performance of Laravel. To ensure smooth performance and deployment of your Laravel project, you should prioritize optimizing Laravel application for your business benefits.

The Laravel management information system enables you to take vital business decisions, and hence optimizing the performance of the Laravel app will surely enable improved business prospects.

Top Laravel Performance Optimization Tips For Your Application

Laravel Performance Optimization Tips

1. Routes caching

If your Laravel application has many routes and configurations, then the php artisan route cache is an essential feature to speed up your Php app improvement.

Run the listed below command to cache the routes.php file


Copy Text

php artisan route: cache

At the time of using closures, the artisan command hurls an exclusion. When we even try to compile the routes, it is suggested to interchange with the controllers.

It is similar to the config cache. The changes you amend in routes.php will not have a favorable effect once you cache it. If you want to refresh the routes cache, you can run the above code again. But if you want to clear the routes cache, run the below code.


Copy Text

php artisan route: clear

2. Use Artisan Commands Effectively

Laravel comes with extra perks when it comes to boosting performance


Copy Text

1. php artisan config:cache
2.
3. php artisan route:cache
4. 
5. // Note: Artisan Optimize was removed in laravel 5.5; this works in previous versions.
6. php artisan optimize --force

Commands are beneficial when you are using so many configurations and route files. Tip: Make sure to clear cache after changes.


Copy Text

1. php artisan config:clear
2. 
3. php artisan route:cache
4.  
5. php artisan view:clear

3. Use the Deployment tool to Appeal to All Commands

We know it cannot be considered a performance tip, but it will help you reduce your time, and that matters. A deployer is a deployment tool, and if you have ever used composer to handle your project dependencies, you’ll feel so right. Deployer can be deployed to Laravel application as its seeds, optimization, and migrations with one command.


Copy Text

php deployer.phar deploy production

4. Eager Loading

The most common issue of retrieving eloquent relationships is the N+1 query problem. Let me help you understand this scenario with two different models of flats and their owners. Consider if you want to retrieve their owners, and to achieve that, you will be required to run the following code:


Copy Text

$cars = App\Flat::all();
 
    foreach ($flats as $flat) {
      echo $flat->owner->name;
    }

It will help you execute one query to find out all of the flats from the database, and another query will help you find out the owners. Let’s move forward with the image, we have 100 flats, and this loop requires 101 queries: one for the flat and an additional to find out the owner of each car. Does it sound so common because we are using a small database? But, We want you to imagine a large dataset and queries to imagine the actual picture.

To overcome this problem, We prefer to use eager loading.


Copy Text

$flats = App\Flat::with('owner')->get();
 
    foreach ($flats as $flat) {
      echo $flat->owner->name;
    }

You can reduce the operation to just two queries by running the above code.

Ready to Improve Your Laravel Application Performance?
Contact the most trusted Laravel Development Company to build scalable, efficient, and user-friendly applications

5. Queues

How about using Queues to improve the application. The image you have developed is an application that sends a welcome email to new users upon signing up. It makes use of third-party email services such as Mailgun. A new user record will be inserted into the database, so a call is redirected to the Maligun to send a welcome email.

This third-party email may take a few seconds, so the user might think that the sign-up process is slow. You can use Queue to send an email and run it as a background task. The code might be lookalike below:


Copy Text

public function register(Request $request)
    {
      // validate form inputs
      $this->validator($request->all())->validate();
 
      // persist user to database
      $user = $this->create($request->all());
 
      // send welcome email
      Mail::to($user)->send(new WelcomeEmail($user));
 
      // log user in
      $this->guard()->login($user);
 
      return $this->registered($request, $user) ?: redirect($this->redirectPath());
    }

Running this code will improve the application’s performance and enhance the user experience.

6. Leverage JIT Compiler

PHP is a computer machine and server-side language. It does not comprehend PHP code natively. Usually, the programmers use a compiler to compile the code into bytecode and interpret the PHP code. The program compilation procedure affects Laravel application performance and the user experience. SO, Laravel programmers can use Zend Engine, which comes with the just-in-time compiler, to compile the code quickly and at once.

7. Compress Images

If your Laravel application contains many images, you should compress all of them to optimize the performance. There are some ways to do the optimization. However, different images require different tools to maintain their quality and resolution of images.

If you use Laravel Mix, it is advisable to use an NPM package like ImageMin while compiling your images. For a very large image, try TinyPNG to compress the image first and then use ImageMin to compress it as much as possible.

8. Classmap optimization

A smart trick to keep your Laravel app compact and ready for easy loading should keep all your inclusive files together. As you want to include multiple files in your application, you just need to call and have one common file.

Such a move will fasten your Laravel application by including several files in a combined file for loading into your application.

9. Precompile Assets

Developers will always maintain the right development environment by keeping different assets needed in your application separate. Though this is a good practice, it is not mandatory for production scenarios. And sure, Laravel has in-build artisan commands that can help you with this bifurcation.


Copy Text

php artisn optimize
php artisn config: cache
php artisan route: cache

Laravel will automatically classify your most used classes and keep them in a single file using the above commands.

10. Assets Bundling

All Laravel applications are accompanied by the instrumental Laravel Mix, which effectively builds your application API from Webpack. Laravel Mix consists of common CSS and Javascript preprocessors that offer you script, styles, and other compilations.

For example, if you want some set of specific style formats for your application file, like:


Copy Text

mix.styles([
  'public/css/vendor/normalize.css',
 'public/css/styles.css'
], 'public/css/all.css');

Using Laravel Mix, your application will auto-create an all.css file from normalize.css and style.css. Hence, you can merge both the style sheets within a single all.css file instead of retrieving them individually. This hack will improve Laravel application performance.

11. Assets minifying

Your loading file turns huge when you implement the above performance optimization tip by compiling assets in one file. To overcome this issue, you may use the following command:


Copy Text

$ npm run production

Conclusion

We hope you liked the Laravel performance checklist for Laravel performance optimization. You must surely take a Laravel performance analysis and find out on your own which tips and tricks will help you have a great optimized app. We host skillfully experienced Laravel application developers who assure you of the fastest responding business apps.

To improve the Laravel performance tuning of your Laravel application, hire Laravel developers from us, to get the job done at your convenience.

Frequently Asked Questions (FAQs)

Easy steps to ensure Laravel website speedy performance are clearing cache(config & routing), using minimal and essential packages only, eager loading, and fetching the bare minimum database queries.

Below is the list of points to consider to reduce page load time in Laravel:

  • Always use the latest Laravel version.
  • Follow the practice of using Artisan Commands.
  • Use packages that suit your application.
  • Routes Caching and Config Caching.

Config caching is the best way to decrease memory usage in your laravel application. Database chunking is also a way to reduce memory usage.

Eloquent ORM (Object Relational Mapper ) is included within Laravel, which provides simple and attractive data implementation while working on a Database.

Laravel News Links

What Are NFA Trusts?

https://cdn.athlonoutdoors.com/wp-content/uploads/sites/8/2012/03/nfa-2.jpg

Many weapons parts are federally regulated like SBRs. Keep them safe with NFA trusts. A prevalent misconception exists among the general public, and the majority of gun owners, that silencers are illegal. Lump machine guns and short-barreled rifles into that questionable group, too. To the better informed, all the previously mentioned weapons can be legally owned by paying a $200 tax and filling out ATF Form 5320.4, also referred to as Form 4.

The most common manner in which to obtain restricted Class III weapons is to fill out the Bureau of Alcohol, Tobacco and Firearms (BATF) Form 4 and register the weapon as “individual” ownership. The second classification, “corporations,” allows incorporated entities to own Class III weapons. A third registration method is to assign your ownership to an NFA trust.

NFA Trusts Are a Popular Method to Own NFA Guns

Creating a trust to own Class III weapons has risen in popularity over the past two years, owing to a couple of reasons. As a part of the background check process, the chief law enforcement officer in the community where you live is required to sign off on the Form 4. NFA trusts are a popular option for those communities where that LEO refuses to sign off on the form. The second reason that trusts have become more popular is the belief that Class III applications registering ownership to a trust get approved in less than the two to eight months it has historically taken to get approval.

The popularity of creating a trust to take ownership of Class III weapons deserves a hard look to weigh the pros and cons associated with this choice. Keep in mind that I am not an attorney. For this reason, I am not making any recommendations that could be construed as legal advice. I am merely presenting the views of two knowledgeable attorneys on the subject, as well as other experts on the subject. Going beyond using a trust to own National Firearms Act (NFA) regulated Title 2 weapons, this method of ownership may be used in states where Title 1 weapons come under close personal scrutiny, too. (Title 1 firearms are the kind that you can go to Wal-Mart or the local gun shop to buy.) An attorney in your state should make that judgment, though.

nfa-2
Handy around barricades, short-barreled rifles are excellent competitors in 3-Gun competitions. Photo courtesy Matt Howard

Before diving into the issue of NFA trusts, let’s examine registering weapons under a corporation to help clear the air. Some of the pitfalls of using a corporation instead of a trust include registration of the corporation on an annual basis that require fees from state and local municipalities, filing taxes and maintaining a board of directors. If the corporation is dissolved, dealing with the assets, such as NFA items, can be difficult legally.

Legal Advice on an NFA Trust

A trust is an estate-planning document. A trust lives on beyond the life of the person establishing the trust. To get an idea of the benefits of creating an NFA trust, I spoke with David Goldman, an attorney from Florida. He established GunTrustLawyer.com, and created a network of lawyers who specialize in creating NFA trusts. “The biggest reason that people use trusts is that the chief LEO won’t sign off,” Goldman said. “One of our most frequent users for trusts is police officers—when budgets are tight and the officers want to arm themselves with short-barreled rifles, but their chief won’t sign off. Privacy is another matter.”

nfa-1
Sun Devil lower. Jeremy Clough photo

I don’t advocate allowing felons to own firearms. Certain legal judgments don’t take into account every case, though. And, with 50 percent of marriages ending in divorce, it complicates some gun ownership situations. “You don’t have to be engaged in criminal activity to be a prohibited person,” Goldman said. “I had a client injure a child in a helicopter accident and was convicted of child endangerment, which made him a ‘prohibited’ person. If his 12 machine guns hadn’t been in a trust, they would have been lost.”

Stories abound of false charges brought by angry spouses embroiled in divorce proceedings. “I had a client throw a cup of water and he was charged with spousal abuse, and became a prohibited person,” Goldman added.

“A person cannot purchase a machine gun without a background check just by using a trust. The gun or firearms trust merely prevents the local CLEO (Chief Law Enforcement Officer) from arbitrarily denying fully qualified individuals the ability to exercise their constitutional right to purchase a firearm. An NFA trust does not make it easier for a criminal to purchase machine guns, silencers, and SBRs because of the ease in which these items can be tracked back to the purchaser.

nfa
Photo courtesy SureFire

“Besides allowing individuals to protect their right to purchase firearms, these trusts provide protections for the families and friends of gun owners that are not available with individual ownership. Through the traditional purchase route, many individuals are at risk of criminal activity and prosecution for permitting a friend, spouse, parent or child use or have access to the items. In addition, individual ownership does not deal with important issues, such as incapacity or death of the firearm owner. Likewise, a gun trust addresses the transfer of these firearms to heirs that may not be eligible to receive them, such as children or people living in a state where Title II firearms are not permitted. As a gun trust lawyer, I have seen many individuals who were forming corporations, trusts, and LLCs that were generic in nature and did not address their needs. Due to these errors, they placed their families, friends and children at unnecessary risk—a risk that can be avoided with an adequate NFA gun trust.”

nfa-5
Jeremy Clough photo

More Aspects

After a long conversation with Mr. Goldman, I related my interest in setting up an NFA trust with fellow writer, shooter and attorney, Jason Wong. A couple months ago, at a camp house in Wyoming, Wong said, “You have to be careful when setting up an NFA trust. I’ve talked to several people who want to take ‘will maker’ software and create a gun trust. There are too many variables in state law to just create a trust in this manner. You run the risk of creating an invalid trust.”

Wong summarized his caution best in a recent article on Tactical-Life.com: “In some jurisdictions, local chief law enforcement officers will refuse to sign the Form 4 certification, and it can be nearly impossible to complete the form,” Wong said. “In these instances, some buyers have resorted to using corporations, limited liability companies, or a trust to avoid the law enforcement certification requirement. When a non-person entity (such as a corporation or trust) is used to purchase NFA firearms, the requirements for a photo and law enforcement certification are waived by the ATF.

“If the buyer is self-employed, he may have already formed a corporation or LLC. In other cases, buyers often form corporations and trusts solely for the purchase of NFA firearms. If a buyer lives within a jurisdiction where a law enforcement certification is difficult or impossible to obtain, he may wish to explore one of these options. Buyers should speak with a lawyer about potential advantages and risks when considering the use of a corporation or a trust. Potential risks include the loss of all firearms possessed by a corporation or trust if the formation and administrative procedures required of the entity are not followed properly.”

nfa-8
The real difference between a standard lower and one for legal SBRs is the BATFE registration. Jeremy Clough photo

“Depending on the state, it can be as easy as signing a piece of paper and have it witnessed and notarized,” Goldman said in regards to completing a NFA trust. “We participate in the fees for providing the information and federal guidance and the local attorney handles the state issues. It can take 24 hours to turn them around to another attorney, but it usually takes a week.”

Cost of Security

Checking on the cost of establishment, I find it common for estate trusts to run in the $1,500 range. “In most states, we try to find attorneys who will prepare the Gun Trusts for a total of $600,” Goldman said.

“There’s a rumor that trusts take half as long to get approval as individual applications,” John Hollister with Advanced Armament Corporation said. “It’s logical because it takes less time to review since no fingerprints are required. There are only 12 examiners who review NFA applications. On July 1, 2011, the NFA application examiners were reshuffled from categorizing based upon the first letter of the last name of the applicant to being divided by state of applicant.” Hollister went on to speculate that individual Form 4 approval would be faster in the near future, owing to the reorganization of application examiners.

If you are in the market to purchase a silencer, machine gun, short-barreled rifle or other NFA weapon, consider all the options carefully. If you choose to form a trust, ensure that you weigh carefully the do-it-yourself route. I’ll be using a local attorney to set up mine.

nfa-lead

The post What Are NFA Trusts? appeared first on Tactical Life Gun Magazine: Gun News and Gun Reviews.

Tactical Life Gun Magazine: Gun News and Gun Reviews