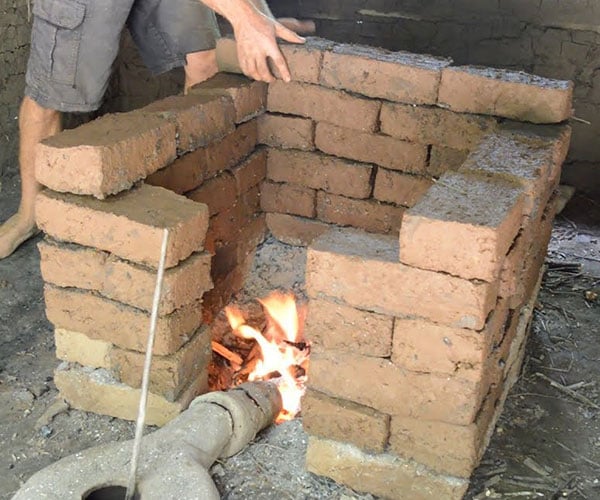
Primitive Technology made durable, permanent and water-resistant clay bricks by firing them on a kiln. The hardened bricks can then be used to make a larger kiln, like a primitive self-replicating factory.
Just another WordPress site
Primitive Technology made durable, permanent and water-resistant clay bricks by firing them on a kiln. The hardened bricks can then be used to make a larger kiln, like a primitive self-replicating factory.

You don’t need to wade through all the YouTube chaff any more looking for a few grains of wheat in search of worthwhile shooting lessons and tips. And getting access to learn from the industry’s top pros is difficult and expensive.
Now, however, OnVirtus, a new online education site, is offering firearms education featuring lessons from some of the best shooting professionals in the business.
TTAG readers can get a 20% discount off the subscription price by using discount code TTAG20 at checkout.
Here’s their press release . . .
OnVirtus Launches Its First Series of Classes from Shooting Professionals
Box Springs, GA – OnVirtus is pleased to introduce the new era of firearms education. During the 2019 NRA Annual Meetings, the OnVirtus.com website will launch its first series of classes taught by the most accomplished firearms professionals in the industry.
“In the past, it’s been difficult to gain access to high-level instructors without sacrificing a lot of time and money. We wanted to give everyone access to good, high quality, instruction,” said Daniel Horner, founder of OnVirtus. “If I had access to this type of a website when I was younger, it would have taken years off my training.”
OnVirtus hosts videos of the best instructors that have proven their capabilities in competition or combat.
With this initial launch, you will see lessons from:
- Jerry Miculek – specializing in 3-gun and revolver
- Shane Coley – specializing in USPSA Limited Division
- Max Michel – specializing in USPSA Open and Carry Optics
- Daniel Horner – specializing in 3-gun and long range rifle
- Todd and Colby Hodnett – specializing in long range rifle and ballistics
- Lena Miculek – specializing in PCC and 3-gun
- Jake Vibbert – specializing in precision rifle
- Brandon Green – specializing in NRA High Power
- True Pearce – specializing in the legalities of concealed carry
More instructors will be added soon, to include:
- Vincent Hancock – specializing in shotgun
- JJ Racaza – specializing in IPSC Limited and Open
- Eric Grauffel – specializing in IPSC
- James Henderson – specializing in NRA Bullseye handgun
- Kenda Lenseigna – specializing in cowboy mounted shooting
There are hours of content on the website, and more will be added on a constant basis. The price to access all the videos from all the instructors is only $124.99 for an annual membership. Videos are presented in small, specific clips that allow you to find exactly what you’re looking for in seconds. Furthermore, the members are encouraged to ask the instructor(s) questions so that future topics can be tailored to what the members want to learn more about.
Visit OnVirtus.com to accelerate your learning curve in multiple shooting disciplines.
via The Truth About Guns
OnVirtus Offering Online Firearms Education Taught by Top Professionals
TEXT and BLOB are special types in MySQL/MariaDB. This article helps to understand them and use them properly.
The post TEXT and BLOB good practices appeared first on Federico Razzoli.
Mounting a new rifle scope correctly is pretty important. If done wrong, you will constantly struggle with finding a good position behind the scope and the adjustments you make when shooting won’t make sense.
There are two keys to properly mounting a scope. First, make sure the scope is in line with the barrel. Second, make sure the scope is square to the world.
You get the scope in line with the barrel by first getting the gun level, then placing the scope directly on top. The scope is then leveled so that the vertical reticle line — and by extension the elevation adjustment — is in line with gravity. This is often done with bubble levels.
Level the gun by placing a bubble on a flat surface like the action rails or Picatinny/Weaver rails.
An example of a bubble level placed on the action rails. Courtesy Author
An example of a bubble level placed on a Picatinny rail. Courtesy Author
Once you know your rifle is level, you then level the scope by putting a bubble on top, specifically on the top of the elevation turret.
Courtesy Author
Once both bubbles read level you then torque the scope ring screws to spec without disturbing anything. The scope is now level to the gun which is level to the world. This will allow all drop compensation to work properly without adding mystery drift and unexplainable dope errors at distance.
Another good way to see if your reticle is properly level is to use a plumb line. It ultimately accomplishes the same thing as a bubble level, though it tends to be more accurate.
Ideally, I will do both. Hang a plumb line (something weighted at the end of a piece of string) in front of the rifle so it’s visible, but has a similar thickness to your scope’s reticle lines.
The white line is nylon string commonly found in hardware stores. Courtesy Author
Level the gun with a bubble, level the scope with a bubble and fine-tune the scope with the plumb line. There should be one consistent line from the string through the reticle.
It’s critical that the gun’s bubble be level when doing this. If the scope’s bubble is a little off, but the reticle matches the plumb line, I will defer to the plumb line. That’s because the turrets aren’t always perfectly square to the lead screw/reticle. Fine-tuning with a plumb line should eliminate small errors caused by this.
I hold to compensate for drop, so this is good enough for me. If you dial in for drop, you might want to run the elevation turret to the top of its movement and back down, ensuring that it stays in line with the plumb.
The reticle should be in line with the turret screw, so they should match, but scopes wear out, things break and manufacturers make mistakes. It doesn’t hurt to double-check that everything is running the way it’s supposed to.
The flat portion at the bottom of the turret housing is the best surface on a scope to use when squaring.
Unfortunately, it’s at the bottom, so not a very convenient place for a bubble. If you have a bubble setup that will work, use it on that surface instead of the top of the turret. I know guys who have stacked feeler gauges between the scope base and the top rail of the rifle to make them as parallel as possible.
This isn’t viable for all rifle and scope mount configurations, but I’ve heard it works quite well.
When tightening the scope ring halves together, you will have to do it in stages. In the beginning, the rings should be loose enough to allow the scope to move while being tight enough to stop it from flopping over due to the weight of the turrets.
My figures are more than enough for this. Courtesy Author
Once level, tighten it a little then re-confirm that everything is level. Sometimes the scope will move. You should have enough wiggle room for fine adjustments.
Carefully tighten to spec and re-confirm. You will want to tighten the screws down in a cross pattern and tighten both rings at the same time. Don’t tighten one completely before you’ve even started tightening the other.
Make sure the top half of the ring is evenly mounted. The gaps on either side of the scope should be equal.
Courtesy Author
Courtesy Author
Torque values for scope ring screws and scope mount cross bolts will vary. Refer to your product’s literature for its recommended inch-pound values. The Wheeler Engineering – Fat Wrench is inexpensive and handy for this job.
Never Loctite your ring screws. Torque them to spec and confirm torque before shooting.
Next is a little shooting voodoo; all the guys I’ve met who are obsessed with accuracy will torque their scope rings screws in the exact same pattern every time. That way the pressure is being applied exactly the same, minimizing any shifts that could be caused by new stress.
This is done when confirming that the screws are still torqued to spec before you go shoot. This is likely just superstition, but it also can’t hurt. It’s also not something I personally do.
Eye relief is the distance your eye should be from the scope to obtain the maximum field of view when looking at your target.
Too close or too far will result in scope shadow. Eye relief distance varies for different scopes and changes depending on how zoomed in it is. Set your eye relief to whatever position and power you will most likely be shooting in.
Keep in mind that your head’s natural position on the stock changes depending on your shooting position. It won’t be the same in the prone as it is when standing. If this is a short-range hunting rifle that will be shot from sticks on 4-6 power zoom, set up a similar shooting position to establish your eye relief.
The important part is that your head is in the same position on the stock when the eye relief is set. If you will be shooting the rifle from a bench with the zoom maxed out, set your eye relief for that. Get in position while sitting, zoom in all the way and move the scope forward or back until the eye relief is correct.
Depending on how your scope is mounted to the rifle, you may need to do this by sliding the scope itself forward and back inside the rings. Because of this I usually determine my eye relief before leveling the scope. If you have a ton of rail space like on a flat top AR-15, eye relief can be easily changed by moving the scope and rings forward or back.
A scope’s “correct” position on the rifle is 100% shooter-dependent. If you don’t have a specific position that you will be shooting in, set the eye relief in the prone position at max power. When shooting in alternate positions you will have some leeway and adjustment ability with your head position. When prone you can’t as easily or comfortably adjust your head position forward and back. That’s why setting the eye relief for this position is a good default.
If I have plenty of rail space to properly adjust my eye relief, I will also set the scope in the rings so that the turret housing is touching the back side of the front ring.
Courtesy Author
This may be more voodoo, but it was something my sniper section did. By butting the scope up to the front rings as pictured, you minimize the chance of the scope sliding in the rings under recoil.
The rearward recoil force of the gun when fired is sharp and strong. Throughout the entire firing cycle that’s when the scope is most likely to move in the rings.
Setting the scope in the rings like that is only possible if eye relief is not set by moving the scope in the rings. Since plenty of scopes are set without this in mind, it might not be a thing, so take it as you will.
Following that same principle of recoil being the strongest force exerted on the scope, press the mount forward on the rails as you tighten it down.
Courtesy Author
This too should eliminate any chance of the mount — and by extension the scope — moving under the force of recoil.
Lapping your rings increases the rings’ holding force by increasing the surface contact between ring and scope. It also evens out the pressure, decreasing or eliminating stress points and ensures that both rings are properly aligned with each other.
The Wheeler lapping bar used to lap the rings. Courtesy Scheels
Leveling scopes can be aggravating since they don’t always want to cooperate. It’s frustrating getting everything level the way you want only to have it move when you start tightening the screws. But, doing it right and getting it as close to perfect as possible is well worth the time and effort.
Mounting the rifle in a gun vise, shooting sled or something similar that gives you the flexibility to make the gun level while keeping it fixed in place is a big help. That being said, I’ve leveled more scopes with the rifle sitting on its bipod than otherwise.
There are also jigs like Badger Ordinance – Dead Level Scope Leveling Device that allow you to level the scope in the rings independent of the rifle, though this only works if you have the rail space to fine-tune your eye relief. You could try marking where you want the scope set in the rings for proper eye relief and then level it in the jig, ensuring the mark stays in the proper spot…if you really want to use the jig.
There are plenty of ways to level a scope. As is the case with so many things in the shooting world, the result outweighs the method. As long as the scope winds up properly leveled to the gun (and the world) you’ve succeeded.

Lavalier microphones, also known as lapel microphones, are designed to capture audio from a single subject. By clipping the microphone to clothing, audio capture will be clear and consistent regardless of which direction the camera is pointing.
Wireless lavalier microphones simplify the process further by removing cables and allowing your subjects to move around freely. In many situations, they’re almost a requirement.
Here are the best wireless lavalier microphones for all budgets.
Fifine Wireless Lav Mic
Fifine Wireless Lav Mic
via MakeUseOf.com
The 6 Best Wireless Lavalier Microphones

macOS is an intuitive operating system, so you don’t have to spend lot of time learning the basics; Knowing this, why should you learn and take advantage of the Unix command line available on your Mac? We have four good reasons:
With so many Mac commands, it’s often difficult to remember and use them all. We’re here to help with a detailed cheat sheet of Mac Terminal commands you can use to unlock enhanced productivity on your system.
Launch the Terminal app from Applications > Utilities or search for it via Spotlight. Then you can get started with some of the powerful commands below.
| Command | Action |
|---|---|
| Shortcuts | |
| Tab | Auto-complete file and folder names |
| Ctrl + A | Go to the beginning of the line you’re currently typing on |
| Ctrl + E | Go to the end of the line you’re currently typing on |
| Ctrl + U | Clear the line before the cursor |
| Ctrl + K | Clear the line after the cursor |
| Ctrl + W | Delete the word before the cursor |
| Ctrl + T | Swap the last two characters before the cursor |
| Esc + T | Swap the last two words before the cursor |
| Ctrl + L | Clear the screen |
| Ctrl + C | Kill whatever you’re running |
| Ctrl + D | Exit the current shell |
| Option + → | Move cursor one word forward |
| Option + ← | Move cursor one word backward |
| Ctrl + F | Move cursor one character forward |
| Ctrl + B | Move cursor one character backward |
| Ctrl + Y | Paste whatever was cut by the last command |
| Ctrl + Z | Puts whatever you’re running into a suspended background process |
| Ctrl + _ | Undo the last command |
| Basics | |
| / (Forward Slash) | Top level directory |
| . (Single Period) | Current directory |
| .. (Double Period) | Parent directory |
| ~ (Tilde) | Home directory |
| sudo [command] | Run command with the security privileges of the super user |
| nano [file] | Opens the Terminal editor |
| open [file] | Opens a file |
| [command] -h | Get help about a command |
| man [command] | Show the help manual of the command |
| Change Directory | |
| cd | Home directory |
| cd [folder] | Change directory, e.g. cd Documents |
| cd ~ | Home directory |
| cd/ | Root of the drive |
| cd – | Previous directory or folder you last browsed |
| pwd | Show your working directory |
| cd.. | Move up to the parent directory |
| cd../.. | Move up two levels |
| List Directory Contents | |
| ls | Display the name of files and subdirectories in the directory |
| ls -C | Force multi-column output of the listing |
| ls -a | List all entries including those with .(period) and ..(double period) |
| ls -1 | Output the list of files in one entry per line format |
| ls -F | Display a / (slash) immediately after each path that is a directory, * (asterisk) after executable programs or scripts, and @ after a symbolic link |
| ls -S | Sort files or entries by size |
| ls -l | List in a long format. Includes file mode, owner and group name, date and time file was modified, pathname, and more |
| ls -lt | List the files sorted by time modified (most recent first) |
| ls -lh | Long listing with human readable file sizes in KB, MB, or GB |
| ls -lo | List the file names with size, owner, and flags |
| ls -la | List detailed directory contents, including hidden files |
| File Size and Disk Space | |
| du | List usage for each subdirectory and its contents |
| du -sh [folder] | Human readable output of all files in a directory |
| du -s | Display an entry for each specified file |
| du -sk* | sort -nr | List files and folders, totaling the size including the subfolders. Replace sk* with sm* to list directories in MB |
| df -h | Calculate your system’s free disk space |
| df -H | Calculate free disk space in powers of 1,000 (as opposed to 1,024) |
| File and Directory Management | |
| mkdir <dir> | Create new folder named <dir> |
| mkdir -p <dir>/<dir> | Create nested folders |
| mkdir <dir1> <dir2> <dir3> | Create several folders at once |
| mkdir "<dir>" | Create a folder with a space in the filename |
| rmdir <dir> | Delete a folder (only works on empty folders) |
| rm -R <dir> | Delete a folder and its contents |
| touch <file> | Create a new file without any extension |
| cp <file> <dir> | Copy a file to the folder |
| cp <file> <newfile> | Copy a file to the current folder |
| cp <file>~/<dir>/<newfile> | Copy a file to the folder and rename the copied file |
| cp -R <dir> <"new dir"> | Copy a folder to a new folder with spaces in the filename |
| cp -i <file><dir> | Prompts you before copying a file with a warning overwrite message |
| cp <file1> <file2> <file3>/Users/<dir> | Copy multiple files to a folder |
| rm <file> | Delete a file (This deletes the file permanently; use with caution.) |
| rm -i <file> | Delete a file only when you give confirmation |
| rm -f <file> | Force removal without confirmation |
| rm <file1> <file2> <file3> | Delete multiple files without any confirmation |
| mv <file> <newfilename> | Move/rename |
| mv <file> <dir> | Move a file to the folder, possibly by overwriting an existing file |
| mv -i <file> <dir> | Optional -i flag to warn you before overwriting the file |
| mv *.png ~/<dir> | Move all PNG files from current folder to a different folder |
| Command History | |
| Ctrl + R | Search through previously used commands |
| history n | Shows the previous commands you’ve typed. Add a number to limit to the last n items |
| ![value] | Execute the last command typed that starts with a value |
| !! | Execute the last command typed |
| Permissions | |
| ls -ld | Display the default permission for a home directory |
| ls -ld/<dir> | Display the read, write, and access permission of a particular folder |
| chmod 755 <file> | Change the permission of a file to 755 |
| chmod -R 600 <dir> | Change the permission of a folder (and its contents) to 600 |
| chown <user>:<group> <file> | Change the ownership of a file to user and group. Add -R to include folder contents |
| Processes | |
| ps -ax | Output currently running processes. Here, a shows processes from all users and x shows processes that are not connected with the Terminal |
| ps -aux | Shows all the processes with %cpu, %mem, page in, PID, and command |
| top | Display live information about currently running processes |
| top -ocpu -s 5 | Display processes sorted by CPU usage, updating every 5 seconds |
| top -o rsize | Sort top by memory usage |
| kill PID | Quit process with ID <PID>. You’ll see PID as a column in the Activity Monitor |
| ps -ax | grep <appname> | Find a process by name or PID |
| Network | |
| ping <host> | Ping host and display status |
| whois <domain> | Output whois info for a domain |
| curl -O <url/to/file> | Download file via HTTP, HTTPS, or FTP |
| ssh <username>@<host> | Establish SSH connection to <host> with user <username> |
| scp <file><user>@<host>:/remote/path | Copy <file> to a remote <host> |
| Homebrew | |
| brew doctor | Check brew for potential problems |
| brew install <formula> | Install a formula |
| brew uninstall <formula> | Uninstall a formula |
| brew list | List all the installed formulas |
| brew search | Display available formulas for brewing |
| brew upgrade | Upgrade all outdated and unpinned brews |
| brew update | Fetch latest version of homebrew and formula |
| brew cleanup | Remove older version of installed formula |
| brew tap homebrew/cask | Tap the cask repository from GitHub |
| brew cask list | List all installed casks |
| brew cask install <cask> | Install the given cask |
| brew cask uninstall <cask> | Uninstall the given cask |
| Search | |
| find <dir> -name <"file"> | Find all files named <file> inside <dir>. Use wildcards (*) to search for parts of filenames |
| grep "<text>" <file> | Output all occurrences of <text> inside <file> (add -i for case insensitivity) |
| grep -rl "<text>" <dir> | Search for all files containing <text> inside <dir> |
| Output | |
| cat <file> | Output the content of <file> |
| less <file> | Output the contents of <file> using the less command that supports pagination and more |
| head <file> | Output the first 10 lines of <file> |
| <cmd> > > <file> | Appends the output of <cmd> to <file> |
| <cmd> > <file> | Direct the output of <cmd> into <file> |
| <cmd1> | <cmd2> | Direct the output of <cmd1> to <cmd2> |
There are lot of commands in this cheat sheet. But you don’t have to learn all of them at once! Pick a few that integrate well with your workflow and save you the most time. Once you’ve mastered these commands, there’s still more to learn about the Terminal to enhance your experience with it.
For further reading, we’ve looked at how to customize the Mac Terminal and make it more useful.
Read the full article: The Mac Terminal Commands Cheat Sheet

I don’t know how good pliers are made (rivet joints and box joints) so that they don’t seize up immediately. One extra whack of the big factory hammer seems to me like it’d wreck most efforts to make a good pair of pliers, or almost anything with a similar joint. They usually seem to get it close enough though, so good on ‘em.
Too many pliers at the stores are packaged so you can’t really get a good feel for the condition of a tool’s joint before you walk away (with it or without). I’ve got a few pliers with silky joints, and they’re an absolute pleasure to use. I’ve had (past tense!) some with sorta sticky joints that were more than a little irritating to use. I’ve had a few that were pretty well stuck, and so got zero use.
Breaking them in just didn’t seem to be worth the effort.
Bought another German pair around Christmas, mail order, good sale price. Too sticky to use. Dang. So I checked the solution machine at YouTube and got this:
Some Permatex compound ($5), some WD40, not a whole lot of work, and Bang! All my previously irritating pliers are silky! I’ve even picked up some truly rusty old abused pliers at Flea Markets and now they’re silky too. Last weekend I found a pair of Kraeuter pliers (a model last made in 1921) and, after some restoration work, they may be better than new. The process is cheap, only a little bit messy and easy to clean up. Rescue those pliers! Oh, and that new German pair (from NWS) is now terrific!
— Wayne Ruffner
Permatex 80036 Valve Grinding Compound ($5)
Available from Amazon
via Cool Tools
Loosen Plier Joints with Valve Grinding Compound
The M16 has a fascinating history in many ways. Its appearance is iconic, and has certainly become part of American culture. It is also a symbol, a microcosm, representing both American ingenuity, blunders…but also triumph.
The M16 design and development process itself was a brutal slog, resulting in a number of wrongheaded missteps, and ultimately in the tragic deaths of service members due to bureaucratic idiocy. Eventually, however, it became, in many ways, a superior rifle to the ones it replaced and led to the current service rifle of our armed forces, the M4 carbine.
It began with a comedy of errors, but ended in success. I’m going to skip a few details here and there to keep this a reasonable length. If someone wanted to commission me to do a book-length feature on this topic (if you’ve got the money, honey, I’ve got the time), get with me after this.
The history of M16 starts, of course, with the
. The Korean War impressed upon the armed forces that while the M1 was accurate, powerful and reliable (when maintained) the poor carrying capacity and relatively heavy recoil made it ill-suited to attacks by massive waves of enemy troops which requires lots of rounds being shot at them.
The M1 Carbine fared no better; while the greater capacity was in its favor, the rather limp 110-grain .30 caliber bullet (less powerful than a .30-30) didn’t have the necessary wallop.
Since most killing in combat took place at rather close range (within 150 yards) they also decided that there were too many weapons systems in service. Why bother issuing the M1 Garand, M1 Carbine, Thompson submachine gun AND the BAR when you could replace them with a single gun that fired the same cartridge?
The government wanted a .30 rifle caliber cartridge, since that’s what they were used to. Additionally, the new .308 Winchester round offered a lot compared to .30-06. With the shorter case length, slightly flatter trajectory and roughly equivalent power, the soldier loses no firepower, but more ammunition can be shipped in the same size of cargo container.
So, they started taking submissions for a new rifle.
Armalite, a division of Fairchild, and their design wiz
, created a semi-auto rifle that handled a .30 caliber cartridge (the then-new .308 Winchester) with a simpler semi-automatic design and lightweight construction. That rifle, the AR-10, used a direct gas impingement system to cycle the bolt.
The design was ingenious at the time. The AR-10 cycles exhaust gases directly back into the receiver, blowing the bolt backward and ejecting the spent round. The buffer spring in the stock compresses and then sends the bolt forward, cocking the gun and cycling the next round into the chamber.
The AR-10, was fitted with furniture made of Bakelite (a hardy, somewhat heat-resistant resinous plastic notable for being the first totally synthetic plastic) and an alloy receiver, weighed less than 7 pounds unloaded.
It had most of the features you’re familiar with. There was a carrying handle, rear aperture sight and front blade sight, polymer stock, pistol grip and forend, the charging handle in the carrying handle rather than on the receiver, flash suppressor, an adjustable gas compensator and the hinged takedown design.

The T-47, an early prototype of the M14 rifle. Credit: Springfield Armory National Historic Site [Public domain], via Wikimedia Commons
Despite very favorable impressions in testing, the T44 rifle submitted by the Springfield Armory (the actual one; not the gun company) was chosen instead,
. The M14 was an improved M1 Garand design; the firing mechanism was almost unchanged, operation and maintenance were almost unchanged except that the M14 chambered .308 (later standardized by NATO as the 7.62mm NATO) ammunition, was magazine-fed with a 20-round box magazine instead of en bloc clips and was select fire-capable.
However, some folks in the armed forces felt almost right away that a smaller cartridge would solve several inherent problems. The .308/7.62mm round is effective, no doubt, but its recoil is rather stout when firing rapidly in semi-auto, and darn tough in full-auto. If a smaller cartridge could be created that had killing power out to, say, 500 yards, with lighter recoil, it would increase the effective lethality of the soldier wielding it.
That was exactly the thinking of General Willard Wyman, who put out a proposal in 1957 for a lightweight infantry rifle that chambered a .223-caliber bullet, effective to 500 yards and with more velocity than M1 Carbine ammunition. Since such a rifle would be easier to fire in close-quarters combat, it would replace the M1 Carbine, M1 Garand and Thompson as well.
Eugene Stoner set to work, scaling his rifle down for the new cartridge (commercialized as the .223 Remington) and had working prototypes in testing by 1958. The new rifle, then-designated the AR-15, actually worked very well.
The receiver, made of stamped alloy, was easy to make at scale since it didn’t require machining. The receiver and barrel, chrome-lined for durability, made it very reliable. The cyclic rate of 600 to 700 rounds per minute was very good and the rifle was quite controllable in full-auto firing. The barrel – with a fast 1:12 twist – made it quite accurate.
Now, by 1958, the M14 wasn’t Facebook official quite yet. Armalite, which was made into a going concern by Fairchild’s investment, had yet to sell any guns beyond the AR-7 (which was only sold in limited numbers to the Air Force) and was tired of having nothing to show for all its hard work. When General Maxwell Taylor ix-nayed the AR-15 in favor of the M14, Armalite decided it had had enough and sold the AR-15 and all rights to Colt.
Colt realized the potential of the AR-15 (and thus the M16) and decided to hang in there. Army trials demonstrated the easier operation but also the efficacy of the rifle, leading to General Curtis LeMay of the US Air Force ordering more than 8,000 of them and declaring it the standard service rifle of the Air Force in 1960.
.jpg)
Curtis LeMay. Credit: US Air Force Link
Around that same time, the conflict in Vietnam was heating up. M14s in the hands of US “advisors” were already showing some weaknesses. Full-auto operation was all but untenable and semi-auto operation and the heavy rifle wasn’t much better when you’re confronted by a close-range ambush or mass charge. The M1 Carbine lacked stopping power, so that was clearly a non-starter.
As a field test, a few thousand AR-15s in their early configuration were put in the hands of South Vietnamese troops for testing under fire. The results were overwhelmingly positive, and reports of the M16’s performance continued to make their way back to Washington.
However, a series of tests conducted by the US Army continued to favor the M14 despite reports from the field indicating the opposite. Secretary of Defense Robert S. McNamara ordered Cyrus Vance – then-Secretary of the Army – to look into why that was happening, and he discovered that the Army was (purposefully) testing match-grade M14s against off-the-rack M16 rifles.

Robert S. McNamara. Credit: Cecil Stoughton, White House photographer [Public domain], via Wikimedia Commons
McNamara called BS, and after having a look at the supply chain for the M14 (McNamara, prior to his service as SecDef, was a rising star at the Ford Motor Company, briefly serving as the company’s president) concluded that it wasn’t sustainable. So he told Taylor, et al., that their goose was cooked and ordered a whole lot of M16 rifles.
However, the old guard wasn’t done. They insisted on the installation of a forward assist in case of jams, which the M1 Garand and M14 had. Everyone who developed the rifle responded, “What are you doing forcing a round in that doesn’t want to go…just eject the thing!” but they would have none of it. The Air Force, however, went ahead; Air Force M16s lacked the forward assist. However, the Army version – the XM16E1 – were equipped with a forward assist. At that point, it was basically done.
By 1963, the M16 was adopted as the standard service rifle for the armed forces. Colt even started selling Colt Armalite Rifles and Colt Sporter Rifles to civilians, which were semi-auto versions for sport shooting. However, at this point, a few key revisions had been made to the M16 that severely compromised its use in the field.
The chrome lining of the receiver had been omitted, to save cost in manufacturing. And by 1964, DuPont informed the government that it couldn’t keep up with demand for propellant.
The .223 Remington cartridge was devised by seating a 55-grain .223-caliber bullet over IMR 4475, a stick powder. Olin came up with an alternative, WC 846, a ball powder. While WC 486 did the job of propelling a 55-grain projectile at 3,300 feet per second, it burned dirty and produced a lot more fouling. Colt also decided it was good idea to bill the rifle as “self-cleaning” and therefore, soldiers didn’t need a cleaning kit.
Early editions of the rifle, had a storage compartment in the stock which contained a cleaning kit. In the first few years of its service history in Vietnam, there was no cleaning kit in there, nor did many infantrymen receive one.
Prior to that, the rifle was known to function reliably. It was accurate at ranges up to 500 yards and lethal. It had few stoppages. Bureaucratic in-fighting and corner-cutting would end up costing many US Army soldiers and US Marines their lives.
By 1965, all troops in-country were issued M16 rifles. Reports started coming in of frequent stoppages, usually failures to eject caused by constant fouling; dead soldiers were found clutching a cleaning rod. Keeping the rifles in working order required constant cleaning, often more than was feasible.

PFC John Henson of the 101st Airborne cleans his M16 rifle. Credit: US Army Post-Work: User:W.wolny [Public domain], via Wikimedia Commons
This led those who had the option to reach for BARs, Stoner rifles and M14s issued to South Vietnamese forces, or picking up AK-47s from dead North Vietnamese and Viet Cong troops.
Eventually, the US Government decided to do something about it and started making some fixes. The chamber and bore were chromed to reduce fouling, cleaning kits were issued more liberally, and new lubricants and propellants were developed to make the gun run cleaner and more reliably.
They also added a birdcage flash suppressor and – in limited batches – created a variant that fired three-round burst instead of full auto.
The fixes worked, and the new variant with said improvements – the M16A1, which first entered service in 1967 – was immediately noted as a drastic improvement over the original.
By 1969, the M14 had been officially knocked off its perch, and the M16A1 remained the standard service rifle until the M16A2 was introduced in the 1980s.
During the Vietnam war, NATO was advised that they should switch to the 5.56mm round instead of the then-standard 7.62x51mm round. NATO pretty much agreed, creating the now-standard 5.56mm NATO round.
After the war, the new standard 5.56mm NATO round (and experience) required some updates, which the US Marines and the army started asking for by the end of the 70s. The Marines asked for a heavier end to the barrel, a flash suppressor with a closed bottom, and sights that could be adjusted for windage and elevation on the fly.
They also wanted a round handguard as opposed the triangular handguard that had been the standard for so long, and they wanted to be able to put a grenade launcher on it (because freedom). Additionally, the twist rate was to be changed to 1:7 to accommodate heavier NATO rounds, including 62-grain tracer ammunition.

M16A2 upper. Note the sight adjustment controls outside the carrying handle. Credit: Fourdee via Wikimedia Commons
The firing mechanism was also changed to three-shot bursts, as it was found the full-auto M16A1 lent itself to “spraying and praying” by inexperienced operators. Pretty much everyone agreed, and those changes were instituted by the mid-80s and the rifle re-designated the M16A2. This rifle served as the official rifle of the US armed forces from the 1980s through the first Gulf War.
A limited number of M16A3s, with full-auto capability instead of 3-round bursts, were made for Navy SEAL and other special operations groups. However, the M16A2 remained in service until…pretty much a few years ago when they were finally phased out of Marine Corps service.
Throughout the Vietnam war, a number of carbine-length versions of the M16 were created and used in various capacities, called the Colt Commando. It wasn’t much at long range but was well-liked for close-in work.
Colt set about tuning it up in the 1980s, eventually settling on a variant with a 14.5-inch barrel. This gave the rifle the optimum balance between accuracy and compact form, along with an adjustable stock which let it be compacted even more.

M4 Carbines in a live-fire exercise. Credit: US Marine Corps Sgt. Devin Nichols [Public domain], via Wikimedia Commons
The then-XM4 was dubbed the M4, and saw its first real deployment in Kosovo. It performed so well that the Army started issuing more and more of them, even ordering officers up to Lt. Colonel in rank to stop carrying pistols and carry an M4 instead. It also replaced submachine guns for most uses. It became so common that the US Army had phased the M16 almost entirely out of front-line service by the early 2000s.
The US Marines also made some revisions in recent years to create the M16A4 variant. The M16A4 eliminated the round handguard in favor of a quad-rail handgaurd by Knight’s Armament. The carry handle and sights were eliminated in favor of a Picatinny rail running the entire length of the receiver to the end of the handguard, and combat optics (red dot sights) added in lieu of iron sights.

M16A4 in combat with the US Marine Corps. Note the optic and quad-rail handguard. Credit: U.S. Marine Corps photo by Cpl. James L. Yarboro [Public domain], via Wikimedia Commons
The M16A4 also added a muzzle compensator instead of a flash suppressor, installed a heavier barrel and free-floated it for greater accuracy. Bolt-catch releases and charging handles were changed to allow ambidextrous operation, and the trigger was improved for an easier pull. The M16A4 was also issued in semi-auto only in addition to the burst mode. Limited numbers of rifles with adjustable stocks were also issued by the Marines.
However, these improvements came a little late in the game. M16A4 rifles were issued in limited numbers starting in 2014 and 2015, which happened to coincide with the announcement that the Marine Corps was switching entirely to the M4 Carbine.
Some other changes occurred along the way. No longer entirely satisfied with Colt’s products, the Army and the Marines have both changed providers to FN. FN had already been making M16A4s for the USMC, but is now also producing M4s for the US Army and the Marines…though the Marine Corps is also in the process of phasing out the M4 in favor of the M27 IAR, an improved AR design by Heckler and Koch.

A member of Marine Force Recon firing the M27 IAR, an H&K-designed rifle based heavily on the M16. Credit: Staff Sgt. Ezekiel Kitandwe [Public domain], via Wikimedia Commons
Today, the M16 has been all but completely phased out except for some select examples that are still in service in front line and reserve units. The M4 has pretty much replaced it, which itself
soon. But, as we all know, nothing lasts.
Feel like I missed any important details? Need to tell us you’re vegan…again? Sound off in the comments!
via The Truth About Guns
The Guide To M16 History That You Never Knew You Needed

