Schema Management Tips for MySQL & MariaDB

Database schema is not something that is written in stone. It is designed for a given application, but then the requirements may and usually do change. New modules and functionalities are added to the application, more data is collected, code and data model refactoring is performed. Thereby the need to modify the database schema to adapt to these changes; adding or modifying columns, creating new tables or partitioning large ones. Queries change too as developers add new ways for users to interact with the data – new queries could use new, more efficient indexes so we rush to create them in order to provide the application with the best database performance.

So, how do we best approach a schema change? What tools are useful? How to minimize the impact on a production database? What are the most common issues with schema design? What tools can help you to stay on top of your schema? In this blog post we will give you a short overview of how to do schema changes in MySQL and MariaDB. Please note that we will not discuss schema changes in the context of Galera Cluster. We already discussed Total Order Isolation, Rolling Schema Upgrades and tips to minimize impact from RSU in previous blog posts. We will also discuss tips and tricks related to schema design and how ClusterControl can help you to stay on top of all schema changes.

Types of Schema Changes

First things first. Before we dig into the topic, we have to understand how MySQL and MariaDB perform schema changes. You see, one schema change is not equal to another schema change.

You may have heard about online alters, instant alters or in-place alters. All of this is a result of work which is ongoing to minimize the impact of the schema changes on the production database. Historically, almost all schema changes were blocking. If you executed a schema change, all of the queries will start to pile up, waiting for the ALTER to complete. Obviously, this posed serious issues for production deployments. Sure, people immediately start to look for workarounds, and we will discuss them later in this blog, as even today those are still relevant. But also, work started to improve capability of MySQL to run DDL’s (Data Definition Language) without much impact to other queries.

Instant Changes

Sometimes it is not needed to touch any data in the tablespace, because all that has to be changed is the metadata. An example here will be dropping an index or renaming a column. Such operations are quick and efficient. Typically, their impact is limited. It is not without any impact, though. Sometimes it takes couple of seconds to perform the change in the metadata and such change requires a metadata lock to be acquired. This lock is on a per-table basis, and it may block other operations which are to be executed on this table. You’ll see this as “Waiting for table metadata lock” entries in the processlist.

An example of such change may be instant ADD COLUMN, introduced in MariaDB 10.3 and MySQL 8.0. It gives the possibility to execute this quite popular schema change without any delay. Both MariaDB and Oracle decided to include code from Tencent Game which allows to instantly add a new column to the table. This is under some specific conditions; column has to be added as the last one, full text indexes cannot exist in the table, row format cannot be compressed – you can find more information on how instant add column works in MariaDB documentation. For MySQL, the only official reference can be found on mysqlserverteam.com blog, although a bug exists to update the official documentation.

In Place Changes

Some of the changes require modification of the data in the tablespace. Such modifications can be performed on the data itself, and there’s no need to create a temporary table with a new data structure. Such changes, typically (although not always) allow other queries touching the table to be executed while the schema change is running. An example of such operation is to add a new secondary index to the table. This operation will take some time to perform but will allow DML’s to be executed.

Table Rebuild

If it is not possible to make a change in place, InnoDB will create a temporary table with the new, desired structure. It will then copy existing data to the new table. This operation is the most expensive one and it is likely (although it doesn’t always happen) to lock the DML’s. As a result, such schema change is very tricky to execute on a large table on a standalone server, without help of external tools – typically you cannot afford to have your database locked for long minutes or even hours. An example of such operation would be to change the column data type, for example from INT to VARCHAR.

Schema Changes and Replication

Ok, so we know that InnoDB allow online schema changes and if we consult MySQL documentation, we will see that the majority of the schema changes (at least among the most common ones) can be performed online. What is the reason behind dedicating hours of development to create online schema change tools like gh-ost? We can accept that pt-online-schema-change is a remnant of the old, bad times but gh-ost is a new software.

The answer is complex. There are two main issues.

For starters, once you start a schema change, you do not have control over it. You can abort it but you cannot pause it. You cannot throttle it. As you can imagine, rebuilding the table is an expensive operation and even if InnoDB allows DML’s to be executed, additional I/O workload from the DDL affects all other queries and there’s no way to limit this impact to a level that is acceptable to the application.

Second, even more serious issue, is replication. If you execute a non-blocking operation, which requires a table rebuild, it will indeed not lock DML’s but this is true only on the master. Let’s assume such DDL took 30 minutes to complete – ALTER speed depends on the hardware but it is fairly common to see such execution times on tables of 20GB size range. It is then replicated to all slaves and, from the moment DDL starts on those slaves, replication will wait for it to complete. It does not matter if you use MySQL or MariaDB, or if you have multi-threaded replication. Slaves will lag – they will wait those 30 minutes for the DDL to complete before the commence applying the remaining binlog events. As you can imagine, 30 minutes of lag (sometimes even 30 seconds will be not acceptable – it all depends on the application) is something which makes impossible to use those slaves for scale-out. Of course, there are workarounds – you can perform schema changes from the bottom to the top of the replication chain but this seriously limits your options. Especially if you use row-based replication, you can only execute compatible schema changes this way. Couple of examples of limitations of row-based replication; you cannot drop any column which is not the last one, you cannot add a column into a position other than the last one. You cannot also change column type (for example, INT -> VARCHAR).

As you can see, replication adds complexity into how you can perform schema changes. Operations which are non-blocking on the standalone host become blocking while executed on slaves. Let’s take a look at couple of methods you can use to minimize the impact of schema changes.

Online Schema Change Tools

As we mentioned earlier, there are tools, which are intended to perform schema changes. The most popular ones are pt-online-schema-change created by Percona and gh-ost, created by GitHub. In a series of blog posts we compared them and discussed how gh-ost can be used to perform schema changes and how you can throttle and reconfigure an undergoing migration. Here we will not go into details, but we would still like to mention some of the most important aspects of using those tools. For starters, a schema change executed through pt-osc or gh-ost will happen on all database nodes at once. There is no delay whatsoever in terms of when the change will be applied. This makes it possible to use those tools even for schema changes that are incompatible with row-based replication. The exact mechanisms about how those tools track changes on the table is different (triggers in pt-osc vs. binlog parsing in gh-ost) but the main idea is the same – a new table is created with the desired schema and existing data is copied from the old table. In the meantime, DML’s are tracked (one way or the other) and applied to the new table. Once all the data is migrated, tables are renamed and the new table replaces the old one. This is atomic operation so it is not visible to the application. Both tools have an option to throttle the load and pause the operations. Gh-ost can stop all of the activity, pt-osc only can stop the process of copying data between old and new table – triggers will stay active and they will continue duplicating data, which adds some overhead. Due to the rename table, both tools have some limitations regarding foreign keys – not supported by gh-ost, partially supported by pt-osc either through regular ALTER, which may cause replication lag (not feasible if the child table is large) or by dropping the old table before renaming the new one – it’s dangerous as there’s no way to rollback if, for some reason, data wasn’t copied to the new table correctly. Triggers are also tricky to support.

They are not supported in gh-ost, pt-osc in MySQL 5.7 and newer has limited support for tables with existing triggers. Other important limitations for online schema change tools is that unique or primary key has to exist in the table. It is used to identify rows to copy between old and new tables. Those tools are also much slower than direct ALTER – a change which takes hours while running ALTER may take days when performed using pt-osc or gh-ost.

On the other hand, as we mentioned, as long as the requirements are satisfied and limitations won’t come into play, you can run all schema changes utilizing one of the tools. All will happen at the same time on all hosts thus you don’t have to worry about compatibility. You have also some level of control over how the process is executed (less in pt-osc, much more in gh-ost).

You can reduce the impact of the schema change, you can pause them and let them run only under supervision, you can test the change before actually performing it. You can have them track replication lag and pause should an impact be detected. This makes those tools a really great addition to the DBA’s arsenal while working with MySQL replication.

ClusterControl
Single Console for Your Entire Database Infrastructure
Find out what else is new in ClusterControl

Rolling Schema Changes

Typically, a DBA will use one of the online schema change tools. But as we discussed earlier, under some circumstances, they cannot be used and a direct alter is the only viable option. If we are talking about standalone MySQL, you have no choice – if the change is non-blocking, that’s good. If it is not, well, there’s nothing you can do about it. But then, not that many people run MySQL as single instances, right? How about replication? As we discussed earlier, direct alter on the master is not feasible – most of the cases it will cause lag on the slave and this may not be acceptable. What can be done, though, is to execute the change in a rolling fashion. You can start with slaves and, once the change is applied on all of them, promote one of the slaves as a new master, demote the old master to a slave and execute the change on it. Sure, the change has to be compatible but, to tell the truth, the most common cases where you cannot use online schema changes is because of a lack of primary or unique key. For all other cases, there is some sort of workaround, especially in pt-online-schema-change as gh-ost has more hard limitations. It is a workaround you would call “so so” or “far from ideal”, but it will do the job if you have no other option to pick from. What is also important, most of the limitations can be avoided if you monitor your schema and catch the issues before the table grows. Even if someone creates a table without a primary key, it is not a problem to run a direct alter which takes half a second or less, as the table is almost empty.

If it will grow, this will become a serious problem but it is up to the DBA to catch this kind of issues before they actually start to create problems. We will cover some tips and tricks on how to make sure you will catch such issues on time. We will also share generic tips on how to design your schemas.

Tips and Tricks

Schema Design

As we showed in this post, online schema change tools are quite important when working with a replication setup therefore it is quite important to make sure your schema is designed in such a way that it will not limit your options for performing schema changes. There are three important aspects. First, primary or unique key has to exist – you need to make sure there are no tables without a primary key in your database. You should monitor this on a regular basis, otherwise it may become a serious problem in the future. Second, you should seriously consider if using foreign keys is a good idea. Sure, they have their uses but they also add overhead to your database and they can make it problematic to use online schema change tools. Relations can be enforced by the application. Even if it means more work, it still may be a better idea than to start using foreign keys and be severely limited to which types of schema changes can be performed. Third, triggers. Same story as with foreign keys. They are a nice feature to have, but they can become a burden. You need to seriously consider if the gains from using them outweight the limitations they pose.

Tracking Schema Changes

Schema change management is not only about running schema changes. You also have to stay on top of your schema structure, especially if you are not the only one doing the changes.

ClusterControl provides users with tools to track some of the most common schema design issues. It can help you to track tables which do not have primary keys:

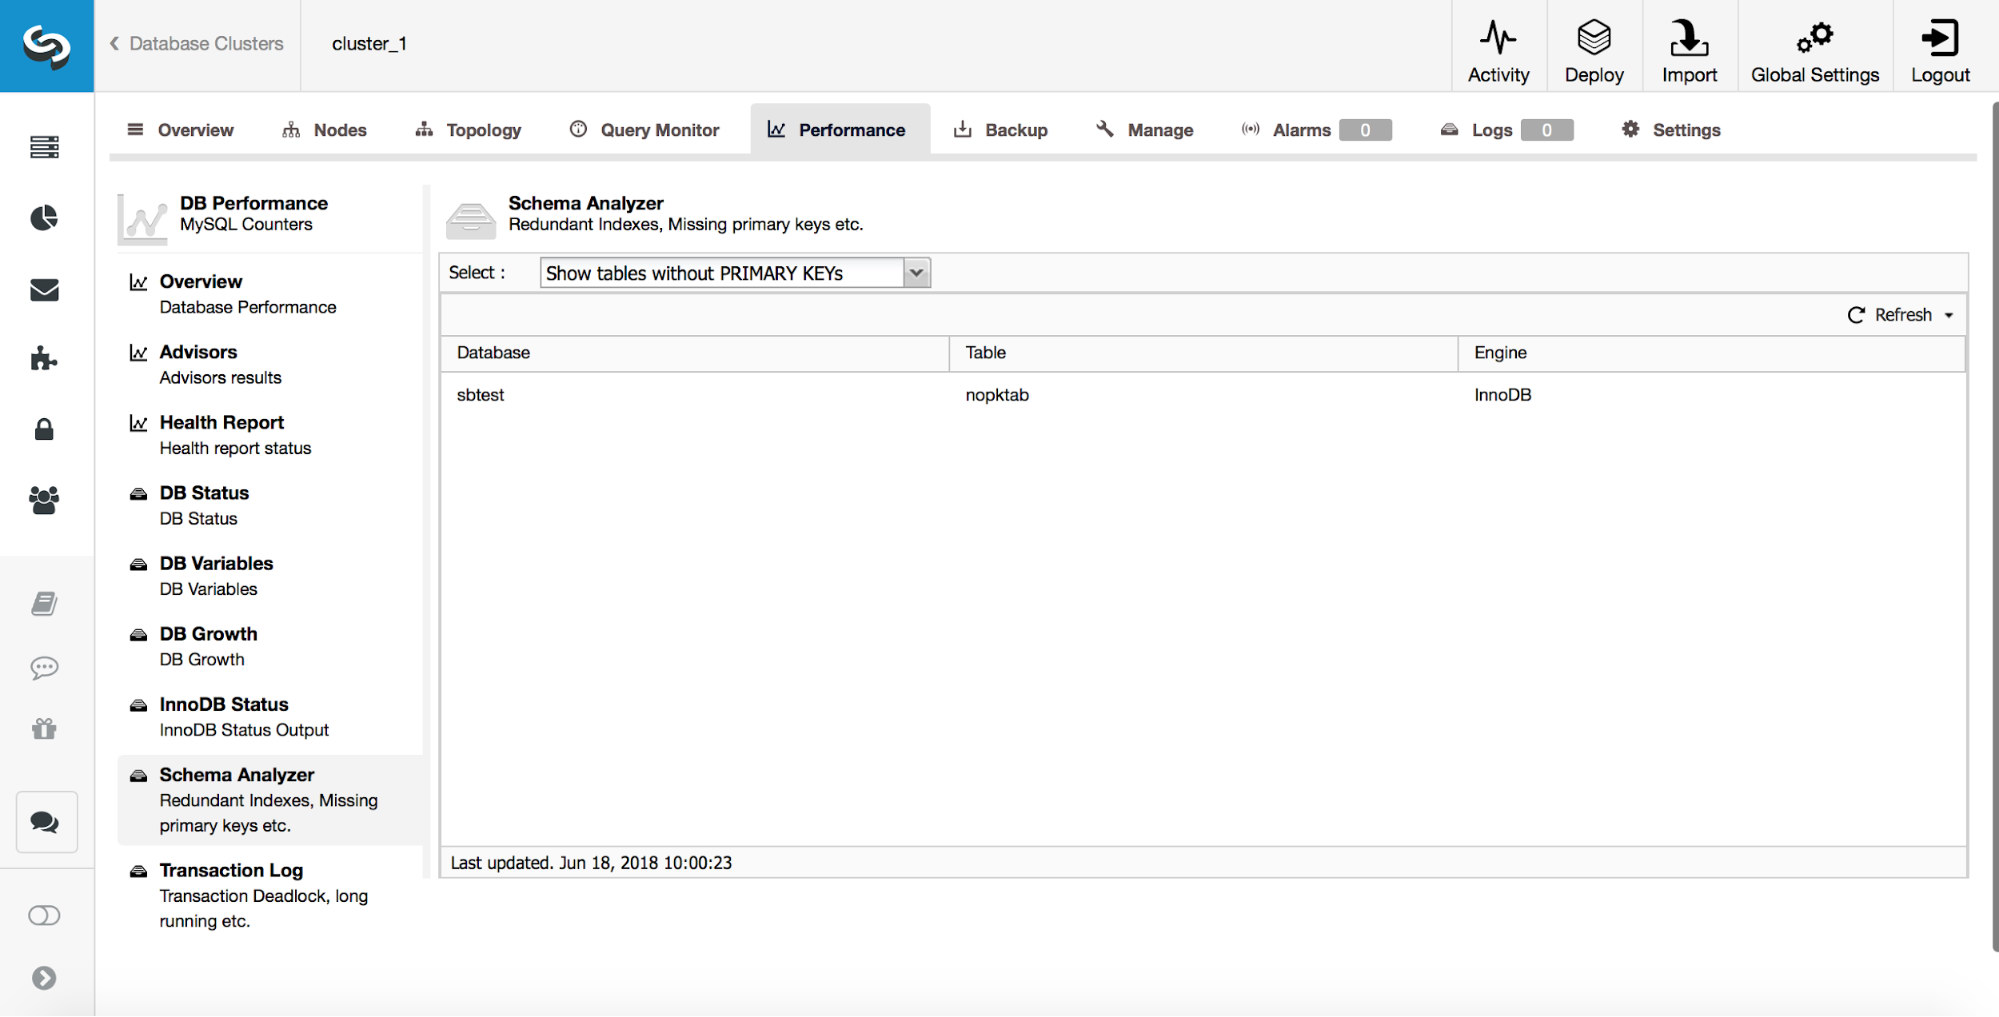
As we discussed earlier, catching such tables early is very important as primary keys have to be added using direct alter.

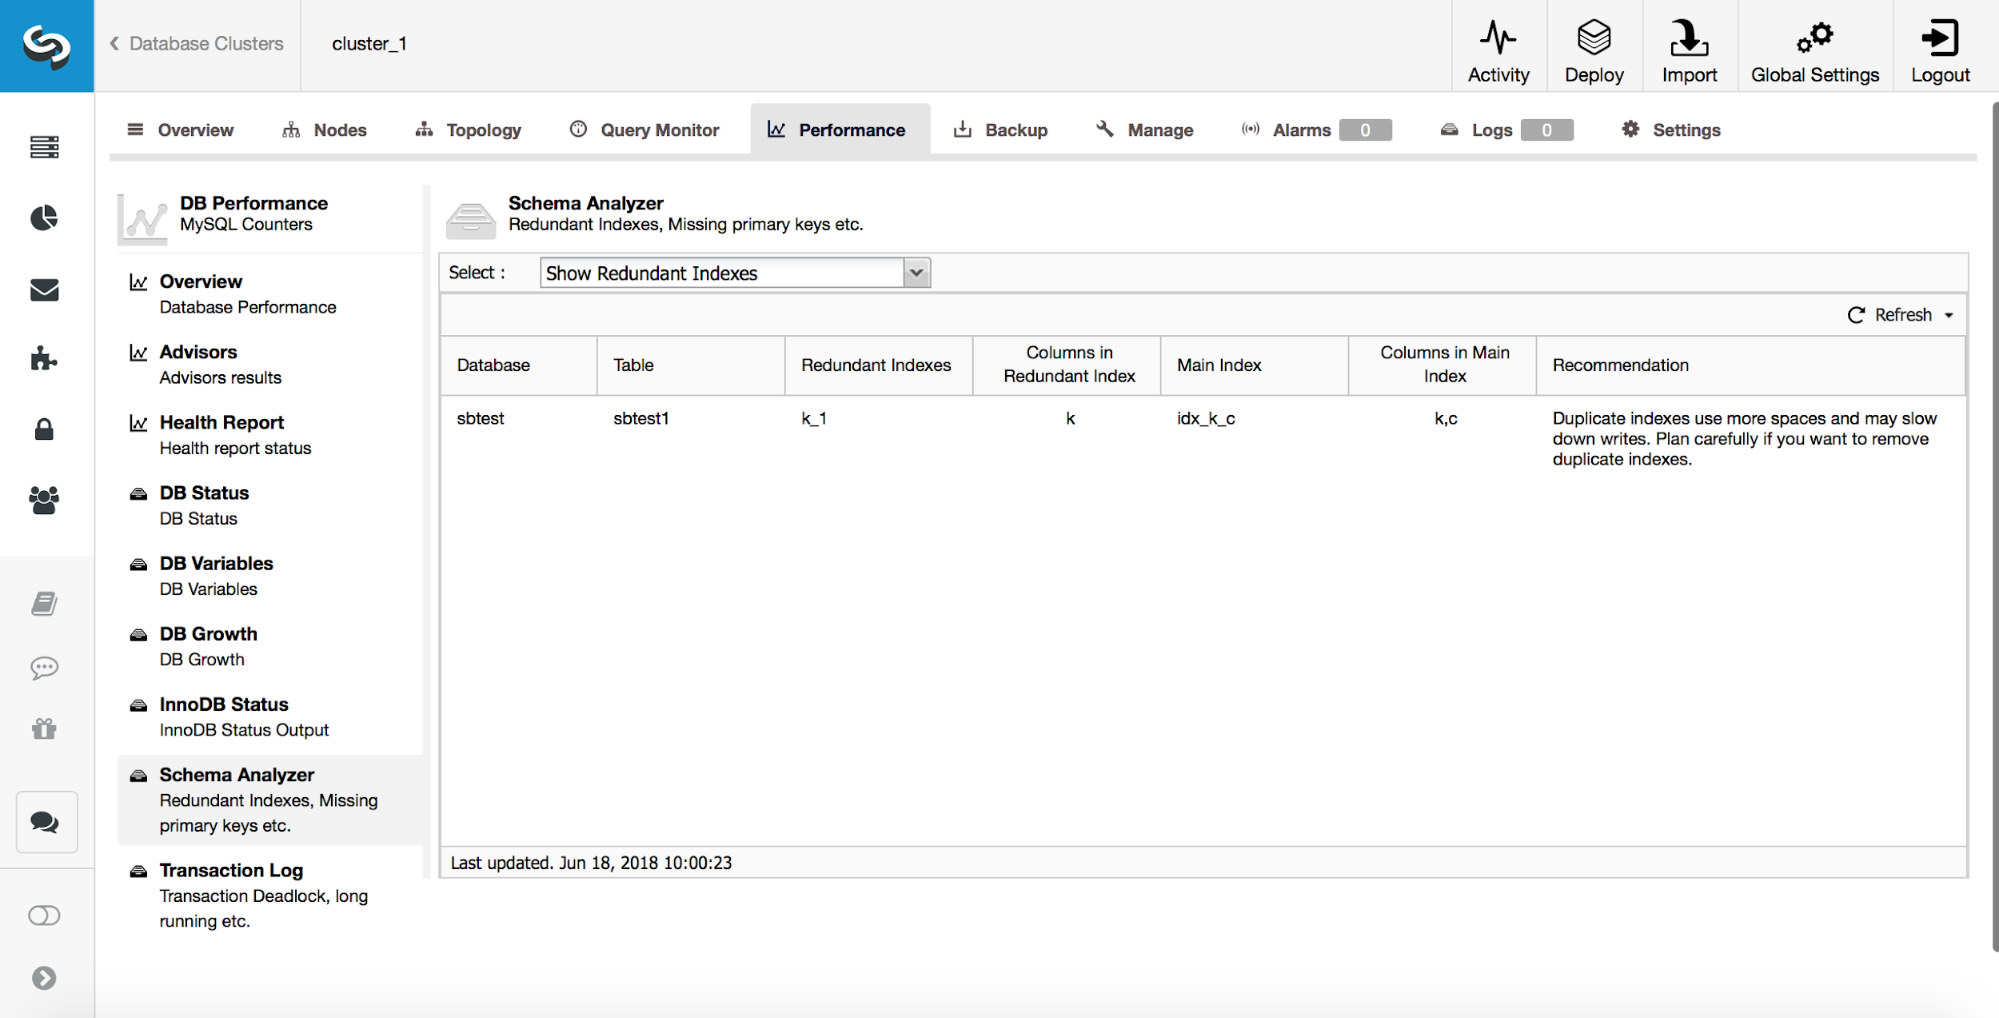
ClusterControl can also help you track duplicate indexes. Typically, you don’t want to have multiple indexes which are redundant. In the example above, you can see that there is an index on (k, c) and there’s also an index on (k). Any query which can use index created on column ‘k’ can also use a composite index created on columns (k, c). There are cases where it is beneficial to keep redundant indexes but you have to approach it on case by case basis. Starting from MySQL 8.0, it is possible to quickly test if an index is really needed or not. You can make a redundant index ‘invisible’ by running:

ALTER TABLE sbtest.sbtest1 ALTER INDEX k_1 INVISIBLE;

This will make MySQL ignore that index and, through monitoring, you can check if there was any negative impact on the performance of the database. If everything works as planned for some time (couple of days or even weeks), you can plan on removing the redundant index. In case you detected something is not right, you can always re-enable this index by running:

ALTER TABLE sbtest.sbtest1 ALTER INDEX k_1 VISIBLE;

Those operations are instant and the index is there all the time, and is still maintained – it’s only that it will not be taken into consideration by the optimizer. Thanks to this option, removing indexes in MySQL 8.0 will be much safer operation. In the previous versions, re-adding a wrongly removed index could take hours if not days on large tables.

ClusterControl can also let you know about MyISAM tables.

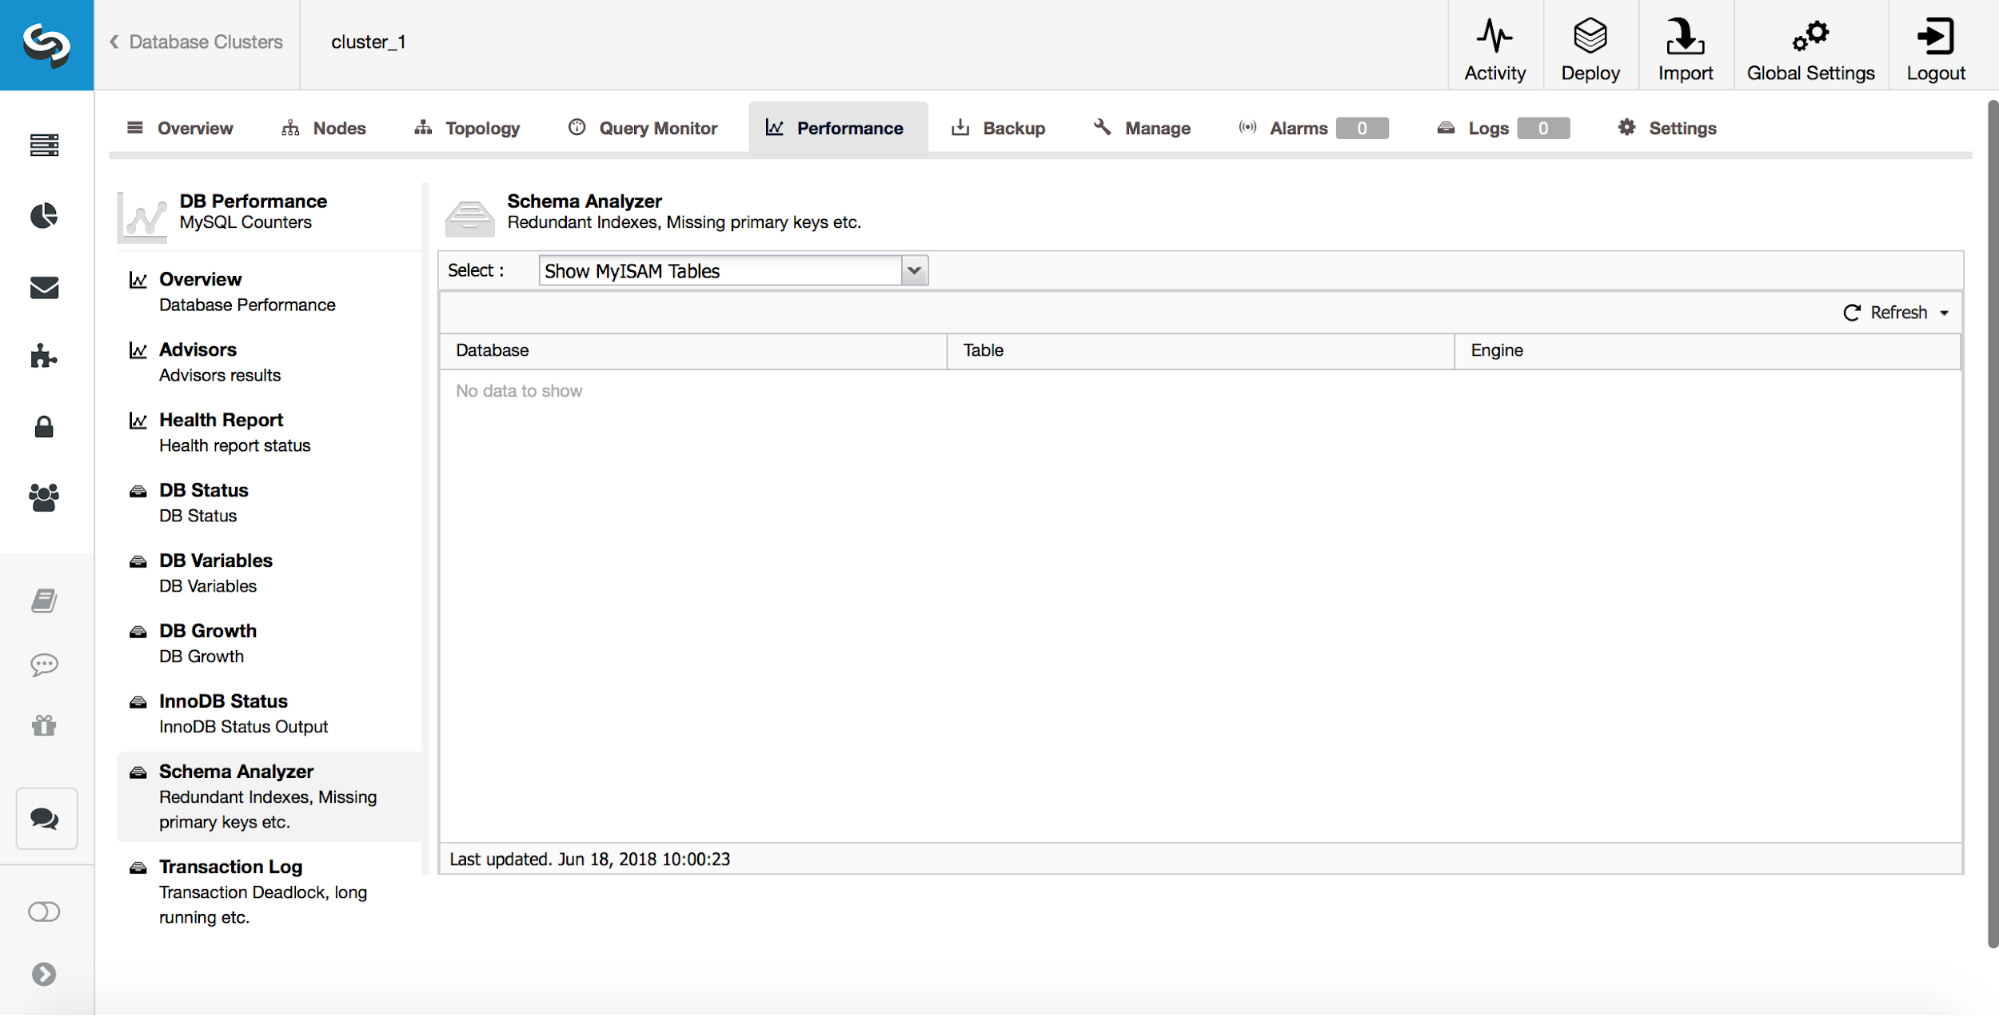
While MyISAM still may have its uses, you have to keep in mind that it is not a transactional storage engine. As such, it can easily introduce data inconsistency between nodes in a replication setup.

Another very useful feature of ClusterControl is one of the operational reports – a Schema Change Report.

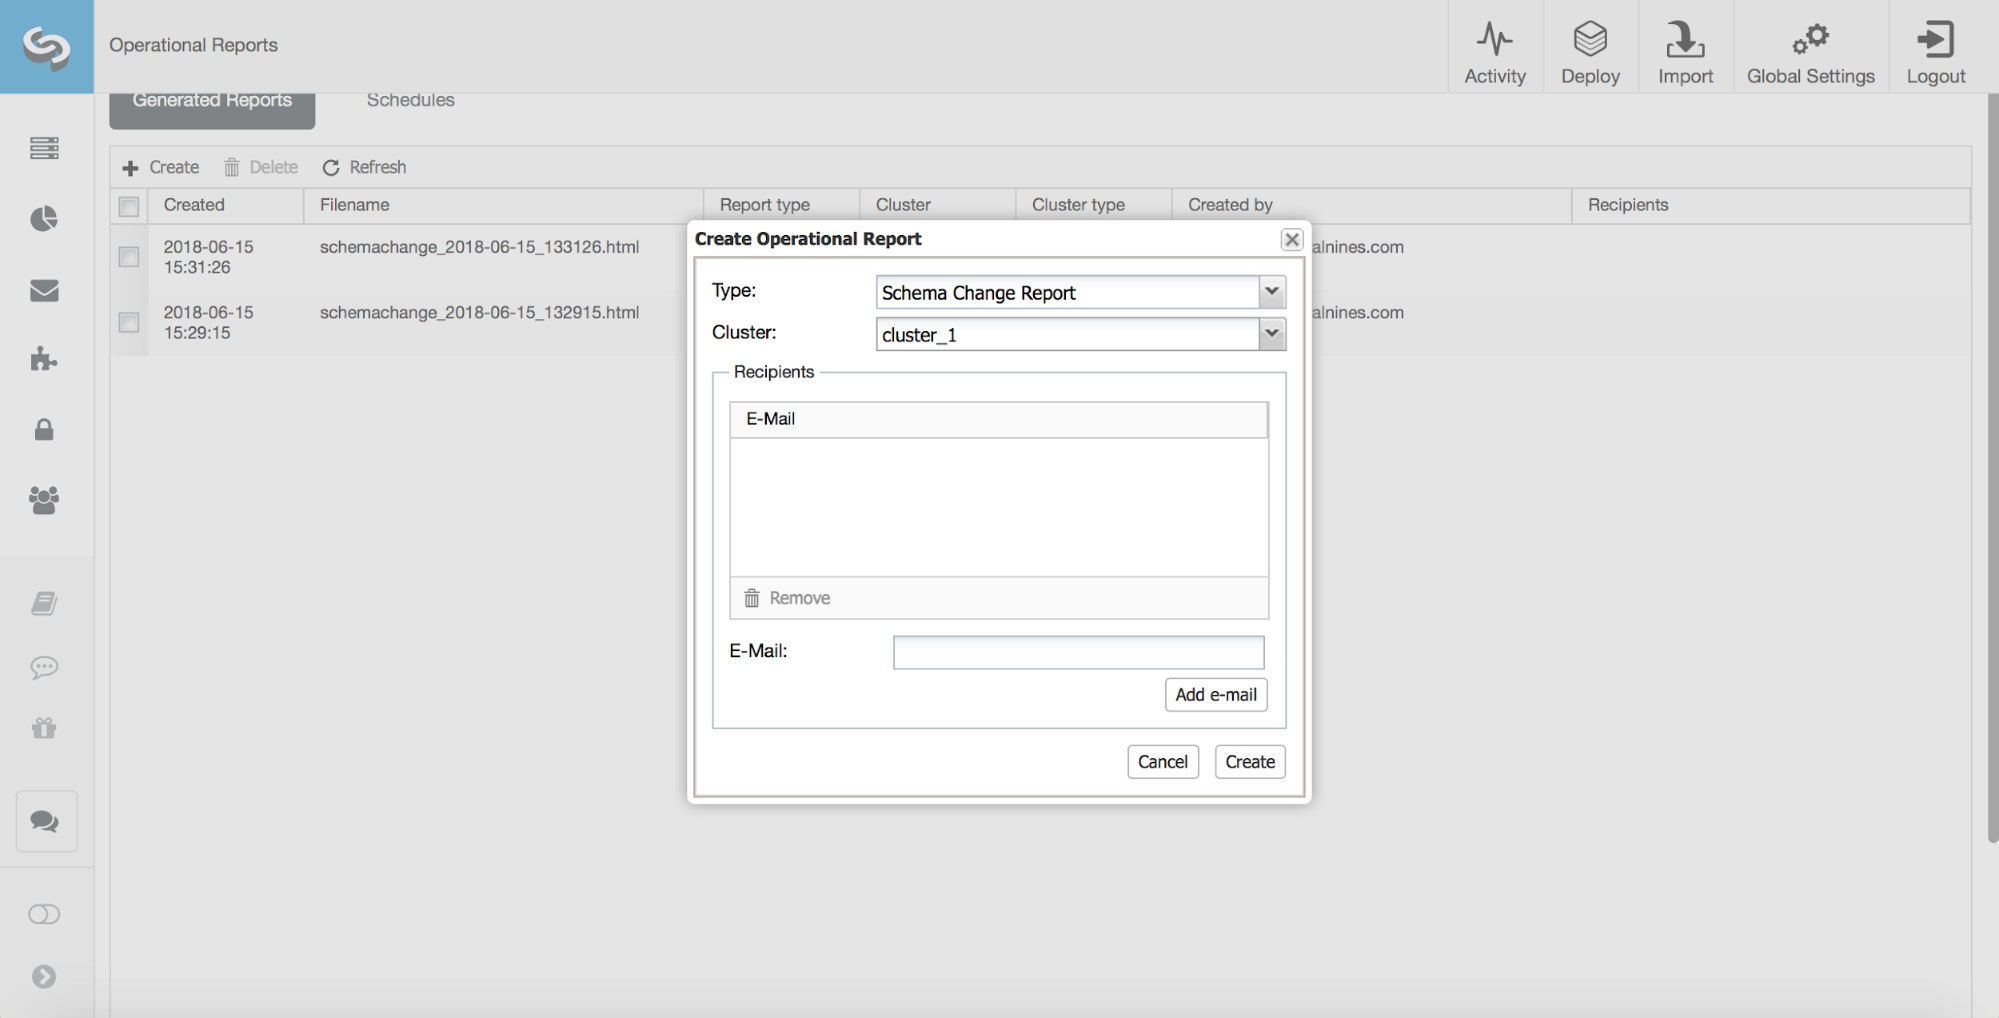
In an ideal world, a DBA reviews, approves and implements all of the schema changes. Unfortunately, this is not always the case. Such review process just does not go well with agile development. In addition to that, Developer-to-DBA ratio typically is quite high which can also become a problem as DBA’s would struggle not to become a bottleneck. That’s why it is not uncommon to see schema changes performed outside of the DBA’s knowledge. Yet, the DBA is usually the one responsible for the database’s performance and stability. Thanks to the Schema Change Report, they can now keep track of the schema changes.

At first some configuration is needed. In a configuration file for a given cluster (/etc/cmon.d/cmon_X.cnf), you have to define on which host ClusterControl should track the changes and which schemas should be checked.

schema_change_detection_address=10.0.0.126
schema_change_detection_databases=sbtest

Once that’s done, you can schedule a report to be executed on a regular basis. An example output may be like below:

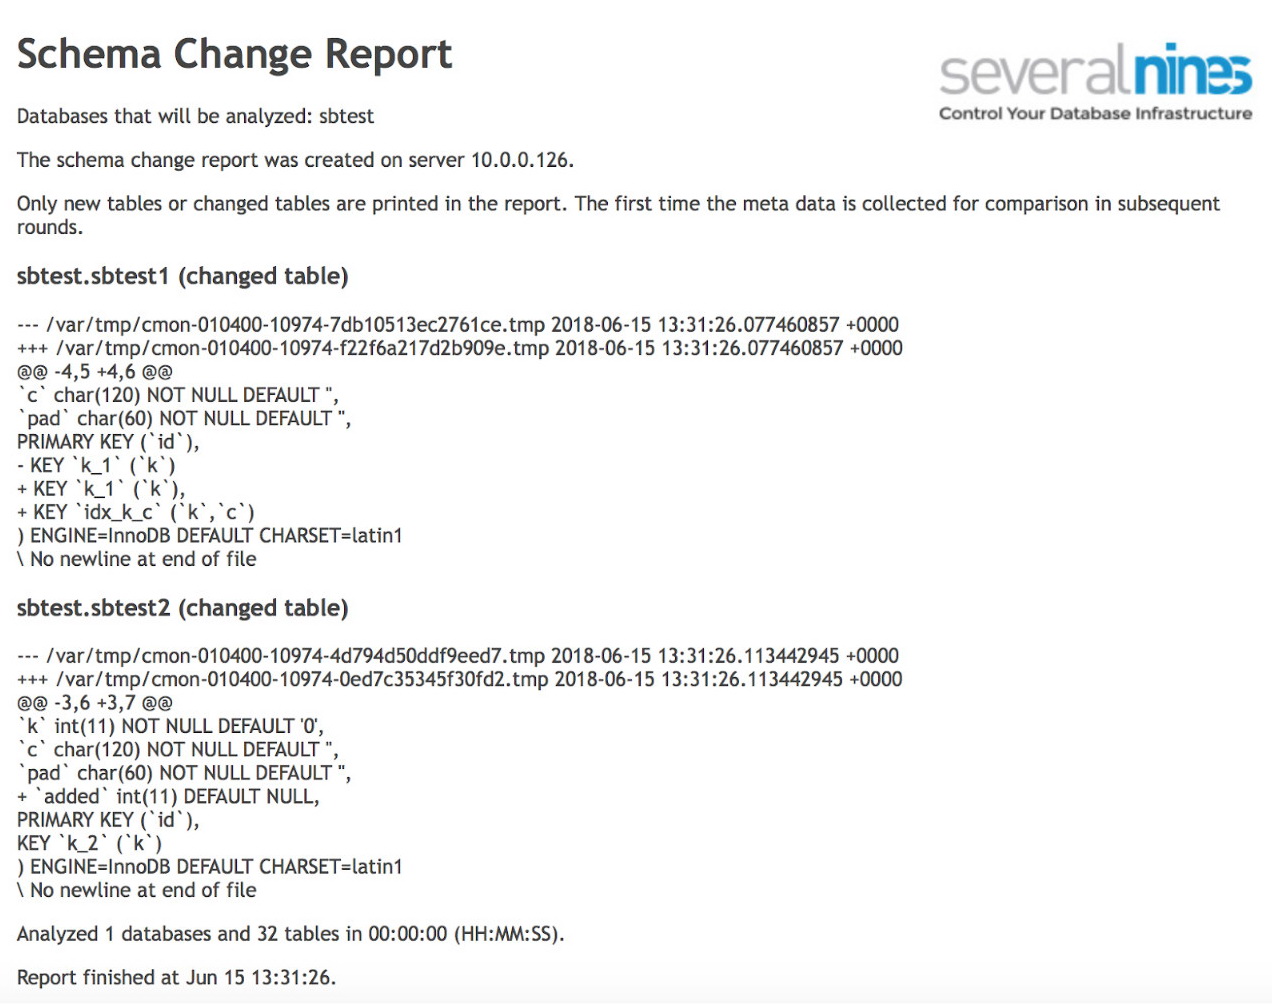
As you can see, two tables have changed since the previous run of the report. In the first one, a new composite index has been created on columns (k, c). In the second table, a column was added.

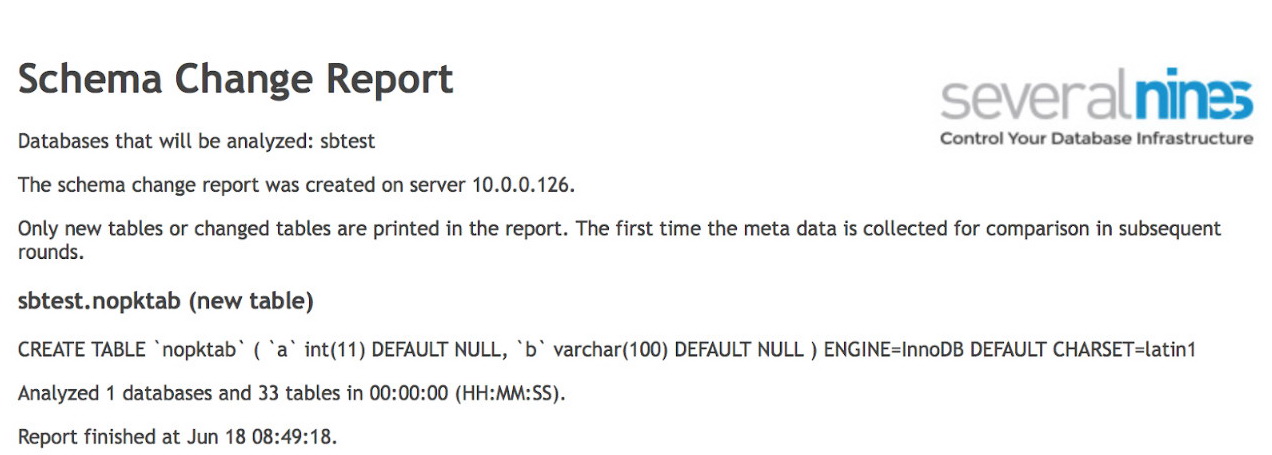
In the subsequent run we got information about new table, which was created without any index or primary key. Using this kind of info, we can easily act when it is needed and solve the issues before they actually start to become blockers.

via Planet MySQL
Schema Management Tips for MySQL & MariaDB

Canadian Music Festival on Hold Due to a Single Nesting Bird

Babies hiding under an adult killdeer.

Birds couldn’t care less about your human entertainment, and a killdeer certainly isn’t going to change its breeding plans to accommodate Ottawa’s annual Bluesfest music festival.

CNN reports:

This year, preparations for the festival are on hold to protect one very special attendee: a mother bird and her nest. Workers discovered the bird, a killdeer, guarding her four eggs while they were setting up one of the festival’s main stages. The breed is protected by the Canadian government and cannot be moved without federal permission.

Killdeers are quirky migratory shorebirds, and you may see them nesting in odd places—like in the middle of a parking lot, for example. But even if the birds don’t choose the safest spots to brood, they’re thankfully defended by some very old conservation laws. Back in the early 1900s, humans were really wrecking bird species, hunting many to near extinction for fun or for their beautiful feathers. In response, the United States and Canada signed a 1916 treaty to protect migrating birds.

Advertisement

Here in the US, the resulting law is called the Migratory Bird Treaty Act of 1918, and Canada has its own version. Since the killdeer is on the list of protected species, the organizers of Bluesfest must ask the Canadian government for permission to move the eggs.

And moving the eggs can be bad. According to the CBC, the killdeer might abandon its eggs if the nest is moved too far.

While it’s a very silly problem to have, it didn’t surprise at least one scientist we spoke to. “They choose some strange places to nest,” Susan Elbin, Director of Conservation and Science at New York City Audubon, told Gizmodo. “We had one nesting in the middle of a construction site on Governor’s Island.” You just need to cordon off and protect the eggs, Elbin said.

Advertisement

The eggs have a three-to-four week incubation period, and then babies are up, running, and flying fairly quickly after hatching. The festival is slated to begin July 5 and will have 300,000 attendees, reports CNN. The festival organizers have an idea as to where to move the birds, but just need the government to give the OK.

Bird conservation is a good thing. If anything, the festival organizers can let the killdeer be this year’s Bluesfest mascot.

[via CNN]

via Gizmodo
Canadian Music Festival on Hold Due to a Single Nesting Bird

How to Deal With Rude People

In this week’s episode of the Upgrade, we spoke with Danny Wallace: comedian, radio host, and author of the book F You Very Much: Understanding the Culture of Rudeness—And What We Can Do About It.

Listen to The Upgrade above or find us in all the usual places where podcasts are served, including Apple Podcasts, Google Play, Spotify, iHeartRadio, Stitcher, and NPR One.

Discussed in This Episode

  • Why we’re all becoming such total a-holes
  • How noise can make us less polite
  • Why we seem to love rude people on television (and in politics)
  • How rudeness can spread like the common cold
  • How we can cope with rudeness
  • How Danny is British, and thus can get away with using a term like “tickety-boo.” (We may not have discussed this, but certainly thought it.)

And so much more.

Our Upgrades of the Week

Every week we like to let you in on the upgrades we’ve made in our own lives. This week we talked about eradicating an ant invasion, purchasing a lopper, and riding along with turbulence.

Want to Say Hello?

Please do. We’re so very lonely.

Call (347) 687-8109 and leave us a voice mail. OR: Email your question or comment or deep thoughts to upgrade@lifehacker.com.


via Lifehacker
How to Deal With Rude People

How Tabasco Sauce is Made

How Tabasco Sauce is Made

Link

“It’s a 5-year process from the beginning to the end.” Business Insider takes us to the Avery Island, Louisiana Tabasco company to learn about the how they make their tasty and ubiquitous hot pepper sauce. The process is not dissimilar from aging good whiskey.

via The Awesomer
How Tabasco Sauce is Made

Apple launches service program to address MacBook keyboard woes

Enlarge /

The keyboard on the 2016 Touch Bar MacBook Pro.

Apple has publicly acknowledged that the butterfly switch keyboards in some MacBook and MacBook Pro computers have given consumers some trouble, and it has launched a new repair service program that promises to fix problems with those keyboards for free, regardless of whether the consumer purchased AppleCare.

Apple says in its public documentation on the program that certain models of MacBook and MacBook Pro “may exhibit one or more of the following behaviors”:

  • Letters or characters repeat unexpectedly
  • Letters or characters do not appear
  • Key(s) feel “sticky” or do not respond in a consistent manner

When they do, “Apple or an Apple Authorized Service Provider will service eligible MacBook and MacBook Pro keyboards, free of charge.” Apple also says that consumers who previously paid for a repair can contact the company to request a refund.

via Ars Technica
Apple launches service program to address MacBook keyboard woes

US Army asks startups to deliver next-generation weapons


guvendemir via Getty Images

While the US Army already works with huge military contractors, it still wants to make sure that it won’t miss the chance nab new technologies developed by small businesses. That’s why it has launched the Army Expeditionary Technology Search or xTechSearch, which will give “nontraditional defense partners” the chance to work with the military division. xTechSearch is a four-phase competition that promises a $200,000 cash prize for the final winner to be announced in April 2019. It’s soliciting innovative technologies the army could use, such as next-gen combat vehicles that can replace tanks.

The competition is also looking for new technologies that reduce the cost of missile defense, as well as innovations that can “enhance [soldier] lethality in close combat.” By launching this challenge, the army is likely hoping to find a gem it wouldn’t have found otherwise, something big corporations might not think of — something born out of necessity to innovate due to lack of funds and access to resources. The challenge is open to all small businesses and is now accepting all technology proposals until July 11th, 2018.

via Engadget
US Army asks startups to deliver next-generation weapons

Back to basics: Isolation Levels In MySQL

In this blog, we will see the very basic thing “I” of “ACID” and an important property of Transaction ie., “ISOLATION”

The isolation defines the way in which the MySQL server (InnoDB) separates each transaction from other concurrent running transaction in the server and also ensures that the transactions are processed in a reliable way. If transactions are not isolated then one transaction could modify the data that another transaction is reading hence creating data inconsistency. Isolation levels determine how isolated the transactions are from each other.

MySQL supports all four the isolation levels that SQL-Standard defines.The four isolation levels are

  • READ UNCOMMITTED
  • READ COMMITTED
  • REPEATABLE READ
  • SERIALIZABLE

The Isolation level’s can be set globally or session based on our requirements.


Output.gif


Choosing the best isolation level based, have a great impact on the database, Each level of isolation comes with a trade-off, let’s discuss on each of them,

READ UNCOMMITTED:

In READ-UNCOMMITTED isolation level, there isn’t much isolation present between the transactions at all, ie ., No locks. A transaction can see changes to data made by other transactions that are not committed yet. This is the lowest level in isolation and highly performant since there is no overhead of maintaining locks, With this isolation level, there is always for getting a “Dirty-Read

That means transactions could be reading data that may not even exist eventually because the other transaction that was updating the data rolled-back the changes and didn’t commit. lest see the below image for better understanding

dirty reads.png

Suppose a transaction T1 modifies a row if a transaction T2 reads the row and sees the modification even though T1 has not committed it, that is a dirty read, the problem here is if T1 rolls back, T2 doesn’t know that and will be in a state of “totally perplexed”

READ COMMITTED:

IN READ-COMMITTED isolation level, the phenomenon of dirty read is avoided, because any uncommitted changes are not visible to any other transaction until the change is committed. This is the default isolation level with most of popular RDBMS software, but not with MySQL.

Within this isolation level, each SELECT uses its own snapshot of the committed data that was committed before the execution of the SELECT. Now because each SELECT has its own snapshot, here is the trade-off now, so the same SELECT, when running multiple times during the same transaction, could return different result sets. This phenomenon is called non-repeatable read.

Non_repeatable_read.png

A non-repeatable occurs when a transaction performs the same transaction twice but gets a different result set each time. Suppose T2 reads some of the rows and T1 then change a row and commit the change, now T2 reads the same row set and gets a different result ie.., the initial read is non-repeatable.

Read-committed is the recommended isolation level for Galera ( PXC, MariaDB Cluster ) and InnoDB clusters.

REPEATABLE READ:

In REPEATABLE-READ isolation level, the phenomenon of non-repeatable read is avoided. It is the default isolation in MySQL.This isolation level returns the same result set throughout the transaction execution for the same SELECT run any number of times during the progression of a transaction.

This is how it works, a snapshot of the SELECT is taken the first time the SELECT is run during the transaction and the same snapshot is used throughout the transaction when the same SELECT is executed. A transaction running in this isolation level does not take into account any changes to data made by other transactions, regardless of whether the changes have been committed or not. This ensures that reads are always consistent(repeatable). Maintaining a snapshot can cause extra overhead and impact some performance

Although this isolation level solves the problem of non-repeatable read, another possible problem that occurs is phantom reads.

A Phantom is a row that appears where it is not visible before. InnoDB and XtraDB solve the phantom read problem with multi-version concurrency control.

REPEATABLE READ is MySQL’s default transaction isolation level.

Phantom_read.png

SERIALIZABLE

SERIALIZABLE completely isolates the effect of one transaction from others. It is similar to REPEATABLE READ with the additional restriction that row selected by one transaction cannot be changed by another until the first transaction finishes. The phenomenon of phantom reads is avoided. This isolation level is the strongest possible isolation level. AWS Aurora do not support this isolation level.


Photo by Alberto Triano on Unsplash

via Planet MySQL
Back to basics: Isolation Levels In MySQL

Do You Use Inflatable Air Shims such as the Winbag?

Winbag Air Shim

Shown here is a Winbag inflatable air shim.

More specifically, it’s a durable inflatable air wedge that’s made from a fiber-reinforced non-marking material.

It’s as flat as 3/32″, allowing it to slide into narrow spaces, and can be inflated to up to 2″. It can lift up to 300 pounds, per Winbag.

The Winbag air shim is said to be useful for installing doors, windows, cabinets, appliances, and all kinds of other fixtures where you might need to make careful height or spacing adjustments.

Have you used one? What kinds of things have you used it for? Don’t have one? What kinds of applications might you use this for?

Price: ~$15-20 each, depending on store and quantity

Buy Now(via Amazon)
Buy Now(via Tool Nut)

I’ve heard lots of good things about the Winbag, and can see a few things I’d use it for (such as installing anti-vibrational pads to a washing machine that’s already installed and blocked in place).

This demo video, although a little infomercial-toned, shows what the Winbag can do:

There’s a competing brand, the Air Shim by Calculated Industries, which can sometimes be found for less money.

Air Shim

They also offer a larger version, the XL 500.

See Also(via Amazon)


via ToolGuyd
Do You Use Inflatable Air Shims such as the Winbag?

How To Create Comment Nesting In Laravel From Scratch

How To Create Comment Nesting In Laravel From Scratch is the today’s main topic. In any topic specific forum, there is always a structure, where you need to reply to someone’s comment and then somebody reply in their comment and so on. So comment nesting is very useful in any web application, which exposes public interest. In this tutorial, we will do it from scratch. We use Polymorphic relationship in this example.

Create Comment Nesting In Laravel From Scratch

As always, install Laravel using the following command. I am using Laravel Valet.

Step 1: Install and configure Laravel.

laravel new comments

# or

composer create-project laravel/laravel comments --prefer-dist

Go to the project.

cd comments

Open the project in your editor.

code .

Configure the MySQL database in the .env file.

Create an auth using the following command.

php artisan make:auth

Now migrate the database using the following command.

php artisan migrate

Step 2: Create a model and migration.

Create a Post model and migration using the following command.

php artisan make:model Post -m

Define the schema in the post migration file.

// create_posts_table

public function up()
{
    Schema::create('posts', function (Blueprint $table) {
        $table->increments('id');
        $table->string('title');
        $table->text('body');
        $table->timestamps();
    });
}

Also, we need to create Comment model and migration, so create by using the following command.

php artisan make:model Comment -m

Okay, now we will use the Polymorphic relationship between the models. So we need to define the schema that way.

// create_comments_table

public function up()
{
    Schema::create('comments', function (Blueprint $table) {
       $table->increments('id');
       $table->integer('user_id')->unsigned();
       $table->integer('parent_id')->unsigned();
       $table->text('body');
       $table->integer('commentable_id')->unsigned();
       $table->string('commentable_type');
       $table->timestamps();
    });
}

Now, migrate the database using the following cmd.

php artisan migrate


How To Create Comment Nesting In Laravel From Scratch

Step 3: Define Polymorphic Relationships.

Now, we need to define the Polymorphic relationships between the models. So write the following code inside app >> Post.php file. 

<?php

// Post.php 

namespace App;

use Illuminate\Database\Eloquent\Model;

class Post extends Model
{
    public function comments()
    {
        return $this->morphMany(Comment::class, 'commentable')->whereNull('parent_id');
    }
}

Here, we have written all the comments, whose parent_id is null. The reason is that we need to display the parent level comment and also save the parent level comment. That is why. We need to differentiate between the Comment and its replies.

Post also belongs To a User. So we can define that relationship as well.

<?php

// Post.php

namespace App;

use Illuminate\Database\Eloquent\Model;

class Post extends Model
{
    public function user()
    {
        return $this->belongsTo(User::class);
    }
    public function comments()
    {
        return $this->morphMany(Comment::class, 'commentable')->whereNull('parent_id');
    }
}

Define the Comment relationship with the Post. Write the following code inside Comment.php file.

<?php

// Comment.php

namespace App;

use Illuminate\Database\Eloquent\Model;

class Comment extends Model
{
    public function user()
    {
        return $this->belongsTo(User::class);
    }
}

Step 3: Define the views, controller, and routes.

Create a PostController.php file using the following command.

php artisan make:controller PostController

Next step is to define the route for the view and store the post in the database. Write the following code inside routes >> web.php file.

<?php

// web.php

Route::get('/', function () {
    return view('welcome');
});

Auth::routes();

Route::get('/home', 'HomeController@index')->name('home');

Route::get('/post/create', 'PostController@create')->name('post.create');
Route::post('/post/store', 'PostController@store')->name('post.store');

Write the following code inside PostController.php file.

<?php

// PostController.php

namespace App\Http\Controllers;

use Illuminate\Http\Request;

class PostController extends Controller
{

    public function __construct()
    {
        return $this->middleware('auth');
    }

    public function create()
    {
        return view('post');
    }

    public function store(Request $request)
    {
        // store code
    }
}

Now, first, we need to create a form for creating the post. So create a blade file inside resources >> views folder called post.blade.php. Write the following code inside a post.blade.php file.

@extends('layouts.app')

@section('content')
<div class="container">
    <div class="row justify-content-center">
        <div class="col-md-8">
            <div class="card">
                <div class="card-header">Create Post</div>
                <div class="card-body">
                    <form method="post" action="">
                        <div class="form-group">
                            @csrf
                            <label class="label">Post Title: </label>
                            <input type="text" name="title" class="form-control" required/>
                        </div>
                        <div class="form-group">
                            <label class="label">Post Body: </label>
                            <textarea name="body" rows="10" cols="30" class="form-control" required></textarea>
                        </div>
                        <div class="form-group">
                            <input type="submit" class="btn btn-success" />
                        </div>
                    </form>
                </div>
            </div>
        </div>
    </div>
</div>
@endsection

Okay, now go to the resources >> views >> layouts >> app.blade.php file and add a link to create a post.

We need to add the link to the @else part of the navigation bar. So, if the user is successfully logged in then and then he/she can create a post otherwise, he or she could not create a post.

@else
     <li class="nav-item">
          <a class="nav-link" href="">Create Post</a>
     </li>

Now, go to this link: http://comments.test/register and register a user. After logged in, you can see the Create Post in the navbar. Click that item, and you will redirect to this route: http://comments.test/post/create. You can see, our form is there with the title and body form fields.

Comment Nesting in Laravel 5.6


Step 4: Save and display the Post.

Okay, now we need to save the post in the database, so write the following code inside store function of PostController.php file.

<?php

// PostController.php

namespace App\Http\Controllers;
use App\Post;

use Illuminate\Http\Request;

class PostController extends Controller
{

    public function __construct()
    {
        return $this->middleware('auth');
    }

    public function create()
    {
        return view('post');
    }

    public function store(Request $request)
    {
        $post =  new Post;
        $post->title = $request->get('title');
        $post->body = $request->get('body');

        $post->save();

        return redirect('posts');

    }
}

After saving the post, we are redirecting to the posts list page. We need to define its route too. Add the following route inside a web.php file.

// web.php

Route::get('/posts', 'PostController@index')->name('posts');

Also, we need to define the index function inside PostController.php file.

// PostController.php

public function index()
{
    $posts = Post::all();

    return view('index', compact('posts'));
}

Create an index.blade.php file inside views folder. Write the following code inside an index.blade.php file.

@extends('layouts.app')

@section('content')
<div class="container">
    <div class="row justify-content-center">
        <div class="col-md-8">
            <table class="table table-striped">
                <thead>
                    <th>ID</th>
                    <th>Title</th>
                    <th>Action</th>
                </thead>
                <tbody>
                @foreach($posts as $post)
                <tr>
                    <td></td>
                    <td></td>
                    <td>
                        <a href="" class="btn btn-primary">Show Post</a>
                    </td>
                </tr>
                @endforeach
                </tbody>

            </table>
        </div>
    </div>
</div>
@endsection

Now, define the show route inside a web.php file. Add the following line of code inside a web.php file.

// web.php

Route::get('/post/show/{id}', 'PostController@show')->name('post.show');

Also, define the show() function inside PostController.php file.

// PostController.php

public function show($id)
{
    $post = Post::find($id);

    return view('show', compact('post'));
}

Create a show.blade.php file inside views folder and add the following code.

@extends('layouts.app')

@section('content')
<div class="container">
    <div class="row justify-content-center">
        <div class="col-md-8">
            <div class="card">
                <div class="card-body">
                    <p></p>
                    <p>
                        
                    </p>
                </div>
            </div>
        </div>
    </div>
</div>
@endsection

Okay, now you can see the individual posts. Fine till now.

Next step is to display the comments on this post.

Laravel Polymorphic morphMany relationship tutorial


Step 5: Create a form to add a comment.

First, create a CommentController.php file using the following command.

php artisan make:controller CommentController

Now, we need to create a form inside a show.blade.php file that can add the comment in the particular post.

Write the following code inside a show.blade.php file.

@extends('layouts.app')

@section('content')
<div class="container">
    <div class="row justify-content-center">
        <div class="col-md-8">
            <div class="card">
                <div class="card-body">
                    <p><b></b></p>
                    <p>
                        
                    </p>
                    <hr />
                    <h4>Add comment</h4>
                    <form method="post" action="">
                        @csrf
                        <div class="form-group">
                            <input type="text" name="comment_body" class="form-control" />
                            <input type="hidden" name="post_id" value="" />
                        </div>
                        <div class="form-group">
                            <input type="submit" class="btn btn-warning" value="Add Comment" />
                        </div>
                    </form>
                </div>
            </div>
        </div>
    </div>
</div>
@endsection

So, we have added a form that can add the comment. Now, we need to define the route to store the comment.

// web.php

Route::post('/comment/store', 'CommentController@store')->name('comment.add');

Okay, now write the store() function and save the comment using the morphMany() relationship.

<?php

namespace App\Http\Controllers;

use Illuminate\Http\Request;
use App\Comment;
use App\Post;

class CommentController extends Controller
{
    public function store(Request $request)
    {
        $comment = new Comment;
        $comment->body = $request->get('comment_body');
        $comment->user()->associate($request->user());
        $post = Post::find($request->get('post_id'));
        $post->comments()->save($comment);

        return back();
    }
}

Okay, now if all is well then, we can now add the comments. Remember, we have not till now display the comments. Just complete the save functionality, whose parent_id is null.

Laravel Nested Set Example


Step 6: Display the comment.

Now, as we have set up the relationship between a Comment and a Post, we can easily pluck out all the comments related to a particular post.

So, write the following code inside the show.blade.php file. I am writing the whole file to display the comments. Remember, this is the parent comments. We still need to create a reply button and then show all the replies.

<!-- show.blade.php -->

@extends('layouts.app')

@section('content')
<div class="container">
    <div class="row justify-content-center">
        <div class="col-md-8">
            <div class="card">
                <div class="card-body">
                    <p><b></b></p>
                    <p>
                        
                    </p>
                    <hr />
                    <h4>Display Comments</h4>
                    @foreach($post->comments as $comment)
                        <div class="display-comment">
                            <strong></strong>
                            <p></p>
                        </div>
                    @endforeach
                    <hr />
                    <h4>Add comment</h4>
                    <form method="post" action="">
                        @csrf
                        <div class="form-group">
                            <input type="text" name="comment_body" class="form-control" />
                            <input type="hidden" name="post_id" value="" />
                        </div>
                        <div class="form-group">
                            <input type="submit" class="btn btn-warning" value="Add Comment" />
                        </div>
                    </form>
                </div>
            </div>
        </div>
    </div>
</div>
@endsection

Now, add the comment, and it will show us here in the same url.

Laravel Nesting Relationships


Step 7: Create a Reply form and save replies.

Now, we need to create a function called replies() inside Comment.php model.

<?php

// Comment.php

namespace App;

use Illuminate\Database\Eloquent\Model;

class Comment extends Model
{
    public function user()
    {
        return $this->belongsTo(User::class);
    }

    public function replies()
    {
        return $this->hasMany(Comment::class, 'parent_id');
    }
}

Here, in the replies function, we need to add a primary key as a parent_id because we need to fetch a reply based on a parent comment’s id.

Okay, now we need to write the display of all the comments and its replies code into the partial blade file.

The reason behind is that, we need to nest the comment replies and how much nesting is required depends upon the user interaction. So we can not predict the nesting levels.

To make more and more flexible, we need to create partials and then repeat that partial to display the nested comment replies.

First, create a partials folder inside resources >> views folder and inside partials folder, create one file called _comment_replies.blade.php.

Write the following code inside the _comment_replies.blade.php file.

<!-- _comment_replies.blade.php -->

 @foreach($comments as $comment)
    <div class="display-comment">
        <strong></strong>
        <p></p>
        <a href="" id="reply"></a>
        <form method="post" action="">
            @csrf
            <div class="form-group">
                <input type="text" name="comment_body" class="form-control" />
                <input type="hidden" name="post_id" value="" />
                <input type="hidden" name="comment_id" value="" />
            </div>
            <div class="form-group">
                <input type="submit" class="btn btn-warning" value="Reply" />
            </div>
        </form>
        @include('partials._comment_replies', ['comments' => $comment->replies])
    </div>
@endforeach

Here, I have displayed all the replies with the text box. So it can do further nesting.

Now, this partial is expect to parameters.

  1. comments
  2. post_id.

So, when we include this partial inside show.blade.php file, we do need to pass these both of the parameters so that we can access here.

Also, we need to define the route to save the reply.

Add the following line of code inside routes >> web.php file.

// web.php

Route::post('/reply/store', 'CommentController@replyStore')->name('reply.add');

So, our final web.php file looks like below.

<?php

// web.php

Route::get('/', function () {
    return view('welcome');
});

Auth::routes();

Route::get('/home', 'HomeController@index')->name('home');

Route::get('/post/create', 'PostController@create')->name('post.create');
Route::post('/post/store', 'PostController@store')->name('post.store');

Route::get('/posts', 'PostController@index')->name('posts');
Route::get('/post/show/{id}', 'PostController@show')->name('post.show');

Route::post('/comment/store', 'CommentController@store')->name('comment.add');
Route::post('/reply/store', 'CommentController@replyStore')->name('reply.add');


Also, define the replyStore() function inside CommentController.php file.

I am writing here the full code of the CommentController.php file.

<?php

// CommentController.php

namespace App\Http\Controllers;

use Illuminate\Http\Request;
use App\Comment;
use App\Post;

class CommentController extends Controller
{
    public function store(Request $request)
    {
        $comment = new Comment;
        $comment->body = $request->get('comment_body');
        $comment->user()->associate($request->user());
        $post = Post::find($request->get('post_id'));
        $post->comments()->save($comment);

        return back();
    }

    public function replyStore(Request $request)
    {
        $reply = new Comment();
        $reply->body = $request->get('comment_body');
        $reply->user()->associate($request->user());
        $reply->parent_id = $request->get('comment_id');
        $post = Post::find($request->get('post_id'));

        $post->comments()->save($reply);

        return back();

    }
}

So, here almost both of the function store and replyStore function is same. We are storing parent comment and its replies in the same table. But, when we are saving a parent comment, the parent_id becomes null, and when we store any reply, then parent_id becomes its comment_id. So that is the difference.

Finally, our show.blade.php file looks like this.

<!-- show.blade.php -->

@extends('layouts.app')
<style>
    .display-comment .display-comment {
        margin-left: 40px
    }
</style>
@section('content')

<div class="container">
    <div class="row justify-content-center">
        <div class="col-md-8">
            <div class="card">
                <div class="card-body">
                    <p><b></b></p>
                    <p>
                        
                    </p>
                    <hr />
                    <h4>Display Comments</h4>
                    @include('partials._comment_replies', ['comments' => $post->comments, 'post_id' => $post->id])
                    <hr />
                    <h4>Add comment</h4>
                    <form method="post" action="">
                        @csrf
                        <div class="form-group">
                            <input type="text" name="comment_body" class="form-control" />
                            <input type="hidden" name="post_id" value="" />
                        </div>
                        <div class="form-group">
                            <input type="submit" class="btn btn-warning" value="Add Comment" />
                        </div>
                    </form>
                </div>
            </div>
        </div>
    </div>
</div>
@endsection

Here, I have defined the CSS to display proper nesting.

Also, include the partials and pass the both of the parameters.

  1. Post comments.
  2. Post id

We can add the parent comment from here but can add the replies from the partials.

I have added the parent comment, and its replies and our database table looks like this.

Laravel Nested Set Database


Also, our final output looks like below.

Laravel 5.6 Polymorphic Nested Relationship Example


Finally, Create Comment Nesting In Laravel Tutorial With Example is over.

I have put the Github Code of Create Comment Nesting In Laravel so that you can check that out as well.

Github Code

Fork Me On Github

Steps To Use Code

  1. Clone the repository.
  2. Install the dependencies
  3. Configure the database.
  4. Migrate the database using this command: php artisan migrate
  5. Go to the register page and add the one user.
  6. Create the post and comment and reply on the comment.

via Planet MySQL
How To Create Comment Nesting In Laravel From Scratch

Comparing RDS vs EC2 for Managing MySQL or MariaDB on AWS

RDS is a Database as a Service (DBaaS) that automatically configures and maintains your databases in the AWS cloud. The user has limited power over specific configurations in comparison to running MySQL directly on Elastic Compute Cloud (EC2). But RDS is a convenient service, as long as you can live with the instances and configurations that it offers.

Amazon RDS currently supports various MySQL and MariaDB versions as well as the, MySQL-compatible Amazon Aurora DB engine. It does support replication, but as you may expect from a predefined web console, there are some limitations.

Amazon RDS Services

Amazon RDS Services

There are some tradeoffs when using RDS. These may not only affect the way you manage and provision your database instances, but also key things like performance, security, and high availability.

In this blog, we will take a look at the differences between using RDS and running MySQL on EC2, with focus on replication. As we will see, to decide between hosting MySQL on an EC2 instance or using Amazon RDS is not an easy task.

RDS Platform Tradeoffs

The biggest size of database that AWS can host depends on your source environment, the allocation of data in your source database, and how busy your system is.

Amazon RDS Environment options

Amazon RDS Environment options
Amazon RDS instance class

Amazon RDS instance class

AWS is split into regions. Every AWS account has limits, per region, on the number of AWS resources that can be created. Once a limit for a resource has been reached, additional calls to create that resource will fail.

AWS Regions

AWS Regions

For Amazon RDS MySQL DB instances, the maximum provisioned storage limit constrains the size of a table to a maximum size of 6 TB when using InnoDB file-per-table tablespaces.

InnoDB file-per-table feature is something that you should consider even if you are not looking to migrate a big database into the cloud. You may notice that some existing DB instances have a lower limit. For example, MySQL DB instances created prior to April 2014 have a file and table size limit of 2 TB. This 2-TB file size limit also applies to DB instances or Read Replicas created from DB snapshots taken before April 2014.

One of the key differences which affects the way you set up and maintain database replication is the lack of SUPER user. To address this limitation, Amazon introduced stored procedures that take care of various DBA tasks. Below are the key procedures to manage MySQL RDS replication.

Skip replication error:

CALL mysql.rds_skip_repl_error;

Stop replication:

CALL mysql.rds_stop_replication;

Start replication

CALL mysql.rds_start_replication;

Configures an RDS instance as a Read Replica of a MySQL instance running outside of AWS.

CALL mysql.rds_set_external_master;

Reconfigures a MySQL instance to no longer be a Read Replica of a MySQL instance running outside of AWS.

CALL mysql.rds_reset_external_master;

Imports a certificate. This is needed to enable SSL communication and encrypted replication.

CALL mysql.rds_import_binlog_ssl_material;

Removes a certificate.

CALL mysql.rds_remove_binlog_ssl_material;

Changes the replication master log position to the start of the next binary log on the master.

CALL mysql.rds_next_master_log;

While stored procedures take care of a number of tasks, it is a bit of a learning curve. Lack of SUPER privilege can also create problems in using external replication monitoring.

Amazon RDS does not currently support the following:

  • Global Transaction IDs
  • Transportable Table Space
  • Authentication Plugin
  • Password Strength Plugin
  • Replication Filters
  • Semi-synchronous Replication

Last but not least – access to the shell. Amazon RDS does not allow direct host access to a DB instance via Telnet, Secure Shell (SSH), or Windows Remote Desktop Connection (RDP). You can still use the client on an application host to connect to the DB via standard tools like mysql client.

There are other limitations, as described in the RDS documentation.

High availability with MySQL on EC2

There are options to operate MySQL directly on EC2, and thereby retain control of one’s high availability options. When going down this route, it is important to understand how to leverage the different AWS features that are at your disposal. Make sure you check out our ‘DIY Cloud Database’ white paper.

To automate deployment and management/maintenance tasks (while retaining control), it is possible to use ClusterControl. Just like with RDS, you have the convenience of deploying a database setup in a few minutes via a GUI. Adding nodes, scheduling backups, performing failovers, and so on, can also be conveniently done via the GUI.

Deployment

ClusterControl can automate deployment of different high availability database setups – from master-slave replication to multi-master clusters. All the main MySQL flavours are supported – Oracle MySQL, MariaDB and Percona Server. Some initial setup of VPC/security group is required, and these are well described in the DIY Cloud Database whitepaper. Note that similar concepts apply, whether it is AWS or Google Cloud or Azure

ClusterControl Deploy in EC2

ClusterControl Deploy in EC2

Galera Cluster is a good alternative to consider when deploying a highly available MySQL service. It has established itself as a credible replacement for traditional MySQL master-slave architectures, although it is not a drop-in replacement. Most applications can still be adapted to run on it. It is possible to define different segments for databases that span across multiple AWS regions.

ClusterControl expand cluster in EC2

ClusterControl expand cluster in EC2

It is possible to setup ‘hybrid replication’ by combining synchronous replication within a Galera Cluster and asynchronous replication between the cluster and one or more slaves. Options like delaying the slave gives an additional level of protection to the data.

ClusterControl Add replication in EC2

ClusterControl Add replication in EC2

Proxy layer

To achieve high availability, deploying a highly available setup is not enough. The applications have to somehow know which nodes are working and which ones are not. Changes in topology, e.g. moving a master to another host, also need to be propagated somehow so as to avoid errors in the application layer. ClusterControl supports deployments of proxies like HAProxy, MaxScale, and ProxySQL. For HAProxy and ProxySQL, there are additional options to deploy redundant instances with Keepalived and VirtualIP.

ClusterControl manager load balancers on EC2 nodes

ClusterControl manager load balancers on EC2 nodes

Cross-region replica

Amazon RDS provides read replica services. Cross-region replicas give you the ability to scale reads, as AWS has its services in a number of datacenters around the world. All read replicas are accessible and can be used for reading in a maximum number of five regions. These nodes are independent and can be used in your upgrade path, or can be promoted to standalone databases.

In addition to that, Amazon offers Multi-AZ deployments based on DRBD, synchronous disk replication. How is it different from Read Replicas? The main difference is that only the database engine on the primary instance is active, which leads to other architectural variations.

As opposed to read replicas, database engine version upgrades happen on the primary. Another difference is that AWS RDS will failover automatically with DRBD, while read replicas (using asynchronous replication) will require manual operations from you.

Multi-AZ failover on RDS uses a DNS change to point to the standby instance, according to Amazon this should happen within 60-120 seconds during the failover. Because the standby uses the same storage data as the primary, there will probably be transaction/log recovery. Bigger databases may spend a significant amount of time on InnoDB recovery, so please consider that in your DR plan and RTO calculation.

Of course, this goes with additional cost. Let’s take a look at some basic example. The cost of db.t2.medium host with 2vCPU, 4GB ram is 185.98 USD per month, the price will double when you enable Multizone (MZ) replica to 370.98 UDB. The price will vary by region but it will double in MZ.

Cost comparision
Cost comparision
Cost comparision
Cost comparision

Cost comparision

In order to achieve the same with EC2, you can deploy your virtual machines in different regions. Each AWS Region is completely independent. The setting of AWS Region can be changed in the console, by setting the EC2_REGION environment variable, or it can be overridden by using the –region parameter with the AWS Command Line Interface. When your set of servers are ready, you can use ClusterControl to deploy and monitor your replication. You can also manually set up replication through the console using standard commands.

Cross technology replication

It is possible to setup replication between an Amazon RDS MySQL or MariaDB DB instance and a MySQL or MariaDB instance that is external to Amazon RDS. This is done using standard replication method in mysql, through binary logs. To enable binary logs, you need to modify the my.cnf configuration. Without access to the shell, this task became impossible in RDS. It’s done in a not so obvious way. You have two options. One is to enable backups – set automated backups on your Amazon RDS DB instance with retention to higher than 0. Or enable replication to a prebuilt slave server. Both tasks will enable binary logs which you can later on use for your replication.

Enable binary logs via RDS backup

Enable binary logs via RDS backup

Maintain the binlogs in your master instance until you have verified that they have been applied on the replica. This maintenance ensures that you can restore your master instance in the event of a failure.

Another roadblock can be permissions. The permissions required to start replication on an Amazon RDS DB instance are restricted and not available to your Amazon RDS master user. Because of this, you must use the Amazon RDS mysql.rds_set_external_master and mysql.rds_start_replication commands to set up replication between your live database and your Amazon RDS database.

Monitor failover events for the Amazon RDS instance that is your replica. If a failover occurs, then the DB instance that is your replica might be recreated on a new host with a different network address. For information on how to monitor failover events, see Using Amazon RDS Event Notification.

In the below example, we will see how to enable replication from RDS to an external DB located on an EC2 instance.
You should have binary logs enabled, we use an RDS slave here.

Specify the number of hours to retain binary logs.

mysql -h RDS_MASTER -u<username> -u<password>
call mysql.rds_set_configuration('binlog retention hours', 7);

On RDS MASTER, create replication user with the following commands:

CREATE USER 'repl'@'ec2DBslave' IDENTIFIED BY 's3cr3tp4SSw0rd';
GRANT REPLICATION SLAVE ON *.* TO 'repl'@'ec2DBslave';

On RDS SLAVE, run the commands:

mysql -u<username> -u<password> -h RDS_SLAVE
call mysql.rds_stop_replication;
SHOW SLAVE STATUS;  Exec_Master_Log_Pos, Relay_Master_Log_File.

On RDS SLAVE, run mysqldump with the following format:

mysqldump -u<username> -u<password> -h RDS_SLAVE --routines --triggers --single-transaction --databases DB1 DB2 DB3 > mysqldump.sql

Import the DB dump to external database:

mysql -u<username> -u<password> -h ec2DBslave
tee import_database.log;
source mysqldump.sql;
CHANGE MASTER TO 
 MASTER_HOST='RDS_MASTER', 
 MASTER_USER='repl',
 MASTER_PASSWORD='s3cr3tp4SSw0rd',
 MASTER_LOG_FILE='<Relay_Master_Log_File>',
 MASTER_LOG_POS=<Exec_Master_Log_Pos>;

Create a replication filter to ignore tables created by AWS only on RDS

CHANGE REPLICATION FILTER REPLICATE_WILD_IGNORE_TABLE = ('mysql.rds\_%');

Start replication

START SLAVE;

Verify replication status

SHOW SLAVE STATUS;

That’s it for now. Managing MySQL on AWS is a big topic. Do let us know your thoughts in the comments section below.

via Planet MySQL
Comparing RDS vs EC2 for Managing MySQL or MariaDB on AWS