Learn How to Make Pretzels from Auntie Anne Herself on Facebook Live

Learn How to Make Pretzels from Auntie Anne Herself on Facebook Live

https://ift.tt/3gDawK3

Whether you got your Auntie Anne’s pretzel fix at the mall or the airport (do they exist anywhere else?), you may be missing those salty, buttery treats now that we’re not spending much time in either place. If this is the case, mark your calendar for Sunday, May 31 at 4 p.m. EST, when THE Auntie Anne herself (the chain’s founder Anne Beiler) will be doing a Facebook Live pretzel-making tutorial. The virtual class will take place at the home of the company’s current president, Heather Neary, but don’t worry: Auntie Anne herself will be there and doing the rolling.

The Auntie Anne’s pretzel recipe

Technically, they want you to order their DIY At-Home Pretzel Kit for the event, which, for $20, comes with most of what you need to make 10 pretzels, either in their original or cinnamon sugar flavor. Butter—a key component of these pretzels—is not included in the kit.

But if you don’t have time to order a kit, or want to save some money, there are several Auntie Anne pretzel copycat recipes out there, including these from Food.com, The Spruce Eats and Once Upon a Chef. The main thing you’ll be learning from Auntie Anne during the tutorial is how to actually form the pretzels, so making your own dough shouldn’t be an issue.

Back by popular demand

The DIY At-Home Pretzel Kits were initially a limited-time special for National Pretzel Day, but ended up being so popular, the company brought them back. “We heard from our guests loud and clear that they are missing our hand-rolled, golden brown pretzel snacks, and quite frankly, we’re missing our guests, too!” Neary said in a statement. “The DIY At-Home Pretzel Kit is not only a great way to satisfy those pretzel cravings, but also creates a fun activity for families to enjoy together while remaining at home.”

Even if you aren’t able to join the Facebook Live demonstration, the video will remain up on the Auntie Anne’s page after that for a quick tutorial whenever you have the time. Now every day can be Pretzel Day!

geeky,Tech,Database

via Lifehacker https://lifehacker.com

May 30, 2020 at 02:08PM

Laravel Packages I never wanna miss again

Laravel Packages I never wanna miss again

https://ift.tt/3eAWcQG

Let’s talk about my favorite topic: Laravel.

In Laravel, I often had the situation that I started building something where a package is already there out in the wild. Since I recognized that also for not so common topics packages are existing but also for niche problems, I check google out first before I start programming things. Best example:

I started building my own tax list for my first Product smartdb.io, where I have Stripe implemented for the billing. While researching for the way of writing the reverse charge on the receipt, I found the package from Marcel Pociot which is solving my problems totally: Vat Calculator

But now my list of Packages which I never wanna lose again:

Livewire

Writing reactive UIs is not so intuitive with vue. Ok, you can get it on your plate fast what you have to do, and packages like Interia.js are adorable, but this is nothing compared to livewire. With vue and laravel, you have to create a REST API first and then fire queries and requests to it. Or use Inertia.js, of course, this is making your life easier. With livewire, you can write everything directly in PHP, no need for big JS things. If you want to create something minimal but reactive like the burger-menu on your page, you can use alpine.js. Alpine.js is minimal and functional like tailwind, just check it out.

Horizon

Horizon is a package for managing your queues. It’s so lovely how easy it is to manage multiple, autoscaling queues with it. You can define what queues should run, how much throughput they can have and also what for timeouts etc. they have. Also, the failed jobs are visible in the UI, that’s so good!

Nova

If you didn’t buy Laravel Nova yet, go for it! It’s such a good admin-tool for all your apps, and you can just pay for it if you go live with your app because the license is not limited at your local machine, only for production apps. I also build whole management apps with nova. For example, our Community “Bitkom”: We made a management System for online orders with it, and just with it and mailgun.

Laravel Gravatar

No need for explanation: Never build an upload for an avatar in your MVP again. Here is the package: thomaswelton/laravel-gravatar

Telescope

Debugging your laravel web-application never was more comfortable than with telescope. It’s so pleasant for development purposes. GitHub

socialite

With Laravel socialite, the Social authentification is so secure and comfortable. You want your users to login with GitHub, Facebook, Google, or others? With socialite, it’s done in under 5 minutes. Get it

Cashier

If you start your own SaaS or Shop with laravel, you’ll have the moment to collect money from your users. With cashier and Stripe, it’s easy. Cashier link

Sushi

Sushi was a sponsor package from Caleb Porzio, which is creating Eloquent Models from an array instead of a database connection. Now it’s free to get here: GitHub. I can describe my use-case of this package at best with “better ENUM”. I use it for long lists of countries, specs, or others that are more or less static, for example, taxes, AWS region mappings to AMIs, and such things.

Laravel Debugbar

You all should know it. I use it for years, and I love it. I’ll not explain it too much, but you can debug your MySQL queries, Gates, views, and all other things you need to debug with it. You see how many Queries are executed, you see which views got rendered and all these goodies. Get it

To be honest, I think this list is not complete. Maybe I’ll add a second list and a third and so on. But for now, these are the packages I don’t want to miss.

programming

via Laravel News Links https://ift.tt/2dvygAJ

May 29, 2020 at 10:06AM

Fisher Space Pen Short Video & Pen Review

Fisher Space Pen Short Video & Pen Review

https://ift.tt/2XeVwu5

Fisher Space Pen — the only pen that writes frozen, under water, and in zero gravity — will be heading back to space with NASA astronauts tomorrow, if all goes according to plan. And that’s what didn’t happen a couple days ago, when the SpaceX launch was delayed.

Here’s a short video about that and about the company’s past & current contributions to the writing industry; the only ballpoint pen that’s been on every manned American space mission since Apollo 7, and a newer all-brass pen with antimicrobial properties (popular lately due to the COVID-19 coronavirus scare).

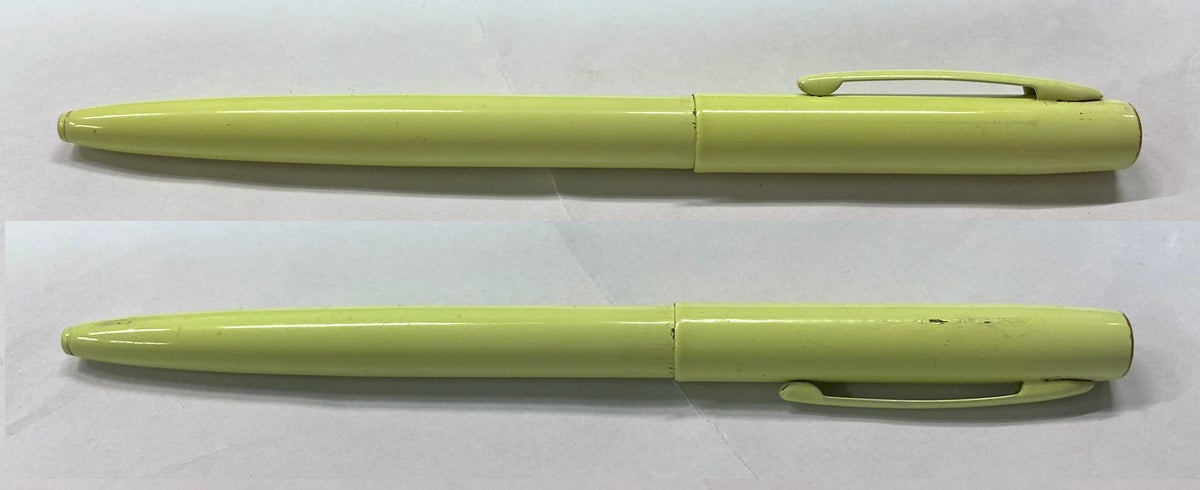
At the 2020 SHOT Show Range Day this past January, I was the happy recipient of a Tradesman Yellow Cap-O-Matic Space Pen, which I immediately put to work.

Two views of my Tradesman Yellow Space Pen (Photo © Russ Chastain)
Two views of my Tradesman Yellow Space Pen
(Photo © Russ Chastain)

The SHOT Show is a busy time, with dozens of meetings and new products each day. While I keep extensive notes electronically on my phone, there’s no substitute for jotting down a quick handwritten note on a business card or pamphlet to remind you of that moment in time once you get back to your room — and eventually back home. After a whirlwind like the SHOT Show, that stack of business cards you amassed won’t mean much without those scribbles telling to to send email, write up a new product, or contact the company for a review sample.

My usual drill is to pick up free pens here & there on the Show floor, and find out which ones are useful via “trial by fire.” Different pens “like” different surfaces, and not every one will write on every business card or slick printed brochure.

This time, I used my Space Pen almost exclusively for all of that work, with no letdowns. My only “iffy” note was on a very shiny business card, on which most pens won’t write well. The Fisher pen wrote well, but the slick surface didn’t allow the ink to soak in at all, and some of the ink was wiped off with handling before it dried.

In other words: the Fisher Space Pen is the best pen I’ve ever owned.

The two parts of the pen body are threaded together, with the pressurized ink cartridge inside. (Photo © Russ Chastain)
The two parts of the pen body are threaded together, with the pressurized ink cartridge inside.
(Photo © Russ Chastain)

It’s the Cap-O-Matic model, which is a click-to-retract style of pen… but instead of a button at the back end of the pen, you “click” the entire rear cap portion (the part with the clip). The entire mechanism is contained in that cap; the lower part is a painted brass tube containing the ink cartridge.

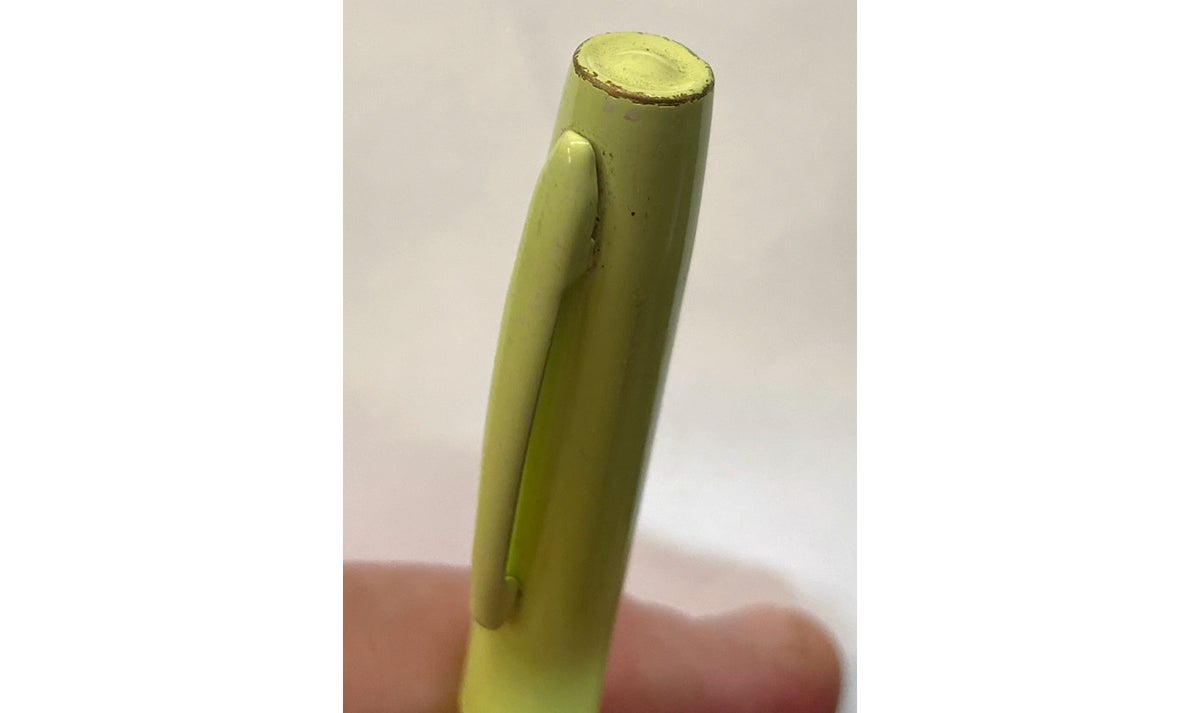
I do a lot of workshop work, which is tough on my things… things like clothes, phone cases, and pens. After 4 months of tough service, my Tradesman pen is doing just fine, with the only casualty being a little lost paint & exposed brass.

My pen has lost a little paint during 4 months of hard use. (Photo © Russ Chastain)
My pen has lost a little paint during 4 months of hard use.
(Photo © Russ Chastain)

Perhaps best of all, it’s easy to spot and easy to identify; there’s very little chance anyone can pick it up and walk away with your pen, thinking it’s theirs — and if you leave it lying on a workbench or desk, it’s easy to spot among the clutter. The Tradesman bright yellow finish is glossy and covers every exterior surface of the pen, including the inside of the clip.

All Fisher Space Pens are lifetime guaranteed for quality against all manufacturing defects.

Company longevity is always a concern when you read the words “lifetime guarantee,” but when a company has been making good on their Space Pen products for more than helf a century, you can have confidence in their staying power.

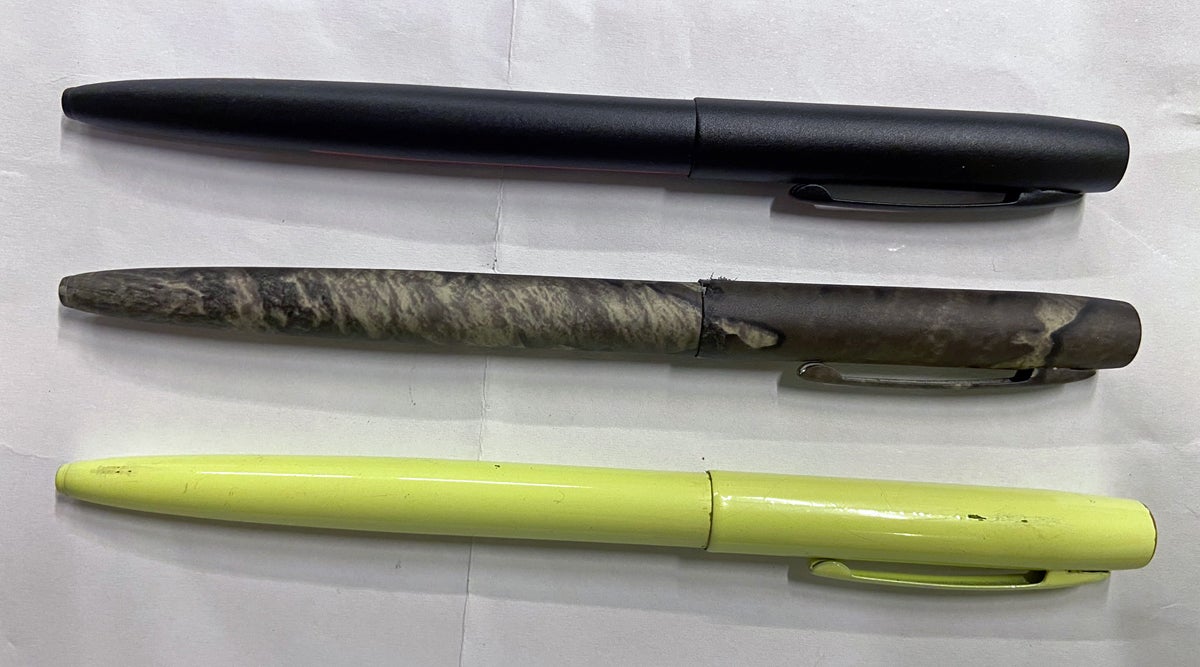
After the Show, I ordered two more Cap-O-Matics; one in TrueTimber Strata Camouflage and one in the Firefighter motif.

Cap-O-Matic Space Pens in Firefighter (top), TrueTimber, and Tradesman Yellow (bottom). (Photo © Russ Chastain)
Cap-O-Matic Space Pens in Firefighter (top), TrueTimber, and Tradesman Yellow (bottom).
(Photo © Russ Chastain)

The TrueTimber version is a wrap, which means there’s no camo below the clip. It has a slightly-textured finish, which is nice for gripping the pen. This is the pen I can see hunters carrying to fill out their hunting licenses or tags, often with shaking (and possibly bloody) hands. There’s no doubt it’ll do this job better than most, and should have no problem writing on your tags.

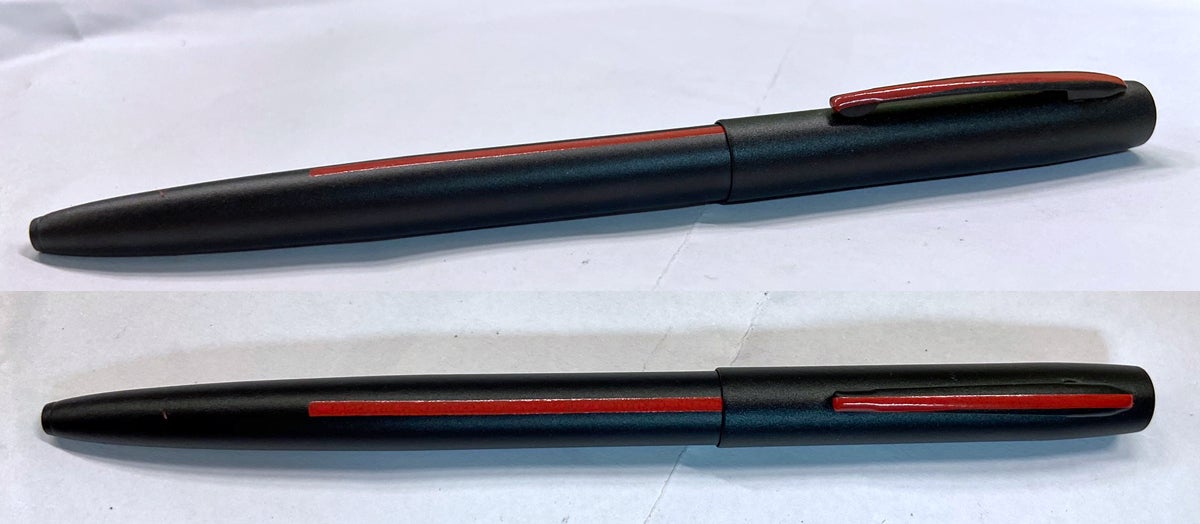
Firefighter version of Fisher Cap-O-Matic Space Pen. (Photo © Russ Chastain)
Firefighter version of Fisher Cap-O-Matic Space Pen.
(Photo © Russ Chastain)

The Firefighter model has an all-over matte black finish enhanced by red lines on the pen clip and the lower body of the pen. It writes like a champ, and for every one sold, Fisher will make a donation to help injured firefighters and their families.

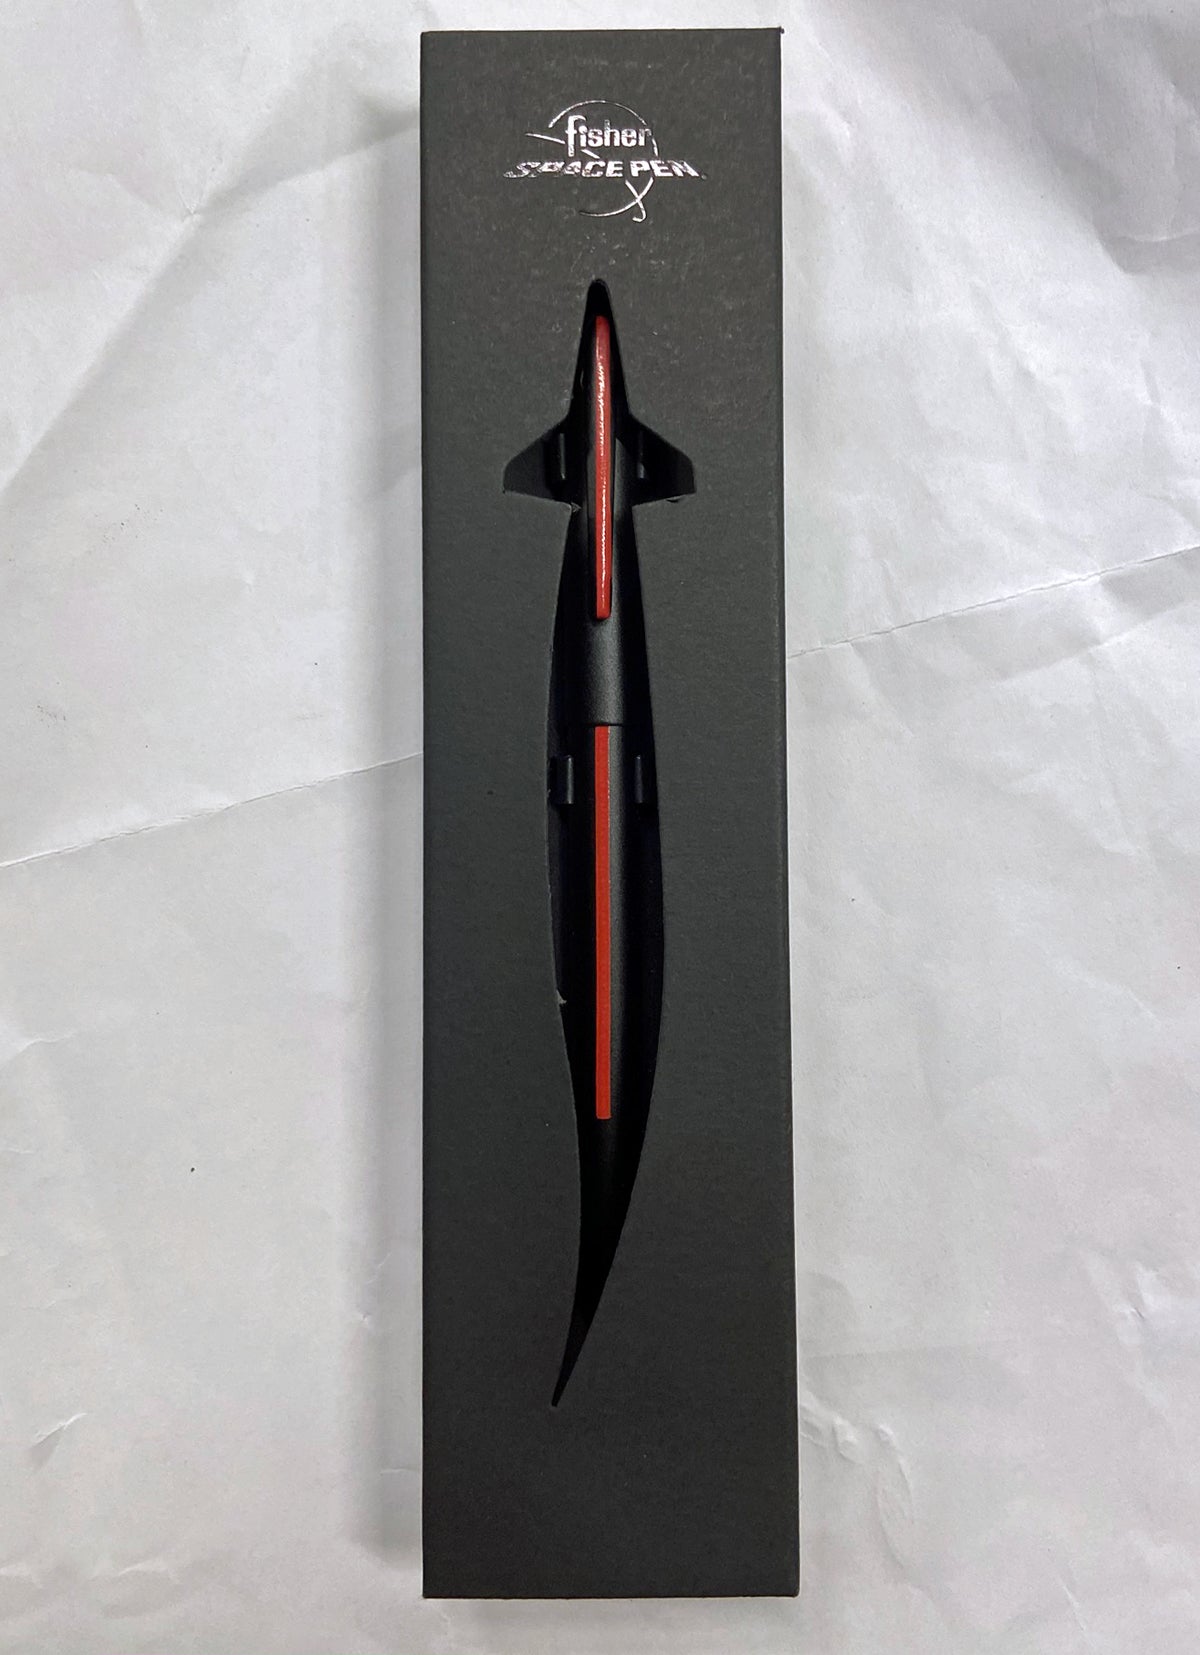
Each Cap-O-Matic Space Pen comes in this attractive "shuttle gift box." (Photo © Russ Chastain)
Each Cap-O-Matic Space Pen comes in this attractive “shuttle gift box.”
(Photo © Russ Chastain)

Engraving is available on some models, including the Red Line Firefighter and Blue Line Police models, with the first line free (up to 30 characters/spaces per line). Up to two more lines can be added at $4 per additional line, for a maximum of 3 30-character lines.

Some people don’t carry a pen. That’s cool; no worries. But I have long been one to carry a pen most of the time. Need to fill out a form or sign a receipt? Use your own pen, not some grubby cheapo that’s been handled by every snot-wiping nose-picker who came before you. Need to endorse a check or fill out a deposit form at the bank? Same thing.

Although I don’t worry about my current Fishers wearing out, I can’t help but drool a little over the original AG7 Astronaut Pen or maybe even the black Titanium Nitride version. Decisions, decisions…

And if you’re going to carry a pen, you might as well make it a good one with a lifetime guarantee. That’d be Fisher Space Pen of Boulder City, Nevada, USA.

The post Fisher Space Pen Short Video & Pen Review appeared first on AllOutdoor.com.

guns

via All Outdoor https://ift.tt/2yaNKUu

May 29, 2020 at 01:40PM

How to filter a list using Laravel query builder and checkboxes

How to filter a list using Laravel query builder and checkboxes

https://ift.tt/3gxVQfq

Let’s set the stage…

We have a list of products that we need to filter. For example, we have a storefront that sells sporting apparel. Each product has a brand (Nike, Adidas etc.) and a category (t-shirts, shoes etc.). We’ll show brands and categories as a list of checkboxes. The user should be able to click on the desired brand and/or category (one or more), then click filter, which will refresh the page showing the filtered results.

Packages

The only package we’ll be using is Spatie’s Laravel query builder. It extends Laravel’s default Eloquent builder by making filtering through large lists easier. Check it out on Github or on Spatie docs. I’ve started using it recently and it has a very fluent API.

Schemas

These models have typical one-to-one relationships, product-to-brand and product-to-category.

I’ve kept the columns to a bare minimum. Product table looks something like this:

$table->text('id'); $table->text('name'); $table->text('description'); $table->text('category_id'); $table->text('brand_id'); $table->text('thumbnail')->nullable(); $table->text('large_preview')->nullable(); 

Category table:

$table->text('id'); $table->text('name'); 

Brand table:

$table->text('id'); $table->text('name'); 

Layout

To get a feel of what this looks like on the front end, we have a column on the left side which lists brands and categories. Each item has a checkbox. The user can check the desired checkbox items and click the filter button.

laravel query builder checkboxes

Below is the snippet for the left panel blade partial. I’ll skip the styling.

<p>Brands</p> @foreach ($brands as $brand) <label class="m-checkbox"> <input name="brand" type="checkbox" value="" @if (in_array($brand->id, explode(',', request()->input('filter.brand')))) checked @endif >  </label> @endforeach <p>Categories</p> @foreach ($categories as $category) <label> <input name="category" type="checkbox" value="" @if (in_array($category->id, explode(',', request()->input('filter.category')))) checked @endif >  </label> @endforeach <button type="button" id="filter">Filter</button> 

Everything is pretty straight forward. The @if conditional is there so once the form is submitted, we can catch the selected id’s through request() object and use them to tick the checkboxes.

Product list renders something like this, again skipping the styles.

@foreach ($products as $product) <p></p> <p></p> <button>Add to Cart</button> <hr> @endforeach 

Javascript

Laravel query builder can filter models based on URL parameters. We’ll use javascript to refresh the page with selected brands and categories. We’re trying to stay away from submitting forms with arrays as names. I have not really found a good way to submit form arrays without swapping brackets with URL safe characters. The query string doesn’t looking appealing when you swap it out. JS method will keep the URL pretty. This also keeps the request() object variable clean, plus it opens the door to other ideas, like submitting through Ajax or Livewire.

<script> function getIds(checkboxName) { let checkBoxes = document.getElementsByName(checkboxName); let ids = Array.prototype.slice.call(checkBoxes) .filter(ch => ch.checked==true) .map(ch => ch.value); return ids; } function filterResults () { let brandIds = getIds("brand"); let catagoryIds = getIds("catagory"); let href = 'products?'; if(brandIds.length) { href += 'filter[brand]=' + brandIds; } if(catagoryIds.length) { href += '&filter[category]=' + catagoryIds; } document.location.href=href; } document.getElementById("filter").addEventListener("click", filterResults); </script> 

When the filter button is clicked, you can collect all the id’s for brand and category. Internally, the getIds function collects all the checkboxes with brand or category names, then filters through, collecting the values of checked checkboxes.

document.location.href=href refreshes the page with the url containing the brand and categories to filter.

document.getElementById("filter").addEventListener("click", filterResults); adds the click event to the filter button.

Controller

The index controller below, without URL parameters, will show all the products. When url parameters are supplied, products will be filtered. Check out Spatie docs for more options.

public function index() { $categories = Category::all(); $brands = Brand::all(); $products = QueryBuilder::for(Product::class) ->allowedFilters([ AllowedFilter::exact('brand', 'brand_id') AllowedFilter::exact('category', 'category_id'), ]) ->get(); return view('products.index', compact('products', 'brands', 'categories')); } 

I hope this helps in your filtering with Laravel project. If you have a question, drop a comment and I’ll be sure to get back to you.

programming

via Laravel News Links https://ift.tt/2dvygAJ

May 28, 2020 at 10:06AM

A History of Perfection: TFB’s Definitive Guide to all Glock Generations

A History of Perfection: TFB’s Definitive Guide to all Glock Generations

https://ift.tt/36MH0xb

The popular phrase “there’s always room for improvement” rings true no matter what industry you’re in. Even for venerated manufacturers such as Smith & Wesson, SIG Sauer, and Glock, there are always tiny steps here and there that are taken to improve their product. Today we’ll be taking a look at the various Glock generations and explore what improvements (or setbacks) were made to the popular line of polymer Austrian pistols over the years.

A History of Perfection: TFB's Definitive Guide to all Glock Generations

A History of Perfection: TFB’s Definitive Guide to all Glock Generations

Glock Generation 1 – 1982

By 1984 Glock was still operating out of just a single building in Deutsch Wagram, Austria. Gaston Glock and 3 employees were hard at work making consumer goods and by the late 70’s even some military hardware. Specifically, the FM 78 Field Knife and machine-gun belt links were at the forefront of their product catalog by the 80s.

A History of Perfection: TFB's Definitive Guide to all Glock Pistol Generations

A History of Perfection: TFB’s Definitive Guide to all Glock Generations – The Original Glock Headquarters

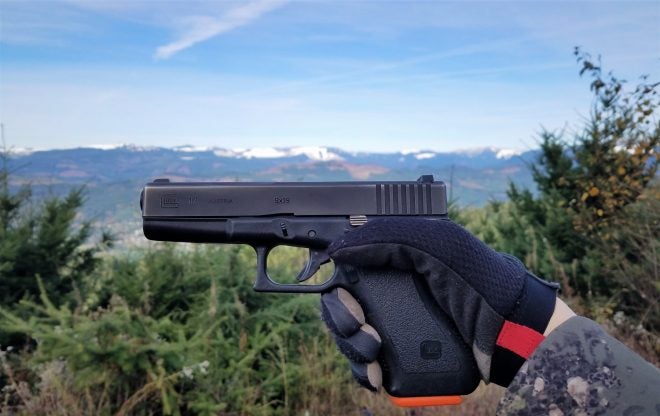
The Glock 17 was the first pistol to come to market after nearly 3 years of development within Glock headquarters. The result of this design process was the semi-automatic polymer-framed Safe Action Glock 17 9mm pistol. The pistol was very bare-bones at this point but proved to be functional and reliable and these qualities gave it much favor with various military and police departments across the globe.

A History of Perfection: TFB's Definitive Guide to all Glock Pistol Generations

A History of Perfection: TFB’s Definitive Guide to all Glock Generations – Photo Credit: Glock

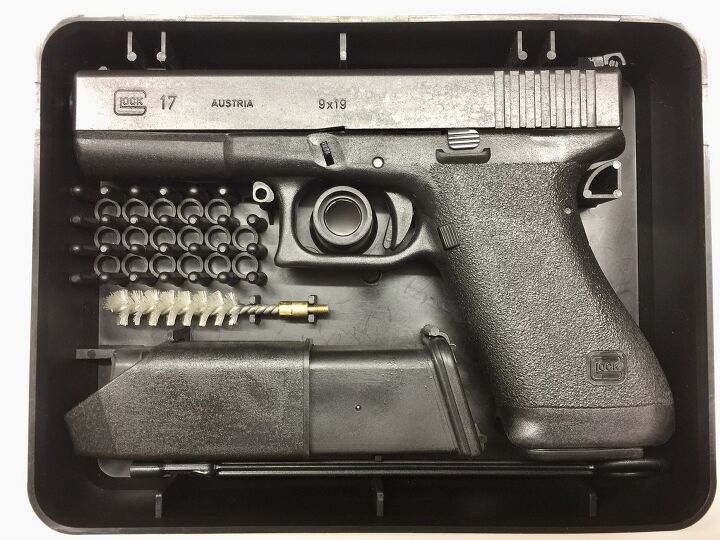
The design of the Glock 17 Gen 1 was simple. There was no accessory rail, the magazine release was minuscule and the grip texturing wrapped fully around the entire pistols grip. The grip pattern used on the Gen 1 pistol frames used a “pebble finish” and had no finger grooves.

Early Glock Gen1 pistols made use of a much thinner bore wall than later generations with the early barrels being referred to as “pencil barrels.” These pistols were produced between 1982 and 1986 and featured serial number prefixes “AF” through “AM”.

A History of Perfection: TFB's Definitive Guide to all Glock Pistol Generations

A History of Perfection: TFB’s Definitive Guide to all Glock Generations

The last notable feature about the Gen 1 Glock pistols was the pistol cases. Early Glock pistols were shipped in the iconic “Tupperware” boxes but Gen 1 Glocks produced and sold in Austria shipped with the case preformed for ammunition storage with these compartments later being removed for importation into the United States. The Generation 1 Glock pistols were produced until 1988 when the Gen 2 Glocks started to make their first appearance.

Glock Generation 2 – 1988

Up until 1988 Glock produced only the Glock 17 model. With the 2nd generation of pistols making their debut in 1988, Glock also released the new Glock 19 – a pistol that would go on to be arguably the most iconic product of the brand. In fact, Hop over on TFBTV argues that the Glock 19 Gen 2 is the greatest generation of Glock to have ever existed.

Gen 2 Glocks saw only minor improvements, some of which were only prompted by pressure from the ATF. For example, Glock had to include a steel serial number plate in order to comply with the BATFE’s regulations (Subpart C—FIREARMS TITLE 27). Other improvements were made to the magazine floorplate and magazine follower spring for improved performance. Glock Gen 2 also holds a special place in my heart as being the pistol heavily featured in the Half-Life series of first-person shooter games.

A History of Perfection: TFB's Definitive Guide to all Glock Pistol Generations

By 1991 Glock had also made revisions to the grip texturing by adding a checkering pattern to the front and rear instead of just on the sides as they had first been released in 1988. These grip modifications gave the user more purchase on the gun in all conditions. In addition to modifications to the grip design, Glock also introduced several calibers including .40 S&W, 10mm Auto, .380 ACP, and .45 ACP.

A History of Perfection: TFB's Definitive Guide to all Glock Pistol Generations

A History of Perfection: TFB’s Definitive Guide to all Glock Generations

In 1995 Glock also introduced the Glock 26 and Glock 27 – the first subcompact pistols made by Glock. These could be considered the first guns that targeted the consumer market rather than the police and military markets.

Glock Generation 3 – 1998

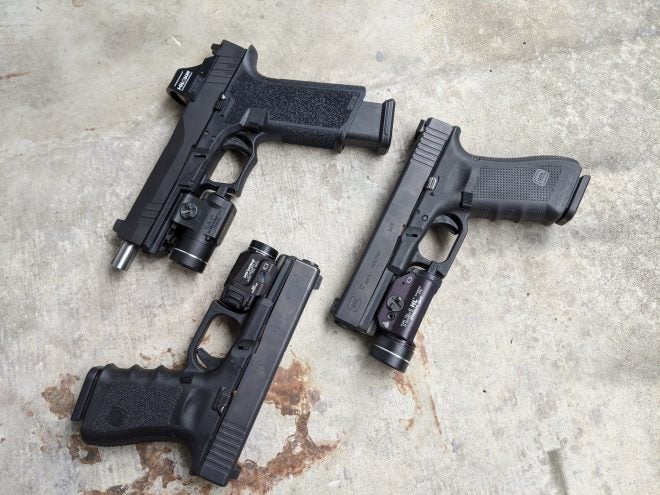
Glock Gen 3 pistols remain to this day some of the most popular handguns on the market. They have been in production for 20 years and are still being produced today and are available for sale. Gen 3 saw the addition of two new calibers (.45 GAP and .357 SIG) and a new feature – an accessory rail. The Universal Glock Rail allowed wielders of the pistols to mount lights and lasers to the gun for added utility.

A History of Perfection: TFB's Definitive Guide to all Glock Pistol Generations

A History of Perfection: TFB’s Definitive Guide to all Glock Generations

Other improvements were the addition of a thumb shelf on both sides of the pistol to accommodate both left and right-handed shooters. By far the most contentious addition to the Gen 3 Glocks were the finger grooves. Many people, myself included, disliked the finger groves. For me, they gave the otherwise smooth lined pistol an odd feeling and awkwardly spaced out your fingers if they didn’t fit exactly inside the groves. However, not everyone disliked them and I supposed that is why the pistols are still being made to this day – someone is buying them.

A History of Perfection: TFB's Definitive Guide to all Glock Pistol Generations

The raised extractor indicating the chamber has a round in it.

Gen 3 also added a life-extending cross pin to the rear of the trigger pin which reduced the stress encountered by the locking block when firing the pistol – this improvement leads to longer service life for the pistol. The last major functional improvement to the Gen 3 Glocks was the addition of an extractor which also served as a loaded chamber indicator. When the pistol had a round in the chamber, the extractor would stick up slightly from the frame giving you a visual indicator that the pistol was hot.

A History of Perfection: TFB's Definitive Guide to all Glock Pistol Generations

Before the start of Glock Gen 4 the Glock 22, 21, 31, 32, and 19 were all being offered in Glock’s new RTF2 (Rough Textured Finish) which had fish-scale style rear slide serrations and a new stippling pattern. These pistols were only offered for a limited time and are no longer being produced.

Glock Generation 4 – 2010

Gen 4 Glocks saw the first dimensional differences to the pistol which to date had been largely identical across generations. The addition of user-serviceable backstraps allowed the user to change both the beavertail and grip of the frame by swapping out Glock Modular Backstraps. The new frames’ base grips were also slightly smaller than previous generations

A History of Perfection: TFB's Definitive Guide to all Glock Pistol Generations

A History of Perfection: TFB’s Definitive Guide to all Glock Generations

A welcome improvement to Generation 4 was the larger magazine catch/release which was nearly tripled in size and was now reversible for both left and right-handed shooters. There was a minor drawback when it was first introduced as the current generation magazines had issues when the magazine catch was moved to the right side (for left-handed shooting). This problem was later corrected with the introduction of a new generation of magazines designed to circumvent this problem.

A History of Perfection: TFB's Definitive Guide to all Glock Pistol Generations

A History of Perfection: TFB’s Definitive Guide to all Glock Generations – A Glock Slimline G42 Pistol

The Generation 4 Glocks featured a new dual recoil spring which reduced the recoil felt when shooting and also had the benefit of reducing wear and tear on the gun. Alongside these improvements, two new single-stack “Slimline” pistols were introduced as part of generation 4 in 2014 and 2015. The Glock 42 .380 ACP pistol and the much favored Glock 43 9mm pistol were introduced as subcompact single stack pistols.

Glock Generation 5 – 2017

The newest numbered generation of Glocks made its debut at SHOT Show 2017 and to date has only released a handful of pistols. The current lineup includes only the 17, 19, 26, 34 MOS, 17 MOS, and 19 MOS pistols. The MOS pistols share a unique optics mounting plate for the addition of a micro red dot – something that spilled its way over into the United States Military Modular Handgun System competition.

A History of Perfection: TFB's Definitive Guide to all Glock Pistol Generations

A History of Perfection: TFB’s Definitive Guide to all Glock Generations

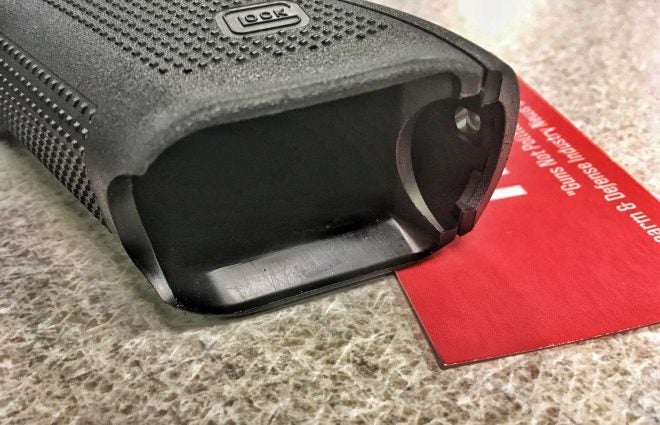
Both the Glock 47 and 45 have since been added to the list of offerings with both being used by United States Customs and Border Patrol agents as their new duty weapon. However, more than just combinations of the already existing slide and frame sized were being added. Gen 5 also saw the addition of a flared magazine well, trigger guard relief cuts for a higher grip as well the first major changes to the internal components.

A History of Perfection: TFB's Definitive Guide to all Glock Generations

A History of Perfection: TFB’s Definitive Guide to all Glock Generations

The internal workings of Glock pistols had more or less remained unchanged since the Gen 1 Glock was introduced, however, the Gen 5 saw the removal of the cross pin that would normally be above the trigger guard. Glock also replaced the standard barrel with a Glock Marksman barrel for all Gen 5 Glocks and lastly, the outer coating is a newer nDLC coating. I’m not personally a fan of this newer coating as I much prefer the Tennifer ferritic nitrocarburizing that has been around and lasted throughout the decades on previous generations of Glocks.

A History of Perfection: TFB’s Definitive Guide to all Glock Generations – The flared magazine well of a Glock Gen 5

Glock Sliver Slimline Era – 2019

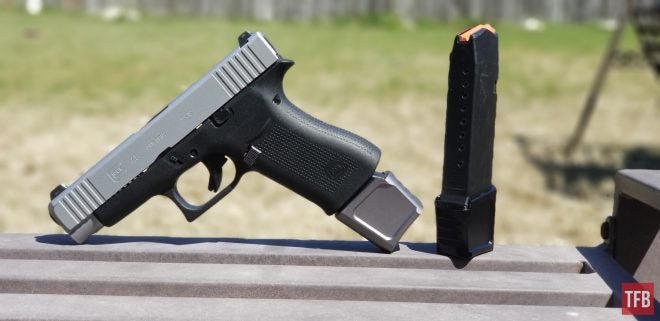
The Slimline series of Glocks were released in early 2019 and made waves when they were revealed to the public. The Glock 48 and 43X were both single-stack 10 round capacity pistols using the Glock Slim 01 magazines. Not quite a Glock 19 but also not a Glock 43 and having features from the last three generations of Glocks makes these pistols almost a generation of their own.

A History of Perfection: TFB's Definitive Guide to all Glock Generations

A History of Perfection: TFB’s Definitive Guide to all Glock Generations

One thing that sets the 43X and 48 (as well as the 43 and 42) is the unique firing pin and striker. All four of the pistols share the same striker and firing pin and these components are not compatible with any other generation of Glock pistol. Furthermore, the Slimline pistols nixed the finger groves from the Gen 3’s as well as the modular backstraps from Gen 4 and Gen 5 but at the same time add their own flair with an increase single-stack magazine capacity, a silver PVD finish and forward slide serrations.

A History of Perfection: TFB's Definitive Guide to all Glock Pistol Generations

A History of Perfection: TFB’s Definitive Guide to all Glock Generations

Regardless of where these Silver Slimline pistols fit they are no longer being produced as they have been replaced by the more traditional all-black models which carry the same features but lack the non-reflective PVD coating. By far these Slimline Glocks have to be my favorite generation of pistols.

More to Come?

Glock continues to make improvements to their long line of pistols and is even branching out into new territory with the recently released Glock 44 22LR pistol. I would expect Generation 5 Glocks to continue for quite a while until we start seeing any signs of Gen 6 Glocks and by then who knows what we will see happen to the popular polymer pistol brand. What is your favorite generation and model of Glock and why? Let us know down in the comments!

A History of Perfection: TFB's Definitive Guide to all Glock Pistol Generations

Thanks to TFBTV’s Hop for some of the photos used in this article


We are committed to finding, researching, and recommending the best products. We earn commissions from purchases you make using the retail links in our product reviews.

Learn more about how this works

.

guns

via The Firearm Blog https://ift.tt/2JX8W99

May 27, 2020 at 08:01PM

He’s Been Generating Free Power for 16 Years Using a Water Wheel

He’s Been Generating Free Power for 16 Years Using a Water Wheel

https://ift.tt/2M12fBL

Way back in ancient times, or maybe about 4 years ago, I posted here about a homemade water wheel power generator built by a guy in Kentucky. He used a vehicle alternator, some bicycle parts, and some old vehicle batteries to generate power to help him run things off-grid. Pretty cool… but not quite as cool as a guy who repurposed an old washing machine and uses it to power his home and workshop!

Here’s what he says about it:

I’ve been living off grid for the past 16 years, I make my own electricity using an old washing machine I found at the dump.

I rewired the smart-drive washing machine motor to generate electricity, the generator is rotated via a water-driven Pelton Wheel (Hydro Turbine).

Water goes into the intake, creates pressure due to the difference in height between intake and outlet nozzle. Water comes out of the nozzle at 60 psi and spins the pelton wheel which is attached to the modified washing machine motor (now a generator).

The generator puts out 3 phase AC voltage which is passed through a 3 phase diode block rectifier to change it into DC, it is then fed directly into a 24v DC battery bank. A 24-240v AC inverter is connected to the battery bank, 240v AC travels up the power lines to my house. I can now power all my 240v AC household appliances from the inverter.

It makes enough power to heat my water and run all the appliances in my energy-efficient house as well as most of the tools in my shed.

Occasionally I have issues with it and need to go down to the stream to problem-solve, a small price to pay to avoid paying a power bill.

His title says “16 years,” but early in the video he says — twice — that he built this generator 6 years ago. Turns out he’s been generating his own power for 16 years, but this particular setup has only been in operation for 6. Late in the video, he shows some of his earlier attempts at power generation.

Warning: the camera work isn’t great and some viewers may find it nauseating.

In the video, he says he’s doing a yearly checkup on the system, having gotten a low-voltage alarm at his house. The system was only putting out 300 of the usual 600 watts. After a quick check at the unit, he strolls up the creek to check the intake.

He stops along the way to chat about some old trees, but finally makes it to his water intake, where he starts digging in the stony creek bed without any explanation. Afterward, he explains his crude-but-effective water filtration system.

He got all his pipe second-hand for about $400, and the most expensive part of his system was the wire to run power from the generator to his house; he said that ran him about $2,000 — but it would have cost $14,000 for him to connect to a power grid and start paying a monthly power bill, so he definitely made the better choice.

As far as maintenance, this filter cleaning is usually only needed about once a year and he says the motor that’s acting as a generator needs new bearings every 2 years.

Pretty sweet setup, all things considered.

The post He’s Been Generating Free Power for 16 Years Using a Water Wheel appeared first on AllOutdoor.com.

guns

via All Outdoor https://ift.tt/2yaNKUu

May 26, 2020 at 03:33PM

Keeping Warm With The 5.11 Aggressor Parka – Review

Keeping Warm With The 5.11 Aggressor Parka – Review

https://ift.tt/3c9leEw

Keeping Warm With The 5.11 Aggressor Parka

U.S.A.-(Ammoland.com)-This winter was an interesting time to be a gun owner and 2A advocate in Virginia. The liberal majority in the state legislature led by Bloomberg’s pawn, Governor Ralph “Black Face” Northam, decided to enact Draconian gun laws across the Commonwealth.

The people of Virginia stood up for their rights and rallied through the cold winter weather against tyrannical gun laws. Being a journalist and a gun owner, meant I had to attend these pro-freedom events and brave the winter elements. Lucky for me, 5.11 offered me their Aggressor Parka to keep me warm while standing up for my rights by the side of other liberty-minded individuals.

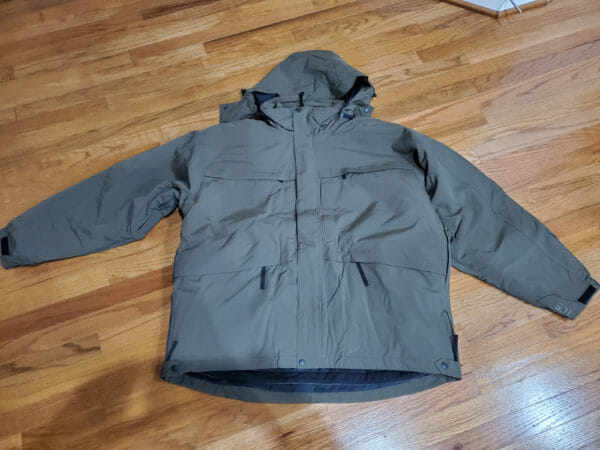
5.11 Aggressor Parka

5.11 Aggressor Parka

The company is well known for its duty ready gear, and the 5.11 Aggressor Parka is no exception to their mission. 5.11 based its parka on its popular 3-in-1 Patrol Jacket that many people in law enforcement use daily. The difference is that the Aggressor Parka is better suited for off duty use than the Patrol Jacket. The difference in situations doesn’t mean that the Aggressor Parka is any less functional than the Patrol Jacket. It is just a little more discrete and doesn’t scream “cop.”

The 5.11 Aggressor Parka comes in two different colors. I got my coat in “Tundra,” which is an olive drab green color. Wearers can also get the jacket in “Coyote,” which is a tan color. I wish 5.11 offered the Aggressor Parka in black. That is my most significant criticism of the jacket. Almost all my winter coats are black. It probably has to do with my OCD, but I was able to deal with a green jacket. I am not sure why the company chose only to provide the coat in two colors. I think 5.11 could increase its sales if the company offered the parka in other colors.

One of the reasons why I like the Aggressor Parka is that the wearer can use it in various weather conditions. During my time with the coat, I wore it while snowboarding in freezing temperatures, in the rain, and during the early spring. In every situation, the parka worked well for me.

The first thing I noticed with the 5.11 Aggressor Parka is how much the coat weighs. It is heavy. I mean, it is cumbersome. I have worn a lot of heavy jackets in the past, but this one is the heaviest coat I have ever owned. My wife picked it up and asked me if I left my gun in the coat. It isn’t unmanageable, but the weight is noticeable.

Virginia might be in the mid-Atlantic region of the east coast, but during the winter it can get cold and does drop below zero then a week later it could warm up into the 50s. That is what makes this Parka great. The wearer of the parka can remove inner fleece leaving a breathable outer shell for when the weather is a little warmer.

During Lobby Day in Richmond last January, I wore this jacket all day, and my upper body never felt cold. The other people that I attended the rally with were in other brands of coats, and they froze their asses off. The 5.11 Aggressor Parka, along with the camaraderie of the other gun owners, did a great job keeping me warm that day.

5.11 Aggressor Parka
The wearer of the parka can remove inner fleece leaving a breathable outer shell for when the weather is a little warmer.

A month later, I attended and spoke at the “For the Love of Country” pro-gun rally outside DC. That day turned out to be the coldest day of the year in Virginia. It was freezing and extremely windy. My legs were cold as hell. My hands were ice, and my face was numb. The cold would have been unbearable if it wasn’t for the 5.11 Aggressor Parka. Although my legs, face, and hands were ice cubes, the coat kept my mid-section nice and toasty. It did its job.

I also wore the Aggressor Parka in the rain. A lot of parkas claim to be water-resistant, but after an hour of being in the elements, the rain ends up soaking the wearer. I took the 5.11 coat on a snowboarding trip to test out the waterproof quality of the parka. I am not the best snowboarder (or even average), so I don’t stay too dry. Couple my snowboarding skills with snow tubing I did with my family, and I got soaked from head to toe.

Even though the rain-soaked 5.11 Aggressor Parka on the outside, my t-shirt stayed dry, and I stayed warm. I also wore this coat in the soaking rain and snow in New York. I spend a lot of time in the Empire State, which gave me an excellent opportunity to test out the parka in a harsher environment than the Virginia winter. It worked just as good for me in New York as it did in my home state.

I think that is the real strength of the 5.11 Aggressor Parka. With the removable fleece, it is very versatile when it comes to multiple weather conditions. The fleece can be removed and reattached quickly. Another cool feature is the side zippers. When I took the parka snowboarding, I would get a little warm, and I didn’t want to take off the jacket to cool down. I was about to use the side zippers to open up the side of the jacket to let in the cold air I could cool down without having to move the coat.

It might sound crazy to rave about, but the zippers that 5.11 chose to use on the Aggressor Parka are very high quality. They used YKK zippers. The zipper is an area where a lot of companies skimp out on using in their designs. A bad zipper can make a great coat unusable.

5.11 included plenty of pocket room in the Aggressor Parka. By my count, 5.11 included nine separate pockets. Two of the pockets were on the inside and the rest on the outside. I usually kept my cell phone on in the inside zipper pocket, and there was plenty of room.

The parka also included the 5.11 “Ready Pocket.” These pockets are massive. I was able to store my full-size notebook in the pocket easily. For someone who has to carry anything like a notebook, then this is a great jacket.

Overall, I was happy with the 5.11 Aggressor Parka. I wish it were a little lighter, but it does its job admirably. The price point of $249 isn’t too bad for what you get. The Aggressor Parka does go on sale from time to time for $199. At that price, I think it is a steal!

Check out 5.11 at www.511tactical.com.


About John CrumpJohn Crump

John is a NRA instructor and a constitutional activist. He is the former CEO of Veritas Firearms, LLC and is the co-host of The Patriot News Podcast which can be found at www.blogtalkradio.com/patriotnews. John has written extensively on the patriot movement including 3%’ers, Oath Keepers, and Militias. In addition to the Patriot movement, John has written about firearms, interviewed people of all walks of life, and on the Constitution. John lives in Northern Virginia with his wife and sons and is currently working on a book on leftist deplatforming methods and can be followed on Twitter at @crumpyss, on Facebook at realjohncrump, or at www.crumpy.com.

The post Keeping Warm With The 5.11 Aggressor Parka – Review appeared first on AmmoLand.com.

guns

via AmmoLand.com https://ift.tt/2okaFKE

May 27, 2020 at 02:34PM

Spatie Multitenancy Package for Laravel

Spatie Multitenancy Package for Laravel

https://ift.tt/36taPTc

Spatie Multitenancy Package for Laravel

Multitenancy is a hot topic for web developers that need to support multiple clients with the same codebase, but need to keep data separate either via table prefixes or separate databases.

In the Laravel space, Spatie released a new offering recently with an unopinionated multitenancy package to make apps tenant-aware:

According to Freek Van der Herten’s introductory post, the “philosophy of the package is that it should only provide the bare essentials to enable multitenancy.”

This package takes care of a few things related to tenancy for you:

  1. Tracking which tenant is the current tenant.
  2. Dynamically change the configuration when changing a tenant.
  3. Tools to help with creating a new tenant database and running migrations on multiple tenants.

We’ll only touch lightly on the package; the best place to get started is reading the laravel-multitenancy documenation.

Tenant Model

At the core of the package is the Tenant model, which represents each available tenant. You can work with and access the current tenant with a few handy methods provided by the package:

use Spatie\Multitenancy\Models\Tenant; // Get the current tenant, or null if there is no current tenant Tenant::current() // Get the same thing via the container app('currentTenant'); // Determine if there is a current tenant Tenant::checkCurrent() // Setting a tenant instance as the current tenant $tenant->makeCurrent(); // Forget the current tenant Tenant::forgetCurrent(); 

Finding Tenants

After installing the Spatie multitenancy package, you have a tenants database table that will include a row for each tenant in the application. Part of the job of Spatie’s package is determining which tenant should be used to serve the current request, typically based on a domain name. Out of the box, the package provides a DomainTenantFinder class to look up a tenant and set it as the current. However, you can configure a custom finder as long as it extends the abstract TenantFinder class.

Other considerations you need when finding a current tenant include the NeedsTenant middleware for setting the current tenant based on the incoming request and the global EnsureValidTenantSession middleware to prevent users from a given tenant to access other tenants.

Tenant-Aware Console and Queues

Another challenge when implementing multi-tenancy is scoping console commands and queue jobs. By default, all queue jobs are tenant-aware, and you can disable that capability via configuration. Spatie’s package provides a TenantAware and NotTenantAware to make specific queue jobs aware of which tenant to run for any custom needs.

Another thing you’ll likely need is the ability to run a console command for each tenant or target a specific tenant. This package has you covered with the tenants:artisan command:

# Run migrate on each tenant php artisan tenants:artisan migrate # Run migrate on a specific tenant with args php artisan tenants:artisan "migrate --seed" --tenant=123 

Learn More

You can learn more about this package, get full installation instructions, and view the source code on GitHub at spatie/laravel-multitenancy.

I’d also recommend reading Freek’s post which goes into more in-depth details and reasons for making this package.

Filed in: News

programming

via Laravel News https://ift.tt/14pzU0d

May 26, 2020 at 09:02AM

Review: Synology DS-1618+ network attached storage device is the best kind of overkill for most

Review: Synology DS-1618+ network attached storage device is the best kind of overkill for most

https://ift.tt/3c1UcPt

More people than ever are working from home, and local-area network storage needs aren’t going down. Don’t cheap out on a low-end network storage device, and get the Synology DS-1618+ to set you up for the future.

If you have one computer, with one user, doing one task, then the storage space you have or can easily add externally is probably sufficient. But as computers, users, or tasks multiply, so does storage. Add in any kind of large file storage need, like accumulation of videos, and it can get out of hand quickly.

Sure, you can keep adding external drives through RAID enclosures like we have, but that can get unwieldy if you have a lot of data and that’s aggravated by multiple users or computers. Cataloging what’s on which drive can be a pain too.

We’ve said it before — we like home servers, and we like the Mac mini for that task. But we also like network attached storage devices (NAS), a device we can sit in the corner, and just let it serve files.

But, it’s all too easy to buy a network attached storage device that doesn’t have enough power for the future, and have to re-buy. This increases cost, and potentially induces a migration nightmare.

Buy what you need from the start of the project. Get something like Synology’s DS-1618+ — which we’ve been using for some time now.

Set and forget

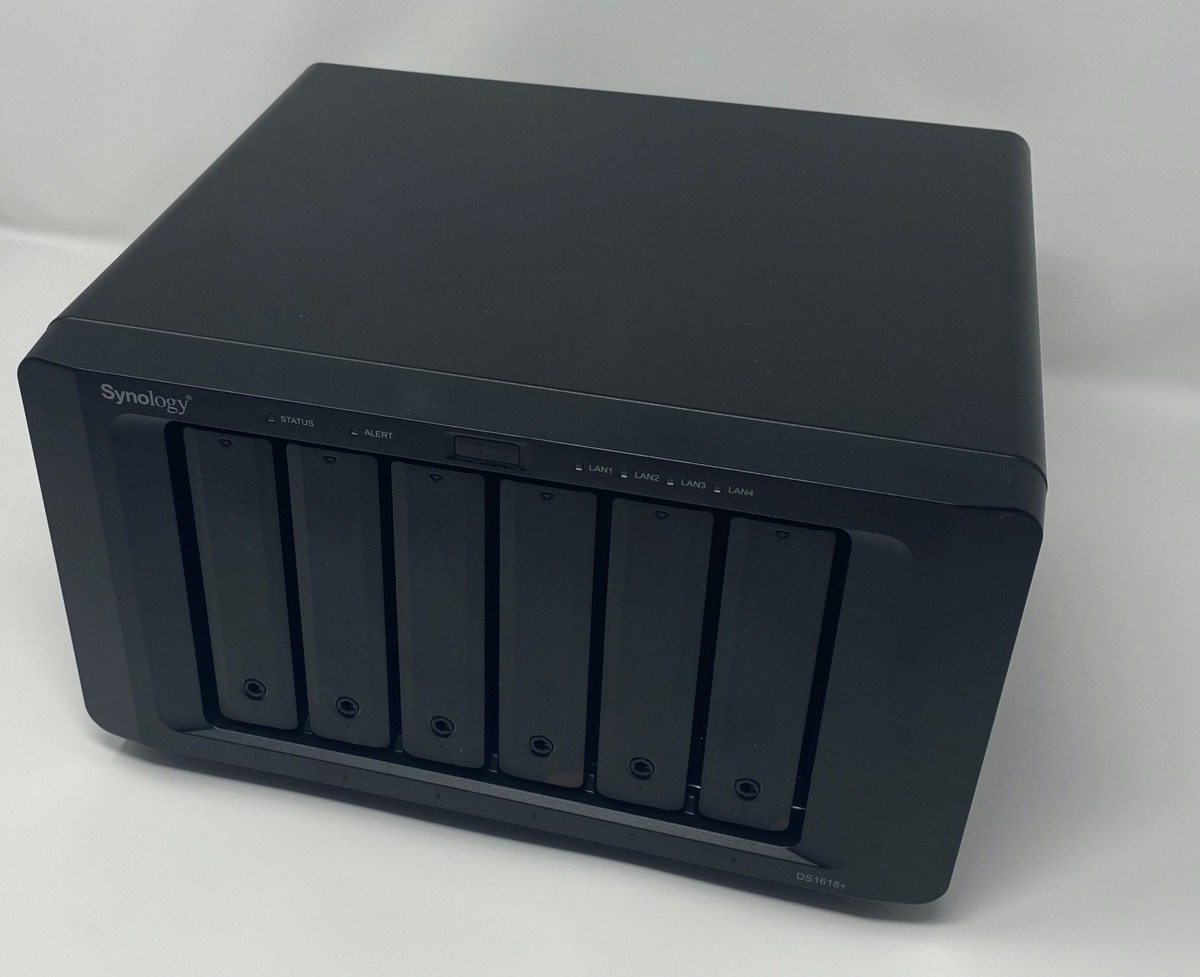
The DS-1618 is plain. It is a black box, specifically designed to sit unobtrusively in a (well ventilated) area of an office. You don’t really want this to be in your office near your workstation or a bedroom with an office space because of noise — but more on that in a bit.

The unit gives the user six bays to add 3.5-inch hard drives, or 2.5-inch SSDs too — but we recommend the former for cost and data density reasons. If this isn’t sufficient, two DX517 expansion chassis can be installed and easily added to the existing RAID through the pair of eSATA ports on the back of the unit.

The DS-1618+ has three USB 3.1 type A connections for expansion, or to back up the entire RAID, assuming you have a large enough external array to hold the contents of the NAS. If you’re so inclined, you can connect a powered USB-A hub to any of these ports for backup or other expansion. And, if you need to, you can connect a USB-only printer to the Synology to turn it into a network printer.

Ports on the rear of a Synology DS-1618+ network attached storage device

Networking is provided by four Gigabit Ethernet ports, with the unit having support link aggregation — in essence, with some routers, you can use all four ports to increase incoming and outgoing bandwidth. But, this can get expensive, as only some routers support it. Besides, in the home office or small business set up with the unit having hard drives, this is overkill.

Extra expansion possibilities are opened up by a PCI-E x4 expansion slot. You can’t just jam any old PCI-E card in there, but Synology does have a list of compatible cards that give the unit things like 10-gig Ethernet, fiberoptic networking cards, SSD caching for faster random access to things like databases, and the like.

Most users won’t need to use this slot for anything. But, it is a good inclusion for the future. The Mac mini has a 10-gig Ethernet option, and the iMac Pro and Mac Pro have it by default. Routers and network switches capable of the speed are coming down in price, and in the next few years, they will become more ubiquitous.

The whole package is powered by an Intel Atom C3538 CPU, with 4GB DDR4 RAM standard. RAM is expandable to 32GB with two SO-DIMM RAM slots on the underneath of the machine. More on this, and why and when you’d want more RAM in a network peripheral in a bit, though.

Loading a hard drive into a Synology DS-1618+ network attached storage device

The chassis is metal and well-engineered. Drive trays are tool-less, beyond the key that’s included in the system to pop the tray out.

Two plastic rails hold a drive firmly in place in the mostly-metal tray. The tray then slides in, and with the level lock on the tray, there is no doubt that you’ve made a good mechanical connection to the SATA drive connector in the NAS itself.

Drive tray assembled and ready to get installed

But, in operation and under load, we’d like it to be a little quieter. Under full I/O and CPU load, the unit doesn’t vibrate, but between fan noise and drive noise, it hits 61 dBa at three feet from the enclosure.

It is replete with LEDs and incredibly blinky when in use. This is expected, given that it has up to six hard drives, and is important to be able to see at a glance if everything is functioning okay. But again, you probably don’t want it physically near your workstation.

Setting up the Synology DS-1618+

Setup is about the easiest we’ve ever seen for a network attached storage device. The first step is to load up the device with drives. Synology makes it easy to see in advance how much storage you’re going to get from the unit with a tool where you can virtually load it up and see what you get — and we highly recommend fiddling with this before you buy drives.

Drive slots interior to the Synology DS-1618+

Synology has a list of recommended drives for the unit, and as a general rule, we do recommend adhering to those. That said, in the courses of our testing, we’ve used an assortment of drive sizes and manufacturers, and found that heat and data transfer consistency changes little.

Synology also has an online tool so you can see what you’re getting into for DSM software setup before you really get going. After you’ve taken a look at that, and following the drive installation, plug it into power, and use Safari or other browsers to go to find.synology.com.

Synology DS-1618+ loaded with drives

This loads up the configuration page for the device, lets you set up an administrative user, and format the drives in the unit. Synology and AppleInsider recommends Synology Hybrid RAID for flexibility. It also supports RAID 0, RAID 1, RAID 5, RAID 6, RAID 10, RAID 50, RAID 60 in hardware — but the drive requirements for each are left as an exercise for the reader.

After formatting, the interface has you configure the basics of file sharing. Using a URL that Synology provides that the NAS itself keeps up to date with your internet-facing IP address, you can also access your files and some of your services outside of your home network, all secured by encryption and password.

We have seen some probing from the Internet, looking for a Synology. The basic security is robust, assuming you’re using best practices for user and password selection. And, this is enhanced by notifications — the DSM will block IP addresses that hammer on the NAS looking for access automatically, and it will email you that it has done so, if you’ve configured it appropriately.

Under the basic configuration of DSM, file sharing is basic SMB — but this can be tailored to a ridiculous extent. Not only can you add additional services like SFTP, BitTorrent, and the like, times of file availability can be selected, you can lock down specific folders with a password, and you can prevent certain folders from being seen by a user at all.

Synology’s DSM also allows for full-drive AES 256-bit encryption without a large amount of performance loss. But if you do this, don’t then use the machine for anything that needs any notable processing horsepower. You can upgrade the RAM, but you can’t upgrade the processor.

The use of the device goes so much deeper than this, though.

What do I want a network attached storage device for, anyway?

Beyond just serving files, a network attached storage device like the Synology DS-1618+ has an expandable ecosystem, very similar to Apple’s App Store. Software can be added to extend the usability of the device — and you can even install Windows on it.

Synology settings page in Safari — your gateway to installing packages and configuring the unit

For most Apple Mac and iPad users, the most usability beyond SMB file sharing will come from an integrated iTunes sharing package, which is easily configured through the web-based interface. Additionally, it can be set up as network Time Machine targets, even for Macs running macOS El Capitan and older with AFP services.

Other software available for the unit include a Plex server, built-in DLNA video streaming, and integration with Dropbox and other cloud-based storage services.

Regarding that video streaming, though — if you use the iTunes server, all of your videos and music need to be encoded properly for iTunes. Basically, you’re front-loading all the processor work that needs to be done for a video, and keeping that work off the NAS itself.

Services like Plex will transcode just about any media format on the NAS prior to streaming, but this takes some effort from the hardware. This is commonly where lesser NAS devices fall down.

In our testing, we consistently can stream three 1080P videos simultaneously with no dropped frames. But, it will only realistically manage one 4K stream, and the enclosure’s fans are very, very loud during the process.

The DS-1618+ also comes with a two-user license for IP-based cameras, to use the unit as the core of a network-based surveillance system. Up to 40 cameras are supported, at additional cost.

As you add services and load, that 4GB of RAM in the unit is consumed very rapidly. It uses virtual memory like every other modern computer does, but as that footprint increases, performance drops. We didn’t run into this when running a Time Machine backup, an iTunes server, and regular file service. When we added a Plex server, we started seeing some performance hits even before we started streaming anything.

So, if you’re going basic, 4GB is probably enough. But, if you plan on running a lot of services, get more RAM. We put 16GB in our unit and didn’t hit any more performance issues induced by low RAM.

DS-1618+ transfer speeds

The Synology 1618+ will saturate your home network, if you let it. With six 7200 RPM drives installed in the NAS, when copying 20GB of large files, we saw 110.1 megabytes per second read, and 109.1 megabytes per second write speeds. The impact of smaller files varies, but when copying 20GB of MP3 files across the network, we saw that same 110 megabytes per second read, but 81 megabytes per second write.

This changes when using 10-gig Ethernet through a Netgear XS505M switch, and to a Mac mini with that 10-gig option. Using that setup, we got about 400 megabytes per second read on big and small files, and 390 megabytes per second write of large files, and 220 megabytes per second write on the MP3 folder.

Buy what you need for tomorrow, not today

The DS-1618+ is not inexpensive. It is Mac mini-priced, if you’re looking to stay inside the Apple ecosystem for your server needs.

From a price perspective, you’re looking at $799 for either the DS-1618+ or the Mac mini on the low-end, assuming you’re using the 2018 Mac mini. Drive prices vary, depending on what you pick up, but $100 per 4TB isn’t an unrealistic estimation. On top of that, for the Mac mini, you’re looking at $200-ish for a USB 3.2 type C enclosure with the limited macOS software RAID options, and much more if you want hardware RAID support — unless you just want four drives in individual enclosures laying about.

From a performance standpoint, that Mac mini home server is more flexible overall, and more powerful. However, it is also more expensive when you consider those additional expenses, and in some respects, not as easy to set up for network services. And, that PCI-E slot for expansion of the NAS is nice.

In a home with low network storage needs or an office that sees a basic need but isn’t sure where to jump in, the Synology DS-1618+ is overkill. But, as you start adding things like media serving and the like, plus the inevitable creep of what you offload onto a NAS once you get started, the unit is a cost-effective way to get a powerful storage solution not just for now, but for the future as well.

Importantly, though, don’t get complacent with backup. It is far too easy to get a NAS in your office and consider yourself safe. A single-facility failure, say, an office fire, will still wipe out all of your data, if you don’t have some sort of off-site backup.

There are certainly cheaper network attached storage units, but they are easy to outgrow. The 1618+ is an excellent, and expandable, starting point.

  • Power to price ratio is excellent
  • Excellent expandability
  • Software configuration more than just about anybody needs
  • Loud and bright
  • Expansion chassis for more drives are expensive
  • Similar in price to a Mac mini

Where to buy

The Synology DS-1618+ sells for $749 at your choice of retailers, including Amazon, B&H and Adorama.

macintosh

via AppleInsider https://ift.tt/3dGGYcl

May 25, 2020 at 06:34PM

Raw Combat Footage Shows Strafing A-10 Warthog Save Ground Troops

Raw Combat Footage Shows Strafing A-10 Warthog Save Ground Troops

https://ift.tt/2Ty8Rvu

Raw Combat Footage Shows Strafing A-10 Warthog Save Ground Troops

a-10 thunderbolt II warthog cannon

By Staff Sgt. Steve Thurow – A-10 Thunderbolt II, Public Domain, Link

By Travis Smola

When soldiers in our armed forces need air support, they welcome the sound of an A-10 Thunderbolt II, AKA the A-10 Warthog. This awesome plane and her pilots have been in service since 1972, despite repeated efforts over the years to kill it.

The Warthog is a favorite of pilots and troops alike because of its ability to support soldiers on the ground. It’s been called a gun with a plane that was built around it because of the devastating 30mm autocannon in the nose can fire armor-piercing depleted uranium shells at up to 3,900 rounds a minute.

That’s a lot of firepower to the rescue when ground troops are in a pinch. In the video below, a convoy comes under heavy attack when the A-10 comes to their rescue. [NSFW: there’s some harsh language in the video.]

You can hear the relief in the voices of these soldiers at the distinctive sound of the A-10’s cannon pounding the enemy position.

The sound of the A-10 is intense. The rounds hit the ground before you hear the BRRRR buzzing sound of those 30mm cannons. There’s a common saying: “If you hear an A-10 shooting, you weren’t the plane’s intended target.” Imagine the psychological effect this plane must have on anyone on the receiving end of its fire.

A-10 Lightningbolt GAU-8 cannon

By USAF – nationalmuseum.af.mil, Public Domain, Link

Seeing raw combat footage like this reminds us that the movies aren’t accurate when it comes to portraying how things often play out in real life on the battlefield. It just makes us even more thankful for the dangerous job performed by our brave service men and women in uniform.

guns

via The Truth About Guns https://ift.tt/1TozHfp

May 23, 2020 at 04:00PM