A binary Captain Marvel shines in a new IMAX poster.Image: IMAX
For some, Monday night marked the end of the college football season. For others, like us, it marked the arrival of brand new footage from Captain Marvel and the news that tickets are now on sale.
The film opens March 8, giving you two months to figure out when you want to see the film but, based on this new extended TV spot, that’s probably going to be as soon as possible. Check it out.
That’s a great spot all around but, for me, the highlight is Coulson asking Nick Fury if he can find more heroes like Carol. The answer, as we know, is yes, he will. He’ll find Captain America, Iron Man, Thor, and the Marvel Cinematic Universe will be born. Plus there’s a lot of humor in the footage, more than we’ve seen so far. All of this is very encouraging.
Plus, with tickets now on sale, there are a few cool new posters specific to different formats. Here are three of them.
The Captain Marvel IMAX posterImage: IMAX
The Captain Marvel Real D poster.Image: Real D
The Captain Marvel Dolby Cinema poster.Image: Dolby
Captain Marvel opens March 8. We’ll have much more Tuesday morning.
For more, make sure you’re following us on our new Instagram @io9dotcom.
Whether you’re running 440C or S90V, even the most super of steels will need to be sharpened eventually. This can be an intimidating task to some, but we’re going to take a look at three systems that make the job easy and achieve fantastic results.
The theory of sharpening is simple. Using something abrasive, usually a stone, material is removed from one side of the edge until you can feel a burr on the opposite side along the entire length of the edge. The process is duplicated on the opposite side.
It’s usually best to alternate the side you are working on every few strokes so that each has a similar amount of material removed, keeping the edge itself even and centered.
Once you are able to raise a consistent burr on each side, you’ll move to finer grit abrasives until you achieve the desired amount of refinement on the edge. The grit you start with will depend on how degraded the edge is.
You can go as high as you want with your grit, all the way up to a mirror polish if desired, but you’ll want to go up to something in the “fine” range…at least 1,000 grit (but often much higher).
This is by no means an exhaustive overview, but it’s plenty to get you started. There are myriad ways to achieve the results you need, and today we’re going to take a look at three of our favorite sharpening systems that are suitable for all levels of experience.
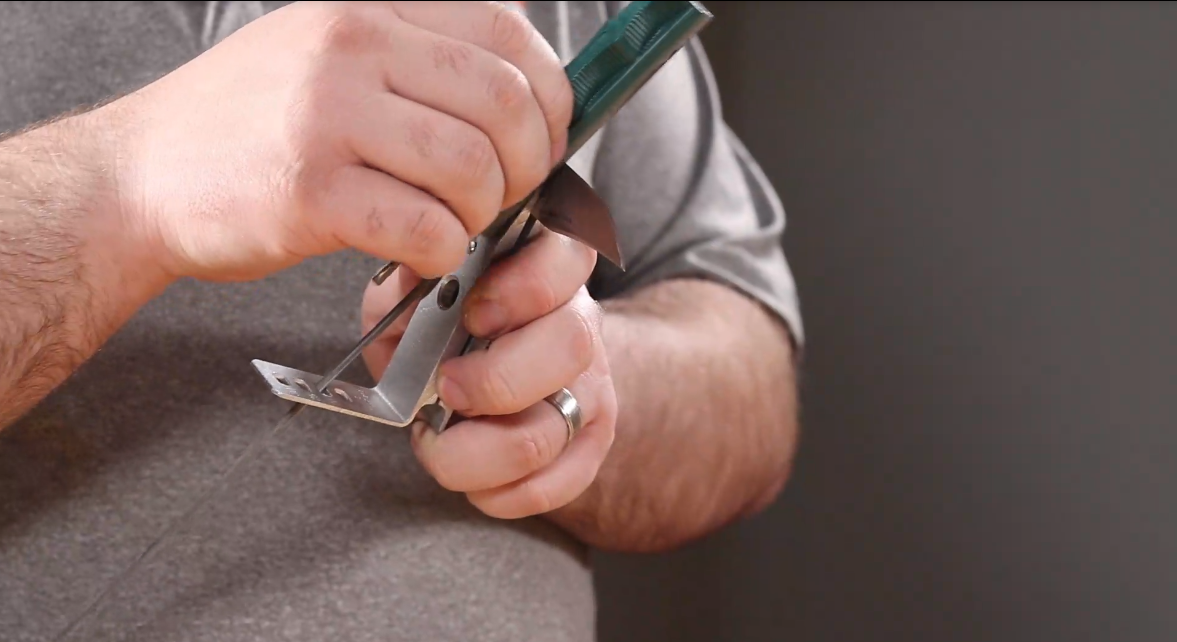
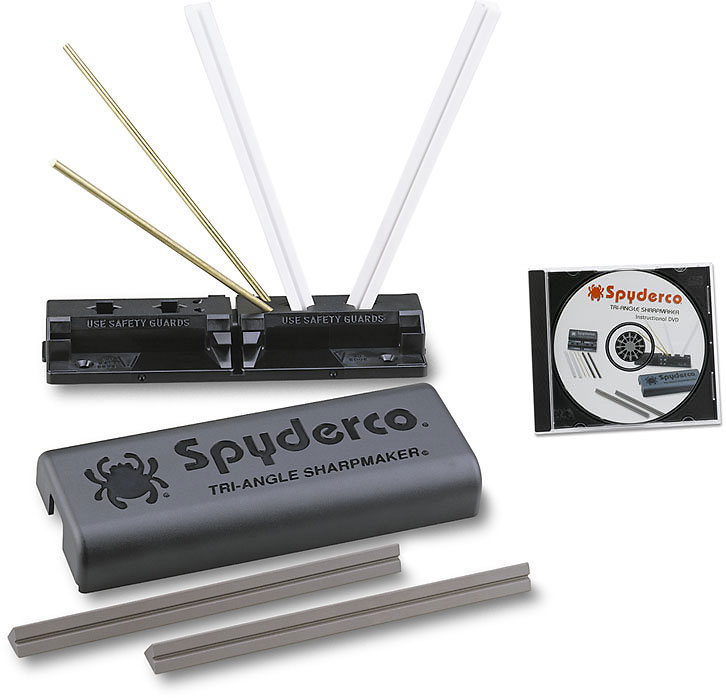
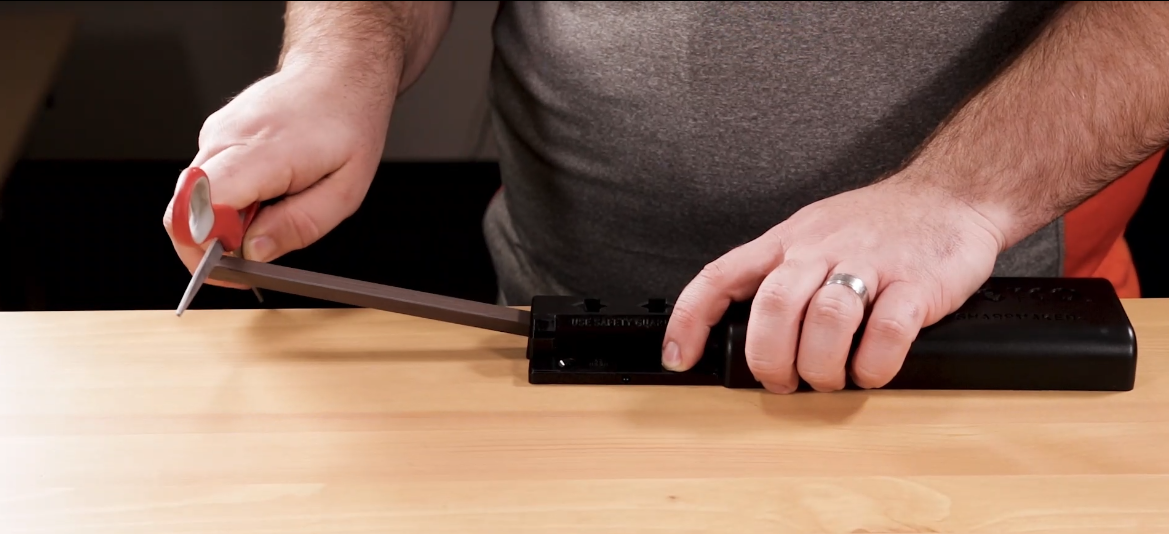
The first is the Spyderco Sharpmaker, an intuitive and easy-to-use device that can achieve hair-shaving results on almost any steel out there, as long as the edge isn’t so far gone that you need to reprofile it.
All of the elements come in a black plastic case that doubles as a stand, making this a very tidy package to store when not in use. There are two preset angles for the stones, meaning you don’t have to worry about maintaining the proper angle as you would when freehand sharpening on a flat stone.
One way to check and see if the preset angle is matching up to your knife is to color the sharpened edge in with a black marker. After a few strokes, if the marks have disappeared, you know you are lined up properly.
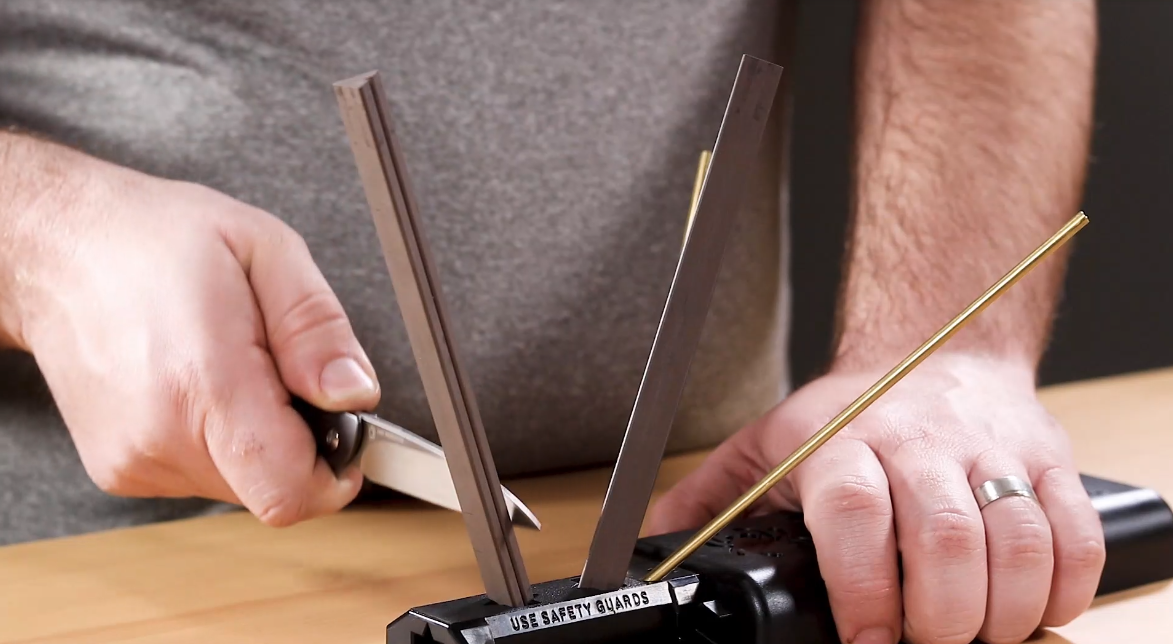
Once the brass guards are in place, you start with the corner of the triangular brown medium stones. All you have to do is hold the blade straight up and down and place the heel of your blade at the top of the stone. Bring the blade straight down, and draw it towards you as you do, so that you hit the whole edge by the time you reach the bottom of the stone.
Do this twenty times on each side of the blade, then rotate the stones and perform twenty strokes per side again, this time on the flat side.
Repeat the same steps as before, this time using fine white stones, starting with the corner, and then the flat side of the triangle. Once you are finished, your edge should be hair popping sharp. At this point, your blade should be able to cut paper, but we aren’t done yet. The stand also has a couple of other ways of holding the stones, allowing you to easily sharpen other tools such as chisels, scissors, and even straight razors.
The Sharpmaker is a truly versatile device that is a classic for a reason – it just plain works.
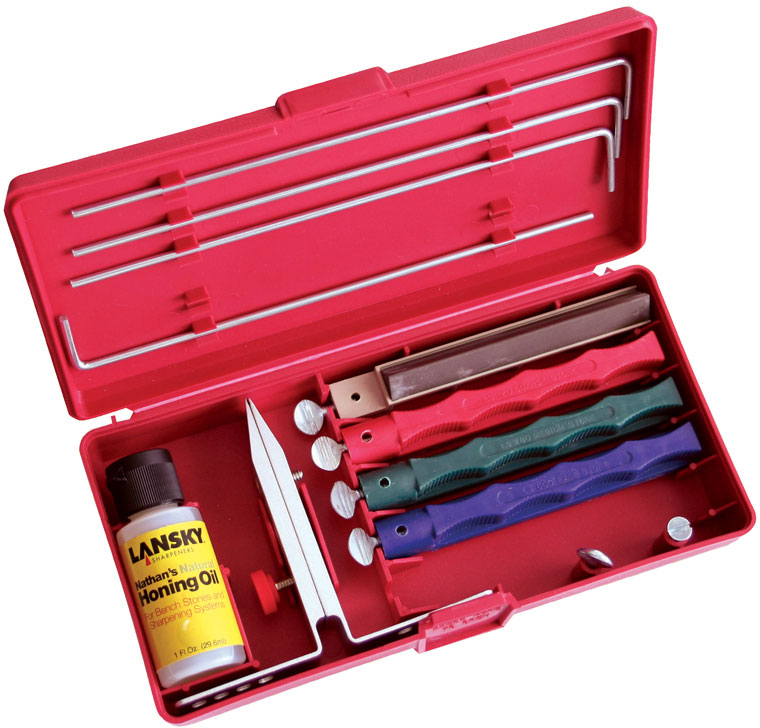
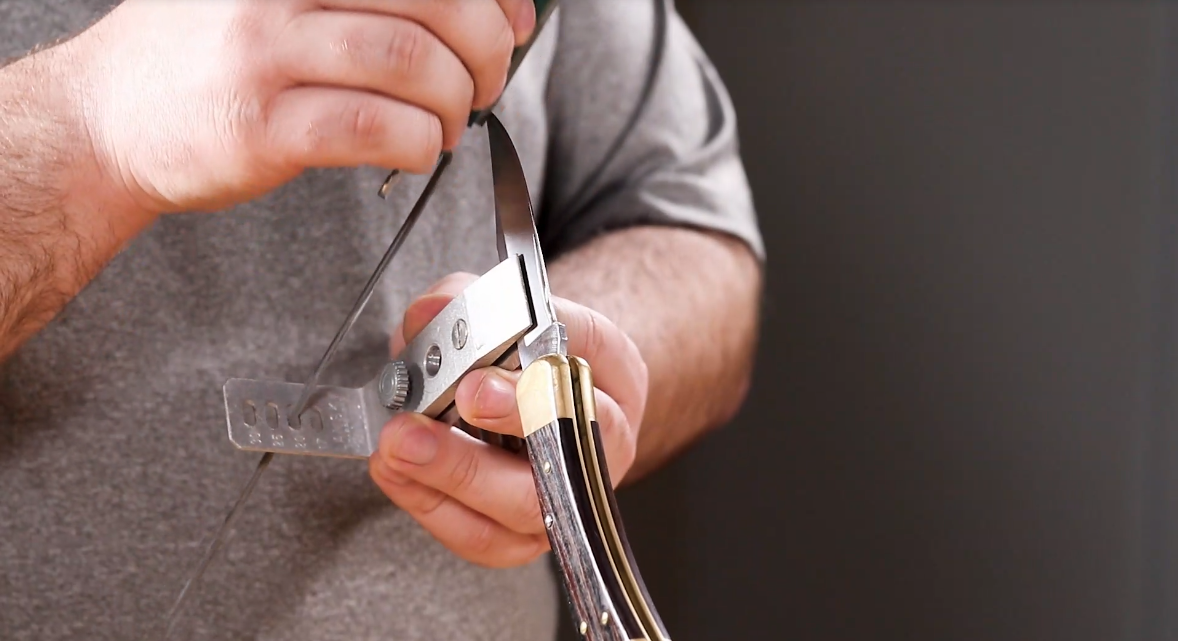
This set comes with a clamp that holds your blade steady and provides guide holes for the included stones so you can maintain the proper angle for your blade. Along with honing oil, the standard set comes with coarse, medium, and fine stones and is a great starting point. For a little extra money, higher-end sets come with more grits but they can also be purchased separately, as the standard set’s case comes with extra slots for storage if you choose to upgrade. The process here is simple. Clamp the spine of your blade into place and attach the guide rods to the stones you wish to use. Starting with the coarsest stone you need, choose your angle and insert the guide rod into the proper hole.
Sharpen as described earlier until you can raise a burr consistently on both sides, then move up to the next grit until your desired sharpness is achieved.
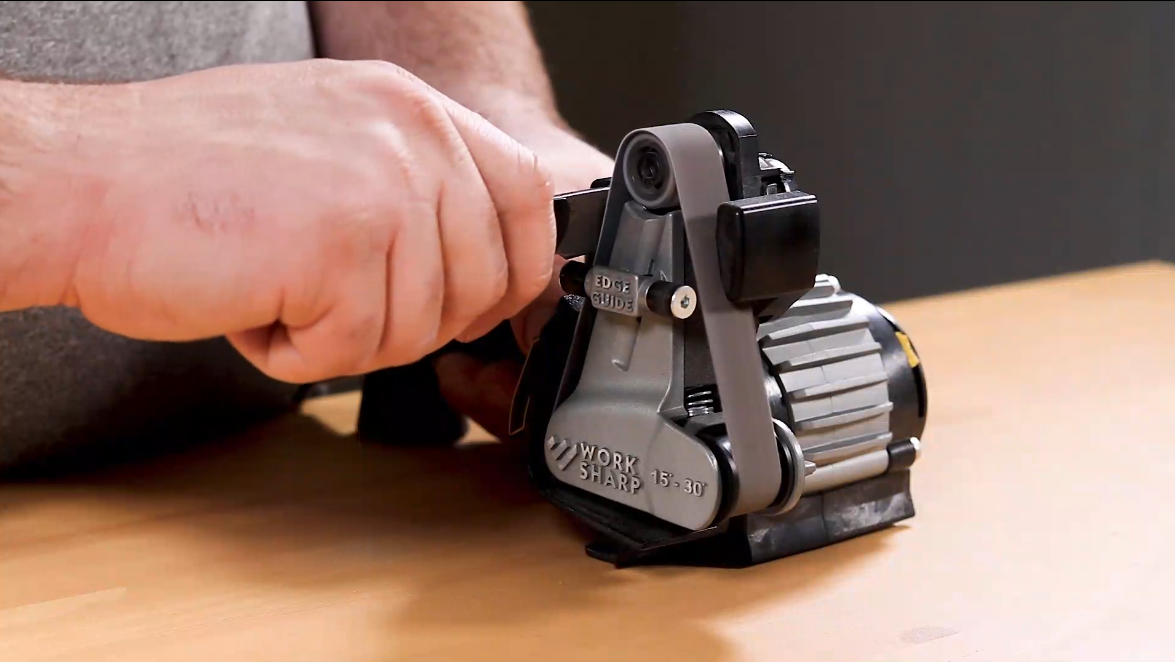
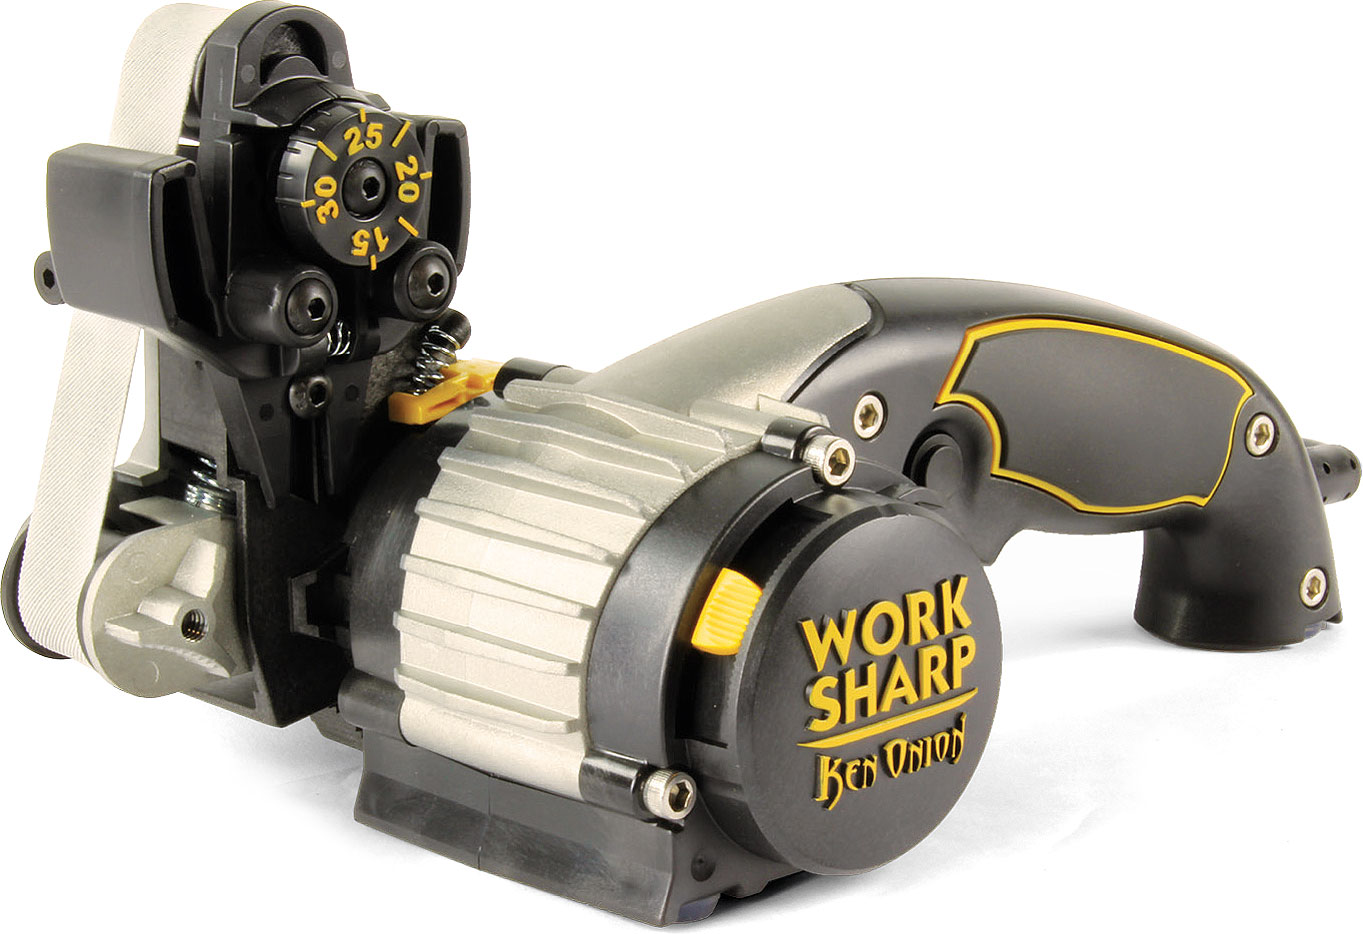
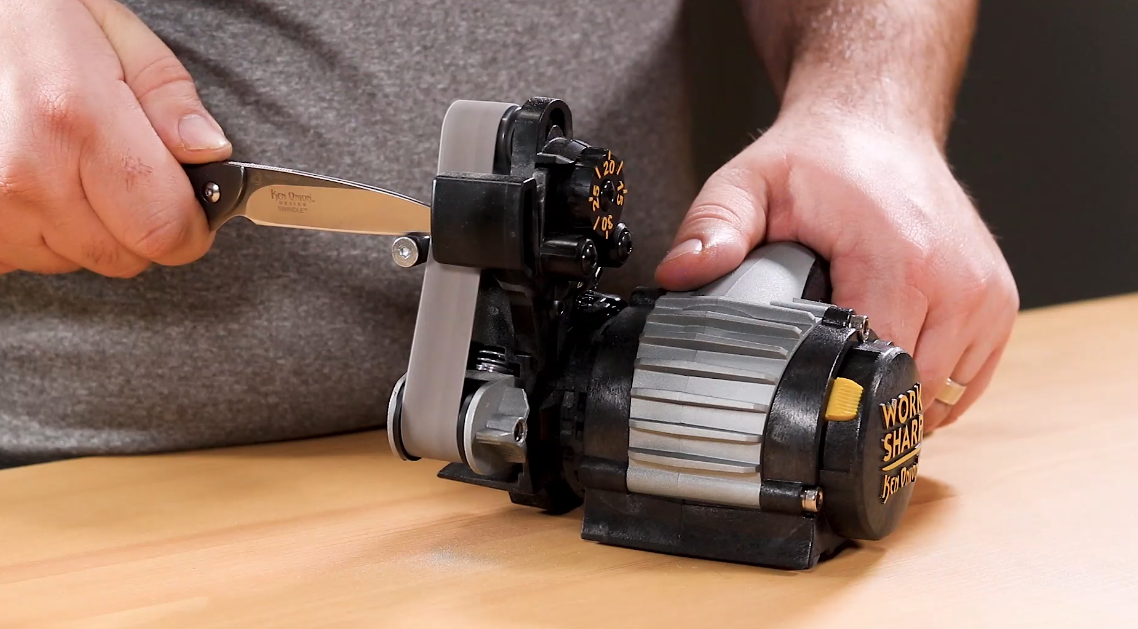
If you want to take your sharpening game to the next level, a powered unit from Work Sharp may be in order. Work Sharp has been raising the bar in the sharpening arena by thinking outside the box, and their Ken Onion Edition Knife & Tool Sharpener is one of our favorite units that they make, offering fast and accurate performance.
Unlike the previous units we showed you, the Ken Onion Work Sharp is driven by an electric motor, using abrasive belts and an adjustable angle guide to sharpen your edge.
After selecting your angle, set the heel of the blade on the belt, pull the trigger to start the motor, and pull the blade backward at a rate of one inch per second according to the manufacturer, stopping the motor before the tip of your knife passes the centerline of the belt. Then do the same for the opposite side. As with all the sharpening methods we’ve shown you, repeat these steps as necessary until the burr is consistent, then proceed to the next grit until desired sharpness is achieved.
One thing to keep in mind when using this unit: the motor speed is adjustable, but make sure you don’t overheat your edge and ruin the temper. Keep things nice and slow until you are comfortable with the system.
Further enhancing the versatility of the Ken Onion Work Sharp is its ability to accept add-ons sold separately, including a tool grinding attachment and a blade grinding attachment, offering a form factor similar to professional knife grinders in a much smaller footprint.
As you can see, there are certainly differences between these three systems, but you won’t go wrong with any of them. Friends don’t let friends carry a dull knife, and these are units that we believe in, and not just because we sell them. We actually own them. The units you saw in this blog are ones that came from the KnifeCenter staff’s personal collections, where they have all given years of reliable service.
What questions do you have about using these sharpening systems? Let us know your tried and true tips in the comments below!
The only kids programming language worth using, Scratch, just celebrated the launch of Scratch 3.0, an update that adds some interesting new functionality to the powerful open source tool.
Scratch, for those without school aged children, is a block-based programming language that lets you make little games and “cartoons” with sprites and animated figures. The system is surprisingly complex and kids have created things like Minecraft platformers, fun arcade games, and whatever this is.
The new version of scratch includes extensions that allow you to control hardware as well as new control blocks.
Scratch 3.0 is the next generation of Scratch – designed to expand how, what, and where you can create with Scratch. It includes dozens of new sprites, a totally new sound editor, and many new programming blocks. And with Scratch 3.0, you are able to create and play projects on your tablet, in addition to your laptop or desk computer.
Scratch is quite literally the only programming “game” my kids will use again and again and it’s an amazing introduction for kids as young as pre-school age. Check out the update and don’t forget to share your animations with the class!
Fireworks explode over the Sydney Harbor Bridge during the midnight display on New Year’s Eve on January 1, 2019 in Sydney, Australia, as the city is one of the first to ring in the new year.Photo: Getty Images
It’s almost 2019. And if you’d rather stay home tonight, we’ve got some great live video streams that will put you in the middle of the New Year’s action.
Thanks to the wonders of the internet, you don’t have to go out and spend a ton of money tonight for something you’ll regret by sunrise. You can stay home and watch livestreams of the festivities from all over the globe, including places like Times Square in New York, and Walt Disney World in Florida.
CNN in Times Square (no cable required)
CNN is livestreaming its New Year’s coverage tonight from 8pm to 1:05am ET (5pm to 10:05pm PT), and you don’t even need a subscription login:
Walt Disney World has a livestream of tonight’s festivities on YouTube that starts at 11:45pm ET, 8:45pm PT.
All Around the Globe
The Washington Post has a great YouTube livestream of different celebrations from around the world that are happening at this exact moment. They’ve already celebrated the New Year in places like Australia, North Korea, and Hong Kong, but there are plenty more to go as midnight glides across the globe.
And much like the Washington Post, NBC News has a similar stream on YouTube that’s tracking the different celebrations happening around the world right now.
Happy New Year! Thanks for sticking with us in 2018, and best of luck in the new year. And if you’re feeling a bit down in the dumps today (the holidays have a way of doing that), remember that things can get better. 2019 is going to be your year. Hang in there.
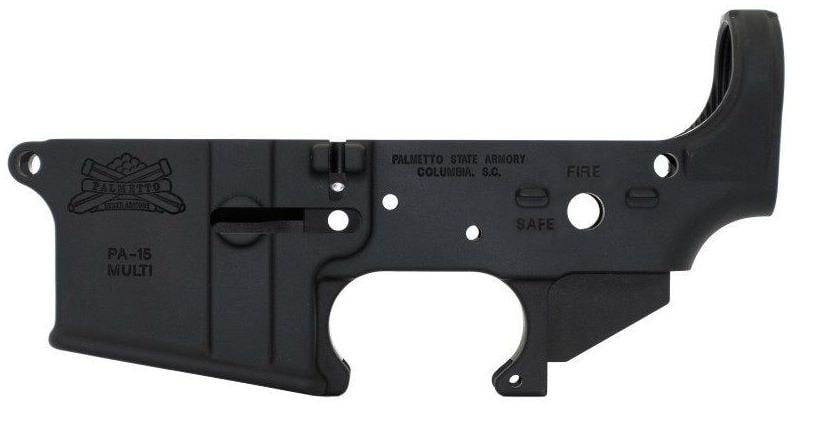
There are few firearms I love more than an AR-15…especially an affordable one that runs great.
As a former gunsmith/rifle builder, I’ve put together probably two hundred of them, and about a dozen missing or dropped pins and springs later…I still love building them.
So many pins…
Of course, as much as I enjoy building them I love buying them too. I’ve bought and sold maybe a dozen rifles in just the past few years, and most of them were sold so I could buy a different AR.
I love the customization and freedom the AR-15 platform provides, and I love having one rifle that I can reconfigure to suit almost any need I may have.
I really do love these guns.
But my wallet freaking hates them. See, in my heart, I hear “MORE GUNS!”, but my head says “Maybe pay rent instead”.
See, like most of you, my eyes are a bit bigger than my bank account balance when it comes to the guns I want to buy or build, so I have to be very selective when it comes to acquiring new pieces for the safe.
That’s where this guide comes in. I’m going to share every tip, trick, secret, and stray scrap of advice I have about building or buying an AR-15 on the cheap. The goal here is to get more people out shooting and to get more guns in the hands of the law-abiding American public.
Like Clint Eastwood almost certainly never said, “More guns is more better”.
Today, we’re gonna talk about how to get your hands on a cheap (but not cheaply made) AR-15. There are two paths to this, building or buying, and we’ll cover both in detail so you can decide which route is the best for you.
The Cheap Philosophy
First, we have to talk about what exactly I mean when I say “cheap”.
See, some things are cheaply made, like Suzuki cars and Hi-Point handguns. Don’t hate me, Japanese people, Toyota’s are great. If you’re a Hi-Point fan though, I don’t really have anything to say to you except to ask… Who hurt you?
Remember, never pay more than 1 Hi-Point for a Hi-Point
In other words, cheaply made is bad. Cheaply made is un-American. Cheaply-made can be downright dangerous in the firearms world. Most importantly, cheaply-made isn’t cheap.
Ever hear the phrase “buy once, cry once”?
It’s pretty self-explanatory, and it is incredibly relevant to all things firearms. If you’re buying cheaply-made guns, optics, or other accessories, you’re really only setting yourself up to spend more money in the long run once your “bargain” breaks.
So, when I say “cheap” please understand that I’m talking in relative terms. Buy crap and you’ll regret it, and if a deal looks too good to be true, it almost always is, especially in the firearms world.
What does “Cheap AR-15” Mean Then?
Affordable!
I have an AR that, if I was really brave enough to actually price all the parts out, would probably clock in around $3,000.
Wilson Combat Recon Tactical is only $2,600 (doesn’t include optic)
I understand the appeal of a gun like that, but that’s just not practical for most people. We’re getting into “down payment on a car” territory at that point, and for the average American, that’s just not a feasible amount of money to tie up in one gun.
Fortunately, you can get a cheap (not cheaply-made) AR-15 for much, much, much less than that.
That’s right, I’m talking $400-$550 AR-15s here, baby. And there are two different ways you can go about getting one of your very own.
The Easy Way Out: Buying a Complete AR-15
When in doubt, get your credit card out!
There are actually a number of manufacturers that make guns in this price range, and even more that have sale prices that will drop into this range.
Are these all good AR-15s? I wish I could say yes, but unfortunately, no. And I’d be extra suspicious of anyone offering a decent AR-15 for under $400 because they likely also have a bridge in Brooklyn and some magic beans they’ll sell you.
The truth is, it takes some serious effort and know-how to spot the diamonds in the rough, and it’s easy to get caught up in the excitement of a good deal.
Calm down, no sale is worth this madness…
Remember what we talked about earlier though! Those once-in-a-lifetime opportunities are often going to cost you more in the long run when your gun breaks down and could end up costing you everything. That’s why we follow a few simple rules.
Do Your Research
Focus on Established Manufacturers
Ask Yourself “Why is this so cheap?”
Sleep on it
Let’s go over these one-by-one.
Do Your Research
This seems obvious, but it’s worth stating. Look very, very carefully at the gun in question. What exactly are you getting? Is it really a complete gun, or are you going to have to spend $150 on a bolt carrier group and charging handle?
What about the manufacturer? Do they have a history of producing reliable products? Do they have good customer service? What’s their warranty look like? I’m a lot more willing to give my hard earned money to a company that’s willing to stand by their product after its been in my hands for a while.
Focus on Established Manufacturers
That brings me to my next point, which is to focus on established, reputable manufacturers. Is the gun from a company that’s been around for years, or did it just spring up last month?
I used to work for a small rifle builder, so I’ll be the last one to cast aspersions against those folks, but if money is tight, I’m much more likely to spend my dollars with somebody like PSA, Radical, or Spikes, someone that has been in the game for a while, rather than spend money with Uncle Tucker’s Discount AR-15 Maker and Live Bait Emporium.
Pro Tip: Never buy a rifle that smells like it came from a bait shop
This also just comes down to economics. Larger manufacturers can make a rifle for cheap simply because they make money in volume. Artisan cookies are great, but Great Value Chunky is cheap.
Ask Yourself: Why is it So Cheap?
There’s no such thing as a free lunch. If an AR-15 is cheap, there’s a reason for it. I work with a whole lot of retailers and not one of them drops their prices through the floor out of the goodness of their heart.
And that’s fair, these folks have to make a living too, I just don’t want it to be at my expense.
So, with that in mind, it’s important to ask yourself just why the price tag on that AR starts with a 4 instead of a 5 or a 6.
Sometimes, it’s so a retailer or manufacturer can clear out old stock. This is especially relevant for companies like Aero that are constantly innovating and improving, or for companies like DPMS that seem to have a new model out every time the wind changes direction.
Often it’s because, like right now, demand is down. When it looked like we were going to get a President in office that wasn’t big on AR-15s to say the least, lots of folks churned out ARs in preparation for panic buying before the inauguration.
Given the way things went, no one really panicked, and no one really bought, so a number of manufacturers ended up with extra inventory that they didn’t shift, and in some cases still haven’t shifted, so that can be a reason for low prices.
Live stream of some firearm manufacturing warehouse, probably
Of course, the simple fact of the matter is that low prices can also mean low quality. Check the manufacturer out and see how their other products stack up, and if possible hold the particular rifle in hand and look for machining defects and flaws in the finish.
A lot of times a little thing like a machining burr on a handguard, or a thin spot in the finish will tell you a lot about the overall care and attention that goes into making a gun.
Sleep On It
Finally, I recommend that you sleep on it unless it’s truly time-sensitive, in which case you should spend even more time on your research.
You sleep like this, right?
A lot of times, we gun owners have a tendency to go “OOOOOH I WANT THE SHINY THING” and whip out the debit cards like gunslingers in the Old West whipping out a six-shooter, and like those fabled outlaws, we sometimes tend to shoot first and ask questions later.
I think it’s better to really take the time to consider your decision before whipping out the wallet if at all possible.
Best Cheap AR-15s to Buy
Alright, lecture over, let’s get to the fun part.
This is the part where we talk about the cheap ARs that are actually worth your money. These are the guns that I’ve either tested, owned, or had recommendations about from people I trust to know what they’re talking about.
If you’re looking to buy instead of build, here’s where I recommend starting.
PSA is my all time, top, number one recommendation for my fellow cheap peoples who are looking for…well, most anything firearms related, really.
PSA 5.56 & .223 Wylde
I’m not 100% sure how they do it (though I think witchcraft is involved) but they always seem to have the lowest sale prices in the industry on everything firearms related.
What’s more, they actually have their own in-house brand of AR’s, AK’s and other rifles, and they’re all available well under what most comparable competitors are selling similar products for.
Make no mistake, the lower end of PSA’s inventory is very no frills, and you won’t get a lot of extra features, but by God, the guns shoot and you only have to shell out five or six bills for them. It’s hard to argue with that.
You’ll want to read some of our reviews of their stuff, we’ve covered almost everything they make but for now – start with our review of 3 of their PSA AR-15s.
We also cover a great buying-hack…you pay less in taxes if you don’t purchase a “complete rifle.”
Or…be sure to check out our video of two of their most popular ones…the basic Freedom model and another free-float handguard model:
DPMS’s low-end rifles are still better than a lot of higher-end rifles, and while it’s true that you get what you pay for, sometimes you can get quality for relatively cheap, which is definitely the case here.
Radical is a company that I’ve talked about before and they continue to impress me. Despite some growing pains early on in the company’s life, Radical Firearms is now churning out rifles that are great entry-level guns.
While they do have some higher-end stuff, their focus, at least for the moment, is on well-engineered rifles that are very carefully manufactured to cut costs (but not corners) wherever possible, and they pass those savings along to the consumer.
I’m still a machinist at heart, so seeing people take the time to not only figure out how to make a quality product but to also take the time to make sure they’re constantly working as efficiently as possible, makes me happy.
You almost can’t talk about budget-minded firearms without talking about ATI, and now that ATI has gotten into the AR-15 game, they get to be included on this list too.
They make my favorite affordable, yet functional 1911 that’s about as close to the original’s our grandparents fought the Nazi’s with as you can get without paying through the nose for an original, or paying slightly less for a replica.
Their rifles are, frankly, surprisingly good, especially for the price. I’ve shot three of them now, and while I haven’t tested one sufficiently to write a full review, I’ve definitely got enough time behind the guns to recommend them.
How to Build a Cheap AR-15
Now, if you just want to buy an AR-15, you can skip down to the end of this article without missing anything, but I encourage you to stick with me because there are some things in here you might need to know.
AR-15 Upper Receiver Parts
Plus, as I always say, it’s waaaaaaaay easier to build an AR-15 than you think, especially if you’re just capping off a built lower with a pre-built upper.
A few of our favorite things…
We’ve already talked at length about how to build an AR, so I won’t go over that here, but I will give you a little homework. Give this guide a look and see if you want to build or buy.
And these will help for the actual building part of everything:
Like anything else, sometimes you pay more for a name than the materials and manufacturing, and with AR-15’s there are a few parts that you can go the cheap route with and be just fine.
Lower: I like cool looking lowers as much as the next guy, but a lower is a lower, and there’s not a huge amount of difference between the $30 ones, and the $300 ones aside from aesthetics and strength, but you shouldn’t be doing anything to your lower that could break it anyway.
Handguard: This one is a toughie, but in general you can get by with a basic A2 handguard at the minimum and it won’t make much difference to the function of the gun, but it will make shooting it less fun, and it cuts down on the grips, lights, and coffee makers you can hang off the side.
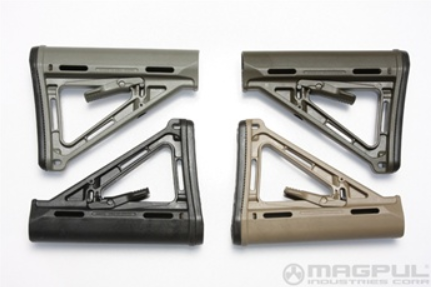
Stock: A cheapo stock will be just fine. You can swap a new one in with about five minutes effort, and there are roughly ten million options out there. A2 and M4 style stocks are almost literally a dime a dozen, and if they’re good enough for our armed forces, they’re good enough for us.
If you want a complete breakdown and review of a bunch of stocks though, read the Best AR-15 Stocks.
Pistol Grip: Same as the stock, a standard A2 grip is so cheap you can almost find people giving them away, and you can swap to a better one in about thirty seconds if you practice.
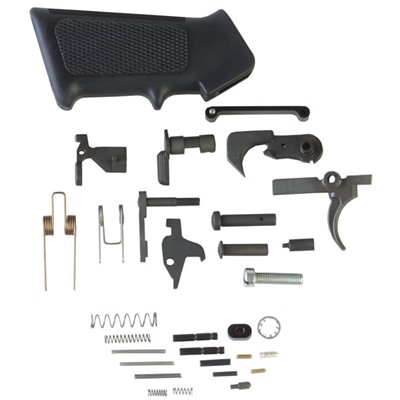
Lower Parts Kit: Most of them are the same anywhere you look, and other than the trigger you are never gonna notice a difference. Some LPKs come with a grip and trigger, so that can save you money and steps.
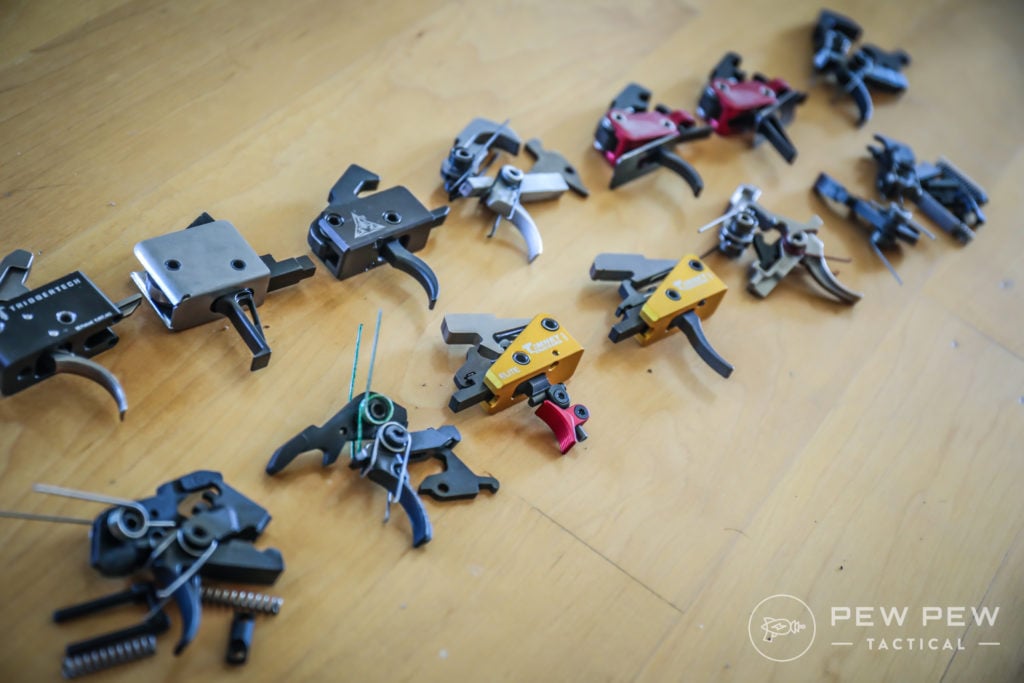
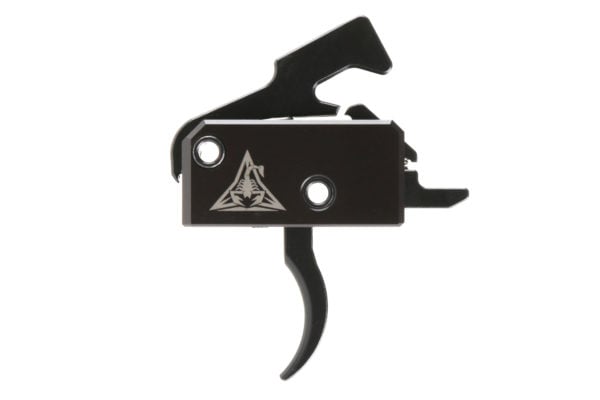
Trigger: The trigger is your primary interface point with your rifle, so it makes sense to start there if you’re looking to get something a little nicer with better performance. Try to aim for a lower parts kit with no trigger so you can pick your trigger yourself.
This is an important part though, so make sure to do your research before buying the trigger that is right for you. A great starting point is our Best AR-15 Triggers article. It even has cool videos!
Tested AR-15 Triggers
Best bang for your buck though, I highly recommend the Rise Armament AR-15 Super Sport Trigger since it is super easy to install, cheap, and a great trigger.
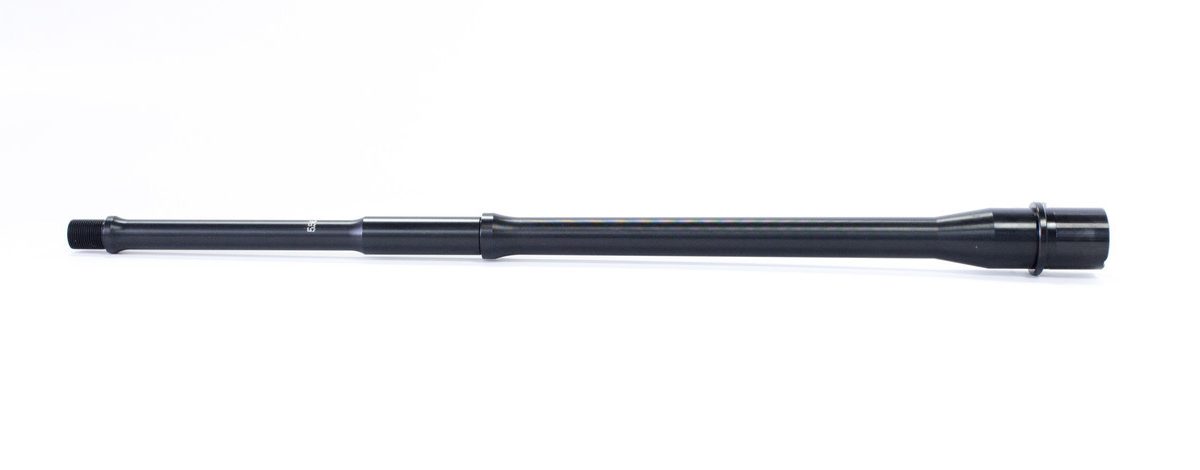
Barrel: After the trigger, the barrel is going to be your biggest accuracy bottleneck, so if you’re going to upgrade, this is your second stop. Faxon is often at the top of our list for barrels with their Gunner profile being the top of the top.
Again, this is one of the critical parts – so take some time and read through our Best AR-15 Barrels & Manufacturersbefore choosing the barrel that is right for you.
Where to Look For Deals
The Best Places to buy Guns Online are all good starting points. Beyond that (shameless plug incoming) be sure to check out our Daily Deals page on the website and our Facebook page for the best sales and deals we find and post every day.
Parting Shots
Alright, that does it for this one. Hopefully, you have a better idea of how to get your hands on an AR on the cheap, whether you’re looking to build or buy. Remember, cheap doesn’t always mean cheaply made, and sometimes a bargain isn’t really a bargain.
Don’t forget your optics! Best AR-15 Opticswill help get you started off right!
Buying one of these rifles, or building one following these guidelines should get you a lasting bargain, and one that you’ll really get your money out of.
What do you think of these cheap ARs? I know you want one, so are you building or buying? Let me know in the comments below! Want to learn everything AR…check out our Definitive AR-15 Guide.
Aircraft carriers are one of the most imposing forms of military might. Wendover Productions shares some trivia about how these cities at sea work, such as their massive workforce, how they resupply, and the fact that they never travel alone.
Another year, another accompanying swarm of soothing process videos provided by the Internet to help us swallow the insanity that was 2018—and at Core77, one of our greatest pastimes is stockpiling the most satisfying of these videos we can find. This year, despite a very unfortunate Instagram hacking on our @core77 account that deleted all of our past videos (sad, we know), we set out to once again deliver on our promise to find the best of #processporn to share with our friends on Instagram. It’s that time of year again to pick the best and the brightest of what we discovered. So take a moment to yourself and enjoy some of this design magic:
This ceramic stamper was a huge hit on our account this year for obvious reasons (original source unknown, but found via World of Engineering)
This string trick lands a little more in the realm of life hack than design #processporn, but hoo-boy, did our Instagram friends find it satisfying (via Reddit).
I could just watch this lathe make ball after ball until that thing can lathe no more.
Watching this gabion basket weaving video is pretty much a hypnosis tool for designers (video by ssmesh9 on YouTube).
Watching thermoforming will never get old to us—and this video of thermoformed luggage is by no means an exception!
This video by @measuredworkshop is maker eye candy—not only do you get a video demonstrating how to do a flush curve in plywood, but it’s also expertly documented.
Ever wondered what it takes to make one of those holiday cookie cutters? Well, I have good news for you: now you no longer have to and it’s mesmerizing (via @otbp_cookiecutters).
While many of you agreed that this process is a little too tedious for tile-making, many simultaneously found it very hard to argue that watching it isn’t satisfying AF.
The sound and visuals of this ceramic scraping process by @abe_haruya make this video ASMR perfection.
If you are not already following pastry chef Amaury Gichon on Instagram, do yourself a favor and follow now—this video of him making a chocolate gramophone (Yes, a GRAMOPHONE) is an excellent demonstration of his unfathomable construction skills.
The process of fiberglass molding is pretty dated, and yes, not very sustainable or safe…but there’s something about watching a fibrous sheet turn into a finished chair that is oh-so-fascinating.
And finally, some culinary #processporn that’s an excellent life hack for anyone who’s a fanatic for noodles.
If you haven’t already, go ahead and follow our Instagram and wait for the never-ending supply of satisfying #processporn to come your way.
The biggest challenges of mounting a Chronos 1.4 high-speed camera to this inverted lawnmower’s blade, which can hit speeds of up to 1,800 RPM, was keeping everything perfectly balanced so that the rig didn’t dangerously wobble, and finding a lens that didn’t distort and lose focus at G-forces higher than 200Gs. In the end, a 2.8-millimeter prime lens worked perfectly, capturing some of the most satisfying high-speed destruction footage we’ve seen in years.
iOS/MacOS:Apple is giving away six high-quality audiobooks of classic stories read by celebrities, free with no strings attached, playable on desktop and mobile. You can download and listen to Pride and Prejudice, The Wonderful Wizard of Oz, The Secret Garden, The Time Machine, Frankenstein, and a small Disney collection of Winnie the Pooh stories. Most of these audiobooks are excellent, one is iffy, and one is garbage.
Pride and Prejudice by Jane Austen(11:43)
The narration of Pride and Prejudice enjoys some ironic distance from the characters, and actor Kate Beckinsale delivers it with a subtle archness. Her natural accent, the kind that makes Americans think all English people are intelligent and classy, is a perfect fit for a novel of manners.
The Wonderful Wizard of Oz by L. Frank Baum (4:20)
Kimmy Schmidt actor Tituss Burgess sounds like he’s reading to children gathered at the foot of his rocking chair. He puts life and energy into the words, and he “does the voices” just a bit, but not enough to get distracting over the 25 chapters.
The Secret Garden by Frances Hodgson Burnett (8:00)
This book is a real challenge for a narrator, as the characters’ accents and voices are a running motif, and even a sign of little Mary Lennox’s character development. Avengers and Doctor Who actor Karen Gillan does the voices beautifully—at least as far as an American can tell. She narrates in her natural Scottish lilt, which, like the story, has a whiff of folktale fantasy.
The Time Machine by H.G. Wells (3:29)
Frasier’s Kelsey Grammer is another well-matched narrator. His mid-Atlantic accent tips over into full English to match the first-person narration of the Time Traveller, a Victorian English scientist. He projects and enunciates like Frasier Crane monologuing on the air, as if the whole book is the Time Traveler’s TED talk. This is a weird, lonely story, one that goes by quickly, and probably the most pleasant to hear while falling asleep.
Frankenstein by Mary Shelley (8:11)
On his podcast Lore, Aaron Mahnke uses a halting delivery, as if he’s thrown five commas into every sentence. This clearly works for enough people to make Lore a success. On Frankenstein, it’s too much. Mahnke’s pauses and his flat delivery make him sound as if he hadn’t practiced before reading. Like most 19th Century gothic horrors, the original Frankenstein is drier than its later adaptations, and a dry narrator can make it a slog.
Not even worth zero dollars. This is not A.A. Milne’s original collection of ten stories about Pooh. It’s only three uncredited stories, which seem to be pastiches of Milne’s originals, written in the same style but with a new plot. The narrator is fully competent, but her anonymity adds to the feeling that this was fished out of Disney’s junk drawer.
Advertisement
The company’s habit of raiding the classics, then copyrighting and trademarking its version, feels especially cynical in this sloppy edition. The three chapters are placed out of order, and they seem to lead to an ending that isn’t included. As a promotion of Apple’s audiobooks, this is a failure. Readers are better off dropping ten bucks on a version of Milne’s real, un-Disneyfied book narrated by Stephen Fry.
It’s great to see Apple handing out top-shelf books with top-shelf narration, even if they threw in a piece of Disney trash. Of course, instead of paying for more, you might just want more free readings. Open Culture has links to 900 free audiobooks, mostly classics.
Set after Star Wars Episode 3, Vader is Star Wars Theory’s fan-made series about the transformation of Anakin Skywalker into Darth Vader. In the first episode, Vader is sent on a mission to defeat a powerful Jedi while he’s still grieving from Padme’s death.