How to Set Up HTTPS on Your Site: A Simple Guide


As of July 2018, Google started marking your website as “not secure” for anyone visiting it using Google Chrome. If you don’t want to lose traffic, it’s a good idea to make sure SSL is set up on your site so people can visit it via HTTPS protocol.

Now is the time to set that up; here’s what you need to do.

Note: You may still see your site as “Not secure” after “successfully” installing an SSL certificate. See our troubleshooting tips at the end of this article for that.

Step 1: Grab Your SSL Certificate

According to the Google Developers blog, enabling HTTPS on your website doesn’t only protect the integrity of your data. HTTPS is also a requirement for many new browser features. Not only that, but it makes your visitors feel more secure whenever they visit your site. These are important reasons your site needs an SSL certificate.

Recently, if you open your website using a Chrome browser, you’ve probably seen that big, ugly “Not Secure” message in front of your URL.

website not secure

That’s not a pleasant thing to see when you’ve invested so much of your time and effort into developing a great website for your visitors.

Before you run out and look for an SSL certificate to buy, make sure you already know where you stand with your current web host.

SSL is fairly simple to set up, but you need to follow the right procedure for your situation. If your web host already offers a free SSL solution, then don’t waste money buying a certificate.

You might also consider reconsidering your choice of web hosts


The Best Web Hosting Services


The Best Web Hosting Services

Looking for the best web hosting service for your needs? Whether it’s for a small blog or a major corporate website, here are our best recommendations.
Read More

.

These are typically the SSL certificate options you have to choose from.

SSL services that offer free SSL certificates often also offer paid ones.

ssl certificate options

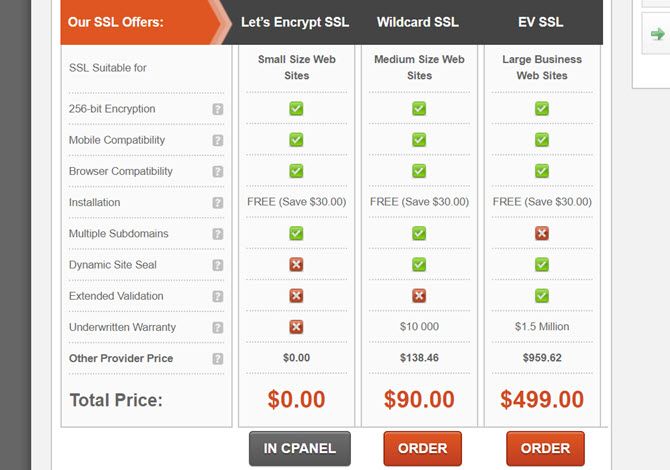
The difference is that most free certificates need to be manually renewed. You can do this via a cron job


How to Schedule Tasks in Linux with Cron and Crontab


How to Schedule Tasks in Linux with Cron and Crontab

The ability to automate tasks is one of those futuristic technologies that is already here. Every Linux user can benefit from scheduling system and user tasks, thanks to cron, an easy-to-use background service.
Read More

, but that’s beyond the scope of this article.

Some web hosts actually offer free management of those cron jobs if you use a service like Let’s Encrypt. SiteGround is one host that does this.

Whichever option you go with, when you order a certificate you’ll see a page like the one below. Both the certificate and the key are a part of the package.

ssl certificate text

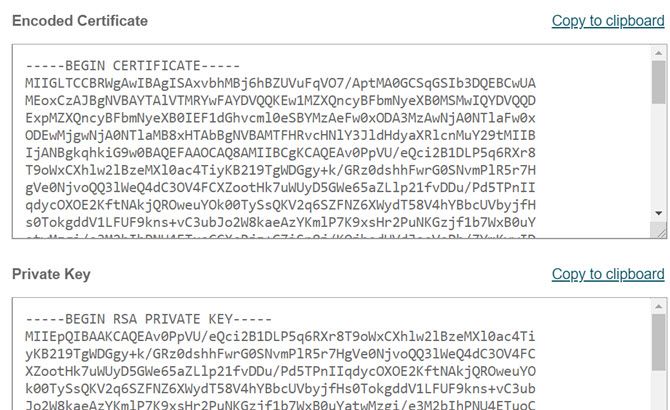
Copy both blocks of encrypted text and save them to a safe place.

Step 2: Install Your SSL Certificate

Most guides that describe how to install an SSL certificate will tell you that you have to have a dedicated IP. This means purchasing a more expensive dedicated hosting plan


What Should You Be Looking for in a Web Host?


What Should You Be Looking for in a Web Host?

Whether you’re creating a new website, or migrating an old one, you need to make sure you’re getting the best deal possible from your chosen web host.
Read More

.

If you have such a plan, and you go into your account you’ll see that you have a dedicated IP associated with it.

website ip address

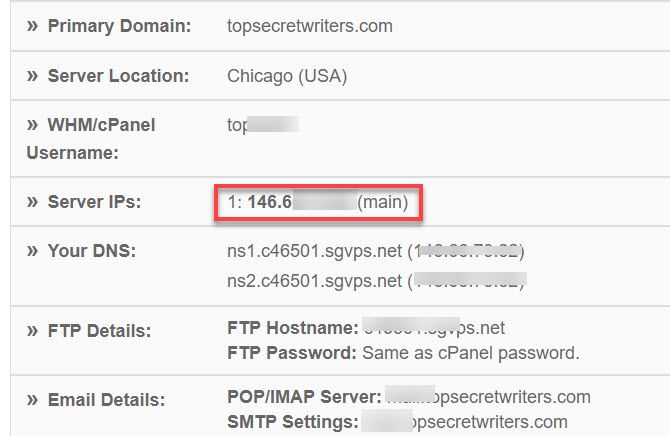
If you have a shared hosting plan, where multiple websites share the same server, then you don’t have a dedicated IP that goes with your URL.

Does that mean you can’t install an SSL certificate without a dedicated hosting plan? No. Thanks to a technology called Server Name Indicator (SNI), you can still install an SSL certificate for your site.

If you have a shared hosting plan, ask your web host whether they support SNI for SSL encryption.

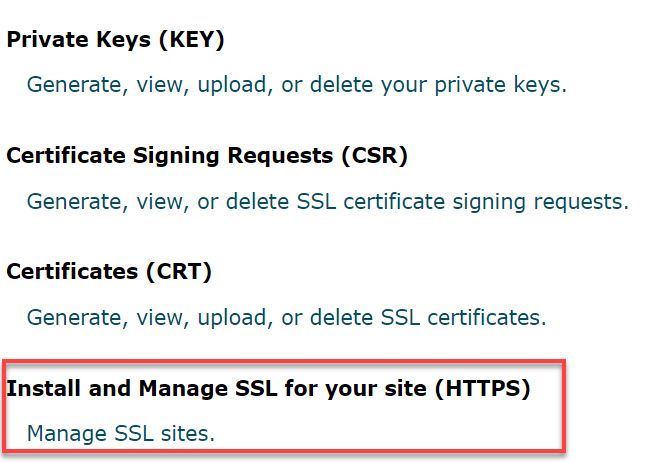
To install your certificate, you’ll need to go into cPanel and click on SSL/TLS Manager.

ssl tls manager

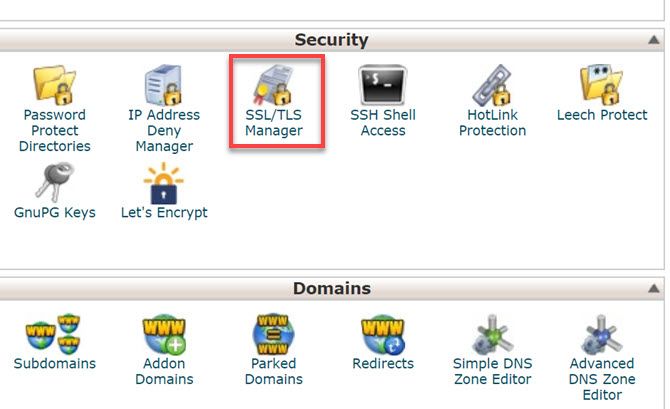
You should see various options for managing SSL certificates.

To install your initial SSL certificate for HTTPS, choose the Install option.

cpanel install ssl

You’ll see the option to choose the domain you’d like to install the certificate onto. Choose the correct domain from the dropdown box.

Next, paste the long encrypted certificate text that you copied when you purchased the certificate.

website certificate text

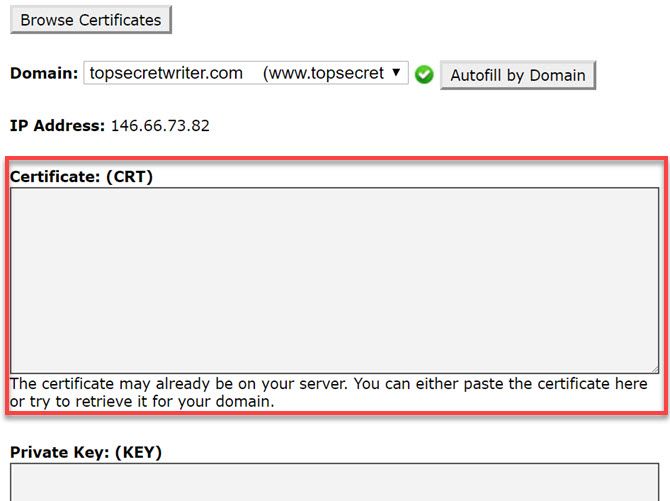
Then, scroll down and also paste the encrypted text for the Private Key that you copied when you bought the certificate.

Once you save, make sure to go into WordPress and refresh all caching. Also clear your browser cache (press Ctrl + F5).

View your site again by typing the site URL with “https://” in front of it. If all is well, you’ll see the “Secure” status in front of your site URL.

secure https url

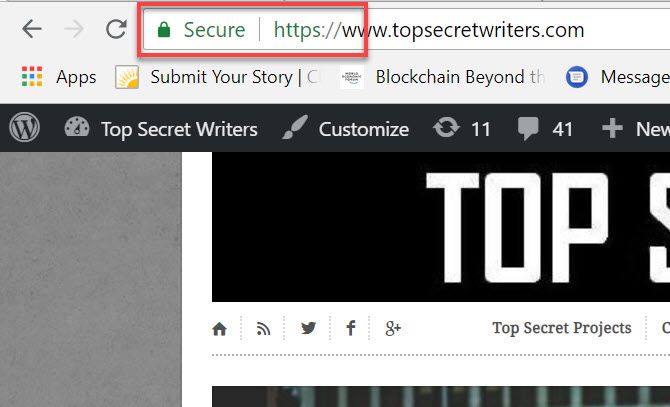
Congratulations! You now have a functioning SSL certificate, and your site can be accessed via HTTPS.

But, you’re not done. If people type in the old URL of your site into their browser, they’ll still see the unsecure version. You need to force all traffic through HTTPS.

How to Enforce HTTPS on Your Site

Your host may actually have a management area set up for you to handle required SSL changes.

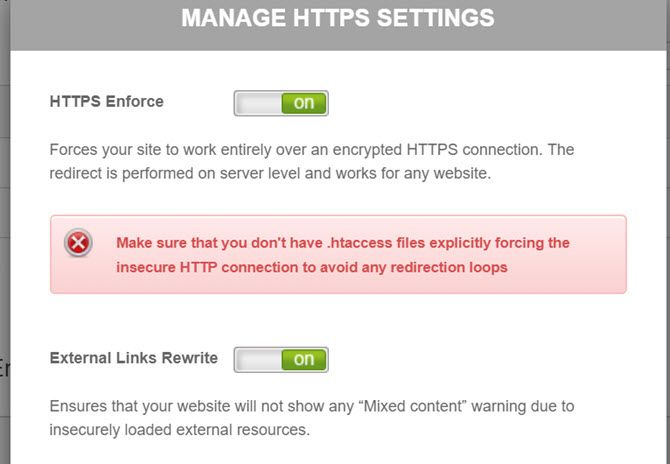
For example, Siteground embeds Let’s Encrypt into cPanel. There, HTTPS Settings allow you to turn on HTTP Enforce and External Links Rewrite.

  • HTTPS Enforce redirects traffic (like people who only type in the site URL without “https” in front of it, to HTTPS.
  • External Links Rewrite modifies external links that start with “http” to “https” so a “Mixed Content” warning doesn’t show up in the browser for your site.

manage https settings

If you don’t have this automated feature with your web host, then you have to do it the manual way.

Browse to the .htaccess file in the root of your web server. Edit it to include the following lines of code.

RewriteCond %{HTTP_HOST} yoursitedomain\.com [NC]
RewriteCond %{SERVER_PORT} 80
RewriteRule ^(.*)$ https://www.yoursitedomain.com/$1 [R,L]

Once you’ve saved this change, anyone who accesses your site via HTTP will be redirected to HTTPS.

Problem 1: CDN Images

You’d think at this point that you’re home free. Well think again.

In many cases, your site may come up, but many of the images will appear broken.

insecure website images

This can happen if you’re using a CDN service for your images. This is because all of your images are provided via the unsecured CDN links. Since your traffic is all redirected to use HTTPS, those images can’t load.

There are two methods of fixing this. The easiest is to modify your SSL certificate to use a wildcard. For example if you use Let’s Encrypt, you’ll see the option to use a wildcard in the SSL management page.

How to Set Up HTTPS on Your Site: A Simple Guide wildcard

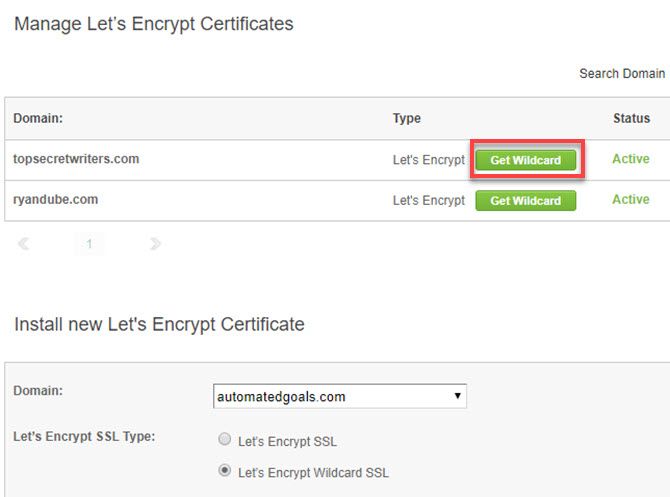
A wildcard lets you use your SSL certificate on any subdomain of your site.

Enable this, and obtain the certificate, private key, and CA bundle encrypted texts from the SSL details.

Go into your CDN service. In the example below, I use MaxCDN. You should find an SSL option in the area where you can manage the Zone for your site.

cdn ssl menu

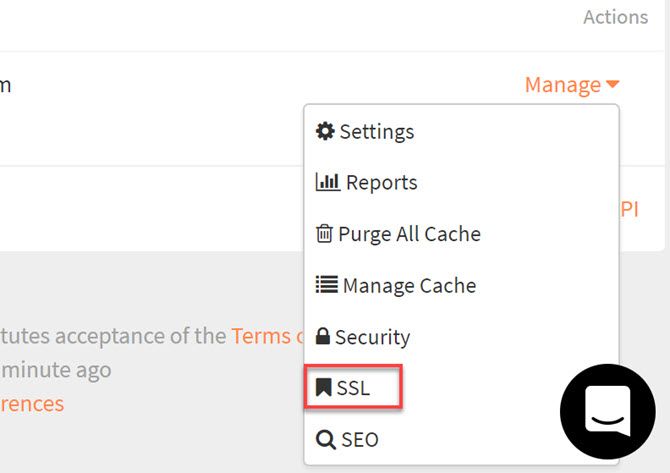
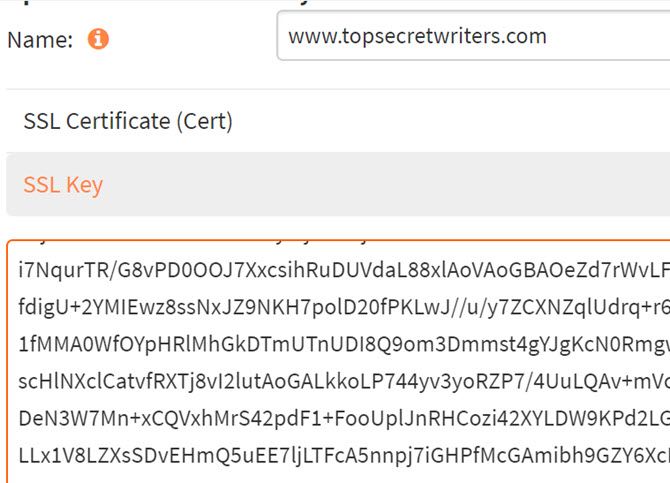
In here, you’ll see fields where you can paste the SSL Certificate and the Private Key.

Use the same encrypted text that you pasted into cPanel previously.

cdn ssl setup

Once you save this, the images should all load properly on your site.

If the SSL service you use doesn’t offer the wildcard option, you’ll actually need to purchase a second SSL certificate for your CDN image assets, and install it using the steps above.

Problem 2: Insecure Links

If you haven’t done anything else to your site except enabled your SSL Certificate and enforced HTTPS, you may still see the “Not Secure” error.

This will even show up when your site loads through HTTPS. The most common cause of this problem is that you still have a bunch of insecure links on your site. This is usually due to links in your sidebar, header, or footer.

Go into WordPress and look through all of your header and footer code, as well as your sidebar widgets. Look for links to services like Gravatar, Facebook, or others.

insecure images

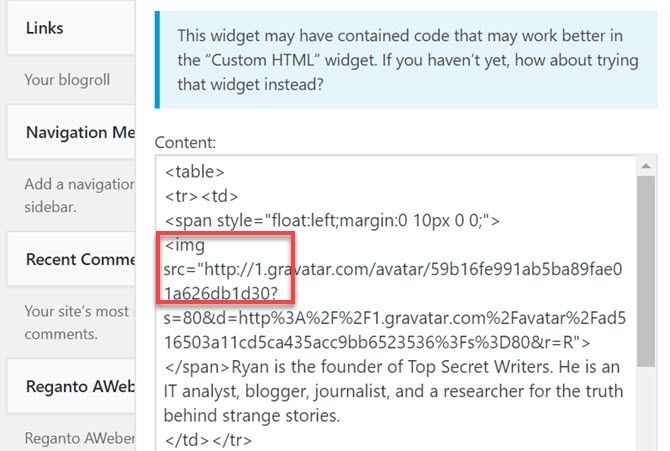
Change those links to use “https” rather than “http”.

Once you’re finished, clear all caches and reload your site. All issues should be resolved at this point and your site is now fully secure!

Protecting Your Visitors With HTTPS Is Smart

Even though your motivation for doing this may be to boost your SEO, the reality is that you’re also protecting your visitors from any packet sniffing hackers.

This is especially valuable if you ask your visitors for information about themselves like names, addresses, phone numbers, or credit card info.

For a personal website, that’s important enough. But if you’re running a business, you should understand why website security is so important to your business success


5 Reasons Why Website Security Is Crucial for a Growing Business


5 Reasons Why Website Security Is Crucial for a Growing Business

Let’s look at how having strong security standards can help with your growing website’s promotional efforts.
Read More

.


via MakeUseOf.com
How to Set Up HTTPS on Your Site: A Simple Guide

The SIG P365 Meets All Four Criteria for Pocket Pistol Perfection


By George Oliveira

Pocket carry is a great alternative when belt-borne holsters aren’t an option. It can be very fast on the draw. Standing around with your hands casually in your pockets is and looks quite natural. Doing so allows you to have a full grip on your pocket pistol and the draw is lightening-quick since your hand is already on your gun.

Pocket carry is also a good choice when hugs and accidental bump-frisks might happen such as at family get-togethers. It’s a great option in non permissive environments since most people don’t expect someone to carry a gun in a pocket and it also makes a great carry method for a back-up gun.

To qualify for service in my pocket, a handgun has to meet four criteria:

  1. It must be 100% reliable with carry ammunition. No if, ands or buts. My reliability test is 500 rounds of FMJ ammunition plus 200 rounds of carry ammunition, all run flawlessly. Yes, ammunition, especially carry ammo, is expensive, but failure at the wrong time is much more costly.
  2. For me, 9mm is my choice. It’s a formidable caliber, especially with +P or +P+ ammunition, and offers high capacity. I understand that many shooters like even smaller calibers, but 9mm is my personal minimal caliber limit. Your mileage may vary.
  3. The firearm’s size must be compact enough to not only fit in the pocket, but small enough to allow it to be drawn from the pocket with a hand wrapped around its grip. The frame can’t be too thick otherwise it could be difficult navigating the pocket opening, and the grip shouldn’t extend beyond the hand as it most likely will snag while being drawn. A pistol with a grip shorter than the hand is wasting valuable ammo-estate. Fill the hand with ammunition!

  1. The shape of the rear end of the slide must be angled. A square-edge slide tends to get caught in the corner of the pocket during the draw stroke. That means that the gun shouldn’t get caught in the pocket during the draw even once. When it comes to life-saving tools and techniques, 99.9% success is failure in my book.

Once a pistol passes my four-point test, it comes down to how well it can be shot and its magazine capacity.

Notice that I didn’t include “accuracy.” A firearm can be inherently accurate, but demonstrate reduced practical accuracy. That is, it’s difficult to actually shoot it accurately.

Small revolvers are a good example. They’re very accurate guns, but their short sight radius, minimalistic sights and long, heavy trigger pull make it hard for shooters to attain the level of accuracy that they’re capable of achieving.

With all of that said and done, the last criteria is capacity. The more here, the better. After a gunfight, no one ever said that they wished they had less ammunition.

Smith & Wesson 642 Airweight

My pocket carry journey started with lightweight snubbies. Never really enjoying their recoil, I found that I didn’t practice as much as I should with them. It didn’t take too many cylinders worth of shooting for it to strain my wrist.

I tried carrying a heavier gun, a Ruger’s SP101. It’s a great gun and its steel frame greatly reduces recoil to a very comfortable level. I carried a light .38 in one pocket and the SP101 in the other. Surprisingly, I found the extra weight didn’t bother me. The SP101 reigned supreme for me as a pocket gun for several years.

That is, until Smith & Wesson introduced the M&P Shield. The Shield was about the same size as the SP101, lighter, has much better trigger, real sights and offered three extra rounds. What’s not to love? The Shield was my new pocket gun.

It was, until SIG SAUER introduced the P365. Its 12+1 capacity bests the Shield’s 8+1 and it’s even a bit smaller. Wow!

Capacity is where SIG’s new P320 really shines. It comes with two 10-round magazines, one flush and one extended, but, both leave the had unfulfilled. But their optional 12-round magazine fills the hand perfectly without extending beyond the hand’s grasp. Not only does the magazine offer higher capacity, it fits the hand better making it easier to shoot accurately.

What’s really amazing about the design of the P320 is that it manages to packs 12+1 rounds into a package that others only manage to get ten or less into.

I know that the P365 has had its growing pains, in particular, there are several reports of broken strikers. I changed out the factory MIM striker on my pistol with a steel version from Lightning Strike, and tested it extensively with both practice and carry ammo. All seems good, and the P365 is now officially my new pocket gun.

That is until…?


via The Truth About Guns
The SIG P365 Meets All Four Criteria for Pocket Pistol Perfection

We’ve Got a Sneak Peek at Anne Rice’s New Vampire Lestat Tale, Blood Communion


Blood Communion comes to life on the page.
Illustration: Mark Edward Geyer (Knopf)

Anne Rice has a much-anticipated Vampire Chronicles TV show in the works at Hulu, and now she’s got a new book in the series starring her most beloved character: Blood Communion: A Tale of Prince Lestat. It’s the first Rice novel to include illustrations—and we’ve got an exclusive excerpt and some image reveals to share.

First, here’s some words from the author herself, explaining a little bit more about her book and its accompanying drawings by artist Mark Edward Geyer:

This is a dream come true, to see a tale of Lestat, my beloved Brat Prince, illustrated, and so beautifully, and tastefully. Mark Edward Geyer’s work makes this a unique and special volume of the Vampire Chronicles. I’m confident the readers will share my enthusiasm when they hold the book in their hands. I am so happy with this publication.

Geyer also contributed illustrations to The Alphabettery, a companion guide for all of the author’s Vampire novels written by Rice scholar Becket, with an introduction by Rice. That comes out October 23, but you’ll be able to get your hands on Blood Communion much sooner, since it publishes October 2.

Actually, why wait that long for your first taste?

Check out the illustrations above and below, and then read on for a juicy sneak peek at Blood Communion’s third chapter.


Vampires, this-a-way?
Illustration: Mark Edward Geyer (Knopf)
In Blood Communion, this illustration faces the chapter three excerpt you can read below.
Illustration: Mark Edward Geyer (Knopf)
Full moon fever.
Illustration: Mark Edward Geyer (Knopf)

Chapter 3

I was in love with the being the moment I glimpsed the house and the great black iron picket fence surrounding it. Such high fences these days are often made of aluminum, and they just don’t look the same as iron. But this fence was indeed crafted from true iron and very high, with gilded pickets like the great fences and gates of Paris, and I loved that mark of care, including the heaviness of the arched gate as I opened it.

Down a relatively short drive lined with majestic oaks stood the house itself, with high front steps of marble and galleries upstairs and down running across its broad façade. Graceful two-story Corin­thian columns punctuated these galleries, giving the place a Graeco-Roman grandeur that suggested a temple.

I figured the place had been built in the flush years right before the Civil War when rich Americans threw up such immense houses in desperate competition with one another, using the native cypress wood and stucco to produce an edifice that appeared to be all of marble when it was not.

I caught the scent of the oil lamps before I marked their soft mellow light behind the heavily figured lace curtains, and I stood for a moment on the bottom step looking up at the fanlight above the broad front door. All the scents of Louisiana, so familiar, so enticing, descended on me: the raw fragrance of the magnolias blooming in abundance on the nearby trees, and the deep perfume of the roses in the garden patches along the galleries, and jasmine, night jasmine of such a sweetness that one could drift off into endless dreaming just breathing it in, and remembering long-ago nights, and life moving confidently at a slower pace.

Steps in the hall beyond, and then a figure in the doorway, impe­rially slim, as the poet says, and with hair like my own, long, so blond it was almost white, gathered back in the fashion Marius and I had popularized at Court. And a hand raised with the flash of a ruby ring beckoning for me to enter.

I hurried to accept the welcome while Thorne and Cyril drifted off to make an inspection of the property, as they so often did.

As soon as I clasped his hand, I liked this blood drinker. His eyes were not large, but they were radiantly blue and his smile animated his entire face.

“Come in, Prince, do come in,” he said in very precise English, sharpened by an accent I couldn’t place.

He was my height and indeed quite thin, wearing a narrow-waisted modern coat and an old-fashioned lace-trimmed shirt over flannel trousers, and wingtipped shoes polished to a mirror luster, with string ties.

He drew me into a broad central hallway, paved in black-and-white marble, and then into a great spacious double parlor, so com­mon in old plantation houses, which had become a library lined with books of all ages. A center table stood in the second parlor, and there we sat down to talk.

By then I’d glimpsed a dining room across the hallway, with a long oval table and English Chippendale chairs. That room too was lined with bookshelves.

Quaint glass oil lamps scattered here and there on the periphery of these rooms provided warm light. The highly polished heart-pine floors were lustrous. Those old floors had never meant to be bare, but rather an under flooring for carpets or parquet. But the poly­mer lacquer had rendered them hard and beautiful and they gave an amber glow to the room.

“Please call me Mitka,” he said, “and your bodyguards are most welcome to come in. My name is Dmitri Fontayne. I’m part Russian, part French. I was made a blood drinker in the time of Great Cath­erine in Russia.”

This delighted me. Vampires in the main don’t volunteer their age or their history this readily, and he seemed entirely trusting when he came so easily to the point.

His mind was entirely in accord with his words, and these words particularly fascinated me. I don’t think I’d ever encountered a blood drinker with quite this background. And there was a great deal I wanted to tell him about Louis suddenly, Louis who was immersed in the novels of Tolstoy, and had myriad questions about them which no one cared to answer, and how much Louis would love him right off.

But I came back to the moment.

“Mitka, my pleasure,” I said. “And you know who I am. Lestat will do, though it seems the world likes to address me as ‘the Prince.’ Don’t worry about Thorne or Cyril. They know I want to talk to you alone.”

“As you wish,” he said. “But they mustn’t go far. You have enemies.”

“If you’re speaking of Rhoshamandes, I know all about him and his latest activities. . . .”

“Ah, but there are others, Prince,” he said. “Please tell them to remain near at hand.”

I did as he wished, sending a silent message to the others, who were prowling around the stables now, having a good time with the horses, which were apparently splendid, and which they wanted to ride.

“Which enemy is this? You do know the band of mavericks in New Orleans has been annihilated?”

“Yes, I do,” he said. A shadow passed over his face, and he looked down for a moment as if he were murmuring a prayer for the dead, but I caught nothing, and then he surprised me by quickly making the Russian Sign of the Cross. Like the Greeks, the Russians touch the right shoulder before the left.

As he looked up, his face brightened beautifully and I felt a kind of elation that was all too common of late, simply being here with him in this ornate parlor surrounded by hundreds of enticing vol­umes, and feeling the night air through the long open windows to the south. Roses again, the scent of roses in Louisiana is perhaps stronger than anywhere else, and then there came on the breeze a great drift of green fragrances from the nearby swamp, all so redo­lent of life.

I had to get myself in hand. Fits of laughter, I’d always strug­gled with at odd moments, and fits of rage occasionally, but now it was spells of elation, as if the common comforts of the world were miracles.

A passage came to me suddenly from Tolstoy, something that Louis had read to me, something that Prince Andrei Bolkonsky was thinking as he lay close to death. Something about love, love making everything possible, and then Louis’s strange comment that Tolstoy’s first two great novels were studies of happiness.

“Ah yes,” said the blood drinker opposite me with irresistible enthusiasm. “ ‘Happy families are all alike,’ ” he said quoting the famous first line from Anna Karenina. Then he caught himself. “For­give me. I make it a matter of courtesy not to ransack the minds of those I’ve only just met. But I couldn’t help it.”

“No need to be concerned at all,” I said. I looked about the room. Too many topics of conversation pressed in on me and I tried to find some order. What had we been talking about? Enemies. I didn’t want to talk about enemies. I started to talk about all that I saw before me, the inevitable Philadelphia wing chairs flanking the marble fireplace, and a tall secretaire punctuating the bookshelves, a lovely piece with inlaid designs and mirrored doors above the flap of the desk.

He was at once brightly happy over this. And something mad occurred to me, that every single time I ever encountered another blood drinker in friendship, it was as if I were meeting and entering an entire world. Seems I’d read somewhere, or heard it in a film, that the Jews believe each life is a universe, and if you take a life, well, then you are destroying a universe. And I thought, Yes, this is true of us, this is why we must love one another, because we are each an entire world. And with blood drinkers there were centuries of stories to tell, millennia of experiences to be related and understood.

Yes, I know what you’re thinking as you read this. All this is obvi­ous. When people suddenly understand love they can sound like per­fect idiots, true.

“This enemy is a creature named Baudwin.” Mitka’s voice star­tled me. “An unsavory creature but a powerful creature, ancient, as ancient perhaps as Marius or Pandora, though I couldn’t myself tell. He was on the prowl in New York at the time that you came there, and made an enemy of Rhoshamandes, and were proclaimed the Prince. I haven’t seen him, however, in over a year.”

“It’s a pleasure to meet you,” I said. “I’ll meet this Baudwin when the time comes. Let’s not waste these moments on him, though I appreciate the warning.”

There was no need for us to discuss the obvious, that if this Baud­win was of the same age as Marius or Pandora, he would destroy me in a moment with the Fire Gift just as I’d destroyed the mavericks in New Orleans. It was sobering to realize that there might be any number of such creatures whom I hadn’t come to know yet, who knew of me. I liked to believe that I met all of the Children of the Millennia and had a fair idea of who hated me and who did not. But I’d never heard of Baudwin.

“I love your house and all you’ve achieved here,” I said, pushing the darker thoughts from my mind. It was enough to know that Cyril and Thorne were paying heed to every word we said.

“I’m so happy you approve,” he responded. “I wouldn’t call it a restoration, since I have used some modern materials and made some distinctly modern choices, but I’ve done my best to use only superior materials throughout.” He too seemed to forget the darker thoughts and his face was fired with enthusiasm now, and as so often happens, the human warmth and the human lines came back to it, and I could see what sort of man he might have been. Likely thirty years of age, no more than that, and I noted how very delicate were his hands with which he gestured easily, and all of the rings he wore—even his ruby ring—were made with pearls.

“It’s taken me years to acquire the furnishings,” he said. “I remember in the beginning when I first came here in the 1930s, it seemed easier to find the very high-quality survivals from the eigh­teenth century—paintings, chairs, that sort of thing.”

He talked on easily of the bones of the house being excellent, and the old plaster falling away to leave bare-brick chain walls. Chain walls are walls that went all the way down to the ground rather than a foundation, and I had not heard that term in many years.

“The house was a total ruin when I first happened upon it. You understand I had no idea you were in New Orleans in those times. I knew there were blood drinkers about, but I knew nothing of them until many decades later when I read all of your stories, and I was riding on the old road to Napoleonville when I saw the house on the night of a bright moon, and I swore it spoke to me. It beckoned me to brave the wreckage and come inside, and once I did I knew I must bring it all back to its former glory, so that some night when I finally left it, it would be infinitely better than I’d found it, and I’d left my stamp upon it with pride.”


Excerpt from Blood Communion: A Tale of Prince Lestat (Vampire Chronicles) by Anne Rice, reprinted by permission. Copyright Knopf.


via Gizmodo
We’ve Got a Sneak Peek at Anne Rice’s New Vampire Lestat Tale, Blood Communion

Comic for September 09, 2018


Transcript

Jerry: Omg! You are soooo wrong! I literally cannot believe you are this gullible. Hahahahaha! Hahahaha! I can’t wait to tweet about your stupidity. Your dumbness will live forever on the internet!
Dilbert: You probably haven’t seen the new data that proves I’m right. Will you apologize like a decent human being or will you move the goalposts claim victory. And trash my name like a demented weasel?
Jerry: Can you tell me more about the weasel option?


via Dilbert Daily Strip
Comic for September 09, 2018

Manipulating queries with non-conforming data via MySQL Query Rewrite Plugin, triggers and stored procedures

The MySQL database is used in thousands of third-party applications, but what can you do when you want to use MySQL with an application, but that application’s queries or data doesn’t match MySQL’s data type or SQL format?

This post will show you three ways to alter a query or mismatched data when you don’t have control of the application’s source code. Of course, there are hundreds of different ways to do what I am about to show you. In this example, I will show you how to use the MySQL Query Rewrite Plugin along with a trigger to alter the non-conforming data. I will also show you an example of manipulating data with a stored procedure.

A customer emailed me with a problem. They wanted to use MySQL for a third-party application, but they didn’t have access to the source code. Their main problem was the application’s TIMESTAMP format didn’t conform to MySQL’s TIMESTAMP format. To be specific, this application produced a TIMESTAMP value that included a trailing time zone, such as “2018-09-05 17:00:00 EDT”. MySQL has two column data types where you can store both the date and time in one column: TIMESTAMP and DATETIME – but MySQL cannot handle TIMESTAMP or DATETIME data with a trailing time zone.

When a TIMESTAMP value is being inserted into a row, MySQL converts the TIMESTAMP value from the current time zone set by the MySQL server (see Time Zone Support) to UTC (Coordinated Universal Time) for storage, and converts the data back from UTC to the current time zone (of the server) when retrieved. (This conversion does not occur for other types such as DATETIME.) By default, the current time zone for each connection is the server’s local time. The time zone can be set on a per-connection basis, and as long as the time zone setting remains constant, you will get back the same value you stored. If you store a TIMESTAMP value, and then change the time zone and retrieve the value, the retrieved value is different from the value you stored. This occurs because the same time zone was not used for conversion in both directions. The current time zone is available as the value of the time_zone system variable. For more information, see Section 5.1.12, “MySQL Server Time Zone Support”.

(From: https://dev.mysql.com/doc/refman/8.0/en/datetime.html)

The customer told me that this application would only be sending data with two different trailing time zones – Central and Eastern. With daylight-savings in use in both of these time zones, this would give us four possible trailing time zone values – CDT, CST, EDT and EST. What we want to do is to intercept the query, and write this TIMESTAMP data to a different column, and then convert the value to UTC time to be stored in the correct column in the database. Because we don’t have access to the source code, I am assuming we have full access to the MySQL database.


NOTE: Since we are using time zone information, if you want to duplicate this post, be sure to load the MySQL time zone information. See: https://dev.mysql.com/doc/refman/8.0/en/time-zone-support.html


The MySQL Rewrite Plugin

In MySQL version 5.7, a plugin named the “Query Rewrite Plugin” was introduced. This plugin can examine SQL statements received by the server and modify those statements before the server executes them. In other words, this gives you the ability to intercept “bad” queries and re-format them to be “good” queries for use with MySQL – or to rewrite the queries to do whatever you need. Think of it as a way to change the source code without actually having the source code.

Installing the plugin is fairly easy. In MySQL version 8.0, you install (or uninstall) the plugin via an SQL script provided with your MySQL installation. The script is named install_rewriter.sql and is located in the “share” directory under your MySQL home directory.

# cd /usr/local/mysql/share  (your directory may be different)
# mysql -u root -p < install_rewriter.sql
Enter password: (enter root password here)

The script only takes a few seconds to load (The uninstall script is named uninstall_rewriter.sql). To check and make sure the plugin was installed, run this command from within MySQL:

mysql> SHOW GLOBAL VARIABLES LIKE 'rewriter_enabled';
+------------------+-------+
| Variable_name    | Value |
+------------------+-------+
| rewriter_enabled | ON    |
+------------------+-------+
1 row in set (0.00 sec)

The plugin was installed correctly if the column named “Value” is set to “ON“.

For this example, I am going to create a small table with three columns, and assume that this is an table from a third-party application. The date_time_value column is where the application would normally store the timestamp information.

mysql> create database test;
 Query OK, 1 row affected (0.01 sec)
mysql> use test;
 Database changed
mysql> CREATE TABLE `time_example` (
  `idtime` int(11) NOT NULL AUTO_INCREMENT,
  `action_record` varchar(30) NOT NULL,
  `date_time_value` timestamp NULL DEFAULT NULL,
  PRIMARY KEY (`idtime`)
) ENGINE=InnoDB AUTO_INCREMENT=1 DEFAULT CHARSET=UTF8MB4;
Query OK, 0 rows affected (0.03 sec)

The date_time_value column will obviously not be able to store timestamp data with a trailing time zone, but let’s see what happens when we try and insert a row of data – and let’s pretend that this is the query the application uses.

mysql> insert into test.time_example (action_record, date_time_value) 
 values ('Arrived at work', '2018-09-05 17:00:00 EDT');
Error Code: 1292. Incorrect datetime value: '2018-09-05 17:00:00 EDT' 
 for column 'date_time_value' at row 1

Of course, we get an error because the format for the timestamp is incorrect.

What we want to do is to alter the table and add a column to store this improperly-formatted timestamp data.

mysql> ALTER TABLE `test`.`time_example` 
    -> ADD COLUMN `date_time_storage` VARCHAR(23) NULL AFTER `date_time_value`;
Query OK, 0 rows affected (0.05 sec)
Records: 0  Duplicates: 0  Warnings: 0

Now that we have a column (date_time_storage) to store the “bad” timestamp data, we need to modify the incoming query so that it writes the timestamp data into the new column.


Note: In MySQL 8.0+, with the Query Rewrite Plugin, you can modify SELECT, INSERT, REPLACE, UPDATE, and DELETE statements. (Prior to MySQL 8.0.12 you could only modify SELECT statements)


This is the query the application is sending to the database:

insert into test.time_example (action_record, date_time_value) values (?, ?);

We want to modify the query to use the new date_time_storage column, instead of the date_time_value column. The new query would look like this:

insert into test.time_example (action_record, date_time_storage) values (?, ?);

Now that we have our old (bad) and new (good) queries, we can insert this into the rewrite_rules table of the query_rewrite database.

INSERT INTO query_rewrite.rewrite_rules
    (pattern, replacement, pattern_database) VALUES(
    'insert into test.time_example (action_record, date_time_value) values (?, ?)',
    'insert into test.time_example (action_record, date_time_storage) values (?, ?)',
    'time_example'
    );
1 row(s) affected, 1 warning(s): 1105 Query 'insert into test.time_example 
 (action_record, date_time_value) values ('Left building', '2018-09-05 17:00:00 EDT')' 
 rewritten to 'insert into test.time_example (action_record, date_time_storage) 
 values ('Left building', '2018-09-05 17:00:00 EDT')' by a query rewrite plugin

(More examples may be found on this page: Query Rewrite Plugin Usage)

We need to execute a stored procedure named flush_rewrite_rules to make this query-rewrite change permanent: (See: https://dev.mysql.com/doc/refman/8.0/en/rewriter-query-rewrite-plugin-usage.html)

mysql> CALL query_rewrite.flush_rewrite_rules();
Query OK, 1 row affected (0.00 sec)

We can confirm the INSERT INTO query_rewrite.rewrite_rules by looking at the rewrite_rules table:

mysql> SELECT * FROM query_rewrite.rewrite_rules\G
*************************** 1. row ***************************
                id: 1
           pattern: insert into test.time_example (action_record, date_time_value) values (?, ?)
  pattern_database: time_example
       replacement: insert into test.time_example (action_record, date_time_storage) values (?, ?)
           enabled: YES
           message: NULL
    pattern_digest: e823e987338aeae6d47f7a729e78f532d3ff3721237c15981bcd11fc2607efda
normalized_pattern: insert into `test`.`time_example` (`action_record`,`date_time_value`) values (?,?)
1 row in set (0.00 sec)

Next, let’s run the same query as before, and see if it puts the timestamp data that is supposed to go into the date_time_value column into the new date_time_storage column:

mysql> insert into test.time_example (action_record, date_time_value) 
 values ('Arrived at work', '2018-09-05 17:00:00 EDT');
Query OK, 1 row affected, 1 warning (0.01 sec)

And now the table contains this data:

mysql> select * from time_example;
+--------+-----------------+-----------------+-------------------------+
| idtime | action_record   | date_time_value | date_time_storage       |
+--------+-----------------+-----------------+-------------------------+
|      1 | Arrived at work | NULL            | 2018-09-05 17:00:00 EDT |
+--------+-----------------+-----------------+-------------------------+
1 rows in set (0.00 sec)

We now have the timestamp with the time zone data stored in the MySQL database, but we need to convert this to a proper format, and put the result into the date_time_value column.

To do this, we can use a trigger.

Normally, you would want your application to produce data in the correct format, but in this example, we don’t have access to the source code. So, we can create a trigger to convert the “incorrectly-formatted” data in date_time_storage to the correct data and store it in date_time_value.


NOTE: These examples won’t work if your TIMESTAMP uses microseconds (6-digits) precision (example: ‘1970-01-01 00:00:01.000000’) – but you can modify the code to accommodate microseconds.


Here is the SQL to create the trigger:

DELIMITER $$
  
CREATE TRIGGER _time_zone_convert_insert2
AFTER INSERT ON time_example
FOR EACH ROW
BEGIN

DECLARE _date_time_no_tz varchar(20);

SET _date_time_no_tz = SUBSTRING(NEW.date_time_storage, 1, 20);

IF NEW.date_time_storage like '%EDT' THEN
    SET NEW.date_time_value = CONVERT_TZ(_date_time_no_tz,'EST5EDT','GMT');
END IF;

IF NEW.date_time_storage like '%EST' THEN
    SET NEW.date_time_value = CONVERT_TZ(_date_time_no_tz,'EST5EDT','GMT');
END IF;

IF NEW.date_time_storage like '%CDT' THEN
    SET NEW.date_time_value = CONVERT_TZ(_date_time_no_tz,'EST5EDT','GMT');
END IF;

IF NEW.date_time_storage like '%CST' THEN
    SET NEW.date_time_value = CONVERT_TZ(_date_time_no_tz,'EST5EDT','GMT');
END IF;

END$$

DELIMITER ;

Now that we have a trigger in place, let’s insert another line into the database – BUT, we still want to use the SQL from the application. The query will try and write to the date_time_value column, but the Query Rewrite Plugin will intercept the original query and substitute our new query instead – which will insert the timestamp data into the date_time_storage column, and then the trigger will convert the timestamp and place the correct value into the date_time_value column.

mysql> INSERT INTO time_example (action_record, date_time_value) 
 VALUES ('Lunch Break', '2018-09-05 18:00:00 EDT');
Query OK, 1 row affected (0.00 sec)

The table now contains a true timestamp column with the correct timestamp value in UTC. (The old row didn’t change)

mysql> SELECT * FROM test.time_example;
+--------+------------+---------------------+-------------------------+
| idtime | product_id | date_time_value     | date_time_storage       |
+--------+------------+---------------------+-------------------------+
|      1 | time now1  | NULL                | 2018-09-05 18:00:00 EDT |
|      2 | time now2  | 2018-09-05 22:00:00 | 2018-09-05 18:00:00 EDT |
+--------+------------+---------------------+-------------------------+
2 rows in set (0.00 sec)

But what about stored procedures?

The easiest way to handle the time zone conversion is with a trigger. But, to show you how stored procedures can do the same thing, I have an example of a stored procedure. In this example, I will be passing the values of the idtime and date_time_storage columns.

This example will be similar to the one above – I created a table named time_example, but this time, I am including the extra column:

'CREATE TABLE `time_example` (
  `idtime` int(11) NOT NULL AUTO_INCREMENT,
  `action_record` varchar(30) NOT NULL,
  `date_time_value` timestamp NULL DEFAULT NULL,
  `date_time_storage` varchar(23) DEFAULT NULL,
  PRIMARY KEY (`idtime`)
) ENGINE=InnoDB AUTO_INCREMENT=1 DEFAULT CHARSET=utf8'

I then inserted a row, where I am storing the time stamp with the time zone information:

mysql> insert into test.time_example (action_record, date_time_storage) 
 values ('Left work', '2018-09-05 17:00:00 EDT’);
Query OK, 1 row affected (0.00 sec)

Here is what the row looks like:

mysql> SELECT * FROM test.time_example;
+--------+------------+-----------------+-------------------------+
| idtime | product_id | date_time_value | date_time_storage       |
+--------+------------+-----------------+-------------------------+
|      1 | Left work  | NULL            | 2018-09-05 17:00:00 EDT |
+--------+------------+-----------------+-------------------------+
1 row in set (0.00 sec)

Again, the date_time_storage column is a temporary storage column. I will call the stored procedure, and provide the idtime and date_time_storage values. The stored procedure which will look at the last three characters in the date_time_storage column, and then convert the time to UTC, which is then stored in the date_time_value column.

call _check_time_zone('1','2018-09-05 17:00:00 EDT');

Now the row looks like this, where the date_time_value column is now stored as UTC:

mysql> SELECT * FROM test.time_example;
+--------+------------+---------------------+-------------------------+
| idtime | product_id | date_time_value     | date_time_storage       |
+--------+------------+---------------------+-------------------------+
|      1 | Left work  | 2018-09-05 21:00:00 | 2018-09-05 17:00:00 EDT |
+--------+------------+---------------------+-------------------------+
1 row in set (0.00 sec)

And here is the code to create the stored procedure:

DELIMITER $$
CREATE DEFINER=`root`@`localhost` 
PROCEDURE `_check_time_zone`(IN _id_time INT, IN _date_time_storage VARCHAR(23))
BEGIN

DECLARE _date_time_no_tz varchar(20);

SET _date_time_no_tz = SUBSTRING(_date_time_storage, 1, 20);

IF _date_time_storage like '%EDT' THEN 
UPDATE time_example SET date_time_value = CONVERT_TZ(_date_time_no_tz,'EST5EDT','GMT')
WHERE idtime = _id_time;
END IF;

IF _date_time_storage like '%EST' THEN 
UPDATE time_example SET date_time_value = CONVERT_TZ(_date_time_no_tz,'EST5EDT','GMT')
WHERE idtime = _id_time;
END IF;

IF _date_time_storage like '%CDT' THEN 
UPDATE time_example SET date_time_value = CONVERT_TZ(_date_time_no_tz,'CST5CDT','GMT')
WHERE idtime = _id_time;
END IF;

IF _date_time_storage like '%CST' THEN 
UPDATE time_example SET date_time_value = CONVERT_TZ(_date_time_no_tz,'CST5CDT','GMT')
WHERE idtime = _id_time;
END IF;

IF _date_time_storage like '%UTC' THEN 
UPDATE time_example SET date_time_value = _date_time_no_tz
WHERE idtime = _id_time;
END IF;

END $$
DELIMITER ;


Tony Darnell is a Principal Sales Consultant for MySQL, a division of Oracle, Inc. MySQL is the world’s most popular open-source database program. Tony may be reached at info [at] ScriptingMySQL.com and on LinkedIn.
Tony is the author of Twenty Forty-Four: The League of Patriots 
Visit http://2044thebook.com for more information.
Tony is the editor/illustrator for NASA Graphics Standards Manual Remastered Edition 
Visit https://amzn.to/2oPFLI0 for more information.

via Planet MySQL
Manipulating queries with non-conforming data via MySQL Query Rewrite Plugin, triggers and stored procedures

The Washington Post’s Analysis of Star Wars’ Toxic Fandom Doesn’t Go Deep Enough


Rose Tico stands ready to stun the bejesus out of any deserters in Star Wars: The Last Jedi.
Photo: Lucasfilm

This morning, the Washington Post published an article titled “Who hates Star Wars for its newfound diversity? Here are the numbers.” It comes to the perhaps unsurprising conclusion that, as ferocious as it has become lately, the toxic subculture that has developed in Star Wars fandom is a vocal minority. But its sampling is still too narrow.

Written by the University of Rochester’s Beth Lacina, an associate professor of political science, the study as presented in the Washington Post’s analysis piece examines a very tight selection of Star Wars associated tweets in the wake of hostile reactions to the latest film in the main saga, The Last Jedi, as well as the controversy surrounding hateful attacks that drove actress Kelly Marie Tran, who played new hero Rose Tico in the film, off social media. Based on random selections of tweets relating to Star Wars, The Last Jedi, Kelly Marie Tran, and Rose Tico up to the point Tran quit social media in June of this year, the analysis finds that about six percent of the gathered tweets contained offensive language and a much smaller subsection of those—around one in 100—contained hate speech.

Those metrics sharply increased when examining just the data that related to Kelly Marie Tran and Rose Tico specifically. Offensive language went from six to 12 percent, and hate speech rose from 1.1 percent of the sampled tweets to 1.8 percent—and it rises even further when specifically examining negative tweets about Rose and Tran, indicating that discussion becomes significantly more toxic when discussing Star Wars’ first non-white female lead negatively than it does with any other criticism of the franchise.

A table from Lacina’s full report contrasting percentages of offensive language and hate speech in tweets relating to Star Wars, Rose Tico and actress Kelly Marie Tran, and then between male and female-identified fan podcasters.
Image: Beth Lacina (University of Rochester)

Lacina’s research also found similar spikes of abusive language when looking at the way people discuss Star Wars with female fans, but it’s here where the cracks of the limited scope of the data begin to show. While the results show that female fans are more likely to receive hateful language from fans—one in 280 tweets containing hate speech in comparison to one in 450 tweets for men—the sampling came from a very specific subset of online Star Wars fandom: Star Wars podcast Twitter accounts. Sixty-three accounts in total, with 37 operated by men and 26 by women, formed the basis for this section of research, and while Lacina argues that Star Wars podcasters are indebted to Lucasfilm (even when not officially affiliated) as the existence of more Star Wars to talk about is vital to them, it’s a sample size that underestimates the scope of how female Star Wars fans interact and express their fandom.

Restricting discussion to specifically Kelly Marie Tran and Rose Tico also sidesteps other female figures, fictional or otherwise, who have become targets for abuse in the months since The Last Jedi. Daisy Ridley’s character Rey (and in her case, this is a holdover from abuse that began with The Force Awakens) and Admiral Holdo (played by Laura Dern) have become frequent points of ire from abusive fandom, questioning everything from their capability as women in positions of power in The Last Jedi’s narrative to the fact that Holdo has purple hair and wears a glamorous dress while in command.

Outside of the film, there’s also been the vilification of producer and Lucasfilm president Kathleen Kennedy, who has become a focal point of criticism among some fans as the public “face” of Star Wars at large (look to some of the recent reactions to the official news that Kennedy, one of Hollywood’s most successful producers, is receiving an honorary Oscar from the Academy). Most recently, The Star Wars Show and Rebels Recon host Andi Gutierrez faced a manufactured backlash after an image of her drinking out of a mug labeled “fanboy tears” was taken out of context to rile up a conflict between a Lucasfilm employee and Star Wars fandom. Lacina’s report is a start, but it barely scratches the surface of a firestorm that started brewing long before The Last Jedi hit theaters.

The full report itself—which is well worth a read—at least acknowledges this limitation, even if the accompanying Washington Post article doesn’t. It explains not just the limitation of scope, but that a randomized sampling of data lacks certain nuances, such as differentiating between a casual use of coarse language and the same language being used to make a discussion more hostile. Most intriguingly, using Gutierrez’s recent harassment as an example, it also highlights an ongoing trend in social media discourse at large: the rise of quick, targeted, and organized campaigns of abuse, an issue that doesn’t just apply to Star Wars and other genre franchises but everything from politics to the rise of Gamergate copycat campaigns like Comicsgate.

As Lacina notes, a random sample of tweets may miss windows where abusive and hateful speech spikes, as it did when Gutierrez’s selfie was posted by the Twitter account of formerly-Lucasfilm-affiliated fan podcast Rebel Force Radio, sparking a wave of targeted harassment:

The graph highlights one difficulty with capturing harassment on Twitter. Harassment frequently occurs in short episodes. Gutierrez’s account received no offensive tweets in the days before July 9, then twenty or more for the next three days. Activity in her account returned to normal on July 13. Since harassment is not spread evenly through time but bunched up at a few points, it is easy to miss an entire episode when drawing a random sample of tweets.

A second difficulty is deleted tweets. Gutierrez received a lot of now-deleted tweets at the same time the offensive tweets sent to her account surged. 4.5% of tweets to her account sent between July 9 to July 12 are now deleted. Offensive speech, hate speech, and threats could be missed entirely because Twitter does not make this kind of data available for research.

Although highlighting episodes of harassment and abuse in fandom circles like this have become more and more common lately, it should come as no surprise that the prevalence of hate and abuse in a fan community as vast and diverse as Star Wars’ is coming from a vocal minority. But not only does that minority still exist—and should be fought against even if it is in small numbers—analysis like Lacina’s shows that there is still a long way to go in getting an accurate reading of just how deeply rooted toxic elements in fan communities have become and the affects they have on individuals. It’s a step in the right direction, but simply a step nonetheless.


via Gizmodo
The Washington Post’s Analysis of Star Wars’ Toxic Fandom Doesn’t Go Deep Enough

Laravel 5.7 CRUD Example Tutorial For Beginners From Scratch

Laravel CRUD Tutorial

Laravel 5.7 CRUD Example Tutorial For Beginners From Scratch is today’s leading topic. Laravel 5.7 has some new cool features as well as several other enhancement and bug fixes. In previous Laracon event, Taylor Otwell announced some of the notable changes which are the following.

  1. Resources Directory Changes.
  2. Callable Action URLs.
  3. Laravel Dump Server.
  4. Improved Error Messages For Dynamic Calls.

Now in this tutorial, first we will install the Laravel 5.7 and then build a CRUD application.

Laravel 5.7 CRUD Example Tutorial

First, let us install Laravel 5.7 using the following command. We will use Composer Create-Project to generate laravel 5.7 projects.

#1: Install Laravel 5.7

Type the following command. Make sure you have installed composer in your machine.

composer create-project --prefer-dist laravel/laravel stocks

Laravel 5.7 CRUD Example Tutorial

Okay, now go inside the folder and install the npm packages using the following command. The requirement for the below command is that node.js is installed on your machine. So, if you have not installed, then please install it using its official site.

npm install

#2: Configure MySQL Database

Now, first, in MySQL, you need to create the database, and then we need to connect that database to the Laravel application. You can also use phpmyadmin to create the database.

Now, After creating the database, we need to open the .env file inside Laravel stocks project and add the database credentials. I have typed my credentials; please enter yours otherwise it won’t connect.

DB_CONNECTION=mysql
DB_HOST=127.0.0.1
DB_PORT=3306
DB_DATABASE=laravel57
DB_USERNAME=root
DB_PASSWORD=root

So now you will be able to connect the MySQL database.

Laravel always ships with migration files, so you can able to generate the tables in the database using the following command.

php artisan migrate

Laravel 5.7 Tutorial

#3: Create a model and migration file.

Go to the terminal and type the following command to generate the model and migration file.

php artisan make:model Share -m

It will create the model and migration file. Now, we will write the schema inside <timestamp>create_shares_table.php file.

   /**
     * Run the migrations.
     *
     * @return void
     */
    public function up()
    {
        Schema::create('shares', function (Blueprint $table) {
            $table->increments('id');
            $table->string('share_name');
            $table->integer('share_price');
            $table->integer('share_qty');
            $table->timestamps();
        });
    }

Okay now migrate the table using the following command.

php artisan migrate

Now, add the fillable property inside Share.php file.

<?php

namespace App;

use Illuminate\Database\Eloquent\Model;

class Share extends Model
{
  protected $fillable = [
    'share_name',
    'share_price',
    'share_qty'
  ];
}

#4: Create routes and controller

First, create the ShareController using the following command.

php artisan make:controller ShareController --resource

Now, inside routes >> web.php file, add the following line of code.

<?php

Route::get('/', function () {
    return view('welcome');
});

Route::resource('shares', 'ShareController');

Actually, by adding the following line, we have registered the multiple routes for our application. We can check it using the following command.

php artisan route:list

Laravel 5.7 Example

Okay, now open the ShareController.php file, and you can see that all the functions declarations are there.

<?php

namespace App\Http\Controllers;

use Illuminate\Http\Request;

class ShareController extends Controller
{
    /**
     * Display a listing of the resource.
     *
     * @return \Illuminate\Http\Response
     */
    public function index()
    {
        //
    }

    /**
     * Show the form for creating a new resource.
     *
     * @return \Illuminate\Http\Response
     */
    public function create()
    {
        //
    }

    /**
     * Store a newly created resource in storage.
     *
     * @param  \Illuminate\Http\Request  $request
     * @return \Illuminate\Http\Response
     */
    public function store(Request $request)
    {
        //
    }

    /**
     * Display the specified resource.
     *
     * @param  int  $id
     * @return \Illuminate\Http\Response
     */
    public function show($id)
    {
        //
    }

    /**
     * Show the form for editing the specified resource.
     *
     * @param  int  $id
     * @return \Illuminate\Http\Response
     */
    public function edit($id)
    {
        //
    }

    /**
     * Update the specified resource in storage.
     *
     * @param  \Illuminate\Http\Request  $request
     * @param  int  $id
     * @return \Illuminate\Http\Response
     */
    public function update(Request $request, $id)
    {
        //
    }

    /**
     * Remove the specified resource from storage.
     *
     * @param  int  $id
     * @return \Illuminate\Http\Response
     */
    public function destroy($id)
    {
        //
    }
}

#5: Create the views

Inside resources >> views folder, create one folder called shares.

Inside that folder, create the following three files.

  1. create.blade.php
  2. edit.blade.php
  3. index.blade.php

But inside views folder, we also need to create a layout file. So create one file inside the views folder called layout.blade.php. Add the following code inside the layout.blade.php file.

<!DOCTYPE html>
<html lang="en">
<head>
  <meta charset="UTF-8">
  <meta name="viewport" content="width=device-width, initial-scale=1.0">
  <meta http-equiv="X-UA-Compatible" content="ie=edge">
  <title>Laravel 5.7 CRUD Example Tutorial</title>
  <link href="" rel="stylesheet" type="text/css" />
</head>
<body>
  <div class="container">
    @yield('content')
  </div>
  <script src="" type="text/js"></script>
</body>
</html>

So basically this file is our main template file, and all the other view files will extend this file. Here, we have already included the bootstrap four by adding the app.css.

Next step would be to code the create.blade.php file. So write the following code inside it.

@extends('layout')

@section('content')
<style>
  .uper {
    margin-top: 40px;
  }
</style>
<div class="card uper">
  <div class="card-header">
    Add Share
  </div>
  <div class="card-body">
    @if ($errors->any())
      <div class="alert alert-danger">
        <ul>
            @foreach ($errors->all() as $error)
              <li></li>
            @endforeach
        </ul>
      </div><br />
    @endif
      <form method="post" action="">
          <div class="form-group">
              @csrf
              <label for="name">Share Name:</label>
              <input type="text" class="form-control" name="share_name"/>
          </div>
          <div class="form-group">
              <label for="price">Share Price :</label>
              <input type="text" class="form-control" name="share_price"/>
          </div>
          <div class="form-group">
              <label for="quantity">Share Quantity:</label>
              <input type="text" class="form-control" name="share_qty"/>
          </div>
          <button type="submit" class="btn btn-primary">Add</button>
      </form>
  </div>
</div>
@endsection

Okay, now we need to open the ShareController.php file, and on the create function, we need to return a view, and that is the create.blade.php file.

// ShareController.php

public function create()
{
   return view('shares.create');
}

Save the file and start the Laravel development server using the following command.

php artisan serve

Go to the http://localhost:8000/shares/create. 

You can see something like this.

Laravel 5.7 Demo For Beginners

#6: Save the data

Now, we need to code the store function to save the data in the database. First, include the Share.php model inside ShareController.php file.

<?php

namespace App\Http\Controllers;

use Illuminate\Http\Request;
use App\Share;

class ShareController extends Controller
{
    /**
     * Display a listing of the resource.
     *
     * @return \Illuminate\Http\Response
     */
    public function index()
    {
        //
    }

    /**
     * Show the form for creating a new resource.
     *
     * @return \Illuminate\Http\Response
     */
    public function create()
    {
        return view('shares.create');
    }

    /**
     * Store a newly created resource in storage.
     *
     * @param  \Illuminate\Http\Request  $request
     * @return \Illuminate\Http\Response
     */
    public function store(Request $request)
    {
      $request->validate([
        'share_name'=>'required',
        'share_price'=> 'required|integer',
        'share_qty' => 'required|integer'
      ]);
      $share = new Share([
        'share_name' => $request->get('share_name'),
        'share_price'=> $request->get('share_price'),
        'share_qty'=> $request->get('share_qty')
      ]);
      $share->save();
      return redirect('/shares')->with('success', 'Stock has been added');
    }

    /**
     * Display the specified resource.
     *
     * @param  int  $id
     * @return \Illuminate\Http\Response
     */
    public function show($id)
    {
        //
    }

    /**
     * Show the form for editing the specified resource.
     *
     * @param  int  $id
     * @return \Illuminate\Http\Response
     */
    public function edit($id)
    {
        //
    }

    /**
     * Update the specified resource in storage.
     *
     * @param  \Illuminate\Http\Request  $request
     * @param  int  $id
     * @return \Illuminate\Http\Response
     */
    public function update(Request $request, $id)
    {
        //
    }

    /**
     * Remove the specified resource from storage.
     *
     * @param  int  $id
     * @return \Illuminate\Http\Response
     */
    public function destroy($id)
    {
        //
    }
}

If the validation fails, then it will throw an error, and we will display inside the create.blade.php file.

If all the values are good and pass the validation, then it will save the values in the database.

Laravel 5.7 CRUD

#7: Display the data.

Okay, now open the file called index.blade.php file and add the following code.

@extends('layout')

@section('content')
<style>
  .uper {
    margin-top: 40px;
  }
</style>
<div class="uper">
  @if(session()->get('success'))
    <div class="alert alert-success">
        
    </div><br />
  @endif
  <table class="table table-striped">
    <thead>
        <tr>
          <td>ID</td>
          <td>Stock Name</td>
          <td>Stock Price</td>
          <td>Stock Quantity</td>
          <td colspan="2">Action</td>
        </tr>
    </thead>
    <tbody>
        @foreach($shares as $share)
        <tr>
            <td></td>
            <td></td>
            <td></td>
            <td></td>
            <td><a href="" class="btn btn-primary">Edit</a></td>
            <td>
                <form action="" method="post">
                  @csrf
                  @method('DELETE')
                  <button class="btn btn-danger" type="submit">Delete</button>
                </form>
            </td>
        </tr>
        @endforeach
    </tbody>
  </table>
<div>
@endsection

Next thing is we need to code the index() function inside ShareController.php file.

<?php

namespace App\Http\Controllers;

use Illuminate\Http\Request;
use App\Share;

class ShareController extends Controller
{
    /**
     * Display a listing of the resource.
     *
     * @return \Illuminate\Http\Response
     */
    public function index()
    {
        $shares = Share::all();

        return view('shares.index', compact('shares'));
    }

    /**
     * Show the form for creating a new resource.
     *
     * @return \Illuminate\Http\Response
     */
    public function create()
    {
        return view('shares.create');
    }

    /**
     * Store a newly created resource in storage.
     *
     * @param  \Illuminate\Http\Request  $request
     * @return \Illuminate\Http\Response
     */
    public function store(Request $request)
    {
      $request->validate([
        'share_name'=>'required',
        'share_price'=> 'required|integer',
        'share_qty' => 'required|integer'
      ]);
      $share = new Share([
        'share_name' => $request->get('share_name'),
        'share_price'=> $request->get('share_price'),
        'share_qty'=> $request->get('share_qty')
      ]);
      $share->save();
      return redirect('/shares')->with('success', 'Stock has been added');
    }

    /**
     * Display the specified resource.
     *
     * @param  int  $id
     * @return \Illuminate\Http\Response
     */
    public function show($id)
    {
        //
    }

    /**
     * Show the form for editing the specified resource.
     *
     * @param  int  $id
     * @return \Illuminate\Http\Response
     */
    public function edit($id)
    {
        //
    }

    /**
     * Update the specified resource in storage.
     *
     * @param  \Illuminate\Http\Request  $request
     * @param  int  $id
     * @return \Illuminate\Http\Response
     */
    public function update(Request $request, $id)
    {
        //
    }

    /**
     * Remove the specified resource from storage.
     *
     * @param  int  $id
     * @return \Illuminate\Http\Response
     */
    public function destroy($id)
    {
        //
    }
}

#8: Edit and Update Data

First, we need to code the edit() function inside  ShareController.php file.

<?php

namespace App\Http\Controllers;

use Illuminate\Http\Request;
use App\Share;

class ShareController extends Controller
{
    /**
     * Display a listing of the resource.
     *
     * @return \Illuminate\Http\Response
     */
    public function index()
    {
        $shares = Share::all();

        return view('shares.index', compact('shares'));
    }

    /**
     * Show the form for creating a new resource.
     *
     * @return \Illuminate\Http\Response
     */
    public function create()
    {
        return view('shares.create');
    }

    /**
     * Store a newly created resource in storage.
     *
     * @param  \Illuminate\Http\Request  $request
     * @return \Illuminate\Http\Response
     */
    public function store(Request $request)
    {
      $request->validate([
        'share_name'=>'required',
        'share_price'=> 'required|integer',
        'share_qty' => 'required|integer'
      ]);
      $share = new Share([
        'share_name' => $request->get('share_name'),
        'share_price'=> $request->get('share_price'),
        'share_qty'=> $request->get('share_qty')
      ]);
      $share->save();
      return redirect('/shares')->with('success', 'Stock has been added');
    }

    /**
     * Display the specified resource.
     *
     * @param  int  $id
     * @return \Illuminate\Http\Response
     */
    public function show($id)
    {
        //
    }

    /**
     * Show the form for editing the specified resource.
     *
     * @param  int  $id
     * @return \Illuminate\Http\Response
     */
    public function edit($id)
    {
        $share = Share::find($id);

        return view('shares.edit', compact('share'));
    }

    /**
     * Update the specified resource in storage.
     *
     * @param  \Illuminate\Http\Request  $request
     * @param  int  $id
     * @return \Illuminate\Http\Response
     */
    public function update(Request $request, $id)
    {
        //
    }

    /**
     * Remove the specified resource from storage.
     *
     * @param  int  $id
     * @return \Illuminate\Http\Response
     */
    public function destroy($id)
    {
        //
    }
}

Now, add the following lines of code inside the edit.blade.php file.

@extends('layout')

@section('content')
<style>
  .uper {
    margin-top: 40px;
  }
</style>
<div class="card uper">
  <div class="card-header">
    Edit Share
  </div>
  <div class="card-body">
    @if ($errors->any())
      <div class="alert alert-danger">
        <ul>
            @foreach ($errors->all() as $error)
              <li></li>
            @endforeach
        </ul>
      </div><br />
    @endif
      <form method="post" action="">
        @method('PATCH')
        @csrf
        <div class="form-group">
          <label for="name">Share Name:</label>
          <input type="text" class="form-control" name="share_name" value= />
        </div>
        <div class="form-group">
          <label for="price">Share Price :</label>
          <input type="text" class="form-control" name="share_price" value= />
        </div>
        <div class="form-group">
          <label for="quantity">Share Quantity:</label>
          <input type="text" class="form-control" name="share_qty" value= />
        </div>
        <button type="submit" class="btn btn-primary">Update</button>
      </form>
  </div>
</div>
@endsection

Finally, code the update function inside ShareController.php file.

public function update(Request $request, $id)
{
      $request->validate([
        'share_name'=>'required',
        'share_price'=> 'required|integer',
        'share_qty' => 'required|integer'
      ]);

      $share = Share::find($id);
      $share->share_name = $request->get('share_name');
      $share->share_price = $request->get('share_price');
      $share->share_qty = $request->get('share_qty');
      $share->save();

      return redirect('/shares')->with('success', 'Stock has been updated');
}

So, now you can update the existing values.

#9: Delete the data

Just code the delete function inside ShareController.php file.

public function destroy($id)
{
     $share = Share::find($id);
     $share->delete();

     return redirect('/shares')->with('success', 'Stock has been deleted Successfully');
}

Finally, Laravel 5.7 CRUD Example Tutorial For Beginners From Scratch is over. I have put the code in the Github Repo. So check out as well.

Github Code

The post Laravel 5.7 CRUD Example Tutorial For Beginners From Scratch appeared first on AppDividend.

via Planet MySQL
Laravel 5.7 CRUD Example Tutorial For Beginners From Scratch

400,000 Websites Vulnerable Through Exposed .git Directories


Open .git directories are a bigger cybersecurity problem than many might imagine, at least according to a Czech security researcher who

discovered almost 400,000 web pages with an open .git directory

possibly exposing a wide variety of data. From a report:

Vladimir Smitka began his .git directory odyssey in July when he began looking at Czech websites to find how many were improperly configured and allow access to their .git folders within the file versions repository. Open .git directories are a particularly dangerous issue, he said, because they can contain a great deal of sensitive information. “Information about the website’s structure, and sometimes you can get very sensitive data such as database passwords, API keys, development IDE settings, and so on. However, this data shouldn’t be stored in the repository, but in previous scans of various security issues, I have found many developers that do not follow these best practices,” Smitka wrote. Smitka queried 230 million websites to discover the 390,000 allowing access to their .git directories. The vast majority of the websites with open directories had a .com TLD with .net, .de, .org and uk comprising most of the others.


via Slashdot
400,000 Websites Vulnerable Through Exposed .git Directories

Loading Unknown CSV Data into a Table Easily

Peter Zaitsev of Percona posted a Tweet about an interactive book Select Star SQL which ‘aims to be the best place on the internet for learning SQL’.  This interactive book uses a data set that can be downloaded or you could work the queries online.  I showed the website to a neighbor who was asking ‘what is the best way to learn SQL’.   The neighbor wanted their own copy of the data and asked how do you turn a raw CSV file into a table.

Well, that can get complicated.

CSV

CSV files use commas to designate each field in the file.  This is a great idea until someone plants a comma in the middle of a field but it is sort of a least common denominator way of passing data between systems.

But a CSV file does not directly fit into a relational table.  You could shove all the data into a JSON column but that is not what we want.   What is needed is a peek at the data in the CSV file to see what the various fields are and possible hints at the types of data therein.  So download the data and please follow along.

Traditionally it took a bit of data sleuthing to examine the CSV file to determine how the data needed to be handled to fit into the relational table even before you fired up your database client. 

If you open the file with a spreadsheet program like Libre Calc they usually will make a best effort at putting each field in its own column.  Luckily this data set has the first row which names the columns. Are here are the column headings:

Execution
Date of Birth
Date of Offence
Highest Education Level
Last Name
First Name
TDCJ Number
Age at Execution
Date Received
Execution Date
Race
County
Eye Color
Weight
Height
Native County
Native State
Last Statement

Looking at the first few rows under the headings we can get a good glimpse at the data types for the columns.  What we want to do on the first pass is to see if values are strings (CHAR), Integers, Realm and the like.  It also helps to look for some field that can be used for a primary key, hopefully a column with unique values.

Execution  INT Primary key??  Unique??
Date of Birth DATE
Date of Offence DATE
Highest Education Level INT
Last Name CHAR
First Name CHAR
TDCJ Number INT
Age at Execution INT
Date Received   DATE
Execution Date DATE
Race CHAR
County CHAR
Eye Color CHAR
Weight INT
Height CHAR
Native County  CHAR
Native State CHAR
Last Statement  LONG TEXT

Second Pass

In this case it looks like we could use Execution as the primary key.  Now we need to go through the data to see what fields need special handling.  Are the possible INT fields all positive values (unsigned), could we use ENUMs anywhere (Maybe Native Country or Native State or Eye Color). 

Also, for metric fans, the Height column uses imperial measurements which may not fit a company policy of metric only (or cubits). Plus Height has two components — Feet and Inches — that we may need to break down later or we may want to record all this data in inches. We will not cover that in this blog post (but we could cover if I get enough folks asking for how to do this).

Also we need to examine each of the CHAR fields to check their maximum lengths.  This can be dangerous for future addendum where suddenly the maximum length set by our first pass at the data is swamped by some much longer fields.  If the only Last Names we see are Smith and Jones, setting the maximum length of the CHAR field works until we run into someone named Buchanan or Schwarzenegger.    But in this case we have a closed system (NO updates to the data) we will not worry about this, at least for his data

So making a best guess, lets assign lengths to the CHAR fields.

Execution  INT Primary key??  Unique??
Date of Birth DATE
Date of Offence DATE
Highest Education Level INT  unsigned
Last Name CHAR  25
First Name CHAR  25
TDCJ Number INT
Age at Execution INT
Date Received   DATE
Execution Date DATE
Race CHAR  10
County CHAR 20
Eye Color CHAR 10
Weight INT
Height CHAR 10
Native County  CHAR 25
Native State CHAR 25
Last Statement  LONG TEXT

Please note that I will be using VARCHAR instead of CHAR in the above and use CHAR just for clarity.

Create Our Table

We could of course create a table like that below and then load the data file.

MySQL Workbench makes quick work of creating the schema.  But Workbench will also has a wizard to open the CSV, let us name the columns, and import the data.

The Easy Way To Go From CSV to Relational Table

MySQL Workbench’s import wizard is reached by clicking on a table icon and selecting Table Data Import Wizard.

Tell the import wizard where the CSV is located
Start the table import wizard

The CSV is split up by fields and we could edit field types 
And the data is loaded

Now I have a big warning in that column names are copied from the CSV table first row.  We could have changed Date of Birth to something like Birth_date but chose not to. This means we have to make queries like SELECT `Date of Birth` FROM tx_deathrow.

But now we have a local copy of the data to use when working through the interactive book.

via Planet MySQL
Loading Unknown CSV Data into a Table Easily