Laravel Livewire CRUD tutorial
https://ift.tt/3d6a4Cb
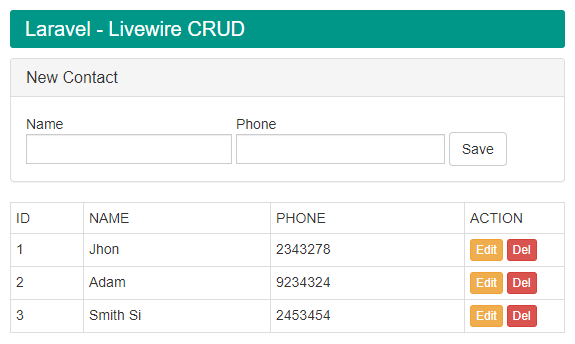
Laravel Livewire is a frontend framework package for Laravel Framework. With the help of Laravel Livewire, you can run php code like JavaScript! It’s really an interesting and magical frontend framework package for Laravel. If you are looking for a step by step CRUD (Create, Read, Update, Delete) tutorial on Laravel livewire then this is the post where I’ll show you a complete step by step Laravel Livewire CRUD operation. If you are very new to Laravel Livewire, I’ll recommend you to read about Larave Livewire post. At the end of this tutorial, we’ll archive this kind of functionality where we can insert, edit, delete record from a single view (SPA) with the help of Larave Livewire without any page refresh.

Table of Contents
- Define a route
- Make a view for CRUD operation
- Make a model
- Install Laravel Livewire
- Setup the layout file
- Create a Laravel Livewire component php class
- Create Laravel Livewire component views
- Conclusion
Define a route
Define a route into route file for returning a view for our CRUD operation. Here we’ll define just one simple route for our entire CRUD operation and rest of things will handle the Laravel Livewire itself! It’s magic and amazing things! no routes for API and blah blah.
Route::view('contacts','admin.contacts');
Make a view for CRUD operation
Make view for CRUD operation inside views directory with the name contacts.blade.php . This view just for a wrapper for our Livewire CRUD component.
@extends('layouts.app')
@section('content')
<div class="container">
<div class="row">
<div class="col-md-6">
@livewire('contact-component')
</div>
</div>
</div>
@endsectionHere you can see, this view contains nothing fancy. Here we just placed a livewire component which we’ll create later.
Make a model
Make a contact model for database operation of our CRUD app. Our table name is contacts with fields id, name, phone. Here timestamp is false because we are not included created_at and update_at fields in our table which are required by default for a Laravel model.
<?php namespace App;
use Illuminate\Database\Eloquent\Model;
class Contact extends Model
{
public $timestamps = false;
protected $table = 'contacts';
protected $fillable = ['name','phone'];
}
Install Laravel Livewire
Install the Laravel Livewire package via composer command.
composer require livewire/livewire
Setup the layout file
Open the template layout file app.blade.php and put the Laravel Livewire style and script directive. add @livewireStyles before </head> and add @livewireScripts before </body> .
Create a Laravel Livewire component php class
We can make the Livewire component with the help of artisan command that provides the package but here we will create from scratch so that we can set up things that we are used to. To do that, create a Livewire directory inside app/Http directory and create a php class name with ContactComponent.php and put the code into it.
<?php
namespace App\Http\Livewire;
use Livewire\Component;
use App\Contact;
class ContactComponent extends Component
{
public $data, $name, $phone, $selected_id;
public $updateMode = false;
public function render()
{
$this->data = Contact::all();
return view('livewire.contacts.component');
}
private function resetInput()
{
$this->name = null;
$this->phone = null;
}
public function store()
{
$this->validate([
'name' => 'required|min:5',
'phone' => 'required'
]);
Contact::create([
'name' => $this->name,
'phone' => $this->phone
]);
$this->resetInput();
}
public function edit($id)
{
$record = Contact::findOrFail($id);
$this->selected_id = $id;
$this->name = $record->name;
$this->phone = $record->phone;
$this->updateMode = true;
}
public function update()
{
$this->validate([
'selected_id' => 'required|numeric',
'name' => 'required|min:5',
'phone' => 'required'
]);
if ($this->selected_id) {
$record = Contact::find($this->selected_id);
$record->update([
'name' => $this->name,
'phone' => $this->phone
]);
$this->resetInput();
$this->updateMode = false;
}
}
public function destroy($id)
{
if ($id) {
$record = Contact::where('id', $id);
$record->delete();
}
}
}Look at the codes inside contact component class. Here we have done all the things that we have to do for CRUD operation. We have declared the public properties ( $data, $name, $phone, $selected_id, $updateMode ) which will be rendered into our component views. This component class do as like as a typical Laravel controller.
Create Laravel Livewire component views
Now create livewire/contacts directories inside views directory and make a file name with component.blade.php inside that.
views
livewire
contacts
component.blade.php
create.blade.php
update.blade.phpCreate component.blade.php view.
<div>
<div class="title">Laravel - Livewire CRUD</div>
@if (count($errors) > 0)
<div class="alert alert-danger">
<a href="#" class="close" data-dismiss="alert">×</a>
<strong>Sorry!</strong> invalid input.<br><br>
<ul style="list-style-type:none;">
@foreach ($errors->all() as $error)
<li></li>
@endforeach
</ul>
</div>
@endif
@if($updateMode)
@include('livewire.contacts.update')
@else
@include('livewire.contacts.create')
@endif
<table class="table table-bordered table-condensed">
<tr>
<td>ID</td>
<td>NAME</td>
<td>PHONE</td>
<td>ACTION</td>
</tr>
@foreach($data as $row)
<tr>
<td></td>
<td></td>
<td></td>
<td width="100">
<button wire:click="edit()" class="btn btn-xs btn-warning">Edit</button>
<button wire:click="destroy()" class="btn btn-xs btn-danger">Del</button>
</td>
</tr>
@endforeach
</table>
</div> Create create.blade.php view.
<div class="panel panel-default">
<div class="panel-heading">
<h3 class="panel-title">New Contact</h3>
</div>
<div class="panel-body">
<div class="form-inline">
<div class="input-group">
Name
<input wire:model="name" type="text" class="form-control input-sm">
</div>
<div class="input-group">
Phone
<input wire:model="phone" type="text" class="form-control input-sm">
</div>
<div class="input-group">
<br>
<button wire:click="store()" class="btn btn-default">Save</button>
</div>
</div>
</div>
</div>Create update.blade.php view.
<div class="panel panel-default">
<div class="panel-heading">
<h3 class="panel-title">Update Contact</h3>
</div>
<div class="panel-body">
<div class="form-inline">
<input type="hidden" wire:model="selected_id">
<div class="input-group">
Name
<input wire:model="name" type="text" class="form-control input-sm">
</div>
<div class="input-group">
Phone
<input wire:model="phone" type="text" class="form-control input-sm">
</div>
<div class="input-group">
<br>
<button wire:click="update()" class="btn btn-default">Update</button>
</div>
</div>
</div>
</div>our Laravel Livewire CRUD app is ready to use. Browse the example.com/contacts and test the CRUD operation by insert, editing and deleting the table records.
Conclusion
Laravel Livewire is really a magical frontend framework for Laravel. If you did all the steps correctly, I assure you that you will be impressed about Laravel livewire. Hope this step by step Laravel Livewire tutorial post will help you to make a simple CRUD application from scratch with Laravel Livewire. If it’s helpful to you then please share this post with others.
programming
via Laravel News Links https://ift.tt/2dvygAJ
February 27, 2020 at 09:44AM