Exploring Aurora Serverless V2 for MySQL

https://mydbops.files.wordpress.com/2022/05/null.png

Aurora Serverless V2 is generally available around the corner recently 21-04-22 for MySQL 8 and PostgreSQL, with promising features that overcome the V1 disadvantages. Below are those major features

Features

  • Online auto instance upsize (vertical scaling)
  • Read scaling (Supports up to 15 Read-replica)
  • Supports mixed-configuration cluster ie, the master can be normal Aurora(provisioned) and readers can be in serverlessv2 and vice versa
  • MultiAZ capability (HA)
  • Aurora global databases (DR)
  • Scaling based on memory pressure
  • Vertically Scales while SQL is running
  • Public IP allowed
  • Works with custom port
  • Compatible with Aurora version 3.02.0 ie., >= MySQL 8.0.23 (only supported)
  • Supports binlog
  • Support for RDS proxy.
  • High-cost saving

Now let’s proceed to get our hands dirty by launching the serverless-v2 for MYSQL

Launching Serverless V2

It’s time to choose the Engine & Version for launching our serverless v2

Engine type : Amazon Aurora

Edition : Amazon Aurora MySQL – Compatible edition ( Only MySQL used)

Filters : Turn ON Show versions that support ServerlessV2 ( saves time )

Version : Aurora MySQL 3.02.0 ( compatible with MySQL 8.0.23 )

Instance configuration & Availability

DB instance class : Serverless ‘Serverless v2 – new’

Capacity Range : Set based on your requirements and costing ( 1 to 64 ACUs )

Aurora capacity units(ACU) : 2GB RAM+ CPU + N/W

Availability & Durability : Create an Aurora replica

While choosing the capacity range, Minimum ACU will define the lowest capacity to which it scales down ie., 1ACU and Maximum ACU will define the maximum capacity to which it can scale up

Connectivity and Misc setting:

Choose the below settings based on your application needs

  • VPC
  • Subnet
  • Public access, (Avoid in favor of basic security)
  • VPC security group
  • Additional configuration ( Cluster group, parameter group, custom DB port, performance insight, backup config, Auto minor version upgrade, deletion protection )

To keep it short I have accepted all the defaults to proceed on to “Create database

Once you click the “create database” you can see the cluster getting created, Initially both the nodes in the cluster will be marked as “Reader instance” – don’t panic it’s quite normal.

Once the first instance becomes available, it would be promoted to “Writer” now the cluster is ready to accept the connection, post which the reader gets created in adjacent AZ, refer to the image below

Connectivity & End-point:

ServerlessV2 cluster also provides 3 end-points ie., Highly available cluster, read-only end-points and individual instance end-point

  • Cluster endpoint – This endpoint connects your application to the current primary DB instance for that Serverless v2 cluster. Your application can perform both read & write operations.
  • Readers endpoint – Serverless v2 cluster has a single built-in reader endpoint which is used only for read-only connections. This also balances connections up to 15 read-replica instances.
  • Instance endpoints – Each DB instance in a serverless v2 cluster has its own unique instance endpoint

You should always be mapping cluster and RO endpoints with applications for high availability

Monitoring:

Though Cloudwatch covers needed metrics, to get a deep & granular insight into DB behavior using PMM, I used this link for quick installation, In short for serverless I wanted to view the below

  • DB uptime, to see if DB reboots during scale-up or scale-down
  • Connection failures
  • Memory resize ( InnoDB Buffer Pool )

Here I took a T2.large machine to install & configure PMM.

Now let’s take Serverlessv2 for a spin:

The beauty of Aurora Serverless V2 is that it supports both Vertical scaling ie., auto Instance upsize as well as Horizontal scaling with read-replicas.

In the remaining portion of this blog will cover the vertical scaling feature of Serverless V2.

Vertical scaling:

With most of the clusters out there the most difficult part is upsizing the writer instance on the fly without interrupting the existing connection. Even after using proxies/DNS for failover, there would be connection failures.

I was more curious about the testing of the vertical scaling feature, since AWS claimed it to be online and without disrupting the existing connected connections, ie., while the query is running. Wow !! fingers crossed.

Come on let’s begin the test, So I decided the remove the “reader instance” first, below is the view of our cluster now.

My initial buffer pool allocation was 672MB since our Minimum (1ACU) we have 2GB out of which ¾ is allocated as InnoDB-buffer-pool

Test Case:

The test case is quite simple, am imposing an Insert only workload(Writes) using the simple load emulator tool Sysbench

Below is the command used

# sysbench /usr/share/sysbench/oltp_insert.lua --threads=8 --report-interval=1 --rate=20 --mysql-host=mydbops-serverlessv2.cluster-cw4ye4iwvr7l.ap-south-1.rds.amazonaws.com --mysql-user=mydbops --mysql-password=XxxxXxXXX --mysql-port=3306 --tables=8 --table-size=10000000 prepare

I started to load 8 tables in parallel with 8 threads and a dataset of 1M record per table

Observations and Timeline:

Scale-up:

Below are my observations during the scale-up process

  • Insert started at 03:57:40 exactly COM_INSERTS reaching 12.80/sec, Serverless was running with 672MB buffer_pool, exactly after 10 secs at 3:57:40 first Scaling process kicks in and buffer_pool memory was raised to 2GB, let’s have a closer look
  • After a Minute at 03:58:40, the second scaling process kicks in and buffer_pool size leaped to ~9G
  • I was keenly watching the uptime of MySQL for each scale-up process and also watching the thread failures, but to my surprise both were intact and memory(buffer pool) was scaling linearly at regular intervals of 60 secs and reached a max of 60GB at 04:11:40
  • The data loading got completed at 04:10:50 ( Graphical stats )

Scale Down:

  • Post the completion of Inserts in DB there was a brief period of 5min, since in production scale down has to be done in a slow and steady fashion. DB was completely idle now and connections were closed, at 04:16:40 buffer pool memory dropped from 60G to 48GB
  • Scale down process kicked in at regular intervals of 3 mins from the previous scale down operation and finally at 04:34:40 the serverless was back

Adaptive Scale-up & Down

I would say this entire scale up and scale down the process is very adaptive, intelligent, and well-organized one

  • No lag in DB performance.
  • Linear increase & decrease of resource is maintained
  • No DB reboot and Connection fails were kept at bay

Below is the complete snapshot of the buffer_pool memory scale_up & scale down process along with the INSERT throughput stats, both the process took around ~40mins

Along with the buffer_pool serverless also auto-tunes the below variables specific to MySQL

innodb_buffer_pool_size

innodb_purge_threads

table_definition_cache

table_open_cache

AWS recommends keeping this value to default in the custom Parameter group of serverlessV2

Below is the image summary of the entire scale-up and scale-down process.

AWS has nailed vertical scaling with aurora serverless, from my point of view its production though it’s in the early GA phase.

Summary:

  • The Upsize happens gradually on demand every 1 min.
  • The downsize happens gradually on the ideal load every 3 min.
  • Supports from MySQL 8.0.23
  • Untouch above said MySQL Variables on

Use Cases:

Below are some of the use cases where Aurora serverless V2 fits in perfectly

  • Applications such as gaming,retail applications, and online gambling apps wherein usage is high for a known period(say daytime or during the match ) and idle or less utilized for the other period
  • Suited for testing and developing environments
  • Multi-tenant applications where the load is unpredictable
  • Batch job processing

This is just a starting point, there are still a lot of conversations pending on the Aurora ServerlessV2 such as horizontal scaling(read scaling), Migration, parameters, DR, MutiAZ failover, and Pricing. Stay tuned here !!

Love to test this Serverless V2 on your production environment, Mydbops database engineers are happy to assist.

Planet MySQL

The Ultimate Guide to Getting Started With Laravel

https://hashnode.com/utility/r?url=https%3A%2F%2Fcdn.hashnode.com%2Fres%2Fhashnode%2Fimage%2Fupload%2Fv1652509426115%2FtxKuaNzBf.jpg%3Fw%3D1200%26h%3D630%26fit%3Dcrop%26crop%3Dentropy%26auto%3Dcompress%2Cformat%26format%3Dwebp%26fm%3Dpng

Disclaimer: This article is long. I recommend you to code along as we progress. If you are not in front of a development computer, bookmark this URL and come back later.

Is this tutorial for you?

☑️ If you know PHP and wish to start using Laravel, this is for you.

☑️ If you know any PHP framework and wish to try Laravel, this is for you.

🙅 If you already know Laravel (well), this tutorial may not help that much.

Why this tutorial?

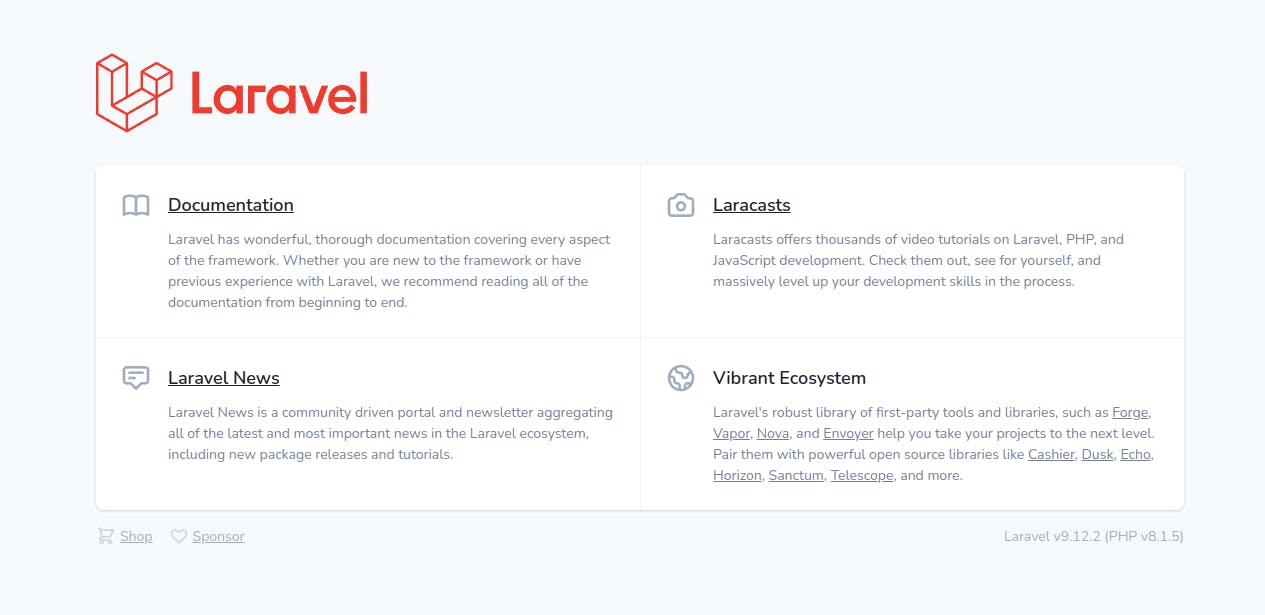
The official Laravel documentation is one of the best technical documentation. But, it is not designed to get beginners started with the framework step-by-step. It doesn’t follow the natural way of learning a new thing.

In this tutorial, we will first discuss what needs to be done next, and then see what Laravel offers to achieve that. In some cases, we’ll discuss why something exists.

Important to note that for getting to the depth of a topic/feature, the Laravel documentation is the only resource you’ll need.

Assumptions

  • You know about Object-oriented programming (OOP)
  • You have an idea about the Model-View-Controller pattern (MVC)
  • You are okay with me not offering a designed demo project with this tutorial.

What is the goal?

We’ll start from scratch and code a simple Laravel web app together to learn the building blocks of Laravel and boost your confidence.

As you may have read:

The only way to learn a new programming language is by writing programs in it.

— Dennis Ritchie (creator of the C programming language)

Same way, you will learn a new framework by doing a small test project today.

Keep in mind that we do not plan to use all the features of Laravel in a single project. We will cover all the important features though.

On your mark, Get set, Go!

You should be ready to get in the active mode from this point onwards. No more passive reading. I want you to code along, break things, witness magic, and call yourself a Laravel developer by the end of this journey.

Come on a ride with me. It’ll be fun, I promise!

On your mark, Get set, Go

Computer requirements

The things that you need to make a Laravel web app run:

  • Nginx (Or a similar webserver to handle HTTP requests)
  • PHP (We’ll use PHP 8.1)
  • MySQL (Laravel supports MariaDB, PostgreSQL, SQLite, and SQL Server too)
  • A bunch of PHP extensions
  • Composer

Depending on your OS, there are a few options available:

Mac

I recommend Valet. It is lightweight and the go-to choice of many devs.

Laravel Sail is a great choice too for Docker fans.

Linux

Laravel Sail is easier for new Linux users.

If you are comfortable with Linux, like me, go with the direct installations.

Windows

I recommend Laragon. It is not from the official Laravel team but works well.

Other good choices are Laravel Sail if you are comfortable with Docker. or Homestead if you have a powerful computer that can run a virtual environment.

A note on Composer

If you haven’t come across Composer before, it’s the dependency manager for PHP. Our project depends on the Laravel framework. And the framework has a lot of other dependencies.

Using the Composer allows us to easily install and update all these direct dependencies and nested dependencies. That results in code reusability which is the reason frameworks can offer such a huge number of features.

Setup the project

Once your computer is prepared to run a Laravel web app, fire your first command to create the project.

composer create-project laravel/laravel my-blog

This command does three things:

  1. Creates a new directory named my-blog
  2. Clones the Laravel skeleton application code into it
  3. Runs the composer install command to install the dependencies

As you may have guessed from the project name, we are developing a simple blog as our sample Laravel web app today.

A core PHP (non-framework) project starts from an empty directory, but a Laravel project starts with the skeleton app to get you up and running.

View in the browser

Many developers use Laravel’s local development server to view the web app during development. For that open terminal, cd into the project directory, and fire:

php artisan serve

You will be presented with a URL. Open that and you’ll see Laravel’s default page.

Laravel default page

Yay. It’s running. Great start.

I recommend using nginx to manage your local sites. You need to use it for production anyway.

Relax

There are many files and directories in the default Laravel web app structure. Please do not get overwhelmed. They are there for a reason and you do not need to know all of them to get started. We will cover them soon.

Create a database

You may use your favorite GUI tool or log in to the database server via console and create a database. We will need the DB name and user credentials soon.

While a Laravel web app can run even without a DB, why would you use Laravel then?
It’s like going to McDonald’s and ordering only a Coke. Okay, some people do it. 😵‍💫

Understanding the project configuration

The configuration values of a Laravel project can be managed from various files inside the config directory. Things like database credentials, logging setup, email sending credentials, third-party API credentials, etc.

The config values of your local environment will be different from the ones on the production server. And if multiple team members are working on the project, they may also need to set different config values on their local computers. But, the files are common for all.

Hmmm… How could that be managed then?

Laravel uses PHP dotenv to let you configure project config values specific to your environment. The .env file is used for the same. It is not committed to the version control system (git) and everyone has their local copy of it.

The Laravel skeleton app creates the .env file automatically when you run the composer create-project command. But when you clone an existing project, you need to duplicate it from the .env.example file yourself.

Working with the .env file

While there are many config values you can set in the .env file, we will discuss a few important ones only:

  • APP_NAME: A sane default. You may wish to change to ‘My Awesome Blog’
  • APP_ENV: Nothing to change. Set this to ‘production’ on the live site.
  • APP_KEY: Used for encryption. Automatically set by the composer create-project command. If you clone an existing project, run the php artisan key:generate command to set it.
  • DB_*: Set respective config values here.

Setting these should get you started. You may update others in the future.

The public directory

Laravel instructs that the public directory must be the entry point for all the HTTP requests to your project. That is for security reasons. Your .env file must not be accessible from the outside.

Please do not try any hack around setting the project root to the public directory. If your host doesn’t allow it, change your host.

You are doing great


You already know a bunch of fundamental Laravel concepts now. Doing well!


Your first database table

Let us start with the articles table. The schema can be:

id integer
title varchar
content text
is_published boolean (default: false)
created_at datetime
updated_at datetime

Challenges

In a non-framework project, we create and manage the tables manually. A few of the issues that we face are:

  • It is hard to track exactly when a column was added/updated in a table.
  • You must make necessary DB schema changes to the production site manually during deployments.
  • If multiple team members are working on the project, each one has to manually perform schema updates to their local database to keep the project working.

With Laravel and other backend frameworks, Migrations solve these issues. Did you ask how? Read on.

Database migrations

Migrations are nothing but PHP files that define the schema using pre-defined syntax. The Laravel framework provides a command to ‘migrate’ the database i.e. apply the latest schema changes.

Let us not stress over the theory much. It will make sense once you practically make one. Please open the terminal (you should be inside the project directory) and fire the following command.

php artisan make:migration create_articles_table

The framework should have created a brand new file inside the database/migrations directory with some default content. The name of the file would be in the format of DATE_TIME_create_articles_table.php.

Please open the file in your favorite text editor/IDE (mine is VS Code). And make changes in the up() method to make it look like the following:

Schema::create('articles', function (Blueprint $table) {
    $table->id();
    $table->string('title');
    $table->text('content');
    $table->boolean('is_published')->default(false);
    $table->timestamps();
});

The code should speak for itself. That is the beauty of Laravel.

Table generation in a snap

Ready to witness magic?

Run the following command to migrate the database:

php artisan migrate

The articles table will appear in your database now. Yeah, you saw it right. And the same command can be run on production and by the team members to create the table. They do not need to ask you for the table name or column details. We have all been there.

Tables can be created, updated, and removed with artisan commands in Laravel. You’ll never need to manually manage the tables in your database.

Fun fact: You can run the php artisan migrate command any number of times without affecting your DB.

Note: You’d find that many other tables were also generated. That is because Laravel comes with a few migration files out of the box. We won’t get into the details but you can update/remove them as needed in your actual projects.

Eloquent ORM

I am excited to share one of the most loved Laravel weapons with you: Eloquent

Eloquent power

If you’re new to the term ‘ORM’, it’s a technique where each database table is represented as a PHP class, and each table record is represented as an object of that class.

If you haven’t experienced the power of objects before, fasten your seatbelt. It’ll be an incredible ride with Eloquent.

Please fire the following command now:

php artisan make:model Article

A new file called Article.php should have been created inside the app/Models directory. It’s a blank class with one trait which we can skip for the time being.

Tip: You can create the model and migration files by firing a single command: php artisan make:model Article --migration

All the database interaction is generally done using Eloquent models in Laravel web apps. There is no need to play directly with the database tables in most cases.

Convention over configuration

Laravel, like many other frameworks, follows some conventions. You may not find the complete list of conventions but following the code examples as per the official documentation goes a long way.

Our model name is Article. And Eloquent will assume the table name to be the plural (and snake cased) version of it i.e. articles. We can still specify the table name if the convention can’t be followed in some exceptional cases.

Similar conventions are followed for the primary key (id) and the timestamps (created_at and updated_at) as most of the tables need them. You need to specify them inside the Eloquent model only if they are different from the default values. Again, no need to write that boilerplate code in most cases. 🤗


All clear till now? Good.. Next plan is to add articles and then list them.


Routes

The endpoints (or URLs) in a core PHP project are decided by files. If the user opens ‘domain.com/about.php’ in the browser, the about.php file gets executed.

But for Laravel web apps, the HTTP server (nginx/apache) is instructed to serve all requests to public/index.php. That file boots the framework and looks at the routes to check whether there is a respective endpoint defined for the requested URL.

There are numerous benefits to this route pattern compared to the traditional way. One of the main benefits is control. Just like they keep only one main entrance gate for buildings for better security, the route pattern allows us to control the HTTP traffic at any moment in time.

Your first route

We have the articles table but no articles yet. Let’s add some. Please open the routes/web.php file in the text editor and add:


use App\Http\Controllers\ArticleController;


Route::get('/articles/create', [ArticleController::class, 'create']);

You just defined a new route where the endpoint is /articles/create. When the user opens that URL in the browser, the create() method of the ArticleController will be used to handle the request.

I have already assumed that you know a bit about the MVC architecture so let’s jump straight into the code.

The controllers

You can either create a controller class in the app/Http/Controllers directory manually or use this command:

php artisan make:controller ArticleController

The controller code is a one-liner for this endpoint. All we need to do is display the add article page to the user.

<?php

namespace App\Http\Controllers;

class ArticleController extends Controller
{
    public function create()
    {
        return view('articles.create');
    }
}

Simple enough, we let the view file deliver the page.

The add article page view

The view files of Laravel are powered by the Blade templating engine. The extension of the view files is .blade.php and you can write HTML, PHP, and blade-syntax code to them.

Getting into the details of Blade is out of the scope of this article. For now, we will write simple HTML to keep things moving. As mentioned, we will also stay away from the designing part.

Please create a new file named created.blade.php in the resources/views/articles directory and add the following code:

<!DOCTYPE html>
<html lang="en">
<head>
    <meta charset="UTF-8">
    <meta http-equiv="X-UA-Compatible" content="IE=edge">
    <meta name="viewport" content="width=device-width, initial-scale=1.0">
    <title>Add Article</title>
</head>
<body>
    <form action="/articles" method="POST">
        @csrf

        <input type="text" name="title" placeholder="Title">
        <textarea name="content" placeholder="Content"></textarea>
        <input type="checkbox" name="is_published" value="1"> Publish?
        <input type="submit" value="Add">
    </form>
</body>
</html>

If the CSRF thing is new for you, the CSRF protection page inside the Laravel documentation does a great job explaining it.

The respective POST route

Route::post('/articles', [ArticleController::class, 'store']);

This route will handle the HTML form submission.

We are following the resource controller convention here. It is not compulsory but most people do follow it.


Congrats! You’re more than halfway there and believe me, it’s easier from here.


Request input validation

You’ll fall in love with the Validation features of Laravel. It is so easy to validate input data that you would want to do it.

Let’s see how:

use Illuminate\Http\Request;


public function store(Request $request)
{
    $validated = $request->validate([
        'title' => ['required', 'string', 'max:255', 'unique:articles'],
        'content' => ['required', 'string'],
        'is_published' => ['sometimes', 'boolean'],
    ]);
}

We are adding the store() method to the controller and validating the following rules with just four lines of code:

  • The ‘title’ and ‘content’ input fields must be provided, must be string, and cannot be empty.
  • A maximum of 255 characters can be passed for the ‘title’ input.
  • The ‘title’ cannot be the same as the title of any other existing articles (Yes, it fires a DB query).
  • The ‘is_published’ input may be passed (only if checked) and the value has to be a boolean when passed.

It still blows my mind 🤯 how can it be so easy to validate the inputs of a request.

Laravel offers an optional Form Request feature to move the validation (and authorization) code out of the controller to a separate class.

Display validation errors

The surprise is not over yet. If the validation fails, Laravel redirects the user back to the previous page and sets the validation errors in the session automatically. You can loop through them and display them on the page as per your design.

Generally, the code to display the validation errors is put in the layout files for reusability. But for now, you can put it in the create.blade.php file.

<body>
    @if ($errors->any())
        <ul>
            @foreach ($errors->all() as $error)
                <li></li>
            @endforeach
        </ul>
    @endif

    // ...

This piece of code uses Blade directives @if and @foreach to display the validation errors in a list.

If you were to do the same code without Blade directives, it would look like:

<body>
    <?php if ($errors->any()) { ?>
        <ul>
            <?php foreach ($errors->all() as $error) { ?>
                <li><?php echo $error; ?></li>
            <?php } ?>
        </ul>
    <?php } ?>

    // ...

Feel the difference? You get it!

Save article details to the database

Open the controller again and append the following code to the store() method.

use App\Models\Article;


public function store(Request $request)
{
    

    Article::create($validated);
}

That’s it! Did you expect the article saving code to be 10 lines long? 😃

This single line will add the new article with the submitted form details in the table. impressive! I know how you feel.

I invite you to go ahead and submit that form now.

Do not worry if you face an error like the following. Ours is a developer’s life.

Mass Assignment Error

Mass assignment

The create() method of the Eloquent model accepts an array where keys are the column names and values are, well, the values.

In our example, we are passing the array of validated inputs to the create() method. But many developers use all of the inputs from the POST request which results in a security vulnerability ⚠️. Users can submit the form with some extra columns which are not supposed to be controlled by them (like id, timestamps, etc.)

Laravel Eloquent enables mass assignment protection out-of-the-box to prevent that. It cares for you.

And you need to specifically inform Eloquent about how you wanna deal with mass assignments. Please open the model file and append the following line:

protected $fillable = ['title', 'content', 'is_published'];

Cross your fingers again, open the browser, and submit that form. With luck, the article should successfully be stored in the database table now. Bingo!

Redirect and notification

You would want to give feedback to the user with a notification after the successful creation of a new article.

Laravel makes it a cinch. Open the store() method of the controller again:


return back()->with('message', 'Article added successfully.');

This is what makes developers fall in love with Laravel. It feels like you’re reading plain English.

The user gets redirected back and a flash session variable is set. A flash session variable is available for one request only and that is what we want.

Again, the handling of notifications is generally done in the layout files using some Javascript plugins. For now, you may put the following code in the create.blade.php for the demo.

<body>
    @if (session('message'))
        <div>
            
        </div>
    @endif

    // ...

Add one more article using the form and you would be greeted with a success message this time.

List of articles

I assume you would have added some articles while testing the add article functionality. Let’s list them on the page now. First, please add a new route:

Route::get('/articles', [ArticleController::class, 'index']);

You read it right. We are using the same URL but the HTTP method is different. When the user opens the ‘/articles’ page in the browser (a GET request), the controller’s index() method will be called. But the store() method is used when the form is submitted to add a new article (a POST request).

The controller code

Here’s how you fetch records from the database and pass them to the view file.

public function index()
{
    $articles = Article::all();

    return view('articles.index', compact('articles'));
}

I am sure you are not surprised this time. You already know the power of Laravel Eloquent now.

The $articles variable is an instance of Collection (not an array) and we will briefly cover that soon.

Simple table to display articles

Please create another file named index.blade.php in the resources/views/articles directory. I will cover just the body tag:

<body>
    <table border="1">
        <thead>
            <tr>
                <th>Title</th>
                <th>Content</th>
                <th>Published</th>
            </tr>
        </thead>
        <tbody>
            @foreach ($articles as $article)
                <tr>
                    <td></td>
                    <td></td>
                    <td></td>
                </tr>
            @endforeach
        </tbody>
    </table>
</body>

The code is straight forward and you may now view the articles you have added on the /articles page now.

The limit string helper is provided by Laravel.

Tip: It is better to display paginated records (articles) when there are hundreds of them. Laravel has got your back for that too.


Pat your back. You did a great job. You can call yourself a Laravel developer now.


Limiting the scope of this article

Okay, everything comes to an end. So is this tutorial.

Implementing the authentication feature to this project is one of the things I wished to include in this article but it is already too long.

And before discussing authentication, we have to learn about password hashing, middleware, and sessions in Laravel.

Another topic I wanted to touch on is Eloquent relationships. This feature is so powerful you’d never want to go back to the old days.

Goes without saying that tests are a must for your production-level projects. And Laravel supports you with testing too.

In short, we have barely scratched the surface here. Drop a comment if you want me to write on the subject more. We can continue this example project and make a series of articles.

Meanwhile, let me share some other Laravel goodies you may wanna explore.

Extras

Collections: Arrays with superpowers. Offers various methods to transform your arrays into almost any format.

Mails: I have never sent an email to a real person from the development site thanks to Laravel. Which I had done multiple times before it.

Queues: Delegating tasks to the background processes gives a huge performance boost. Laravel Horizon + Redis combo provides scalability with simplicity.

Logging: Enabled by default. All the app errors are logged inside the storage/logs directory. Helps with debugging a lot.

File Storage: Managing user-uploaded files doesn’t have to be complex. This feature is built on top of the stable and mature Flysystem PHP package.

Factories and Seeders: Quick generation of dummy data of your tables for demo and tests.

Artisan commands: You’ve already used some. There are many more in the basket. And you can create custom ones too. Quite helpful when combined with the scheduler.

Task scheduling: I bet you’d agree that setting up cronjobs the right way is hard. Not in Laravel. You’ve to see it to believe it.

And many more…

What next?

There are a thousand and seventy more things we can do for this project. If you are interested, here are a few options:

  • Add register/login functionality
  • Let the user enter markdown for content for better formatting
  • Generate slug for the articles automatically
  • Allow users to edit/delete articles
  • Let users attach multiple tags to the articles

Bye bye

Okay, stop.

You have created a small project in Laravel and learned the basics. Time to celebrate. 🥳

I hope you enjoyed the journey as much as I did. Feel free to ask any questions below.

And If you know someone who might be interested in learning Laravel, share this article with them right away.

Bye.

PS – I would be very happy if you could push your code to a repository and share the link with me.

Laravel News Links

Following Supreme Court Precedent, Federal Court Says Unexpected Collection Of Data Doesn’t Violate The CFAA

https://i0.wp.com/www.techdirt.com/wp-content/uploads/2022/05/Screenshot-2022-05-14-1.22.33-PM.png?w=229&ssl=1

Last summer, the Supreme Court finally applied some common sense to the Computer Fraud and Abuse Act (CFAA). The government has long read this law to apply to pretty much any computer access it (or federal court litigants) doesn’t like, jeopardizing the livelihood of security researchers, app developers, and anyone who might access a system in ways the owner did not expect.

Allowing the government’s interpretation of the CFAA to move forward wasn’t an option, as the Supreme Court explained:

If the “exceeds authorized access” clause criminalizes every violation of a computer-use policy, then millions of otherwise law-abiding citizens are criminals. Take the workplace. Employers commonly state that computers and electronic devices can be used only for business purposes. So on the Government’s reading of the statute, an employee who sends a personal e-mail or reads the news using her work computer has violated the CFAA.

Or consider the Internet. Many websites, services, and databases “which provide ‘information’ from ‘protected computer[s],’ §1030(a)(2)(C)’” authorize a user’s access only upon his agreement to follow specified terms of service. If the “exceeds authorized access” clause encompasses violations of circumstance-based access restrictions on employers’ computers, it is difficult to see why it would not also encompass violations of such restrictions on website providers’ computers. And indeed, numerous amici explain why the Government’s reading of subsection (a)(2) would do just that: criminalize everything from embellishing an online-dating profile to using a pseudonym on Facebook

A decision [PDF] handed down by a New York federal court follows the Van Buren ruling to dismiss a lawsuit brought against a third-party app that collects and shares TikTok data to provide app users with another way to interact with the popular video sharing app. (h/t Orin Kerr)

Triller may exceed users’ expectations about what will be collected or shared, but it makes it pretty obvious it’s in the collection/sharing business. To utilize Triller, users have to opt in to data sharing right up front, as the court points out:

“To post, comment, or like videos, or to watch certain content on the App, users must create a Triller account.” ¶¶ 8, 30. When creating an account, a user is presented with a screen, depicted below, that provides various ways to sign up for an account:

This first step makes it clear Triller will need access to other social media services. Users can go the email route, but that won’t stop the app’s interaction with TikTok data. Hyperlinks on the sign-up screen directs users to the terms of service and privacy policy — something few users will (understandably) actually read.

But all the processes are in place to inform users about their interactions with Triller and its access to other social media services’ data. The court spends three pages describing the contents of these policies the litigant apparently did not read.

This is not to say users should be victimized by deliberately obtuse and convoluted terms of service agreements. If anything, more service providers should be required to explain, in plain English, what data will be collected and how it will be shared. But that’s a consumer law issue, not a CFAA issue, which is supposed to be limited to malicious hacking efforts.

Being unaware of what an app intends to do with user data is not a cause for action under the CFAA, especially now that some guardrails have been applied by the nation’s top court.

Wilson alleges that Triller exceeded its authorized access by causing users “to download and install the App” to their mobile devices without informing users that the App contained code that went beyond what users expected the App to do,” by collecting and then disclosing the users’ information. However, as Triller argues, even assuming that Wilson is not bound by the Terms and thus did not authorize Triller to collect and disclose her information, it is not the case that Triller collects this information by accessing parts of her device that she expected or understood to be “off limits” to Triller. Van Buren, 141 S. Ct. at 1662. Rather, Wilson merely alleges that Triller collects and then shares information about the manner in which she and other users interact through the App with Triller’s own servers. Thus, at most, Wilson alleges that Triller misused the information it collected about her, which is insufficient to state a claim under the CFAA.

Wilson can appeal. But she cannot revive this lawsuit at this level. The federal court says the Van Buren ruling — along with other facts in this case — make it impossible to bring an actionable claim.

Accordingly, Wilson’s CFAA claim is dismissed with prejudice.

That terminates the CFAA claims. Other arguments were raised, but the court isn’t impressed by any of them. The Video Privacy Protection Act (VPPA) is exhumed from Blockbuster’s grave because TikTok content is, after all, recorded video. Violations of PII (personally identifiable information) dissemination restrictions are alleged. These are tied together and they both fail as well.

While the complaint alleges what sort of information could be included on a user’s profile and then ultimately disclosed to the third parties, it contains no allegation as to what information was actually included on Wilson’s profile nor how that information could be used by a third party to identify Wilson. Indeed, the complaint lacks any allegation that would allow the Court to infer a “firm and readily foreseeable” connection between the information disclosed and Wilson’s identify, thus failing to state a claim under the VPPA even assuming the broader approach set out in Yershov.

These claims survive dismissal. So does Wilson’s claim about unjust enrichment under New York state law — something predicated almost entirely on the size of the hyperlinks directing users to Triller’s privacy policy and terms of service. Those can be amended, but there’s nothing in the decision that suggests they’ll survive dismissal again.

Wilson also brings a claim under Illinois’ more restrictive state law concerning user data (the same one used to secure a settlement from Clearview over its web scraping tactics), but it’s unclear how this law applies to a Illinois resident utilizing a service that is a Delaware corporation being sued in a New York federal court. It appears the opt-in process will be the determining factor, and that’s definitely going to weigh against the plaintiff. Unlike Clearview, which scrapes the web without obtaining permission from anyone or any site, Triller requires access to other social media sites to even function.

It’s a good decision that makes use of recent Supreme Court precedent to deter bogus CFAA claims. While Wilson may have legit claims under federal and state consumer laws (although this doesn’t appear to be the case here…), the CFAA should be limited to prosecution and lawsuits directed against actual malicious hacking, rather than app developers who are voluntarily given access to user information by users. This doesn’t mean entities like Triller should be let off the hook for obscuring data demands and sharing info behind walls of legal text. But the CFAA is the wrong tool to use to protect consumers from abusive apps.

Techdirt

Database Engineer — Income and Opportunity

https://blog.finxter.com/wp-content/uploads/2022/05/image-180.png

5/5 – (5 votes)

Before we learn about the money, let’s get this question out of the way:

What is a Database Engineer?

A database engineer is responsible for providing the data infrastructure of a company or organization. This involves designing, creating, installing, configuring, debugging, optimizing, securing, and managing databases. Database engineers can either work as employees or as freelancers remotely or onsite.

What Does a Database Engineer Do?

As already indicated, a database engineer is responsible for providing the data infrastructure of a company or organization.

In particular, a database engineer has many responsibilities, such as the following 15 most popular activities performed by a database engineer today:

  1. Creating a new database system.
  2. Finding a database system tailored to the needs of an organization.
  3. Designing the data models.
  4. Accessing the data with scripting languages including SQL-like syntax.
  5. Installing an existing database software system onsite.
  6. Configuring a database system.
  7. Optimizing a database management system for performance, speed, or reliability.
  8. Consulting management regarding data management issues.
  9. Keeping databases secure and providing proper access control to users.
  10. Monitoring and managing an existing database system to keep it running smoothly.
  11. Debugging potential bugs, errors, and security issues detected at runtime.
  12. Testing and deploying a database system on a public cloud infrastructure such as AWS.
  13. Handling distribution issues in the case of a distributed database management system.
  14. Ensuring budget adherence when running on a public cloud and estimating costs for private database solutions.
  15. Communicating and negotiating with salespeople (e.g., from Oracle).

These are only some of the most common activities frequently handled by database engineers.

Database Engineer vs Data Engineer

A database engineer is responsible for providing the data infrastructure of a company or organization. This involves designing, creating, installing, configuring, debugging, optimizing, securing, and managing databases. Database engineers can either work as employees or as freelancers remotely or onsite.

A data engineer prepares data to be used in data analytics and operations, essentially providing automated or semi-automated ways for data collection and creating pipelines that connect various data sources to database management systems such as the ones managed by a database engineer.

A data engineer focuses on filling data into a database system whereas a database engineer is focused on providing the database system in the first place. There are intersection points between data engineers and database engineers at the interface between data sources and data management.

Database Engineer vs Database Administrator

Database administrators perform a similar role to database engineers in that they are responsible for setting up, installing, configuring, securing, and managing a database management system.

The focus is more on the technical maintenance of existing systems than the theoretical development of new solutions.

But the lines between those two job descriptions are blurry and often overlap significantly.

Annual Income of Database Engineer (US)

How much does a Database Engineer make per year?

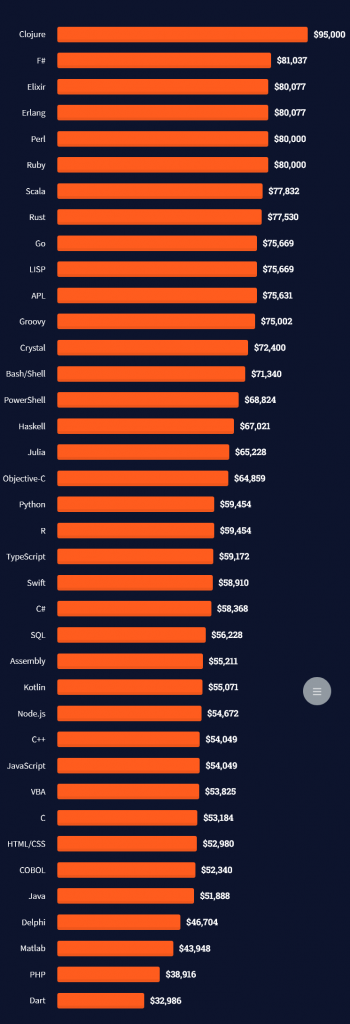
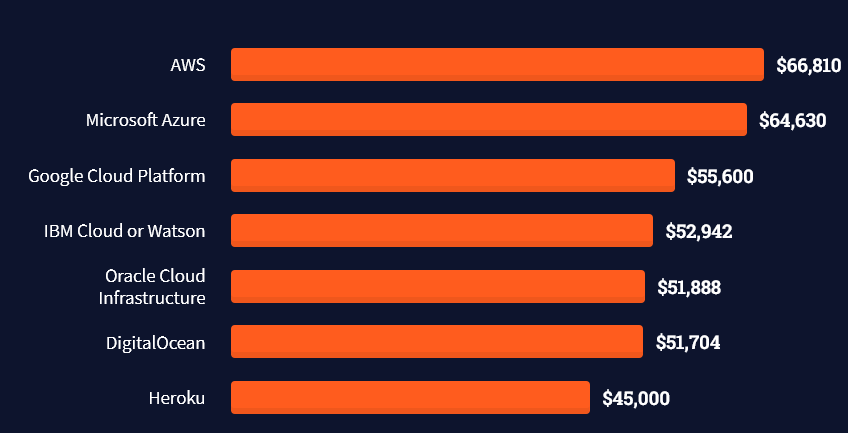
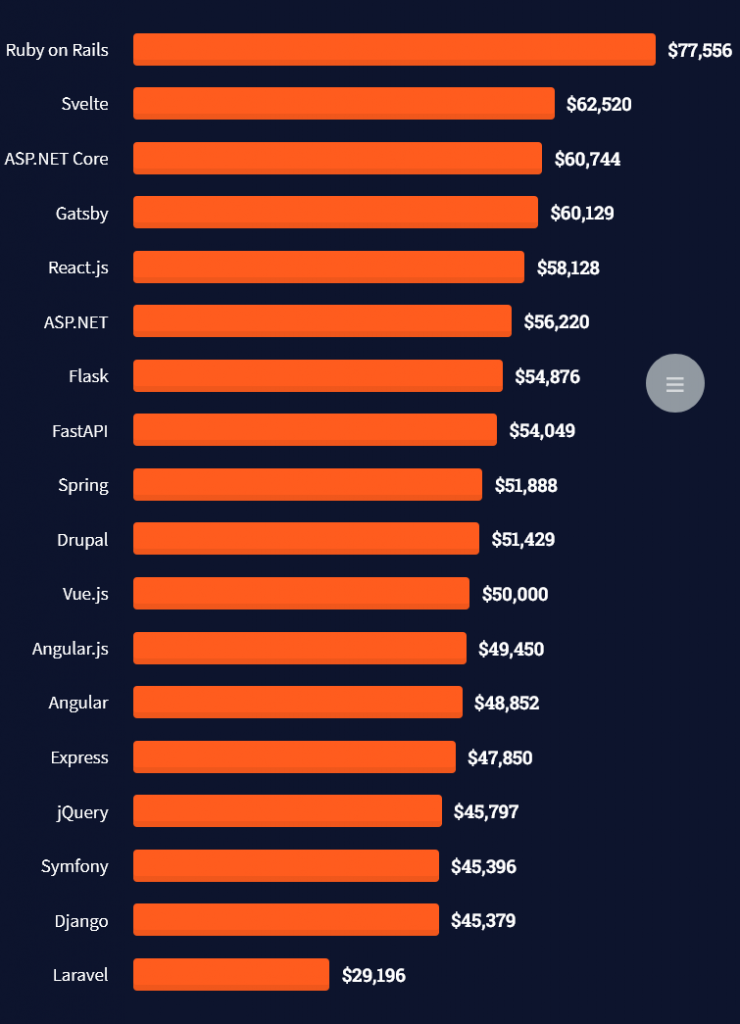
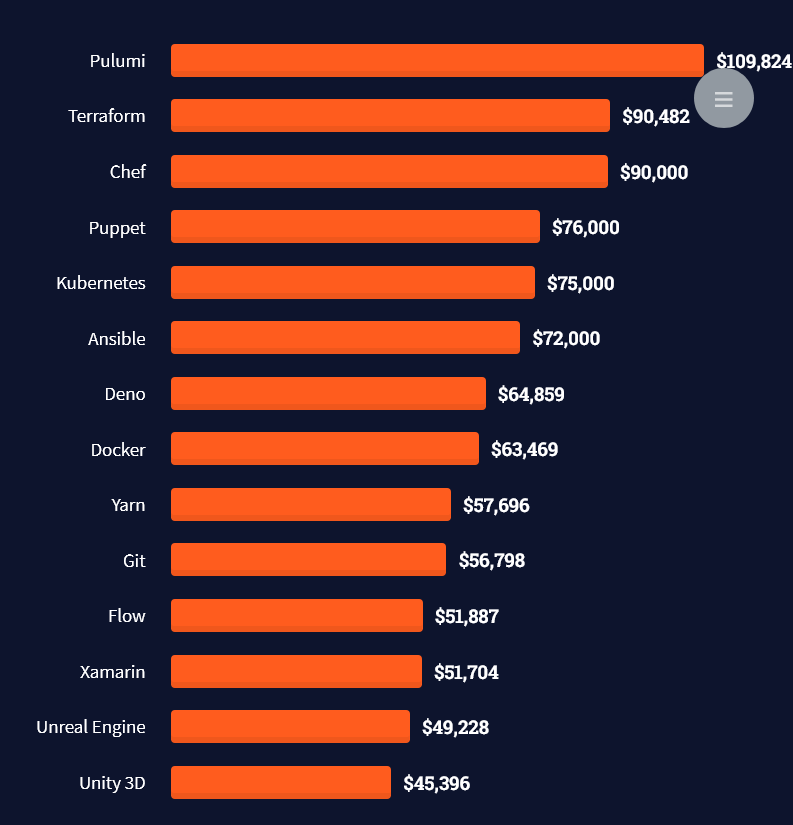
💬 Question: How much does a Database Engineer in the US make per year?

Figure: Average Income of a Database Engineer in the US by Source. [1]

The average annual income of a Database Engineer in the United States is between $72,536 and $135,000, with an average of $103,652 and a statistical median of $106,589 per year.

This data is based on our meta-study of ten (10) salary aggregators sources such as Glassdoor, ZipRecruiter, and PayScale.

Source Average Income
Glassdoor.com $91,541
ZipRecruiter.com $107,844
BuiltIn.com $120,961
Talent.com $135,000
Indeed.com $106,037
PayScale.com $88,419
SalaryExpert.com $107,141
Comparably.com $110,987
Zippia.com $96,058
Salary.com $72,536
Table: Average Income of a Database Engineer in the US by Source.

💡 Note: This is the most comprehensive salary meta-study of database engineer income in the world, to the best of my knowledge!

Let’s have a look at the hourly rate of Database Engineers next!

Hourly Rate

Database Engineers are well-paid on freelancing platforms such as Upwork or Fiverr.

If you decide to go the route as a freelance Database Developer, you can expect to make between $30 and $130 per hour on Upwork (source). Assuming an annual workload of 2000 hours, you can expect to make between $60,000 and $260,000 per year.

⚡ Note: Do you want to create your own thriving coding business online? Feel free to check out our freelance developer course — the world’s #1 best-selling freelance developer course that specifically shows you how to succeed on Upwork and Fiverr!

Industry Demand

But is there enough demand? Let’s have a look at Google trends to find out how interest evolves over time (source):

The interest in database engineering has remained relatively stable over the last two decades.

If you compare the interest with “database administration”, you can see that “database engineering” actually wins in relative importance (source):

Learning Path, Skills, and Education Requirements

Do you want to become a Database Endineer? Here’s a step-by-step learning path I’d propose to get started with Database :

Here you can already start with the first step — do it now! 🙂

You can find many additional computer science courses on the Finxter Computer Science Academy (flatrate model).

But don’t wait too long to acquire practical experience!

Even if you have little skills, it’s best to get started as a freelance developer and learn as you work on real projects for clients — earning income as you learn and gaining motivation through real-world feedback.

🚀 Tip: An excellent start to turbo-charge your freelancing career (earning more in less time) is our Finxter Freelancer Course. The goal of the course is to pay for itself!

Related Video

You can find more job descriptions for coders, programmers, and computer scientists in our detailed overview guide:

Related Income of Professional Developers

The following statistic shows the self-reported income from 9,649 US-based professional developers (source).

💡 The average annual income of professional developers in the US is between $70,000 and $177,500 for various programming languages.

Question: What is your current total compensation (salary, bonuses, and perks, before taxes and deductions)? Please enter a whole number in the box below, without any punctuation. If you are paid hourly, please estimate an equivalent weekly, monthly, or yearly salary. (source)

The following statistic compares the self-reported income from 46,693 professional programmers as conducted by StackOverflow.

💡 The average annual income of professional developers worldwide (US and non-US) is between $33,000 and $95,000 for various programming languages.

Here’s a screenshot of a more detailed overview of each programming language considered in the report:

Here’s what different database professionals earn:

Here’s an overview of different cloud solutions experts:

Here’s what professionals in web frameworks earn:

There are many other interesting frameworks—that pay well!

Look at those tools:

Okay, but what do you need to do to get there? What are the skill requirements and qualifications to make you become a professional developer in the area you desire?

Let’s find out next!

General Qualifications of Professionals

StackOverflow performs an annual survey asking professionals, coders, developers, researchers, and engineers various questions about their background and job satisfaction on their website.

Interestingly, when aggregating the data of the developers’ educational background, a good three quarters have an academic background.

Here’s the question asked by StackOverflow (source):

Which of the following best describes the highest level of formal education that you’ve completed?

However, if you don’t have a formal degree, don’t fear! Many of the respondents with degrees don’t have a degree in their field—so it may not be of much value for their coding careers anyways.

Also, about one out of four don’t have a formal degree and still succeeds in their field! You certainly don’t need a degree if you’re committed to your own success!

Freelancing vs Employment Status

The percentage of freelance developers increases steadily. The fraction of freelance developers has already reached 11.21%!

This indicates that more and more work will be done in a more flexible work environment—and fewer and fewer companies and clients want to hire inflexible talent.

Here are the stats from the StackOverflow developer survey (source):

Do you want to become a professional freelance developer and earn some money on the side or as your primary source of income?

Resource: Check out our freelance developer course—it’s the best freelance developer course in the world with the highest student success rate in the industry!

Other Programming Languages Used by Professional Developers

The StackOverflow developer survey collected 58000 responses about the following question (source):

Which programming, scripting, and markup languages have you done extensive development work in over the past year, and which do you want to work in over the next year?

These are the languages you want to focus on when starting out as a coder:

And don’t worry—if you feel stuck or struggle with a nasty bug. We all go through it. Here’s what SO survey respondents and professional developers do when they’re stuck:

What do you do when you get stuck on a problem? Select all that apply. (source)

Related Tutorials

To get started with some of the fundamentals and industry concepts, feel free to check out these articles:

Where to Go From Here?

Enough theory. Let’s get some practice!

Coders get paid six figures and more because they can solve problems more effectively using machine intelligence and automation.

To become more successful in coding, solve more real problems for real people. That’s how you polish the skills you really need in practice. After all, what’s the use of learning theory that nobody ever needs?

You build high-value coding skills by working on practical coding projects!

Do you want to stop learning with toy projects and focus on practical code projects that earn you money and solve real problems for people?

🚀 If your answer is YES!, consider becoming a Python freelance developer! It’s the best way of approaching the task of improving your Python skills—even if you are a complete beginner.

If you just want to learn about the freelancing opportunity, feel free to watch my free webinar “How to Build Your High-Income Skill Python” and learn how I grew my coding business online and how you can, too—from the comfort of your own home.

Join the free webinar now!

References

[1] The figure was generated using the following code snippet:

import matplotlib.pyplot as plt
import numpy as np
import math

data = [91541,
        107844,
        120961,
        135000,
        106037,
        88419,
        107141,
        110987,
        96058,
        72536]

labels = ['Glassdoor.com',
          'ZipRecruiter.com',
          'BuiltIn.com',
          'Talent.com',
          'Indeed.com',
          'PayScale.com',
          'SalaryExpert.com',
          'Comparably.com',
          'Zippia.com',
          'Salary.com']

median = np.median(data)
average = np.average(data)
print(median, average)
n = len(data)

plt.plot(range(n), [median] * n, color='black', label='Median: $' + str(int(median)))
plt.plot(range(n), [average] * n, '--', color='red', label='Average: $' + str(int(average)))
plt.bar(range(len(data)), data)
plt.xticks(range(len(data)), labels, rotation='vertical', position = (0,0.45), color='white', weight='bold')
plt.ylabel('Average Income ($)')
plt.title('Database Engineer Annual Income - by Finxter')
plt.legend()
plt.show()

Finxter

Google Lets Personal Users Stay On ‘No-Cost Legacy G Suite’ With Custom Gmail Domain

Back in April, Google delayed when G Suite legacy free-edition users had to start paying for Workspace. The company will now let you stay on a "Free Legacy Edition of G Suite for personal use" as the "no-cost" alternative in a rather notable policy change. 9to5Google reports: This "no-cost" option is for people that aren’t interested in paying for Workspace but want to retain access to their data and not just export via Google Takeout. For the past few months, people have been waiting to join a waitlist for this alternative. In a change of plans, there’s no longer a waiting list, and these old users can sign-up for no-cost Legacy G Suite now. Head to your account’s Google Admin Console as there are many reports of it going live this afternoon. You have until June 27 to pick a transition path.
Most notably, you can "continue using your custom domain with Gmail." […] Besides the custom Gmail domain, you will "retain access to no-cost Google services" and "keep your purchases and data." […] However, you must confirm to Google that your usage is for non-commercial personal use: "Google may remove business functionality from this offering and transition businesses to Google Workspace. Additionally, this option will not include support."


Read more of this story at Slashdot.

Slashdot