Amid an unprecedented and unjustified attack on the firearm industry, Smith & Wesson President & CEO issues strong statement: pic.twitter.com/6NHztbGIe4
We’ll start by creating a new test file. Please execute the following command in your terminal:
php artisan make:test UserTest
A new test file should be created at tests/Feature/UserTest.php.
Heads up – Resetting the database
If your code and tests play with the database, you should reset your database after each of your tests to ensure that one test cannot affect the results of another one. Laravel makes it effortless by providing a trait that you can add to your test classes.
Please add the following trait in the UserTest.php file:
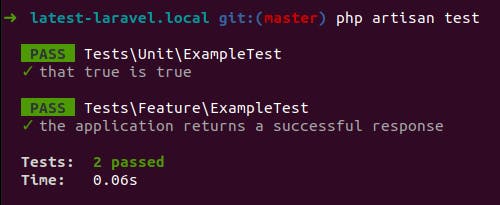
The default test file already covers a test for a GET request. Thus, we can directly write a test for a POST request.
When the user submits the form from the browser, a POST request is made with the inputs and values. We are going to simulate the same thing in our tests.
Please append the following code to the UserTest.php file:
Laravel provides an easy way to make a POST request from your test files using the post() method. Using that, we make the request and verify that user details are added to the database and the response is a redirect with the proper message in the session.
Wasn’t this straightforward? Let’s try one more.
Test for the validation
How about adding a test to make sure that our validation works as expected? Please append the following code to the UserTest.php file:
Here, we pass invalid data for the form inputs and confirm (assert) that there is a redirect response (HTTP status code 302) and that there are validation errors in the session.
Test for the unique email address
The business requirement is that the email address of each user has to be unique so let us add a test for the same. Append this test to the UserTest.php file:
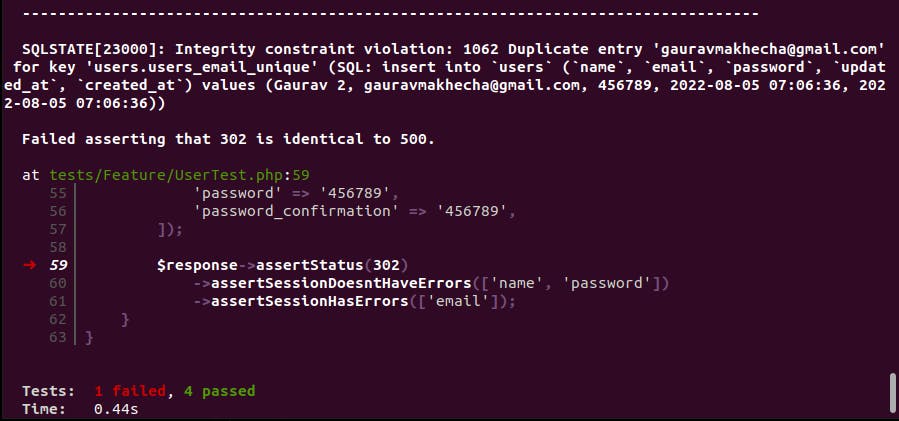
This test uses Laravel Factory to add a user to the database and then tries to make a POST request with the same email address. Let us run tests and see the results.
Oops, it failed. And the reason? We missed adding the unique validation in our code.
The Fix
Now your test is guiding you with the development. (Yes TDD!)
Please make the following update in the routes/web.php file:
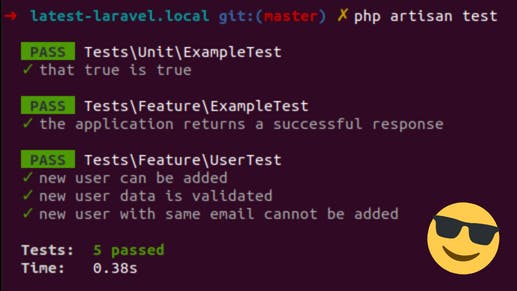
Once updated, give yourself a pat on the back and run the tests again (php artisan test)
What more?
Did you realize you are now officially a developer who writes automated tests? Congrats!
Need more examples? Check this directory from the official Laravel repository for tests related to various modules.
The goal of this article is just to get you started with writing tests. Not to cover different use cases or scenarios. Hence, I limit the practical coding here and would like to share a few other things to help you progress with it.
Patterns that can help you
Many developers aren’t sure for which parts of their code should they write tests. The simplest answer is: Try to write automated tests for all the functionality that you check while manually testing your web app.
In this example, we would have checked the DB entry, the validation messages, and the redirect while manually testing the web app. And that is what our automated tests covered.
Here are a couple of patterns to help you plan your tests:
1. Given-When-Then
2. Arrange-Act-Assert
Both are similar so you can use any of them. The idea is:
First, you set the scene (Add existing DB records, log in a user, etc.)
Then you take an action (Visit a URL, submit a form, etc.)
Finally, you verify the results/effects (A DB entry, a session call, response status code, etc.)
This way can generally help you in writing most of the test cases.
What we covered in this article are Feature tests. There are many other types of tests (Unit tests, Feature tests, Integration tests, Acceptance tests, etc.).
Do not hurry to learn/use all of them, you don’t have to. You will feel the need yourself if/when the time arrives.
Topics like mocking and stubbing fall in the same category. Believe me, it is not compulsory to use them. But keep in mind they are quite handy for medium to big-size projects. We use them in our projects and can’t live without them.
A Note on PEST
We use PEST for writing tests but I decided not to include that in this article to keep things simple. I wish (and am sure) it would come out of the box with Laravel.
To The Moon
I hope this article gets you started with writing tests and you never stop in the future. Feel free to comment below in case of any questions. May those tools give you more testing features 😉
And if any of your friends are also giving excuses to start writing tests, how about sharing this article with them for the push?
We are happy to announce the new release of our flagship solution for MySQL – dbForge Studio for MySQL – which is now available on Linux and macOS! Check out the updated features and improvements. Getting Started and Video Tutorials When you need to learn how the product or its specific feature works, you as […]
Volquartsen Firearms is very well known in the rimfire market for their high-quality, accurate pistols often used for varmint hunting or competition shooting. Volquartsen has just announced the addition of the new Scorpion-X to their line of complete pistols. The new Scorpion-X uses the all-new Volquartsen LLV-X upper which features multiple mounting hole locations so […]
An anonymous reader quotes a report from The Register: A dozen US midwestern research colleges and universities have signed up to a project intended to bolster the semiconductor and microelectronics industries with combined research and education to ensure work for their students in high-tech industries. The "Midwest Regional Network to Address National Needs in Semiconductor and Microelectronics" consists of a dozen institutions, made up of eight from Ohio, two from Michigan, and two from Indiana. Their stated aim is to support the onshoring efforts of the US semiconductor industry by addressing the need for research and a skilled workforce.
According to Wright State University, the network was formed in response to Intel’s announcement that it planned to build two chip factories near Columbus, Ohio, and followed a two-day workshop in April hosted by the state. […] However, the university network was also formed to help address the broader national effort to regain American leadership in semiconductors and microelectronics, or at least bring some of it back onshore and make the US less reliant on supplies of chips manufactured abroad.
The president of each institution has signed a memorandum of understanding to form the network, and the expectation is that the group will expand to include more than these dozen initial members. The intention is that the institutions taking part will be able to make use of each other’s existing research, learning programs, capabilities, and expertise in order to boost their collective ability to support the semiconductor and microelectronics industry ecosystems. Challenges for the network include developing mechanisms to connect existing research, and training assets across the region, and developing a common information sharing platform to make it easier to identify opportunities for joint programming and research across the network. The institutions involved in the network include: Wright State University, Columbus State Community College, Lorain County Community College, Michigan State University, Ohio State University, Purdue University, Sinclair Community College, University of Cincinnati, University of Dayton, University of Michigan, and the University of Notre Dame, Indiana.
Further reading: Biden Signs China Competition Bill To Boost US Chipmakers
Social login is now an essential part of any site which performs user authentication. It does not need to replace the standard form based authentication, quite the contrary, social login complements it. Login with social accounts is a straightforward process and it saves the users a lot of time, as they won’t need to fill the whole form. They just sign up with their social account and they can log into the website with just a few clicks.
OAuth is an open standard protocol for access delegation, commonly used as a way for internet users to grant websites or applications access to their information on other websites but without giving them the passwords. Laravel Socialite package provides a simple, fluent interface to authenticate with OAuth providers. It currently supports authentication via Facebook, Twitter, LinkedIn, Google, GitHub, GitLab and Bitbucket.
Prerequisites
A Laravel project is required to use Socialite package. Take a look on how to create your first Laravel project, if you don’t have any yet. The latest stable and compatible version is recommended to be installed for the both: framework and PHP.
To get started with Socialite, use the Composer package manager to add the package to your project’s dependencies:
composer require laravel/socialite
Registering with OAuth providers
Before implementing and using Socialite, you will need to generate credentials for OAuth providers your application want to operate with. Typically, these credentials may be retrieved by creating a developer application within the service you will be authenticating with.
Detailed explanation on how to retrieve credentials for different services can be found below:
Configuring your application
Credentials generated in the step above should be placed in your application’s config/services.php configuration file. Depending on the providers you want to use, credentials are defined with one of the following keys : facebook, twitter-oauth-2, linkedin, google, github, gitlab or bitbucket.
That’s an example of definition of Google OAuth credentials in config/services.php configuration file.
Define environment variables
Environment variables provide another way to specify configuration options and credentials. As you can see, the definition of credentials in config/services.php is using environment variables and it means that you need to define them in your .env file:
Define both routes in the project routes/web.php file with desired options (prefixes, names, middleware, etc…).
Preparing your database
Once the user has been retrieved from the OAuth provider, you may determine if the user exists in your application’s database and authenticate the user. If the user does not exist in your application’s database, you will typically create a new record in your database to represent the user. OAuth callbacks include a string that represents a unique identifier for the user on the OAuth platform.
In case of using MySQL database, a new varchar column can be added to the users table. It will contain OAuth identifier and help us to find the user in future queries, i.e., facebook_id, twitter_id, google_id, etc... You may want to save user token, refresh token and token expiration date too. Everything depends on the use case.
Implementing Socialite controller
We’ve previously configured two routes for the OAuth provider and both routes are pointing to the same controller. Socialite helps to abstract the complicated OAuth logic making the implementation quite standard, with slight differences for different providers. A template has been defined and it can be used for all available OAuth2 providers changing the class constant and completing TODOs that depends on your application.
<?php namespace App\\Controllers;
use Illuminate\\Http\\Request; use Illuminate\\Http\\RedirectResponse;
use Laravel\\Socialite\\Facades\\Socialite; use Laravel\\Socialite\\Two\\User as SocialUser;
public function redirect(): RedirectResponse { return Socialite::driver(self::OAUTH_PROVIDER)->redirect(); }
public function callback(Request $request): RedirectResponse { /** @var SocialUser $socialUser */ $socialUser = Socialite::driver(self::OAUTH_PROVIDER)->user();
if ($socialUser->getEmail() === null) { // TODO Missing email, redirect to manual registration page }
try { // TODO Get user from database using ID or email address // TODO Throw UserNotFoundException if user does not exist // TODO Update user attributes (if needed) } catch (UserNotFoundException $e) { // TODO Create new user record in the database } finally { // TODO Authenticate existing or new created user in the system }
// TODO redirect authenticated user } }
First let’s check what kind of information social user variable contains:
$socialUser->getId() // User identifier from OAuth provider
$socialUser->getNickname() // User nickname or null
$socialUser->getName() // User name concatenated with surname in some cases
$socialUser->getEmail() // User email address
$socialUser->getAvatar() // User avatar URL
Additional information can be gathered for Google OAuth users:
$socialUser['email_verified'] // User email verification flag (boolean)
Generally, for OAuth2 providers, token information is available too:
As you can see it’s very easy to setup any provider and the code for all of them is quite similar.
Conclusion
Login with social accounts is a straightforward process and at the same time it improves the user experience. Officially Socialite plugin only supports popular platforms for OAuth but you can find non-official implementations of other platforms too.
Many Mailtrap users create their apps with PHP and the vast majority of them choose Laravel. It is simple and in addition, is covered in-depth by documentation and tutorials. However, we still observe numerous questions on sending emails with Laravel, testing them, as well as Mailtrap configurations. We have analyzed the most popular requests on Stack Overflow, Reddit as well as Google search and in this post we will provide you with the list of answers. How to send an email with Laravel? How to send a Laravel email via Mailtrap? Why isn’t Laravel mail working? Let’s figure it out.
Why Laravel and how it works
Laravel is a PHP framework that stands out for its simplicity, modernity, and connectivity. Probably, those characteristics make it especially popular among startups.
Laravel is widely used for building websites, marketplaces, web apps, and even frameworks.
The mail function is essential for these tasks, to register or notify the users, so it’s native in Laravel and provides a wide range of capabilities:
A list of integrations for sending emails through local or cloud-based services. Now Laravel proposes using drivers for SMTP, Mailtrap Email Delivery, Mailgun, SparkPost, Amazon SES, and sendmail.
Options for queueing emails.
Markdown support, which is available in a quite few frameworks. It lets you create beautiful templates and easily include buttons, tables, or panels.
Regular plain text and HTML messages.
Attaching files of different formats and MIME types, as well as raw data, inline attachments, and even embedding raw data into mail templates.
Templating system, which lets you use various templates and configure the view.
Message previews in-browser.
In addition, there are some noteworthy options:
Localization methods, so that you can set the desired language for a specific user.
Local development mailing. This is how you can prevent sending test emails to real inboxes. Mailtrap is one of the preferred options.
What you need to know about Laravel Mail
You will intuitively find all guidelines on the Laravel website and the educational Laracasts portal. That is why we rejected the idea of creating our own tutorial. For a better understanding, we decided to outline some basic principles, provide you with examples of creating an email in Laravel, and give you some tips and explanations.
Building email in Laravel
Here are a couple of basic things to keep in mind.
Laravel includes its own command-line interface called Artisan. (Yes, it definitely refers to their slogan “The PHP framework for web artisans”). It provides a bundle of useful commands, for email creation in particular. To get all available commands, type:
php artisan list
Each email category can be represented as a “mailable”. It’s a class that is responsible for building a specific email message using a set of methods.
For example:
php artisan make:mail NewUserNotification
command generates a class, which you’ll find at ‘app/Mail/NewUserNotification.php. The build() method of this class creates email messages:
public function build()
{
    return $this->from('example@example.com')
        ->view('emails.newuser');
}
This way, we have written a mailable with a build() method. Of course, it’s a minimal example, but you can make the necessary configuration and the next time you need to send it again, you will just type:
To send an email, you have a bunch of options. Laravel’s creators recommend using one of the API based drivers: Mailgun, SparkPost, or Amazon SES.
Laravel 7.0 introduces multiple drivers. It means that you can set one of the drivers as a default one in your mail configuration file (Mailgun, for example), but configure sending particular types of messages (let’s say, notifications) with SparkPost.
For configurations, follow this section of the Laravel Documentation.
You are also free to use any SMTP server you prefer, like Gmail. The related configurations are made in the config/mail.php file. In the default Laravel setup, the email configuration is read from environment variables so to edit them, you should save your changes to the .env file (you will find it in the root directory).
The Mailtrap SMTP server is one of the recommended SMTP methods in Laravel. It helps you avoid sending test emails to real inboxes by accident. It is designed to catch these interim emails and help you debug them. With Mailtrap, your email will never land in the real inbox in any of the email clients.
So, if you are ready to send your message to your own or even your customer’s inbox, don’t forget to replace the configuration with that of the real server. For example:
And if you’re using Mailtrap Email Delivery as your sending solution, we provide the SMTP configuration for you. Just copy-paste the configuration listed in the app, verify your domain, and you’re good to go.
Laravel versions
A new version of Laravel is released every six months. Then bug fixes are provided for another six months while security fixes are delivered within a year. Also, starting from 5.1, Laravel offers long-term support (LTS) version, with bug fixes valid for two years and security fixes – for three.
For July 2020, Laravel 7.0 is the latest released version.
We observe that in 2020 users were still working with Laravel 6.2, 5.8, 5.6, 5.4, 5.3, or even 5.2 versions. But versions below 5.5 (LTS) were no longer supported:
Sometimes, the use of the old versions might result in some performance issues. Most likely, you might just miss some functionality and waste your time. Here is a list of some important updates delivered in 6 and 7 versions, which affect email sending options.
Laravel 6 (LTS) introduced semantic versioning, compatibility with Laravel Vapor, enhanced authorization responses, job middleware, lazy collections, and subquery improvements, as well as other bug fixes and usability improvements.
Laravel 7 delivered Laravel Sanctum (an authentication system), Blade component tags, a developer-focused HTTP client, first-party CORS support, multiple mail drivers, a new artisan test command, along with other bug fixes and usability improvements.
How to send email in Laravel 7.0 using SMTP
To sum up, let’s review an example of coding a message in Laravel 7.0 and testing it with Mailtrap’s fake SMTP service. We will take advantage of Laravel’s awesome features like Blade templates, Mailable class, and Markdown support.
We assume that you have been already using Laravel for building your application. If you were working in one of the previous versions, update your laravel/framework dependency to7.0.*in your composer.json file, as recommended in the official guide.
Let’s start by defining an SMTP server and setting the mailing configuration. We prefer to test our notifications with Mailtrap first, to make sure our code works fine and the content of the messages is rendered properly.
Mailtrap is a default server in Laravel, so you need just to type in your credentials. You will find them in the SMTP Settings tab of your Inbox. Also, you can use Integrations data from the same tab. Choose Laravel from the list, copy the following details, and paste them to your .env file:
This way, we have created a Mailable class, with the name MailtrapExample.php. Now we should find it in the Mail directory in app/Mail. We have a template, which contains basic needed functions so that we should just modify it.
<?php
namespace App\Mail;
use Illuminate\Bus\Queueable;
use Illuminate\Mail\Mailable;
use Illuminate\Queue\SerializesModels;
use Illuminate\Contracts\Queue\ShouldQueue;
class MailtrapExample extends Mailable
{
    use Queueable, SerializesModels;
    /**
     * Create a new message instance.
     *
     * @return void
     */
    public function __construct()
    {
        //
    }
    /**
     * Build the message.
     *
     * @return $this
     */
public function build()
    {
        return $this->from('mail@example.com', 'Mailtrap')
            ->subject('Mailtrap Confirmation')
            ->markdown('mails.exmpl')
            ->with([
                'name' => 'New Mailtrap User',
                'link' => '/inboxes/'
            ]);
    }
We’ve added a sender, a subject, a couple of variables and introduced the Markdown support.
Now it’s time to create the body of our message. For this purpose, we will use a Blade template.
We have specified that our mailable is located in the mails.exmpl. Now we need to create a ‘mails’ directory with a blade template file ‘exmpl.blade.php’. inside. Templates represent views in Laravel, so keep the template file in the resources/views/mails directory.
@component('mail::message')
Hello ****,
Thank you for choosing Mailtrap!

Click below to start working right now
@component('mail::button', ['url' => $link])
Go to your inbox
@endcomponent
Sincerely,
Mailtrap team.
@endcomponent
Our simple configuration is done, and we can move forward with sending our message. Specify the route in theroutes/web.php:
<?php

use App\Mail\MailtrapExample;
use Illuminate\Support\Facades\Mail;

Route::get('/send-mail', function () {

    Mail::to('newuser@example.com')->send(new MailtrapExample());

    return 'A message has been sent to Mailtrap!';

});
Run your application. Usually, it should be php artisan serve in development, then go to /send-mail path of your application in the browser (http://127.0.0.1:8000/send-mail when running with php artisan serve.)
Note that starting from the 5.8 version, Laravel is capable of serving multiple applications. Earlier, only port 8000 was available but now serves scans for free options up to 8009.
That’s it. Your application will send a message and you will see it in your Mailtrap inbox:
Verify if the result matches your expectations: whether all elements are displayed correctly and links work properly. View the Check HTML and Analysis tabs in Mailtrap to make sure your messages won’t be considered spam and will be rendered correctly in most email clients.
Once you are satisfied with the results of tests, replace SMTP configurations with your production server or configure any other option to send emails to real inboxes.
Following the tragedy in Uvalde, Texas, gun control advocates have taken the anti-gun narrative to a fever pitch. They insist that the only way to prevent mass shootings is to institute stricter gun control on law-abiding citizens. However, when a good guy with a gun stopped a bad guy with a gun in an Indiana mall, they disregard it as isolated. But a Crime Prevention Research Center study proves it to be quite common.
Study Proves the Good Guy with a Gun Theory
The gun control lobby has spent years trying to create a narrative that guns are never used for self-defense. They have dedicated a plethora of articles across liberal media to help build this false premise. Likewise, they insist that the only people who should be armed are police officers. And then they attend a “defund the police” rally.
Not to open a still healing wound, but we saw how trained law enforcement handled Uvalde. It wasn’t a shining endorsement for disarming citizens and making them rely on that kind of response.
This isn’t meant as an attack on law enforcement officers. They have a very hard and dangerous job. Not to mention thankless in today’s society. I am just demonstrating that you are your own last line of defense. As the saying goes, “when seconds count, police are just minutes away.”
However, in stark contrast is the recent incident in the mall in Indiana. After an active shooter opened fire on unsuspecting victims in a food court, it only took an armed citizen 15 seconds to stop it. Although, unfortunately, three people were killed, it could’ve been far worse if not for the good guy with a gun.
There are many cases like this where a concealed carry permit holder acted in their own self-defense or the defense of others. You may have noticed that we have been compiling stories of recent cases where guns save lives. This is not by accident. It’s an effort to create a one-stop reference library of evidence when gun grabbers try to tell you otherwise.
An Ongoing Study
Well, we aren’t the only ones providing such a resource. The Crime Prevention Research Center has a running list of cases where concealed handgun permit holders have stopped likely mass shootings. In fact, the list was recently updated to include the case in Indiana.
The post was originally written in April of 2015 but is still periodically updated. However, it states that lack of news coverage on the topic means they probably do not have all the cases. Still, 60 cases over seven years are nothing to take lightly. That is a lot of mass shootings that could have been far worse.
But it’s important to note that the list only compiles instances where firearms were used to stop likely mass shootings. It does not include the use of firearms in the act of self-defense.
When it comes to self-defense, American Gun Facts states, “The best estimates are that guns are used to deter or thwart crime between 500,000 and 2.8 million times per year, but the more likely answer is probably somewhere in the middle. A 2021 survey estimated that guns are used 1.67 million times per year in self defense in the United States.”
No Shortage of Examples
As I mentioned, there are 60+ cases to dig through. So, you will have no shortage of examples for your gun control friends. The list even includes some examples you may recognize from our reporting. Such as the Indiana case and the case of the woman who prevented a mass shooting at a graduation party.
Here are a few other examples:
“Phenix City, AL, April 13, 2022 (WTVM, Ledger-Enquirer) Two suspects went to the truck shop over a dispute from earlier in the day. One got out of his vehicle and begin to shoot at four people standing outside the business. One of the intended victims with a concealed handgun permit had his own firearm and returned fire, striking both suspects. The business owner Paul Thrasher said ‘if [they] would not have been [sic] returned fire, he would have advanced on us we would have had a fatality. Thank God for my employees.’”
“Portland, OR, February 19, 2022 A homeowner allegedly confronted participants at a racial justice demonstration Saturday night before pulling out a handgun and shooting multiple people in the crowd, leaving one woman dead and several others injured. The shooting ended when a person with the group of demonstrators, who is licensed to conceal carry a firearm, fired back, striking the homeowner in the hip.”
“Syracuse, NY, August 31, 2021 The District Attorney credited a property manager with saving the lives of several individuals after he pulled a legally possessed 9mm handgun and fatally wounded a man who opened fire on a crowd outside a building.”
You Can Take Your Chances, and I’ll Take a Good Guy with a Gun
You know the saying, “the only thing that stops a bad guy with a gun is a good guy with a gun.” It’s not just a bumper sticker, it is founded on fact.
Case after case proves that guns save lives, specifically good guys with guns. Not everyone can live in a gated community with a security guard or ten. Some of us live in the real world where people are shot and killed by criminals as a result of rising violent crime and soft-on-crime policies.
As crime increases and gun control rhetoric dominates every TV across the nation, you should understand the facts. If you still support gun control, that is your right. We live in a country where diversity of thought is encouraged, and you are welcome to lead by example and disarm yourself.
You can take your chances, but I will take a good guy with a gun.


 Volquartsen Firearms is very well known in the rimfire market for their high-quality, accurate pistols often used for varmint hunting or competition shooting. Volquartsen has just announced the addition of the new Scorpion-X to their line of complete pistols. The new Scorpion-X uses the all-new Volquartsen LLV-X upper which features multiple mounting hole locations so […]
 Hands on testing with over 2 dozen triggers! Here are our top recommendations for precision, speed, and durability.Recoil