Laravel 11 JSON Web Token(JWT) API Authentication Tutorial

https://www.itsolutionstuff.com/upload/laravel-11-jwt-authentication.png

In this post, I will show you how to API Authentication using JWT token in laravel 11 application. We will learn from scratch about APIs, JWT REST APIs, and Laravel JWT Authentication, and create an example API as well.

What is API?

An API (application programming interface) is simply a way of communication between two or more computer programs.

APIs are also used for web and mobile application development; therefore, building a REST API is very essential for any web and mobile application developer.

What is JWT?

JWT stands for JSON Web Token, it is an open standard (RFC 7519) that defines a compact and self-contained way for securely transmitting information between parties as a JSON object. JWT is commonly used for Authorization, Information Exchange, etc.

In this example, we will install the Laravel 11 application. Then, we will install the api. Then we will use php-open-source-saver/jwt-auth package to use JWT. After that, we will create register, login, refresh, profile, and logout APIs for user authentication. So, let’s follow the steps below to complete this example step by step:

laravel 11 JWT authentication

Step for Laravel 11 JWT Authentication API Tutorial

  • Step 1: Install Laravel 11
  • Step 2: Enable API and Update Authentication Exception
  • Step 3: Install and Setup JWT Auth package
  • Step 4: Update User Model
  • Step 5: Create API Routes
  • Step 6: Create Controller Files
  • Run Laravel App

Follow the below few steps to create a restful API example in the laravel 11 app.

Step 1: Install Laravel 11

This step is not required; however, if you have not created the Laravel app, then you may go ahead and execute the below command:

composer create-project laravel/laravel example-app

Step 2: Enable API and Update Authentication Exception

By default, laravel 11 API route is not enabled in laravel 11. We will enable the API using the following command:

php artisan install:api

Now, if user is not authenticate then exception will call and we will return json response. so, let’s update app.php file.

bootstrap/app.php

<?php

use Illuminate\Foundation\Application;
use Illuminate\Foundation\Configuration\Exceptions;
use Illuminate\Foundation\Configuration\Middleware;
use Illuminate\Auth\AuthenticationException;
use Illuminate\Http\Request;

return Application::configure(basePath: dirname(__DIR__))
    ->withRouting(
        web: __DIR__.'/../routes/web.php',
        api: __DIR__.'/../routes/api.php',
        commands: __DIR__.'/../routes/console.php',
        health: '/up',
    )
    ->withMiddleware(function (Middleware $middleware) {
        //
    })
    ->withExceptions(function (Exceptions $exceptions) {
        $exceptions->render(function (AuthenticationException $e, Request $request) {
            if ($request->is('api/*')) {
                return response()->json([
                    'message' => $e->getMessage(),
                ], 401);
            }
        });
    })->create();

Step 3: Install and Setup JWT Auth package

In this step, we will install php-open-source-saver/jwt-auth composer package.

composer require php-open-source-saver/jwt-auth

now, publish the package config file:

php artisan vendor:publish --provider="PHPOpenSourceSaver\JWTAuth\Providers\LaravelServiceProvider"

Next, generate a secret key. This will add JWT config values on .env file:

php artisan jwt:secret

now, we will update auth guard config file.

config/auth.php

<?php
return [

    /*
    |--------------------------------------------------------------------------
    | Authentication Defaults
    |--------------------------------------------------------------------------
    |
    | This option defines the default authentication "guard" and password
    | reset "broker" for your application. You may change these values
    | as required, but they're a perfect start for most applications.
    |
    */

    'defaults' => [
        'guard' => 'api',
        'passwords' => 'users',
    ],

    /*
    |--------------------------------------------------------------------------
    | Authentication Guards
    |--------------------------------------------------------------------------
    |
    | Next, you may define every authentication guard for your application.
    | Of course, a great default configuration has been defined for you
    | which utilizes session storage plus the Eloquent user provider.
    |
    | All authentication guards have a user provider, which defines how the
    | users are actually retrieved out of your database or other storage
    | system used by the application. Typically, Eloquent is utilized.
    |
    | Supported: "session"
    |
    */

    'guards' => [
        'web' => [
            'driver' => 'session',
            'provider' => 'users',
        ],
        'api' => [
            'driver' => 'jwt',
            'provider' => 'users',
        ],
    ],

    ...

Step 4: Update User Model

In the model, we implement first the Tymon\JWTAuth\Contracts\JWTSubject contract on the User Model and implement the getJWTIdentifier() and getJWTCustomClaims() methods.

app/Models/User.php

<?php

namespace App\Models;

use Illuminate\Database\Eloquent\Factories\HasFactory;
use Illuminate\Foundation\Auth\User as Authenticatable;
use Illuminate\Notifications\Notifiable;
use PHPOpenSourceSaver\JWTAuth\Contracts\JWTSubject; 

class User extends Authenticatable implements JWTSubject
{
    use HasFactory, Notifiable;

    /**
     * The attributes that are mass assignable.
     *
     * @var array
     */
    protected $fillable = [
        'name',
        'email',
        'password',
    ];

    /**
     * The attributes that should be hidden for serialization.
     *
     * @var array
     */
    protected $hidden = [
        'password',
        'remember_token',
    ];

    /**
     * Get the attributes that should be cast.
     *
     * @return array
     */
    protected function casts(): array
    {
        return [
            'email_verified_at' => 'datetime',
            'password' => 'hashed',
        ];
    }

    /**
     * Get the identifier that will be stored in the subject claim of the JWT.
     *
     * @return mixed
     */
    public function getJWTIdentifier()
    {
        return $this->getKey();
    }
 
    /**
     * Return a key value array, containing any custom claims to be added to the JWT.
     *
     * @return array
     */
    public function getJWTCustomClaims()
    {
        return [];
    }
}

Step 5: Create API Routes

In this step, we will create API routes. Laravel provides the api.php file for writing web service routes. So, let’s add a new route to that file.

routes/api.php

<?php

use Illuminate\Support\Facades\Route;

use App\Http\Controllers\API\AuthController;
 
Route::group([
    'middleware' => 'api',
    'prefix' => 'auth'
], function ($router) {
    Route::post('/register', [AuthController::class, 'register']);
    Route::post('/login', [AuthController::class, 'login']);
    Route::post('/logout', [AuthController::class, 'logout'])->middleware('auth:api');
    Route::post('/refresh', [AuthController::class, 'refresh'])->middleware('auth:api');
    Route::post('/profile', [AuthController::class, 'profile'])->middleware('auth:api');
});

Step 6: Create Controller Files

In the next step, we’ve created a new controller called BaseController and AuthController. I created a new folder named "API" in the Controllers folder because we’ll have separate controllers for APIs. So, let’s create both controllers:

app/Http/Controllers/API/BaseController.php

<?php
 
namespace App\Http\Controllers\API;
 
use Illuminate\Http\Request;
use App\Http\Controllers\Controller as Controller;
 
class BaseController extends Controller
{
    /**
     * success response method.
     *
     * @return \Illuminate\Http\Response
     */
    public function sendResponse($result, $message)
    {
    	$response = [
            'success' => true,
            'data'    => $result,
            'message' => $message,
        ];
 
        return response()->json($response, 200);
    }
 
    /**
     * return error response.
     *
     * @return \Illuminate\Http\Response
     */
    public function sendError($error, $errorMessages = [], $code = 404)
    {
    	$response = [
            'success' => false,
            'message' => $error,
        ];
 
        if(!empty($errorMessages)){
            $response['data'] = $errorMessages;
        }
 
        return response()->json($response, $code);
    }
}

app/Http/Controllers/API/AuthController.php

<?php

namespace App\Http\Controllers\API;
  
use App\Http\Controllers\API\BaseController as BaseController;
use App\Models\User;
use Validator;
use Illuminate\Http\Request;
  
class AuthController extends BaseController
{
 
    /**
     * Register a User.
     *
     * @return \Illuminate\Http\JsonResponse
     */
    public function register(Request $request) {

        $validator = Validator::make($request->all(), [
            'name' => 'required',
            'email' => 'required|email',
            'password' => 'required',
            'c_password' => 'required|same:password',
        ]);
     
        if($validator->fails()){
            return $this->sendError('Validation Error.', $validator->errors());       
        }
     
        $input = $request->all();
        $input['password'] = bcrypt($input['password']);
        $user = User::create($input);
        $success['user'] =  $user;
   
        return $this->sendResponse($success, 'User register successfully.');
    }
  
  
    /**
     * Get a JWT via given credentials.
     *
     * @return \Illuminate\Http\JsonResponse
     */
    public function login()
    {
        $credentials = request(['email', 'password']);
  
        if (! $token = auth()->attempt($credentials)) {
            return $this->sendError('Unauthorised.', ['error'=>'Unauthorised']);
        }
  
        $success = $this->respondWithToken($token);
   
        return $this->sendResponse($success, 'User login successfully.');
    }
  
    /**
     * Get the authenticated User.
     *
     * @return \Illuminate\Http\JsonResponse
     */
    public function profile()
    {
        $success = auth()->user();
   
        return $this->sendResponse($success, 'Refresh token return successfully.');
    }
  
    /**
     * Log the user out (Invalidate the token).
     *
     * @return \Illuminate\Http\JsonResponse
     */
    public function logout()
    {
        auth()->logout();
        
        return $this->sendResponse([], 'Successfully logged out.');
    }
  
    /**
     * Refresh a token.
     *
     * @return \Illuminate\Http\JsonResponse
     */
    public function refresh()
    {
        $success = $this->respondWithToken(auth()->refresh());
   
        return $this->sendResponse($success, 'Refresh token return successfully.');
    }
  
    /**
     * Get the token array structure.
     *
     * @param  string $token
     *
     * @return \Illuminate\Http\JsonResponse
     */
    protected function respondWithToken($token)
    {
        return [
            'access_token' => $token,
            'token_type' => 'bearer',
            'expires_in' => auth()->factory()->getTTL() * 60
        ];
    }
}

Run Laravel App:

All the required steps have been done, now you have to type the given below command and hit enter to run the Laravel app:

php artisan serve

make sure in details api we will use following headers as listed bellow:

'headers' => [
    'Accept' => 'application/json',
    'Authorization' => 'Bearer '.$accessToken,
]

Here is Routes URL with Verb:

Now simply you can run above listed url like as bellow screen shot:

1) Register API: Verb:POST, URL:http://localhost:8000/api/auth/register

2) Login API: Verb:POST, URL:http://localhost:8000/api/auth/login

3) Profile API: Verb:POST, URL:http://localhost:8000/api/auth/profile

4) Refresh API: Verb:POST, URL:http://localhost:8000/api/auth/refresh

5) Logout API: Verb:POST, URL:http://localhost:8000/api/auth/logout

Output:

You can download code from git: Download Code from Github

I hope it can help you…

Laravel News Links

Why CleanMyMac X Is a Safe Tool and a Must-Have for Your Mac Maintenance Needs

https://static1.makeuseofimages.com/wordpress/wp-content/uploads/2024/07/cleanmymac-x.png

This article is sponsored by CleanMyMac X. Product choices and opinions expressed are from the sponsor and do not reflect the views of MakeUseOf editorial staff.

If the name CleanMyMac X sounds familiar, it’s probably because this handy software application has been around for 16 years and has been downloaded more than 30 million times. This multi-functional app will clean up junk and other files that are cluttering up your hard drive, monitor performance, and remove malware, leaving your Mac performing like it did when you first bought it.

Plus, its ultra-convenient Menu App gives you complete oversight as to what’s happening on your Mac and where the problems are.

When your Mac is running slowly, the first piece of advice is always the same: clean up your files! Further to a simple file cleanup, CleanMyMac X runs many more diagnostics and checks to bring your speed and overall performance up to par.

CleanMyMacX

CleanMyMac X is all-in-one package to enhance the speed and performance of your Mac. It cleans megatons of junk and makes your computer run faster. Just like it did on day one.

If you’ve never cleaned up your Mac before, chances are you’re running at a much slower speed due to outdated caches, broken downloads, and gigabytes of other useless or hidden files. So before you go trading in your Mac for something newer, give it a good deep clean to reveal its true performance capabilities.

The beauty of CleanMyMac X lies in its simplicity: clicking the one-button Smart Scan is all it takes to launch the newly updated scanning algorithm and get your computer running more efficiently in under a minute. Read on to find out more about what CleanMyMac X can do and learn about the cutting-edge tech brand that built it.

MacPaw Is a Long-Time Trusted Software Brand

Tech brand MacPaw has been on a mission to create user-empowering software that simplifies people’s lives. The company released the original CleanMyMac in 2008 as a simple solution to help Mac users declutter and get their machines running quicker and smoother.

Since its inception, CleanMyMac has launched a Version 2, Version 3, and finally its fourth version, CleanMyMac X, its most optimized and comprehensive cleanup, protection, and high-speed tool yet.

The most exciting advantages of the CleanMyMac X software are:

  • Smart Scan all-in-one center
  • CleanMyMac Assistant intelligent helper
  • Malware removal
  • Updater for your installed apps
  • Reinvented menu with internet speed check, available Dropbox space, and control for resource-consuming apps
  • Leading-edge visual design

Reliable Software From an Award-Winning Innovator

Throughout its 16 years of innovating, MacPaw has grown into an internationally recognized, award-winning brand—this includes two Red Dot Awards and an iF Design Award for CleanMyMac product design.

How CleanMyMac Keeps your Apple Computer in Prime Condition

CleanMyMac X is a safe tool for maintaining and optimizing your Mac’s performance. If you think your Mac might need some tuning up, consider this: the average CleanMyMac X user cleaned 47 GB of junk, removed 4 unneeded apps, and neutralized 3 malware threats. Keep reading to find out how the app takes your Mac from sluggish and cluttered to quick and clean.

Clean Up Your files

The main feature of the CleanMyMac X app is the intuitive Smart Scan function, which is the starting point for optimizing your Mac’s speed and performance. Once you click “Scan,” the algorithm will automatically do a deep dive to find useless files and junk that you can then choose to keep or delete from the summary of found items.

The System Junk feature helps you target non-essential files—including duplicate mail attachments, automatically generated system junk, and deleted files—that can all be removed to free up space and improve overall performance.

Let the Assistant Help You Along the Way

The CleanMyMac X Assistant is always ready to give tips on how to use the app more effectively—such as further cleanup, reminders about incomplete operations, and steps to enhance your Mac’s security.

Protect Your Mac

Sometimes malicious files can be tough to locate, but the Malware Removal module, powered by Moonlock engine, targets vulnerabilities from unwanted adware, viruses, spyware, and cryptocurrency miners.

The Privacy module can completely wipe any trace of all unwanted activity. Want to delete all of your browsing history in one go? Done. Need to get rid of all your random downloads? Easy.

Enhance Your Speed

The CleanMyMac X Speed Optimization feature helps you increase your Mac’s output by identifying the sources that could be slowing you down.

Within the Speed module, you can also perform regular diagnostic check-ups, including repairing disk permission and verifying the start-up disk, which can both help to keep your Mac optimized.

Take Control of Your Applications

Did you know that even after you delete an app, remnants of it can remain on your computer? The updated Uninstaller module removes applications wholly and deletes parts that have been left behind, plus it can identify potentially harmful apps with the new Suspicious Apps category.

The Updater helps you to ensure that all of your current applications are kept up-to-date, and includes convenient descriptions of any changes.

Manage Your Storage Space

Sometimes you know that you’re running low on space, but it can be hard to pinpoint the culprits. The innovative Space Lens is a space-management module that visualizes everything in your folders, displaying them as bubbles of various sizes. From there you can review this detailed storage map and decide what stays and what can go.

More Features to Enhance Your Mac Experience

The all-new Menu App provides more oversight of how your Mac is performing with six detailed monitors: storage, protection, CPU performance, memory, battery, and connected devices. In the Connected Devices module, you can even safely eject all devices individually or all at once.

Each of the above monitoring categories breaks out into its own detailed view:

  • Connected Devices: Get an instant view of anything connected to your Mac via WiFi, Bluetooth, or cable.
  • Protection Monitoring: Visualize threats and get ideas on how to protect your Mac from malware.
  • CPU Performance: Keep an eye on your CPU load, see a list of top-consuming apps, and monitor for unusual activity spikes.
  • Memory: See what’s happening with your RAM and which apps are taking up space.
  • Storage: Keep track of available storage, temperature, and condition of your drive.
  • Battery: Monitor the overall health of your battery, including how long it takes for one full charge.

Is CleanMyMac Legit?

CleanMyMac X is a widely used and completely safe software application for your Mac. CleanMyMac X is notarized by Apple, which guarantees that the app is free from malicious components and safe for distribution. It is also available on the Mac App Store, boasting an impressive 4.6 stars out of 5, with 9,900 reviews.

Besides, Apple regularly features and adds CleanMyMac to its app collections lists on MAS: Featured app: CleanMyMac X, optimize your Mac, Tidy up your Mac : App Store Story, Apps optimized for M1 Macs.

How to Get CleanMyMac X Today

CleanMyMac X is available starting at $97.61 as a one-time purchase or starting at $41.79 for a one-year subscription, depending on your needs. It can also be bundled for more savings when you buy CleanMyMac X for two Macs or for five Macs.

Don’t let your Mac maintenance take a back seat: take control of your Mac’s storage, speed, performance, and security. If you’re still unsure, you can get a free, seven-day trial of CleanMyMac X with instant activation and cancellation at any time. Thirty million downloads can’t be wrong!

MakeUseOf

Ohio residents can now add driver’s license, state ID to the iPhone Wallet app

https://photos5.appleinsider.com/gallery/47606-92947-000-lead-Arizona-xl.jpgOhio officially becomes the fifth state to support driver’s licenses and State IDs stored on the iPhone and Apple Watch via the Apple Wallet app.


In 2020, Apple announced plans to allow iPhone owners to add their passport, driver’s license, and state ID to the iPhone. Four years later, only a handful of states have adopted the feature.

Spotted by 9to5mac, Ohioans can now add their driver’s license or state ID to their iPhone or Apple Watch. This allows them to pass through select Transportation Security Administration (TSA) checkpoints faster and more securely. Currently, the Wallet-stored IDs can be used at the following airports:

AppleInsider News

Viewsonic LX700-4K RGB Projector

https://theawesomer.com/photos/2024/07/viewsonic_lx700-4k_rgb_projector_t.jpg

Viewsonic LX700-4K RGB Projector

Viewsonic’s follow up to its beloved LX700 4K projector. The LX700-4K RGB uses a new RGB laser that can produce up to 5,200 lumens and 100% of the BT.2020 color gamut for vibrant and accurate output. It can project up to a 300″ image at 4K /60Hz, but it also has 1440p/120Hz and 1080p/240Hz modes for crisp and smooth big screen gaming.

The Awesomer

Book Freak 165: Amusing Ourselves to Death

https://substackcdn.com/image/fetch/w_1456,c_limit,f_auto,q_auto:good,fl_progressive:steep/https%3A%2F%2Fsubstack-post-media.s3.amazonaws.com%2Fpublic%2Fimages%2Fb37d7a0a-8a39-4295-931e-52bc9a31ce7b_978x1500.jpeg

Get Amusing Ourselves to Death

Neil Postman’s Amusing Ourselves to Death was a 1985 wake-up call we didn’t know we’d need forty years later. Postman (1931-2003), a media theorist and cultural critic, argued that television was not just changing what we watch, but how we think and communicate as a society. While Postman’s focus was on television, his insights have become even more relevant in our current digital age. In an era dominated by social media, smartphones, and an ever-expanding array of digital entertainment options, Postman’s warnings about the impact of media on critical thinking and public discourse have only grown more urgent.

Here are four excerpts that are about television but easily apply to social media today:

Instagram:

“Americans no longer talk to each other, they entertain each other. They do not exchange ideas, they exchange images. They do not argue with propositions; they argue with good looks, celebrities and commercials.”

Twitter:

“We are presented not only with fragmented news but news without context, without consequences, without value, and therefore without essential seriousness; that is to say, news as pure entertainment.”

TikTok:

“Now … this” is commonly used on radio and television newscasts to indicate that what one has just heard or seen has no relevance to what one is about to hear or see, or possibly to anything one is ever likely to hear or see. The phrase is a means of acknowledging the fact that the world as mapped by the speeded-up electronic media has no order or meaning and is not to be taken seriously. There is no murder so brutal, no earthquake so devastating, no political blunder so costly—for that matter, no ball score so tantalizing or weather report so threatening—that it cannot be erased from our minds by a newscaster saying, “Now … this.” The newscaster means that you have thought long enough on the previous matter (approximately forty-five seconds), that you must not be morbidly preoccupied with it (let us say, for ninety seconds), and that you must now give your attention to another fragment of news or a commercial.

YouTube:

Entertainment is the supra-ideology of all discourse on television. No matter what is depicted or from what point of view, the overarching presumption is that it is there for our amusement and pleasure. That is why even on news shows which provide us daily with fragments of tragedy and barbarism, we are urged by the newscasters to “join them tomorrow.” What for? One would think that several minutes of murder and mayhem would suffice as material for a month of sleepless nights.

Cool Tools

The first GPT-4-class AI model anyone can download has arrived: Llama 405B

https://cdn.arstechnica.net/wp-content/uploads/2024/07/lama405b_hero_3-800×450.jpg

A red llama in a blue desert illustration based on a photo.

In the AI world, there’s a buzz in the air about a new AI language model released Tuesday by Meta: Llama 3.1 405B. The reason? It’s potentially the first time anyone can download a GPT-4-class large language model (LLM) for free and run it on their own hardware. You’ll still need some beefy hardware: Meta says it can run on a "single server node," which isn’t desktop PC-grade equipment. But it’s a provocative shot across the bow of "closed" AI model vendors such as OpenAI and Anthropic.

"Llama 3.1 405B is the first openly available model that rivals the top AI models when it comes to state-of-the-art capabilities in general knowledge, steerability, math, tool use, and multilingual translation," says Meta. Company CEO Mark Zuckerberg calls 405B "the first frontier-level open source AI model."

In the AI industry, "frontier model" is a term for an AI system designed to push the boundaries of current capabilities. In this case, Meta is positioning 405B among the likes of the industry’s top AI models, such as OpenAI’s GPT-4o, Claude’s 3.5 Sonnet, and Google Gemini 1.5 Pro.

A chart published by Meta suggests that 405B gets very close to matching the performance of GPT-4 Turbo, GPT-4o, and Claude 3.5 Sonnet in benchmarks like MMLU (undergraduate level knowledge), GSM8K (grade school math), and HumanEval (coding).

But as we’ve noted many times since March, these benchmarks aren’t necessarily scientifically sound or translate to the subjective experience of interacting with AI language models. In fact, this traditional slate of AI benchmarks is so generally useless to laypeople that even Meta’s PR department now just posts a few images of charts and doesn’t even try to explain them in any detail.

A Meta-provided chart that shows Llama 3.1 405B benchmark results versus other major AI models.

Enlarge / A Meta-provided chart that shows Llama 3.1 405B benchmark results versus other major AI models.

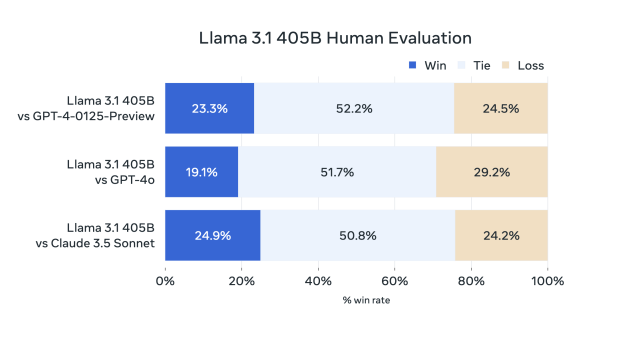
We’ve instead found that measuring the subjective experience of using a conversational AI model (through what might be called "vibemarking") on A/B leaderboards like Chatbot Arena is a better way to judge new LLMs. In the absence of Chatbot Arena data, Meta has provided the results of its own human evaluations of 405B’s outputs that seem to show Meta’s new model holding its own against GPT-4 Turbo and Claude 3.5 Sonnet.

A Meta-provided chart that shows how humans rated Llama 3.1 405B's outputs compared to GPT-4 Turbo, GPT-4o, and Claude 3.5 Sonnet in its own studies.

Enlarge / A Meta-provided chart that shows how humans rated Llama 3.1 405B’s outputs compared to GPT-4 Turbo, GPT-4o, and Claude 3.5 Sonnet in its own studies.

Whatever the benchmarks, early word on the street (after the model leaked on 4chan yesterday) seems to match the claim that 405B is roughly equivalent to GPT-4. It took a lot of expensive computer training time to get there—and money, of which the social media giant has plenty to burn. Meta trained the 405B model on over 15 trillion tokens of training data scraped from the web (then parsed, filtered, and annotated by Llama 2), using more than 16,000 H100 GPUs.

So what’s with the 405B name? In this case, "405B" means 405 billion parameters, and parameters are numerical values that store trained information in a neural network. More parameters translate to a larger neural network powering the AI model, which generally (but not always) means more capability, such as better ability to make contextual connections between concepts. But larger-parameter models have a tradeoff in needing more computing power (AKA "compute") to run.

We’ve been expecting the release of a 400+ billion parameter model of the Llama 3 family since Meta gave word that it was training one in April, and today’s announcement isn’t just about the biggest member of the Llama 3 family: There’s an entire new iteration of improved Llama models with the designation "Llama 3.1." That includes upgraded versions of its smaller 8B and 70B models, which now feature multilingual support and an extended context length of 128,000 tokens (the "context length" is roughly the working memory capacity of the model, and "tokens" are chunks of data used by LLMs to process information).

Meta says that 405B is useful for long-form text summarization, multilingual conversational agents, and coding assistants and for creating synthetic data used to train future AI language models. Notably, that last use-case—allowing developers to use outputs from Llama models to improve other AI models—is now officially supported by Meta’s Llama 3.1 license for the first time.

Abusing the term “open source”

Llama 3.1 405B is an open-weights model, which means anyone can download the trained neural network files and run them or fine-tune them. That directly challenges a business model where companies like OpenAI keep the weights to themselves and instead monetize the model through subscription wrappers like ChatGPT or charge for access by the token through an API.

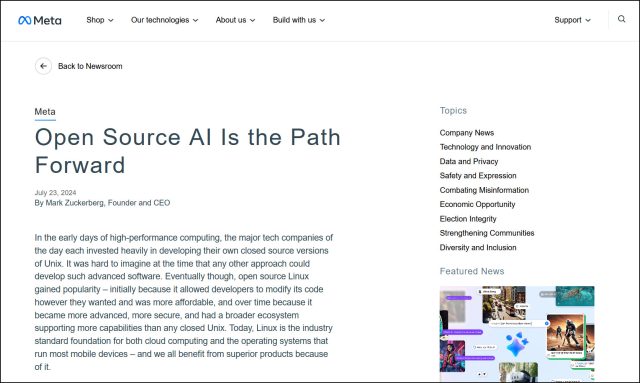
Fighting the "closed" AI model is a big deal to Mark Zuckerberg, who simultaneously released a 2,300-word manifesto today on why the company believes in open releases of AI models, titled, "Open Source AI Is the Path Forward." More on the terminology in a minute. But briefly, he writes about the need for customizable AI models that offer user control and encourage better data security, higher cost-efficiency, and better future-proofing, as opposed to vendor-locked solutions.

All that sounds reasonable, but undermining your competitors using a model subsidized by a social media war chest is also an efficient way to play spoiler in a market where you might not always win with the most cutting-edge tech. That benefits Meta, Zuckerberg says, because he doesn’t want to get locked into a system where companies like his have to pay a toll to access AI capabilities, drawing comparisons to "taxes" Apple levies on developers through its App Store.

A screenshot of Mark Zuckerberg's essay, "Open Source AI Is the Path Forward," published on July 23, 2024.

Enlarge / A screenshot of Mark Zuckerberg’s essay, "Open Source AI Is the Path Forward," published on July 23, 2024.

So about that "open source" term. As we first wrote in an update to our Llama 2 launch article a year ago, "open source" has a very particular meaning that has traditionally been defined by the Open Source Initiative. The AI industry has not yet settled on terminology for AI model releases that ship either code or weights with restrictions (such as Llama 3.1) or that ship without providing training data. We’ve been calling these releases "open weights" instead.

Unfortunately for terminology sticklers, Zuckerberg has now baked the erroneous "open source" label into the title of his potentially historic aforementioned essay on open AI releases, so fighting for the correct term in AI may be a losing battle. Still, his usage annoys people like independent AI researcher Simon Willison, who likes Zuckerberg’s essay otherwise.

"I see Zuck’s prominent misuse of ‘open source’ as a small-scale act of cultural vandalism," Willison told Ars Technica. "Open source should have an agreed meaning. Abusing the term weakens that meaning which makes the term less generally useful, because if someone says ‘it’s open source,’ that no longer tells me anything useful. I have to then dig in and figure out what they’re actually talking about."

The Llama 3.1 models are available for download through Meta’s own website and on Hugging Face. They both require providing contact information and agreeing to a license and an acceptable use policy, which means that Meta can technically legally pull the rug out from under your use of Llama 3.1 or its outputs at any time.

Ars Technica – All content

Fact check: Founding Fathers did know about repeating rifles

https://www.buckeyefirearms.org/sites/buckeyefirearms.org/files/styles/slideshow/public/field/image/belton-letter-continental-congress.jpg?itok=7mA-4_jq

Cover page of Joseph Belton's first letter to the Continental Congress, sent April 11, 1777
by Logan Metesh

Many people try to claim that the Founding Fathers couldn’t have conceived of repeating rifles when they drafted the Second Amendment to the Bill of Rights. However, the story of Joseph Belton and his correspondence with the Continental Congress proves otherwise.

If you’d prefer to watch and learn, the video I made here details the entire event. If you’d prefer to read about it, the story unfolds below.

Belton, an inventor and gunsmith from Philadelphia, claimed to have devised a new flintlock musket capable of firing as many as sixteen consecutive shots in as little as twenty seconds. After the gun had fired its consecutive loads, it could then be reloaded individually like all other traditional firearms of that era. He first wrote to Congress about his new invention on April 11, 1777, letting them know he could demonstrate it to them at any time.

Intrigued by Belton’s claim, Congress ordered 100 examples of his “new improved gun.” They authorized him to oversee the construction of new guns, or alteration of existing guns, so that they were capable of discharging eight rounds with one loading and that he “receive a reasonable compensation for his trouble, and be allowed all just and necessary expences [sic].”

On May 7, Belton replied to Congress with his terms regarding what he felt to be “reasonable compensation.” In order to determine his fee, Belton wanted to arm 100 soldiers with his invention and demonstrate the capabilities of such armed men to a panel of four military officers — two of Congress’ choosing and two of Belton’s choosing. The officers then determined how many men they felt Belton’s 100 men were equivalent to when carrying a standard firearm. (For example, 100 specially armed men were equivalent to 200 regularly armed men, or more.)

For his ability to double the manpower, Belton felt that he was entitled to £1,000 for every 100 men he armed from a given state. Belton justified his price by claiming that a state could not raise, equip, and clothe 100 men for £1,000, making his 100 men armed as though they were 200 men a bargain. (For reference, £1,000 in 1777 is the equivalent of £150,000 today. If all 13 states outfitted 100 men, Belton would receive £13,000 — or £1,900,000 today.)

Belton argued that arming 3,000 men or more with his invention created enumerable advantages beyond description on the battlefield, making his compensation “vastly reasonable.” As such, his terms were non-negotiable. If Congress refused or attempted to haggle in any way, he would withdraw his offer completely. (For those doing the math, 3,000 men armed with Belton’s repeater would mean that he’d collect more than £4,500,000 in today’s currency.)

Belton must have realized immediately that his demands were more than outlandish because the next day, on May 8, he wrote a letter to John Hancock lowering his fee to £500 for doubling, £1,500 for tripling, £2,000 for quadrupling, and so forth.

On May 15, Congress read Belton’s letter to the body. They quickly dismissed it because of his “extraordinary allowance.” (No one saw that coming, right?) Congress considered the matter dropped and didn’t reply to Belton, likely assuming he would take their lack of reply as a refusal.

They assumed wrong.

Having heard nothing from Congress for over a month, Belton wrote them again on Saturday, June 14. This time, he claimed he could accurately hit targets with his rifle out to 100 yards and possibly even out to 200 yards. He offered to demonstrate this feat to Congress on the following Monday at 10:00 am in the State House Yard.

The same day Belton wrote this letter, Congress was involved with something that would prove far more important. On June 14, 1777, the Continental Congress approved the design for a national flag.

With Congress engaged in more pressing matters, Belton’s letter went unanswered for almost a month when he decided to write again.

His letter from July 10 was not nearly as polite as his previous ones. This time, he tried to rile members of the body by claiming that Great Britain regularly pays £500 for lesser services. If, he mused, the “little Island” could afford such payments, surely this “extensive continent” could do the same.

He also enclosed a letter signed by General Horatio Gates, Major General Benedict Arnold (before he became a turncoat), well-known scientist David Rittenhouse, and others, all claiming that his invention would be of “great Service, in the Defense of lives, Redoubts, Ships & … even in the Field,” and that they felt Belton was entitled to “a handsome [sic] reward from the Publick [sic].”

Having received the letter immediately, Congress resolved that same day to refer Belton’s petition to the Board of War, made up of five delegates. Among these five delegates were the future second president of the United States, John Adams, and Benjamin Harrison V, father and great-grandfather of the ninth and 23rd presidents of the United States, respectively.

Nine days later, on July 19, Congress got word from the Board of War. Much to Belton’s dismay, they dismissed his petition altogether. At this point, he must have finally gotten the hint that Congress wouldn’t authorize such exorbitant payment for his services. The historic record turns up no more correspondence between Belton and Congress.

Despite the fact that Joseph Belton failed to convince the Continental Congress to outfit colonial soldiers with his repeating rifle, it’s still a very important story. Belton invented his gun in 1777. The Bill of Rights wasn’t ratified until 1791. That means our Founding Fathers not only knew about repeating rifles 14 years before the creation of the Second Amendment, but that they thought highly enough of the idea to pursue further development and implementation of such technology. The fact that it proved to be cost-prohibitive is moot, as it certainly could have been done if Congress and Belton had agreed upon the definition of “reasonable compensation.”

So, the next time someone tells you the Second Amendment was never designed to protect the right to own a repeating rifle or that it was only meant to apply to flintlock firearms, sit them down and tell them the story of Joseph Belton and his repeating flintlock musket.

Republished with permission from AmmoLand.

Buckeye Firearms Association

Witness the rise of the Bene Gesserit in new Dune: Prophecy teaser

https://cdn.arstechnica.net/wp-content/uploads/2024/07/duneTOP-760×380.jpg

The HBO Original Series Dune: Prophecy will premiere this November.

Fans of director Denis Villeneuve’s epic two-part film adaptation of Frank Herbert’s Dune have no doubt been curious about the upcoming HBO Max series, Dune: Prophecy. It’s a prequel series inspired by the novel Sisterhood of Dune, written by Brian Herbert and Kevin J. Anderson, exploring the origins of the Bene Gesserit. The studio just dropped a tantalizing teaser rife with political intrigue, ominous warnings, and a bit of hand-to-hand combat.

The series was first announced in 2019, with Villeneuve serving as an executive producer and Alison Schapker (Alias, Fringe, Altered Carbon) serving as showrunner. The first season will consist of six episodes, and it’s unclear how closely the series will adhere to the source material. Per the official premise:

Set 10,000 years before the ascension of Paul Atreides, Dune: Prophecy follows two Harkonnen sisters as they combat forces that threaten the future of humankind, and establish the fabled sect that will become known as the Bene Gesserit.

Emily Watson co-stars as Valya Harkonnen, leader of the Sisterhood, with Olivia Williams playing her sister, Tula Harkonnen. Mark Strong plays Emperor Javicco Corrino, described as "a man from a great line of war-time Emperors, who is called upon to govern the Imperium and manage a fragile peace," while Jodhi May plays Empress Natalya and Sarah-Sofie Boussnina plays Princess Ynez.

The cast also includes Shalom Brune-Franklin as Mikaela, a Fremen woman who serves the royal family; Travis Fimmel as Desmond Hart, described as "a charismatic soldier with an enigmatic past"; Chris Mason as swordsman Keiran Atreides; Josh Heuston as Constantine Corrino, the illegitimate son of Javicco; Edward Davis as rising politician Harrow Harkonnen; Tabu as Sister Francesca, the Emperor’s former lover; Jihae as Reverend Mother Kasha, the Emperor’s Truthsayer; Faoileann Cunningham as Sister Jen, Chloe Lea as Lila, Jade Anouka as Sister Theodosia, and Aoife Hinds as Sister Emeline, all acolytes at the Sisterhood School.

Power = control

A short teaser was shown in May during the Warner Bros. Discovery Upfront presentation in New York City. It was heavy on the exposition, with a voiceover describing the founding of a sisterhood assigned to the Great Houses "to help them sift truth from lies." The result was a "network of influence throughout the Imperium… but power comes with a price."  They want to place a Sister on the throne and arrange a marriage to make it possible. Not all the Sisters were on board with the plan, however, with one warning that the Sisterhood was playing god "and we will be judged for it."

This latest teaser opens with an admonition to acolytes of the Sisterhood: "You wish to serve the Great Houses and shape the flow of power; you must first exert power over yourself." The emperor seems to be easily wooed by the "sorceresses," much to his empress’s chagrin, but the more influence the Sisterhood wields, the more enemies it gains. Desmond Hart also has his suspicions about the Sisterhood, probably with good reason. "Our hands are poised on the levers of power but yet our grasp on it is still fragile," Valya tells her sister Tula, assuring her that "I am trying to protect the Imperium"—and "sacrifices must be made."

Dune: Prophecy premieres this November on Max.

Listing image by HBO Max

Ars Technica – All content