Bloomberg Connects offers guides to partnered museums and cultural institutions across the globe.
Besides museums, you’ll find botanical gardens, historic cemeteries, zoos, monuments, theaters, and more in this app.
Bloomberg Connects excels in preparing you for real-world visits, while its closest competition, Google Arts & Culture, focuses more on virtual collections.
You probably think that if you want to check out a museum, you actually have to go there. But that’s not the case anymore, thanks to the popularity of smartphones. Today, with apps like Bloomberg Connects, you can see and learn about collections from all over the world.
What Is Bloomberg Connects, and What Can You Use It For?
Bloomberg Connects is an app for iOS and Android that partners with museums and other cultural institutions across the planet to offer guides to their various collections and exhibits. When you open the app, you’ll see a list of nearby locations you can tap on.
Once you open each individual guide, you’ll be presented with a wealth of info about what you can find there, from current exhibits to the permanent collection, organized in various ways that should suit anyone’s preferences.
Curious about who’s buried in a nearby cemetery? Or do you want to see the latest hot exhibition a museum’s putting on? All these things are spotlighted in Bloomberg Connects, with plenty of pictures and essays to feed your desire for knowledge.
The app also includes maps of each location, so you don’t need to pick up a paper guide at the door when you visit. You can zoom in, which is helpful if you have poor eyesight, and the app also marks the highlights of the institution so that you can easily get to them in person.
What Places Can You Visit With Bloomberg Connects?
Like the Bloomberg organization, which serves as its sponsor, the Bloomberg Connects app is available worldwide. You can find over 550 institutions from over 24 countries, including the United States, Canada, the United Kingdom, Mexico, and Italy.
The types of places available include museums, botanical gardens, historic cemeteries, zoos, theaters, historic houses, monuments, galleries, art walks, and even events like the Venice Biennale. Among these locations are heavy hitters like the Metropolitan Museum of Art, the Art Institute of Chicago, and the Guggenheim. You can check out the full list on Bloomberg Connect’s website, where you’ll find dozens of small institutions too.
However, even if your interest doesn’t lie with museums, Bloomberg Connects has a few interesting collections to check out, like MTA Arts and Design. These are artworks you can see inside the New York City subway system if you’re curious. The app covers a lot of street art and other work you may encounter in your everyday life, like the Project Row Houses in Houston, the Street Art Museum in Amsterdam, and the NYC Health + Hospitals Arts in Medicine program.
How Does Bloomberg Connects Compare With Google Arts & Culture?
There are dozens of museum guides available, many of which are bespoke apps limited to a single institution like the Rijksmuseum or Museo del Prado. The one guide you’re most likely to have heard of and used is Google Arts & Culture, which covers over 2,000 institutions across the world and is available on the web or as an app.
Aside from covering far more places, Google Arts & Culture has an extensive collection of images from most of the institutions it covers, and you can easily search for specific keywords. It’s good for doing art research, looking for inspiration for your own work, or just doing virtual visits of collections.
What Google Arts & Culture isn’t great at is preparing you for visits to real-world locations. It’s difficult to find and browse the list of institutions it covers, and both the app and website are extremely cluttered with various experiments like VR experiences and games—although some Google Arts & Culture web games are worth playing.
In contrast, Bloomberg Connects points you to the nearest locations and tells you everything you need to know to visit, from basics like the hours of operation to guides spotlighting the temporary exhibitions on display. During your visit, you can even look up objects via a number or QR code and enjoy text or audio commentary.
There’s no clear "winner" between the two, as they essentially are designed to do different things. For art lovers, both services are worth having in your arsenal. But when it comes to what app you should have on your phone, Bloomberg Connects is definitely worth keeping around for your next trip.
There’s no real way to explain the pricing structure of knives. Brand, materials, function, and country of origin all play a role in retail pricing. But still, the numbers are all over the place.
Perhaps nothing complicates all that more than the $10 Ozark Trail 7.5” EDC folding knife, sold exclusively at Walmart. It’s been on the market for a little while now, but a couple of months ago, it started to get a lot of attention on the internet — so much so that it’s sold out in stores and online.
Dubbed “The Ozark Grail,” the internet stands divided on whether this 7.5-inch pocket knife is actually dependable. Purists note it is strikingly similar in form and function to Benchmade’s Bugout, which starts at $180 and is one of the highest-grossing pocket knives on the market today.
But the Bugout isn’t without its own faults (it’s a medium-duty knife at best), and this $10 Ozark Trail knife addresses that by adding steel liners that beef up the core and eliminate handle flex.
In short: I beat the snot out of this knife, and though it looks like it, it still functions just as well as the day that I took it out of its clamshell packaging in the parking lot at my local Walmart. This $10 Ozark Trail folding knife from Walmart may not have a backstory to brag about. In its place is an underdog knife with the form, function, and materials I expect in knives 10 times its price.
Ozark Trail did its homework with the design and execution of this knife. The Ozark Trail 7.5-inch Slide Lock Folding Knife is a versatile, everyday carry pocket knife aimed at the outdoor crowd.
It sports a 3.3-inch D2 drop-point blade that can be actuated by an ambidextrous thumb stud. Ball bearings around the pivot further aid the opening operation on the knife.
After hard use and 1,000+ cycles, the blade showed no wobble, wear, or loss of lock strength; (photo/Nick LeFort)
It also boasts a crossbar lock — not only the strongest and most reliable knife lock around, but it also allows for opening and closing the knife with one hand.
There’s no way of avoiding the similarities between this knife and the Benchmade Bugout. Where the Bugout has metal plates that support the pivot and lock, the Ozark Trail carries a full steel frame, from tip to tail. This addresses flexing issues and gives support to both the pivot and lock. Additionally, it does so without adding weight to the knife, which tops out at 2.9 ounces.
Other aspects include a nondescript orange plastic handle scales and a right-hand, tip-up pocket clip. There’s also a black coating on the blade to help stave off rust and corrosion, above and beyond the protective properties of the D2 steel.
First Impressions
Growing up, Ozark Trail always struck me as a value brand. My family bought Ozark Trail tents for a fraction of the price of big-name tents and hoped they’d get us through a season. I’ve found the brand’s products durable and reliable enough for family camping, but not on par with higher quality brands for anything backpacking or trekking related
With that in mind, I walked into this $10 Walmart knife test with low to moderate expectations.
(Photo/Nick LeFort)
When I first handled this knife, I sat in my truck in the Walmart parking lot looking for build imperfections or a lack of finish work. I found none.
All the layers matched up, and the blade sat perfectly down the center of the handle channel. I saw no marks on the handle scales where they came out of the mold, and felt no wobble in the blade. Then, I spent the next 20 minutes driving back to the house, flicking the knife open and closed.
As someone who’s tested knives that touch the $1,000 mark and all price points up to it, I really can’t make sense of this $10 knife. It seems like the company must take a loss in profits just to upset the industry. D2 steel may now be considered a value steel, but that doesn’t mean it’s any less potent than in the days when it was highly sought after.
The crossbar lock is the strongest, most reliable, and most widely adapted lock mechanism on a folding knife. And from the frame up, this knife is solid and durable. This is easily a $40 knife by today’s standards, if not more.
There had to be a catch.
In the Field
This knife shares similarities with the Bugout in both form and function, at a fraction of the price; (photo/Nick LeFort)
I found tons of complaints aboutthis knifeonline, many of which are unsubstantiated. Out of the box, I had no blade wobble nor any issues with the crossbar lock itself. However, you can find some dyed-in-the-wool knife nerds claiming otherwise. This is a common practice when things seem too good to be true. People will go to great lengths to find something negative to say about unicorns.
But I don’t think their findings are genuine.
I spent a month beating the hell out of this knife, but not outside the norm of any other knife I test. I tested it like any other knife, because that’s how it’s going to be treated. In between using it in real-life situations, I cycled the knife as many times as I could when I had some downtime.
It became a habit and I stopped counting at 1,000. There was no blade wobble, no wear on the pivot pin, and the lock worked just as well as it did the day I removed it from the packaging.
One thing that has always bothered me about the Bugout is how the handle flexes. As I stated previously, the inclusion of steel liners on the Ozark Trail eliminated that. Another concern I have had about the Bugout is how well it would stand up to lateral torsion, or side-to-side flexing.
So, I batoned the Ozark Trail into a piece of wood and flexed it left and right, fully expecting it to snap — but it didn’t. After that, there was a little blade wobble, but I easily fixed that by retightening the pivot screw.
(Where) Can You Get One?
I have never seen so much hype around a knife in my life. In the world of knives right now, nothing has more attention focused on it. Suffice it to say, the fan-dubbed “Ozark Grail” is sold out online.
However, there are rumors that you can find them on shelves at random Walmarts throughout the land. If you’re out getting cat food, it might be worth taking the walk a few aisles over to see if you’re in luck.
That said, you can sign up for alerts when this knife comes back in stock online. If you want to get your hands on one now and don’t mind paying a little extra, there are plenty of them on eBay. The markup isn’t terrible — I saw a few for around $30, which is still a good deal for this knife.
Conclusion: Should You Buy?
For just $10, this knife is a standout choice for everyday and outdoor use. Its value is exceptional, proving once again that knife pricing often defies logic; (photo/Nick LeFort)
After a month of real-world use, the “Ozark Grail” has my stamp of approval. The coating on the blade is starting to wear off and the blade could use a rehoning, although it is still fairly sharp. But these things are to be expected. I didn’t notice anything out of the ordinary, aside from the knife being orange and black and giving off some serious Halloween vibes.
In my expert opinion, there is no reason (besides being sold out everywhere) that you shouldn’t buy the Ozark Trail 7.5-in. knife; you could easily trust it to get you through day-to-day life or any outdoor adventures you have planned. For $10, it’s truly an anomaly, but, as I said, knife pricing doesn’t make sense.
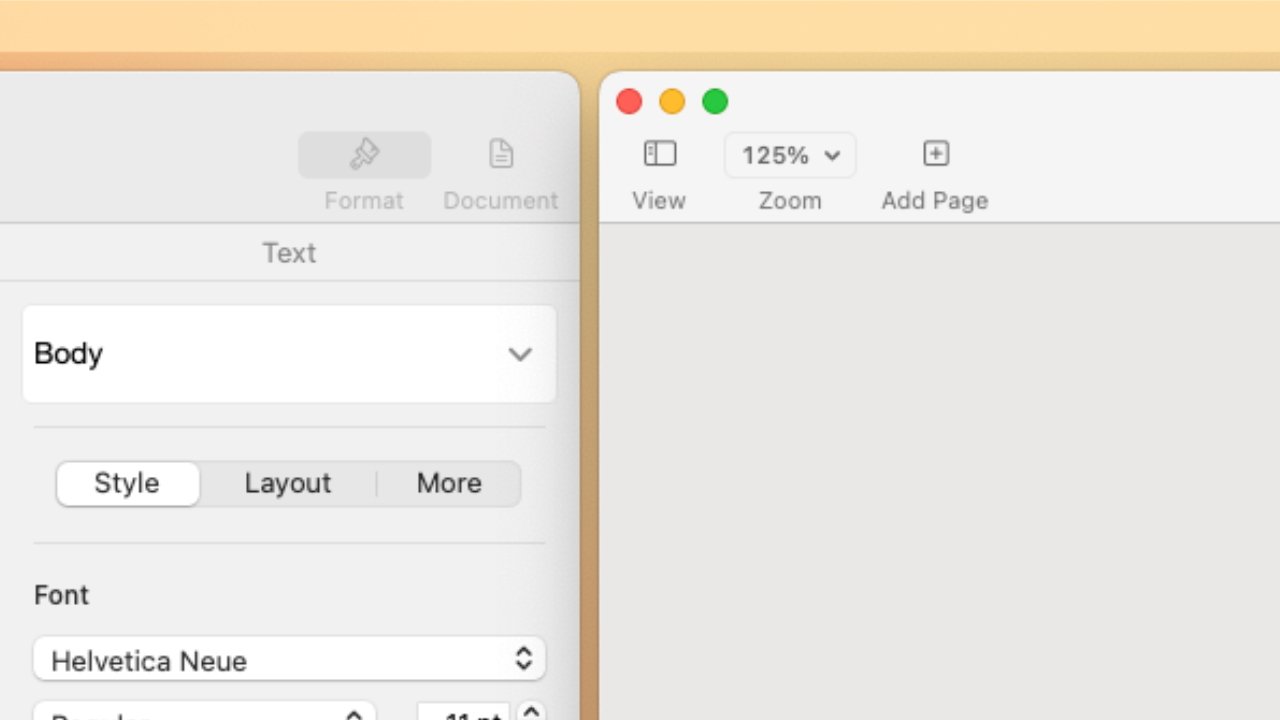
Tiled windows have a gap, or margin, by default, but you can change that.
By default, macOS Sequoia leaves a neat gap between windows when they are tiled — but if you don’t like that, it’s easy to change it.
If you use Apple’s new Window Tiling feature in macOS Sequoia to just tile one window over the side of your screen, you’ll never notice this. But as soon as you tile two next to each other, you’ll see a gap.
It’s the same kind of gap that Apple imposes when you drag widgets onto the Mac screen, the same kind of thing where it’s trying to make things neat. It isn’t a mistake, it’s a conscious choice by Apple — but you can still change it if you like.
For a feature that is meant to help everyone handle all the mess of windows and documents we have open, Apple has rather buried some of the controls in Settings. But if you go there, you’ll find the setting to change.
How to turn off the gaps in Window Tiling
Go to Settings
Choose Desktop & Dock
Scroll down to the Windows section
Turn off Tiled windows have margins
There are two other options in this section that can cause irritation, and both can be switched on or off. One is just whether you have to hold the Option key when you drag a window, if you want it to tile.
Just turn this setting off to get rid of the gaps between tiled windows on macOS Sequoia
That one might actually be useful, once you remember it, because the second option is about what happens when you drag a window to the edge of your screen. Very often, you’re going to find that although you just wanted to reposition a window, you’ve come close enough to the edge that the Mac tiles it.
When that does happen, you can drag the window away again and it will revert to the original size.
You do get used to this, but it never quite goes away. So you could turn on the requirement to use the Option key while you drag — or you could just turn off dragging to the edges.
There isn’t a great deal of functionality in Apple’s Window Tiling, at least not compared to third-party apps such as Moom. But what is there works well — and what is there can be adjusted to suit you.
You can learn a lot of firearms skills, survival skills, and other useful information from the Internet, but what if the Internet goes down, or you just want a hard copy of all that information because you’re an old-fashioned and practical kind of person? T.Rex Arms is looking to fill that need with a new series of military-issued field manuals that are updated to be more usable.
Note that T.Rex Arms isn’t here to change the content of these classic military field manuals. Instead, they want to simply make them easier to read and learn from, instead of offering the shoddily-scanned-and-printed dreck that so many budget-oriented publishers have sold over the years.
Check out the explanation below, from Isaac Botkin of T.Rex Arms:
It’s a very practical way of looking at the realities of field manuals—yes, doing the typesetting all over again is going to be work, but we’re not talking rocket science here either (as Botkin says, it was not a lot of work, but more than he expected). If the end result is a much more useful book, then it’s well worth paying a bit extra to have that in hand. If you’ve picked up some of these government-issued books at a gun show or army surplus store, you know that they can terrible quality, and T.Rex’s solution sounds like something a lot of customers could use.
Not to mention, they’re still offering links to download these books as PDFs for free in their original and unimproved form. See their entry for the Marine Rifle Squad Handbook here; those links are at the bottom of the page. You can’t accuse them of being out to make a quick buck—they’re only charging for their work of publishing and printing.
Have your say
Botkin says T.Rex Arms doesn’t want to simply reprint the Ranger Handbook or other commonly-published military manuals. Botkin’s X/Twitter post on September 4 said “T.Rex Arms is a publishing company now. We sell books, and we reprint books. It is a small start, but let us know what we should do next!”. So if there’s a field manual you believe deserves a reprint, let them know via comments on YouTube, or social media. Your suggestion could help them get useful, maybe even life-saving, information out there for readers.
Most locks on doors and cabinets are pretty ordinary. 3D animator fkt likes to dream up designs for unique lock mechanisms, which make the process of locking things much more interesting to observe. Here’s a playlist of some of fkt’s amazing concept locks, each of which looks like it could be turned into a real-world lock with enough maker skills.
At first, the term "multi-tenancy" might sound like a technical challenge, but it’s actually a straightforward strategy for organizing software to serve multiple users seamlessly. While the concept itself is simple to grasp, its implementation can vary depending on the specific needs of different applications.
Let’s begin by defining what multi-tenancy really means.
Multi-tenant SaaS applications are a type of software that allows multiple users to access the same software instance. This is achieved by partitioning the software into separate, isolated environments that are dedicated to each tenant. Customer data could be stored in a separate database for each tenant, or in a shared database with data assigned to tenants by unique identifiers.
As an example, consider a email service provider like Google Workspace or Microsoft 365. Each customer (tenant) has their own set of email accounts, calendars, contacts, and other data, all of which is isolated from other customers. In this case, the tenant can invite users (its employees) to their account and they might be charged per user per month/year.
1. SaaSykit Tenancy
SaaSykit Tenancy is a feature-rich multi-tenant SaaS starter kit that provides everything you need to build a modern multi-tenant SaaS application.
SaaSykit Tenancy simplifies the process of building multi-tenant applications. You can create seat-based subscription plans, allowing your users to subscribe and automatically generate a tenant space. From there, they can invite users, assign roles and permissions, and manage access easily. Once tenants invite users and they accept the invitation, seat-based billing is handled behind the scenes and synced with all the supported payment providers (Stripe, Paddle, Lemon Squeezy) automatically.
Main features:
Multi tenant dashboards: powered by FilamentPHP, each tenant has their own dashboard. Users can be part of different dashboards and they can easily switch between them.
Flat-rate & Seat-based subscription plans: you can create flat-rate or seat-based subscription plans and charge customers based on the number of seats.
One-time purchase products: you can offer your tenants one-time purchase products, such as a lifetime license for your software.
User Invitations: tenants can invite users to their account, and users can accept or reject the invitation.
Automatic Billing: SaaSykit Tenancy handles the billing process for you. It syncs seat-based billing with all the supported payment providers (Stripe, Paddle, Lemon Squeezy) automatically once a user accepts the invitation or is kicked out of the tenant.
Team Management & Roles & Permissions: Tenants can manage their team members, invite or remove users, assign roles and permissions, and manage access easily.
Multiple payment providers: Stripe, Paddle, and Lemon Squeezy support out of the box.
Customizable UI & ready-to-use components: SaaSykit offers customizable UI and ready-to-use components. You can easily customize the UI to fit your brand and you can use the ready-to-use components to build your own UI.
Built-in blog: SaaSykit Tenancy comes with a built-in blog that you can use to share news, updates, and other information with your tenants.
Beautiful checkout process: SaaSykit Tenancy comes with a beautiful checkout process that you can use to charge your tenants.
Multiple login providers: SaaSykit Tenancy supports multiple login providers, such as Google, GitHub, GitLab, and more.
Product management & discount codes: you can manage your products and create discount codes to offer your tenants from the admin panel.
Stats dashboard: track your MRR, churn rates, ARPU, and other SaaS metrics right inside your admin panel.
Automated tests: all major features are covered by ever-growing automated tests suite.
Best for:
SaaSykit Tenancy is a great choice for SaaS developers who want to build a feature-rich multi-tenant SaaS application while saving their time and effort.
2. Tenancy for Laravel
Tenancy for Laravel boilerplate builts on top of the Tenancy for Laravel package, which comes with advanced multi-tenant features for Laravel.
Main features:
Sign-up flow: Tenants can sign up and create their own account.
Cashier billing: Tenancy integrates with Cashier billing (Paddle) to handle the billing process for you.
Admin panel: comes with a Nova admin panel to manage tenants.
Automated test: comes with a tenant-aware test suite.
Best for:
Advanced users who want to get their hands dirty while building their multi-tenancy application and having big control on the details, while building the other parts of their application on their own.
3. Spatie Laravel Multi-tenancy
Spatie multi-tenancy is not a starter kit, but an open source package that allows you to build multi-tenant applications in Laravel.
Main features:
Easy to install & use: Spatie multi-tenancy is easy to install and configure.
Support single database & multi-database: Spatie multi-tenancy supports both single database and multi-database approaches.
Simple multi-tenancy features & not convoluted.
Best for:
Users who want a simple and efficient multi-tenancy package, and are willing to implement the rest of the application by themselves.
4. Tenancy Package
Just like Spatie multi-tenancy, Tenancy Package is not a starter kit, but an open source package that allows you to build multi-tenant applications in Laravel.
Features:
Easy to install & use: Tenancy Package is easy to install and configure.
Allows for great contol: you can configure the package to separate tenant files, caches, configs, database, etc.
Best for:
Similar to Spatie multi-tenancy, this package is ideal for developers seeking a straightforward multi-tenancy solution, who are comfortable building the remaining components of their application independently.
In the world of SaaS, building multi-tenant applications is often crucial for efficiently serving multiple clients. Fortunately, the Laravel ecosystem offers developers a range of powerful tools that simplify the implementation of multi-tenancy SaaS applications.
SaaSykit Tenancy is perfect for those who want a ready-to-use, feature-rich foundation, complete with seat-based billing, user management, and a customizable UI along with many other features. For developers with more technical knowledge who want to get their hands dirty, seeking more control over details, Tenancy for Laravel and the Spatie package offer powerful yet flexible options to build your SaaS exactly the way they envision it.
Choosing the right tool depends on your specific requirements and how much control you want over the implementation process. With the right choice, you’ll be well on your way to building a robust and scalable multi-tenant SaaS application that can grow alongside your business.
I’m writing this on 31st August 2024, and it is exactly 3 years since I sent out my first email to Laravel Security in Depth!There have been a few changes over the years, such as renaming to Securing Laravel back in May 2023, and moving from Substack to Ghost in April/May this year, but throughout all of that, I’ve been sending out emails each week about Laravel Security.
As of right now, I have written and published 90 security tips, and 28 in depth articles, alongside a bunch of other special articles, including the OWASP Top 10 series at the end of 2022. I still find those numbers incredible, especially since I’m pretty sure never actually missed a week! (I’ve been late a few times, but never missed one.) As someone who only blogged infrequently prior to starting this, and (still) is taking forever to build a course, I am incredibly proud of what I’ve been able to achieve with Securing Laravel.
All of that comes from you, my wonderful subscribers. I owe all of this to you, and your support and encouragement. Thank you so much for supporting Securing Laravel, and reading my emails every week. It means so much knowing folks value my work, and are interested in learning what I have to teach. 🙏
Now, let’s look at what happened this past year…
Subscribers
As of right now, I have 3,858 subscribers (both free and paid), which is incredibly awesome! I was hoping to hit 4,000 by today, but that’s still pretty close! Last year I had 2,521 subscribers, which is an increase of 1,337. 🤣 (A good consolation prize for not hitting 4,000.)
Of that number, there are currently 162 premium subscribers, which I am absolutely humbled by. I started this as a labour of love, and it now financially supports me by directly paying for the time I spend writing these emails each week. As a self-employed consultant who loves doing developer education in the security space, this support means the world. Thank you. 🥰
I would love to grow both these numbers within the next 12 months, so I’m setting myself a goal of 6,000 total subscribers and 200 premium subscribers. 🤞 If I can get more premium subscribers, it will let me do some really cool things, but I’ll talk about that below.
Published Articles
In the last 12 months, I have published:
Note, the numbers don’t add up because my release schedule is every 8 days not 7, and last week was supposed to have an In Depth not a Tip.
The Security Tips covered a very wide range of topics this year, from protecting against timing attacks, increasing bcrypt rounds, avoiding XSS in various different scenarios, configuring security headers, validation, testing, and lots more…
We also had a departure from our normal schedule with a Laravel Security Notice, where I touched on the “Androxgh0st” malware, which was "targeting" Laravel in the wild. Given it was going around the media without useful details, I felt the need to set the record straight on why it was most likely not going to affect you, and how to check you’re safe.
We recently started a new series called Pentesting Laravel, where I am walking you through my entire Security Audit and Penetration Testing process with an intentionally vulnerable app. This is my favourite series to date, and contains a lot of really cool tips. I’m not holding anything back, and you can take these articles and work through your own apps. The series will continue next week with part 3.
In addition, the following In Depth articles were published:
Adding Rehashing to Laravel I walk you through the process of adding password rehashing back into Laravel (since it was inexplicitly missing), and explain how the authentication system works. This is a fascinating one for anyone interested in the auth system.
Securing Apps on Forge An overview of my process for deploying apps on Laravel Forge and how I ensure they are deployed securely. A must for anyone who uses Forge, as some of Forge’s defaults aren’t security best practice.
Introducing Random Release announcement and documentation for my PHP package called Random. It provides cryptographically secure randomness in various forms for all PHP apps, regardless of version and framework.
Protecting Staging Sites! A bunch of tips and recommendations for deploying staging sites securely, to avoid them being compromised and used to attack production.
Registration Without Enumeration! Answering a common question: how can you build a registration form that doesn’t leak user existence? The default Laravel scaffolding is very leaky, so this fills a gap if you deal with PII or PHI and can’t have enumeration vectors.
Graceful Encryption Key Rotation Laravel 11 introduced encryption key rotation, so we dive into exactly how it works, and when you should (and shouldn’t) use it.
Using CSS Clickjacking to Steal Passwords An exploration into a fun vulnerability I found on a client app, which involves abusing inline CSS to conduct a clickjacking attack to steal sensitive information like passwords. I am very proud of this one, as it shows just how sneaky some attacks can be, and how you have to be so careful with what you allow in your apps.
In addition to writing a new email & article each week, I’ve also been working through my older articles, updating content and fixing styling, and posting them on social media. This has been a great way to get more eyes on the site, and more subscribers signing up. Most of my past articles are still very relevant, so keeping them circulating like this has the added benefit of reminding folks about important security issues.
Move to Ghost
I originally launched on Substack because they offered a really simple way to start a paid newsletter, and had solid technology and good marketing options. I was a happy author for the first couple of years.
When Twitter was bought by Musk and there was a kerfuffle regarding .substack.com links being blocked, I switched to a custom domain name (securinglaravel.com) and renamed to Securing Laravel. At the time it was motivated by the need to promote my links on Twitter and get rid of the .substack.com domain, but from that point I started to notice some warning signs around Substack (summary: Substack support racist content and attacked their users who tried to speak out about it).
Around the start of this year, I started to seriously look for an alternative and get off Substack. One option was to build a platform myself on Laravel, but I honestly just didn’t have the time to stuff around integrating billing, emails, member management, etc. That’s my eventual goal, but unless a lot of you suddenly sign up for a premium subscription soon, it won’t be happening this year. 😔
Instead, I looked at alternatives. I checked out three main options: Buttondown, beehiiv, and Ghost. I liked Buttondown, but it didn’t have a nice web presence, which is important for sharing on socials, and beehiiv was very noisy with a huge amount of features. Ghost felt simple but powerful, and most importantly, they had a Concierge Team who managed to migration for me!
After a bunch of questions to ease my paranoia, the migration actually happened! I sent out my first Ghost-powered Security Tip on the 6th May 2024!
The Concierge team made it fairly easy, but it wasn’t completely straightforward. There were some small things that went wrong, such as:
My Stripe account was locked by Substack, and require a game of three-player email tennis to get it locked at the right time.
None of the URLs persisting after the migration so the entire site 404’ed, but luckily this was easily fixed with a custom redirect route. (This had me stressed for a few hours though!)
Some of the content formatting had broken, with missing elements from Substack that Ghost doesn’t have.
No footnotes! 😭 Long time readers will know I used to use footnotes excessively, so it was quite frustrating to discover they were missing. I’ve since changed my writing style so I don’t rely on them any more.
Ongoing billing issue! 😡 Annoyingly, Ghost doesn’t support importing to showing discounts applied to subscriptions prior to the import, which means anyone with a discount from Substack (or a legacy priced subscription), will see the wrong price in Ghost. I’ve had a number of folks cancel due to this, which is frustrating and disappointing that Ghost won’t fix it.
One final annoyance with Ghost is the inability to generate a discount offer that applies to multiple products – or even a discount code. Instead, to offer a 25% discount for Securing Laravel’s 3rd Birthday, I need to give you two different links and you need to decide between them which one to use… 😒
For example, this one will get you 25% off a monthly premium subscription:
While this one will give you 25% off a yearly premium subscription:
Yes, those links are real discounts. Do you like my sneaky sales segue? 😉
The point of this email isn’t to sell you a premium subscription, so all I will say is that premium subscriptions allow me to dedicate time each month to write these emails and use my skills to improve security within the Laravel Framework and educate the community. Please consider upgrading to support my work if that is something you are able to do.
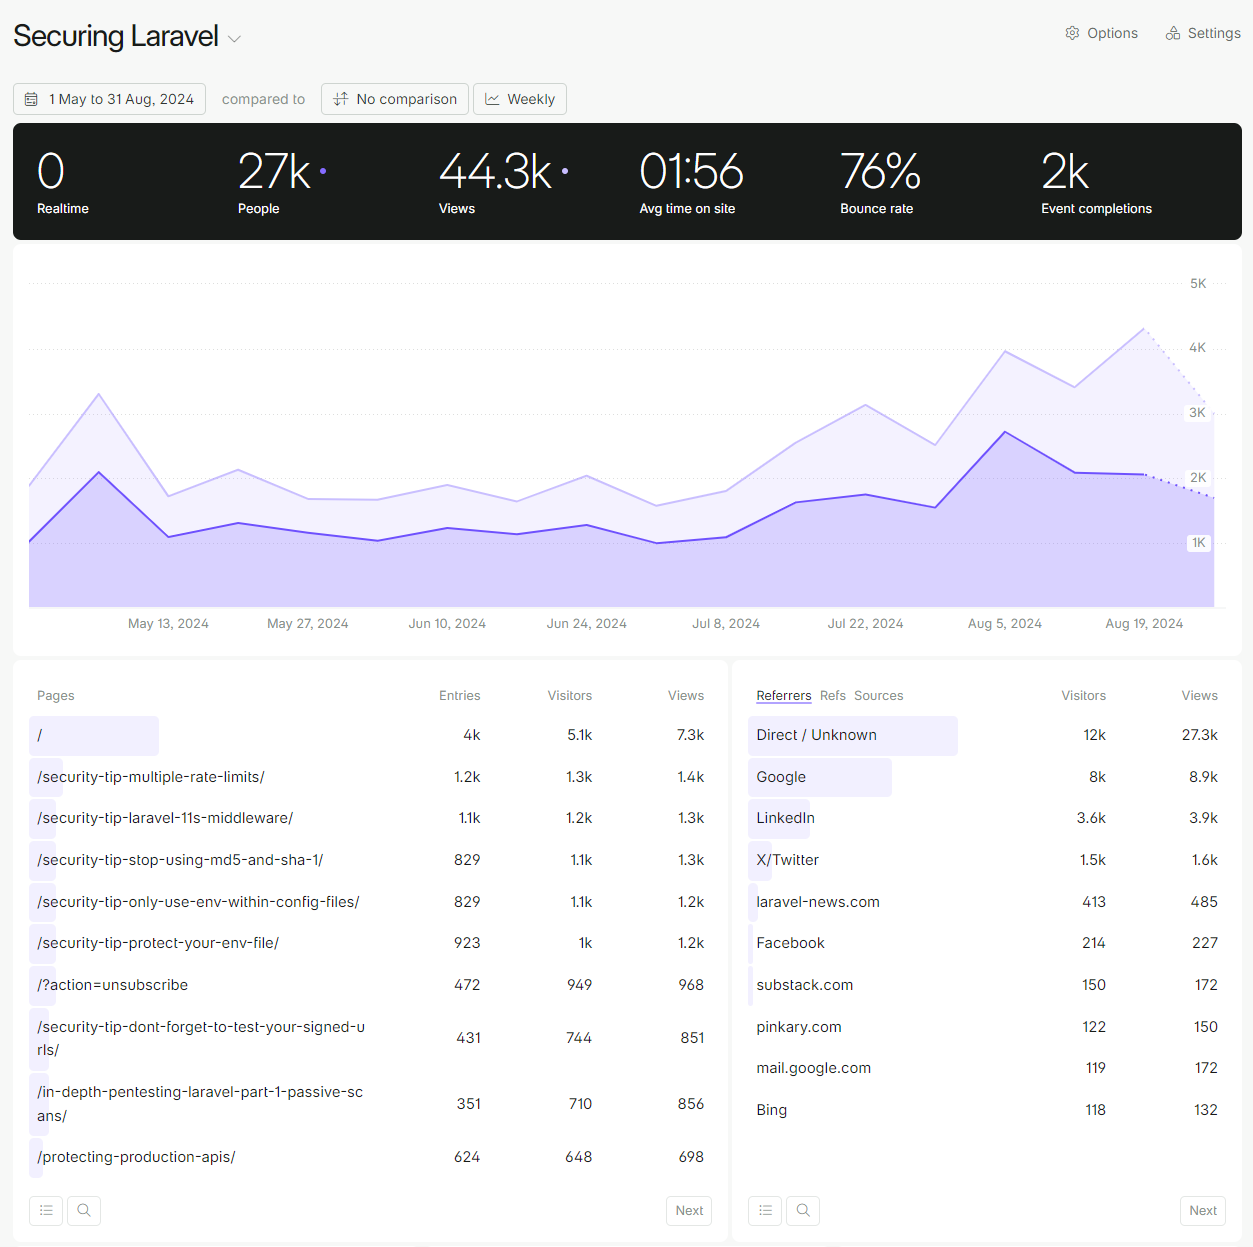
Analytics
One of the nice things about moving to Ghost is the ability to use my own analytics, so I now have Fathom Analytics set up and tracking views.
So let’s take a look at how it’s going:
Analytics from the start of May until 31st August.
It’s nice to see the number of people & views is increasing, especially the past 2 months when I’ve been trying to promote articles a bit more. I need to keep growing the site and getting more eyes on it, and now that I have decent analytics, I can track it better.
I find it fascinating that LinkedIn gives me such a high amount of traffic, and I really need to focus more of my energy over there!
Note, the high number of hits to the /?action=unsubscribe link in the above screenshot appear to be email clients that auto-click links. It does not correlate to the actual number of unsubscribes (which is incredibly tiny, for which I am very grateful).
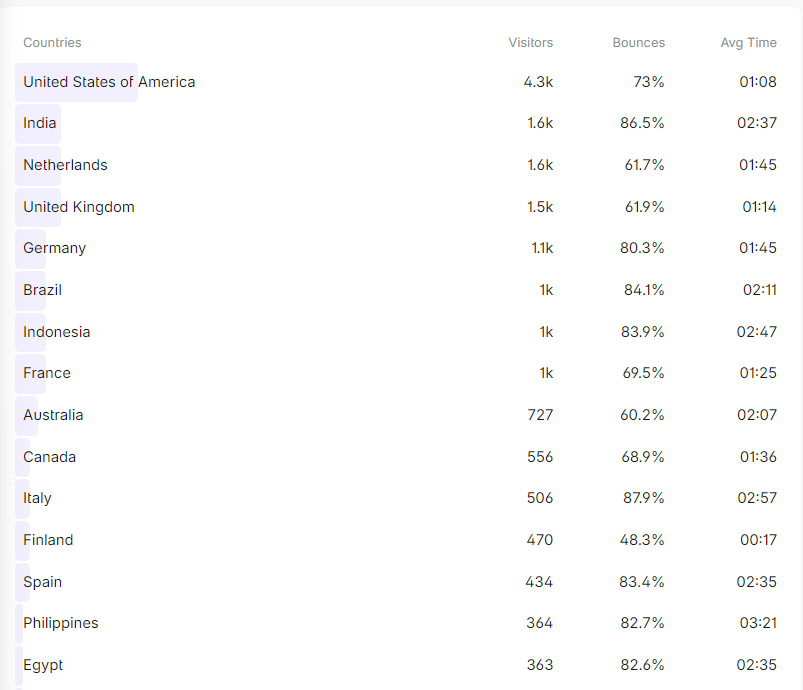
The other interesting metric is the top countries. USA is understandably at the top, but it’s cool to see India and Netherlands so high! Australia is quite low in comparison, which means I need to do more promotion at home!
Top 15 countries in Analytics
Delayed Birthday Challenge
You will no doubt have seen me talking about the birthday challenge, which I was planning to run this week. Unfortunately I had to delay it, so I’m currently aiming for the end of September. I’ll keep you posted on that as I get the ball rolling. 🤞
By way of explination (and this applies to why my course is taking so long too), this year has been an incredibly hard one, for a bunch of personal and health reasons. I’ve been living with Psoriatic Arthritis for 12 years, but it started to get really bad this year, most likely induced by a lot of extra stresses, and July and August were very tough months and it was hard to get much extra work done around the essentials. I’m starting to get it back under control now, but it’s an ongoing process.
I decided to delay the challenge, rather than try to push through, because I didn’t want to cut corners or reduce the scope. I want it to be a lot of fun, and challenging, and I will need to dedicate time to do it properly. Thanks for your patience while I get it organised, and I hope you enjoy it when it’s ready!
Looking Ahead
So what’s going to happen in the next 12 months for Securing Laravel?
The most important thing is, I will continue publishing my weekly Security Tips and monthly In Depth articles on my usual schedule. 🙂
As part of that, I will continue the Pentesting Laravel series, and then probably write accompanying articles for my Laracon AU talk for November. This is a brand new talk, so there may be a few things I want to cover! Alongside these, I need to set up and run the 3rd birthday competition. Ideally in September, but worst case I’ll hold it alongside Laracon AU in some fashion.
In terms of new things, I’m considering adding a Community Links section into each Security Tip email. This would be similar to the what Laravel News does in their weekly newsletter, but focused specifically on Laravel and PHP security-related articles, and packages. Folks in the community would be able to submit their links, and I’ll include them in my emails – sharing the love and hopefully exposing cool new resources. (Let me know if this is something you’re interested in?)
I mentioned my desire to grow the number of premium subscribers above, and my reasons for that are relatively simple: I want to spend more time working directly with the framework, and popular community packages, diving into the security-related components, looking for improvements and potential vulnerabilities/edge cases.
This is something I don’t get to spend enough time doing – most of my time is spent working with security audit clients and writing these emails. With more premium subscribers, I can shift more of my time onto Securing Laravel, and in addition to writing emails, I can dive into more framework and community code.
🤓
I actually started working on an audit of a well known package a few months ago, but it proved infeasible, so I shifted to doing my Pentesting Laravel series on a custom app I built. I’ve a few ideas to make this possible in the future.
One final thing I want to do is publish my Dropbear toolkit, as a free open-source tool for the community to use to help secure and test their apps. It’s still a "works on my machine" state at the moment, so I need to work on that and get it ready for everyone.
Alright, that’s a whole lot of words, so I think it’s time to finish up!
Thank you once again for being a subscriber to Securing Laravel. Your support means so much to me, and I love knowing there is a community around writing secure apps and learning more about security.
Please tell all of your Laravel and PHP friends, co-workers, and enemies to subscribe, so we can grow this community to 4,000, and well beyond! (Remember, my goal is 6,000 in 12 months!)
Also, if you’d like to follow me on social media, you can find all of my accounts linked in Pinkary: https://pinkary.com/@valorin.
If I can ask one favour, since you’ve made it this far, can you please hit Reply in your email client and let me know two things:
What you love about Securing Laravel.
What you think can be improved about Securing Laravel.
SaaSykit Tenancy is a multi-tenant, feature-rich Laravel-based SaaS starter kit packed with essential features to power modern SaaS applications. It offers a significant head start by providing all the foundational components you need, enabling you to focus on building your unique SaaS features rather than starting from scratch.
SaaSykit Tenancy builds on the foundation of the original SaaSykit, adding multi-tenancy support to the mix. This means you can easily create a SaaS application that can serve multiple tenants (organizations), each with its own users, subscriptions, and settings.
Building a successful multi-tenant SaaS application is no small feat. In addition to developing your core idea, you must also manage a host of other tasks, such as payment integration, product management, subscription upgrades and downgrades, landing pages, email notifications, customer education through a blog, and much more.
🤑 Seat-based subscriptions (charge per user) where billing is automatically synced with payment providers as users are added or removed from the tenant
💴 Flat-rate subscriptions per tenant
📩 User invitations to tenants
🧑🤝🧑 Team Management, adding & removing users from tenants
👮 Tenant Roles & Permissions to control what users can do within a tenant
🔌 Events for tenant actions (user added, removed, invited, etc.)
💻 Easy product, plan, discount and pricing management
👩 Stunning admin panel and user dashboard (powered by FilamentPHP)
🚪 Beautiful checkout process
🧾 Invoice generation
🗓️ Ready-to-use components (hero sections, features, testimonials, and more)
🥑 Built-in user authentication and social login (Google, Facebook, X, and more) & reCAPTCHA
📈 SaaS metric tracking in a beautiful dashboard
🎨 Customizable landing page styling for your branding
💌 Email templates and transactional emails
📝 Built-in Blog with automatic open graph image generation with many themes to choose from
🚧 Integrated Roadmap for your SaaS
🧒 User / role management for admin panel
🌍 Fully translatable and SEO-optimized
🚀 One-press deployment
🧪 Clean code & automated test coverage included
🧑💻 Extensive documentation
and much more
Whether you’re building a multi-tenant SaaS application or a user-based platform, for yourself or a client, SaaSykit has you covered. Both SaaSykit Tenancy and SaaSykit offer robust starting points for your project, saving you significant time and effort.
Alice keyboards offer an ergonomic layout to reduce wrist movement.
Customizable options are available, like switches and keycaps, for comfort.
Switch to an Alice keyboard for increased comfort during long typing sessions.
If you’re looking for a new keyboard, there are many options. Apart from different sizes and switches, different layouts provide a more ergonomic user experience. Depending on how much you type, the comfort an Alice keyboard provides might just be reason enough to switch.
What Is an Alice Keyboard?
Alice keyboards split the traditional keyboard layout into two parts and angle the keys, so minimal wrist movement is required when typing. They’re also fairly new, with the first Alice-style keyboards designed by keyboard enthusiast Yuk Tsi in 2018. The split format in a single frame results in a much more ergonomic and comfortable typing experience than the standard "slab" keyboards we’re all used to.
Additionally, since your wrists aren’t moving as much, your shoulders and forearms feel more at ease during longer typing sessions. Note that Alice keyboards aren’t the same as split keyboards, which are divided from the middle into two separate units, each covering one side of the QWERTY layout.
Just like every other keyboard on the market, there’s a fair amount of customization, layout, and design options you can choose from when looking for an Alice keyboard. Since most, if not all, Alice keyboards you’ll find will be mechanical, you can change things like the switches and keycaps and even install mods to enhance the sound or feel of your keyboard.
The mods aren’t very different from regular keyboards either, so you can easily adapt them to the Alice format. Since they’re mostly mechanical, you’ll also be able to fix your keyboard when it doesn’t work as relatively easily.
More interestingly, Alice keyboards come in a few different options. These options vary between keyboards that change the number of keys, their alignment or orientation, and sometimes add extra features like additional buttons or dials.
How Are They Different From Regular Keyboards?
Alice keyboards, even in the QWERTY layout, differ from regular ones. It’ll take a while to get used to an Alice keyboard when first starting out, as the keys are in different places and angled differently. You’ll also try to subconsciously move your wrists, which throws you off at first.
However, once you get used to the layout, the real benefits of the Alice keyboard start kicking in. Since your wrists aren’t moving as much, you won’t feel as exhausted after long typing sessions. Additionally, if you have wrist pain or issues like carpal tunnel syndrome, an Alice keyboard can go a long way in providing comfort.
Why You Should Switch to an Alice Keyboard
The main reason you should switch to an Alice keyboard, especially if you type a lot, is comfort. They aren’t necessarily as ergonomic as the keyboard manufacturer would want you to think, but they’re easier on your wrists, forearms, and shoulders compared to a regular keyboard.
Just like gaming keyboards can be a great fit for even non-gamers, Alice keyboards are the next step. That is if you’re okay paying for them. Alice keyboards are not a popular product, so expect some markup from manufacturers. You can find some pretty good budget options, such as the Keychron V8 Max or Epomaker Cidoo, coming in at $100 and $45, respectively, at the time of writing.
There is a catch, though. Regular and fully split keyboards offer much more freedom of movement when typing, allowing you to type in different positions. Alice keyboards will work best when you’re in a certain position, meaning you won’t get to move around that much. If you often find yourself typing in different positions, an Alice keyboard might not be the best decision.
Overall, an Alice keyboard will provide better comfort during long typing sessions, with the same advantages as any regular mechanical keyboard. So, if you’re a programmer, writer, or anyone who spends a significant amount of time typing, you should definitely consider an Alice keyboard.
Storing currency values in a database might seem like a trivial task, but it can become complicated due to issues like precision and rounding errors. This article will discuss several strategies for storing currency or money in a MySQL database, along with their pros and cons.
DECIMAL Data Type
The most recommended way to store currency is by using the DECIMAL data type. DECIMAL can store exact numeric data values, unlike FLOAT or DOUBLE, which are approximate numeric data types.
Here is an example of how to define a DECIMAL field for storing currency:
CREATE TABLE products (
    id INT AUTO_INCREMENT,
    price DECIMAL(19,4),
    PRIMARY KEY(id)
);
In this example, DECIMAL(19,4) means that the price field will store numbers that have up to 19 digits, including 4 digits after the decimal point.
Advantages:
Accurate to the last penny (or even beyond, depending on your specified decimal places), making it perfect for financial calculations. It is sometimes the guidelines of government financial bodies to store to 4 decimal places, even for currencies with only 2 decimal places. This is to increase precision when calculating tax.
Disadvantages:
DECIMAL columns take more storage space compared to FLOAT or DOUBLE.
Math operations with DECIMAL columns are slower compared to FLOAT or DOUBLE.
FLOAT or DOUBLE Data Types
Another way to store currency is by using FLOAT or DOUBLE data types, which can store approximate numeric data values.
CREATE TABLE products (
    id INT AUTO_INCREMENT,
    price FLOAT,
    PRIMARY KEY(id)
);
Advantages:
FLOAT and DOUBLE columns take less space compared to DECIMAL.
Math operations with FLOAT or DOUBLE are faster compared to DECIMAL.
Disadvantages:
FLOAT and DOUBLE cannot store exact values, which can lead to rounding errors. This makes them a poor choice for financial calculations where precision is essential.
Storing Cents Instead of Dollars
Another strategy is to store the money value in cents (or the smallest unit of your currency) as an INTEGER.
CREATE TABLE products (
    id INT AUTO_INCREMENT,
    price INT,
    PRIMARY KEY(id)
);
In this case, if the price of a product is $19.99, you would store 1999 in the price column.
Advantages:
Since you are storing an integer, the calculations will be exact, and you will not have to worry about rounding errors.
Disadvantages:
This approach requires you to manually convert between dollars (or your main currency unit) and cents in your application logic.
Choosing the right method to store currency values in your MySQL database depends on your specific use case. If exactness is critical, as it usually is in financial applications, DECIMAL is often the best choice despite its higher storage costs and slower calculations. FLOAT and DOUBLE could be used for applications where the speed of calculations is more important and a minor loss of precision can be tolerated. Storing money as cents in an INTEGER field is another approach that ensures exact calculations and could be convenient for certain applications.