How Mossad Planned Its Exploding Pager Operation: Inside Israel’s Penetration of Hezbollah

The Washington Post interviewed Lebanese officials, people close to Hezbollah, and Israeli, Arab and U.S. security officials and politicians about a years-long plan (originated at Mossad headquarters) that ultimately killed or maimed "as many as 3,000 Hezbollah officers and members — most of them rear-echelon figures… along with an unknown number of civilians… when Israel’s Mossad intelligence service triggered the devices remotely on September 17."
In the initial sales pitch to Hezbollah two years ago, the new line of Apollo pagers seemed precisely suited to the needs of a militia group with a sprawling network of fighters and a hard-earned reputation for paranoia… Best of all, there was no risk that the pagers could ever be tracked by Israel’s intelligence services. Hezbollah’s leaders were so impressed they bought 5,000 of them and began handing them out to mid-level fighters and support personnel in February. None of the users suspected they were wearing an ingeniously crafted Israeli bomb… Israeli officials had watched with increasing anxiety as the Lebanese group added new weapons to an arsenal already capable of striking Israeli cities with tens of thousands of precision-guided missiles. Mossad, the Israeli intelligence service responsible for combating foreign threats to the Jewish state, had worked for years to penetrate the group with electronic monitoring and human informants. Over time, Hezbollah leaders learned to worry about the group’s vulnerability to Israeli surveillance and hacking, fearing that even ordinary cellphones could be turned into Israeli-controlled eavesdropping and tracking devices. Thus was born the idea of creating a kind of communications Trojan horse, the officials said. Hezbollah was looking for hack-proof electronic networks for relaying messages, and Mossad came up with a pair of ruses that would lead the militia group to purchase devices that seemed perfect for the job — equipment that Mossad designed and had assembled in Israel. The first part of the plan, booby-trapped walkie-talkies, began being inserted into Lebanon by Mossad nearly a decade ago, in 2015. The mobile two-way radios contained oversized battery packs, a hidden explosive and a transmission system that gave Israel complete access to Hezbollah communications. For nine years, the Israelis contented themselves with eavesdropping on Hezbollah, the officials said, while reserving the option to turn the walkie-talkies into bombs in a future crisis. But then came a new opportunity and a glitzy new product: a small pager equipped with a powerful explosive. In an irony that would not become clear for many months, Hezbollah would end up indirectly paying the Israelis for the tiny bombs that would kill or wound many of its operatives. Because Hezbollah leaders were alert to possible sabotage, the pagers could not originate in Israel, the United States or any other Israeli ally. So, in 2023, the group began receiving solicitations for the bulk purchase of Taiwanese-branded Apollo pagers, a well-recognized trademark and product line with a worldwide distribution and no discernible links to Israeli or Jewish interests. The Taiwanese company had no knowledge of the plan, officials said… The marketing official had no knowledge of the operation and was unaware that the pagers were physically assembled in Israel under Mossad oversight, officials said… In a feat of engineering, the bomb component was so carefully hidden as to be virtually undetectable, even if the device was taken apart, the officials said. Israeli officials believe that Hezbollah did disassemble some of the pagers and may have even X-rayed them. "Thousands of Apollo-branded pagers rang or vibrated at once, all across Lebanon and Syria," according to the article, with a short sentence in Arabic that said "You received an encrypted message." The two-button de-encryption procedure "ensured most users would be holding the pager with both hands when it detonated," according to the article, although "Less than a minute later, thousands of other pagers exploded by remote command, regardless of whether the user ever touched his device. The following day, on September 18, hundreds of walkie-talkies blew up in the same way, killing and maiming users and bystanders…" "As Hezbollah reeled, Israel struck again, pounding the group’s headquarters, arsenals and logistic centers with 2,000-pound bombs," the article concludes. And the strike "convinced the country’s political leaders that Hezbollah could be put on the ropes, susceptible to a systematic dismantling using airstrikes and, eventually a ground invasion…"


Read more of this story at Slashdot.

Slashdot
How to make an external bootable drive in macOS Sequoia

https://photos5.appleinsider.com/gallery/61263-126550-IMG_9785-xl.jpg

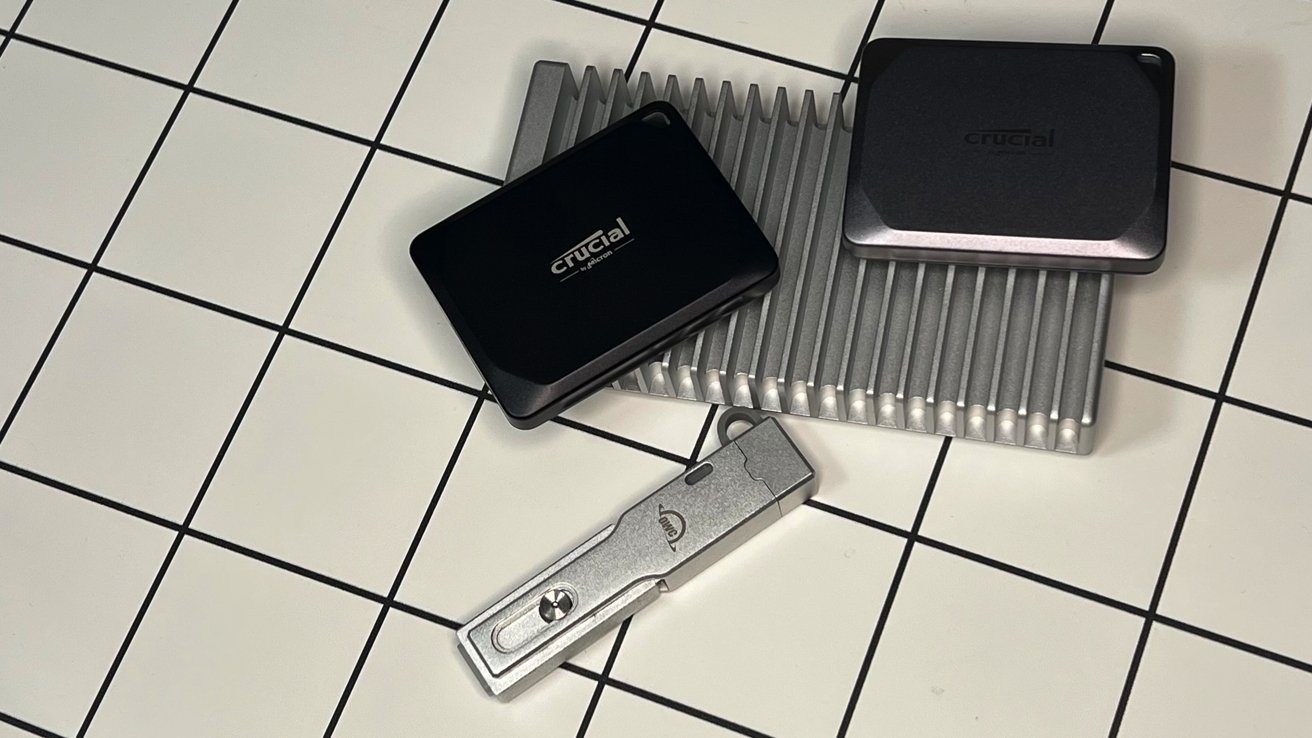
All of these drives can get Sequoia. Here’s how.


Apple makes it harder to make an external boot drive for your Mac than it has in the past, but sometimes you still need to do it. Here’s how to do it in macOS Sequoia.

Apple Silicon and macOS may be excellent, but when a Mac won’t start up, having the option to boot from an external drive is key. It will help with diagnosing the problem, and at worst it can mean your being able to carry on working after just a few minutes.

Being able to boot up any Mac from an external drive you happen to have with you is a potential security risk, though, and Apple is not having that. You now have to make a deliberate, positive choice to disable an element of macOS security in order to even start.

Take extreme care

Not only will you be actively turning off a security feature, you’ll also have to erase the external drive you want to boot from. You know that accidentally erasing your Mac’s own internal drive would be disastrous, you know you wouldn’t do that deliberately.

Yet despite that and despite the Mac double-checking you mean what you’re doing, it is still possible to make a mistake.

Consequently, the short answer to how you make a bootable external working drive is very, very carefully — and only after you’ve backed up everything.

You’ve simply got to make a backup of anything on the external drive that you want, because that’s all going away. It isn’t strictly necessary to back up your Mac’s internal drive, but do it anyway.

Use Apple’s Disk Utility to format the external drive

Maybe you’ll just have a spare copy of your data, but maybe that spare copy will be what you need to get back to work.

Then the job entails two steps:

  1. Allowing your Mac to boot from external drives at all
  2. Preparing a bootable external drive

That first part is crucial, and it is crucial that you do it before you have any problems. If you need to boot from an external drive because your Mac won’t start up, you’ve got to have already done this step because there’s no way to do it later.

So while your Mac is fine, take a few minutes to do this enabling of external drives. If you’re still on an Intel Mac, the process is different, but for all Apple Silicon Macs you have to go through these same steps.

How to allow external startup drives on Apple Silicon Macs

  1. Shut down the Mac
  2. Press the power button and keep it pressed
  3. Let go when you see one or more drives and an Options section
  4. Select Options and click Continue
  5. When the Mac boots into Recovery Mode, select a Mac user you know the password for
  6. Log in as that user
  7. Ignore all of the options in the pop-up list and instead choose Startup Security Utility from the Utilities menu
  8. Click to select the Mac’s internal drive and then click Unlock
  9. Follow the prompts concerning passwords, and select Security Policy
  10. In the Security Policy window that appears, click to select Reduced Security
  11. Then click OK
  12. Under the Startup Disk menu at top left of your screen, choose Shut Down

Now your Mac is ready. You can plug in an external drive to start up from it — except you now need to prepare that drive.

How to create an external, bootable work disk with macOS Sequoia

Not every external drive will do, but most will. The ones to ignore are the cheapest flash drives, though, as this works even with many USB sticks.

The external drive should preferably be a fast one. It definitely has to be a single drive — you can’t start up your Mac by plugging in any kind of RAID array of drives.

You can use a spinning hard drive, and those are available cheaply. But this is something where you need reliability, so go for one of the current best external SSDs.

Be so careful to choose the right drive

And of course the drive has to have macOS Sequoia on it.

So next you format the drive, then you put the macOS installer onto it.

How to format an external drive on macOS Sequoia

  1. Connect your external drive to your Mac
  2. Open Disk Utility in Applications, Utilities on your Mac
  3. Carefully select the external drive from the list that appears
  4. Click on Erase
  5. Give the drive a name
  6. From the dropdown menus that appear, choose APFS
  7. Click on Erase

Under Apple Silicon, this is likely to take only moments. When it’s done, the drive is ready, and you can go get macOS Sequoia from the Mac App Store — but you need to look in the right place.

Even as Apple promotes a new macOS on the App Store, it may not give you a link to a downloadable installer. Instead, search the Mac App Store for "macOS Sequoia," and you’ll find it.

From the list of search results that appears, click on View, then when you see it, Get. Important — it’s going to look exactly as if you’re about to install macOS Sequoia on your Mac’s internal drive, but you are not.

It looks like that because you are bounced from the App Store to the Settings app, and its Software Update section. After a few moments, however, a popup asks whether you want to download the OS. Click on the Download button to say yes.

Don’t think you can go make coffee and lunch, the time remaining is an estimate that tends to be overly cautious

Once it is downloaded, then you are prompted to install. While that is what you want, take a moment first to find the installer in the Finder. It will be called "Install macOS Sequoia" and is about 14.5GB is size.

Find it and make a copy somewhere. If you later want to install macOS Sequoia on different Macs, or if you just need to start again with your current one, it’s handy to have that file available.

Nonetheless, you downloaded it to install it on your external drive and assuming that drive is now formatted, you can just follow the prompts. Be certain, though, be absolutely certain, that you have selected that external drive first.

The next step takes several minutes, although you have nothing to do during that time but wait. When it’s ready, the Mac will ask you to restart it and will also caution that it may then restart itself several times.

You now have an external startup disk with macOS Sequoia on it

In theory, you’re finished now, but in practice installing a copy of macOS anywhere sets the Mac off asking you questions. It will try to prompt you through questions about location, Siri, and so on.

It will try very hard, but you don’t need to answer everything. While Apple seems to have made this deliberately hard to spot, there will always be a "Set Up Later" or similar button somewhere on the screen.

You may find that your fresh, new installation of macOS Sequoia on the external drive abruptly launches the same macOS Sequoia installer. Just quit it.

What to do next

You made this drive bootable for a reason, and whether that’s because you suspect a particular problem, or you just want to be careful, you need to do one thing next. You need to startup the Mac from this drive, just to be certain that it works.

It almost certainly will. The only possibility where it might not is if there is an issue with the external drive.

Typically that means there’s a fault or that the drive isn’t fast enough. What you’ll almost certainly find is that even when it works, though, the external drive will not be as fast as your internal one.

The result is that you’ll feel your Mac is slower. It’s possibly Apple’s way of saying you need to get that internal drive fixed sharpish.

Assuming that you can put up with a slower Mac if it means you can carry on working, you do also need to make sure that you have the tools you need to do that work. So while it’s probably not worth copying everything over from your Mac to this drive, at least make sure that the major applications you use are there.

With a slower Mac and perhaps not all of your applications available, booting from an external drive is a compromise. But it’s a compromise we need in order to fix problems or work around them.

So it’s good that Apple has made it so that by default, random strangers can’t boot your Mac from their drive. But it’s a relief that Apple hasn’t made it impossible for us to — as long as we prepare in advance.

AppleInsider News

Most Common AR-15 Malfunctions and Quick Fix Guide

https://www.ammoland.com/wp-content/uploads/2024/09/common-ar15-malfunctions-500×375.jpg

the most common ar-15 malfunctions
Most Common AR-15 Malfunctions and Quick Fix Guide

The AR-15 platform, known for its reliability and versatility, is popular among shooters for various applications, from sport shooting to home defense. However, like any mechanical system, it is not immune to malfunctions. Whether at the range or in a critical situation, experiencing a malfunction can be frustrating and, at times, dangerous if not handled properly. Understanding the most common issues and knowing how to quickly and effectively clear them is essential for any AR-15 owner.

In this article, we’ll explore the most common AR-15 malfunctions, such as failure to feed, failure to eject, and double feeds, along with practical tips on addressing each one. These troubleshooting techniques can help ensure your rifle operates smoothly, reducing downtime and keeping you target focused. Always remember to prioritize safety when diagnosing and clearing any firearm malfunction.

Live Inventory Price Checker


Lead Star Arms Barrage 16" .223/5.56 AR-15 Rifle with 17" Ravage Handguard, Black
Palmetto State Armory
$
1259.99


$
999.99


Lead Star Arms Barrage 16" .223/5.56 AR-15 Rifle with 17" Ravage Handguard, Black
Palmetto State Armory
$
1259.99


$
999.99


Colt .223 Rem/5.56 AR-15 Rifle – AR15A4
Palmetto State Armory
$
1374.99


$
1019.99


Colt .223 Rem/5.56 AR-15 Rifle – AR15A4
Palmetto State Armory
$
1374.99


$
1019.99

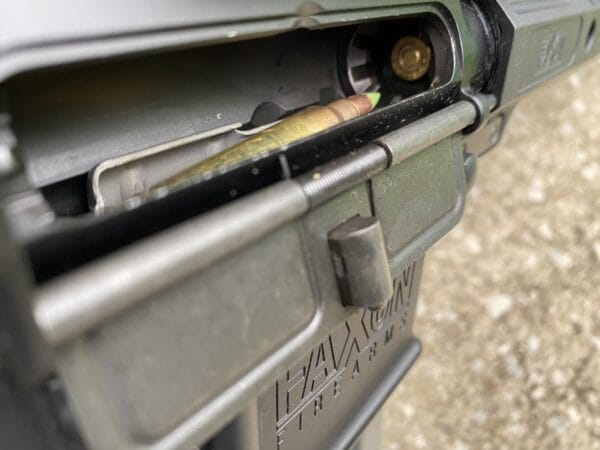
Faxon AR-15 reconfigured to resemble an M16-A4.
(Photo: Scott Witner)

Safety First

Before diving into specific malfunctions, it’s important to emphasize the need for safety. If your AR-15 doesn’t fire as expected, remove your finger from the trigger and ensure the firearm is pointed in a safe direction. Avoid attempting to force the weapon to function. Instead, take a moment to assess the situation calmly. With experience, diagnosing and clearing malfunctions will become second nature, but taking it slow and steady is the safest approach for now.

Before we get into the list of the most common malfunctions, check out the following video by Pat McNamara on handling the most common rifle malfunctions. He breaks it down into an easy-to-understand format that everyone can understand.

Failure to Feed (FTF)

Failure to Feed (FTF) is one of the most common malfunctions encountered by AR-15 users. It occurs when a round from the magazine fails to load into the chamber. This malfunction can happen unexpectedly, whether it’s the first shot of the day or midway through a magazine. The good news is that most failure-to-feed issues are straightforward to diagnose and resolve.

Quick Fix:

Tap, Rack, Reassess: Tap the magazine to ensure it’s seated, rack the charging handle to chamber a round, and reassess the rifle’s readiness to fire. If the problem persists, switch out the magazine and check for worn-out springs or bent feed lips.

Preventative Tip: Regularly inspect your magazines. For reliable performance, consider using trusted options like Magpul Gen 3 PMAGs or D&H metal magazines. Why these? The D&H mags don’t just stand up to the challenge; they’re built for it, with anti-tilt followers and a gray Teflon finish that withstands temperature changes and environmental challenges like a champ.

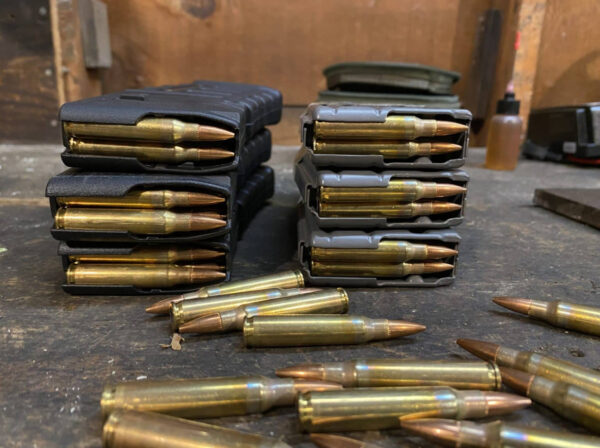
AR-15 magazine malfunctions
(Photo: Scott Witner – Magpul PMAG (Left) D&H Metal Mags (Right)

As a Marine infantryman, I’ve carried the M16/M4 across the globe and fired thousands of rounds through them. This experience hasn’t just made me a better shooter; it’s shown me firsthand how often gear can fail, especially magazines. Most malfunctions? They came down to issues with the mags—worn out from use, bent feed lips, damaged followers, or springs that just couldn’t cut it anymore. The fix was usually simple: swap out the faulty magazine. More often than not, that was all it took to get back in action.

Failure to Eject/Extract (FTE)

Failure to Eject (FTE), also known as a “stovepipe” malfunction, occurs when the empty cartridge case of a fired round fails to exit the chamber and gets stuck, usually protruding from the ejection port. Similarly, a Failure to Extract happens when the bolt successfully extracts the spent casing from the chamber but fails to eject it completely, leaving it trapped in the rifle. Both types of malfunctions prevent the next round from being chambered.

Quick Fix:

Immediate Action: Lock the bolt to the rear, drop the magazine, and tilt the rifle to shake out the casing. If stuck, use a cleaning rod to push it out from the muzzle.

Preventative Tip: Regularly clean your bolt carrier group and chamber to prevent carbon buildup. Ensure the extractor and ejector springs are in good condition.

Failure to Fire (FTF)

Failure to Fire (FTF) occurs when the shooter pulls the trigger, but instead of the expected “bang,” there is only a disappointing “click.” This malfunction can be caused by various factors, ranging from ammunition issues to mechanical problems within the rifle. This includes rounds with improperly seated bullets, damaged casings, or bad primers.

Understanding the root causes of FTF and how to address them can save time and prevent unnecessary frustration at the range or in a critical situation.

Quick Fix:

Eject the round and check the primer for a light or absent strike.

Reload and chamber a new round. If the rifle still doesn’t fire, inspect the bolt and firing pin for damage or dirt buildup.

Preventative Tip: Use quality ammunition and keep your rifle clean and lubricated to ensure reliable firing.

Over-Gassed and Under-Gassed Rifles

Whether your AR-15 is over- or under-gassed, gas system issues can lead to a range of malfunctions that affect your rifle’s reliability and performance. Understanding the symptoms and causes of each condition is crucial for diagnosing and resolving related malfunctions effectively.

Over-gassed symptoms: Harsh recoil and failure to eject properly.

Under-gassed symptoms: Failure to lock the bolt back or weak ejection.

Quick Fixes:

Over-Gassed: Install an adjustable gas block or use heavier buffers and springs to slow down the cycling.

Under-Gassed: Check gas block alignment and use higher-quality ammunition. You may also need to switch to a lighter buffer and spring.

Preventative Tip: Keep your gas system clean and consider using an adjustable gas block to fine-tune the system for your ammo and shooting conditions.

Double Feeds

A double feed occurs when two rounds attempt to enter the chamber simultaneously, causing a jam. This usually happens when a live round is stuck behind a previously fired round or its empty casing. Faulty magazines, weak springs, or extractor and ejector failures can cause double feeds.

Quick Fix:

Drop the magazine, lock the bolt to the rear, and use your fingers or a tool to remove the obstructing rounds. After clearing the jam, insert a fresh magazine and cycle the bolt.

Preventative Tip: Ensure your magazine springs are strong and avoid overloading your magazines to reduce tension-related failures.

Bolt Override

A bolt override is a rare but serious malfunction where a live round or spent casing gets stuck above the bolt and below the charging handle. This type of jam can be particularly challenging to clear.

Quick Fix:

Drop the magazine, pull the charging handle back, and lock the bolt to the rear. While keeping pressure on the charging handle, strike the butt of the rifle on a hard surface to dislodge the obstruction.

Preventative Tip: Ensure your ejector and extractor are functioning properly and keep your rifle clean to avoid buildup that could lead to a bolt override.

Stovepipe Malfunction

A stovepipe malfunction, named for how the spent casing sticks vertically out of the ejection port like a stovepipe, occurs when the empty casing fails to fully clear the rifle during ejection. This can disrupt the cycle of operations and prevent the next round from being chambered. Although stovepipes are relatively easy to fix, repeated occurrences can indicate underlying issues that need to be addressed.

Quick Fix:

To eject the casing, perform the “tap, rack, reassess” drill. If it’s still stuck, manually lock the bolt to the rear and clear the obstruction.

Preventative Tip: Keep your rifle clean, especially the bolt carrier group, and ensure your ejector functions correctly. If this happens frequently, consider upgrading your ejector spring.

Conclusion

Experiencing these AR-15 malfunctions can be frustrating, but understanding the most common issues and how to address them will help you become a more proficient and confident shooter. Regular maintenance, proper cleaning, and using quality components are key to minimizing these malfunctions.

From failure to feed to stovepipe malfunctions, each issue has specific causes and solutions. By familiarizing yourself with these troubleshooting techniques, you can quickly diagnose and clear malfunctions, ensuring your rifle remains functional.


About Scott Witner

Scott Witner is a former Marine Corps Infantryman with 2ndBn/8th Marines. He completed training in desert warfare at the Marine Air Ground Combat Center, Mountain Warfare and survival at the Mountain Warfare Training Center, the South Korean Mountain Warfare School in Pohang, and the Jungle Warfare school in the jungles of Okinawa, Japan. He now enjoys recreational shooting, trail running, hiking, functional fitness, and working on his truck. Scott resides in Northeastern Ohio.

Scott Witner

AmmoLand Shooting Sports News