With an $800 ceiling and photo editing performance as the goal, I asked ChatGPT for a recommended PC parts list. The result? A clean, efficient build that outperformed my expectations and made smart, deliberate choices in every category.
Starting With Clear Objectives
The mission was straightforward: build a system optimized for photo uploading and editing. It needed to be fully capable of handling large RAW files, support quick exports, allow for multitasking, and remain cool and quiet during extended editing sessions.
I asked ChatGPT to generate a component list within a strict $800 budget, optimized for creative work. Having built several PCs in the past, I didn’t expect to follow its advice exactly. Still, I was curious to see how AI would approach the balance between value and performance.
After spending over 40 hours researching, reading reviews, and comparing benchmarks, I made only a handful of minor changes. To my amazement, almost everything in the final build matched ChatGPT’s original recommendations.
The Final Build
Tyler Fyock/MakeUseOf
Here’s the full breakdown of what went into the system, with prices from when I purchased each part in October 2024:
I already owned the RTX 2070, so that swap was more about practicality than preference. I also squeezed in a bit of RGB and changed out the case for a very similar make and model. Beyond that, I stayed incredibly close to the original AI-suggested build.
Prioritizing What Actually Mattered
The smartest part of ChatGPT’s recommendation wasn’t the individual components—it was how it balanced performance across the entire system. There was no overspending on unnecessary features, and no individual part created a bottleneck.
The CPU offered standout value. For $70, the Ryzen 5 5500 offers six cores and Zen 3 architecture, which is plenty of muscle for photo editing without spending more than necessary.
The RAM boasts 32GB of fast DDR4-3600 memory with low latency, making it perfect for handling large projects and multiple applications simultaneously. Although ChatGPT didn’t recommend RAM sticks with RGB, the subtle lighting added a nice touch without driving up the cost much, so I felt compelled to spend a few extra dollars.
Tyler Fyock/MakeUseOf
Storage was particularly well-optimized. The Crucial P3 NVMe SSD ensures fast load times for the OS and active projects, while the 4TB WD Blue drive offers plenty of room for RAW photo libraries and archives.
The motherboard includes Wi-Fi, a clean layout, and a simple BIOS menu. Nothing flashy, but highly functional and reliable.
Every dollar went toward components that directly impact real-world performance. That kind of discipline is something I’ve seen people struggle with, especially when building PCs for the first time. By choosing components wisely, I not only met my current needs but also ensured the PC is future-proof without spending a fortune.
Fast, Quiet, and Built for Work
In actual use, this build exceeds expectations.
Lightroom runs like a dream. Large RAW files open instantly, previews load quickly, and batch exports of 100+ images are finished in no time at all. Photoshop handles layers, masks, and filters with ease, even when tweaking multi-gigabyte images. AI-powered adjustments are also lightning fast.
The system stays cool, too. With the upgraded cooler and nine-fan setup, thermals never spike under load. Even during long editing sessions, the PC remains unbelievably quiet—exactly what you want in a workspace. Fan curves are easy to dial in thanks to the included hub and PWM support, allowing a fine balance between airflow and acoustics. I have my fans set to Turbo, and there’s almost no audible noise, even under heavy CPU and GPU load.
Tyler Fyock/MakeUseOf
Boot times are near-instant thanks to the NVMe drive, and system responsiveness stays consistent even with dozens of tabs open, large libraries indexed in Lightroom, and other background tools running simultaneously. Whether I’m batch editing, exporting to external drives, or uploading work to the cloud, the machine keeps up with minimal stutters or delays.
While my build is optimized for photo editing, ChatGPT is more than capable of understanding the most important parts of a gaming PC or any other type of PC. It’s that same understanding that helped me prioritize the right components to build a system perfectly tailored for creative work.
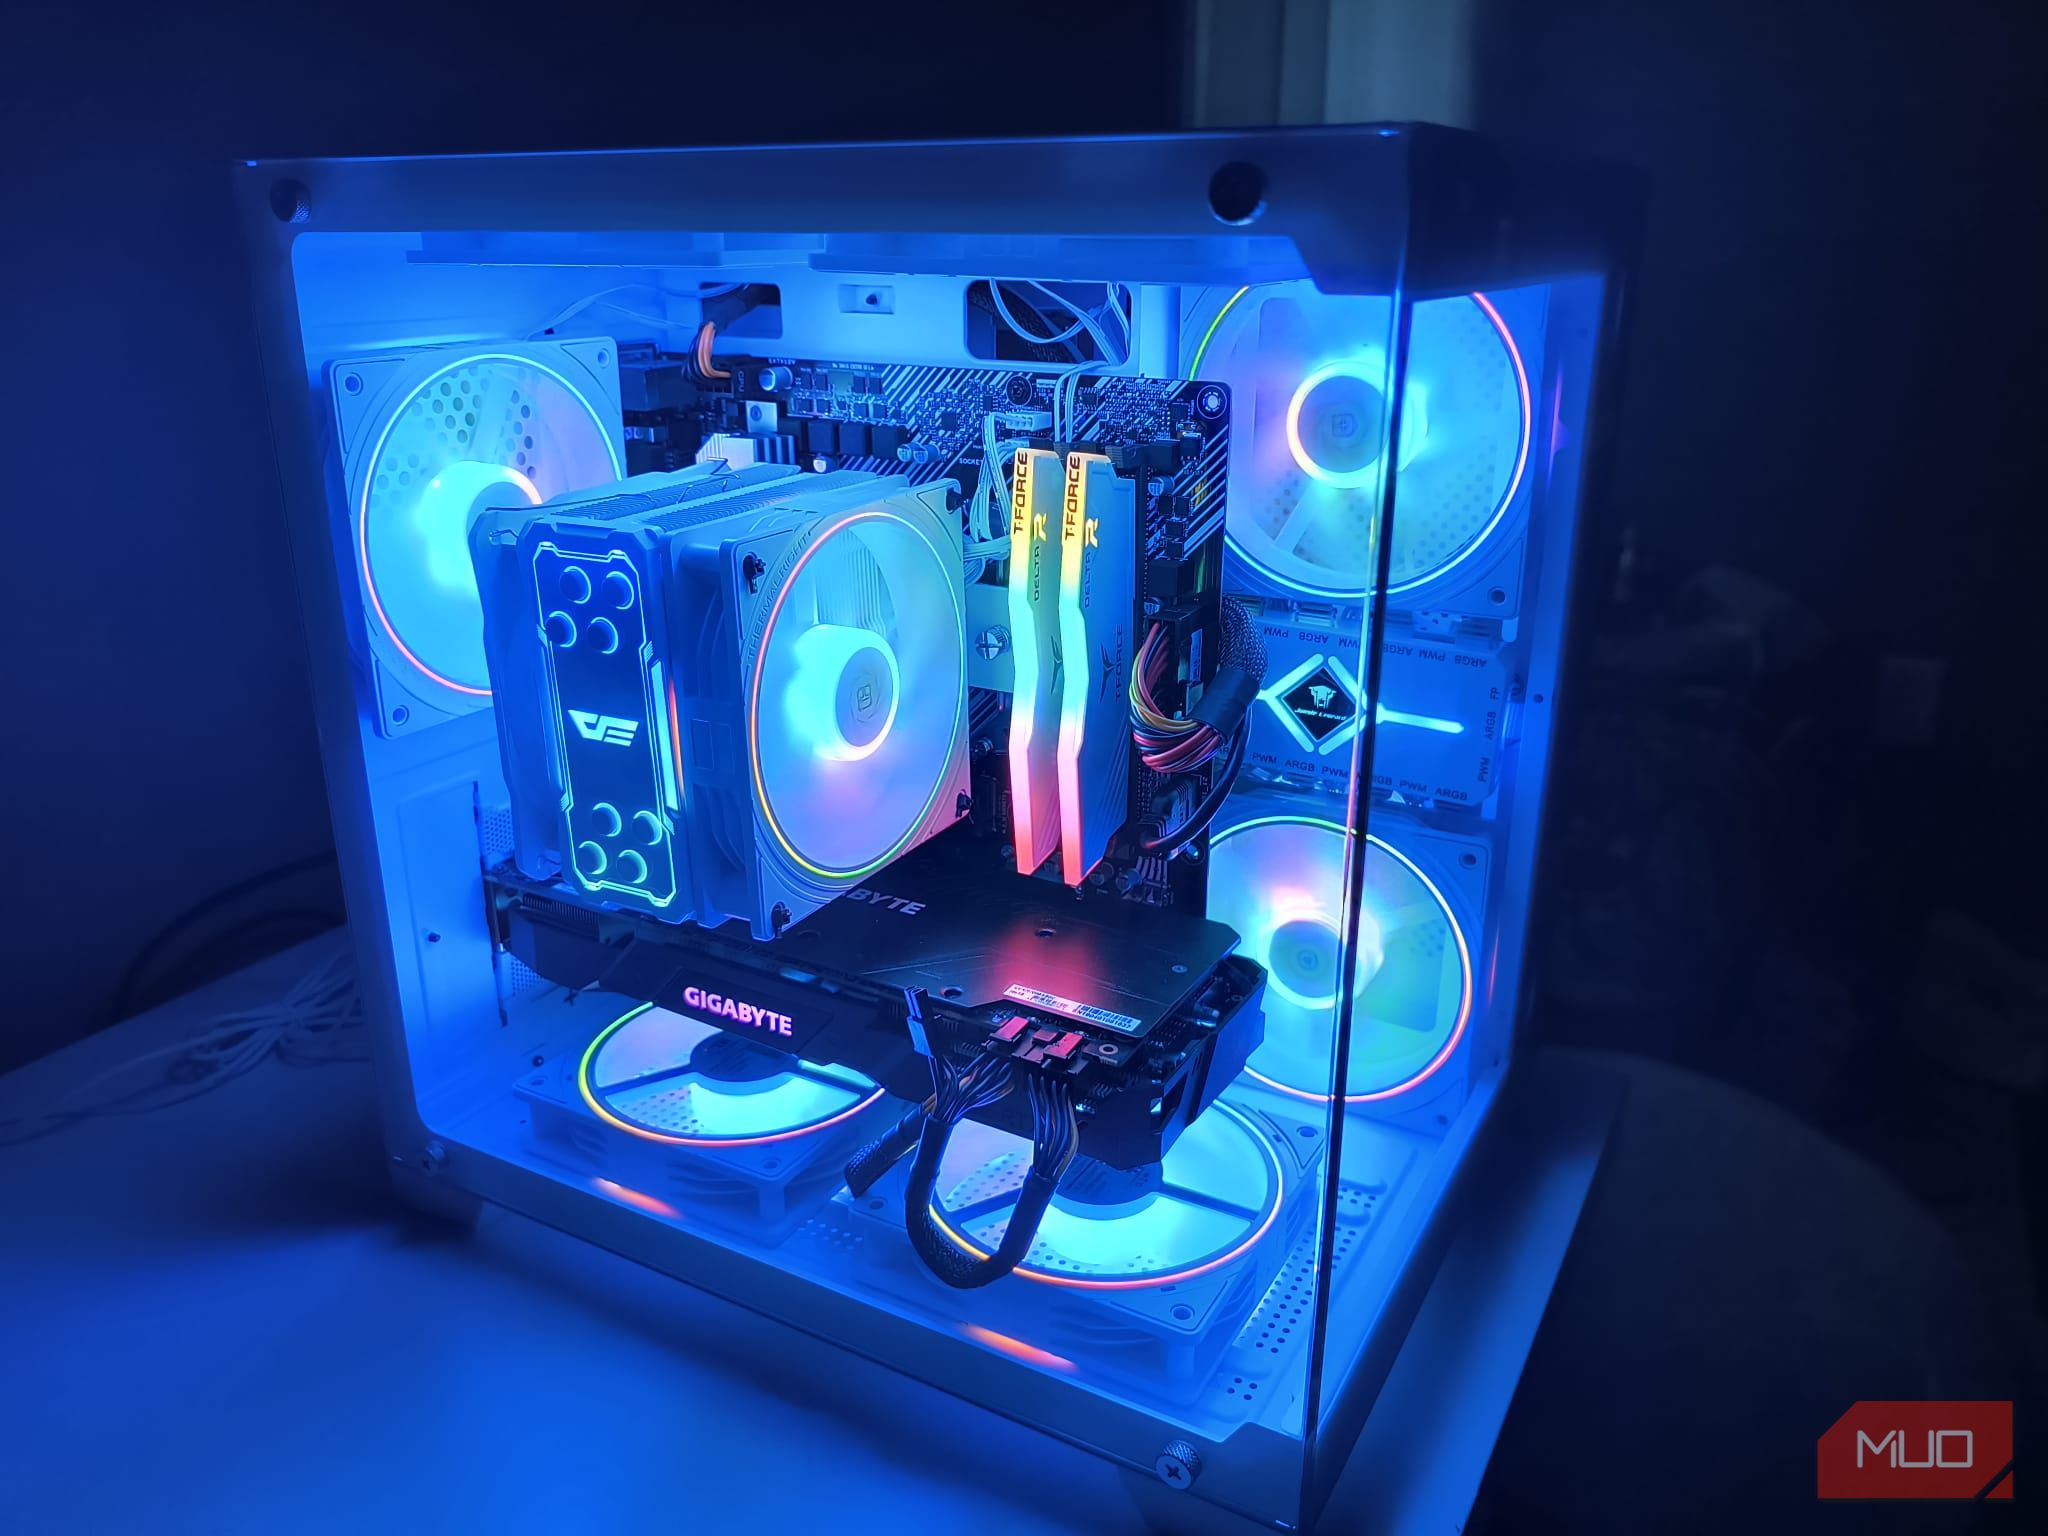
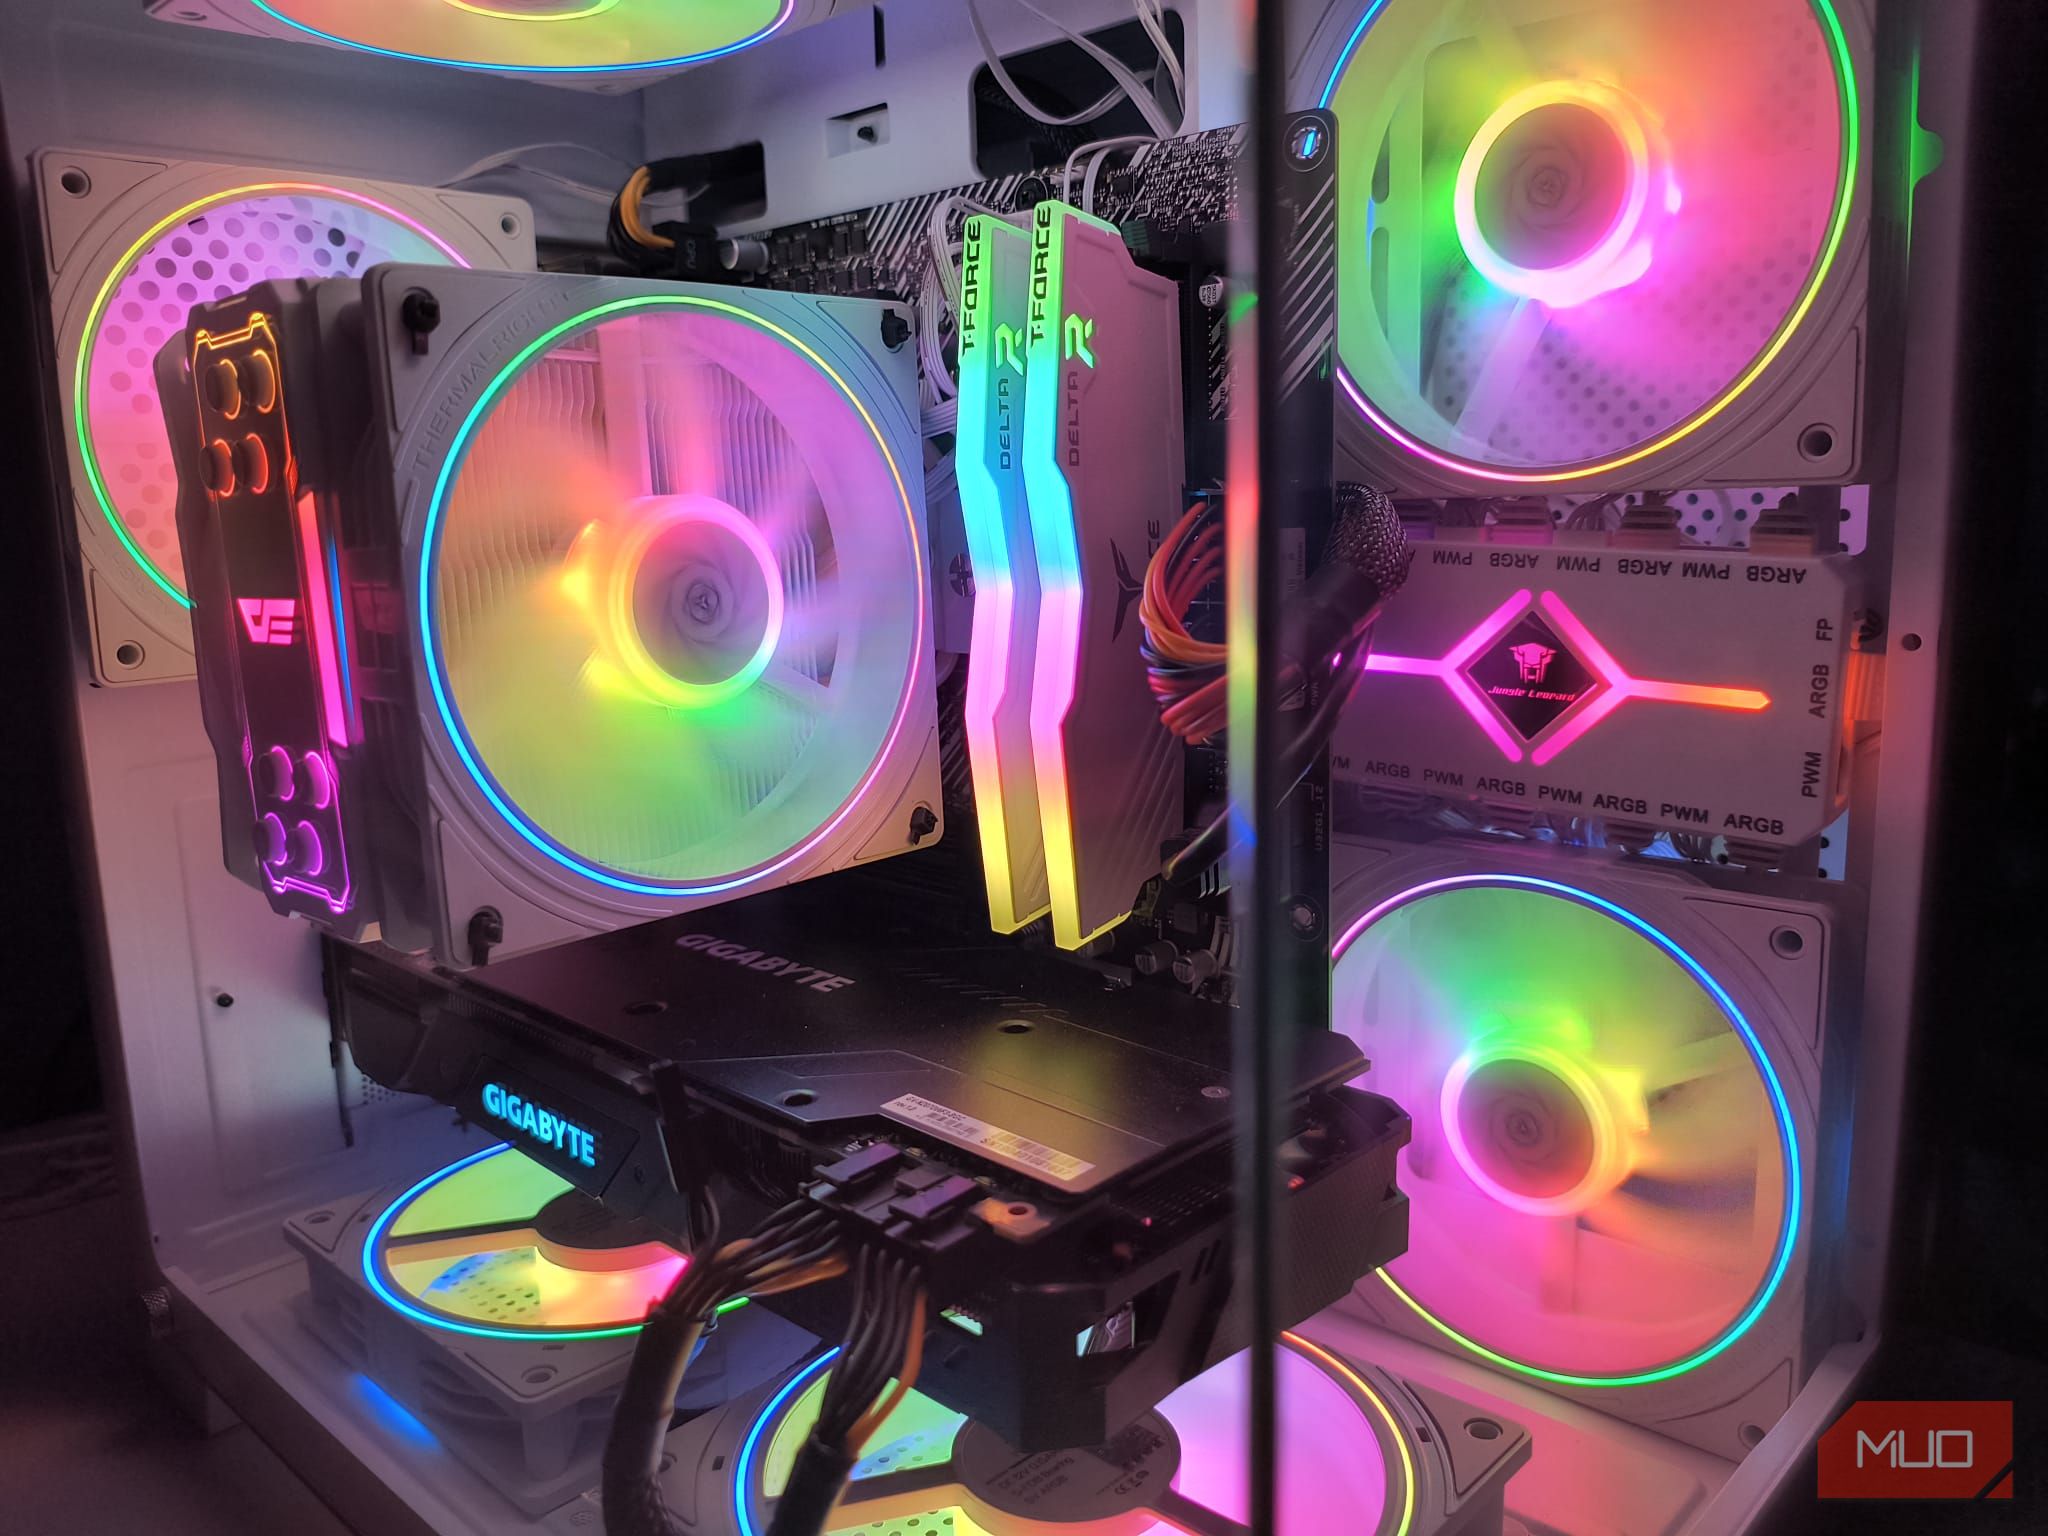
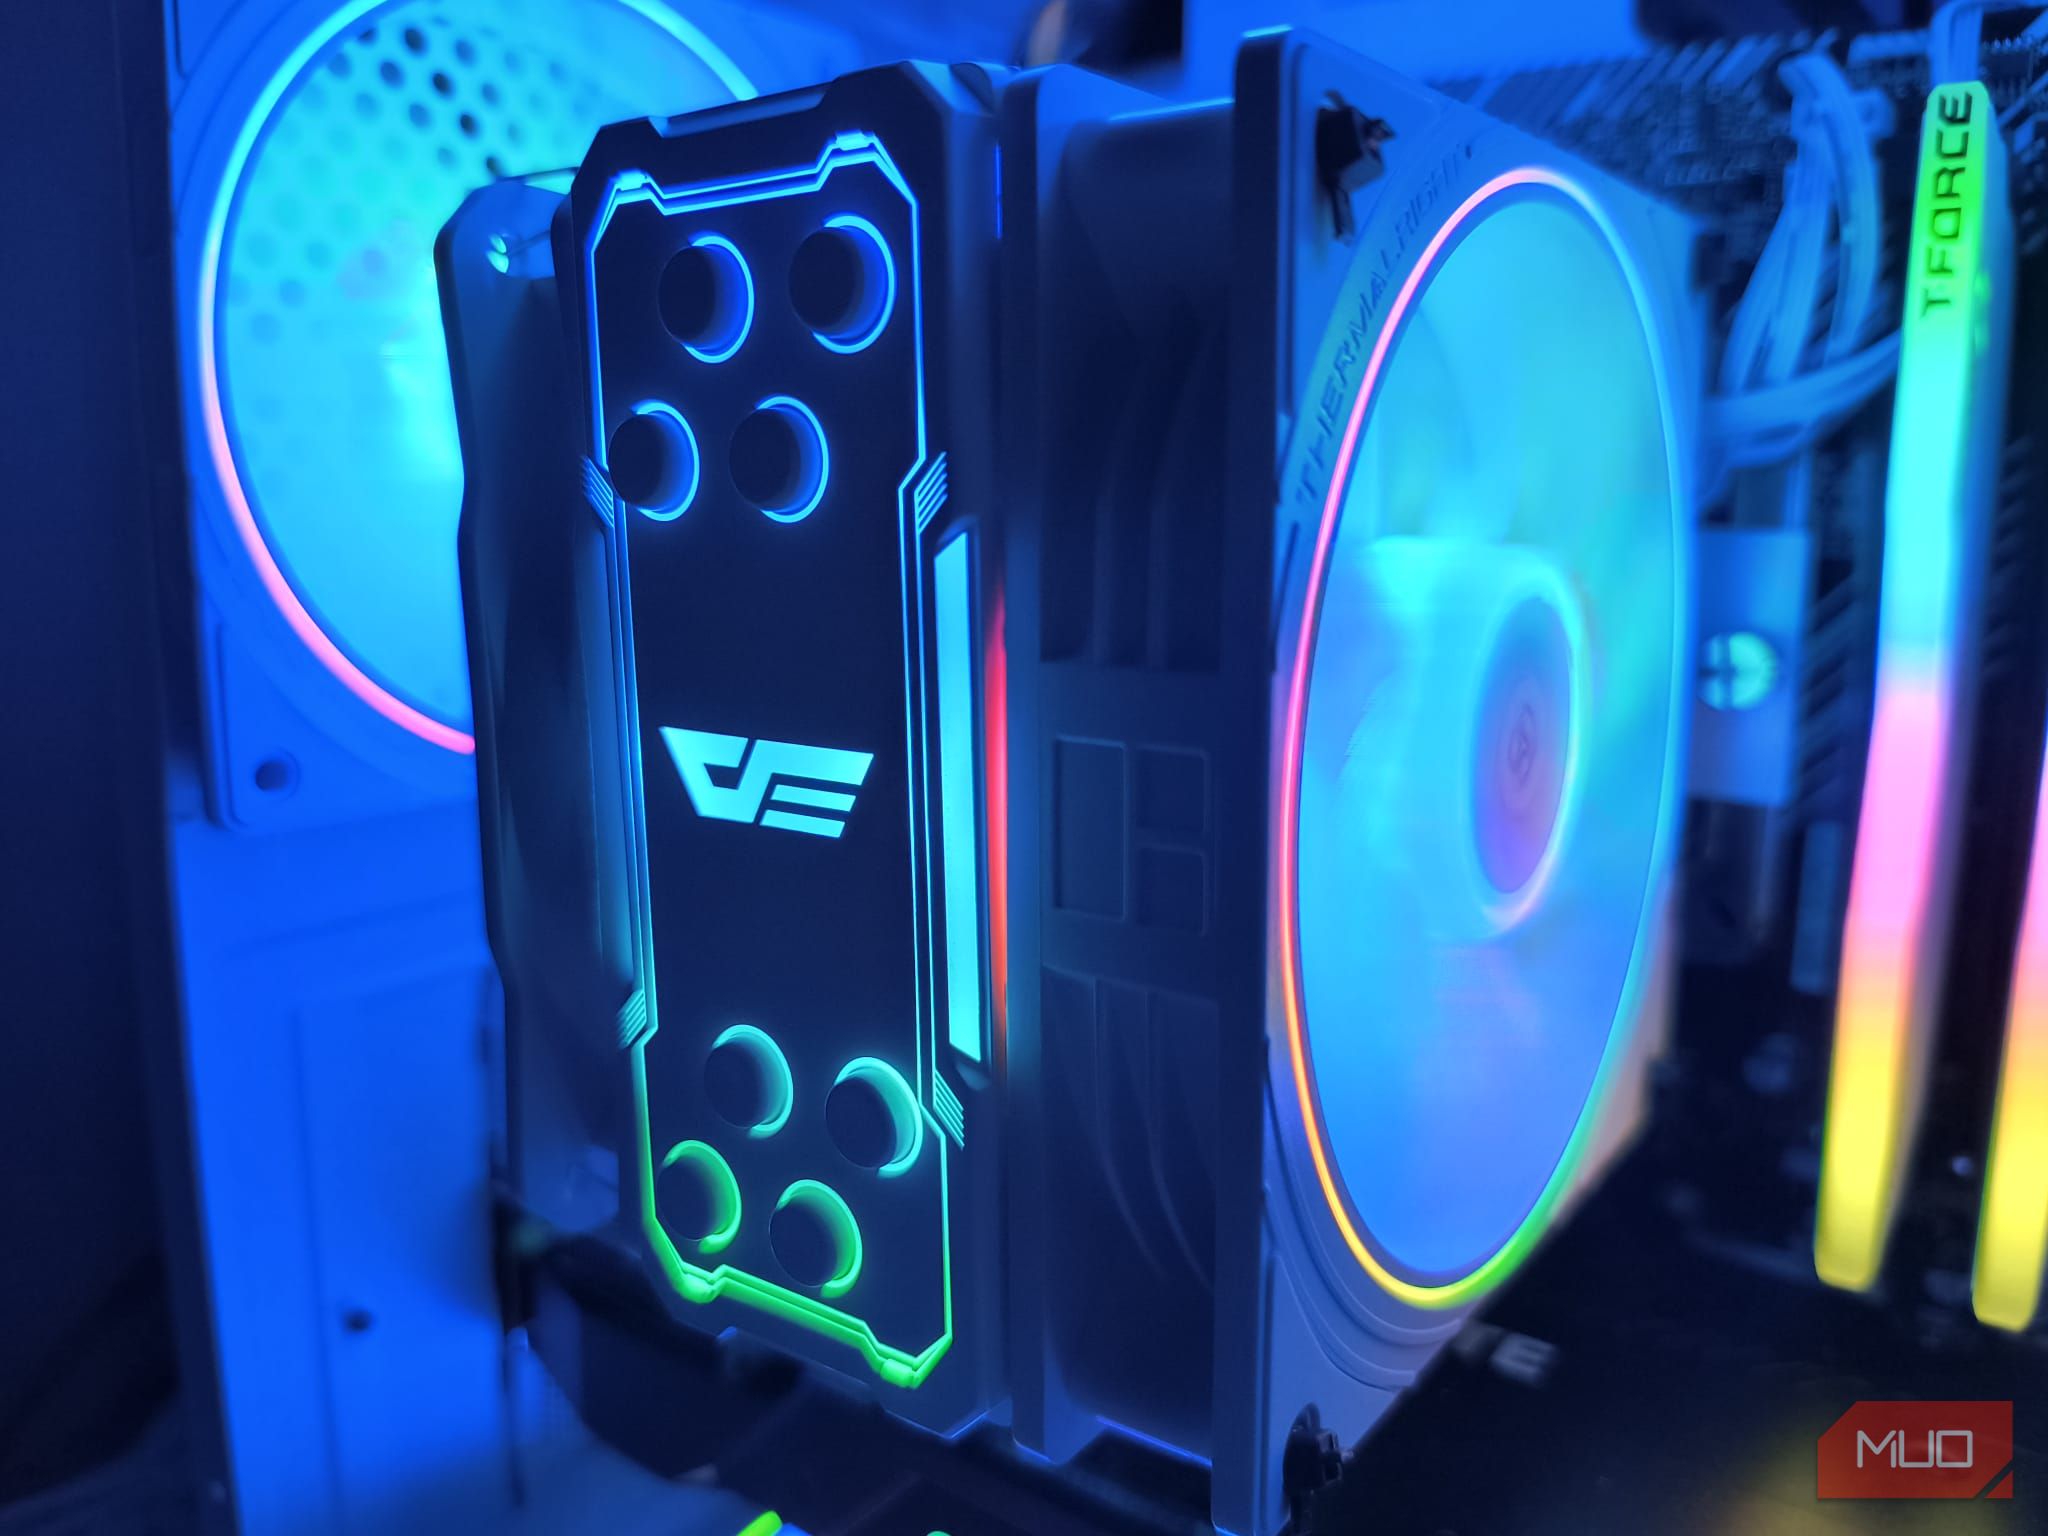
The Cooler That Changed Everything
Tyler Fyock/MakeUseOf
Initially, I installed the Ryzen 5 5500 with its stock cooler. It worked well enough for light tasks, but once I started exporting large batches of RAW photos, the thermal limits became obvious. Performance began to throttle, and fan noise increased noticeably.
That’s where the DarkFlash Z4 Pro came in—a $21 upgrade that ChatGPT had recommended from the beginning. I hesitated at first, not realizing the impact this simple piece of hardware would have on my system’s performance. Budget aftermarket coolers can be hit-or-miss, and I was working with a fairly tight case. To my surprise, it fit perfectly, with just a few millimeters of clearance inside the Apevia Prism-WH.
Tyler Fyock/MakeUseOf
The result? Temperatures dropped by more than 15°C under load. Noise levels substantially decreased. More importantly, sustained performance improved drastically. For such a modest investment, it made a much more significant impact than I expected. ChatGPT proved that it had thought ahead not only about cooling, but also about case dimensions and part compatibility.
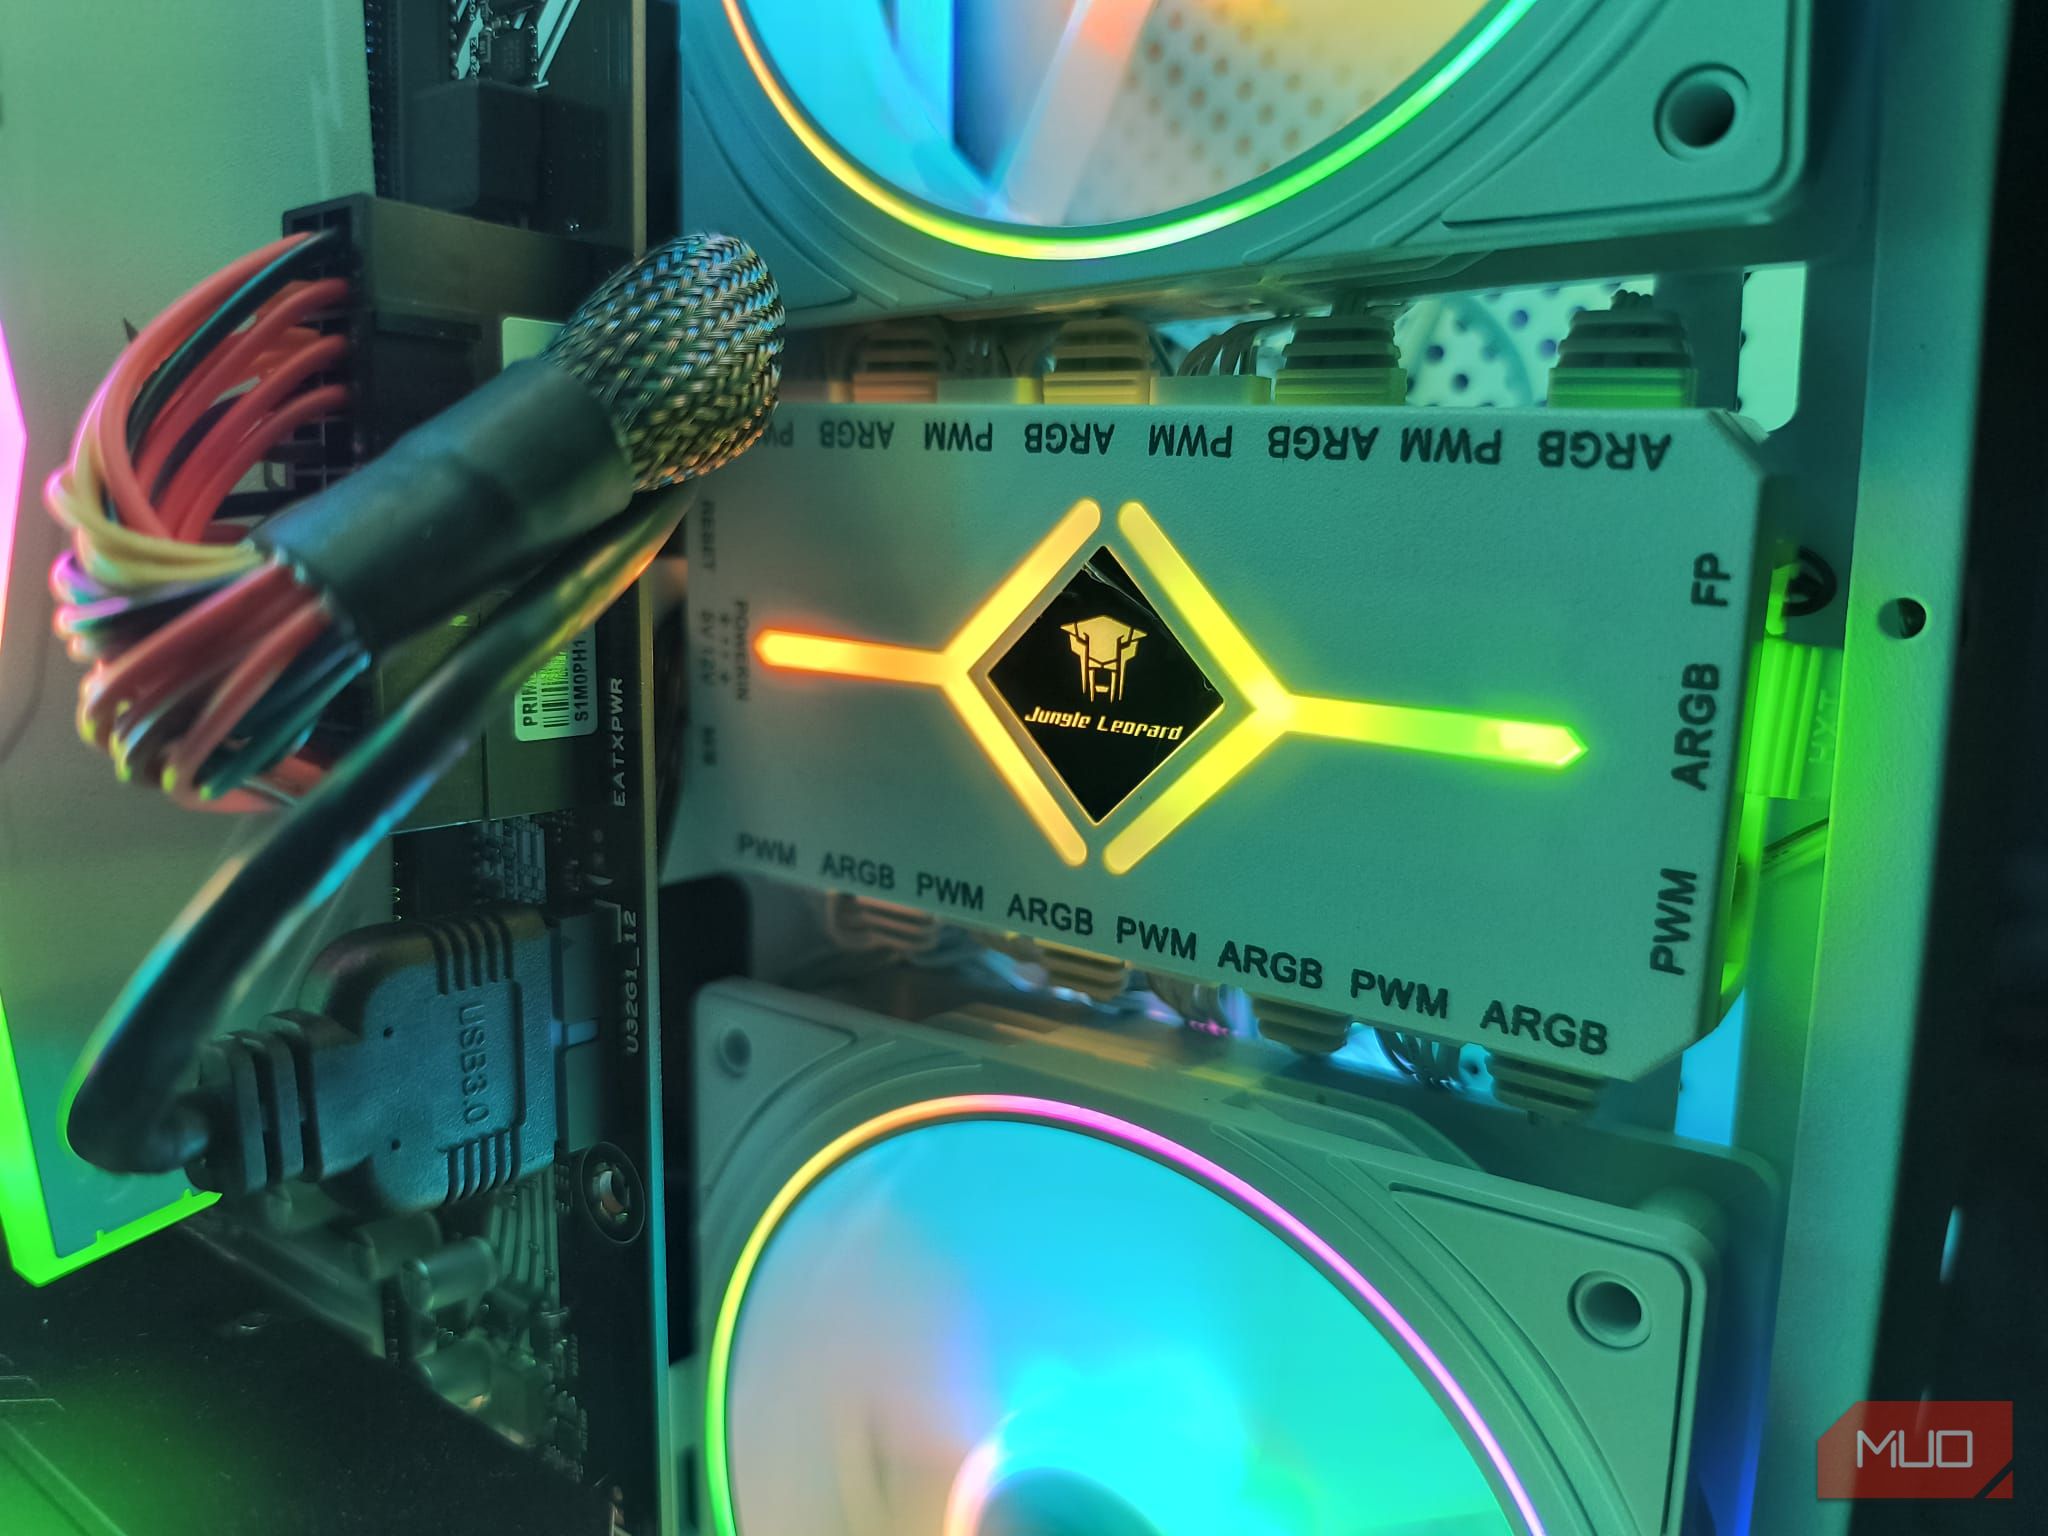
Clean Aesthetics, Minimal Compromises
Tyler Fyock/MakeUseOf
The case ChatGPT recommended was a simple airflow model. Choosing the right case is essential for both aesthetics and functionality, and there are many great budget PC cases available. I opted for the Apevia Prism-WH Micro-ATX Cube instead of the recommended tower. This was a build for my wife, after all, and she wanted something that looked clean and modern with glass panels and a white finish.
Despite the stylistic shift, system performance wasn’t compromised. The airflow stayed strong, and the removable sides made cable management surprisingly easy. The compact cube layout gave the build a tidy, intentional feel, while still leaving enough room for a full-size GPU and aftermarket cooling.
The ARGB fans paired well with the RAM’s lighting, giving the build a polished look without too much excess. These subtle lighting accents added just the right amount of personality to a creative workspace. Customized color control was made simple thanks to the suggested fan hub, which also streamlined power and signal routing to keep the interior clean and clutter-free. Even this detail was part of ChatGPT’s suggested layout, and it ended up being one of the most convenient additions during the build process.
Tyler Fyock/MakeUseOf
The result was a system that not only performed exceptionally but also looked far more expensive than it actually was. This PC is proof that clean design doesn’t require a premium price tag.
What Surprised Me Most About Chat Suggestions
Going in, I expected ChatGPT to offer a basic list of mainstream parts. However, it surprised me with a thoughtful set of recommendations, including lesser-known brands like TeamGroup and DarkFlash. The $21 DarkFlash cooler, in particular, was a standout, something I never would have considered but ended up performing great.
In addition to the optimized system performance, what really impressed me was how compatible each component was physically and technically. The AM4 CPU, motherboard, and cooler worked seamlessly, while the SSD installed without issues. The RAM ran at full speed with no BIOS adjustments, the triple-fan GPU fit the case perfectly, and the power supply had all the right connectors, no adapters needed.
Tyler Fyock/MakeUseOf
Even the cooling setup was well-thought-out. The fan hub supported ARGB and PWM, and the motherboard had just the right number of headers. It felt like every part was selected with a clear understanding of dimensions, airflow, and connections.
Most surprising of all, ChatGPT didn’t overlook the essentials—things like thermal paste, a Phillips screwdriver, and an anti-static wrist strap, which can be easy to forget. The whole experience felt more like following a well-planned PC build than assembling randomized parts.
ChatGPT as an Assistant, Not a Replacement
ChatGPT didn’t know which parts were in stock or how I preferred to have my cables organized. It wasn’t able to build this PC for me, but it did provide a fully thought-out starting point.
Its recommendations weren’t randomized; they were strategic. ChatGPT was able to factor in a plethora of variables, such as compatibility, bottlenecks, thermal limits, and overall value. It helped narrow the field, allowing me to focus on refining the build rather than spending hours filtering through low-quality advice on Reddit forums or YouTube.
I double-checked every part, read benchmarks, and took my time, but I continued to return to that initial list. If I had immediately gone with the suggested parts provided by ChatGPT, it would have saved me days of research and second-guessing.
Although ChatGPT laid a solid foundation for me, it’s still essential to fine-tune your build by exploring additional tools. I had to navigate through a handful of the best custom PC builder websites to ensure the final build was perfectly aligned with my specific needs and preferences, taking into account factors that ChatGPT couldn’t fully address on its own.
Related
You’d be amazed by how quickly AI can generate a tailored computer parts list.
Anyone who has ever built a PC knows how easy it is to waste money on parts that seem appealing on paper but do very little for real-world performance. After building more than a few PCs over the years, this one felt different. It was cleaner, quicker, and more intentional. The planning was grounded in logic and value, not flash or hype.
Thanks to a free tool and a few smart swaps, I walked away with a machine that runs faster, looks better, and costs less than anything I could have planned on my own. When working within a tight budget, every dollar needs to be intentional—and to my surprise, ChatGPT delivered exactly that.
ElasticLens is a Laravel package that integrates Elasticsearch with Eloquent models. It provides advanced search capabilities while maintaining Laravel’s familiar syntax.
The Vortex Strike Eagle 1-8×24 FFP is an ideal optic for a number of uses from plinking, to competition and training.
Whether you’re setting up an AR-15 for home defense, duty use, or range days, one decision makes a big difference: your zero distance.
Zeroing determines how your point of aim (POA) and point of impact (POI) match up across different distances.
Today, we’ll break down four common zeroing options — 25, 36/300, 50/200, and 100 yards — and help you pick the best one for your mission.
Understanding POA vs. POI and Bullet Trajectory
Before diving into distances, it’s important to understand the relationship between Point of Aim (POA) and Point of Impact (POI).
POA is where your optic’s reticle or red dot is placed.
POI is where the bullet actually lands.
Because your optic sits higher than your barrel — known as height over bore — bullets travel in an arc, not a straight line. As a result, your POA and POI only truly match at specific distances. Picking the right zero helps manage that arc and makes hits easier across varying ranges.
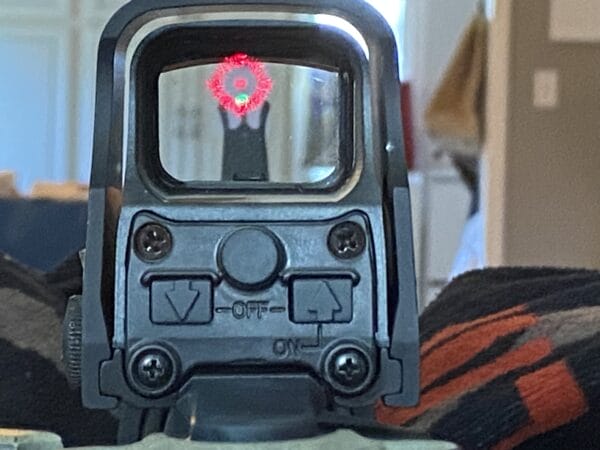
Sight picture for boresighting for a 50/200-yard zero.
The 25-Yard Zero: Quick Setup, but Not Always Ideal
If you’re working with a 25-yard zero, it’s usually because:
Your range is short.
You need a fast, practical zero for close-quarters use.
Zeroing at 25 yards theoretically sets you up for a second intersection around 300 yards. But here’s the downside: between 100 and 200 yards, your rounds can hit 4–6 inches high.
Best for:
Indoor ranges.
Emergency field zeroing.
Defensive shooting inside 50 yards.
If you expect to engage past 100 yards regularly, there are better options.
Understanding the 36/300 Yard Zero (USMC Style)
This classic Marine Corps zero involves aligning your rifle at 36 yards, which theoretically matches again at 300 yards.
Lance Cpl. Jacob Arthur, a crew chief serving with 3rd Assault Amphibian Battalion and a native of Los Angeles, shoots during a timed event at the 2013 Western Division Matches here, March 5. More than 300 competitors from Marine Corps Air Station Yuma, Mirimar, Logistics Base Barstow and Camp Pendleton came to Wilcox Range to compete in the two-week competition. Only the top ten percent on the competitors will receive medals and will qualify to compete in the Marine Corps Champion Matches later this year.
Sounds perfect, right?
Here’s the catch: At 200 yards, the bullet’s trajectory peaks significantly — often 5+ inches higher than your point of aim. That may not seem like much, but it can easily cause misses on smaller, partially exposed targets or when aiming for vital zones.
Best for:
Shooters trained in range estimation.
Full-size rifle setups designed for engagements from 0–300 yards.
Military marksmanship qualifiers.
Be cautious: Unless you’re trained to account for that mid-range rise, the 36/300 zero can create problems at common engagement distances.
The 50/200 Yard Zero: The Practical General-Purpose Zero
The 50/200-yard zero is one of the most popular for modern AR-15 users, especially those running red dot optics.
Bullet crosses the line of sight at 50 yards.
Slightly peaks at 100 yards (around 1–2 inches high).
Meets the line of sight again at 200 yards.
This creates a Maximum Point Blank Range (MPBR), meaning you can aim center mass and expect effective hits from 0–250 yards without needing to compensate for bullet drop.
Best for:
Red dots and holographic sights.
Home defense, patrol rifles, general-purpose ARs.
Shooters who want simple, stress-proof aiming.
Pro Tip: You can even rough zero at 10 yards indoors by placing your POA about 1.9 inches above your bore’s centerline before fine-tuning at the range.
The 100-Yard Zero: Precision at Known Distances
The 100-yard zero is a favorite for those using magnified optics like ACOGs, LPVOs, or variable scopes.
The Mike-102 easily made hits at 500 yards when paired with a 4×32 Trijicon ACOG. IMG Jim Grant
Many BDCreticles are calibrated assuming a 100-yard zero, making it easier to estimate holdovers at extended distances.
Best for:
Precision shooting at known distances.
Hunting applications where bullet placement matters.
Rifles with 3x, 4x, or variable magnification.
Heads up: With a 100-yard zero, you’ll need to understand and apply elevation holds once you stretch past 150–200 yards.
Matching Zeros to BDC Reticles
If your optic has a BDC reticle, match your zero distance to its design.
ACOGs, LPVOs, and similar optics often assume a 100-yard zero.
Red dots benefit more from the flatter trajectory of a 50-yard zero because simple center-mass aiming covers more ground without complicated holds.
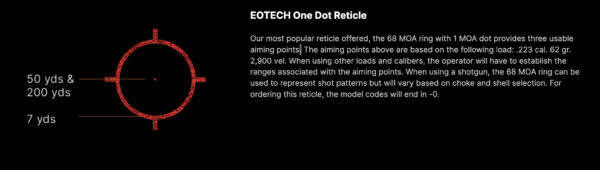
EOTECH 512 Reticle (Courtesy of EOTECH)
Final Thoughts: Pick Your Zero, Train With It
Choosing the right zero for your AR-15 isn’t just about ballistics — it’s about matching your gear to your purpose.
Red dot, home defense, patrol? Choose the 50/200-yard zero.
Hunting, precision shooting, magnified optics? The 100-yard zero is your friend.
Limited range space? 25 yards gets you functional fast, but know the limitations.
Long-range shooting? 36/300 yard zero — if you’re trained to manage the trajectory.
No matter which zero you choose, training is everything. Know your holds, your bullet rise and fall, and how your rifle behaves under stress. Confidence in your zero could make the difference when it counts.
About Scott Witner
Scott Witner is a former Marine Corps Infantryman with 2ndBn/8th Marines. He completed training in desert warfare at the Marine Air Ground Combat Center, Mountain Warfare and survival at the Mountain Warfare Training Center, the South Korean Mountain Warfare School in Pohang, and the Jungle Warfare school in the jungles of Okinawa, Japan. He now enjoys recreational shooting, trail running, hiking, functional fitness, and working on his truck. Scott resides in Northeastern Ohio.
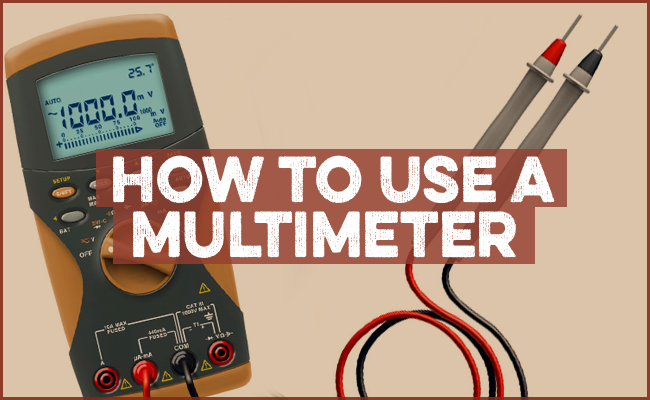
A multimeter is invaluable for the DIY troubleshooting of electrical problems around the house. You can use it to identify faulty wiring, check if electrical sockets have power, and test batteries. My electrical engineer brother-in-law, Ryan Davis, recently showed me how to use one. Here’s a write-up of what I learned. Maybe you’ll find it handy.
What Does a Multimeter Measure?
A multimeter measures three electrical properties:
Voltage (Volts): The electrical potential difference that pushes electrons through a circuit. Measure voltage to check battery charge or verify power in outlets.
Current (Amps): The flow of electrical charge through a conductor, indicating how much electricity is moving through a circuit. Measure current to verify that circuits or devices are drawing the correct amount of electricity.
Resistance (Ohms): How much a material opposes electrical flow. Higher resistance means less electricity flow. Measure resistance to check component continuity, verifying that a wire or fuse isn’t broken.
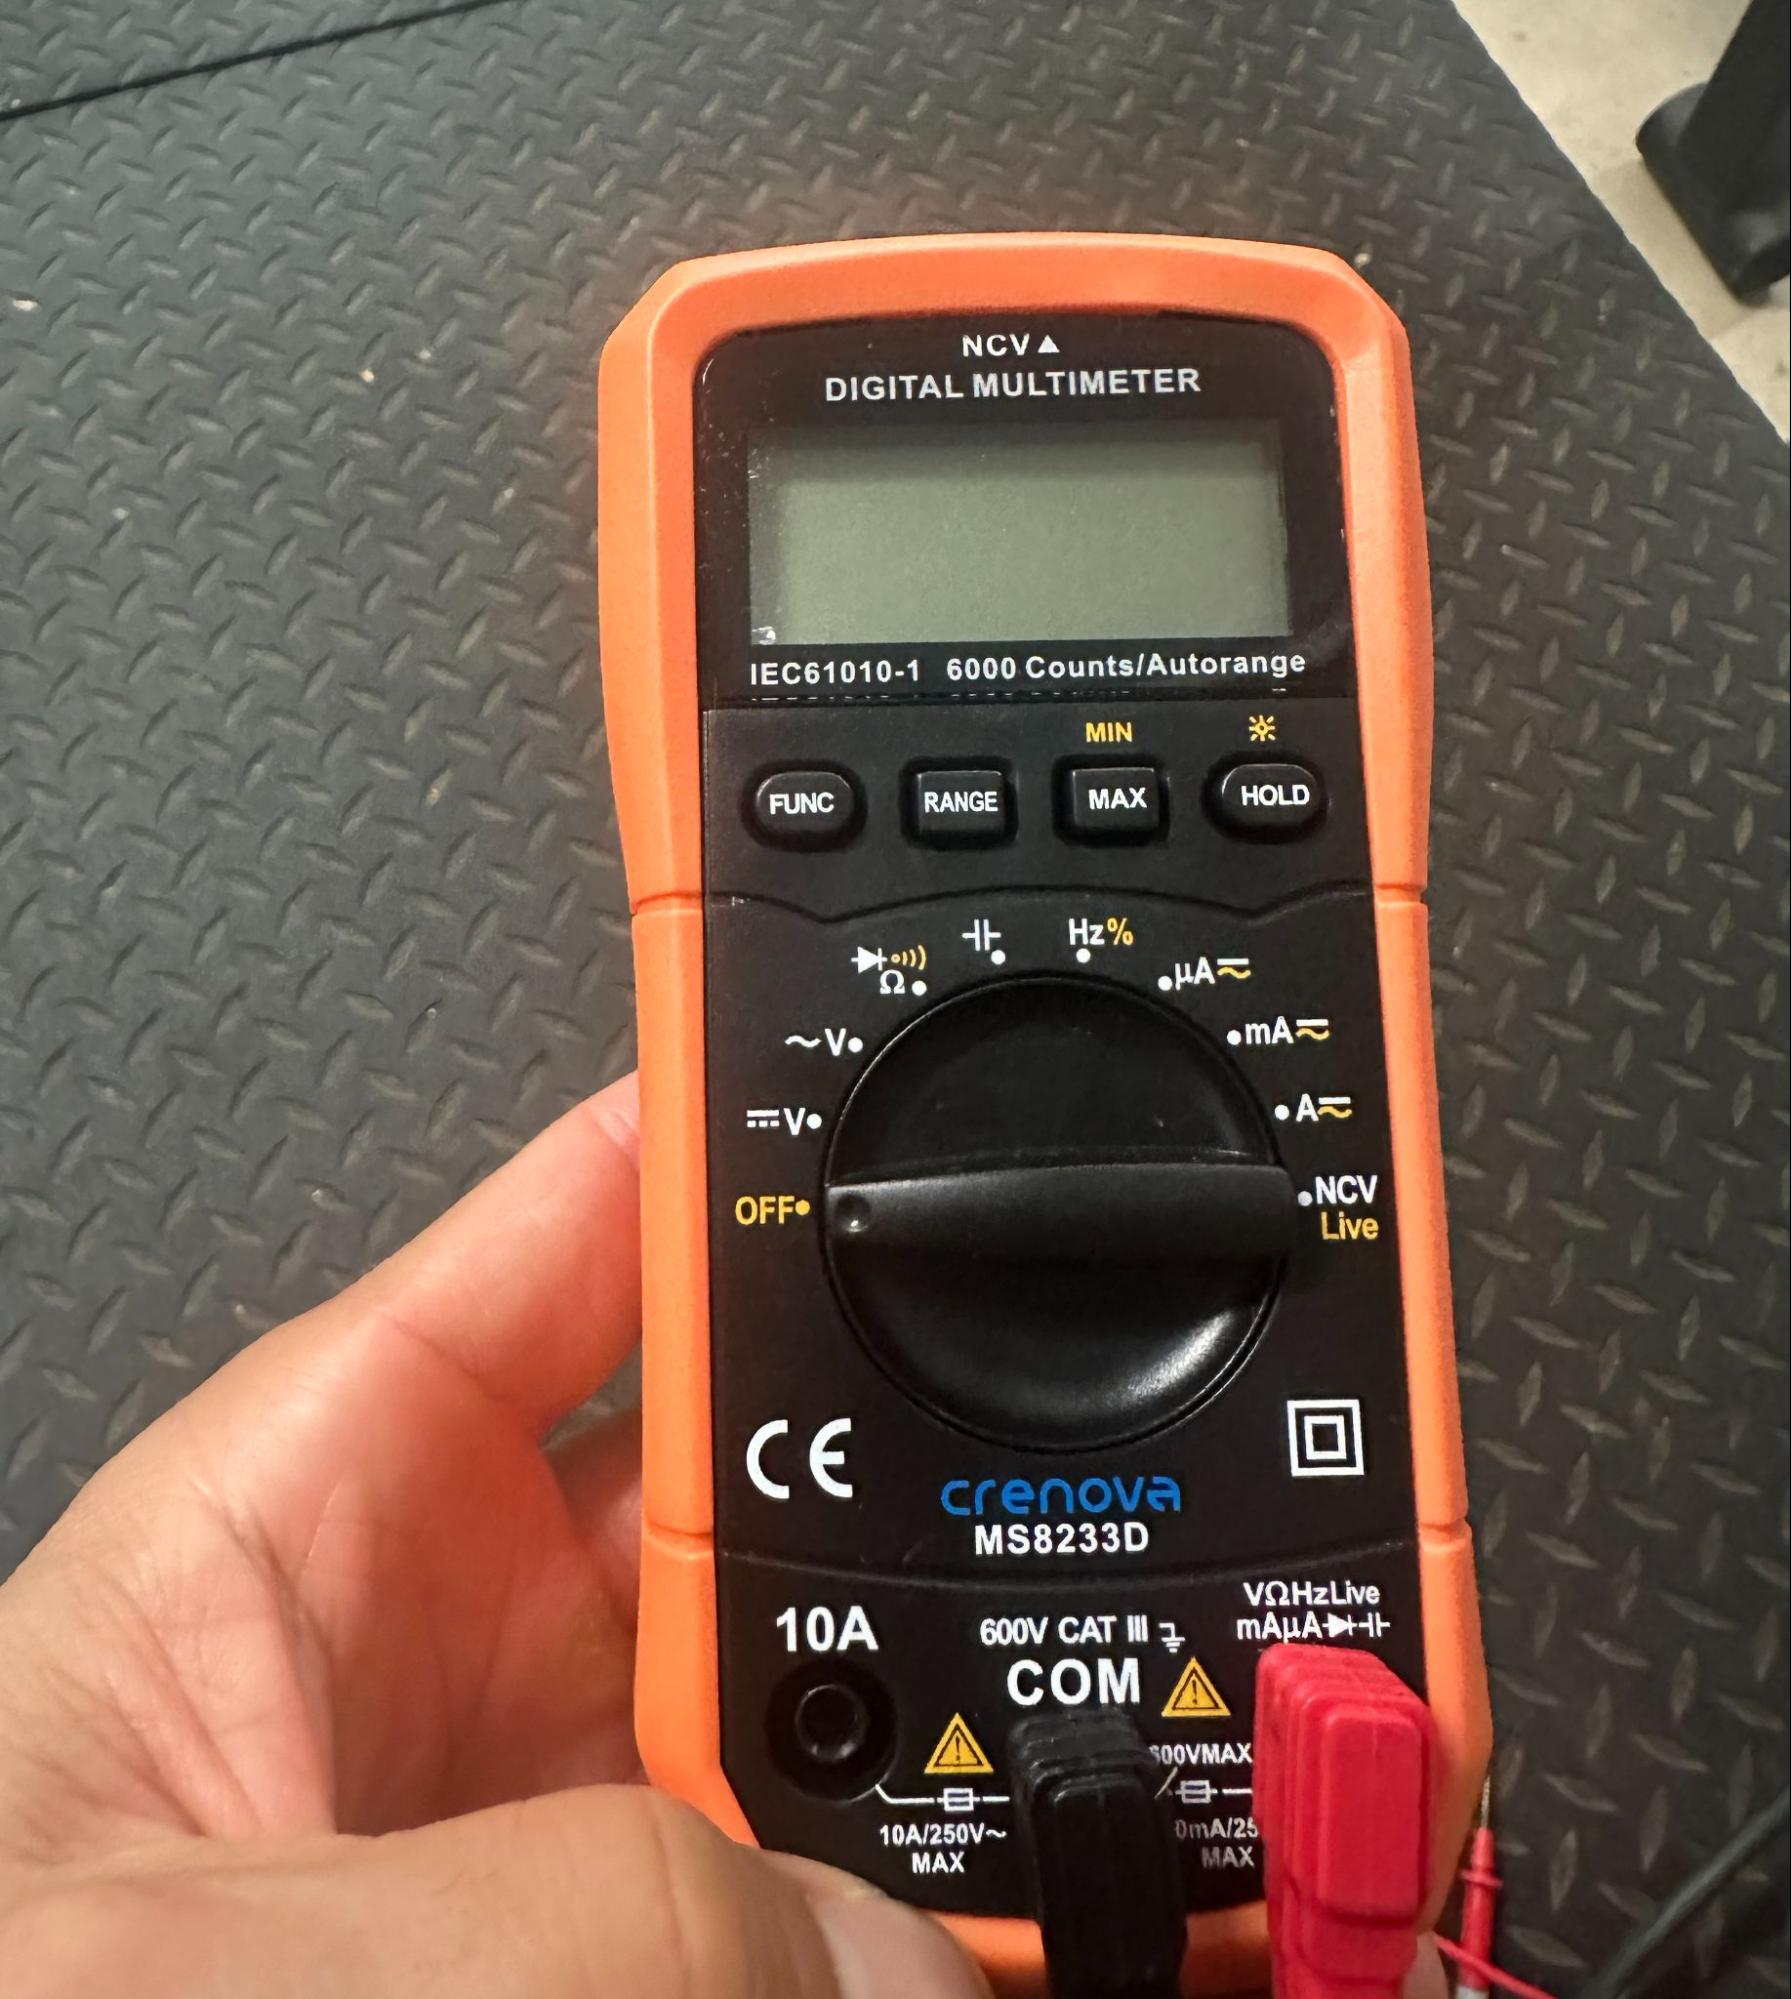
Basic Multimeter Components
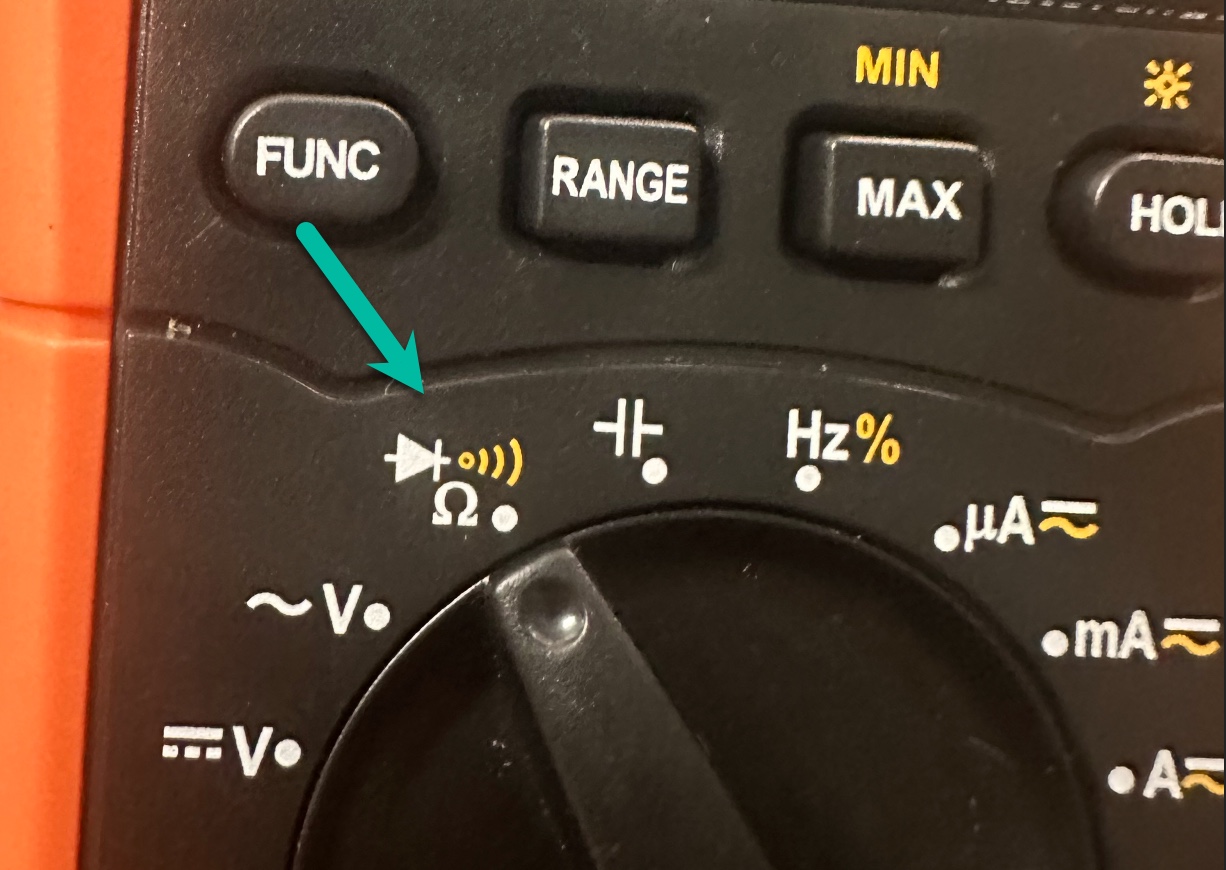
Multimeters come in analog and digital forms. One of the nice features of digital multimeters is that they’re auto-ranging, meaning the multimeter automatically selects the correct measurement range for the quantity you’re testing — voltage, current, or resistance — so you don’t have to manually dial in an expected value range. That makes digital multimeters easier for beginners to use.
The main components of a multimeter (whether digital or analog) include:
Display: Shows the measured value.
Dial: Lets you select what to measure (voltage, current, resistance).
Ports: COM (black) and two red ports: one for voltage, resistance, and milliamp/μA measurements, and one for high current (up to 10A). Most pro multimeters separate the ports for measuring voltage/resistance and milliamp/μA. There will be a port you use when you’re measuring voltage and resistance measurements. Never plug into the 10A jack unless you’re measuring large currents.
Probes: Black (negative) and red (positive) wires to connect to test points.
Real-World Applications
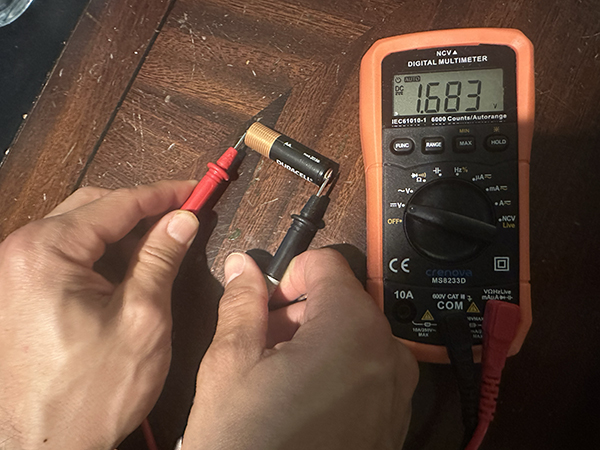
Testing Batteries (Voltage)
You can use a multimeter to test if your batteries still have juice. Here’s how to do it:
Plug the black probe into “COM” and red probe into the milliamp/μA port.
Turn the dial to DC voltage (~ V).
Touch red probe to battery’s positive terminal, black to negative.
Read the display — AA/AAA should be around 1.5V, 9V around 9V, car batteries 12.6V when charged.
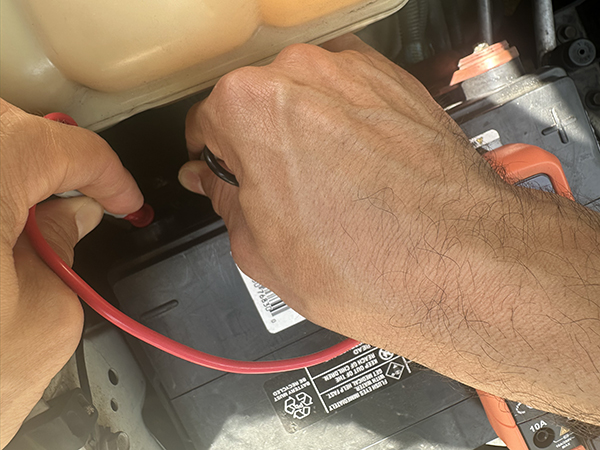
Testing for Parasitic Draw (Current)
A few years ago, my car wouldn’t start in the mornings. Once I jumped the battery, it was fine. The battery was good. But then a few days later, the car wouldn’t start again. I made sure I wasn’t leaving dome lights on or anything.
I ended up taking it to a mechanic, and he used a multimeter to discover a parasitic draw from a wireless phone adapter plugged into the cigarette lighter. Here’s how I could have used my multimeter to diagnose this on my own:
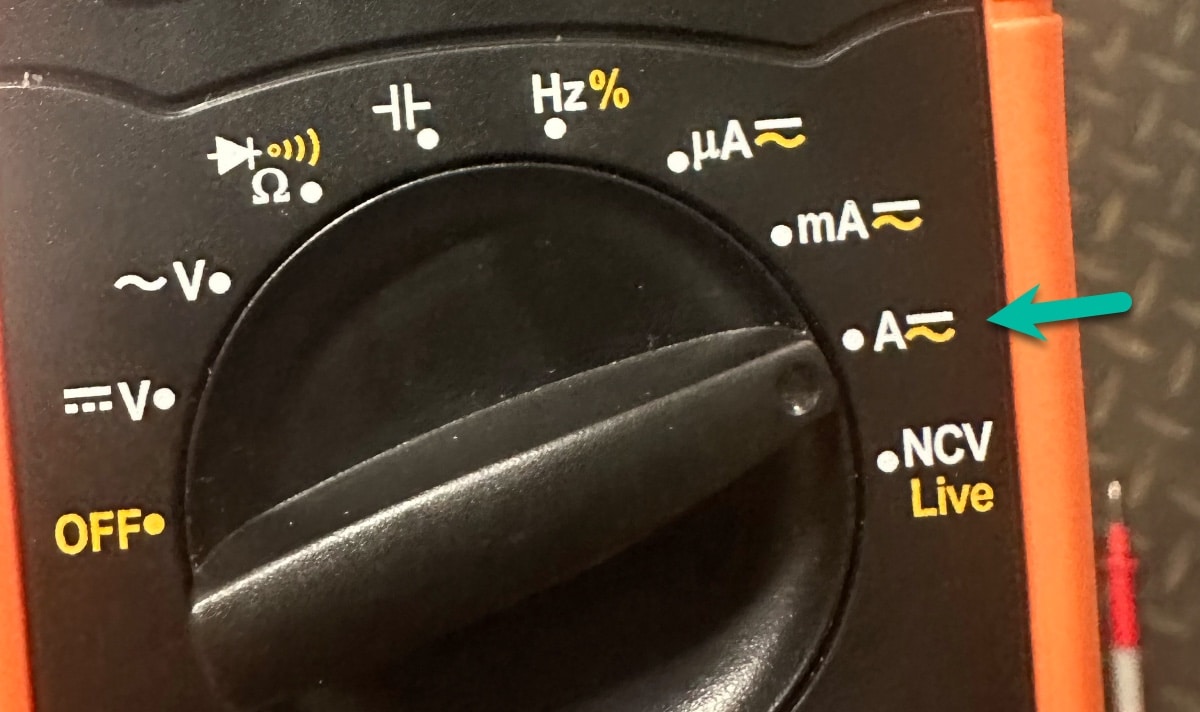
1. Set Up Your Meter
Turn the dial to DC Amps (A⎓ or mA⎓).
Plug the black lead into COM.
Plug the red lead into the mA jack.
2. Break the Circuit at the Negative Terminal
Use a wrench to loosen and remove the negative battery cable from the battery post.
3. Connect the Meter in Series
You’re going to place the meter in series, which means you’re connecting it directly into the path of the electrical current. Instead of electricity flowing directly from the battery to the cable, it now flows through the meter first, then continues to the cable. Because the meter and cable form a single continuous path (like links in a chain), they’re said to be connected “in series.” This setup lets the meter measure all the electricity moving through that pathway.
It’s hard to see what I’m doing in this pic, but it’s this:
Touch the black probe to the negative battery post.
Touch the red probe to the loose battery cable.
You’ve now inserted the multimeter in series and the battery current is flowing through your meter.
4. Read the Display
A normal reading is typically 20–80 milliamps (0.02–0.08A).
Anything above 100mA (0.1A) is excessive and warrants investigation.
5. Track the Culprit
If the meter reads above 100mA:
Have another person start pulling fuses one at a time from the fuse box.
Watch the current draw after each one.
When the draw drops significantly, you’ve found the circuit responsible. From there, trace what’s connected to it.
Testing Extension Cords (Resistance/Continuity)
Extension cords take a beating. Over time, the insulation can crack, wires can loosen, and corrosion can creep into the connections.
A damaged extension cord is a fire or shock waiting to happen. Fortunately, your multimeter makes it easy to test cords and catch problems before they become dangerous.
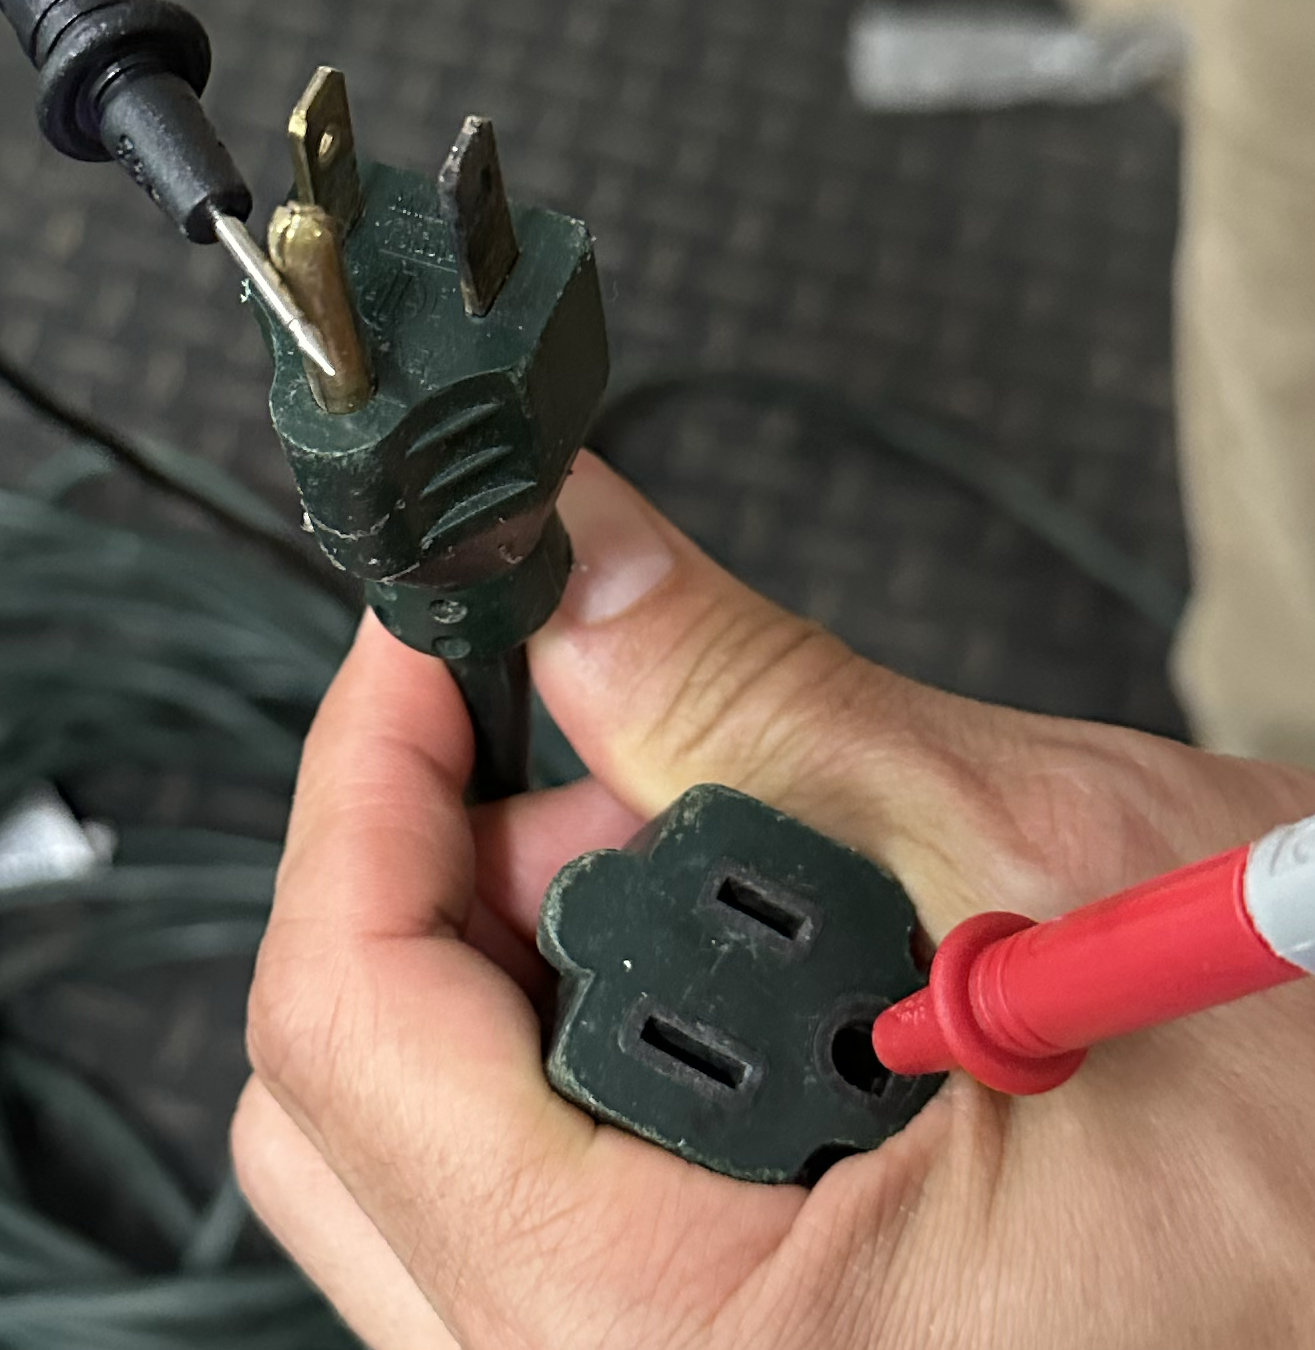
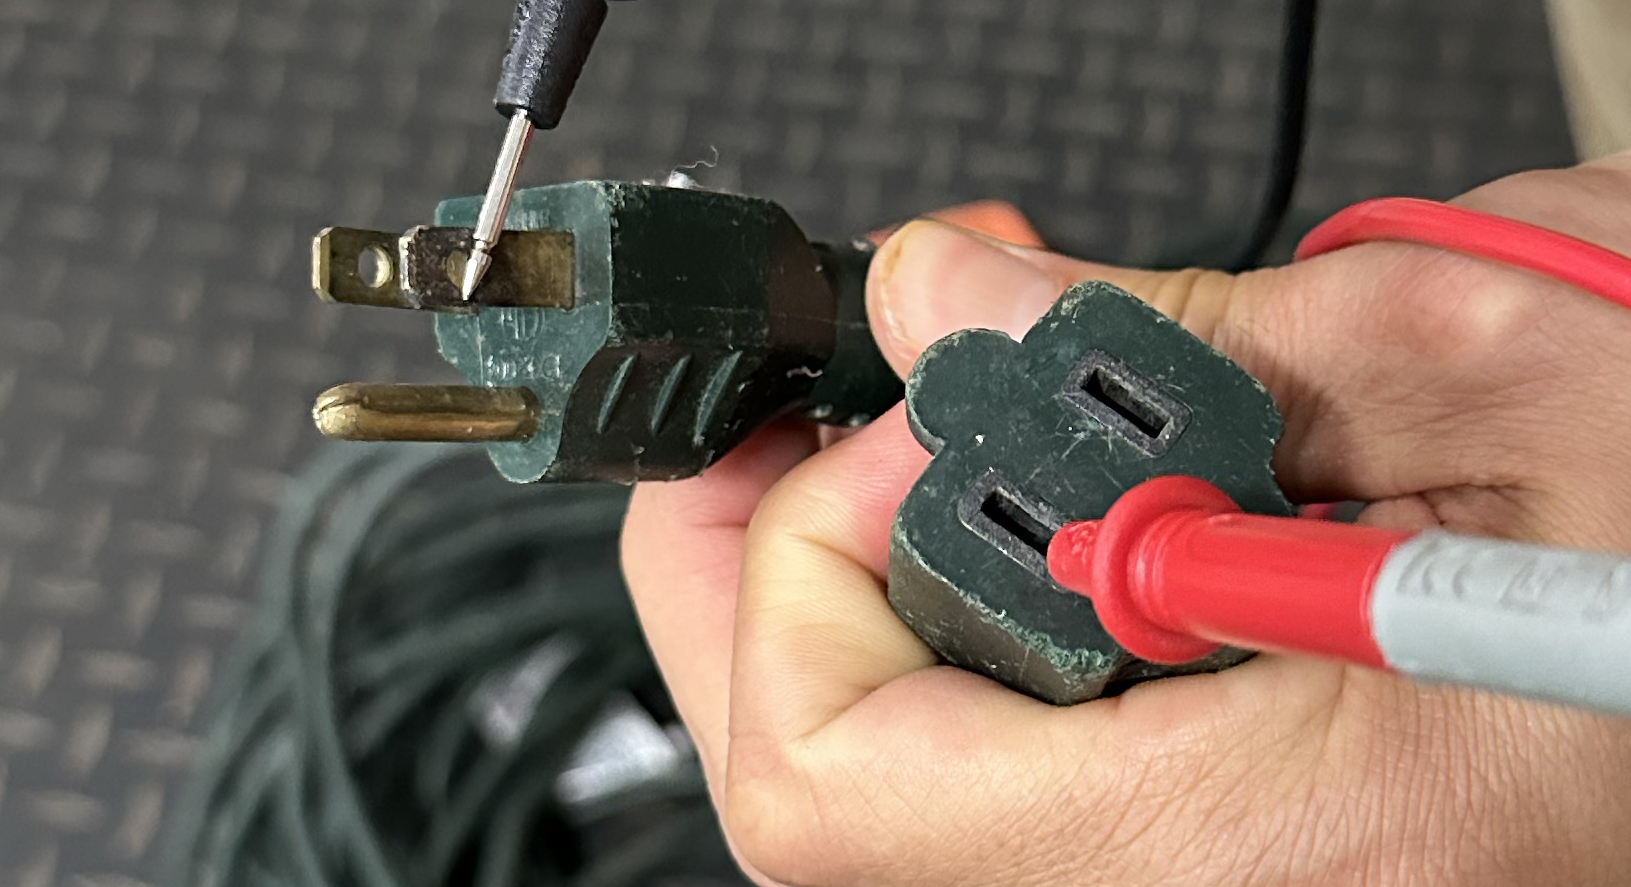
Step 1: Check for Continuity and Shorts
Start with the cord completely unplugged.
Set your multimeter to resistance (Ω) or continuity mode. Plug the red probe into the voltage/resistance port.
To test each wire:
Ground:
Insert the red probe into the round ground hole on the female (plug-in) end.
Touch the black probe to the round ground prong on the male (wall plug) end.
Expect a reading under a few ohms depending on cord length and gauge. Anything over ~5 ohms could indicate corrosion or a partial break.
Now check for shorts:
Keep the red probe in the ground hole and touch the black probe to each flat prong on the male end.
Your multimeter should display “O.L.” or infinity, indicating no connection. If you get a low reading, the cord has a short and should be tossed.
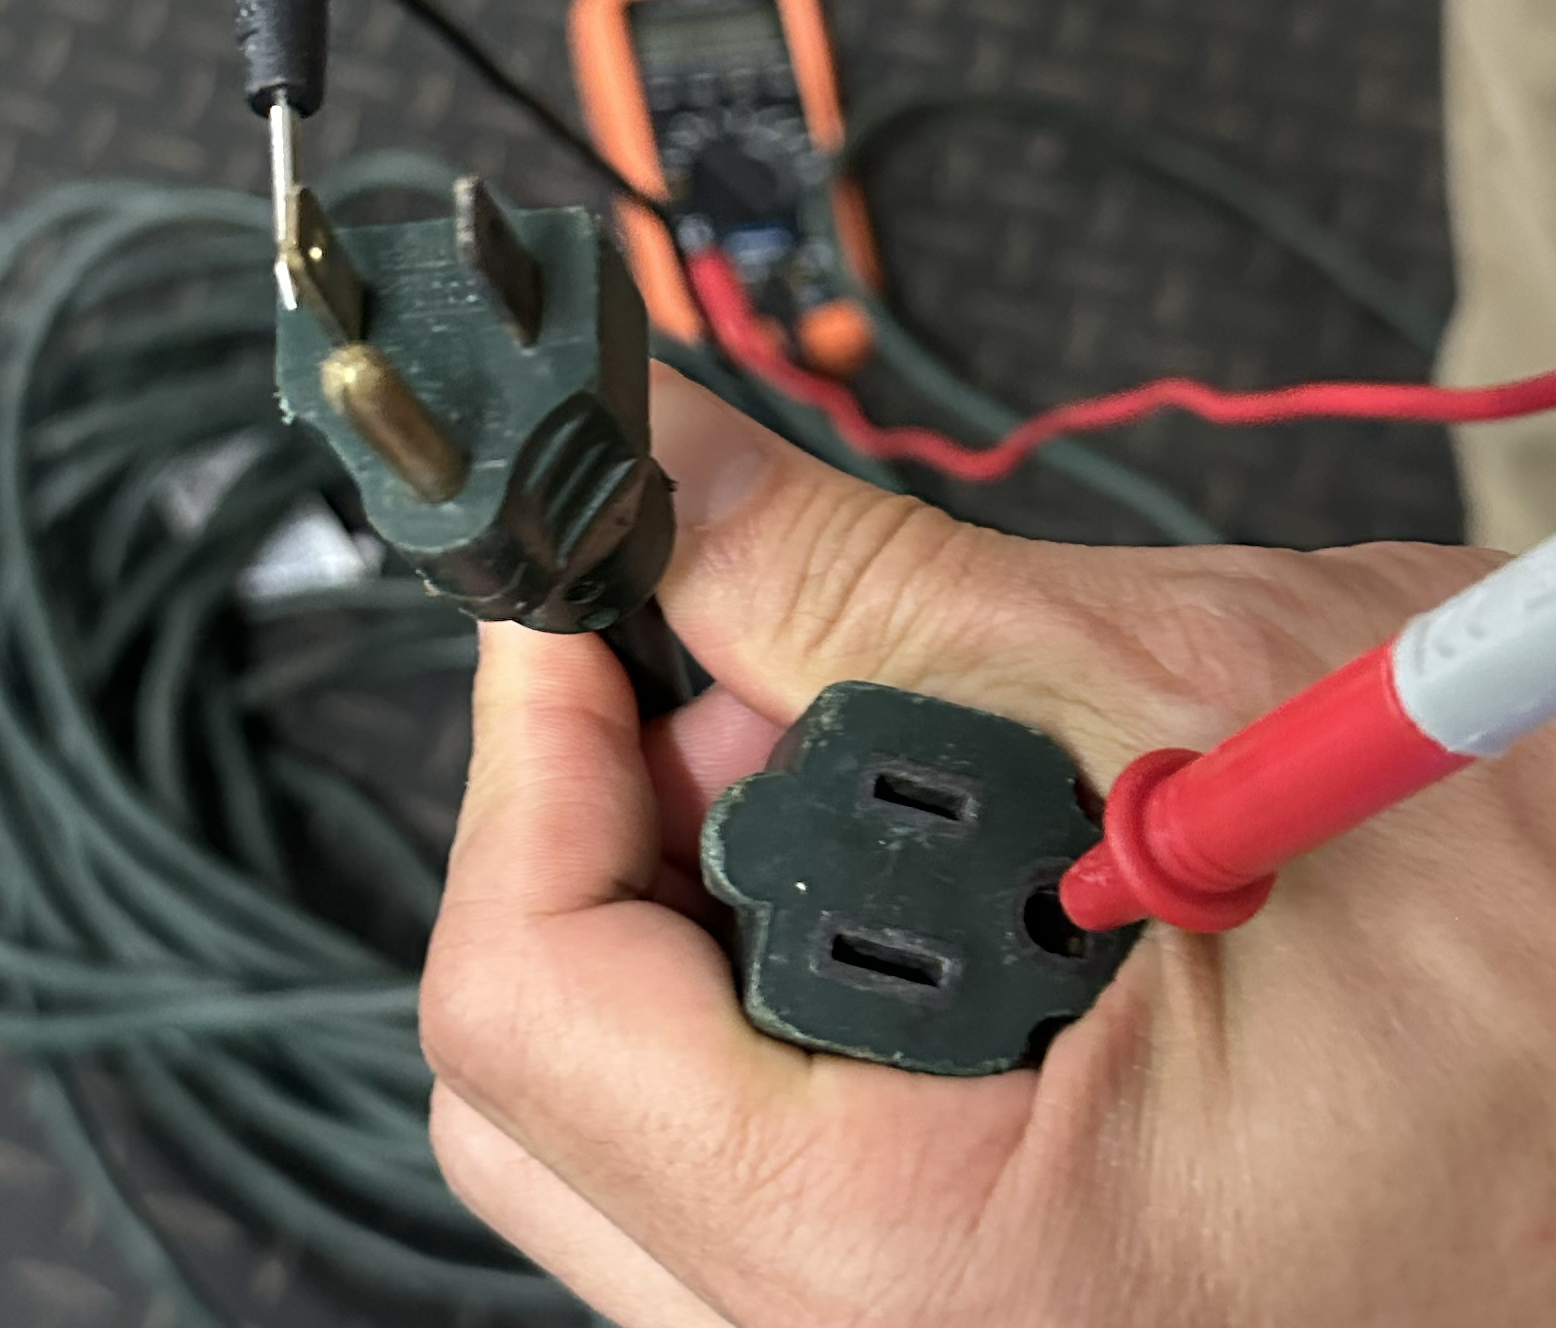
Hot and Neutral Slots:
Repeat the same procedure for the short (hot) slot and long (neutral) slot:
Match each slot to its corresponding prong and test for continuity (0.8 ohms or less).
Cross-test against the other prongs for “O.L.” readings to confirm there are no shorts between wires.
If any test shows continuity between circuits that shouldn’t be connected, that cord goes in the trash. It’s not worth trying to repair.
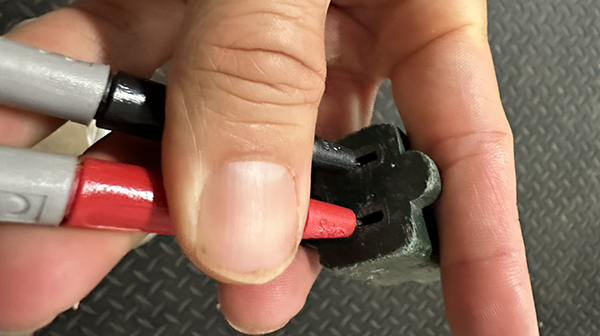
Step 2: Test for Live Voltage
Once you’ve confirmed the cord isn’t damaged, you can check that it’s delivering voltage properly.
Plug the cord into a live wall outlet.
Set your multimeter to AC voltage (VAC).
Insert the probes into the two female holes of the cord. You should get around 120 volts.
Move one of the probes to the ground hole (it’s round). You should again see ~120 volts.
These readings confirm the cord is carrying voltage properly and safely.
There you go. How to use a multimeter. Whether you’re checking batteries, hunting down mysterious electrical problems in your vehicle, or making sure your extension cords aren’t fire hazards waiting to happen, this simple tool can save you time, money, and headaches.
Wallace & Gromit: The Wrong Trousers features a contraption that slides Wallace out of his bed, downstairs to the kitchen, into his clothes, then fixes him some toast and jam. Joseph’s Machines thought it would be fun to reenact the sequence in real life, but as his video reveals, it took a lot of prep, trial, and error to get everything to work just right.
If you purchased an Apple device in the last 10 years, you might be able to receive some of the money from the company’s recently settled spying lawsuit. The original lawsuit claimed Apple was capturing sensitive information with its Siri voice assistant without users’ consent, and sending it to third-party contractors. The company agreed to settle the case for $95 million in January 2025, and thanks to the new landing page for the settlement, there’s now a way to file a claim on your own.
To file a claim, you you need to have bought an "iPhone, iPad, Apple Watch, MacBook, iMac, HomePod, iPod touch or Apple TV" between September 17, 2014 and December 31, 2024, and believe Siri accidentally activated on your device during a private conversation. From the $95 million Apple is paying out, you can receive up to $20 per device you believe called up Siri, provided you swear under oath it happened.
You have until July 2, 2025 to file your claim. If you qualify for the settlement, you may have already been notified with information on your Claim Identification Number and Claim Confirmation Code. If you haven’t received either but believe the settlement applies, you’re free to submit a claim on your own.
Apple claims that Siri was designed with protecting users’ privacy in mind, and agreeing to share data to improve the voice assistant — through your device’s Privacy & Security settings — never uses audio recordings or transcripts for anything other than training. In the case of newer devices, voice data is processed locally anyway, so agreeing to share your data is supposed to be the only way Apple could ever access it.
Given the growing focus on AI, and the large amounts of data needed to train it, there’s good reason to be skeptical about where companies are getting their training material. Apple prefers to get its customers consent, but the company has turned to new sources to help its AI research along. For example, Apple recently disclosed that it will start using the images captured for its Street View-esque feature in Apple Maps to train its models.
This article originally appeared on Engadget at https://www.engadget.com/big-tech/you-can-now-claim-your-piece-of-apples-95-million-siri-privacy-settlement-213020351.html?src=rssEngadget
The way-too-good-to-be-playing-in-a-garage Middle Aged Dad Jam Band is back with another great cover. This time, they’re joined by Reno 911! alum Kerri Kenney-Silver, who lends her vocal talents to this spirited rendition of The Breeders’ track Cannonball. It’s a fun and energetic performance that’s sure to bring back good memories for ’90s kids.