Prepping is divided into various categories. There are the realistic preppers who prep for stuff like hurricanes and other natural disasters; the bug out preppers, who plan on bugging out to the wilderness; and the prepsteaders, such as myself who are working on developing a homestead.
Then there are the armchair preppers who talk about stuff that is so far off the wall their plans are unrealistic. For example, in 2015 I posted a video on YouTube about trespassers scouting the bug out location.
The gist of the video was of people trespassing on private property. Whoever it was crossed a creek, and walked up on my land far enough to see a shed and the back of a field. Just a little further and they could have seen the back of my house.
Someone posted a comment on the video stating, “This why you do not have neighbors.”
Let me get this straight, preppers are not supposed to have neighbors? Are we supposed to live so far in the boonies nobody else wants to live near us? We talked about this in the forum – Survivalist Living Too Far in the Boonies. There comes a point where someone is living so far in the boonies even driving to town is an all day affair.
Then there is the issue of urban creep. Land bought today in the boonies may have neighbors in 10, 20 or 30 years. Land has a way of changing hands. Property may be seized for back taxes, then auctioned off. Then the land my turn into someones home. Elderly people pass away, and the kids sell the land.
The person who posted the comment, when someone buys land next to his, what would he be xpected to do? Maybe sell his land and relocate?
It is unrealistic to buy land, then move when someone buys land next to you. How is someone supposed to set down long term roots if they are relocating every few years? How is someone supposed to develop an orchard, build anything… selling and relocating every year?
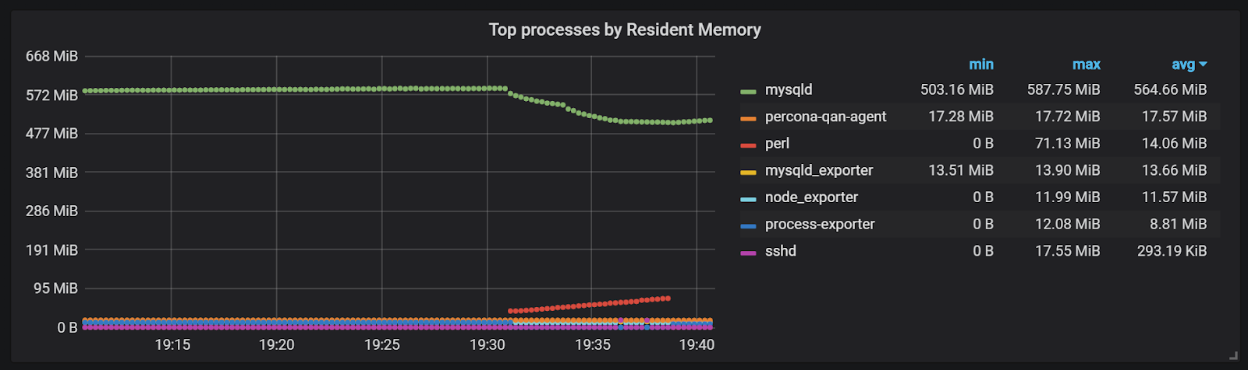
While Percona Monitoring and Management (PMM) captures a lot of host metrics, it currently falls short providing per-process information, such as which particular process uses a lot of CPU resources, causes Disk IO or consumes a lot of memory.
In our database performance optimization and troubleshooting practice, this information has proven quite useful in many cases: batch jobs taking much more resources than developers would estimate and misconfigured Percona XtraBackup or Percona Toolkit are among the most common offenders.
Per-process metrics information can also be very helpful when troubleshooting database software memory leaks or memory fragmentation.
You don’t know which processes cause you problems at the outset, so it is important to capture information about all of the processes (or specifically exclude the processes you do not want to capture information about) rather than capture information about selected few.
While capturing such helpful information is not available in PMM out of the box (yet), you can easily achieve it using PMM’s External Exporter support and the excellent Prometheus Process Exporter by Nick Cabatoff.
These instructions are for Debian/Ubuntu Linux Distributions but they should work with RedHat/CentOS based versions as well – just use RPM package instead of DEB
1: Download the process exporter packages from GitHub:
This captures process metrics every 10 seconds (adjust interval if desired).
Important note: due to some internal limitations, you need to use a different service name (“processes-my-host”) for each host. I suggest just adding the hostname to the descriptive name “processes” for simplicity.
5: Get Matching Dashboard from Grafana.com
While you can browse the data captured by the Advanced Data Exploration Dashboard, it is not any fun. I created a PMM-style dashboard and published it on Grafana.com. I based it on Nick’s original dashboard.
To add this dashboard to your PMM Server, click Dashboard Search on your PMM Server.
From there, click on “Import Dashboard”. Use 6033 as the Grafana.com Dashboard ID.
6: You’re done!
You should have data flowing, and you should be able to see the data on the graphs.
In this example, I have pt-query-digest (shown as Perl) parsing the log file and pushing MySQL Server away from memory.
Note, as you likely have many processes on the system, the graphs are designed to show only the top processes. All running processes, however, are available in the drop-down if you want to access the history for a specific process.
Let us know what you think. We are looking at how to integrate this functionality directly into Percona Monitoring and Management!
Peter managed the High Performance Group within MySQL until 2006, when he founded Percona. Peter has a Master’s Degree in Computer Science and is an expert in database kernels, computer hardware, and application scaling.
This post is about setting up MySQL InnoDB Cluster with 5 nodes on a sandbox deployment. Here, we focus on implementation part, the core concepts will be explained in separate posts.
Prerequisites:
MySQL Engine
MySQL Shell
MySQL Router
Deploying MySQL InnoDB Cluster involves the following steps:
Deploying MySQL Engine (Sandbox Instance)
Creating an InnoDB Cluster
Adding nodes to InnoDB Cluster
Configuring MySQL Router for High Availability.
Testing High Availability.
Deploying MySQL Engine:
If the MySQL engines are already installed on all the nodes, you can skip this step and directly move into creating an InnoDB Cluster part.
I am deploying 5 Sandbox instances (which is in-built on MySQL Shell application) on a same machine. On production system, there will be separate nodes for each MySQL Engines. Let’s begin with the deployments:
To open MySQL Shell : Start -> cmd -> Type mysqlsh (OR) Start -> MySQL Shell
deploySandboxInstance()module will deploy new Sandbox Instance on the mentioned port, let’s deploy the following 5 Sandbox instances:
dba.deploySandboxInstance (3307)
dba.deploySandboxInstance (3308)
dba.deploySandboxInstance (3309)
dba.deploySandboxInstance (3310)
dba.deploySandboxInstance (3311)
Sample Output:
MySQL JS > dba.deploySandboxInstance (3307)
A new MySQL sandbox instance will be created on this host in
C:\Users\rathish.kumar\MySQL\mysql-sandboxes\3307
Warning: Sandbox instances are only suitable for deploying and running on your local machine for testing purposes and are not accessible from external networks.
Please enter a MySQL root password for the new instance: ***
Deploying new MySQL instance…
Instance localhost: 3307 successfully deployed and started.
Use shell.connect(‘root@localhost:3307’); to connect to the instance.
MySQL JS >
To connect the deployed sandbox instance:
MySQL JS > \connect user@host:portand enter the password when prompted. (OR)
MySQL JS > shell.connect(‘user@host:port’)
Sample Output:
MySQL localhost: 3307 ssl JS > \connect root@localhost:3307
Creating a session to ‘root localhost: 3307’
Enter password: ***
Fetching schema names for auto completion… Press ^C to stop.
Closing old connection…
Your MySQL connection id is 16
Server version: 8.0.11 MySQL Community Server – GPL
No default schema selected; type \use
MySQL localhost: 3307 ssl JS > \ssl
Switching to SQL mode… Commands end with;
MySQL localhost: 3307 ssl SQL > select @@port;
+——–+
| @@port |
+——–+
| 3307 |
+——–+
1 row in set (0.0006 sec)
MySQL localhost: 3307 ssl SQL >
Creating InnoDB Cluster:
To create an InnoDB cluster, connect to seed (primary) server, which contains the original data by using above method and follow the below steps:
var cluster = dba.createCluster(‘ClusterName’)
Sample Output:
MySQL localhost:3307 sslJS > var cluster = dba.createCluster(‘DBCluster’)
A new InnoDB cluster will be created on instance ‘root@localhost:3307’.
Validating instance at localhost:3307…Instance detected as a sandbox.
Please note that sandbox instances are only suitable for deploying test clusters for use within the same host.
This instance reports its own address as L-IS-RATHISH
Instance configuration is suitable.
Creating InnoDB cluster ‘DBCluster’ on ‘root@localhost:3307’…
Adding Seed Instance…
Cluster successfully created. Use Cluster.addInstance() to add MySQL instances.
At least 3 instances are needed for the cluster to be able to withstand up to one server failure.
Adding nodes to InnoDB Cluster:
The secondary replication nodes will be added to cluster by using the addInstance() method.
A new instance will be added to the InnoDB cluster. Depending on the amount of data on the cluster this might take from a few seconds to several hours.
Please provide the password for ‘root@localhost:3311’: ***
Adding instance to the cluster …
Validating instance at localhost:3311…
Instance detected as a sandbox.
Please note that sandbox instances are only suitable for deploying test clusters for use within the same host.
This instance reports its own address as L-IS-RATHISH
Instance configuration is suitable.
The instance ‘root@localhost:3311’ was successfully added to the cluster.
Configuring MySQL Router for High Availability:
MySQL Router routes client connections to servers in the cluster and it provides separate ports for Read and Read/Write operations.
MySQL Router takes its configuration from InnoDB Cluster’s metadata and configure itself by using –-bootstrap option. It is recommended to install MySQL Router on a separate server or can be installed on the application server.
The MySQL Router command is given below, this should be run on the server with Read/Write (R/W) role.
shell> mysqlrouter–bootstrap user@host:port
The server roles can be checked by using the status() method. Let us check the status of our cluster:
MySQLlocalhost:3307 sslJS > cluster.status()
{
"clusterName": "DBCluster",
"defaultReplicaSet": {
"name": "default",
"primary": "localhost:3307",
"ssl": "REQUIRED",
"status": "OK",
"statusText": "Cluster is ONLINE and can tolerate up to 2 failures.",
MySQL Router has now been configured for the InnoDB cluster ‘DBCluster’.
The following connection information can be used to connect to the cluster.
Classic MySQL protocol connections to cluster ‘DBCluster’:
– Read/Write Connections: localhost:6446
– Read/Only Connections: localhost:6447
X protocol connections to cluster ‘DBCluster’:
– Read/Write Connections: localhost:64460
– Read/Only Connections: localhost:64470
Existing configurations backed up to ‘C:/Program Files/MySQL/MySQL Router 8.0/mysqlrouter.conf.bak’
Connecting InnoDB Cluster:
From MySQL Router configuration, we get the connection information, by default, port 6446 used for Read /Write connections and Port 6447 used for Read/Only connections. MySQL Router allows to configure custom port numbers for R/W and R/O client connections.
Let us connect to first connect to Read/Write port and then connect to Read/Only port for testing.
Welcome to the MySQL monitor.Commands end with ; or \g.
Your MySQL connection id is 176
Server version: 8.0.11 MySQL Community Server – GPL
Copyright (c) 2000, 2018, Oracle and/or its affiliates. All rights reserved. Oracle is a registered trademark of Oracle Corporation and/or its affiliates. Other names may be trademarks of their respective owners.
Type ‘help;’ or ‘\h’ for help. Type ‘\c’ to clear the current input statement.
mysql> select @@port;
+——–+
| @@port |
+——–+
|3307 |
+——–+
1 row in set (0.00 sec)
mysql> create database ClustDB;
Query OK, 1 row affected (0.09 sec)
mysql> use ClustDB;
Database changed
mysql> create table t1 (id int auto_increment primary key);
Welcome to the MySQL monitor.Commands end with ; or \g.
Your MySQL connection id is 47
Server version: 8.0.11 MySQL Community Server – GPL
Copyright (c) 2000, 2018, Oracle and/or its affiliates. All rights reserved. Oracle is a registered trademark of Oracle Corporation and/or its affiliates. Other names may be trademarks of their respective owners.
Type ‘help;’ or ‘\h’ for help. Type ‘\c’ to clear the current input statement.
mysql> select @@port;
+——–+
| @@port |
+——–+
|3308 |
+——–+
1 row in set (0.00 sec)
mysql> select * from ClustDB.t1;
+—-+
| id |
+—-+
|1 |
+—-+
1 row in set (0.00 sec)
mysql> insert into ClustDB.t1 (id) values (2);
ERROR 1290 (HY000): The MySQL server is running with the –super-read-only option so it cannot execute this statement
mysql>
Testing High Availability:
We have connected to R/W and R/O instances, and it is working as expected. Now let’s test the High Availability by killing primary seed node (3307) and Read/Only instance (3308).
C:\Users\rathish.kumar\MySQL\mysql-sandboxes\3307 will be killed
Killing MySQL instance…
Instance localhost:3307 successfully killed.
Now refresh run the query on the existing Read/Write and Read/Only connections and check the port:
Read/Only Instance:
mysql> select @@port;
ERROR 2006 (HY000): MySQL server has gone away
No connection. Trying to reconnect…
Connection id:38
Current database: *** NONE ***
+——–+
| @@port |
+——–+
|3310 |
+——–+
1 row in set (1.30 sec)
mysql>
This error is due to connection rerouting while we are still connected to server. This error will not occur on new connections. Let us try with Read/Write connections:
Welcome to the MySQL monitor.Commands end with ; or \g.
Your MySQL connection id is 32
Server version: 8.0.11 MySQL Community Server – GPL
Copyright (c) 2000, 2018, Oracle and/or its affiliates. All rights reserved. Oracle is a registered trademark of Oracle Corporation and/or its affiliates. Other names may be trademarks of their respective owners.
Type ‘help;’ or ‘\h’ for help. Type ‘\c’ to clear the current input statement.
mysql> select @@port;
+——–+
| @@port |
+——–+
|3311 |
+——–+
1 row in set (0.00 sec)
mysql>
There is no changes required from applications, the InnoDB Cluster will identify the changes and automatically configure itself and high availability achieved with the help of MySQL Router.
I suggest you to test InnoDB Cluster on lab environment and share your findings on comment section for other readers. I will be coming with other articles on working with InnoDB Cluster and Troubleshooting InnoDB Cluster. Need of any assistance on InnoDB Cluster, please share it on comment section.
Gizmodo went behind the scenes at the “Disney Morgue” to see how Walt Disney’s animation history is being preserved for future generations. The morgue has everything from the earliest drawings for short cartoons like Mickey Mouse’s Steamboat Willie (1928) to animation cels from movies like Snow White and the Seven Dwarves (1937) to stunning reference art from films like Moana (2016).
It’s a rare glimpse at the people and their technologies that are working to make sure that Disney’s animation history is around for generations to come.
In the early days of animation, many of the major studios saw animation cels as disposable after a movie was finished. But today, those fragments of animation history are recognized as treasures that give us a peek at how some of our favorite movies were made. Unfortunately, those pieces of art history naturally degrade with time.
Advertisement
“The cels degrade naturally by the nature of the material that they’re made of,” said Kristen McCormick of the Walt Disney Animation Research Library.
Animation art, just like old film itself, must be handled carefully. But even if they’re handled with the utmost care, they’re still going to become damaged simply through the passing of time. The cels warp and shrink over the years, deteriorating through a process called hydrolysis. Gizmodo also talked with Michael Schilling, lead scientist at the Getty Conservation Institute, about how they’re working on restoring damaged animation art.
“If the humidity is raised to just the right level, the paint will actually reattach to the plastic sheet,” said Schilling, describing the painstaking process of restoring the cels.
Both Schilling and McCormick talk about how incredible it is to watch these old Disney films today. Their jobs have given them a new appreciation for the work that went into these classics. And it inspires them to continue the work that they do to preserve these important pieces of history. They love their jobs, and it’s clear that you would too if you got a chance to work with such unique treasures from the history of Disney animation.
Advertisement
“I always see something new each day,” McCormick told Gizmodo about what her job is like. “And I’m always astounded by the beauty of the pieces.”
It’s been a long time since Apple could claim its computers were really virus-free. Even mighty Mac owners have to keep an eye out for the latest vulnerabilities and malware, just like everyone else, and there’s some new malicious Mac software making the rounds that you should know about.
Advertisement
Spotted by Reddit user BackwardsBinary, “mshelper” is malware that’s designed to hog your Mac’s resources, causing your battery life to plummet (and your laptop to likely get a little warmer and louder). It’s unclear where this malicious code came from or what it’s doing, but one popular theory is that it’s cryptojacking software designed to mine cryptocurrency on your computer without your knowledge. Yuck.
Cryptojacking can push your processor to overwork itself, potentially causing permanent damage to your computer or mobile device. So, if that’s what we’re dealing with, you’ll want to clean up your Mac as soon as possible. Thankfully, it’s pretty easy to identify and eradicate mshelper.
Advertisement
The first thing you’ll want to do is confirm whether mshelper is installed on your Mac. To find out, open Activity Monitor and click on the CPU tab. You should see a list of all the apps and software running on your computer. Make sure they’re organized by the amount of resources they’re using (% CPU). If it’s present, mshelper should show up at the top of the list. If it doesn’t show up, you can also reorder the list by name alphabetically to double-check that it’s really not there.
If you do find the malware on your Mac, you’ll have to go in and delete a few files on your system to remove it. Open Macintosh HD (if you can’t find it, just do a Spotlight search). Then, head to Library, click on LaunchDaemons, find the file labeled “com.pplauncher.plist,” and delete it. Next, head back to Library, click on Application Support, and delete the file labeled “pplauncher.” Finally, restart your Mac.
Advertisement
With that out of the way, you should be safe from the latest Mac malware. Just be careful not to download any suspicious files in the future so you can avoid whatever terrible software comes next.
“It started as an idea – what if we made a Deadpool movie?” Ryan Reynolds continues the hype train for Deadpool 2 by copying Marvel Studios’ 10th year anniversary video. In a way, he’s almost right – X-Men Origins: Wolverine came out in 2009.
By Malcolm Owen Friday, May 18, 2018, 07:00 am PT (10:00 am ET)
If your Mac is running hot and is consuming its battery at a higher rate than expected in recent days, you may be affected by ‘mshelper.’ AppleInsider explains how to check for the resource-consuming malware, and how to stop it from slowing down macOS.
New malware affecting macOS has started to circulate, with reports from Mac users on Apple’s support forums and Reddit revealing systems are being affected by it. Affected Mac systems typically have their processor running at full tilt, which can prevent other software from working optimally due to resources being used on this unwanted program.
The high processor usage can also cause the Mac to run its fans constantly to try and cool everything down. For MacBook users, mshelper’s interference also means the battery life will erode away faster than normal.
It is unknown what exactly mshelper is doing to utilize the processor at such a high rate, but speculation on the Apple support forum suggests it could be some form of adware, or possibly a program used for mining cryptocurrency on a victim’s computer. Aside from using the processor, there also doesn’t seem to be any other issues it causes on affected desktops, as is typical with ransomware.
As it isn’t a virus, it is likely mshelper is distributed through an installation of another piece of software rather than spreading organically.
Checking for mshelper
Open Activity Monitor, which can be found in the Applications folder under Utilities. Alternately, you can search for “Activity Monitor” in Finder, under a “This Mac” search.
Once Activity Monitor is open, click CPU to bring up a list of processes currently using it, then click the Process Name tab to sort the list by alphabetical order. Scroll down the list until you reach where mshelper would appear alphabetically.
You can also click %CPU to sort the list by processor usage. As mshelper is a processor-intensive program, it should appear at the top of the list.
If it appears at all, then the next task is to eliminate it from macOS.
Removing mshelper
While it is possible to kill the process, this is futile due to it automatically restarting once closed. One way to stop this from happening is to delete just two files buried in the Mac’s library.
In Finder, select your Mac’s internal storage, then select Library followed by the LaunchDaemons folder. Select com.pplauncher.plist and delete it.
The other file is also found in the Library, under Application Support then pplauncher. Select and delete pplauncher.
At this point, you can kill the process.
Further notes
Apple does operate its own anti-malware protection system in macOS, designed to protect against threats known to the company. While it isn’t currently protecting against this issue, it is highly probable Apple will include changes in a future update to prevent it from working.
With gas prices hitting a three-year high and projected to keep rising, we Americans are going to take a hit every time we fill up our flashy new SUVs and crossovers we’re all buying. But there’s a counterargument that today’s vehicles offset rising gas prices with higher fuel efficiency. But are they efficient enough to “break even” with more expensive gas? We did some math to find out.
This has been coming up a lot as American carbuyers go completely mad for crossovers and trucks and small cars fall to the wayside. Ford went as far as killing all of its cars in America. Welcome, as ever, to the sedanocalypse. Some people don’t think this will be all that bad, but the math doesn’t always back that up.
For this experiment, we looked at gas prices over the years as well as the fuel economy figures of two representative vehicles: the Ford F-150, the best selling vehicle in the country for the last bazillion years and the Honda CR-V, a good middle-of-the-road crossover like we all love buying these days. Technically, the Nissan Rogue outsells the Honda at the moment, but it hasn’t been around that many years. We were not cursed with the Rogue back in 2003. Simpler times.
Advertisement
The first fun year to compare our current gas situation with is 2003, a kind of barometer for the pre-Recession cheap gas days. The Hummer H2's best selling year was 2003, which makes it a kind of spiritual peak.
For our control vehicle, let’s look at the base-model Ford F-150, which has made huge strides in fuel economy since it went aluminum a few years ago.
To help organize our data, A Chart:
The price of one gallon of regular in 2003 came to $1.56 (lol), according to Statista. We were going to use the U.S. government’s figures for gas prices, but it charts all grades of gas combined while Statista let us track regular alone, which seemed more fair.
Advertisement
OK, so a Ford F-150 from 2003 had a 25-gallon tank and a combined city/highway mileage estimate of 16 mpg. This meant that a fill up of your new ‘03 Ford would have cost you $39 at the time, and you wouldn’t have to fill up for another 400 miles. At 16 mpg, you’d burn up 6.25 gallons to go 100 miles, or $9.75 for every 100 miles you drive.
How does this compare to a current Ford F-150? A few things get changed. The cost for a gallon of regular as of the day of this writing is $2.90, according to AAA. The now-lightweight 2018 Ford F-150 has a smaller gas tank of 23 gallons, but it also has an improved combined mileage estimate of 21 mpg. Of course, because gas is now more expensive, it’ll cost $66.70 to fill the tank, and you won’t need to dump that much cash down the drain for another 483 miles. That comes down to 4.76 gallons or $13.80 for ever 100 miles you drive.
This is the interesting stuff. The F-150 has grown more efficient in 15 years’ time, but it has not offset the rise in gas prices. You’re still paying more at the pump with your more efficient F-150 today than with your gas-guzzling F-150 back in 2003, bumping Linkin Park.
Advertisement
Things follow a similar path for the Honda CR-V, which has climbed from 23 mpg in 2003 to a lofty 28 in 2018. In spite of the added fuel efficiency, it costs more to fill up today ($23.87 vs $40.67) and more for every 100 miles you drive ($7.09 s $10.42.)
We also plugged in numbers for a couple other years including 2008 (a real high point for gas prices, spiking up to $3.25 across the year and nation as a whole) and 2009 (when gas prices dropped down to $2.35 before they climbed up to a record 2012 high of $3.62). In both of those years, gas mileage was low enough and gas prices high enough that it is cheaper to drive around today’s more efficient cars. But if you look at where we are historically, we’re actually climbing right up to where 2008 was.
If you plug in 2008 gas prices into our current fuel economy figures, kind of like what we could expect to see at the pump within a year, it’s basically going to cost you another five or 10 bucks per fill up. To put it in perspective, it’d be like if your current 2018 F-150 dropped to under 19 miles per gallon, down from 21. It’d be the same if your current 2018 CR-V dropped to 25 mpg from 28. The gains of efficiency we’ve been happy to see from carmakers are going to get effectively washed away.
Advertisement
Is that convoluted? OK, that’s kind of convoluted. The point is that while today’s cars are more efficient than they were in the days of cheap gas, today’s gas prices have largely if not completely offset those gains and it’s looking worse from here. There’s little to say that we won’t still be hurting at the pump with better-mpg vehicles just like we were in the days of really high prices.
We’d also like you to note that this isn’t completely comprehensive math. For the sake of simplicity, we didn’t work in variables like miles people drove year by year, exactly how fleet mileage went up or down year by year or how the Earth’s rotation would affect tires. This was a basic exercise, conducted with a few variables and even more basic math to create a sketch of how this all has played out for America.
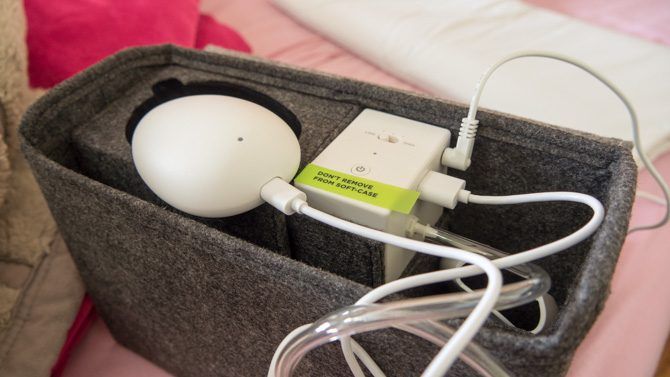
Our verdict of the Smart Nora Anti-Snoring Device: Smart Nora is an innovative non-invasive anti-snoring solution, but more importantly: it worked for us. If snoring is driving a wedge in your relationship, give it a go and reclaim your sleep. 1010
Apparently, I snore like a chainsaw. Like many people faced with this sleeping situation, my wife has resorted to kicking me until I stop. SmartNora–a device that began as a Kickstarter–has completely fixed that. When it detects snoring, it nudges my head up and down, clearing the airways and stopping the snoring. It’s a non-invasive solution to an age old problem, and it’s become a bedtime essential in our house.
The Smart Nora costs $300 direct from SmartNora.com. Anything that can get some precious sleep time back is worth every penny. Join us as we take a closer look at exactly how the Smart Nora works, and at the end of this review, we’re giving one away.
What’s In The Box?
There’s quite a lot of unfamiliar tech in the box, so let’s break down each component.
Pump and Case
Everything is housed inside a sleek felt-covered case measuring 4 x 7 x 10 inches. Integral to this case is the air pump in the center. Don’t try to remove this from the case, as you may damage the unit. The whole box should be placed under your bed in normal use, but you’ll need to unpack the other bits first.
Inflator
In the largest pocket, you’ll find the pillow inflator with attached hose. This consists of stiff outer plates with small plastic air pillows on the inside.
The design allows a small amount of air to move your whole pillow. Unfold this, and place it under your pillow or inside the pillow case, with the tube facing the outside.
If you received a comfort sleeve, you can put the inflator inside this. This step is optional, but adds a little extra padding if you’re using particularly thin pillows.
Pebble
You’ll find the Pebble wireless sensor on the left, as well as a mounting bracket elsewhere in the box. Ideally, the sensor should placed no more than 4 inches above your head, mounted to your headboard. If this isn’t possible though, you can also place it on a bedside table, no more than an arm’s length away from your head.
The Pebble houses the microphone, but is also your main interaction point with the device.
Other Bits
Also in the package is a Micro USB cable, and mains power lead. The Micro USB cable is used to syncronize and charge the Pebble sensor unit. The battery lasts for approximately a week.
The base unit itself also houses a battery for the pump. This is intended only as a backup or for situations where you just don’t have mains power, like camping. In normal situations, the base unit should be left plugged into the mains at all times and turned on.
I’d really like to commend them on the inclusion of 4 different easy-to-swap plug adaptors. Combined with the fact that everything can be packed down into itself, the Smart Nora is ideal for travelling. You needn’t lose sleep just because you’re not in your own bed.
Ease of Use and Setup
Once you’ve got the base unit plugged into mains power and the tube connected, turn on the main power button. Then unlock the Pebble with the slide switch underneath.
To pair the Bluetooth, plug the Micro USB cable from the Pebble into the base unit. You should also leave it plugged in for at least three hours if this is the first time you’ve done so. It’ll flash green when fully charged, or red when the battery is low. If you want to go ahead and test the inflation, tap on the Bluetooth button underneath the Pebble.
Apart from the initial setup, daily operation couldn’t be simpler. Each night before bed, all you need to do is tap on the Pebble to turn on the device. Hold down for a second to activate with the 30 minute delay. That’s it. The delay is useful if you find Smart Nora is waking you while still trying to fall asleep. I have no trouble falling straight asleep, so I didn’t need the delay.
On a few occasions, we experienced a flashing blue light. This means the Bluetooth connection has been lost. Plugging in the Micro USB cable again will fix this.
How Does Smart Nora Actually Work?
To detect when someone is snoring, a sensor is needed: in this case, a microphone, housed within the Pebble unit. This listens carefully for the light snoring that usually precedes really loud snoring.
Then we get to the really clever bit: a flat, unobtrusive air sack is placed under the snorer’s pillow. When snoring is detected, it gently inflates then immediately deflates, causing the snorer head to move. This adjusts the airways in your neck and throat, allowing air to flow freely, which stops the snoring. The whole inflation and deflation process takes about a minute for a full cycle.
The pump is whisper-quiet. I could hear it while testing it in the daytime if I put my ear right next to it, but it’s not loud enough to wake me up when sleeping. Even less so when placed under the bed. For the first few days, it was more the sound of the air sacks inflating that would wake me.
A Novel Reactive Approach
Smart Nora is the first device to use this completely novel approach. Yet, some reviewers have criticised this reactive method. In order for Smart Nora to work, it must first hear you snoring, by which time your partner may have already woken up. It’s not a proactive system that will stop you snoring in the first place, nor will it correct any underlying health issues. In fact, it’s more or less exactly like your partner waking up and nudging you–but it’s automated and a lot gentler.
We found this reactive method worked well. In most cases, she didn’t wake up at all, because the Smart Nora caught me snoring before it became loud enough. On the rare occasion she did wake up and saw the pillow kick into action, she could immediately fall back to sleep. It’s the process of actively engaging your brain and resetting that sleep cycle that causes real sleep loss. This happens if you need to shove your partner a little, or lie in bed waiting for them to stop. The Smart Nora avoids that situation.
This Smart Nora’s unique approach means you can use it with your existing pillow. The Pebble is unobtrusive, and you needn’t adapt to anything weird being strapped to your face. The entire system is so discreet that no one will even know it’s there unless you point it out.
Sensitivity and Inflation Settings
There’s two settings that you’ll need to tweak in order to find the best setting for you.
On the base unit you can set three different inflation strengths. These change how much air is pumped in, and consequently how high your pillow will rise and fall. We found the highest was almost comical, pushing my head from horizontal to completely vertical. Medium was perfect.
On the underside of the Pebble, you’ll find 5 levels of sensitivity for the microphone. The highest setting will activate immediately with the slightest noise. It should only be used in the most quiet of bedrooms. The lowest setting will only activate if it hears very loud snoring, multiple times. It can be used in very noisy rooms. The medium setting with be suitable for most people, activating with multiple snores, of normal loudness.
If your partner is very sensitive to your snoring, turn up the sensitivity so it activates faster.
Are There Any Cases Smart Nora Won’t Work?
There are a few situations in which Smart Nora will be less effective.
If you sleep with a white noise machine or similar, you’ll need to reposition things. Make sure the white noise is further away from the Pebble microphone than you are. Set Smart Nora on low sensitivity, and it’ll detect only the loudest noise. So as long as you snore louder than the white noise, it should still work.
Fans or air conditioning can also be an issue. If you’ve ever tried blowing into a microphone, you’ll know how noisy it’ll be. Ensure the airflow isn’t pointed at the Pebble, and it should be fine. The ambient noise from a fan or aircon alone won’t be enough to cause unintended activation. Even if it does, the motion isn’t intrusive enough to wake you.
Lastly, remember that it works by raising or lowering your pillow. If you’re the kind of person who slips off the pillow, it won’t do anything for you. The opposite is also true: if you hug your pillow tightly, it may wake you up.
There’s Also an App… Soon, Maybe
Promised very soon is an accompanying app. It’ll be launching on iOS first, giving “additional insights into your snoring”. Exactly what that entails is not yet clear. Unfortunately, the delay has angered some Kickstarter backers, since it was an integral part of the campaign.
Some of the Smart Nora app functionality promised on Kickstarter
To be clear, the Smart Nora system functions fully without an app. It’ll still stop you snoring. It just doesn’t take full advantage of the Bluetooth capabilities built into the system. Think of it as an added bonus coming at some point.
Will It Work For You?
For some people, snoring can be a debilitating condition. Loss of sleep is no laughing matter, and for couples it can drive a literal wedge between them. Some will spend many thousands of dollars trying to fix the problem to no avail. You’ll funny shaped pillows, pills of every color, masks, and mouth gags – none of which really work, are utterly uncomfortable, or are so expensive that they’re unaffordable for most people.
Smart Nora recommend a week to fully get used to the system, but they also have a 30-day money back guarantee in case it doesn’t. That said, it only took a few days for me to acclimatise. The results were fantastic–or so my wife says. I’m a heavy sleeper, so while it’s stopped my snoring, I’m ultimately not the one seeing the benefit! Snoring is a problem with many causes and many forms, so I can can’t say the Smart Nora will 100% work for everyone. All I can say is: it worked for us.
If you or your partner are losing sleep from snoring, I would absolutely recommend giving the Smart Nora a go. It’s a surprisingly simple approach, but it seems to actually work. Smart Nora is a bedtime must-buy.