A Guide To The State Of Print Stylesheets In 2018

A Guide To The State Of Print Stylesheets In 2018

Rachel Andrew


Today, I’d like to return to a subject that has already been covered in Smashing Magazine in the past — the topic of the print stylesheet. In this case, I am talking about printing pages directly from the browser. It’s an experience that can lead to frustration with enormous images (and even advertising) being printed out. Just sometimes, however, it adds a little bit of delight when a nicely optimized page comes out of the printer using a minimum of ink and paper and ensuring that everything is easy to read.

This article will explore how we can best create that second experience. We will take a look at how we should include print styles in our web pages, and look at the specifications that really come into their own once printing. We’ll find out about the state of browser support, and how to best test our print styles. I’ll then give you some pointers as to what to do when a print stylesheet isn’t enough for your printing needs.

Key Places For Print Support

If you still have not implemented any print styles on your site, there are a few key places where a solid print experience will be helpful to your users. For example, many users will want to print a transaction confirmation page after making a purchase or booking even if you will send details via email.

Any information that your visitor might want to use when away from their computer is also a good candidate for a print stylesheet. The most common thing that I print are recipes. I could load them up on my iPad but it is often more convenient to simply print the recipe to pop onto the fridge door while I cook. Other such examples might be directions or travel information. When traveling abroad and not always having access to data these printouts can be invaluable.

Reference materials of any sort are also often printed. For many people, being able to make notes on paper copies is the way they best learn. Again, it means the information is accessible in an offline format. It is easy for us to wonder why people want to print web pages, however, our job is often to make content accessible — in the best format for our visitors. If that best format is printed to paper, then who are we to argue?

Why Would This Page Be Printed?

A good question to ask when deciding on the content to include or hide in the print stylesheet is, “Why is the user printing this page?” Well, maybe there’s a recipe they’d like to follow while cooking in the kitchen or take along with them when shopping to buy ingredients. Or they’d like to print out a confirmation page after purchasing a ticket as proof of booking. Or perhaps they’d like a receipt or invoice to be printed (or printed to PDF) in order to store it in the accounts either as paper or electronically.

Considering the use of the printed document can help you to produce a print version of your content that is most useful in the context in which the user is in when referring to that print-out.

Workflow

Once we have decided to include print styles in our CSS, we need to add them to our workflow to ensure that when we make changes to the layout we also include those changes in the print version.

Adding Print Styles To A Page

To enable a “print stylesheet” what we are doing is telling the browser what these CSS rules are for when the document is printed. One method of doing this is to link an additional stylesheet by using the <link> element.

<link media="print" href="print.css">

This method does keep your print styles separate from everything else which you might consider to be tidier, however, that has downsides.

The linked stylesheet creates an additional request to the server. In addition, that nice, neat separation of print styles from other styles can have a downside. While you may take care to update the separate styles before going live, the stylesheet may find itself suffering due to being out of sight and therefore out of mind — ultimately becoming useless as features are added to the site but not reflected in the print styles.

The alternate method for including print styles is to use @media in the same way that you includes CSS for certain breakpoints in your responsive design. This method keeps all of the CSS together for a feature. Styles for narrow to wide breakpoints, and styles for print. Alongside Feature Queries with @supports, this encourages a way of development that ensures that all of the CSS for a design feature is kept and maintained together.

@media print {
    
}

Overwriting Screen CSS Or Creating Separate Rules

Much of the time you are likely to find that the CSS you use for the screen display works for print with a few small adjustments. Therefore you only need to write CSS for print, for changes to that basic CSS. You might overwrite a font size, or family, yet leave other elements in the CSS alone.

If you really want to have completely separate styles for print and start with a blank slate then you will need to wrap the rest of your site styles in a Media Query with the screen keyword.

@media screen {
    
}

On that note, if you are using Media Queries for your Responsive Design, then you may have written them for screen.

@media screen and (min-width: 500px) {
    
}

If you want these styles to be used when printing, then you should remove the screen keyword. In practice, however, I often find that if I work “mobile first” the single column mobile layout is a really good starting point for my print layout. By having the media queries that bring in the more complex layouts for screen only, I have far less overwriting of styles to do for print.

Add Your Print Styles To Your Pattern Libraries And Style Guides

To help ensure that your print styles are seen as an integral part of the site design, add them to your style guide or pattern library for the site if you have one. That way there is always a reminder that the print styles exist, and that any new pattern created will need to have an equivalent print version. In this way, you are giving the print styles visibility as a first-class citizen of your design system.

Basics Of CSS For Print

When it comes to creating the CSS for print, there are three things you are likely to find yourself doing. You will want to hide, and not display content which is irrelevant when printed. You may also want to add content to make a print version more useful. You might also want to adjust fonts or other elements of your page to optimize them for print. Let’s take a look at these techniques.

Hiding Content

In CSS the method to hide content and also prevent generation of boxes is to use the display property with a value of none.

.box {
  display: none;
}

Using display: none will collapse the element and all of its child elements. Therefore, if you have an image gallery marked up as a list, all you would need to do to hide this when printed is to set display: none on the ul.

Things that you might want to hide are images which would be unnecessary when printed, navigation, advertising panels and areas of the page which display links to related content and so on. Referring back to why a user might print the page can help you to decide what to remove.

Inserting Content

There might be some content that makes sense to display when the page is printed. You could have some content set to display: none in a screen stylesheet and show it in your print stylesheet. Additionally, however, you can use CSS to expose content not normally output to the screen. A good example of this would be the URL of a link in the document. In your screen document, a link would normally show the link text which can then be clicked to visit that new page or external website. When printed links cannot be followed, however, it might be useful if the reader could see the URL in case they wished to visit the link at a later time.

We achieve this by using CSS Generated Content. Generated Content gives you a way to insert content into your document via CSS. When printing, this becomes very useful.

You can insert a simple text string into your document. The next example targets the element with a class of wrapper and inserts before it the string, “Please see www.mysite.com for the latest version of this information.”

.wrapper::after {
  content: "Please see www.mysite.com for the latest version of this information.";
}

You can insert things that already exist in the document however, an example would be the content of the link href. We add Generated Content after each instance of a with an attribute of href and the content we insert is the value of the href attribute – which will be the link.

a[href]:after {
  content: " (" attr(href) ")";
}

You could use the newer CSS :not selector to exclude internal links if you wished.

a[href^="http"]:not([href*="example.com"]):after {
  content: " (" attr(href) ")";
}

There are some other useful tips like this in the article, “I Totally Forgot About Print Stylesheets”, written by Manuel Matuzovic.

Advanced Print Styling

If your printed version fits neatly onto one page then you should be able to create a print stylesheet relatively simply by using the techniques of the last section. However, once you have something which prints onto multiple pages (and particularly if it contains elements such as tables or figures), you may find that items break onto new pages in a suboptimal manner. You may also want to control things about the page itself, e.g. changing the margin size.

CSS does have a way to do these things, however, as we will see, browser support is patchy.

Paged Media

The CSS Paged Media Specification opens with the following description of its role.

“This CSS module specifies how pages are generated and laid out to hold fragmented content in a paged presentation. It adds functionality for controlling page margins, page size and orientation, and headers and footers, and extends generated content to enable page numbering and running headers/footers.”

The screen is continuous media; if there is more content, we scroll to see it. There is no concept of it being broken up into individual pages. As soon as we are printing we output to a fixed size page, described in the specification as paged media. The Paged Media specification doesn’t deal with how content is fragmented between pages, we will get to that later. Instead, it looks at the features of the pages themselves.

We need a way to target an individual page, and we do this by using the @page rule. This is used much like a regular selector, in that we target @page and then write CSS to be used by the page. A simple example would be to change the margin on all of the pages created when you print your document.

@page {
  margin: 20px;
}

You can target specific pages with :left and :right spread pseudo-class selectors. The first page can be targeted with the :first pseudo-class selector and blank pages caused by page breaks can be selected with :blank. For example, to set a top margin only on the first page:

@page :first {
  margin-top: 250pt;
}

To set a larger margin on the right side of a left-hand page and the left side of a right-hand page:

@page :left {
  margin-right: 200pt;
}
    
@page :right {
  margin-left: 200pt;
}

The specification defines being able to insert content into the margins created, however, no browser appears to support this feature. I describe this in my article about creating stylesheets for use with print-specific user agents, Designing For Print With CSS.

CSS Fragmentation

Where the Paged Media module deals with the page boxes themselves, the CSS Fragmentation Module details how content breaks between fragmentainers. A fragmentainer (or fragment container) is a container which contains a portion of a fragmented flow. This is a flow which, when it gets to a point where it would overflow, breaks into a new container.

The contexts in which you will encounter fragmentation currently are in paged media, therefore when printing, and also when using Multiple-column layout and your content breaks between column boxes. The Fragmentation specification defines various rules for breaking, CSS properties that give you some control over how content breaks into new fragments, in these contexts. It also defines how content breaks in the CSS Regions specification, although this isn’t something usable cross-browser right now.

And, speaking of browsers, fragmentation is a bit of a mess in terms of support at the moment. The browser compatibility tables for each property on MDN seem to be accurate as to support, however testing use of these properties carefully will be required.

Older Properties From CSS2

In addition to the break-* properties from CSS Fragmentation Level 3, we have page-break-* properties which came from CSS2. In spec terms, these have been superseded by the newer break-* properties, as these are more generic and can be used in the different contexts breaking happens. There isn’t much difference between a page and a multicol break. However, in terms of browser support, there is better browser support for the older properties. This means you may well need to use those at the current time to control breaking. Browsers that implement the newer properties are to alias the older ones rather than drop them.

In the examples that follow, I shall show both the new property and the old one where it exists.

break-before & break-after

These properties deal with breaks between boxes, and accept the following values, with the initial value being auto. The final four values do not apply to paged media, instead being for multicol and regions.

  • auto
  • avoid
  • avoid-page
  • page
  • left
  • right
  • recto
  • verso
  • avoid-column
  • column
  • avoid-region
  • region

The older properties of page-break-before and page-break-after accept a smaller range of values.

  • auto
  • always
  • avoid
  • left
  • right
  • inherit

To always cause a page break before an h2 element, you would use the following:

h2 {
  break-before: page;
}

To avoid a paragraph being detached from the heading immediately preceding it:

h2, h3 {
  break-after: avoid-page;
}

The older page-break-* property to always cause a page break before an h2:

h2 {
  page-break-before: always;
}

To avoid a paragraph being detached from the heading immediately preceding it:

h2, h3{
  page-break-after: avoid;
}

On MDN find information and usage examples for the properties:

break-inside

This property controls breaks inside boxes and accepts the values:

  • auto
  • avoid
  • avoid-page
  • avoid-column
  • avoid-region

As with the previous two properties, there is an aliased page-break-inside from CSS2, which accepts the values:

  • auto
  • avoid
  • inherit

For example, perhaps you have a figure or a table and you don’t want a half of it to end up on one page and the other half on another page.

figure {
  break-inside: avoid;
}

And when using the older property:

figure {
  page-break-inside: avoid;
}

On MDN:

Orphans And Widows

The Fragmentation specification also defines the properties orphans and widows. The orphans property defines how many lines can be left at the bottom of the first page when content such as a paragraph is broken between two pages. The widows property defines how many lines may be left at the top of the second page.

Therefore, in order to prevent ending up with a single line at the end of a page and a single line at the top the next page, you can use the following:

p {
  orphans: 2;
  widows: 2;
}

The widows and orphans properties are well supported (the missing browser implementation being Firefox).

On MDN:

box-decoration-break

The final property defined in the Fragmentation module is box-decoration-break. This property deals with whether borders, margins, and padding break or wrap the content. The values it accepts are:

  • slice
  • clone

For example, if my content area has a 10-pixel grey border and I print the content, then the default way that this will print is that the border will continue onto each page, however, it will only wrap at the end of the content. So we get a break before going to the next page and continuing.


The border does not wrap each page and so breaks between pages

If I use box-decoration-break: clone, the border and any padding and margin will complete on each page, thus giving each page a grey border.

The border wraps each individual page

Currently, this only works for Paged Media in Firefox, and you can find out more about box-decoration-break on MDN.

Browser Support

As already mentioned, browser support is patchy for Paged Media and Fragmentation. Where Fragmentation is concerned, an additional issue is that breaking has to be specified and implemented for each layout method. If you were hoping to use Flexbox or CSS Grid in print stylesheets, you will probably be disappointed. You can check out the Chrome bugs for Flexbox and for Grid.

The best suggestion I can give right now is to keep your print stylesheets reasonably simple. Add fragmentation properties — including both the old page-break-* properties as well as the new properties. However, accept that these may well not work in all browsers. And, if you find lack of browser support frustrating, raise these issues with browsers or vote for already raised issues. Fragmentation, in particular, should be treated as a suggestion rather than a command, even where it is supported. It would be possible to be so specific about where and when you want things to break that it is almost impossible to lay out the pages. You should assume that sometimes you may get suboptimal breaking.

Testing Print Stylesheets

Testing print stylesheets can be something of a bore, typically requiring using print preview or printing to a PDF repeatedly. However, browser DevTools have made this a little easier for us. Both Chrome and Firefox have a way to view the print styles only.

Firefox

Open the Developer Toolbar then type media emulate print at the prompt.


Typing media emulate print
Emulating print styles in Firefox

Chrome

Open DevTools, click on the three dots icon and then select “More Tools” and “Rendering”. You can then select print under Emulate CSS Media.


Chrome DevTools emulate print media
Emulating print styles in Chrome

This will only be helpful in testing changes to the CSS layout, hidden or generated content. It can’t help you with fragmentation — you will need to print or print to PDF for that. However, it will save you a few round trips to the printer and can help you check as you develop new parts of the site that you are still hiding and showing the correct things.

What To Do When A Print Stylesheet Isn’t Enough

In an ideal world, browsers would have implemented more of the Paged Media specification when printing direct from the browser, and fragmentation would be more thoroughly implemented in a consistent way. It is certainly worth raising the bugs that you find when printing from the browser with the browsers concerned. If we don’t request these things are fixed, they will remain low priority to be fixed.

If you do need to have a high level of print support and want to use CSS, then currently you would need to use a print-specific User Agent, such as Prince. I detail how you can use CSS to format books when outputting to Prince in my article “Designing For Print With CSS.”

Prince is also available to install on your server in order to generate nicely printed documents using CSS on the web, however, it comes at a high price. An alternative is a server like DocRaptor who offer an API on top of the Prince rendering engine.

There are open-source HTML- and CSS-to-PDF generators such as wkhtmltopdf, but most use browser rendering engines to create the print output and therefore have the same limitations as browsers when it comes to implementing the Paged Media and Fragmentation specifications. An exception is WeasyPrint which seems to have its own implementation and supports slightly different features, although is not in any way as full-featured as something like Prince.

You will find more information about user agents for print on the print-css.rocks site.

Other Resources

Due to the fact that printing from CSS has really moved on very little in the past few years, many older resources on Smashing Magazine and elsewhere are still valid. Some additional tips and tricks can be found in the following resources. If you have discovered a useful print workflow or technical tip, then add it to the comments below.

Smashing Editorial
(il)

via Smashing Magazine
A Guide To The State Of Print Stylesheets In 2018

Google launches Cloud Composer, a new workflow automation tool for developers

Google Cloud is launching the first public beta of Cloud Composer today, a new workflow automation tool for developers that’s based on the Apache Airflow project.

Typically, IT teams build their own automated workflow as needed, but the result of that is often a mess of different tools and Bash scripts that don’t always work together. Airflow and Cloud Composer allow teams to standardize on a single way of building and orchestrating workflows.

Google notes that its new tool, which uses Python as its default language, will allow teams to build workflows across on-premises tools and across multiple clouds and that the open source nature of the project will ensure that developers can take their workflows and use them across platforms. While the service is deeply integrated with the Google Cloud Platform, the team stressed that there is no lock-in.

“In building Cloud Composer, we wanted to combine the strengths of Google Cloud Platform with Airflow,” the Cloud Composer team writes in today’s announcement. “We set out to build a service that offers the best of Airflow without the overhead of installing and managing Airflow yourself. As a result, you spend less time on low-value work, such as getting Airflow installed, and more time on what matters: your workflows.”

In Airflow — and by extension in Cloud Composer, too — the different tasks and their expected outcomes (as well as what to do when things go wrong), are defined in a so-called Directed Acyclic Graph. These are standard Python files that define the workflow down to its details. You can find the full documentation here.

Google notes that it is actively participating in the Airflow community, too, and that it has contributed a number of pull requests already.


via TechCrunch
Google launches Cloud Composer, a new workflow automation tool for developers

5 Lesser-Known Free Stock Image Sites for Images That Stick Out

Photos and images have copyrights. If you want to use an image, you need permission from the photographer or employ other legal ways to use a photo. The easiest free option is to use a royalty-free image.

The internet is full of amazing stock photography sites


The 15 Best Sites for Free High-Resolution Stock Images


The 15 Best Sites for Free High-Resolution Stock Images

Free high-resolution images are hard to come by. Wouldn’t it be nice if you could get free stock images that are curated for quality and resolution? You can!
Read More

that give you such free images. You’ve probably heard of the more popular ones like Pexels, Unsplash, and Pixabay. But everyone goes there! So if you want to stand out from the crowd, you need images from places that most people don’t know about.

These lesser-known stock photography sites are just as good as any of the popular ones. But since you are one of the lucky few MakeUseOf readers to know about them, chances are that they will be unique in your circles.

1. UnDraw: Illustrations for Designs and Mockups in SVG Format

lesser-known free stock image sites

Whether you’re designing a new app or creating a PowerPoint presentation, a few good illustrations can really spruce things up. SVG, or Scalable Vector Graphics, is the most popular format for that. And UnDraw is a resource for such free, hand-drawn illustrations.

All of the graphics on the site are completely free and don’t even require an attribution, so you can include them without any linkbacks or credits. Since every file is in the SVG format, you can resize it to make it as large as you want, even large enough to print billboards out of it.

And SVG also makes the color palette customizable, so you can change the colors to your liking. Or pick a color and UnDraw will show illustrations to match it.

UnDraw is a shockingly good site for the number of clean illustrations it offers for free. In fact, it’s better than most of the high-quality vector art sites


10 Amazing Sites to Find High-Quality Vector Art


10 Amazing Sites to Find High-Quality Vector Art

Finding quality vector art for your designs can be time-consuming. That’s why we’ve put together this list of 10 top vector libraries for you to find exactly what you need, every time.
Read More

you already know. Designers and app developers will especially love these since they can be a template to create something magnificent.

2. Moose: Professional Photographers and Models Make Stock Photos

lesser-known free stock image sites

Usually, stock photography is all about cheesy images or amateur photography. But Moose takes a different approach, with professionals in both the photography and modeling spheres.

Moose’s aim is to make stock photos that you can ideally use together. That’s why you will often find different pictures with a similar background, or the same model in different settings, and so on. The lighting is also kept as static as possible so that you can Photoshop two pictures into one without it being jarring.

At any point, you can sort Moose by the category of photos, the models, or the photographers. All the pictures are free to use as long as you link back to Moose with accreditation, or you can buy the picture and not link or attribute it.

3. Clipstill: Free Cinemagraphs to Stun Your Viewers

lesser-known free stock image sites

Cinemagraphs are images with one small part of the scene in motion. It’s a visually stunning end result, adding just that little bit of action to bring the photo to life. Cinemagraphs are a creative way to use animated GIFs


5 Uses for Animated GIFs Other Than Annoying Memes


5 Uses for Animated GIFs Other Than Annoying Memes

GIF animations aren’t just for corny memes and annoying reactions (but it doesn’t mean you can’t use them as such). Here at MakeUseOf, we’ve got a whole bag full of uses for these cool little…
Read More

, and now you can get a few for free.

Clipstill all about paid stock cinemagraphs, but every month, it offers six high-quality items for free. It’s probably a good idea to download these for the future since the site will change those as time goes on.

Of course, it’s only six. So here’s another lesser-known site with ten more royalty-free, attribution-free stock cinemagraphs. Over at Free Cinemagraphs, the makers took free stock video footage and turned them into cinemagraphic GIFs.

4. Reshot: A New Alternative to Unsplash

lesser-known free stock image sites

Since it first launched, Unsplash has become a stock photography darling. We’d go so far as to say that it’s the best site for guaranteed free-to-use high-quality images


The Best Place for Guaranteed Free-to-Use High-Quality Images for Any Reason


The Best Place for Guaranteed Free-to-Use High-Quality Images for Any Reason

The images on Unsplash come with a generous license: they can be used for personal or commercial projects with no attribution necessary.
Read More

. But it has also become a bit boring, and you will see images from the site used in many places.

Reshot, in some ways, is the new Unsplash. It too has images that are manually curated by its staff, so you will only get good quality photos, not a bunch of nonsense. Importantly, Reshot seems to scour through a lot of other stock photography sources that Unsplash doesn’t, so its collection is markedly different. If you’re bored of Unsplash or its search is giving you the same results, Reshot is a breath of fresh air.

Importantly, Reshot offers a “Diversity Matters” pack with photos that celebrate all the diversity in humans, be it race, age, sex, or whatever else. This is guaranteed to make your pictures look more inclusive and connect with a wider audience.

5. Librestock: Multi-Site Search for Stock Photos

lesser-known free stock image sites

Many of the popular stock photography sites are actually aggregators. Both Pixabay and Pexels feature plenty of imagery from other sources. So now we have a “super-aggregator” in Librestock, which searches through several of these existing aggregators.

Librestock searches Stocksnap, Negative Space, Picography, ISO Republic, Gratisography, Shotstash, Pexels, and Foodie Factor. The thumbnails are large enough to give you a good look at the image before you go to the host site, saving you a few of those back-and-forth clicks.

Librestock also has a section for video search to help you find quality copyright-free stock footage


The Top 6 Websites for Quality Copyright-Free Stock Videos


The Top 6 Websites for Quality Copyright-Free Stock Videos

When you need stock video, you don’t want to break the bank to get it. These sites provide high-quality stock videos that are completely free.
Read More

, searching the best sites that cater to videos instead of images.

A Lot More Than Just Stock Images…

Speaking of videos, the whole “stock media” space is much larger than just photography. And it’s not just these big aggregators. Individual artists often put up their work for free so that anyone in the world can use it.

To get started, check out these sites to find stock audio, video, images, and icons


5 Sites to Find Free Stock Photos, Videos, Audio, and Icons


5 Sites to Find Free Stock Photos, Videos, Audio, and Icons

Find free stock photos, videos, sounds, and icons. With these resources, you don’t have to Google anymore. You can safely use them in your creations, as long as you attribute it to the source.
Read More

. You won’t be disappointed!


via MakeUseOf.com
5 Lesser-Known Free Stock Image Sites for Images That Stick Out

There’s one setpiece-and-superhero packed flick to watch this week—Batman Ninja

Box-office figures and passionate Internet comment threads be damned. If you want dizzying and varied action set-pieces, a laundry list of beloved characters within a single adventure, and everything from time travel to quips about miso to giant robots juxtaposed against feudal Japan… well, there’s only one recently released blockbuster superhero flick for you.

Batman Ninja—the first theatrically released (in Japan at least), full-length anime film in the Dark Knight’s repertoire—finally hit streaming and VOD services (Amazon, iTunes, Google Play) in the US this week. The new title from DC Animation and Warner Bros. comes available in Japanese with English subtitles or as a straightforward English-language anime. And while its combination of highly stylized art, over-the-top story, and anime’s-greatest-hits touches won’t be for everyone, those with an affection for at least part of that recipe will be extremely pleased with what they’ve ordered.

Tale as old as time

To briefly set the stage, Batman finds himself investigating a Gorilla Grodd experiment in modern-day Gotham. The brainy primate has evidently been building a time machine with sinister, not scientific, intent. Unbeknownst to him, Catwoman’s in the vicinity looking for a quick score, all while other local heroes and villains have been centralized near city hall. So when things go awry as Batman storms the lab, everyone finds themselves transported back to feudal Japan.

The machine doesn’t instantaneously send everyone back, however. Travel has been staggered. By the time Batman wakes in the street, he finds a pamphlet at his feet with his face on it (can’t read it, though, it’s in Japanese). A pack of samurai in familiar clown masks quickly surround him, and the Dark Knight must dispatch of them to get any sense of what’s happening: “We were sent to find a man dressed as a bat, and we were ordered to kill him on sight,” the samurai say. “He cannot be allowed to live.”

Batman luckily runs into a disguised Catwoman next, and she catches him up while suggesting Bruce Wayne take on his own era-appropriate garb. It turns out, all the villains of Gotham have landed and taken over various feudal regions of Japan. They’ve been feuding with each other as they all hope to unify the country under one evil ruler—the Joker stands as the current clubhouse leader.

“They call me the Demon King, the most powerful man in Japan, but you can call me Lord Joker,” he says when we get the inevitable first encounter between the old foes. “It wasn’t always an aspiration, but if life throws you time travel, you have to make travel-ade.”

Thus, Batman must round up whatever heroes have also made this trip to save the citizens of feudal Japan, maintain the correct historical timeline, and bring down the Joker et al. before getting these characters back to present-day Gotham. Batman Ninja may lack Infinity Stones, but you can’t call its premise any less world-shaking. (Plus, our hero does at least have to round up five in-villain-possession power converters to make the time machine work.)

The English-language trailer

Anime by numbers? Still fun

I am no anime expert, but I have dabbled in Afro Samurai and grew up enjoying the infusion of Japanese-influenced-or-exported pop culture entities (Power Rangers, Dragon Ball Z, Pokemon, and various Miyazaki films) that characterized ’90s pop culture. Batman Ninja’s loving genre homages all strike the right tone.

via Ars Technica
There’s one setpiece-and-superhero packed flick to watch this week—Batman Ninja

The best and worst laptop brands 2018


BW Brands

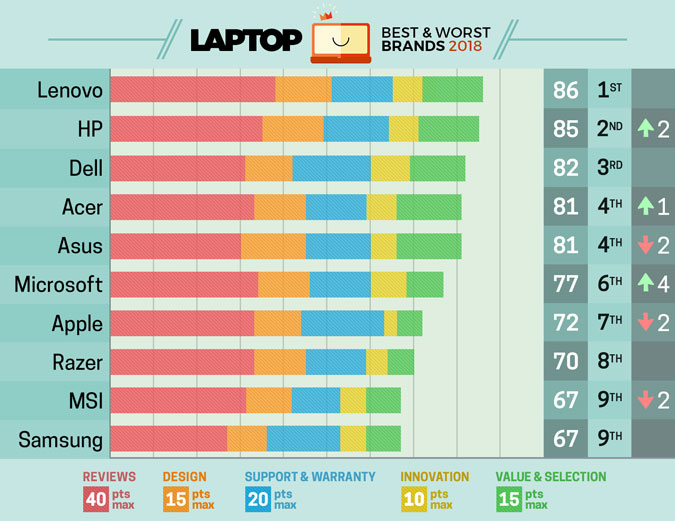
Whether you’re purchasing a $1,500 gaming laptop or a $200 Chromebook, the brand matters. That’s why we rate the top 10 laptop brands each year, based on their support, design, innovation, value/selection and, most of all, product quality.

For 2018, Lenovo retained its place for a second year as the best laptop vendor, but it just barely edged out second-place HP and third-place Dell. Apple, which used to dominate this contest, fell all the way to seventh place, down from fifth last year.

1. Lenovo (86/100)

Lenovo takes first place again this year, on the strength of the company’s fantastic product lineup. From the beautiful ThinkPad X1 Carbon, which was the only product to get a perfect, 5-star review in the past year, to the versatile Yoga 920, Lenovo’s laptops earned the most Editors’ Choice awards of any brand. And a full 53 percent of the company’s laptops scored 4 or higher. However, Lenovo’s tech support scores declined from last year, and stiff competition from HP and Dell made this a nail-bitingly close race.

Best Lenovo Laptops | See Lenovo’s Full Report Card

2. HP (85/100)

After a banner year, filled with compelling laptops such as the gorgeous HP Spectre x360, the powerful ZBook 17 and the affordable HP Envy 13t, HP jumped ahead two places from its spot in 2017 to finish second. With great design marks and the second highest review score, HP gave Lenovo a run for its money.

Best HP Laptops | See HP’s Full Report Card

3. Dell (82/100)

Dell’s product portfolio is a mixture of fantastic premium systems, like the Dell XPS 13 and the awesome Alienware 15, and ho-hum mainstream and budget products. The company earned high marks for its improved tech support, which assigns users personal tech support people who follow up with them.

Best Dell Laptops | See Dell’s Full Report Card

4. Acer (81/100)

With laptops like the Spin 1 and Aspire E 15 in its lineup, Acer knows how to provide premium features at bargain-basement prices. The company can also make bold premium products, as evidenced by the $9,000 Predator 21X.

Best Acer Laptops | See Acer’s Full Report Card

4. Asus (81/100)

Thanks to innovative systems like the Zephyrus, Asus is a leader in gaming. With stunning blue models like the ZenBook UX331UN, indestructible laptops like the Chromebook C213S and great bargains like the ZenBook UX330UA, Asus is also a leader in design and value.

Best Asus Laptops | See Asus’ Full Report Card

6. Microsoft (77/100)

Microsoft makes only a handful of laptops, but all of its systems are first-rate. The company’s innovative Surface Book 2 convertible and the colorful and comfortable Surface Laptop are highlights.

See Microsoft’s Full Report Card

7. Apple (72/100)

Oh, how the mighty have fallen! Apple just doesn’t seem as focused on its laptop business as it used to be. The company did nothing to innovate or even tweak its designs in the past year, and only one of the company’s laptops earned an Editors’ Choice award. However, Tim Cook’s company still has the best tech support you can get.

Best Apple Laptops | See Apple’s Full Report Card

8. Razer (70/100)

If you’re looking for a premium gaming laptop and you have a generous budget, you should look into Razer, which has some really compelling laptops. Those include the Razer Blade and Razer Blade Pro. However, if you need something more affordable, you’ll have to look elsewhere.

See Razer’s Full Report Card

9. MSI (67/100)

MSI is one of the premiere gaming-laptop companies, but it still finds itself in a tie for 10th place, primarily because of very weak tech support. However, the company still has some very compelling products, including the MSI GT75VR Titan Pro, which had the best keyboard of any gaming laptop.

Best MSI Laptops | See MSI’s Full Report Card

9. Samsung (67/100)

If Samsung gave its laptops half the amount of love as it gives its phones, the company would probably fare better. As it stands, Samsung offers a small lineup of laptops that just don’t stack up to the competition. It also has, by far, the least-attractive designs in the industry. However, the tech support is excellent.

Best Samsung Laptops | See Samsung’s Full Report Card

How We Rate Brands

Each laptop brand is assigned a score based on a 100-point scale. Points are awarded in five categories: Design, Reviews, Tech Support/Warranty, Innovation and Value, and Selection. Here’s what each means.

Reviews (40 points): The most important aspect of any brand is the quality of its products. To determine a company’s Reviews category score, we used the ratings we gave its laptops between March 1, 2017, and Feb. 28, 2018. We took the average laptop rating for each brand (Laptop Mag rates on a scale of 1 to 5), converted that average rating to a 40-point scale and then added a 0.75-point bonus for each Editors’ Choice award.

Design (15 points): We absolutely will judge a notebook by its cover — and its sides, deck, bezel and base. Though no two notebooks look exactly the same, each brand has a design language that cuts across its product lines.

Brand Reviews (40) Design (15) Support & Warranty (20) Innovation (10) Value & Selection (15) Overall (100)
Lenovo 38 13 14 7 14 86
HP 35 14 15 7 14 85

Dell

31 11 18 9 13 82
Acer 33 12 14 7 15 81
Asus 30 15 15 6 15 81
Microsoft 34 12 14 8 9 77
Apple 33 11 19 3 6 72
Razer 33 12 14 5 6 70
MSI 31 11 11 6 8 67
Samsung 27 9 17 6 8 67

Tech Support and Warranty (20 points): When you buy a laptop, you want to know that the manufacturer is going to stand behind that machine and help you with technical problems. We base this category’s score primarily on the ratings from our annual Tech Support Showdown, in which we go undercover and pose questions to all of the companies, using their phone, web and social channels. However, 2 out of the 20 points were awarded based on the quality of the company’s standard warranty coverage.

Innovation (10 points): The laptop market is moving fast, and if you stand still, you’ll get rolled over. For the Innovation category, we awarded points based on the brand’s ability to move the market forward by implementing or developing new technologies, as well as by taking risks.

Value and Selection (15 points): How many different kinds of shoppers does the manufacturer address, and do the products provide good bang for your buck? For this category, we awarded points for offering a wide range of laptop types (budget, business, gaming, etc.) and for providing aggressive pricing.

Scorecard and Winners

via Engadget
The best and worst laptop brands 2018

The Best Uninterruptible Power Supply (UPS)

An assortment of black plastic UPS's.
Photo: Mark Smirniotis

We started by considering 93 models from three leading companies: APC, CyberPower, and Tripp Lite. We’ve tested uninterruptible power supplies and surge protectors from these companies in the past, and all the power-product companies have long histories and reputations as reliable. Since a UPS is designed to be used in an emergency, choosing from a reliable brand is crucial to avoid buyer’s remorse at the worst possible time.

To whittle down such a massive list of candidates, we considered the most important factors that go into a great UPS:

Power management: We insisted that any UPS we tested use line-interactive topology, or automatic voltage regulation (AVR), a more advanced form of power management than that used by less expensive “standby” UPS models. AVR means that when power from a wall outlet briefly dips or surges outside of a specified range, a small transformer in the UPS acts like a buffer to compensate without relying on the battery; the UPS switches to battery power only when the transformer can’t handle the variation. This reduces wear and tear on the battery during frequent brownout conditions, prolonging its overall life and providing more-reliable power to sensitive gear like hard drives. Since AVR is available without a huge price premium, it’s a sensible feature to have to get the most from a UPS in the long term.

A UPS without some type of AVR is generally referred to as a “standby” UPS. That’s because the battery is always on standby, ready to jump in anytime the voltage from the wall outlet fluctuates outside a small predetermined range. A standby UPS is fine for many applications, but the battery inside may need to be replaced sooner, and it may not correct voltage fluctuations as quickly as an AVR model. We dismissed any standby models without testing them.

Battery capacity: Most UPS batteries are small, sealed, lead-acid batteries, not so different from a car battery. That makes them much cheaper than the lithium-based batteries in smartphones and laptops, but it’s also why they’re heavier and store less energy.

Two Leoch sealed lead-acid batteries side by side; the plastic connectors on the tops seem to be the only difference.
The batteries inside our top pick (left) and upgrade pick (right) are almost identical. Photo: Mark Smirniotis

Manufacturers often publish run-time ratings that outline how long a UPS can keep various wattages running. Since most ratings are based on ideal conditions, we tested our top candidates at two different loads, 50 W and 300 W, to see how they managed in real-world use. Our 50 W load was meant to simulate powering a cable modem and Wi-Fi router. Our 300 W load is closer to a full workstation, as it adds a modern desktop (around 150 W), a 27-inch monitor (88 W maximum), and network-attached storage hard drives (60 W maximum).

Since the batteries will likely start to hold less energy at the three-year mark (and may hold noticeably less energy after the five years) most models we considered have replaceable batteries to extend the life of the UPS. Prices for name-brand replacements range from $30 to $60, and the process is simple enough for a novice to complete in just a couple minutes.

Power output: While battery capacity and runtime measure how long a UPS can supply power, the power output tells you how much it can power at any one time. Most models explicitly include their output in the name or model number in volt-amperes (VA). The smallest UPS models we found with the AVR feature we require output 650 VA, more than enough to run a modem and Wi-Fi router at home. For an upgrade pick, we looked for models with at least a 1,000 VA rating. VA ratings aren’t common in most people’s lives, but they’re power ratings along the same lines as the more-familiar watts (W). For a quick estimation when shopping, you can assume that a UPS’s wattage rating will be about 60 percent of its volt-amp rating. So a UPS rated for 685 VA can probably handle about 400 W. That’s plenty to keep a cable modem (25 W), Wi-Fi router (30 W), and laptop charger (65 W) up and running for a while.

Outlets: All outlets on a home UPS provide surge protection, limiting the amount of extra voltage that could reach and potentially damage anything plugged into them. But generally only half of the outlets will be connected to the battery backup in case of an outage—and are prominently marked as such. That’s why we focused on models that had at least eight outlets total, since you’ll have only four of them in a power outage. In most home offices, this shouldn’t cause a problem, but it does require some planning in terms of making sure the right things are plugged into the right outlets.

Power Quality: For each model we tested, we looked at the power output using a digital oscilloscope provided by Bitscope. This let us see how well the inverters in each UPS converted the DC energy stored into the battery into the AC power provided by the outlets. Specifically, the oscilloscope let us look at two aspects of power quality: which models introduced the least amount of electrical noise into the line, and how well the modified sine wave inverter in each model imitated the kind of power that comes out of a standard wall outlet. For our upgrade pick, we also required a pure sine wave inverter (see the next item).

A small circuitboard with two lights on it, hooked up to two cables.
We used a Bitscope Micro and digital oscilloscope software to look at the waveforms on each UPS. Photo: Mark Smirniotis

Pure sine wave power: A modified sine wave (MSW) inverter turns the DC power stored in the battery into the AC power you need coming out of the outlets. Because MSW inverters are less expensive to make and work well for most devices, they’re the the most common type of inverter used in UPS units (including our top pick). But MSW inverters create only a close approximation of the kind of AC power that comes out of a wall outlet—it’s not quite the same. Most gadgets that charge with a power brick (including smartphones, tablets, and laptops) won’t care much, since the power brick does extra conversion anyway. But anything expecting AC power for moving parts like motors won’t work normally on an MSW inverter, and audio equipment can pick up buzzes of interference from them. And some home medical devices just won’t work with MSW power. In any of those cases, you need pure sine wave (PSW) inverters instead.

Pure sine wave inverters, and the UPS models that use them, replicate the smooth wave of power that comes from a wall outlet powered by a utility company. These inverters are more expensive to make and thus less common when it comes to inexpensive or occasional-use power sources. We’ve come across multiple online discussions discussing how to provide backup power for CPAP machines and whether MSW or PSW were better. We reached out to ResMed, makers of a variety of home respiratory care devices, to find out what they recommend. Amy Cook, the company’s marketing director, told us that many of the company’s newer products have power converters or even lithium-ion battery backups available. But if you plan on using a different power source, “older-generation PAPs (S8 and earlier) that are using modified sine wave inverters cannot power their respective humidifiers.” Given the importance, not to mention cost, of equipment like CPAP machines, we’d recommend you opt for a battery backup made by the same manufacturer, if available. If not, we prefer to stick to PSW inverters—like the one included in our upgrade pick—to avoid any problems.

Extra features: A basic UPS doesn’t need a lot of features to do its job, but other features we considered include status displays that show battery charge and remaining runtime right on the unit and power-management software that lets you monitor and manage a UPS (over USB) from your computer. Neither feature is crucial for a UPS in most homes—the power goes out and you know you have limited network or computer time to do what you need to do. But a status display is a nice-to-have feature that can help calm power anxiety, and power management software that works on any operating system future-proofs changes in your setup so that your UPS can be just as useful years down the line as it is the first day you plug it in.

Every UPS from a reputable brand comes with some basic surge protection built in, which is good because you can’t plug your UPS into a surge protector or plug a surge protector into a UPS. Unfortunately, most affordable UPS units don’t offer much protection compared with a dedicated surge protector. In previous tests, electrical engineer Lee Johnson took apart our UPS samples to examine their guts. Based on his assessment, we found that our picks should protect your equipment about as well, if not for as long, as basic surge protectors we’ve tested before.

via Wirecutter: Reviews for the Real World
The Best Uninterruptible Power Supply (UPS)

[Review] Radical Firearms Upper: Best Cheap AR Upper or Total Bust?

If you’re always hunting deals (make sure you like and follow us on Facebook, we post 3-4 every day) you probably have seen something from Radical Firearms for sale on the cheap.

I’m talking, complete rifles selling for $500-$600, uppers for $200…that kind of cheap.

Of course, when you’re looking at something that uses an explosion to fire a 55gr projectile out at 3,200 feet per second, is it really the best idea to go cheap?

That’s what I wanted to find out.  

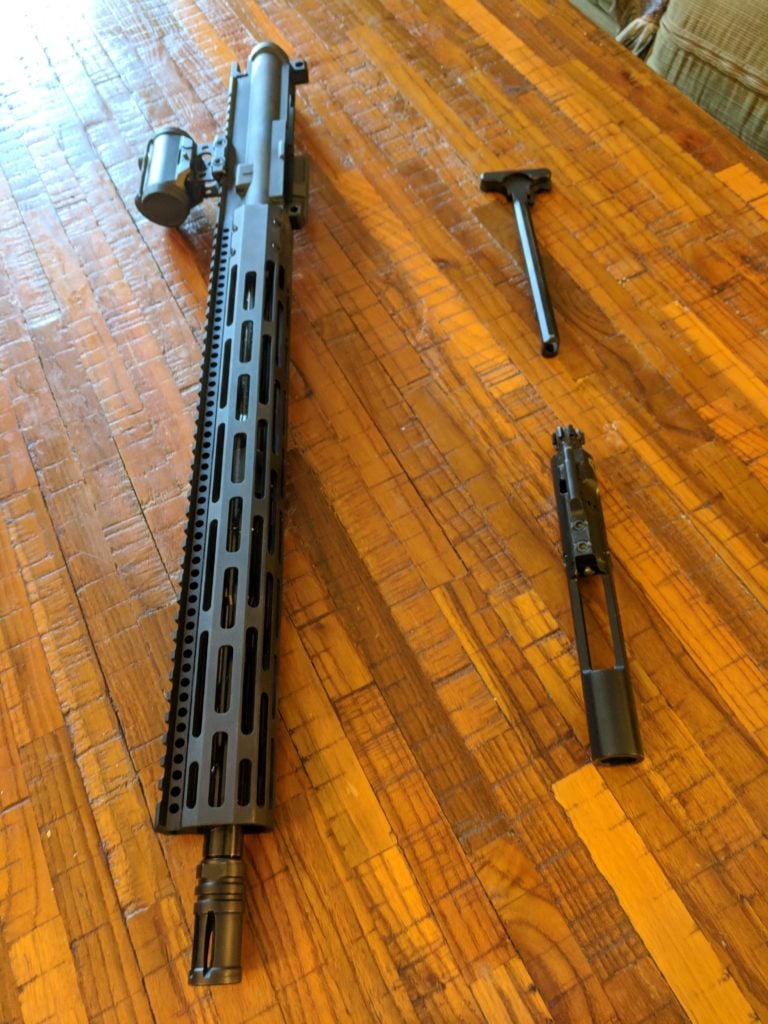
I found a Radical Firearms upper for sale for the rock-bottom, the you-gotta-be-kidding-me price of $190.  This was an assembled upper minus BCG and charging handle, for less than $200 even with shipping

Radical Upper and Aero Bolt
BCG and Charging Handle not included.

How did it shake out?  Is a $200 upper worth it?

Let’s find out.

Specs of the Radical Firearms Upper

  • 16” 4140 Chromoly Barrel With Melonite Coating
  • 5.56 SOCOM Profile
  • M4 Feed Ramps
  • 1:7 Twist Rate
  • A2 Flash Hider
  • 1/2×28 TPI
  • Low Profile Gas Block
  • Carbine Length Gas System
  • Radical Firearms Forged MIL-STD Upper Receiver
  • MIL-STD Upper Parts Kit
  • RF Dimpled Forward Assist
  • Radical Firearms 15″ MHR Hybrid Rail System
Radical Firearms 16" 5.56 NATO M-Lok Upper Assemble

Radical Firearms 16" 5.56 NATO M-Lok Upper Assemble

Prices accurate at time of writing

A Little Background on Radical Firearms

Radical Firearms is a relative newcomer to the AR-15 world.  I first heard about them when they brought some of their work to SHOT Show in 2016 or so, but they’ve been around for about five years now.

In that half-decade, they’ve expanded rapidly and carved out a niche for themselves as one of the best budget manufacturers in the business.  

How did they do that?

They decided to start making as many parts as they could in-house.  

radical firearms rifle
Be sure to check out the awesome article from Breach Bang Clear about Radical’s business.

This afforded them the opportunity to exercise a high degree of control over their manufacturing, while also allowing them to cut out a lot of the middleman markup that gets slapped on rifles by “manufacturers” that just assemble guns from third-party parts, rather than making everything in-house.

And make no mistake, they are a manufacturer.  They make every part of the rifles they sell, other than barrels, pins/springs, and LPKS.  Their site also says they don’t make BCGs but I think that info is a bit out of date as I’ve seen a number of Radical Firearms branded BCGs out there.

They are also an American manufacturer, which I know is important to a lot of folks, and best of all they prefer to hire vets and LE personnel when they can, like many in the firearms industry.

The Primary & Secondary Kerfuffle and Rumors of Poor Quality

Primary and Secondary banner
Image Source: Primary and Secondary

Also back in 2016, there was a bit of a mixup between Radical Firearms and Primary and Secondary (an excellent forum focused on providing info to MIL/LEO folks who use rifles and such at work) when there was a misunderstanding regarding an NDA, a prototype rifle, and a visit to an employees workplace.

Now, without going into a lot of detail here, it turns out that there was some confusion on both sides, and a rifle that was actually a prototype was reviewed as if it was a finished product, and there were some issues about on whose behalf the review was being conducted.

It all created a bit of a mess, but thankfully the folks at Radical Firearms and the folks at Primary and Secondary are all professionals, and they got everything sorted out.

You can read Primary and Secondary’s full statement on the issue if you want to know more, but the gist of it is, everybody said sorry and moved on.  Radical Firearms got a properly working rifle to them, and in the end, the Radical Firearms Carbine received a solid review.

Why I Bought The Radical Firearms Upper

This all leads me to this review and why I bought a Radical Firearms upper of my very own.

Now, like I said, Radical and PS buried the hatchet over the misunderstanding and everyone moved on.  But it left a wonky taste in my mouth. I know the smell of PR spin when it passes my nostrils, and this felt a little…off.

So I decided to see for myself, and I didn’t want to contact Radical about getting a T&E upper in to check out.   I wanted a regular ole upper off the warehouse shelf, just like the one you would get if you ordered one.  

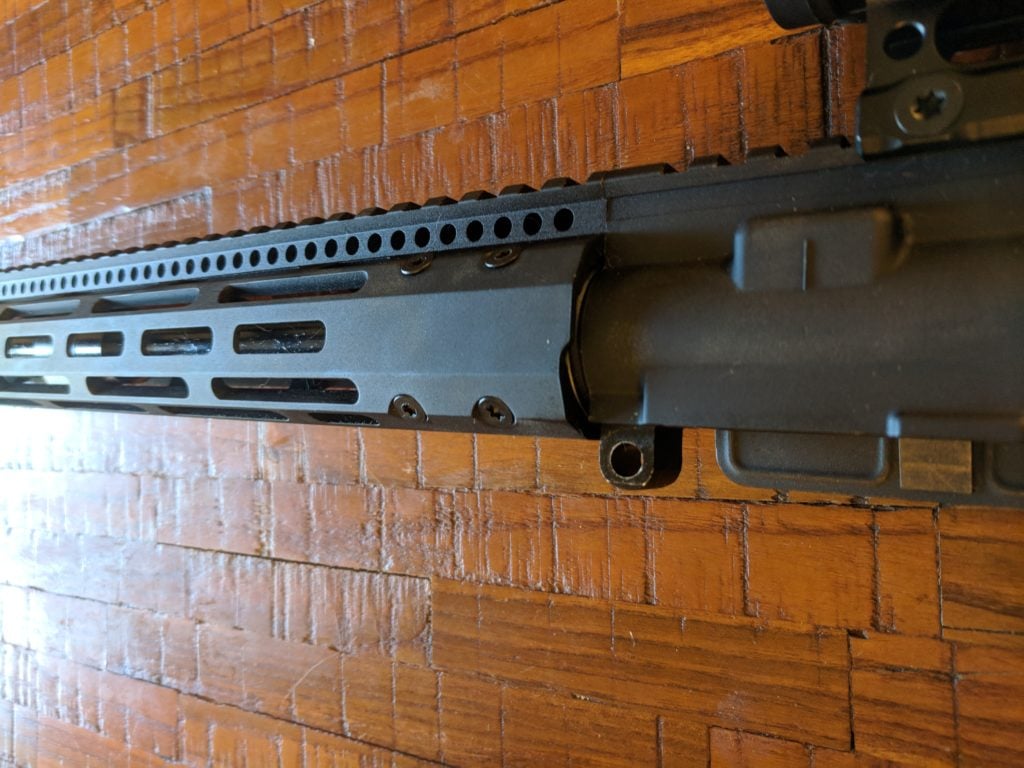
Radical upper
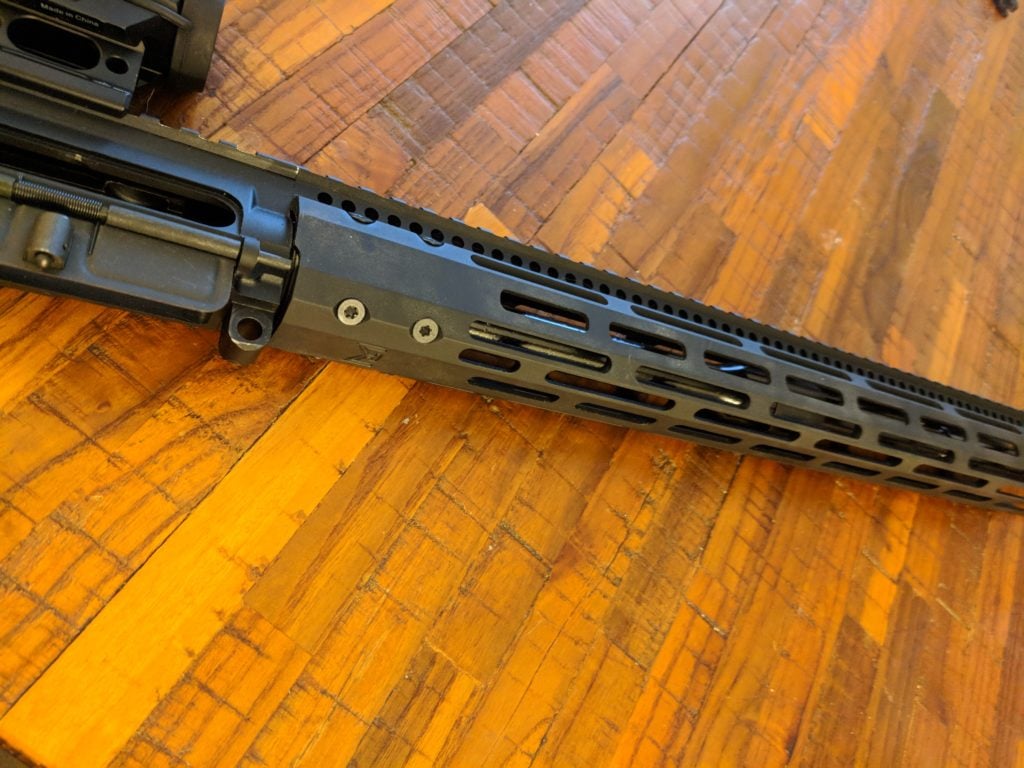
I was worried about the handguard screws, but so far I haven’t had any issues.

I searched around and found one at Optics Planet and snapped it up during last year’s Black Friday sale.  

I did this for two reasons.

  1. I wanted to be as unbiased as possible, and avoid getting a T&E/review upper that might get looked over a little more on the way out the door.  Not that I don’t trust the folks at Radical Firearms, I just don’t trust anybody, especially not when they’re offering me cheap prices.
  2. I needed another upper, and I’m at that age now where I have to buy Christmas presents for every-freaking-body in the world, so money is tight around our house from about Halloween to Valentine’s Day and the Radical Firearms upper was cheap.  Cheap is good.  Me and the missus like cheap. 

So, is Radical Firearms another in a long line of fly-by-night machine shops turning out AR parts with sloppy standards and poor practices?

Or are they something else?  Maybe even a sorely needed quality, American manufacturer offering good rifles at great prices?

I wanted to know, and I sure found out.

The Upper Itself

The upper I bought had a 15” MLOK rail, and A2 flash hider, and not much else going for it.  I like the shape of the handguard, it has a sort of quasi-rounded thing going on with a flattish bottom.

Radical fitment
The finish on the pivot pin hole is a little lacking and seems to be more like a paint than an actual anodized finished, but I suppose corners have to be cut somewhere, and it shouldn’t be an issue.

Machining is totally adequate.  I noticed no rough edges, file marks, burrs, or other machining imperfections.  Everything is totally in spec and I had no problems fitting the upper to a variety of lowers, including two Aero lowers, a Spikes lower, and an Anderson lower.  

Testing the Radical Firearms Upper

Now, the upper I received was sans BCG and charging handle, so I added my own until I could get a Radical Firearms BCG, which I’ll talk about it a minute.

For now, I threw in a spare Aero Precision BCG and a generic charging handle that came from…somewhere.  I throw BCM Gunfighter handles on all my guns, so this one probably came off a complete upper or something.  

Aerp Precision BCG

Aerp Precision BCG

Prices accurate at time of writing

With that, I inspected the upper, daubed a little Dykem layout/machining fluid on the screws holding the handguard in place so I could see if they were turning or working themselves out under recoil, lubed everything that needed lubing, slapped the upper on an Aero complete lower, and hit the range.

I packed a little over 250 rounds on that first outing, a mix of Federal American Eagle, range-quality handloads, and a box of Federal Gold Medal, all with 77gr bullets to take maximum advantage of the 1:7 twist barrel.

I also slapped a Bushnell TRS red dot, my personal favorite cheapo optic, on top of the upper’s full-length rail. I chose this because I figure most people who buy these aren’t going to be putting something super expensive like the absolutely amazing Aimpoint PRO on top of it.

Bushnell TRS-25

Bushnell TRS-25

Prices accurate at time of writing

And again, there’s nothing wrong with a budget rifle, as long as it works.  If you aren’t a precision shooter, the difference between a sub-1” group and a 2.5” group isn’t a big deal, but you will pay through the nose for the former and can throw together a rifle that’ll do the latter for about $600.  

I zeroed this setup in at 25 yards, and then stepped over to the 100, 200, and 400 yard stretches to see what it could really do.

Again, this is with a mix of ammo, and honestly, I didn’t expect much out of the upper.  At $190, if I could hit pie plates at 100 yards, I’d have gone home happy.  I set out to build a beater gun after all.

But holy shit did I underestimate this upper.

I was hitting 6” steel plates at 100 yards with absolutely boring regularity, the staccato pingpingping of rapid-fire impacts setting the plate swinging on the chains.

At fifty yards, I was left with one ragged dime-sized hole.  

Reaching out to 400 yards, I was able to fairly easily smack a steel pig silhouette target, though I was pushing myself more than the rifle, and I’ll take credit for any misses.

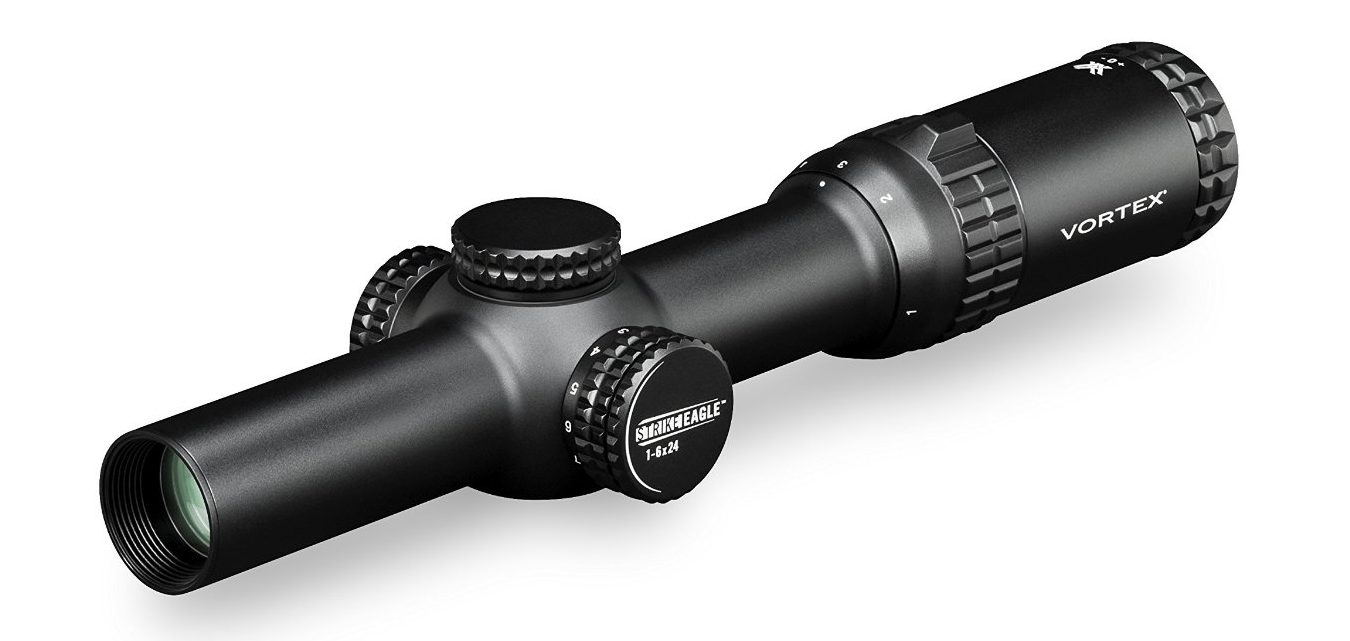
Punching paper with the Gold Medal ammo was equally surprising.  I swapped in a Vortex Strike Eagle 1-6x scope and after a quick bore sight and about a third of a mag to really dial the scope in, I was getting easy 2 MOA groups at 100 and 200 yards, and a best group of 1.8 inches (measured center to center with calipers) at 100 yards.


Best Bang-For-The-Buck Scope
Vortex 1-6x Strike Eagle

Vortex 1-6x Strike Eagle

Prices accurate at time of writing

I noticed no keyholing or other weirdness, and I shot the full 250 or so rounds without a single issue (this was with beat up PMAGS and one steel GI mag).

Now, is any of that matching accuracy?  No, of course not.  I have AR’s that’ll punch ¾ MOA groups all day.  

But those rifles have an extra digit on their price tag.  Nowhere do I see Radical Firearms claiming to make the most accurate guns in the world for $600.  I see them saying they make guns that work for $600, and their upper certainly reflects that.

Since November, I’ve put about a thousand rounds through this upper, cleaned it once, lubed it three or four times, and I’ve experienced precisely two malfunctions, both from the same mag.

That mag also had problems feeding in a $2,500 rifle where it actually causes a double feed (and some swearing).

Overall Impressions

Overall, I was very impressed with the Radical Upper I received.

The rumors and the gossip and the snide remarks are all just hot air.  I think Radical Firearms is a good company that makes great products, and they are definitely a manufacturer to keep your eye on.

When I was researching them beforehand, I saw a lot of comments from others about the low quality of their products, and machining issues, and “Chinesium” and on and on and on.  

But I noticed that these were always comments from people who had a “friend” who owned one.  Or somebody was quoting somebody that overheard somebody that…was full of it.

I haven’t seen very many complaints ( none, really) from people who own Radical Firearms products, and I can say, since I purchased this thing with my own money, that I also have no complaints about the upper I bought and tested for this review, and others are saying the same.

Will it knock the wings off a fly at a thousand yards?  Not unless you get very lucky, but not every rifle needs to be that accurate.

For me, for this rifle, I wanted something I could abuse and knock around, and still count on it to hit what I was aiming at inside 400 yards or so.  And this does that.

If you’re looking for a reliable beater gun, an entry-level upper for a new build project, or even something that’s competition-ready on a tight budget, I can’t think of a better value for your dollar than these uppers.

And they’re available in everything from 7.62×39 to the hot new .224 Valkyrie, so you can get one for every occasion.

Parting Shots

I’m happy with my purchase, and anyone who complains about a $200 upper that goes bang every time and puts rounds on target is probably just looking for something to complain about.

What do you think of the Radical Firearms upper?  Would you put one on your gun? Drop me a line in the comments below!  Check out the rest of our favorite guns & gear at Editor’s Picks.

The post [Review] Radical Firearms Upper: Best Cheap AR Upper or Total Bust? appeared first on Pew Pew Tactical.

via Pew Pew Tactical
[Review] Radical Firearms Upper: Best Cheap AR Upper or Total Bust?

Anker Upgraded Our Readers’ Favorite Bluetooth Earbuds, and They’re Just $22 Today

Anker SoundBuds Slim+ Bluetooth Headphones | $22 | Amazon | Promo code ANKER411

Our readers voted Anker’s SoundBuds Slims as their favorite affordable Bluetooth headphones, but we may need a recount, as Anker recently released the upgraded SoundBuds Slim+, on sale for just $22 today with promo code ANKER411.

The biggest change from the original model is the inclusion of AptX encoding, which should improve sound quality with compatible devices. Anker also claims that waterproofing has been improved, though they’re both still rated as IPX5, so any change on that front is likely modest. One thing that hasn’t changed: the seven hour battery, which is excellent for earbuds of this size.


via Lifehacker
Anker Upgraded Our Readers’ Favorite Bluetooth Earbuds, and They’re Just $22 Today