https://www.percona.com/blog/wp-content/uploads/2022/10/altinity-6.png
 MySQL is an outstanding database for online transaction processing. With suitable hardware, it is easy to execute more than 1M queries per second and handle tens of thousands of simultaneous connections. Many of the most demanding web applications on the planet are built on MySQL. With capabilities like that, why would MySQL users need anything else?
Well, analytic queries for starters. Analytic queries answer important business questions like finding the number of unique visitors to a website over time or figuring out how to increase online purchases. They scan large volumes of data and compute aggregates, including sums, averages, and much more complex calculations besides. The results are invaluable but can bog down online transaction processing on MySQL.
Fortunately, there’s ClickHouse: a powerful analytic database that pairs well with MySQL. Altinity is working closely with our partner Percona to help users add ClickHouse easily to existing MySQL applications. You can read more about our partnership in our recent press release as well as about our joint MySQL-to-ClickHouse solution.
This article provides tips on how to recognize when MySQL is overburdened with analytics and can benefit from ClickHouse’s unique capabilities. We then show three important patterns for integrating MySQL and ClickHouse. The result is more powerful, cost-efficient applications that leverage the strengths of both databases.
Signs that indicate MySQL needs analytic help
Let’s start by digging into some obvious signs that your MySQL database is overburdened with analytics processing.
Huge tables of immutable data mixed in with transaction tables
Tables that drive analytics tend to be very large, rarely have updates, and may also have many columns. Typical examples are web access logs, marketing campaign events, and monitoring data. If you see a few outlandishly large tables of immutable data mixed with smaller, actively updated transaction processing tables, it’s a good sign your users may benefit from adding an analytic database.
Complex aggregation pipelines
Analytic processing produces aggregates, which are numbers that summarize large datasets to help users identify patterns. Examples include unique site visitors per week, average page bounce rates, or counts of web traffic sources. MySQL may take minutes or even hours to compute such values. To improve performance it is common to add complex batch processes that precompute aggregates. If you see such aggregation pipelines, it is often an indication that adding an analytic database can reduce the labor of operating your application as well as deliver faster and more timely results for users.
MySQL is too slow or inflexible to answer important business questions
A final clue is the in-depth questions you don’t ask about MySQL-based applications because it is too hard to get answers. Why don’t users complete purchases on eCommerce sites? Which strategies for in-game promotions have the best payoff in multi-player games? Answering these questions directly from MySQL transaction data often requires substantial time and external programs. It’s sufficiently difficult that most users simply don’t bother. Coupling MySQL with a capable analytic database may be the answer.
Why is ClickHouse a natural complement to MySQL?
MySQL is an outstanding database for transaction processing. Yet the features of MySQL that make it work well–storing data in rows, single-threaded queries, and optimization for high concurrency–are exactly the opposite of those needed to run analytic queries that compute aggregates on large datasets.
ClickHouse on the other hand is designed from the ground up for analytic processing. It stores data in columns, has optimizations to minimize I/O, computes aggregates very efficiently, and parallelizes query processing. ClickHouse can answer complex analytic questions almost instantly in many cases, which allows users to sift through data quickly. Because ClickHouse calculates aggregates so efficiently, end users can pose questions in many ways without help from application designers.
These are strong claims. To understand them it is helpful to look at how ClickHouse differs from MySQL. Here is a diagram that illustrates how each database pulls in data for a query that reads all values of three columns of a table.
MySQL stores table data by rows. It must read the whole row to get data for just three columns. MySQL production systems also typically do not use compression, as it has performance downsides for transaction processing. Finally, MySQL uses a single thread for query processing and cannot parallelize work.
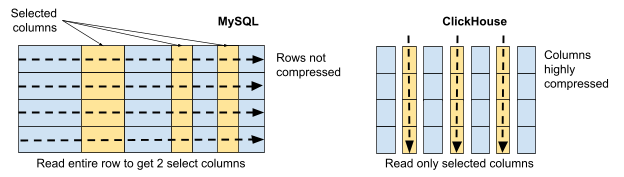
By contrast, ClickHouse reads only the columns referenced in queries. Storing data in columns enables ClickHouse to compress data at levels that often exceed 90%. Finally, ClickHouse stores tables in parts and scans them in parallel.
The amount of data you read, how greatly it is compressed, and the ability to parallelize work make an enormous difference. Here’s a picture that illustrates the reduction in I/O for a query reading three columns.

MySQL and ClickHouse give the same answer. To get it, MySQL reads 59 GB of data, whereas ClickHouse reads only 21 MB. That’s close to 3000 times less I/O, hence far less time to access the data. ClickHouse also parallelizes query execution very well, further improving performance. It is little wonder that analytic queries run hundreds or even thousands of times faster on ClickHouse than on MySQL.
ClickHouse also has a rich set of features to run analytic queries quickly and efficiently. These include a large library of aggregation functions, the use of SIMD instructions where possible, the ability to read data from Kafka event streams, and efficient materialized views, just to name a few.
There is a final ClickHouse strength: excellent integration with MySQL. Here are a few examples.
- ClickHouse can ingest mysqldump and CSV data directly into ClickHouse tables.
- ClickHouse can perform remote queries on MySQL tables, which provides another way to explore as well as ingest data quickly.
- The ClickHouse query dialect is similar to MySQL, including system commands like SHOW PROCESSLIST, for example.
- ClickHouse even supports the MySQL wire protocol on port 3306.
For all of these reasons, ClickHouse is a natural choice to extend MySQL capabilities for analytic processing.
Why is MySQL a natural complement to ClickHouse?
Just as ClickHouse can add useful capabilities to MySQL, it is important to see that MySQL adds useful capabilities to ClickHouse. ClickHouse is outstanding for analytic processing but there are a number of things it does not do well. Here are some examples.
- Transaction processing – ClickHouse does not have full ACID transactions. You would not want to use ClickHouse to process online orders. MySQL does this very well.
- Rapid updates on single rows – Selecting all columns of a single row is inefficient in ClickHouse, as you must read many files. Updating a single row may require rewriting large amounts of data. You would not want to put eCommerce session data in ClickHouse. It is a standard use case for MySQL.
- Large numbers of concurrent queries – ClickHouse queries are designed to use as many resources as possible, not share them across many users. You would not want to use ClickHouse to hold metadata for microservices, but MySQL is commonly used for such purposes.
In fact, MySQL and ClickHouse are highly complementary. Users get the most powerful applications when ClickHouse and MySQL are used together.
Introducing ClickHouse to MySQL integration
There are three main ways to integrate MySQL data with ClickHouse analytic capabilities. They build on each other.
- View MySQL data from ClickHouse. MySQL data is queryable from ClickHouse using native ClickHouse SQL syntax. This is useful for exploring data as well as joining on data where MySQL is the system of record.
- Move data permanently from MySQL to ClickHouse. ClickHouse becomes the system of record for that data. This unloads MySQL and gives better results for analytics.
- Mirror MySQL data in ClickHouse. Make a snapshot of data into ClickHouse and keep it updated using replication. This allows users to ask complex questions about transaction data without burdening transaction processing.
Viewing MySQL data from ClickHouse
ClickHouse can run queries on MySQL data using the MySQL database engine, which makes MySQL data appear as local tables in ClickHouse. Enabling it is as simple as executing a single SQL command like the following on ClickHouse:
CREATE DATABASE sakila_from_mysql
ENGINE=MySQLDatabase('mydb:3306', 'sakila', 'user', 'password')
Here is a simple illustration of the MySQL database engine in action.
The MySQL database engine makes it easy to explore MySQL tables and make copies of them in ClickHouse. ClickHouse queries on remote data may even run faster than in MySQL! This is because ClickHouse can sometimes parallelize queries even on remote data. It also offers more efficient aggregation once it has the data in hand.

Moving MySQL data to ClickHouse
Migrating large tables with immutable records permanently to ClickHouse can give vastly accelerated analytic query performance while simultaneously unloading MySQL. The following diagram illustrates how to migrate a table containing web access logs from ClickHouse to MySQL.
On the ClickHouse side, you’ll normally use MergeTree table engine or one of its variants such as ReplicatedMergeTree. MergeTree is the go-to engine for big data on ClickHouse. Here are three important features that will help you get the most out of ClickHouse.

- Partitioning – MergeTree divides tables into parts using a partition key. Access logs and other big data tend to be time ordered, so it’s common to divide data by day, week, or month. For best performance, it’s advisable to pick a number that results in 1000 parts or less.
- Ordering – MergeTree sorts rows and constructs an index on rows to match the ordering you choose. It’s important to pick a sort order that gives you large “runs” when scanning data. For instance, you could sort by tenant followed by time. That would mean a query on a tenant’s data would not need to jump around to find rows related to that tenant.
- Compression and codecs – ClickHouse uses LZ4 compression by default but also offers ZSTD compression as well as codecs. Codecs reduce column data before turning it over to compression.
These features can make an enormous difference in performance. We cover them and add more performance tips in Altinity videos (look here and here.) as well as blog articles.
The ClickHouse MySQL database engine can also be very useful in this scenario. It enables ClickHouse to “see” and select data from remote transaction tables in MySQL. Your ClickHouse queries can join local tables on transaction data whose natural home is MySQL. Meanwhile, MySQL handles transactional changes efficiently and safely.
Migrating tables to ClickHouse generally proceeds as follows. We’ll use the example of the access log shown above.
- Create a matching schema for the access log data on ClickHouse.
- Dump/load data from MySQL to ClickHouse using any of the following tools:
- Mydumper – A parallel dump/load utility that handles mysqldump and CSV formats.
- MySQL Shell – A general-purpose utility for managing MySQL that can import and export tables.
- Copy data using SELECT on MySQL database engine tables.
- Native database commands – Use MySQL SELECT OUTFILE to dump data to CSV and read back in using ClickHouse INSERT SELECT FROM file(). ClickHouse can even read mysqldump format.
- Check performance with suitable queries; make adjustments to the schema and reload if necessary.
- Adapt front end and access log ingest to ClickHouse.
- Run both systems in parallel while testing.
- Cut over from MySQL only to MySQL + ClickHouse Extension.
Migration can take as little as a few days but it’s more common to take weeks to a couple of months in large systems. This helps ensure that everything is properly tested and the roll-out proceeds smoothly.
Mirroring MySQL Data in ClickHouse
The other way to extend MySQL is to mirror the data in ClickHouse and keep it up to date using replication. Mirroring allows users to run complex analytic queries on transaction data without (a) changing MySQL and its applications or (b) affecting the performance of production systems.
Here are the working parts of a mirroring setup.
ClickHouse has a built-in way to handle mirroring: the experimental MaterializedMySQL database engine, which reads binlog records directly from the MySQL primary and propagates data into ClickHouse tables. The approach is simple but is not yet recommended for production use. It may eventually be important for 1-to-1 mirroring cases but needs additional work before it can be widely used.

Altinity has developed a new approach to replication using Debezium, Kafka-compatible event streams, and the Altinity Sink Connector for ClickHouse. The mirroring configuration looks like the following.
The externalized approach has a number of advantages. They include working with current ClickHouse releases, taking advantage of fast dump/load programs like mydumper or direct SELECT using MySQL database engine, support for mirroring into replicated tables, and simple procedures to add new tables or reset old ones. Finally, it can extend to multiple upstream MySQL systems replicating to a single ClickHouse cluster.

ClickHouse can mirror data from MySQL thanks to the unique capabilities of the ReplacingMergeTree table. It has an efficient method of dealing with inserts, updates, and deletes that is ideally suited for use with replicated data. As mentioned already, ClickHouse cannot update individual rows easily, but it inserts data extremely quickly and has an efficient process for merging rows in the background. ReplicatingMergeTree builds on these capabilities to handle changes to data in a “ClickHouse way.”
Replicated table rows use version and sign columns to represent the version of changed rows as well as whether the change is an insert or delete. The ReplacingMergeTree will only keep the last version of a row, which may in fact be deleted. The sign column lets us apply another ClickHouse trick to make those deleted rows inaccessible. It’s called a row policy. Using row policies we can make any row where the sign column is negative disappear.
Here’s an example of ReplacingMergeTree in action that combines the effect of the version and sign columns to handle mutable data.

Mirroring data into ClickHouse may appear more complex than migration but in fact is relatively straightforward because there is no need to change MySQL schema or applications and the ClickHouse schema generation follows a cookie-cutter pattern. The implementation process consists of the following steps.
- Create schema for replicated tables in ClickHouse.
- Configure and start replication from MySQL to ClickHouse.
- Dump/load data from MySQL to ClickHouse using the same tools as migration.
At this point, users are free to start running analytics or build additional applications on ClickHouse whilst changes replicate continuously from MySQL.
Tooling improvements are on the way!
MySQL to ClickHouse migration is an area of active development both at Altinity as well as the ClickHouse community at large. Improvements fall into three general categories.
Dump/load utilities – Altinity is working on a new utility to move data that reduces schema creation and transfer of data to a single. We will have more to say on this in a future blog article.
Replication – Altinity is sponsoring the Sink Connector for ClickHouse, which automates high-speed replication, including monitoring as well as integration into Altinity.Cloud. Our goal is similarly to reduce replication setup to a single command.
ReplacingMergeTree – Currently users must include the FINAL keyword on table names to force the merging of row changes. It is also necessary to add a row policy to make deleted rows disappear automatically. There are pull requests in progress to add a MergeTree property to add FINAL automatically in queries as well as make deleted rows disappear without a row policy. Together they will make handling of replicated updates and deletes completely transparent to users.
We are also watching carefully for improvements on MaterializedMySQL as well as other ways to integrate ClickHouse and MySQL efficiently. You can expect further blog articles in the future on these and related topics. Stay tuned!
Wrapping up and getting started
ClickHouse is a powerful addition to existing MySQL applications. Large tables with immutable data, complex aggregation pipelines, and unanswered questions on MySQL transactions are clear signs that integrating ClickHouse is the next step to provide fast, cost-efficient analytics to users.
Depending on your application, it may make sense to mirror data onto ClickHouse using replication or even migrate some tables into ClickHouse. ClickHouse already integrates well with MySQL and better tooling is arriving quickly. Needless to say, all Altinity contributions in this area are open source, released under Apache 2.0 license.
The most important lesson is to think in terms of MySQL and ClickHouse working together, not as one being a replacement for the other. Each database has unique and enduring strengths. The best applications will build on these to provide users with capabilities that are faster and more flexible than using either database alone.
Percona, well-known experts in open source databases, partners with Altinity to deliver robust analytics for MySQL applications. If you would like to learn more about MySQL integration with ClickHouse, feel free to contact us or leave a message on our forum at any time.
Percona Database Performance Blog


