https://media.notthebee.com/articles/625878b58d968625878b58d96a.jpg
"Elon Musk is making my job at Twitter unsafe!!!"
Not the Bee
Just another WordPress site
https://media.notthebee.com/articles/625878b58d968625878b58d96a.jpg
"Elon Musk is making my job at Twitter unsafe!!!"
Not the Bee
https://i.kinja-img.com/gawker-media/image/upload/c_fill,f_auto,fl_progressive,g_center,h_675,pg_1,q_80,w_1200/5b73b02a781ab7951e857532eb3f2f0a.jpg
There are few perfect things in this world, so it’s worth celebrating them when we find them. Case in point: this unbelievably outstanding video from Gazelle Automations, which imagines if the classic animation studio Filmation had managed to get its hands on the Star Trek: The Next Generation crew.
Trek fans likely know that Filmation did the original Star Trek: The Animated Series from 1973, while others may recognize the name as the maker of the classic He-Man and the Masters of the Universe cartoon of the ‘80s. But anyone who’s ever laid eyes on a Filmation cartoon knows the studio was incredibly cheap. It reused as much footage as possible, it animated as little as possible, and it slowed down the story as much as possible, all to spend as little as possible. So when you watch this video, be assured it’s not a parody, but an exact replica of what Filmation would have done with The Next Generation had the studio made a spin-off back in the ‘70s:
The attention to detail is astounding, from the lack of the whites of their eyes, to the strange angles of the shots, to the way each Borg has to be teleported in succession. I swear, when Worf raises his phaser to shoot the Borg, that’s even the same (low) number of cels Filmation used for the motion. Here, compare the clip to this scene from the classic Trek cartoon:
Uncanny, right? What really gets me is that Gazelle Automations even nailed the characters’ shifting eyes, which represented the sum total of emotional reactions the Filmation characters would have in response to… well, anything, basically. Even the purple, oversimplified designs of the Borg are perfect. No notes!
Wondering where our RSS feed went? You can pick the new up one here.
Gizmodo
https://cdn.athlonoutdoors.com/wp-content/uploads/sites/6/2021/06/Mepro-FRBS.jpg
Although optics are all the rage now, many still like the simplicity and dependability of good old iron sights. They make a great backup as well. However, if the front and rear sights are not properly aligned your shot placement and overall accuracy will suffer. Not to mention, if they are really far off, they may pose more of a risk in a home or self-defense scenario. This short primer provides the basics on how to adjust your iron sights if they need it.

RELATED STORY
Mepro FRBS: Backup Flip-Up Sights Add Hyper-Bright Illumination
Although some people like to zero at 25 meters, others prefer to zero at 50 yards. However, you may want to zero at 100 yards depending on your intended use. But keep in mind the effect this will have on close-quarters application. For this exercise, we chose a 50-yard zero.
1.) Be sure you and your rifle are on a stable surface such as a bench rest or sandbags. Any movement, no matter how slight, will throw off your shots and affect the point of bullet impact.
2.) Place a target 25 yards downrange and fire a three-round group.
3.) Based on where your shots hit, determine if you need to adjust for windage, elevation, or both.
4.) If you need to adjust for elevation, first, figure out which sight to move. If it is the front sight, move the post up or down (a tool may be required). A general rule for adjusting a front sight is to move the sight in the opposite direction you want your group to move. For example, if you are shooting low, lower the front sight. However, your front sight may not be adjustable, in which case use your rear sight to adjust for elevation.

5.) If you need to adjust for windage, move the rear sight windage knob (left/right). However, you may also need to adjust the rear sight for elevation, and you will use the elevation dial for this (up/down). The general rule for adjusting a rear iron sight is to move it in the direction you want your group to move. For example, if you’re hitting the target high and to the right, move your sight down and to the left. The FORS (Front Sight Opposite, Rear Sight Same) acronym should help remember.
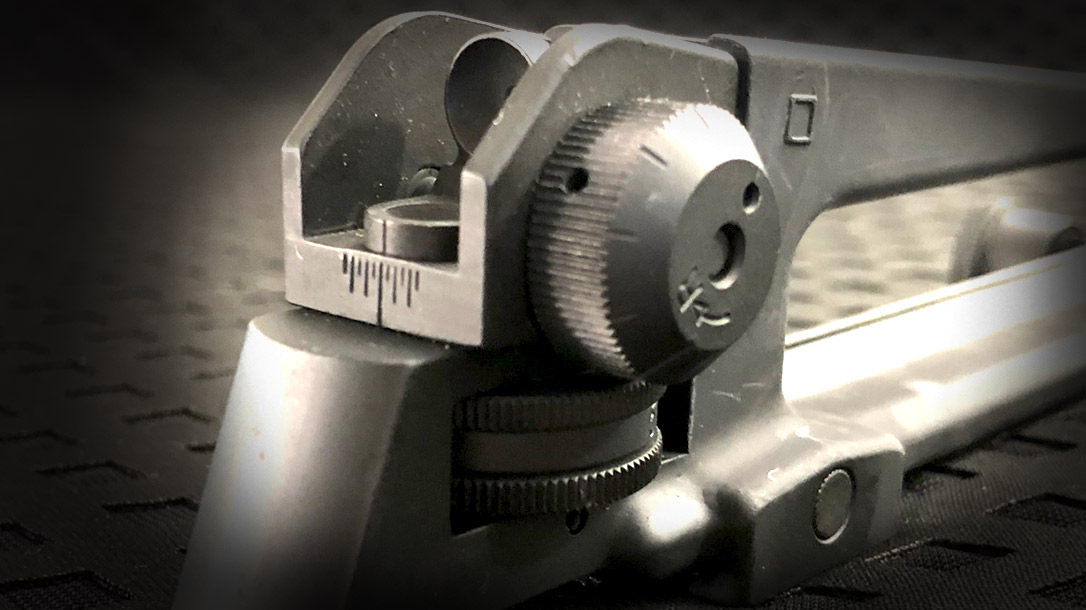
6.) Shoot three-round groups and adjust the sights until the desired point-of-aim, point-of-impact is achieved.
7.) Once you have a zero at 25 yards, back the target back to 50 yards and repeat. At this point, you should only need to adjust the elevation.
There are some things to take into consideration when adjusting iron sights. First, if you are not able to shoot a tight group, make sure you are using a proper bench rest. Likewise, make sure your bench rest is stable.
If you are unable to achieve a tight group due to inexperience, it may be best to have a gunsmith perform your sight adjustments. Once the adjustments are made, make sure to practice regularly until you are able to tighten your group.
Next, if you are having a hard time dialing in your zero, try adjusting the elevation or windage separately. For example, shoot a three-round group and then adjust your elevation. Then, shoot another three-round group and adjust your windage. Focusing on one adjustment at a time may help to simplify things.
Finally, if you’re sights are really far off and you are not hitting paper at all, pull the target closer. Bring the target in to 10 yards and get a zero at that distance. Then, move it out to 25 yards. And finally, out to the intended 50 yards.
Once you’re done adjusting and zeroing in your sights, you are ready for the range, the hunt, or personal defense.
The post How to Adjust and Zero In Your Rifle’s Iron Sights for Improved Accuracy appeared first on Personal Defense World.
Personal Defense World
https://refactoring.guru/images/refactoring/social/facebook-share-preview.png?id=dbf9e98269595be86eb668f365be6868
Design patterns are typical solutions to common problems
in software design. Each pattern is like a blueprint
that you can customize to solve a particular
design problem in your code.
List of 22 classic design patterns,
grouped by their intent.
Patterns are a toolkit of solutions to common
problems in software design. They define
a common language that helps your team
communicate more efficiently.
Design patterns differ by their complexity, level of
detail and scale of applicability. In addition,
they can be categorized by their intent
and divided into three groups.
Who invented patterns and when?
Can you use patterns outside software
development? How do you do that?
Are patterns as good as advertised?
Is it always possible to use them?
Can patterns sometimes be harmful?
Laravel News Links
https://media.notthebee.com/articles/6256cb6ae6c136256cb6ae6c14.jpg
Put on your fire suit and check this out:
Not the Bee
https://media.notthebee.com/articles/62561fabd530762561fabd5308.jpg
For the record, I doubt it will ever go away.
Not the Bee
https://www.louderwithcrowder.com/media-library/image.png?id=29676025&width=980
The left got shellacked in Virginia and New Jersey on the last election day by parents who viewed them as coming after their children. Instead of seeing that as a problem, they determined parents were the problem and quadrupled down on it. Ron DeSantis came out in support of parents and protecting children. Progressives are anti-that to the point of insanity. I’m not one to give opponents political advice, but they may want to listen to John Rich. (h/t Not The Bee)
Rich is outspoken in politics, and Tim Pool asked him if he was afraid of the left coming after his children and his family as a result. "Cowboy Stevie Wonder" says the left are the ones who need to be afraid. It’s bookmarked around the 1:05:00 mark.
Timcast IRL – CREEPY Video Shows Mass Shrieking In China Over Starvation & Lockdown w/John Rich
youtu.be
"They better fear ever coming after my kids. I’ll let you come after me all you want to. You leave my family alone. We will die for our families. […] That’s what they don’t understand, these liberals and people running our country. There is a fierce love and dedication and responsibility that we have as parents that you step over that line and you start messing with my kids, there is no boundaries anymore between us.
"You want full contact support? You want to raise the stakes on what you’re doing to our kids and how you’re, in my opinion, assaulting them in all these ways you’re going to assault my kids? Once you try to assault me one time. I’m going to step in front of these little kids now you’re going to deal with it with a grown-ass man and a grown-ass woman who got nothing to lose.
"Whatever look I have in my eye right now is because I know what I’m saying I’m feeling it down in my guts, that it is what tens of millions if not more Americans are feeling right now, regardless of their politics […] You mess with our kids you’ve got a world of hurt coming your way this fall."
Nothing left to add to that other than, "Hell yeah, brother!"
Though, as a valuable service to readers of the Louder with Crowder Dot Com website, I’ll share my five favorite John Rich/Big & Rich songs:
1. "The Man I Am Right Now"
2. "Drive Myself to Drink"
3. "Kick My Ass"
4. "Between Raising Hell and Amazing Grace"
5. "Rollin’"
The Louder with Crowder Dot Com Website is on Instagram now! Follow us at @lwcnewswire and tell a friend!
Crowder: Here’s Why Kids Feel Hopeless Today
youtu.be
Louder With Crowder
The Stripe Payment Element is an embeddable UI component that lets you accept multiple forms of payment…Laracasts
Most likely this is a test or demonstration platform for the XM914E1 Chain Gun system that Northrop was awarded.
But yes, it is essentially a Ford F250 technical with the 30mm gun from an AH-64 Apache mounted in the back.
And I want one.
Gun Free Zone
https://miro.medium.com/max/1200/1*Bde3OGVhudKMNgneD96xDw.pngAdd Google Analytics to your Laravel application with Google Tag Manager.Laravel News Links