Pandas DataFrame Methods equals(), filter(), first(), last(), head(), and tail()

https://blog.finxter.com/wp-content/uploads/2022/01/image-6.png

The Pandas DataFrame has several Re-indexing/Selection/Label Manipulations methods. When applied to a DataFrame, these methods evaluate, modify the elements and return the results.

This is Part 7 of the DataFrame methods series:

  • Part 1 focuses on the DataFrame methods abs(), all(), any(), clip(), corr(), and corrwith().
  • Part 2 focuses on the DataFrame methods count(), cov(), cummax(), cummin(), cumprod(), cumsum().
  • Part 3 focuses on the DataFrame methods describe(), diff(), eval(), kurtosis().
  • Part 4 focuses on the DataFrame methods mad(), min(), max(), mean(), median(), and mode().
  • Part 5 focuses on the DataFrame methods pct_change(), quantile(), rank(), round(), prod(), and product().
  • Part 6 focuses on the DataFrame methods add_prefix(), add_suffix(), and align().
  • Part 7 focuses on the DataFrame methods at_time(), between_time(), drop(), drop_duplicates() and duplicated().
  • Part 8 focuses on the DataFrame methods equals(), filter(), first(), last(), head(), and tail()

Getting Started

💡 Note: To follow along with the examples below, click here to download the finxters.csv file of auto-generated dummy user data. Move this file to the current working directory.

Remember to add the Required Starter Code to the top of each code snippet. This snippet will allow the code in this article to run error-free.

Required Starter Code

import pandas as pd

Before any data manipulation can occur, this library will require installation:

  • The pandas library enables access to/from a DataFrame.

To install these libraries, navigate to an IDE terminal. At the command prompt ($), execute the code below. For the terminal used in this example, the command prompt is a dollar sign ($). Your terminal prompt may be different.

$ pip install pandas

Hit the <Enter> key on the keyboard to start the installation process.

Feel free to check out the correct ways of installing the library here:

If the installations were successful, a message displays in the terminal indicating the same.

DataFrame equals()

The equals() method compares two (2) DataFrames/Series against each other to determine if they have an identical shape and elements. If identical return True, otherwise return False.

The syntax for this method is as follows:

DataFrame.equals(other)
Parameter Description
other A DataFrame or Series to compare.

For this example, we have two (2) DataFrames containing grades for three (3) students.

df_scores1 = pd.DataFrame({'Micah': [91, 58, 73],
                           'Bob':     [53, 87, 46],
                           'Chloe':  [60, 54, 61]})
  
df_scores2 = pd.DataFrame({'Micah': [91, 58, 73],
                           'Bob':     [53, 87, 46],
                           'Chloe':  [60, 54, 61]})
  
result = df_scores1.equals(df_scores2)
print(result)
print(df_scores1.shape)
print(df_scores2.shape)
  • Line [1-2] creates two (2) DataFrames.
  • Line [3] compares df_scores1 against df_scores2 testing the shape and elements. The outcome saves to result (True/False).
  • Line [4] outputs the result to the terminal.
  • Line [5-6] confirms the shape of the DataFrames is equal by outputting the results to the terminal.

Output:

True
(3, 3)
(3, 3)

DataFrame filter()

The filter() method returns a subset of a DataFrame/Series rows/columns based on index label(s). This method does not filter a DataFrame/Series on the contents. The filter applies to the specific label(s) of the selected index. The return value is a subset of the callable.

The syntax for this method is as follows:

DataFrame.filter(items=None, like=None, regex=None, axis=None)
Parameter Description
items A filter list of columns to include in the result.
like A filter string of columns (ex: like='FID') to include in the result.
regex A regex string to filter columns (ex: regex='e$') to include in the result.
axis If zero (0) or index is selected, apply to each column. Default is None. If one (1) is selected, apply to each row.

For this method, various scenarios below highlight its capabilities.

This example uses the items parameter to filter the DataFrame and return the result.

Code – Example 1:

df_fxs = pd.read_csv('finxters.csv')
result = df_fxs.filter(items=['Username', 'Rank'])
print(result.head())
  • Line [1] reads in the comma-separated CSV file and saves it to df_fxs.
  • Line [2] filters df_fxs to include only the columns matching the item labels (Username and Rank). These columns (and associated values) save to result.
  • Line [3] outputs the first five (5) rows (head()) to the terminal.

Output:

  Username Rank
0 wildone92            Authority
1 AmyP             Beginner
2 1998_pete      Basic Knowledge
3 TheCoder  Experienced Learner
4 AliceM Authority

This example uses the like parameter to filter the DataFrame and return the result.

Code – Example 2:

df_fxs = pd.read_csv('finxters.csv')
result = df_fxs.filter(like='FID', axis=1)
print(result.head())
  • Line [1] reads in the comma-separated CSV file and saves it to df_fxs.
  • Line [2] filters df_fxs to include only the columns matching the like label ('FID'). This column (and associated values) save to result.
  • Line [3] outputs the first five (5) rows (head()) to the terminal.

Output:

  FID
0 30022145
1 30022192
2 30022331
3 30022345
4 30022359

This example uses the regex parameter to filter the DataFrame and return the result.

Code – Example 3

df_fxs = pd.read_csv('finxters.csv')
result = df_fxs.filter(regex='e$', axis=1)
print(result.head())
  • Line [1] reads in the comma-separated CSV file and saves it to df_fxs.
  • Line [2] filters df_fxs to include only the columns matching the regex label (First_Name, Last_Name and Username). These columns (and associated values) save to result.
  • Line [3] outputs the first five (5) rows (head()) to the terminal.

Output:

  First_Name Last_Name Username
0 Steve   Hamilton  wildone92
1 Amy  Pullister       AmyP
2 Peter       Dunn  1998_pete
3 Marcus   Williams   TheCoder
4 Alice    Miller    AliceM

Note: Each column name in the output ends with the letter e.

DataFrame first()

The first() method retrieves and returns the first set number of rows (periods) based on the value entered. The index must be a date value to return the appropriate results.

The syntax for this method is as follows:

DataFrame.first(offset)
Parameter Description
offset This parameter is the date period of the data to display (ex: 1M, 2D).

For this example, the blood pressure for three (3) patients over a two (2) month period is retrieved.

r = pd.date_range('2021-01-01', periods=3, freq='1M')
df = pd.DataFrame({'Patient-1': [123, 120, 144], 
                   'Patient-2': [129, 125, 90],
                   'Patient-3': [101, 95,  124]},index=r)

result = df.first('1M')
print(result)
  • Line [1] sets up the following:
    • The date range start date ('2021-01-01').
    • The number of periods (3).
    • The frequency ('1M'). This statement equates to 1 Month.
  • Line [2] creates a DataFrame containing:
    • Three (3) patient names containing three (3) elements of data for each patient.
  • Line [3] saves the first month period to result.
  • Line [4] outputs the result to the terminal.

Output:

  Patient-1  Patient-2  Patient-3
2022-01-31        123        129        101
2022-02-28        120        125         95

💡 Note: The date range for the selected frequency references the last day of the month.

DataFrame last()

The last() method retrieves and returns the last set number of rows (periods) based on the value entered. The index must be a date value for this method to return the expected results.

The syntax for this method is as follows:

DataFrame.last(offset)
Parameter Description
offset This parameter is the date period of the data to display (ex: 1M, 2D).

For this example, the blood pressure for three (3) patients over a  two (2) month period is retrieved.

r = pd.date_range('2021-01-01', periods=3, freq='1M')
df = pd.DataFrame({'Patient-1': [123, 120, 144], 
                   'Patient-2': [129, 125, 90],
                   'Patient-3': [101, 95,  124]},index=r)

result = df.last('1M')
print(result)
  • Line [1] sets up the following:
    • The date range start date ('2021-01-01').
    • The number of periods (3).
    • The frequency ('1M'). This statement equates to 1 Month.
  • Line [2] creates a DataFrame containing:
    • Three (3) patient names containing three (3) elements of data for each patient.
  • Line [3] saves the output to result.
  • Line [4] outputs the result to the terminal.

Output:

  Patient-1  Patient-2  Patient-3
2022-03-31        144 90 125

💡 Note: The date range for the selected frequency references the last day of the month.

DataFrame head() and tail()

These methods display n numbers of records (top or bottom). These methods are useful when you are accessing large amounts of data.

If no parameter is entered, by default, five (5) rows display.

  • The head() method returns the top five (5) rows of the DataFrame.
  • The tail() method returns the bottom five (5) rows of the DataFrame

If a parameter is entered in one of the above methods, n number of rows (top/bottom) will display.

As you will note, the head() method was accessed many times during this article. Both methods are must-haves in your knowledge base.

The syntax for these methods is as follows:

DataFrame.head(n=5)
DataFrame.tail(n=5)
Parameter Description
n An integer value indicating the number of rows to display. By default, five (5) rows display.

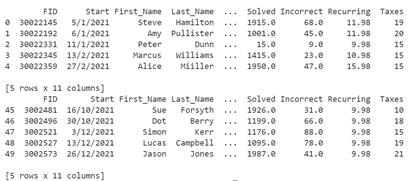
For this example, the first five (5) records from the DataFrame and the last five (5) records (tail) from the same DataFrame display.

df_fxs = pd.read_csv('finxters.csv')
print(df_fxs.head())
print(df_fxs.tail())

Output:

Finxter

Comic for January 09, 2022

https://assets.amuniversal.com/d5abc33036a5013a89b9005056a9545d

Thank you for voting.

Hmm. Something went wrong. We will take a look as soon as we can.

Dilbert Daily Strip

A tongue-in-cheek look at an Air Force veteran

http://img.youtube.com/vi/kzLUcP6eTqQ/0.jpg


Here’s what its creator terms "A Hastily Created Documentary on the A-10 Warthog".  I had to laugh.  It’s only about 3 minutes long, but it’s fun.

A few grunts of my acquaintance, who relied on the Warthog to pull their butts out of trouble in the sandbox over several tours, also laughed as they watched it.  I daresay even the A-10’s pilots will enjoy it.

Peter

Bayou Renaissance Man

How to Get Free Microsoft Office for Students

https://static1.makeuseofimages.com/wordpress/wp-content/uploads/2022/01/office-apps-unsplash_.jpeg

How to Get Free Microsoft Office for Students

If you’re a student, you might be eligible for a free Microsoft Office subscription. Here’s how to get it.

Microsoft Office is the most widely used suite of office tools. It includes a word processor, a spreadsheet program, a presentation program, and several other tools. The company also sells different plans designed for non-profit, business, or personal usage.

If you are a school administrator, teacher, or student, you might be eligible for a free Microsoft 365 subscription. The Microsoft Office student package is great for students on a budget, especially those who don’t want to or can’t pay the full price for the Office Suite.

What’s Included in the Microsoft 365 Student Subscription?

A free Office 365 subscription is a fantastic choice for students as it lets them collaborate on popular web apps like Word, Excel, and PowerPoint. The free Office subscription also gives users a 50 GB mailbox and access to Microsoft Teams to freely communicate with other classmates.

Students also get access to personal cloud storage with OneDrive (unlimited for five or more users, otherwise it’s 1TB per user), as well as access to Microsoft Sway for creating interactive reports and presentations.

Related: The Best Features of Microsoft Sway for Creating Interactive Reports and Presentation

There are three tiers that Microsoft offers, namely:

  • Office 365 A1
  • Office 365 A3
  • Office 365 A5

A1 is available for free, but A3 and A5 are paid options, costing $2.5 per user per month and $6 per user per month, respectively. A more detailed breakdown of the pricing structure is also available on Microsoft’s academic website.

MAKEUSEOF VIDEO OF THE DAY

How to Sign Up for the Free Microsoft 365 Student Subscription

Microsoft has made it incredibly easy for students to sign up for a free Office student subscription. All you have to do is to enter your valid school email address on their official Office 365 Education website, and it’ll tell you whether your school’s eligible for the program.

If your institution is eligible, access will be immediately granted.

Related: How to Use OneNote for School: Tips for Students and Teachers

What if Your Institution Is Ineligible?

If, in case, your school is not eligible, you will get an option to sign up for an automated verification process. The process is mostly instantaneous, but in some cases, might take up to 30 days for completion.

Once you have access to Microsoft Office as a student, you might want to check out a few planner templates designed for students to help you manage your assignments and life better.

15 Checklist, Schedule, and Planner Templates for Students

Planning templates for students can help keep track of classes and homework, making preparations for the school year a breeze.

Read Next

About The Author

Najam Ahmed
(28 Articles Published)

Najam Ahmed is an experienced content marketer and copywriter with a focus on SaaS offerings, startups, digital agencies, and ecommerce businesses. He’s worked closely with founders and digital marketers over the past eight years to produce articles, eBooks, newsletters, and guides. His interests include gaming, traveling, and reading.

More
From Najam Ahmed

Subscribe to our newsletter

Join our newsletter for tech tips, reviews, free ebooks, and exclusive deals!

Click here to subscribe

MUO – Feed

New Lava-Like Coating Can Stop Fires In Their Tracks

sciencehabit shares a report from Science.org: It takes a lot of science to stop a fire. To prevent homes and workplaces from going up in smoke, manufacturers have added flame retardants to plastic, wood, and steel building materials for decades. But such additives can be toxic, expensive, and sometimes ineffective. Now, researchers in Australia and China have come up with a new flame retardant that, when exposed to extreme heat, forms a ceramic layer akin to hardened lava, squelching the flames before they spread. "This is very good work," says David Schiraldi, a chemist at Case Western Reserve University, who has developed other flame retardants. He notes that the ceramic’s starting materials aren’t particularly expensive or toxic, making it more likely to see widespread use. "[This] could impact public safety in the long run."
[The researchers] used three components. First, they created a mixture of several metal oxide powders — including oxides of aluminum, silicon, calcium, and sodium. That mix begins to melt at about 350C (below the temperature of most flames), forming a glasslike sheet. Next, the researchers added tiny flakes of boron nitride, which flow easily and help fill any spaces between the metal oxides as the glass forms. Finally, they added a fire-retardant polymer, which they described in ACS Nano in 2021. The polymer acts as a binder to glue the rest of the mixture to whatever it’s coating. That mix dissolved in water into a milky-white solution, which they then sprayed on a variety of surfaces, including rigid foam insulation, wood, and steel. After it dried, they blasted each coated material for 30 seconds with an 1100C butane torch. In each case, the coating melted into a viscous liquid, covering the material in a continuous glassy sheet.
When heated by the torch, coating spewed out nonflammable gases, such as carbon dioxide. As it did, it became more dense and formed a uniform, noncombustible char layer, which blocked flames from spreading to the materials underneath. The novel flame retardant protected rigid polymer foam — the kind used to insulate homes — better than more than a dozen commonly used retardants, the researchers report today in Matter. The new coating also excelled at protecting wood and steel. If sprayed on building materials during construction, the new coating could prevent disasters like the 2017 Grenfell Tower fire in London, where 72 people died, the researchers say.


Read more of this story at Slashdot.

Slashdot

This is the way

Someone in Palm Beach tells New Yorkers leave if ‘woke’

Someone had a warning for New Yorkers visiting former President Donald Trump’s new hometown — leave if you are “woke.”

Palm Beach police are investigating after someone placed fliers over the weekend on New York-licensed cars parked in the wealthy island reading, “If you are one of the those ‘woke’ people — leave Florida. You will be happier elsewhere, as will we.”

Remember that I just recently wrote a post about some fucking guy who had the Progressive audacity to leave San Francisco,  because it is a failed city, for Miami but say that Miami is worse.

This is what Red Southern states have to deal with.

I’m learning all about what New Yorkers are doing to North Carolina.

Telling those fuckers to stay out with flyers is probably the nicest way Southerners have dealt with carpetbaggers.

Real Python: Build a Django Front End With Bulma – Part 2

In this four-part tutorial series, you’re building a social network with Django that you can showcase in your portfolio. This project will strengthen your understanding of relationships between Django models and show you how to use forms so that users can interact with your app and with each other. You’ll also make your Django front end look good by using the Bulma CSS framework.

In the first part, you extended the Django User model to add profile information that allows users to follow and unfollow each other. You also learned how to customize the Django admin interface and troubleshoot during development with the help of Django’s error messages.

In the second part of this tutorial series, you’ll learn how to:

  • Integrate Bulma CSS and style your app
  • Use template inheritance to reduce repetition
  • Structure Django templates in a folder hierarchy
  • Build routing and view functions
  • Interlink pages of your app using dynamic URLs

After finishing the second part of this project, you’ll move on to the third part of this tutorial series, where you’ll create the back end for adding content to your social network. You’ll also add the missing templates to allow your users to view the text-based content on their dashboard page.

You can download the code that you’ll need to start the second part of this project by clicking the link below and going to the source_code_start/ folder:

Get Source Code: Click here to get the source code for this part of building out your Django social network.

Demo

In this four-part tutorial series, you’re building a small social network that allows users to post short text-based messages. The users of your app can also follow other user profiles to see the posts of these users or unfollow them to stop seeing their text-based posts:

In the second part of this series, you’ll work with templates and learn to use the CSS framework Bulma to give your app a user-friendly appearance. You’ll also tackle common tasks such as setting up routing, views, and templates for individual user profile pages as well as interlinking them with the profile list page:

At the end of this part of the tutorial series, you’ll be able to access detail pages and the profile list page and navigate between them. You’ll also have Bulma added to style the pages.

Project Overview

In this section, you’ll get an overview of the topics that you’ll cover in this second part of the tutorial series. You’ll also get a chance to revisit the full project implementation steps, in case you need to skip back to a previous step from an earlier part of the series or if you want to see what’s still up ahead.

At this point, you should have finished working through part one of this tutorial series. If you did, then you’re ready to continue with your next steps, which focus on templates and front-end styling:

After completing all steps of this second part of the series, you can continue with part three.

To refresh your memory and get an overview of how you’ll work through all four parts of this series on building your Django social network, you can expand the collapsible section below:

You’re implementing the project in a number of steps spread out over multiple separate tutorials in this series. There’s a lot to cover, and you’re going into detail along the way:

✅ Part 1: Models and Relationships

  • Step 1: Set Up the Base Project
  • Step 2: Extend the Django User Model
  • Step 3: Implement a Post-Save Hook

📍 Part 2: Templates and Front-End Styling

  • Step 4: Create a Base Template With Bulma
  • Step 5: List All User Profiles
  • Step 6: Access Individual Profile Pages

⏭ Part 3: Follows and Dweets

  • Step 7: Follow and Unfollow Other Profiles
  • Step 8: Create the Back-End Logic For Dweets
  • Step 9: Display Dweets on the Front End

⏭ Part 4: Forms and Submissions

  • Step 10: Submit Dweets Through a Django Form
  • Step 11: Prevent Double Submissions and Handle Errors
  • Step 12: Improve the Front-End User Experience

Each of these steps will provide links to any necessary resources. By approaching the steps one at a time, you’ll have the opportunity to pause and come back at a later point in case you want to take a break.

With the high-level structure of this tutorial series in mind, you’ve got a good idea of where you’re at and which implementation steps you’ll handle in the later parts.

Before getting started with the next step, take a quick look at the prerequisites to skim any links to other resources that might be helpful along the way.

Prerequisites

To successfully work through this part of your project, you need to have completed the first part on models and relationships and you should confirm that your project is working as described there. It would be best if you’re also comfortable with the following concepts:

Read the full article at https://realpython.com/django-social-front-end-2/ »


[ Improve Your Python With 🐍 Python Tricks 💌 – Get a short & sweet Python Trick delivered to your inbox every couple of days. >> Click here to learn more and see examples ]

Planet Python

Close-up Cutting Stuff

https://theawesomer.com/photos/2022/01/cutting_stuff_close_up_macro_t.jpg

Close-up Cutting Stuff

Link

Object pointed their macro camera lens at ordinary objects like wires and bolts so we could see what they look like when they’re cut in half. The slow-motion and sound effects help to heighten the impact of the visuals.

The Awesomer