https://media.notthebee.com/articles/61ba0a9f7979c61ba0a9f7979d.jpg
Glenn Loury is a great American and a truly impressive thinker.
Not the Bee
Just another WordPress site
https://media.notthebee.com/articles/61ba0a9f7979c61ba0a9f7979d.jpg
Glenn Loury is a great American and a truly impressive thinker.
Not the Bee
https://theawesomer.com/photos/2021/12/inside_the_enigma_machine_t.jpg
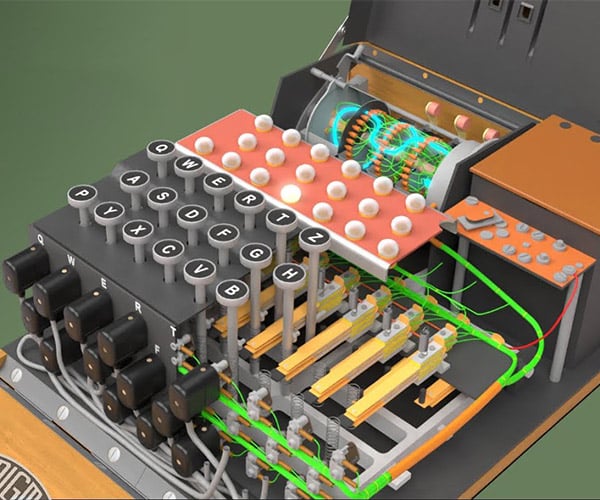
The Enigma Machine was a cipher device used by Germany during WWII to encrypt and decrypt top-secret communications. Animator and educator Jared Owen provides a detailed look at its ingenious design and how it scrambled and unscrambled letters. Given its complexity, we’re amazed that it was cracked.
The Awesomer
Another self-test opportunity for you guys: do you know everything about file uploads in Laravel?Laravel News Links
https://theawesomer.com/photos/2021/12/making_shiny_steel_spheres_t.jpg

Scott from Wonder World was fascinated by a video that showed how large metal spheres are made using explosive hydroforming. Here, he dives deeper into the process, along with other methods used for making spheres from steel, such as the shiny art pieces made by Shenzhen Maoping Sculpture Arts.
The Awesomer
https://gunfreezone.net/wp-content/uploads/2021/12/country-santa-1.jpg
Many years ago, the Missus bought what was considered a cute Christmas ornament: a singing country Santa. It was fun for a little while but after the 100th time listening to the same song, I developed a hatred for the bastard.
The doll eventually ceased to function, but rather than throw it away, we kept it because I had promised myself to shoot the dammed thing whenever I had the chance.
So, I tested the upgraded 10-22 just now. 10 rounds without a hiccup.
Country Santa is dead.


I haven’t shot the shotgun in a while. I figure a mag full of birdshot to test functionality may be in the future books.
https://www.thefirearmblog.com/blog/wp-content/uploads/2021/12/DSC04455_GX4_TORO_StillLife-180×180.jpg
 The newest iteration of Taurus’ successful GX4 micro-compact 9mm pistol is finally here. The Taurus GX4 T.O.R.O (Taurus Optics Ready Option) has just been announced. It will be compatible with many of the market’s most popular red dot sights and features a lot of flexibility in terms of optics selection for budget-minded customers. If you’ll […]
The post Budget Carry Optics: The Taurus GX4 T.O.R.O Is Finally Here! appeared first on The Firearm Blog.
The Firearm Blog
https://assets.amuniversal.com/532f21002a07013a8638005056a9545d
Thank you for voting.
Hmm. Something went wrong. We will take a look as soon as we can.
Dilbert Daily Strip
https://i.ytimg.com/vi/P9BRXvlFBqQ/maxresdefault.jpgIn this video, we will be looking at how to deploy the Laravel project to the production environmentLaravel News Links
Another self-test opportunity for you guys, do you know everything about Laravel Eloquent relationships? HasMany, BelongsToMany, Polymorphic, etc?Laravel News Links
In this Larabit, I’ll teach you the essentials of how to build a service container in three…Laracasts