Memes that made me laugh 29

Memes that made me laugh 29

https://ift.tt/3ms69U7


Gathered up over the past week on the Internet.

More next week!

Peter

non critical

via Bayou Renaissance Man https://ift.tt/1ctARFa

October 26, 2020 at 05:59AM

Stack Abuse: What Does if __name__ == “__main__”: Do in Python?

Stack Abuse: What Does if __name__ == “__main__”: Do in Python?

https://ift.tt/37IeoYk

Introduction

It’s common to see if __name__ == "__main__" in Python scripts we find online, or one of the many we write ourselves.

Why do we use that if-statement when running our Python programs? In this article, we explain the mechanics behind its usage, the advantages, and where it can be used.

The __name__ Attribute and the __main__ Scope

The __name__ attribute comes by default as one of the names in the current local scope. The Python interpreter automatically adds this value when we are running a Python script or importing our code as a module.

Try out the following command on your Python interpreter. You may find out that __name__ belongs to the list of attributes in dir():

dir()

dir() output

The __name__ in Python is a special variable that defines the name of the class or the current module or the script from which it gets invoked.

Create a new folder called name_scripts so we can write a few scripts to understand how this all works. In that folder create a new file, script1.py with the following code:

print(f'The __name__ from script1 is "{__name__}"')

script1.py output

That’s a curveball! We’d expect that the name would be script1, as our file. What does the output __main__ mean?

By default, when a script is executed, the interpreter reads the script and assigns the string __main__ to the __name__ keyword.

It gets even more interesting when the above script gets imported to another script. Consider a Python file named script2.py with the following code:

import script1  # The print statement gets executed upon import

print(f'The __name__ from script2 is "{__name__}"')

script2.py output

As you can see, when the script is executed the output is given as script1 denoting the name of the script. The final print statement is in the scope of script2 and when it gets executed, the output gets printed as: __main__.

Now that we understand how Python uses the __name__ scope and when it gives it a value of "__main__", let’s look at why we check for its value before executing code.

if __name__ == "__main__" in Action

We use the if-statement to run blocks of code only if our program is the main program executed. This allows our program to be executable by itself, but friendly to other Python modules who may want to import some functionality without having to run the code.

Consider the following Python programs:

a) script3.py contains a function called add() which gets invoked only from the main context.

def add(a, b):
    return a+b


if __name__ == "__main__":
    print(add(2, 3))

Here’s the output when script3.py gets invoked:

script3.py output

As the script was executed directly, the __name__ keyword is assigned to __main__, and the block of code under the if __name__ == "__main__" condition is executed.

b) Here’s what happens when this snippet is imported from script4.py:

import script3

print(f"{script3.__name__}")

script4.py output

The block under if __name__ == "__main__" from script3.py did not execute, as expected. This happened because the __name__ keyword is now assigned with the name of the script: script3. This can be verified by the print statement given which prints the assigned value for the __name__ keyword.

How Does __name__ == "__main__" Help in Development?

Here are some use cases for using that if-statement when creating your script

  • Testing is a good practice which helps not only catch bugs but ensure your code behaves as required. Test files have to import a function or object to them. In these cases, we typically don’t want the script being run as the main module.
  • You’re creating a library but would like to include a demo or other special run-time cases for users. By using this if-statement, the Python modules that use your code as a library are unaffected.

Creating a __main__.py File for Modules

The point of having the if __name__ == "__main__" block is to get the piece of code under the condition to get executed when the script is in the __main__ scope. While creating packages in Python, however, it’s better if the code to be executed under the __main__ context is written in a separate file.

Let’s consider the following example – a package for performing calculations. The file tree structure for such a scenario can be visualized as:

calc                 # --> Root directory
├── __main__.py
├── script1.py
├── script2.py
├── script3.py
├── script4.py
└── src              # --> Sub-directory
    ├── add.py
    └── sub.py

The tree structure contains calc as the root directory and a sub-directory known as src. The __main__.py under the calc directory contains the following content:

from src.add import add
from src.sub import sub

a, b = input("Enter two numbers separated by commas: ").split(',')
a, b = int(a), int(b)

print(f"The sum is: {add(a, b)}")
print(f"The difference is: {sub(a, b)}")

The add.py contains:

def add(a, b):
    return a+b

And sub.py contains:

def sub(a, b):
    return a-b

From right outside the calc directory, the script can be executed and the logic inside the __main__.py gets executed by invoking:

python3 calc

script1.py output

This structure also gives a cleaner look to the workspace location, the way how the directories are organized, and the entry point is defined inside a separate file called __main__.py.

Conclusion

The __name__ == "__main__" runs blocks of code only when our Python script is being executed directly from a user. This is powerful as it allows our code to have different behavior when it’s being executed as a program instead of being imported as a module.

When writing large modules, we can opt for the more structured approach of having a __main__.py file to run a module. For a stand-alone script, including the if __name__ == "__main__" is a simpler method to separate the API from the program.

Python

via Planet Python https://ift.tt/1dar6IN

October 26, 2020 at 09:50AM

Why the iPhone 12 Pro is worth the upgrade cost

Why the iPhone 12 Pro is worth the upgrade cost

https://ift.tt/31EV7TN


Putting the iPhone 12 Pro through its paces in the real world really shows why it’s worth the extra cost over an iPhone 12.

It’s more than surface deep

The new iPhone 12 Pro of course offers more features than its predecessors, but before you even notice any of those, you immediately see — and feel — how it has all been physically redesigned. As with all the iPhone 12 range, it has the iPad Pro-style flat edges, and they make it remarkably appealing to hold.

Then with the iPhone 12 Pro, Apple retained the stainless steel frame but has four new colors. What’s been less well reported, though, is that even the colors that we thought we’d seen before, such as silver and gold, have a subtly different — and better — look.

For instance, the silver version, which has the white glass back, is now lighter than before. The gold has a new finish to make the color more substantial around the edge, and this also makes it more resistant to fingerprints. Unfortunately, the darker colors remain fingerprint magnets.

Graphite iPhone 12 Pro and space gray iPhone 11 Pro

Whereas Pacific Blue is entirely new. It replaces last year’s green and, at least anecdotally, appears to be a particularly popular option. There’s a slight slate-color tint to the blue on the iPhone 12 Pro, and it’s gorgeous enough that you will keep staring at it until you put the phone in a case.

To go with these brand new colors, and improved existing ones, are new exclusive wallpapers. Apple has created four new live wallpapers for the iPhone 12 Pro line that match the phone colors, and move. Hold your finger on the lock screen and these images animate as if they have lens flares.

Massive camera updates

You can point to the finer color and, actually, to the brighter screen, to say there are variations between the iPhone 12 and the iPhone 12 Pro, but the real differences are in the new photo and video capabilities on the new iPhone 12 Pro.

Most of the best new features are relegated to the iPhone 12 Pro Max, though. That has yet to be released, but in the meantime, iPhone 12 Pro has some key new features of note.

Such as the addition of Dolby Vision recording at 60 frames per second, as opposed to the 30fps of the iPhone 12. The inclusion of Dolby Vision at all is a feat, and it means that these two smartphones are the first in the world on which you can shoot, edit, and share 4K Dolby Vision HDR.

However, if you are going to benefit from Dolby Vision, it feels wrong to hamper yourself with the 30fps version. The iPhone 12 Pro’s 60fps is certainly better, and makes greater use of the potential of Dolby Vision recording.

What’s more, in real-world use, it is as easy as you’d want and expect it to be.

When you come to play or edit it, you can immediately tell that footage was shot in Dolby Vision because it is marked with an HDR watermark in the top-left corner of the video app. Similarly, if you edit in the Photos app, you’ll see the display get brighter as it starts to display this footage.

It all looks very good when played on an HDR-capable display, but can be toggled off if you don’t wish to capture it and take up all the storage space it requires.

Night shoots

Another frankly amazing feature we explored was night mode portraits on the iPhone 12 Pro. This night mode feature came with the iPhone 11 line, and it already allowed you take long-exposure shots in very low light situations. With iPhone 12 Pro, though, that same functionality comes to portrait shots.

When you switch to portrait mode in the Camera app and go to take a pic in a very low-light environment, you will see the night mode icon in the lower-left corner where the 1X and 2X indicators are.

You can’t zoom in and keep this portrait effect, you have to take the shot at 1X. Explain to your subject that you have to step closer. That’s because for this type of shot it needs the new faster aperture of the wide-angle camera rather than that on the 2X tele lens.

For the iPhone 12 Pro, Apple increased the aperture from f/1.8 to f/1.6 which allows more light in and allows the shutter to fire faster. The new LiDAR scanner is also used because it allows the camera to focus in near pitch-black environments.

iPhone 11 Pro low-light portrait shot versus night mode portrait on iPhone 12 Pro

We will have a more comprehensive comparison soon, but we did take a quick set of example shots using portrait mode on our iPhone 11 Pro and iPhone 12 Pro. The iPhone 11 Pro wasn’t able to enable portrait mode at all so it just captured a normal image.

Naturally, that image came out very, very dark and completely unusable. On the other hand, iPhone 12 Pro captured a very impressive image in almost no light.

Ultra-wide lens correction on iPhone 12 Pro

Aside from night mode coming to all cameras — notably including the front-facing True Depth or selfie one — Apple has improved the ultra-wide lens. There’s also a new lens correction that’s applied in order to deal with the quite excessive distortion that could be present before. Once more, see our sample shot took on iPhone 11 Pro and iPhone 12 Pro to see how much of a difference this has made.

As important and visibly improved as the new lens and camera systems are, it’s this combination of corrections and software control that make the iPhone 12 Pro such a good buy for photographers. That’s only going to become even truer, too, when the promised Apple ProRAW format comes out.

We’ll know for sure when it’s released and we can test it in the real world. However, Apple ProRAW is claimed to take all of the advantages of shooting RAW, of using uncompressed images, and applying Apple’s computational photography algorithms to get the very finest results possible.

Internal upgrades

Powering all of these new features is Apple’s latest A14 Bionic processor. Last year, the A13 Bionic processor on the iPhone 11 Pro scored 1334 and 3543 on the single-core and multi-core tests. This year, the iPhone 12 Pro pulled a 1598 and a 4180.

That represents about a 20 percent improvement on the single-core score and about 15 percent gain on the multi-core. These are the kinds of improvements that don’t just sound good on paper, you can actually appreciate them in real use.

Geekbench scores for iPhone 12 Pro

That’s going to apply to everything you do on the phone as most tasks are single-core, so this iPhone 12 Pro feels more snappy in daily use. But it’s particularly noticeable in video and photo editing, which is faster even when you’re dealing with 4K 60FPS content.

Most of these internal differences are also in the iPhone 12, but Apple has given the iPhone 12 Pro an extra 2GB of RAM, bringing it to 6GB. This directly aids with specific tasks like loading apps from the background, many Safari tabs, and more. Storage was doubled too, going from 64Gb on the base model to 128GB at the same price point.

Of course, 5G is also an internal upgrade, supporting both sub-6GHz and mmWave 5G here in the US, and sub-6GHz elsewhere.

MagSafe

MagSafe charger on iPhone 12 Pro

In terms of what it means for the iPhone 12 Pro, though, MagSafe is poised to be a massive new feature. You’re going to see a huge increase in the iPhone ecosystem between cases, chargers, mounts, wallets, cases, folios, PopSockets, and more, which are all on their way.

Right now, our real world tests with the iPhone 12 Pro have been using Apple’s own cases, and its own MagSafe charger.

Even based on these, though, MagSafe is a hit. The convenience of the longer lead that means you can pick up the phone without disconnecting it from the charge is a boon.

And the magnets really do instantly center the iPhone 12 Pro on the right spot to make sure it gets charged properly.

Look to the future

That’s the thing about an Apple device. You can review it as it’s launched, and you can properly test it out in the real world, but then it changes.

We’re going to see the addition of more MagSafe devices — such as Apple’s own forthcoming device that charges both the iPhone 12 Pro and the Apple Watch — and we’re going to see Apple ProRAW soon.

Right now, the iPhone 12 Pro is an exceptional phone. It’s going to be interesting to see just how significant the extra camera improvements are in the iPhone 12 Pro Max. But regardless of that, this iPhone 12 Pro is a good buy that is going to keep on getting better.

macintosh

via AppleInsider https://ift.tt/3dGGYcl

October 26, 2020 at 01:18PM

The Most Flammable Dust

The Most Flammable Dust

https://ift.tt/3jsZOWJ

The Most Flammable Dust

Link

You wouldn’t think that something as innocuous as corn starch could cause a massive fireball, but you’d be wrong. The Beyond the Press channel conducted a series of experiments to show just how flammable various kinds of dust and powder can be when exposed to a flame. They didn’t try non-dairy creamer though.

fun

via The Awesomer https://theawesomer.com

October 26, 2020 at 02:45PM

The No-Code Generation is arriving

The No-Code Generation is arriving

https://ift.tt/3kuyetu

In the distant past, there was a proverbial “digital divide” that bifurcated workers into those who knew how to use computers and those who didn’t.[1] Young Gen Xers and their later millennial companions grew up with Power Macs and Wintel boxes, and that experience made them native users on how to make these technologies do productive work. Older generations were going to be wiped out by younger workers who were more adaptable to the needs of the modern digital economy, upending our routine notion that professional experience equals value.

Of course, that was just a narrative. Facility with using computers was determined by the ability to turn it on and login, a bar so low that it can be shocking to the modern reader to think that a “divide” existed at all. Software engineering, computer science, and statistics remained quite unpopular compared to other academic programs, even in universities, let alone in primary through secondary schools. Most Gen Xers and millennials never learned to code, or frankly, even to make a pivot table or calculate basic statistical averages.

There’s a sociological change underway though, and it’s going to make the first divide look quaint in hindsight.

Over the past two or so years, we have seen the rise of a whole class of software that has been broadly (and quite inaccurately) dubbed “no-code platforms.” These tools are designed to make it much easier for users to harness the power of computing in their daily work. That could be everything from calculating the most successful digital ad campaigns given some sort of objective function, or perhaps integrating a computer vision library into a workflow that calculates the number of people entering or exiting a building.

The success and notoriety of these tools comes from the feeling that they grant superpowers to their users. Projects that once took a team of engineers some hours to build can now be stitched together in a couple of clicks through a user interface. That’s why young startups like Retool can raise at nearly a $1 billion and Airtable at $2.6 billion, while others like Bildr, Shogun, Bubble, Stacker, and dozens more are getting traction among users.

Of course, no-code tools often require code, or at least, the sort of deductive logic that is intrinsic to coding. You have to know how to design a pivot table, or understand what a machine learning capability is and what might it be useful for. You have to think in terms of data, and about inputs, transformations, and outputs.

The key here is that no-code tools aren’t successful just because they are easier to use — they are successful because they are connecting with a new generation who understands precisely the sort of logic required by these platforms to function. Today’s students don’t just see their computers and mobile devices as consumption screens and have the ability to turn them on. They are widely using them as tools of self-expression, research and analysis.

Take the popularity of platforms like Roblox and Minecraft. Easily derided as just a generation’s obsession with gaming, both platforms teach kids how to build entire worlds using their devices. Even better, as kids push the frontiers of the toolsets offered by these games, they are inspired to build their own tools. There has been a proliferation of guides and online communities to teach kids how to build their own games and plugins for these platforms (Lua has never been so popular).

These aren’t tiny changes. 150 million play Roblox games across 40 million user-created experiences, and the platform has nearly 350,000 developers. Minecraft for its part has more than 130 million active users. These are generation-defining experiences for young people today.

That excitement to harness computers is also showing up in educational data. Advanced Placement tests for Computer Science have grown from around 20,000 in 2010 to more than 70,000 this year according to the College Board, which administers the high school proficiency exams. That’s the largest increase among all of the organization’s dozens of tests. Meanwhile at top universities, computer science has emerged as the top or among the top majors, pulling in hundreds of new students per campus per year.

The specialized, almost arcane knowledge of data analysis and engineering is being widely democratized for this new generation, and that’s precisely where a new digital divide is emerging.

In business today, it’s not enough to just open a spreadsheet and make some casual observations anymore. Today’s new workers know how to dive into systems, pipe different programs together using no-code platforms, and answer problems with much more comprehensive — and real-time — answers.

It’s honestly striking to see the difference. Whereas just a few years ago, a store manager might (and strong emphasis on might) put their sales data into Excel and then let it linger there for the occasional perusal, this new generation is prepared to connect multiple online tools together to build an online storefront (through no-code tools like Shopify or Squarespace), calculate basic LTV scores using a no-code data platform, and prioritize their best customers with marketing outreach through basic email delivery services. And it’s all reproducible, since it is in technology and code and not produced by hand.

There are two important points here. First is to note the degree of fluency these new workers have for these technologies, and just how many members of this generation seem prepared to use them. They just don’t have the fear to try new programs out, and they know they can always use search engines to find answers to problems they are having.

Second, the productivity difference between basic computer literacy and a bit more advanced expertise is profound. Even basic but accurate data analysis on a business can raise performance substantially compared to gut instinct and expired spreadsheets.

This second digital divide is only going to get more intense. Consider students today in school, who are forced by circumstance to use digital technologies in order to get their education. How many more students are going to become even more capable of using these technologies? How much more adept are they going to be at remote work? While the current educational environment is a travesty and deeply unequal, the upshot is that ever more students are going to be forced to become deeply fluent in computers.[2]

Progress in many ways is about raising the bar. This generation is raising the bar on how data is used in the workplace, in business, and in entrepreneurship. They are better than ever at bringing together various individual services and cohering them into effective experiences for their customers, readers, and users. The No-Code Generation has the potential to finally fill that missing productivity gap in the global economy, making our lives better while saving time for everyone.

[1] Probably worth pointing out that the other “digital divide” at the time was describing households who had internet access and households who did not. That’s a divide that unfortunately still plagues America and many other rich, industrialized countries.

[2] Important to note that access to computing is still an issue for many students and represents one of the most easily fixable inequalities today in America. Providing equal access to computing should be an absolute imperative.

technology

via TechCrunch https://techcrunch.com

October 26, 2020 at 12:26PM

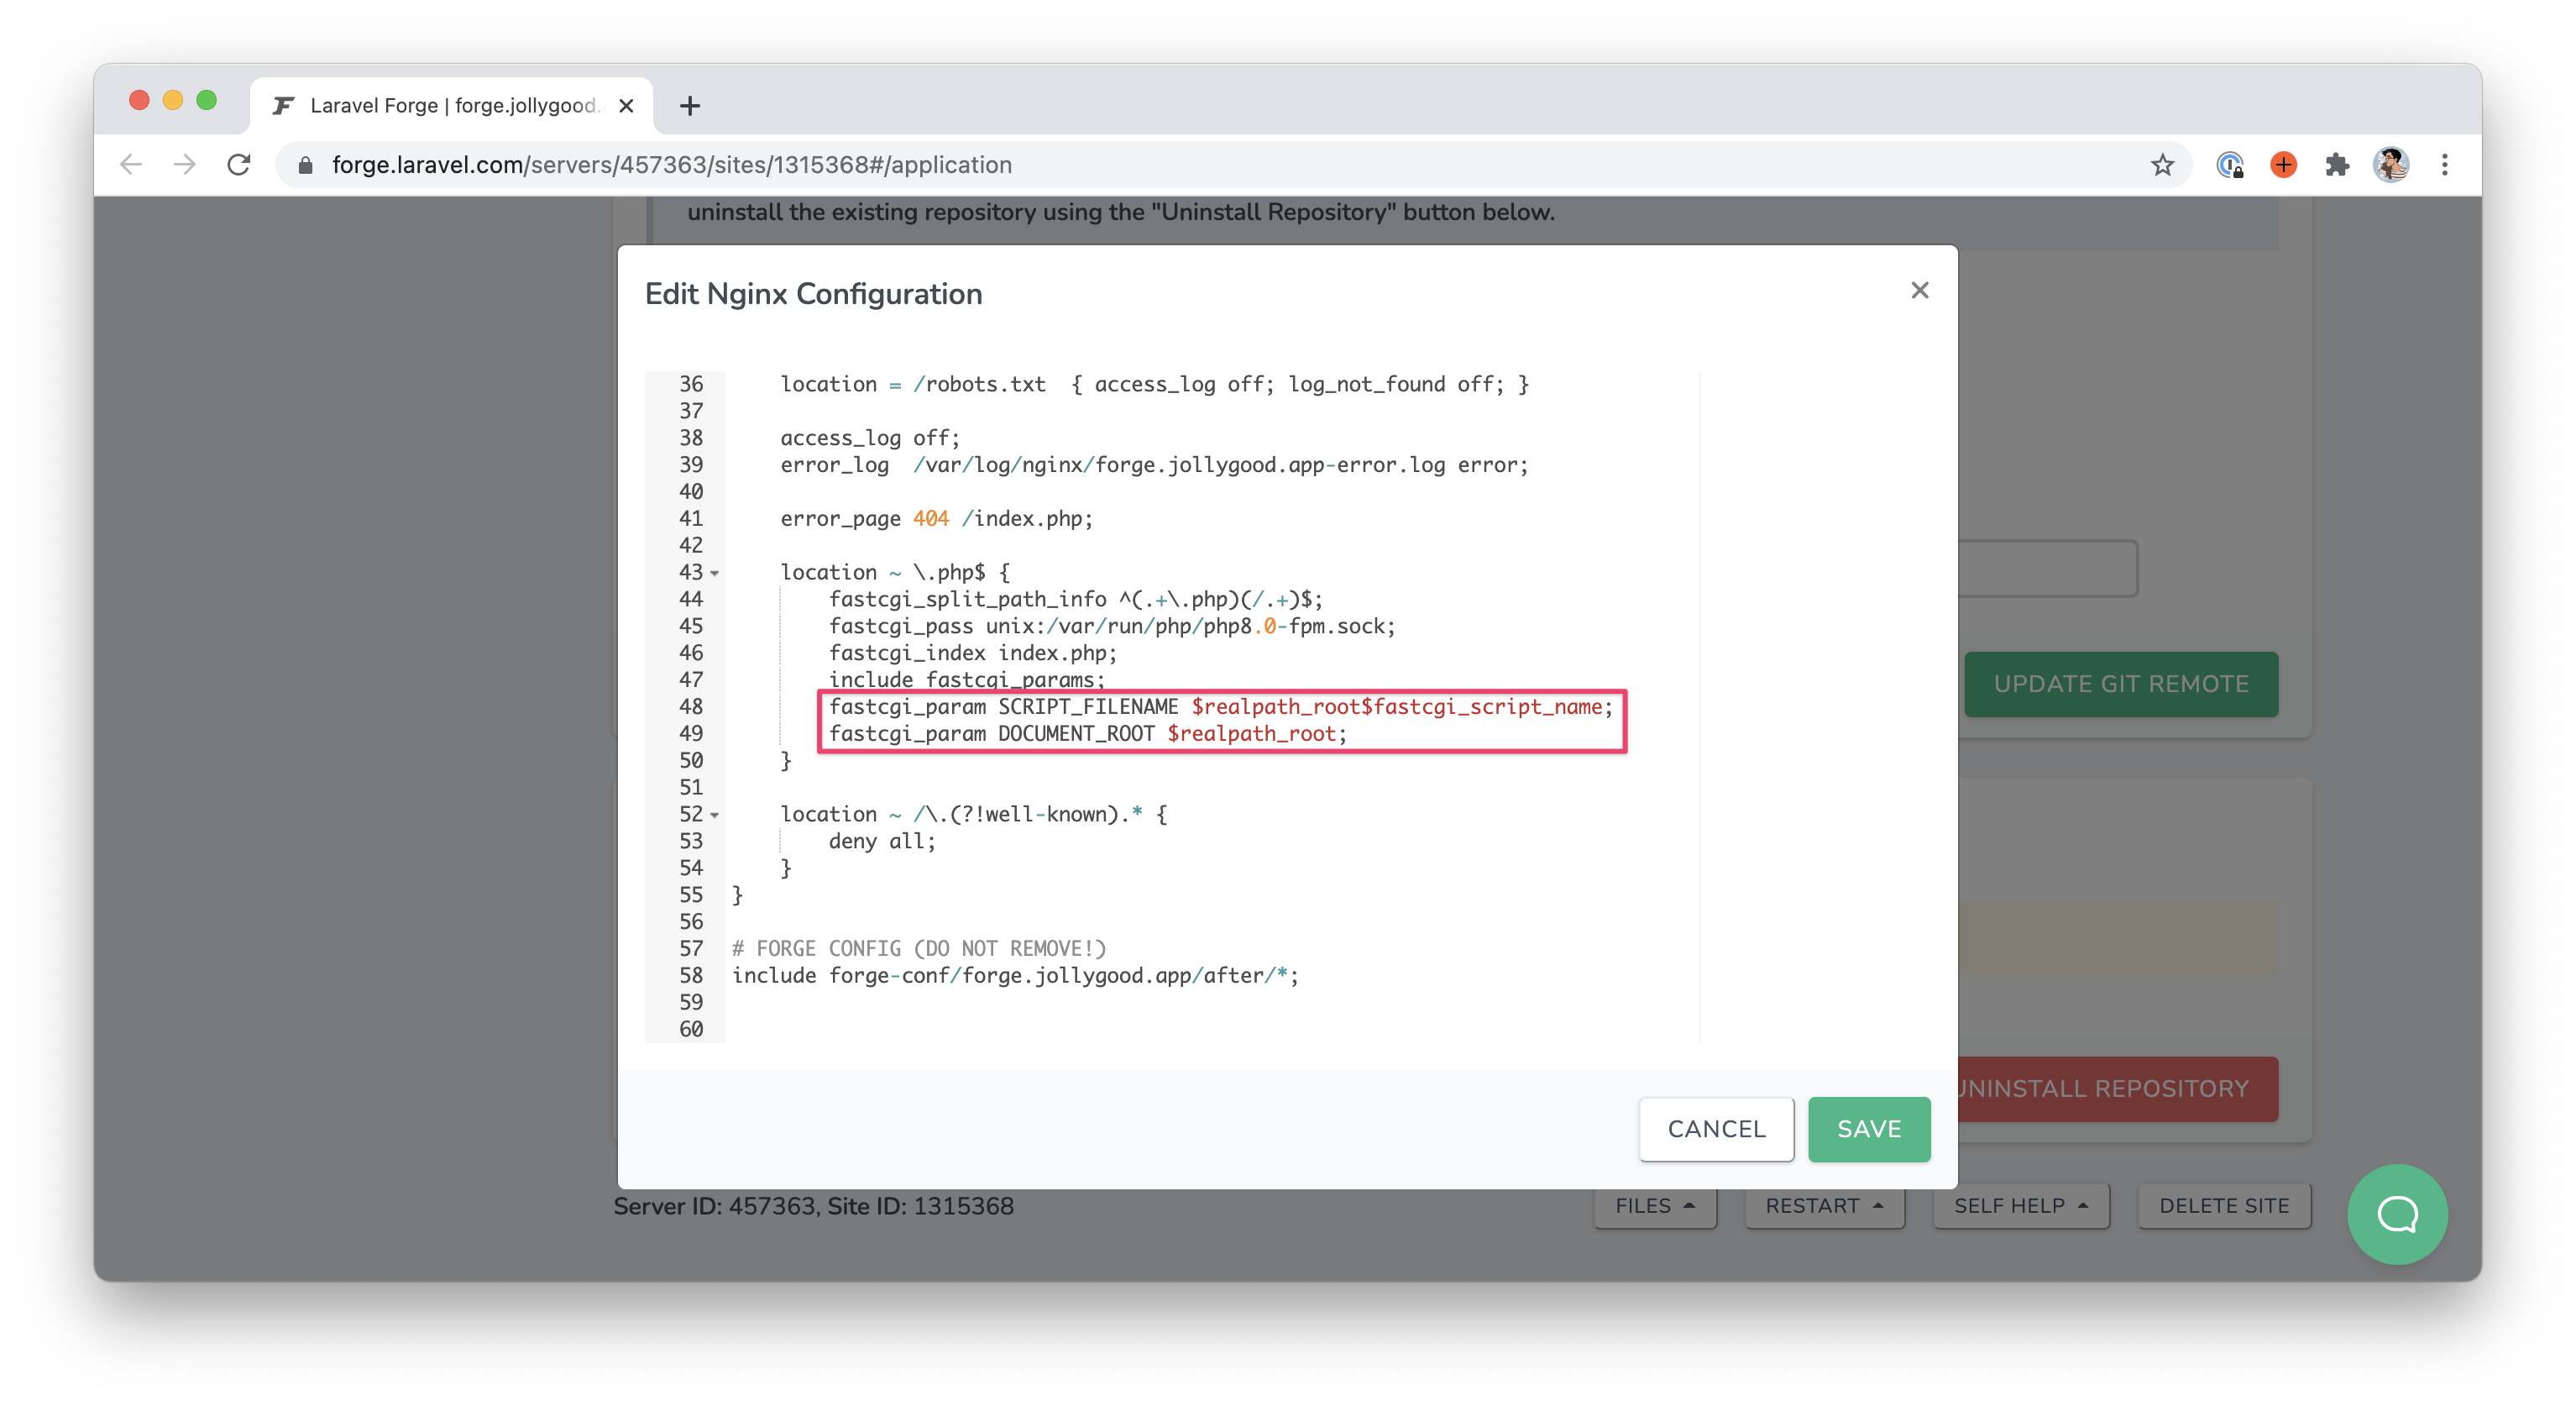
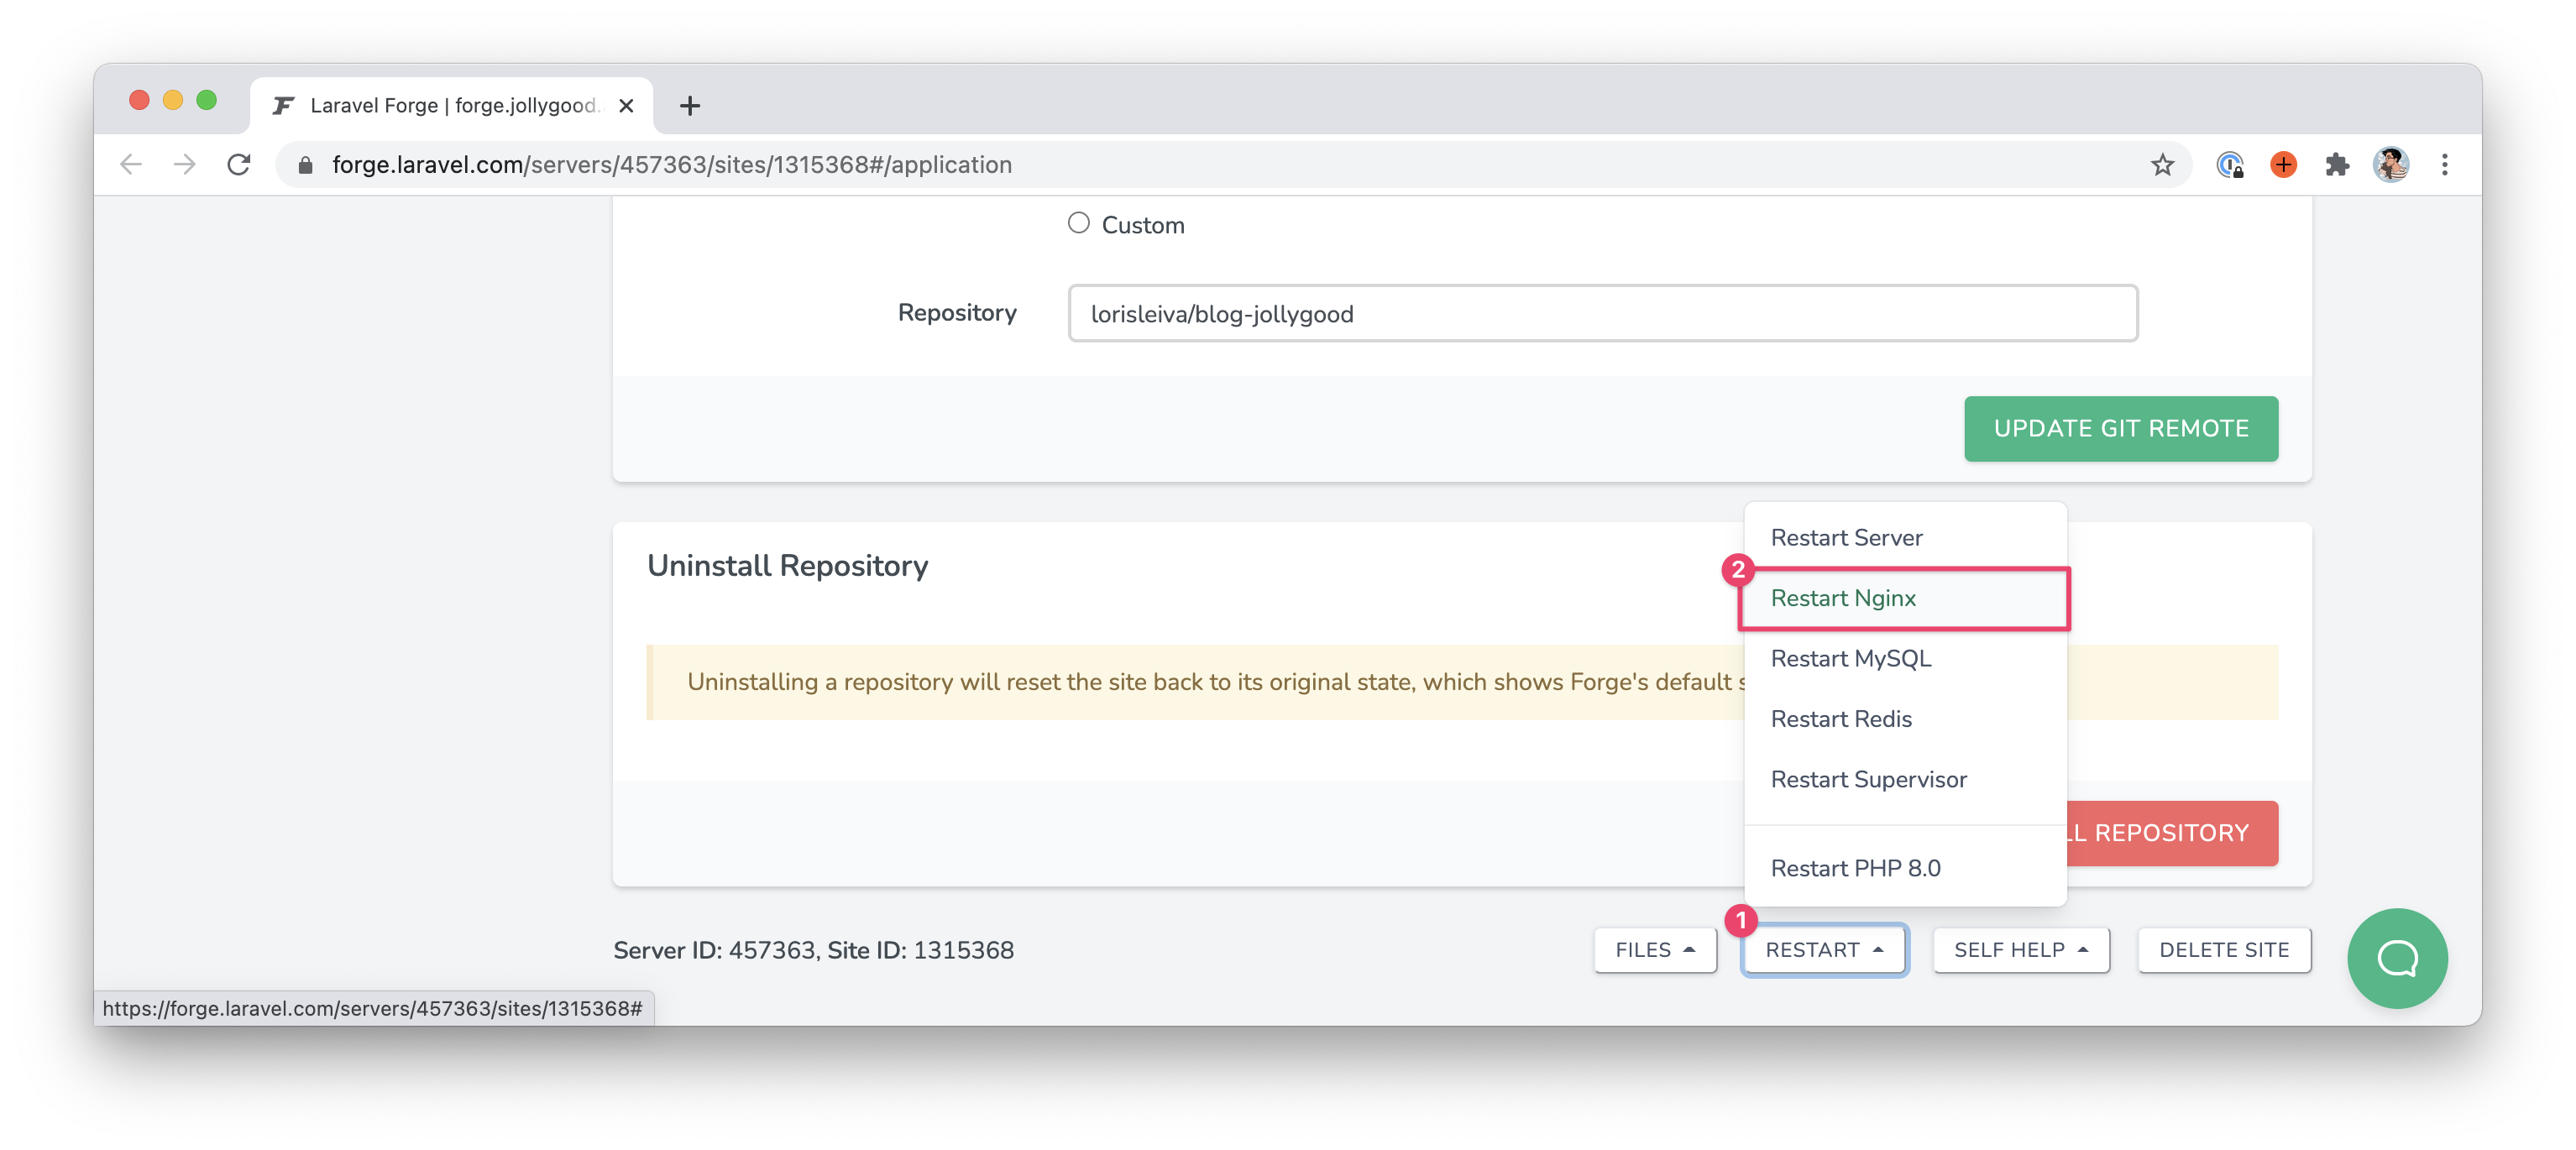
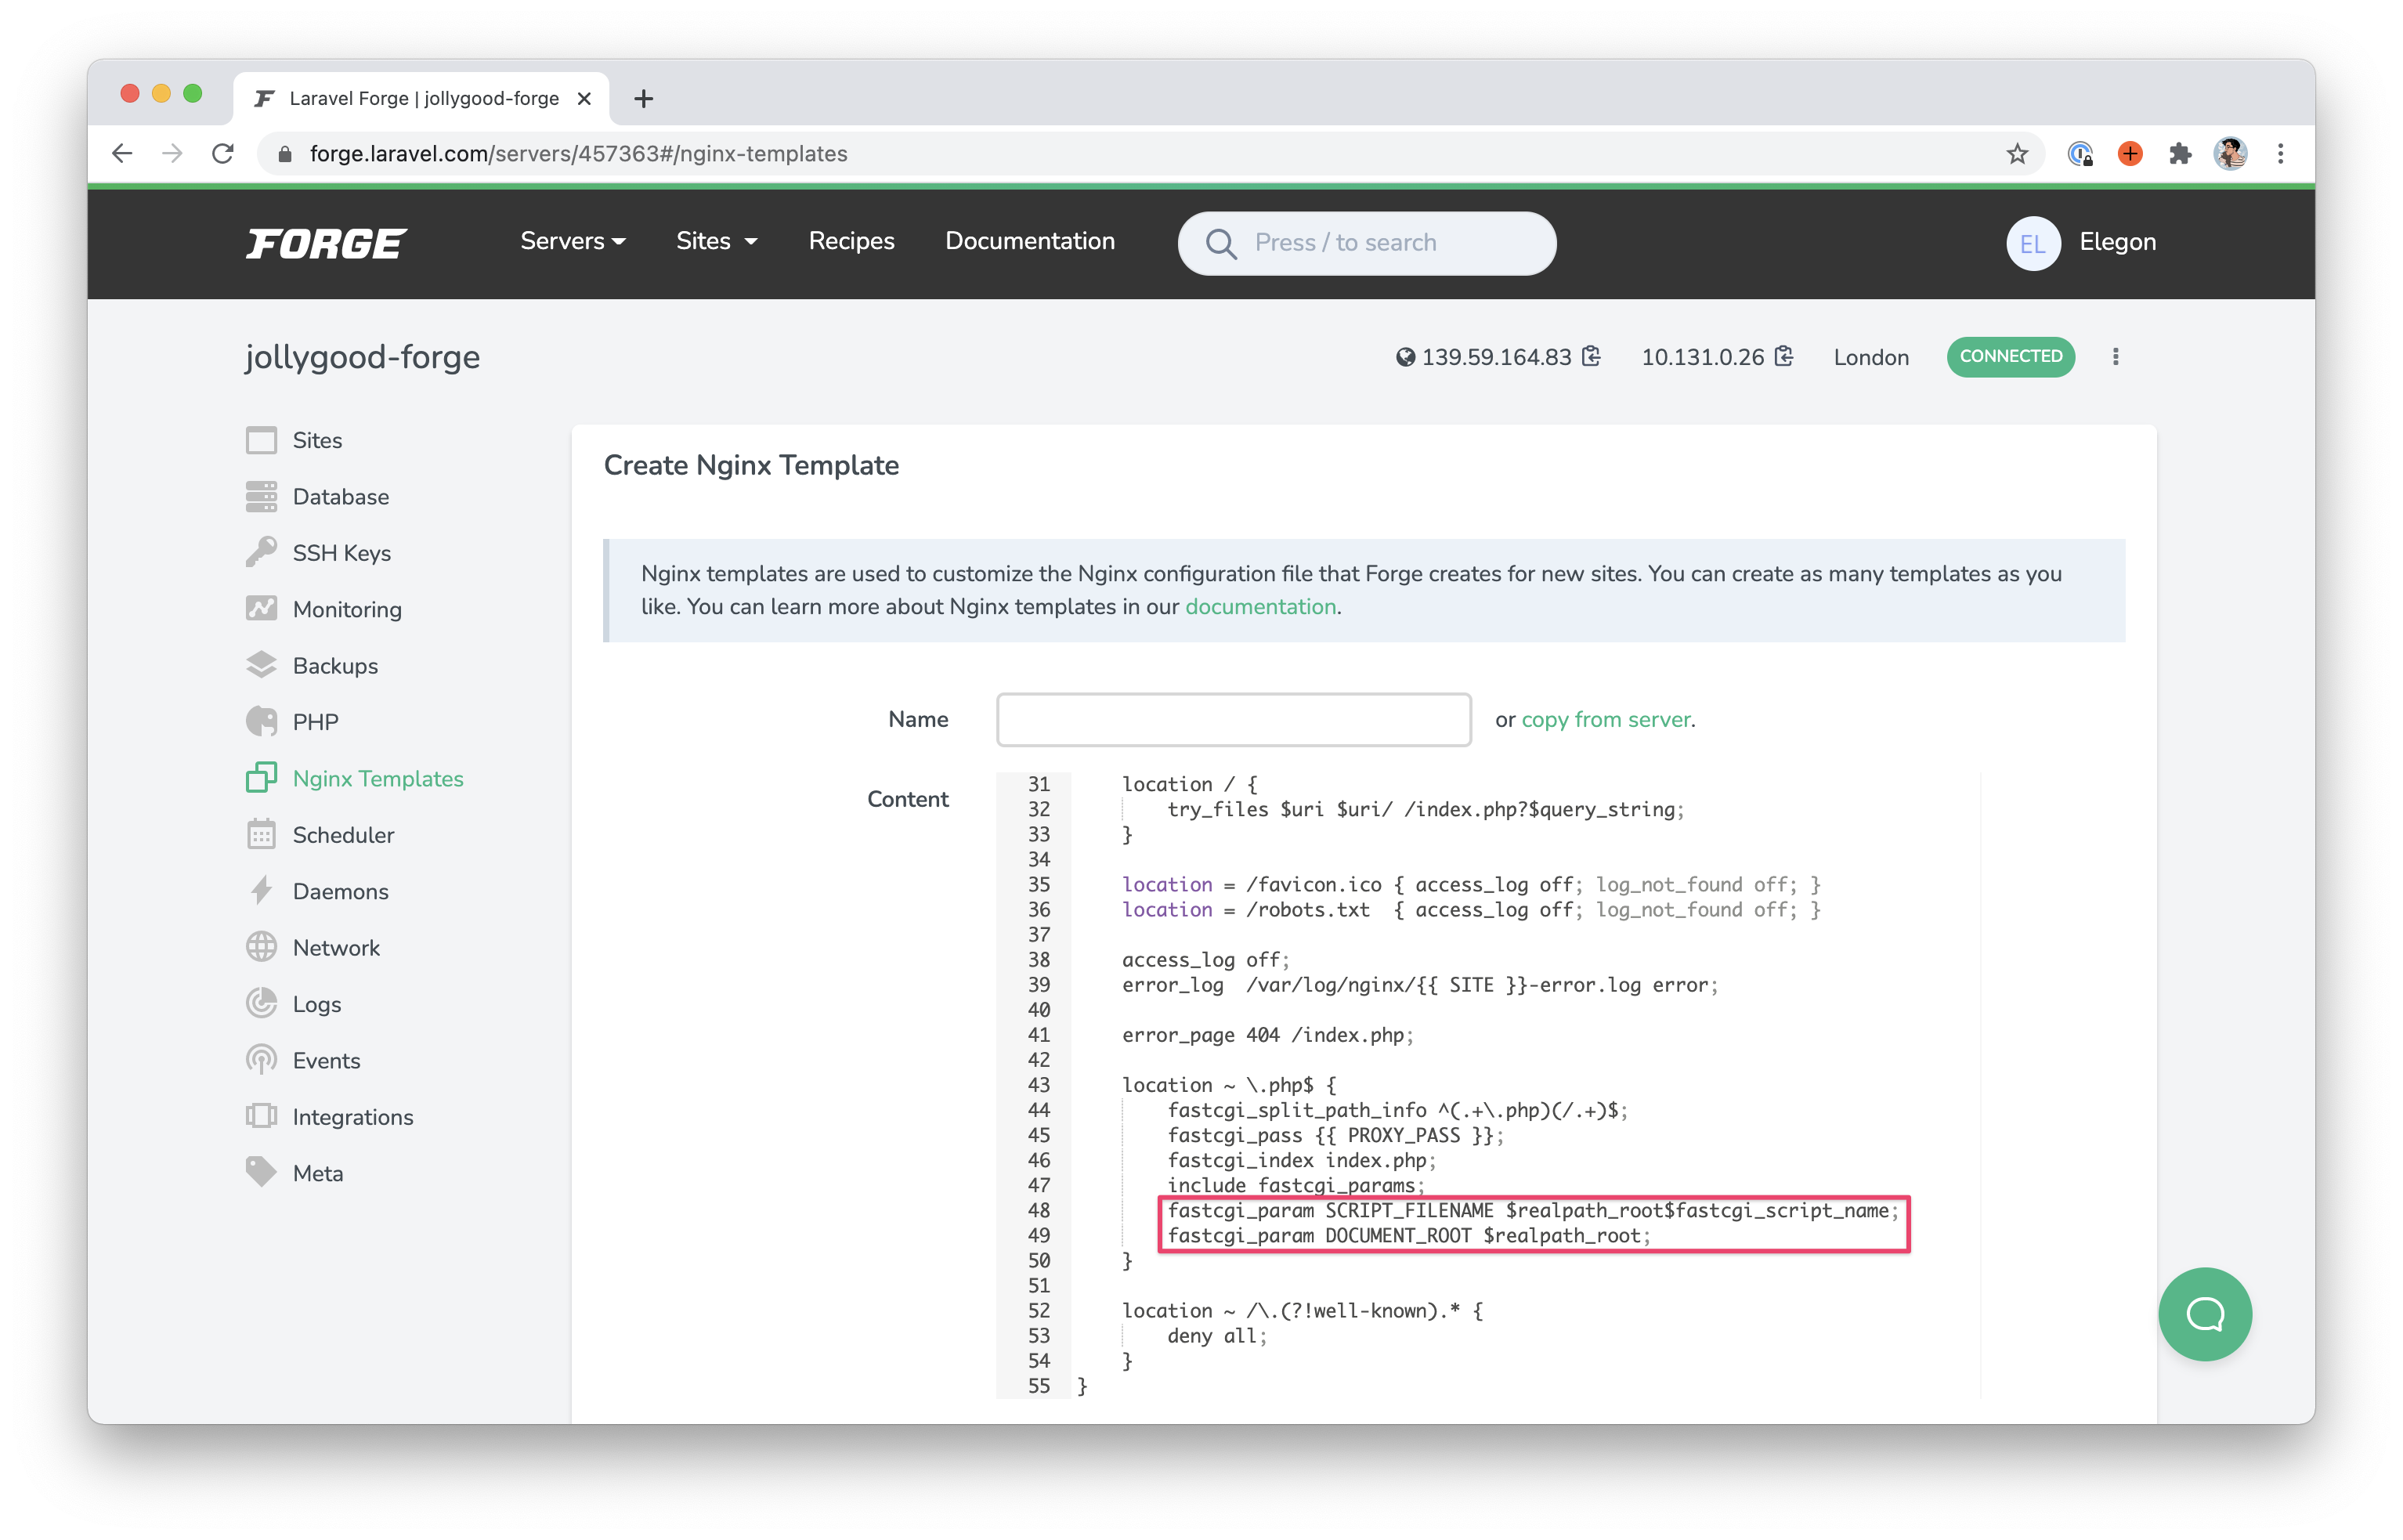
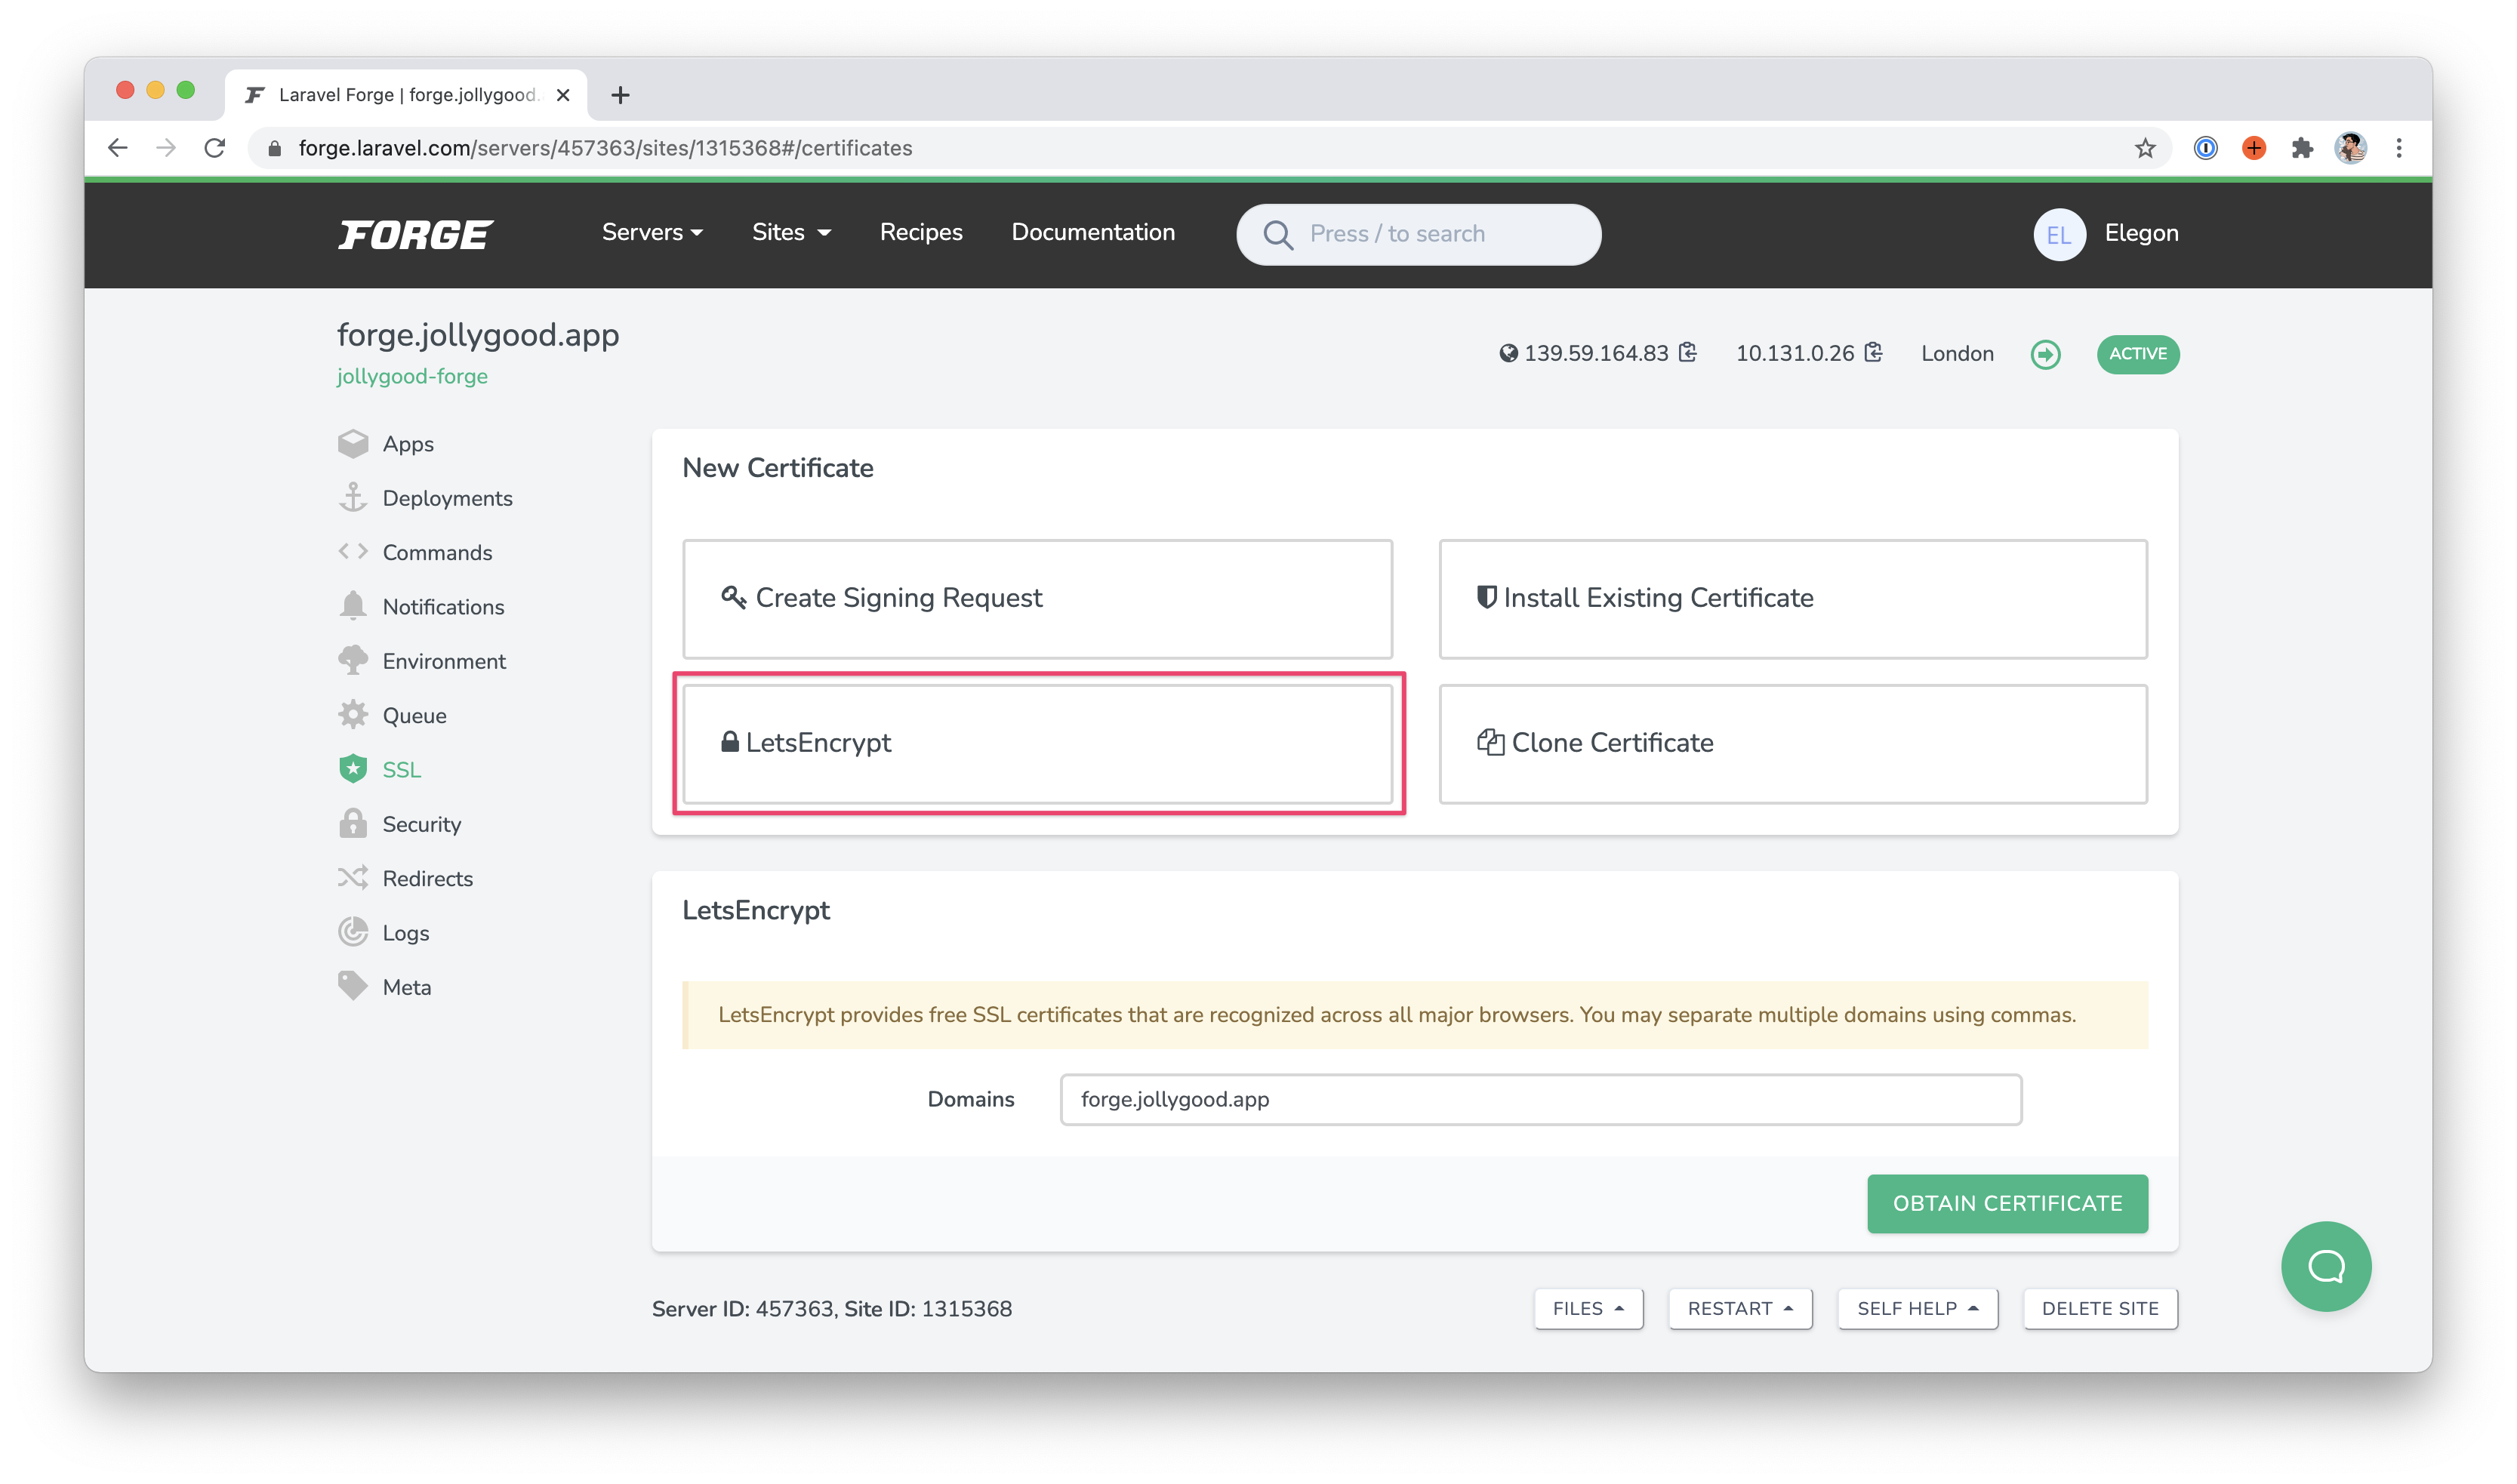
Using the new Upserts feature in the Laravel Query Builder

Using the new Upserts feature in the Laravel Query Builder

https://ift.tt/34vbNPw


When to use eloquent upserts

You’ve probably come across a situation before where you needed to do some kind of mass update or sync with external data. A naive way you might approach this could be similar to below.

collect($csvContacts)->each(function (array $row) {
    $contact = Contact::updateOrCreate(
        ['email' => $row['email']],
        ['name' => $row['name'], 'address' => $row['address']]
    );
});

Under the hood, this will make 2 queries for each record. First, it will find the first row matching all of the key/value pairs in the first array. If a row already exists, it will update it, otherwise a new row is inserted.

With small imports this will work fine, but imagine you had 100,000 rows in your CSV. This would result in 200,000 queries, which is going to take forever.

Using Upserts

When using upserts a single query is made containing all the rows. This query includes on duplicate key update on MySQL and on conflict ... do update set on Postgres which instructs the database to update records if they already exist in the database.

It’s important to note that you must have either a primary or unique index on the column you are upserting so the database. If you forget to add the index you’ll get an error.

Obviously, making a single query is much more efficient and lets the database internally compute duplicate rows (which is very quick since you have an index on the column).

It’s also a good idea to chunk these queries into blocks, especially if your queries are inserting/updating lots of data. If you don’t do this, you may hit query size limits on some databases.

collect($csvContacts)
    ->map(function (array $row) {
        return Arr::only($row, ['email', 'name', 'address']);
    })
    ->chunk(1000)
    ->each(function (Collection $chunk) {
        Contact::upsert($chunk, 'email');
    });

Additional Reading

Documentation
Framework PR

programming

via Laravel News Links https://ift.tt/2dvygAJ

October 25, 2020 at 08:18PM

Integrate PayPal Plus on Laravel 8

Integrate PayPal Plus on Laravel 8

https://ift.tt/3orELaQ


If you are interested to integrate PayPal plus with Laravel 8, this tutorial will help you a lot. Today, I will guide you on how to integrate PayPal Plus with Laravel. Let’s get started.

Requirements

PayPal Account

You need to have a Paypal account in order to process.

Create Sandbox Accounts.

Navigate to Sandbox > Accounts then click on the blue color Create Account button.
On the popup box, set

  • Account Type: Business
  • Country: Brazil

Create Sandbox App

Navigate to Sandbox > My Apps & Credentials click on the blue color Create App button.
In the form,

  • Set an app name. It can be anything you want.
  • Choose newly created sandbox business email.

Get APP Credentials

Once you have done successfully, navigate to the newly created app. You should able to see Client ID and Client Secret for the app.

Generate Fake Credit Card

Navigate to Mock > Credit Card Generator and then create a credit card. It will give you a card number, expired date and CVV.

Laravel Integration

Let’s dig into laravel application now.

Step 1: Define Routes:

Go to web.php file and define a GET route /paypal.


Route::get('paypal', [PayPalController::class, 'index']);

Step 2: Create Controller:

Now let’s create a controller called PayPalController.

php artisan make:controller PayPalController

In the index() method, first, let’s send a request for creating the payment request as described in the documentation

    public function index()
    {
        $clientId = "PayPal Private Key";
        $secret = "PayPal Public Key";

        // Get Bearer Token
        $ch = curl_init();

        curl_setopt($ch, CURLOPT_URL, "https://api.sandbox.paypal.com/v1/oauth2/token");
        curl_setopt($ch, CURLOPT_HEADER, false);
        curl_setopt($ch, CURLOPT_SSL_VERIFYPEER, false);
        curl_setopt($ch, CURLOPT_SSLVERSION , 6);
        curl_setopt($ch, CURLOPT_POST, true);
        curl_setopt($ch, CURLOPT_RETURNTRANSFER, true); 
        curl_setopt($ch, CURLOPT_USERPWD, $clientId.":".$secret);
        curl_setopt($ch, CURLOPT_POSTFIELDS, "grant_type=client_credentials");

        $token = json_decode(curl_exec($ch), true);
        $bearerToken = $token['access_token'];

        $total = 121;

        $postData = [
            'intent' => 'sale',
            'payer' => [
                'payment_method' => 'paypal',
            ],
                'transactions' => [
                    0 => [
                        'amount' => [
                            'currency' => 'BRL',
                            'total' => $total,
                            'details' => [
                                'shipping' => '0',
                                'subtotal' => $total,
                                'shipping_discount' => '0.00',
                                'insurance' => '0.00',
                                'handling_fee' => '0.00',
                                'tax' => '0.00',
                            ],
                        ],
                    'description' => 'This is the payment transaction description',
                    'payment_options' => [
                        'allowed_payment_method' => 'IMMEDIATE_PAY',
                    ],
                    'item_list' => [
                        'shipping_address' => [
                            'recipient_name' => 'PP Plus Recipient',
                            'line1' => 'Gregório Rolim de Oliveira, 42',
                            'line2' => 'JD Serrano II',
                            'city' => 'Votorantim',
                            'country_code' => 'BR',
                            'postal_code' => '18117-134',
                            'state' => 'São Paulo',
                            'phone' => '0800-761-0880',
                        ],
                        'items' => [
                            0 => [
                                'name' => 'handbag',
                                'description' => 'red diamond',
                                'quantity' => '1',
                                'price' => $total,
                                'tax' => '0',
                                'sku' => 'product34',
                                'currency' => 'BRL',
                            ],
                        ],
                    ],
                ],
            ],
            'redirect_urls' => [
                'return_url' => 'https://example.com/return',
                'cancel_url' => 'https://example.com/cancel',
            ],
        ];

        // Send request for Permission
        $ch = curl_init();

        curl_setopt($ch, CURLOPT_URL, 'https://api.sandbox.paypal.com/v1/payments/payment');
        curl_setopt($ch, CURLOPT_RETURNTRANSFER, 1);
        curl_setopt($ch, CURLOPT_POST, 1);
        curl_setopt($ch, CURLOPT_POSTFIELDS, json_encode($postData));

        $headers = array();
        $headers[] = 'Content-Type: application/json';
        $headers[] = 'Authorization: Bearer ' . $bearerToken;
        curl_setopt($ch, CURLOPT_HTTPHEADER, $headers);

        $result = curl_exec($ch);
        if (curl_errno($ch)) {
            echo 'Error:' . curl_error($ch);
        }

       $paymentData = json_decode($result, true);

       return view("paypal-plus")
            ->with('paymentData', $paymentData);
    }

Create a view page

Now, let’s create a view page called resources/views/paypal-plus.blade.php for rendering the paypal form.

    <script src="https://www.paypalobjects.com/webstatic/ppplusdcc/ppplusdcc.min.js" type="text/javascript">
    </script>

    <div id="ppplus"></div>

    <input type="hidden" id="paypal_approval_url" value="">
    <input type="hidden" id="paypal_payment_id" value="">

    <script type="application/javascript">
        var approvalUrl = document.getElementById('paypal_approval_url').value;
        var paymentId = document.getElementById('paypal_payment_id').value;

        var ppp = PAYPAL.apps.PPP({
            "approvalUrl": approvalUrl,
            "placeholder": "ppplus",
            "mode": "sandbox",
            "payerEmail": "[email protected]",
            "payerFirstName": "Thouhedul",
            "payerLastName": "Islam",
            "payerTaxId": "424.159.708-40",
            "country": "BR",
            "collectBillingAddress": false,
            onContinue: function (rememberedCards, payerId, token, term) {
                window.location = 'http://127.0.0.1:8000/paypal-approval?rememberedCards='
                    + rememberedCards 
                    + '&payerId=' + payerId
                    + '&token=' + token
                    + '&term=' + term
                    + '&paymentId=' + paymentId;
            },
        });
    </script>

    <button
        type="submit"
        id="continueButton"
        onclick="ppp.doContinue(); return false;"> Checkout
    </button>

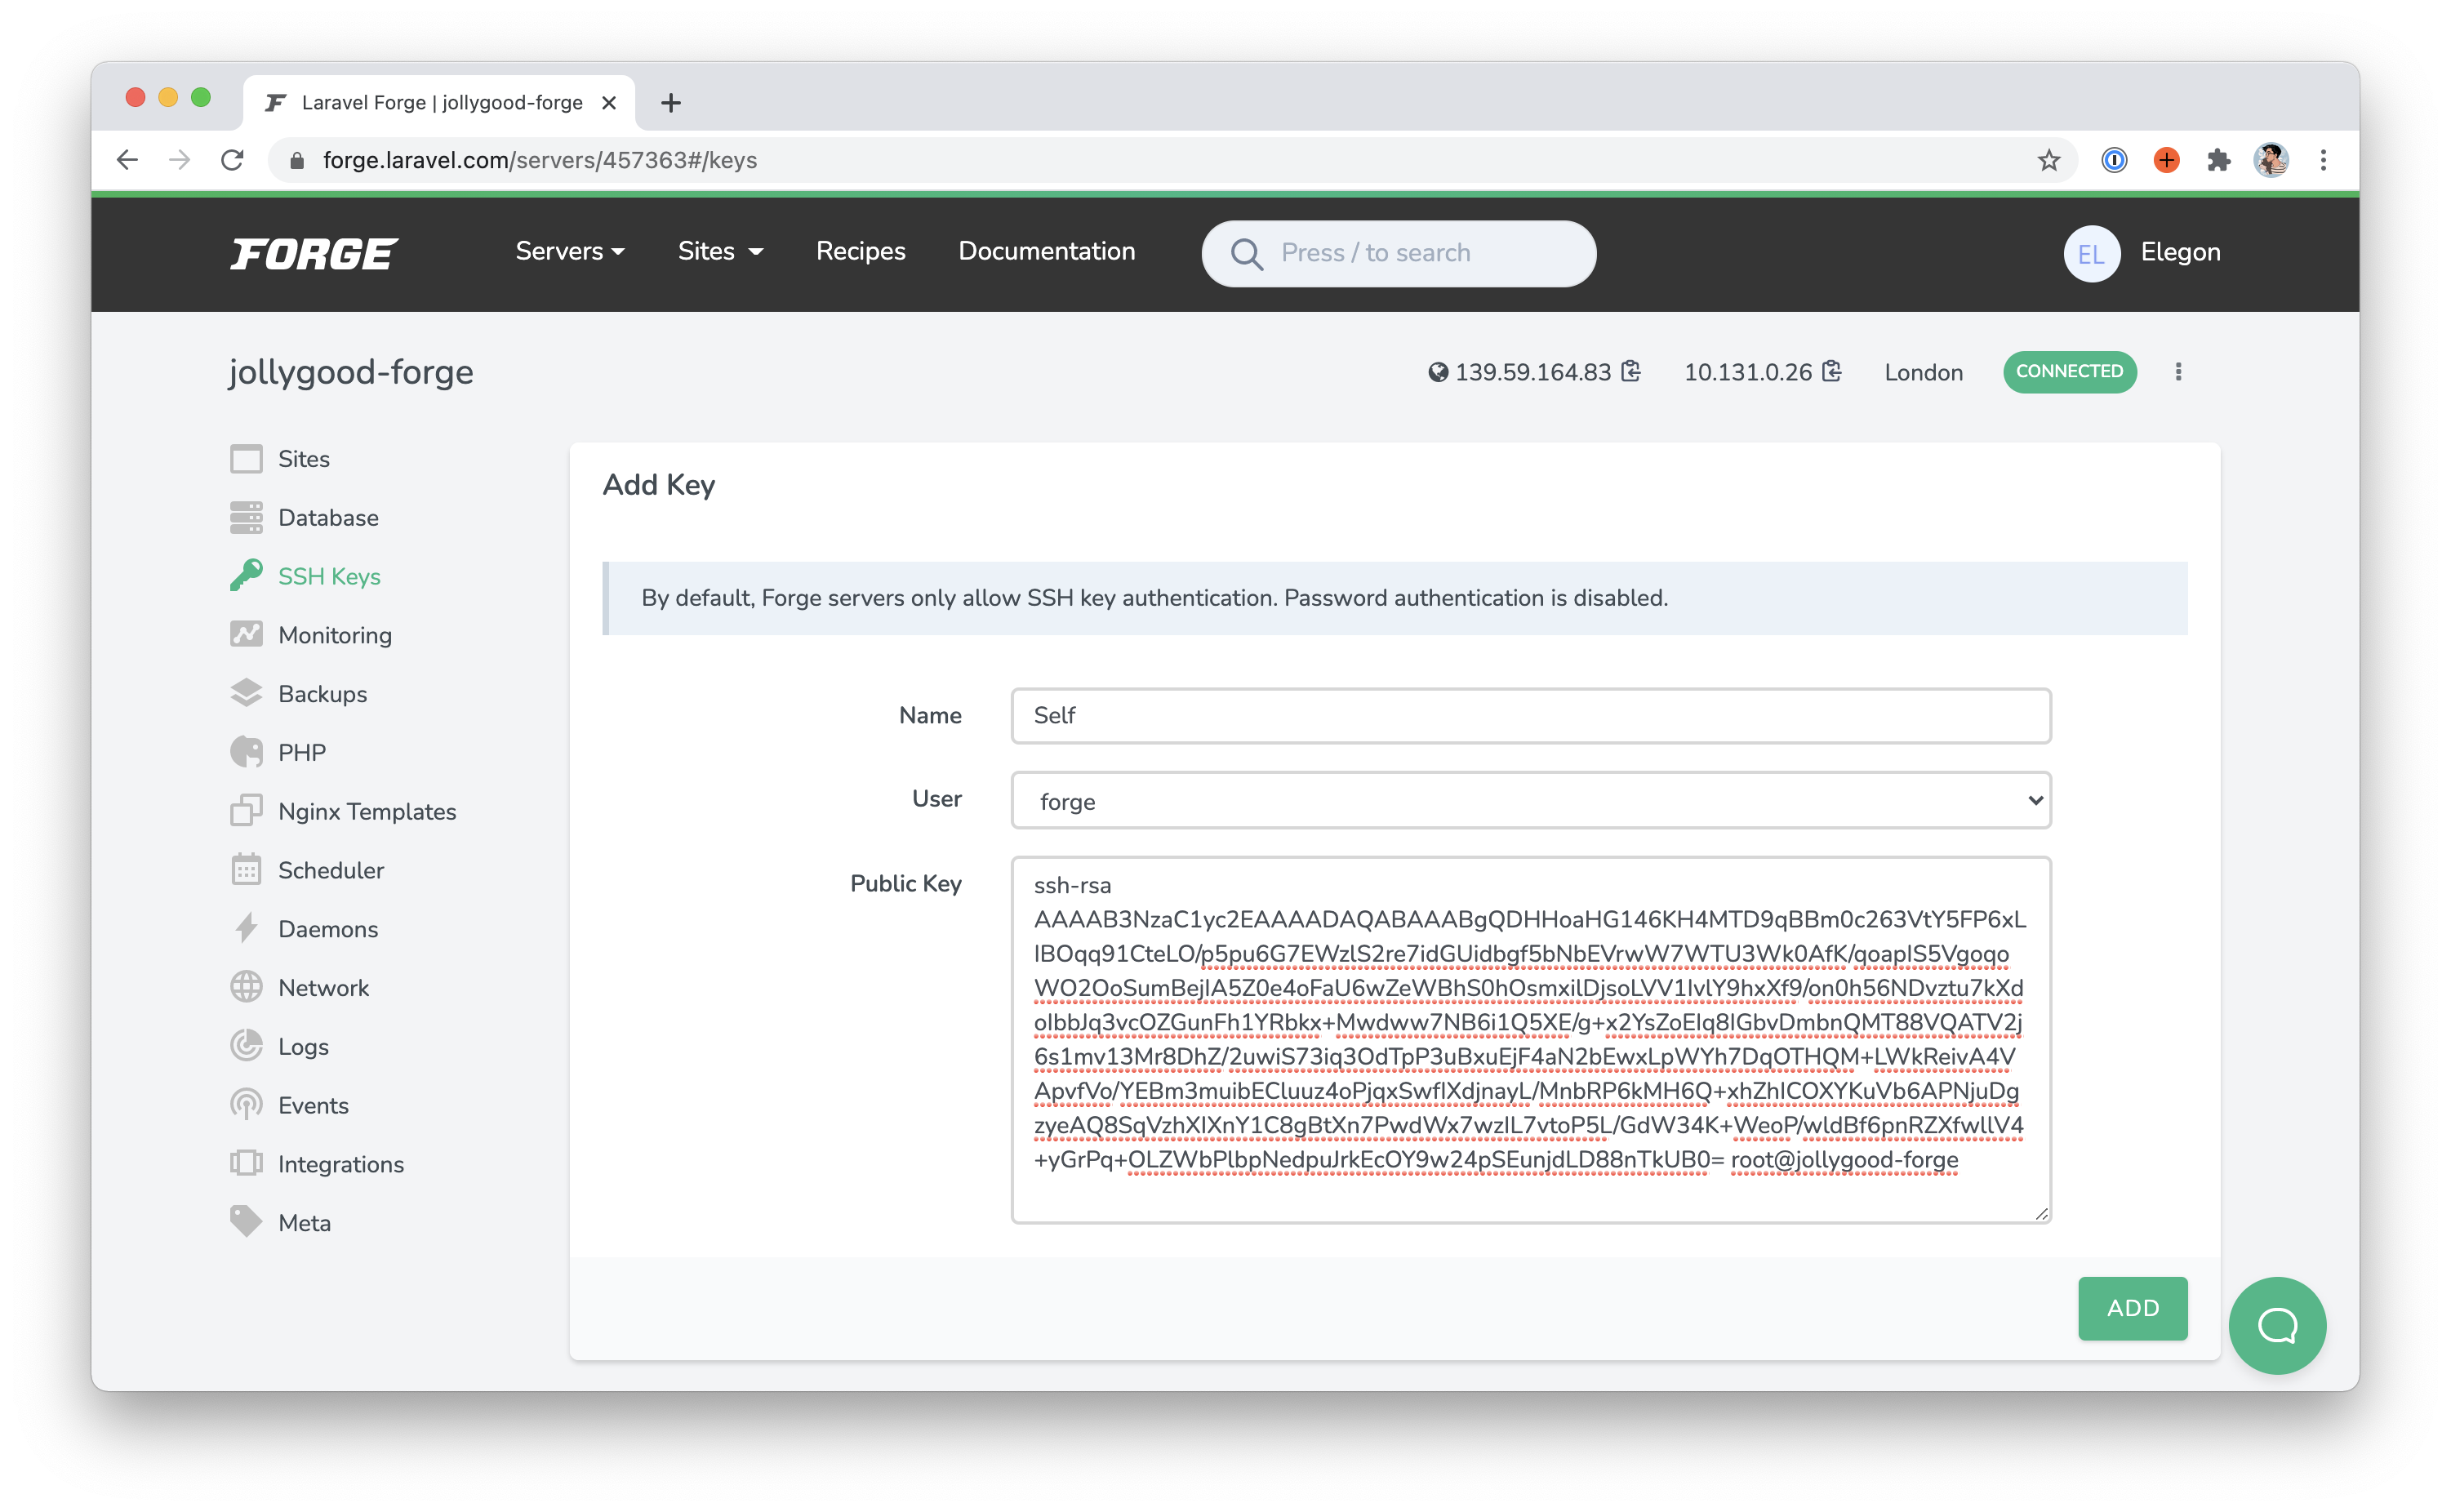
Note here, I have set a redirect location once user submit the form. So, let’s define a new route for that.

Define route for redirect location

Route::get('paypal-approval', [PayPalController::class, 'post']);

Create Post Method

To process, let’s create a method called post().
$clientId = “PayPal Public ID”;
$secret = “PayPal Private ID”;

    public function post()
    {
        $payerId = request()->payerId;
        $rememberedCards = request()->rememberedCards;
        $token = request()->token;
        $paymentId = request()->paymentId;

        $clientId = "PayPal Private Key";
        $secret = "PayPal Public Key";

        // Get Bearer Token
        $btCh = curl_init();

        curl_setopt($btCh, CURLOPT_URL, "https://api.sandbox.paypal.com/v1/oauth2/token");
        curl_setopt($btCh, CURLOPT_HEADER, false);
        curl_setopt($btCh, CURLOPT_SSL_VERIFYPEER, false);
        curl_setopt($btCh, CURLOPT_SSLVERSION , 6);
        curl_setopt($btCh, CURLOPT_POST, true);
        curl_setopt($btCh, CURLOPT_RETURNTRANSFER, true); 
        curl_setopt($btCh, CURLOPT_USERPWD, $clientId.":".$secret);
        curl_setopt($btCh, CURLOPT_POSTFIELDS, "grant_type=client_credentials");

        $token = json_decode(curl_exec($btCh), true);
        $bearerToken = $token['access_token'];

        $ch = curl_init();
        curl_setopt($ch, CURLOPT_URL, "https://api.sandbox.paypal.com/v1/payments/payment/$paymentId/execute");
        curl_setopt($ch, CURLOPT_RETURNTRANSFER, 1);
        curl_setopt($ch, CURLOPT_POST, 1);
        curl_setopt($ch, CURLOPT_POSTFIELDS, "{\n  \"payer_id\": \"$payerId\"\n}");

        $headers = array();
        $headers[] = 'Content-Type: application/json';
        $headers[] = 'Authorization: Bearer ' . $bearerToken;
        curl_setopt($ch, CURLOPT_HTTPHEADER, $headers);

        $result = curl_exec($ch);

        if (curl_errno($ch)) {
            echo 'Error:' . curl_error($ch);
        }

        curl_close($ch);

        return $approvedData = json_decode($result, true);
    }

Testing

Now let’s test the fake card that we have generated earlier. Now, you have to put card number, expired date, CVV and put any name. Once done, submit the form.

If everything goes smoothly, you will get some data like this. Where you will get "state": "approved" and should have "id": "PAYID-L6HGX3A4MT388022P233113E".

BTW, if you need to show any thank you page, then you can do operation based on state and id on the condition.

{
    "id": "PAYID-L6HGX3A4MT388022P233113E",
    "intent": "sale",
    "state": "approved",
    "cart": "66099532VT8552054",
    "payer": {
        "payment_method": "paypal",
        "status": "UNVERIFIED",
        "payer_info": {
            "email": "[email protected]",
            "first_name": "John",
            "last_name": "Doe",
            "payer_id": "CC3S9AQAUZH62",
            "shipping_address": {
                "recipient_name": "PP Plus Recipient",
                "line1": "Gregório Rolim de Oliveira, 42",
                "line2": "JD Serrano II",
                "city": "Votorantim",
                "state": "São Paulo",
                "postal_code": "18117-134",
                "country_code": "BR",
                "normalization_status": "UNKNOWN"
                },
            "tax_id_type": "BR_CPF",
            "tax_id": "42415970840",
            "country_code": "BR"
            }
        },
        ...

Hope this post will be helpful for you.

programming

via Laravel News Links https://ift.tt/2dvygAJ

October 25, 2020 at 08:18PM

Composer 2.0 is now released with performance improvements

Composer 2.0 is now released with performance improvements

https://ift.tt/37FgoAu

Composer 2.0 is now released and it comes with many changes and performance improvements.

The post Composer 2.0 is now released with performance improvements appeared first on Laravel News.


Join the Laravel Newsletter to get Laravel articles like this directly in your inbox.

programming

via Laravel News https://ift.tt/14pzU0d

October 24, 2020 at 04:52PM

How to force restart your iPhone 12 or iPhone 12 Pro

How to force restart your iPhone 12 or iPhone 12 Pro

https://ift.tt/2FTtwqa


The iPhone 12 and iPhone 12 Pro may be high performance, but that won’t stop the occasional need to force restart your mobile device. Here’s the steps you need to reboot your iPhone 12 if a graceful shutdown isn’t possible.

While it is entirely possible for some iPhone users to never need to turn off or restart their device at all, the vast majority of users will at some point need to do so. Maybe an app hung in such a way that iOS can’t handle, or the iPhone stops responding to touches and individual button presses.

In such situations, the best course of action is to restart your iPhone, but even that may not be immediately possible, such as if the screen isn’t responding to touch input, preventing you from performing the final swipe to power it off. Even in this scenario, you can still forcefully restart the device.

This guide will take you through the usual way of turning off your iPhone, and then to do the forced restart. It is usually advisable to go for the first method, but the second is also useful as it is a generally quicker process to reboot, and far more likely to work.

These methods cover practically all models that use Face ID as their biometric authentication system, from the iPhone X to modern models including the iPhone 12 and iPhone 12 Pro. It can even be used on iPad models that use Face ID, such as the current-generation iPad Pro, with the force restart method even able to be used on the iPhone 8 and iPhone 8 Plus.

Most earlier models have different techniques to force a restart, typically relying on a press of the Home button. Its removal forced Apple to come up with a newer procedure for the iPhone X, which it has continued to use ever since.

How to turn the iPhone 12 off then on again

  • Hold down both the volume up and side buttons at the same time for a few seconds.
  • Press the on-screen power symbol at the top of the screen and slide it to the right.
  • To turn it back on, hold the side button until the Apple logo appears.

This method performs a graceful shutdown of the iPhone, followed by the standard turn-on procedure. This is the method you should be trying to accomplish first.

In the event that you cannot use the iPhone’s touchscreen, step two of that list will not be possible to complete. This is why there is a method to forcefully restart the device.

How to force restart the iPhone 12 and iPhone 12 Pro

  • Press and very quickly release the volume up button, followed by the volume down button.
  • Press and hold down the side button.
  • When the Apple logo appears, release the side button.

While this method will attempt to restart your iPhone, it may not necessarily fix the problem. Apple’s support pages offer further advice if the iPhone won’t turn back on, including how to restore the device in more serious cases.

Forcing a restart on iPhone 12 Pro

As a word of warning, make sure to pay attention when you are restarting your iPhone, and follow all instructions properly. This is specifically the case if you confuse the two sets of instructions and end up holding down the volume up and side buttons for a prolonged period of time.

Doing so will start a five-second countdown for the Emergency SOS function, where it will count down from five and vibrate for each number, as the Emergency SOS slider fills up. On reaching 0 while still holding both buttons down, the iPhone will consider the bar full and dial the emergency services, which may prompt the police or an ambulance visit to your location.

Just remember to pay attention and to release the buttons if the vibration and countdown starts.

macintosh

via AppleInsider https://ift.tt/3dGGYcl

October 23, 2020 at 02:33PM

How to Customize Your iPhone Home Screen

How to Customize Your iPhone Home Screen

https://ift.tt/2IX0reB


At long last, iPhone owners can finally customize their home screens with widgets. (Android users, feel free to skip—y’all have had this feature for years.) After you install iOS 14, you can deck out your iPhone with fresh icons, wallpaper, and widgets for a fully personalized look. Here’s how to get started.

First, you’ll need some new app icons. You can find some online by searching for iPhone icon packs, or by visiting a site like icons8.com. Save the icons to your camera roll.

Then head on over to the App Store and download Widgetsmith, which lets you change your iPhone’s fonts and colors, and Apple’s Shortcuts app (if you don’t already have it), which is where things start to get a little…. complicated.

You have to create shortcuts from your new app icons to the apps themselves. Within the Shortcuts app, hit the plus sign in the top right corner. Then tap Add Action and select Scripting. From there, choose the Open App command, then pick the app you want to open. Hit the three dots and select Add to Home Screen. From here, write the name of the app and hit the icon picture to the left. Select the Choose Photo option to open up your Camera Roll and select that icon you chose for this particular app in step one. Unfortunately, you have to repeat this process for every new app icon. To get rid of the old app icons, long-press your home screen to send them to the App Library.

Creating shortcuts from new icons to apps will slow down app loading times and also prevent you from viewing notification badges. And, as you can see from the video above, this process is time-consuming, to say the least. But if you want your iPhone to reflect your true spirit, it might be worth the hours it takes to fully trick out your home screen. Don’t say we didn’t warn you!

geeky,Tech

via Gizmodo https://gizmodo.com

October 23, 2020 at 03:51PM