Comic for September 17, 2020
https://ift.tt/3iDp3WX
fun
via Dilbert Daily Strip http://dilbert.com
September 17, 2020 at 01:17AM
Just another WordPress site
Comic for September 17, 2020
https://ift.tt/3iDp3WX
fun
via Dilbert Daily Strip http://dilbert.com
September 17, 2020 at 01:17AM
Nail Holder Pliers
https://ift.tt/35OG8JJ
| Buy
Never smash a finger again when hammering in nails. These safety pliers have unique grooves designed for steadying various nail sizes, so you can get them started without having to hold them between your fingertips. They’re made from sturdy plastic and lay flat against either horizontal or vertical surfaces.
fun
via The Awesomer https://theawesomer.com
September 17, 2020 at 10:15AM
Biden Attempts To Appeal To Hispanics By Performing Authentic Mexican Hat Dance While Firing Pistols Into The Air
https://ift.tt/33vVrEq
Biden Attempts To Appeal To Hispanics By Performing Authentic Mexican Hat Dance While Firing Pistols Into The Air
KISSIMMEE, FL—Biden made a campaign stop in Florida this week to celebrate Hispanic Heritage Month and reach out to his favorite voters: the Hispanics. In an effort to appeal to the voters, he performed a cultural celebration of Hispanic heritage by dancing in a sombrero and fake mustache, eating a burrito, and firing a pistola in the air.
“Hey there, fellow Latinx!” Biden said. “Before I begin, I would like to show you my Mexican celebration dance which I will perform to the tune of ‘La Cucaracha,’ Enjoy!”
Biden then turned to a cassette player on the podium and pressed play. As the well known Spanish folk song began to play, Biden performed a dance in his traditional Mexican clothing he had recently purchased at a Spirit Halloween Store. Halfway through the performance, he yelled out, “You kids ain’t seen nothing yet! Watch this!”
Biden then began to hop around and shoot an old fashioned Mexican pistola into the air. When he was finished, he sat down on the stage and ate a giant burrito for about 20 minutes.
When he was finished, the hall erupted in applause as the audience of several individuals stood on their feet to cheer the performance.
Biden knew he had nailed the performance, and that the Hispanic vote was in the bag. He was put back on ice in the basement until he is needed to go win over other ethnic groups.
After creating The Babylon Bee in six literal days, Adam Ford rested. But he rests no longer. Introducing Not the Bee — a brand new humor-based news site run by Adam himself. It’s loaded with funny content and all the best features of a social network. And the best part? Everyone with a subscription to The Bee gets full access at no extra cost.
fun
via The Babylon Bee https://babylonbee.com
September 16, 2020 at 06:32PM
How it Works
https://ift.tt/2ZJ1jZO
To get started, let’s review the basics of Livewire and build the obligatory counter example. Next, we’ll take a brief look at the request/response lifecycle of a Livewire component.
View the source code for this episode on GitHub.
programming
via Laracasts https://ift.tt/1eZ1zac
September 16, 2020 at 10:08AM
Basic Data Analysis with MySQL Shell Python mode
https://ift.tt/2ZFyT2L
I recently watched a fantastic Python Pandas library tutorial series on YouTube. Without a doubt, Pandas is great for all sorts of data stuff. On the same token, MySQL Shell in Python mode is quite powerful in the sense that Python and the MySQL Shell (version >= 8.0) are somewhat united in the same environment. Although Pandas is in a league all its own when it comes to data analysis, between the power of MySQL and Python, we can also perform some basic analysis easily in MySQL Shell Python mode. In this blog post, I will cover some basic data analysis using Python mode in the MySQL Shell. Continue reading to see examples…
OS, Software, and DB used:
If you enjoy the content written here, by all means, share this blog and your favorite post(s) with others who may benefit from or like it as well. Since coffee is my favorite drink, you can even buy me one if you would like!
You can download the Stack Overflow Developer Survey Results data set used in this post for your own exploration if you would like.
For starters, we use the available global db
object and get a connection to an existing table in the database/schema by passing in a name to the get_table()
method:
1
|
MySQL localhost:33060+ ssl learning Py > data = db.get_table(‘so_data’)
|
I store the ‘so_data’ table in a shell.Object
variable named ‘data’. We can call the count()
method against this object and get a count of the total rows in the table:
1
2 |
MySQL localhost:33060+ ssl learning Py > data.count()
88883 |
Related: Read the post, Dynamic MySQL CREATE TABLE statement with pandas and pyodbc, I wrote and see how I dynamically created the ‘so_data’ table and populated it with accompanying data.
Calling the select()
method on the ‘data’ object, I can essentially retrieve all rows and columns from the table. However, at this time, I am only interested in the actual column names of the table. I’ll store this result in a ‘rows’ object variable:
1
|
MySQL localhost:33060+ ssl learning Py > rows = data.select().execute()
|
With the ‘rows’ variable, I call the get_column_names()
method on it and am returned a Python list
of all the table’s column names:
1
2 3 4 5 6 7 8 9 10 11 12 13 |
MySQL localhost:33060+ ssl learning Py > cols = rows.get_column_names()
MySQL localhost:33060+ ssl learning Py > cols [ "Respondent", "MainBranch", "Hobbyist", "OpenSourcer", "OpenSource", "Employment", "Country", "Student", "EdLevel", "UndergradMajor", "EduOther", "OrgSize", "DevType", "YearsCode", "Age1stCode", "YearsCodePro", "CareerSat", "JobSat", "MgrIdiot", "MgrMoney", "MgrWant", "JobSeek", "LastHireDate", "LastInt", "FizzBuzz", "JobFactors", "ResumeUpdate", "CurrencySymbol", "CurrencyDesc", "CompTotal", "CompFreq", "ConvertedComp", "WorkWeekHrs", "WorkPlan", "WorkChallenge", "WorkRemote", "WorkLoc", "ImpSyn", "CodeRev", "CodeRevHrs", "UnitTests", "PurchaseHow", "PurchaseWhat", "LanguageWorkedWith", "LanguageDesireNextYear", "DatabaseWorkedWith","DatabaseDesireNextYear", "PlatformWorkedWith", "PlatformDesireNextYear", "WebFrameWorkedWith", "WebFrameDesireNextYear", "MiscTechWorkedWith", "MiscTechDesireNextYear", "DevEnviron", "OpSys", "Containers", "BlockchainOrg", "BlockchainIs", "BetterLife", "ITperson", "OffOn", "SocialMedia", "Extraversion", "ScreenName", "SOVisit1st", "SOVisitFreq", "SOVisitTo", "SOFindAnswer", "SOTimeSaved", "SOHowMuchTime", "SOAccount", "SOPartFreq", "SOJobs", "EntTeams", "SOComm", "WelcomeChange", "SONewContent", "Age", "Gender", "Trans", "Sexuality", "Ethnicity", "Dependents", "SurveyLength", "SurveyEase" ] |
As you can see, there are quite a lot of columns in this table. Instead of counting them myself, I use the Python len()
method and get a count of the ‘cols’ list
object:
1
2 |
MySQL localhost:33060+ ssl learning Py > len(cols)
85 |
Summary: We can use combinations of MySQL Shell methods: get_table()
, count()
, select()
, get_column_names()
and the Python len()
method and determine pertinent table meta-data information.
We learned in the previous section that table ‘so_data’ has over 80k rows of data, along with 85 total columns. That alone is nothing to scoff at. Instead of loading up our screens with many many rows and columns, I’ll utilize several of the available MySQL Shell methods, choosing certain columns and constraining the number of returned rows (if any).
The select()
method can accept a list of columns names, separated by commas. In this next query, I specify just the ‘SocialMedia’ column and limit the total number of rows to 10, using the limit()
method:
1
2 3 4 5 6 7 8 9 10 11 12 13 14 15 16 |
MySQL localhost:33060+ ssl learning Py > data.select(‘SocialMedia’).limit(10).execute()
+————-+ | SocialMedia | +————-+ | Twitter | | Instagram | | Reddit | | Reddit | | Facebook | | YouTube | | YouTube | | YouTube | | Twitter | | YouTube | +————-+ 10 rows in set (0.0010 sec) |
Pro Tip: The limit()
method parameter is the number of rows you want to be returned from theselect()
method.
While the above query does provide good information, suppose we need to know of all the unique values in the ‘SocialMedia’ column. We can easily include the DISTINCT
keyword in the call to select()
with the desired column name:
1
2 3 4 5 6 7 8 9 10 11 12 13 14 15 16 17 18 19 20 21 |
MySQL localhost:33060+ ssl learning Py > data.select(‘DISTINCT (SocialMedia)’).execute()
+————————–+ | SocialMedia | +————————–+ | Twitter | | Instagram | | Reddit | | Facebook | | YouTube | | NA | | VK ВКонта́кте | | WhatsApp | | I don”t use social media| | WeChat | | LinkedIn | | Snapchat | | Weibo | | Hello | | Youku Tudou | +————————–+ 15 rows in set (0.2199 sec) |
Based on the returned query results, we can see there are 15 unique values for the ‘SocialMedia’ column.
Summary: The select()
method is capable of choosing either all table columns or individual columns depending on your needs and the column names supplied as parameters. If you need specific columns in your query results, provide those columns separated by commas as parameters to select()
. select()
also allows MySQL keywords to be included with columns should you need any of them as in the example query using DISTINCT
.
On the other hand, constrain the number of output rows returned from any query using the limit()
method by specifying the number of desired rows using limit()
‘s number parameter.
In the previous section, we executed a query using select()
and DISTINCT
, retrieving the unique values in the ‘SocialMedia’ column. We have these results from that query:
1
2 3 4 5 6 7 8 9 10 11 12 13 14 15 16 17 18 19 20 21 |
MySQL localhost:33060+ ssl learning Py > data.select(‘DISTINCT (SocialMedia)’).execute()
+————————–+ | SocialMedia | +————————–+ | Twitter | | Instagram | | Reddit | | Facebook | | YouTube | | NA | | VK ВКонта́кте | | WhatsApp | | I don”t use social media| | WeChat | | LinkedIn | | Snapchat | | Weibo | | Hello | | Youku Tudou | +————————–+ 15 rows in set (0.2199 sec) |
What is the total number of non-NULL
rows for each unique ‘SocialMedia’ column value in the ‘so_data’ table? Can we find out with MySQL Shell Python mode? Absolutely.
We can use the COUNT()
aggregate function on the ‘SocialMedia’ column right in the select()
method. However, we need a GROUP BY
clause in the query as well. MySQL Shell has us covered with a same-named method, group_by()
.
In this query, I’ll retrieve a count of the actual values in the ‘SocialMedia’ column (ignoring NULL
‘s in that count) and group those counts by the ‘SocialMedia’ column:
1
2 3 4 5 6 7 8 9 10 11 12 13 14 15 16 17 18 19 20 21 |
MySQL localhost:33060+ ssl learning Py > data.select(‘SocialMedia’, ‘COUNT(SocialMedia) AS num_medias’).group_by(‘SocialMedia’).execute()
+————————–+————+ | SocialMedia | num_medias | +————————–+————+ | Twitter | 11398 | | Instagram | 6261 | | Reddit | 14374 | | Facebook | 13178 | | YouTube | 13830 | | NA | 4446 | | VK ВКонта́кте | 603 | | WhatsApp | 13347 | | I don”t use social media| 5554 | | WeChat | 667 | | LinkedIn | 4501 | | Snapchat | 628 | | Weibo | 56 | | Hello | 19 | | Youku Tudou | 21 | +————————–+————+ 15 rows in set (0.2566 sec) |
Summary: We can easily query using aggregate functions in the select()
method and group on appropriate columns with the group_by()
method.
The WHERE
clause is responsible for filtering out which rows are returned from a query by way of some predicate test. Without a WHERE
clause, all rows are returned from a SELECT
query. Maybe you want that. Maybe not. If not, use WHERE
to filter rows according to your needs.
The WHERE
clause is not limited to only the SELECT
statement, as it is highly important in the DML commands UPDATE
and DELETE
. Without a WHERE
clause targeting a specific row or rows, all rows are affected – in the case of DML (UPDATE
and DELETE
) – or returned from a SELECT
query. MySQL Shell has a where()
method we can use to filter the rows in a select()
query just the same as in regular MySQL (or any SQL dialect).
It is generally a good practice not to include potential user input values into our query expressions. Most programming languages have some sort of binding mechanism in place that imposes a sort of parameterized query and/or a prepared statement. Using parameterized queries and prepared statements, we can greatly reduce the risk of SQL Injection attacks.
MySQL Shell has a bind()
method we can use instead of directly concatenating values into the query strings of the where()
predicate test(s). bind()
accepts named parameters (which is what I will use in the examples below) or the universal ‘?’ style of parameter binding.
Readers may be interested in the ‘DatabaseWorkedWith’ column of the ‘so_data’ table so let’s filter that column by rows where the ‘SocialMedia’ column is ‘Hello’ using where()
and bind()
:
1
2 3 4 5 6 7 8 9 10 11 12 13 14 15 16 17 18 19 20 21 22 23 24 25 26 |
MySQL localhost:33060+ ssl learning Py > qry_cols = ‘DatabaseWorkedWith’
MySQL localhost:33060+ ssl learning Py > data.select(qry_cols).where(‘SocialMedia = :soc_media’).bind(‘soc_media’, ‘Hello’).execute() +—————————————————————————————————————————————–+ | DatabaseWorkedWith | +—————————————————————————————————————————————–+ | Microsoft SQL Server;MySQL;SQLite | | Cassandra | | MySQL;Redis | | Microsoft SQL Server;MySQL | | NA | | NA | | Cassandra;Elasticsearch;Microsoft SQL Server;Oracle;SQLite | | PostgreSQL | | Cassandra | | NA | | NA | | DynamoDB | | Cassandra | | MongoDB;MySQL;Oracle;Other(s): | | SQLite | | NA | | NA | | NA | | Cassandra;Couchbase;DynamoDB;Elasticsearch;Firebase;MariaDB;MongoDB;Microsoft SQL Server;MySQL;Oracle;PostgreSQL;Redis;SQLite;Other(s): | +—————————————————————————————————————————————–+ 19 rows in set (0.3925 sec) |
In this query, I use bind()
and include a matching named placeholder (minus the colon : prefix) and corresponding value for what is specified in the where()
method predicate. For example, in the where()
method I used the ‘:soc_media’ named parameter and represented it in bind()
with ‘soc_media’ and the actual accompanying value, ‘Hello’. Pretty straightforward.
Oftentimes, you need to filter a SELECT
query by more than one column or expression using multiple predicates. The MySQL Shell where()
method easily accepts multiple predicate conditions just as a regular MySQL WHERE
clause would using the AND
and OR
logical operators.
But, with multiple where()
predicates, that also means multiple parameterized values right? Yes, it does.
However, multiple calls to bind()
can be chained one after another, for each of the needed bound values. See the following query for a better understanding:
1
2 3 4 5 6 7 8 9 10 11 12 13 14 15 16 17 18 |
MySQL localhost:33060+ ssl learning Py > data.select(qry_cols).where(‘SocialMedia = :soc_media AND DatabaseWorkedWith <> :na’).bind(‘soc_media’, ‘Hello’).bind(‘na’, ‘NA’).execute()
+—————————————————————————————————————————————–+ | DatabaseWorkedWith | +—————————————————————————————————————————————–+ | Microsoft SQL Server;MySQL;SQLite | | Cassandra | | MySQL;Redis | | Microsoft SQL Server;MySQL | | Cassandra;Elasticsearch;Microsoft SQL Server;Oracle;SQLite | | PostgreSQL | | Cassandra | | DynamoDB | | Cassandra | | MongoDB;MySQL;Oracle;Other(s): | | SQLite | | Cassandra;Couchbase;DynamoDB;Elasticsearch;Firebase;MariaDB;MongoDB;Microsoft SQL Server;MySQL;Oracle;PostgreSQL;Redis;SQLite;Other(s): | +—————————————————————————————————————————————–+ 12 rows in set (0.3308 sec) |
In the above query, we filtered using where()
on columns ‘SocialMedia’ and ‘DatabaseWorkedWith’. For each of the columns, we also include a separate call to bind()
.
The first bind()
method call includes the value ‘Hello’ for the ‘SocialMedia’ column named parameter ‘:soc_media’ and the second bind()
method call has the matching parameters for the ‘DatabaseWorkedWith’ with column and the ‘NA’ value for the ‘:na’ placeholder.
Summary: MySQL Shell provides powerful where()
and bind()
methods for row-filtering needs.
Be sure and check out, X DevAPI User Guide for MySQL Shell in Python Mode, for in-depth information on many of the topics covered in today’s post along with much much more.
I have written several blog posts about MySQL Shell Python mode so feel free to check any of those that interest you:
MySQL Shell Python mode is jam-packed with a ton of goodies and features. It opens up new options for working with data in the MySQL ecosystem. If you have not tried MySQL in Python mode, give it a shot. I am quite sure you will really like what you see.
Like what you have read? See anything incorrect? Please comment below and thanks for reading!!!
Thank you for taking the time to read this post. I truly hope you discovered something interesting and enlightening. Please share your findings here, with someone else you know who would get the same value out of it as well.
Visit the Portfolio-Projects page to see blog post/technical writing I have completed for clients.
To receive email notifications (Never Spam) from this blog (“Digital Owl’s Prose”) for the latest blog posts as they are published, please subscribe (of your own volition) by clicking the ‘Click To Subscribe!’ button in the sidebar on the homepage! (Feel free at any time to review the Digital Owl’s Prose Privacy Policy Page for any questions you may have about: email updates, opt-in, opt-out, contact forms, etc…)
Be sure and visit the “Best Of” page for a collection of my best blog posts.
Josh Otwell has a passion to study and grow as a SQL Developer and blogger. Other favorite activities find him with his nose buried in a good book, article, or the Linux command line. Among those, he shares a love of tabletop RPG games, reading fantasy novels, and spending time with his wife and two daughters.
Disclaimer: The examples presented in this post are hypothetical ideas of how to achieve similar types of results. They are not the utmost best solution(s). The majority, if not all, of the examples provided, is performed on a personal development/learning workstation-environment and should not be considered production quality or ready. Your particular goals and needs may vary. Use those practices that best benefit your needs and goals. Opinions are my own.
The post Basic Data Analysis with MySQL Shell Python mode appeared first on Digital Owl’s Prose.
technology
via Planet MySQL https://ift.tt/2iO8Ob8
September 16, 2020 at 12:02PM
Laravel 8 step by step CRUD
https://ift.tt/2RBK73T
If you are new in Laravel 8 and looking for a step by step tutorial for Laravel 8 CRUD example app then this post will help you to learn how to make a complete CRUD application using Laravel 8. Before starting we have to check our system requirement is okay to use Laravel 8. The Laravel 8 minimum requirements are listed below so that you can confirm either your system is okay or not to install Laravel 8 project for making a Laravel 8 CRUD application.
Laravel 8 requirements
Steps for making Laravel 8 CRUD
Step 01: Install Laravel 8
First, install a fresh new Laravel 8 project. To do that, open your command prompt and run the artisan command below. This command will install and create a new Laravel 8 project for you. Before running this command make sure you have a stable internet connection. This command will take some times depends on your internet connection speed.
composer create-project laravel/laravel laravel8-project 8.0
N.B: Replace the laravel8-project
with your project name. According to this name, a folder will create in your project directory.
Step 02: Database Configuration
Now create a database in MySQL via phpMyAdmin or other MySQL clients which you. Now open .env
file from Laravel 8 project and update the database details.
DB_CONNECTION=mysql
DB_HOST=127.0.0.1
DB_PORT=3306
DB_DATABASE=laravel8
DB_USERNAME=root
DB_PASSWORD=
Here laravel8
is our database name. If your database name different then update it and save. Our project creation finished and the database is ready to use.
Step 03: Make model & migration
We will make a contact list Laravel 8 CRUD example application. So that we need a contacts table in our database. Here we do not create the table manually. Here we use Laravel migration. When we’ll run our migration that will make the table for us. Run the command in your terminal.
php artisan make:model Contact -m
This command will make a Contact.php model class file into the app/Models
directory of our Laravel 8 project and a migration file will be created into the database migrations directory.
Now open the migration file from database/migrations directory of your Laravel 8 project and replace the code with below.
<?php
use Illuminate\Support\Facades\Schema;
use Illuminate\Database\Schema\Blueprint;
use Illuminate\Database\Migrations\Migration;
class CreateContactsTable extends Migration
{
/**
* Run the migrations.
*
* @return void
*/
public function up()
{
Schema::create('contacts', function (Blueprint $table) {
$table->bigIncrements('id');
$table->string('name');
$table->string('email');
$table->string('phone');
$table->timestamps();
});
}
/**
* Reverse the migrations.
*
* @return void
*/
public function down()
{
Schema::dropIfExists('contacts');
}
}
Our migration file is ready. Now run the migration with this command. This command will create our tables in our database.
php artisan migrate
Step 04: Make controller
In our controller, all our business login will be coded to make Laravel 8 CRUD system. To make the controller run the command.
php artisan make:controller ContactController
By this command, a file will be created in app/Http/Controllers
name with ContactController.php. Write the code below in the ContactController.php
<?php namespace App\Http\Controllers;
use App\Contact;
use Response;
use App\Http\Requests;
use App\Http\Controllers\Controller;
use Illuminate\Http\Request;
class ContactController extends Controller
{
public function index()
{
$data = Contact::orderBy('id','desc')->paginate(10)->setPath('contacts');
return view('admin.contacts.index',compact(['data']));
}
public function create()
{
return view('admin.contacts.create');
}
public function store(Request $request)
{
$request->validate([
'name' => 'required',
'email' => 'required|email',
'phone' => 'required'
]);
Contact::create($request->all());
return redirect()->back()->with('success','Create Successfully');
}
public function show($id)
{
$data = Contact::find($id);
return view('admin.contacts.show',compact(['data']));
}
public function edit($id)
{
$data = Contact::find($id);
return view('admin.contacts.edit',compact(['data']));
}
public function update(Request $request, $id)
{
$request->validate([
'name' => 'required',
'email' => 'required|email',
'phone' => 'required'
]);
Contact::where('id',$id)->update($request->all());
return redirect()->back()->with('success','Update Successfully');
}
public function destroy($id)
{
Contact::where('id',$id)->delete();
return redirect()->back()->with('success','Delete Successfully');
}
}
Step 05: Define routes
Open the web.php
file from routes folder and write the routes like below.
Route::resource('contacts','ContactController');
Here we are using the Laravel resource route which will make all our required routes that are needed for Laravel 8 CURD example app.
Step 06: Make views
Here is the final part, We need some forms and HTML markup to show our records and data insert, update. Let’s make those views. Create a folder inside views folder name with contacts
so that all views are related to contact CRUD will be in the same folder and organized.
We need the Laravel H package for making HTML form easily. Install it by the composer.
composer require haruncpi/laravel-h
Create an index.blade.php
to show all our records from the database.
@extends('layout')
@section('content')
<div class="col-md-12">
<div class="table-responsive">
<table class="table table-bordered table-condensed table-striped">
<thead>
<th>ID</th>
<th>NAME</th>
<th>EMAIL</th>
<th>PHONE</th>
<th>ACTION</th>
</thead>
<tbody>
@foreach($data as $row)
<tr>
<td></td>
<td></td>
<td></td>
<td></td>
<td>
<a href="" class="btn btn-primary">Edit</a>
<form action="" method="post">
@csrf @method('DELETE')
<button class="btn btn-danger" type="submit">Delete</button>
</form>
</td>
</tr>
@endforeach
</tbody>
</table>
</div>
<div>
<?php echo $data->render(); ?>
</div>
</div>
@endsection
Create a create.blade.php
file for insert data.
@extends('layout')
@section('content')
{!! F::open(['action' =>'ContactController@store', 'method' => 'POST'])!!}
<div class="col-md-6">
<div class="form-group required">
{!! F::label("NAME") !!}
{!! F::text("name", null ,["class"=>"form-control","required"=>"required"]) !!}
</div>
<div class="form-group required">
{!! F::label("EMAIL") !!}
{!! F::text("email", null ,["class"=>"form-control","required"=>"required"]) !!}
</div>
<div class="form-group required">
{!! F::label("PHONE") !!}
{!! F::text("phone", null ,["class"=>"form-control","required"=>"required"]) !!}
</div>
<div class="well well-sm clearfix">
<button class="btn btn-success pull-right" title="Save" type="submit">Create</button>
</div>
</div>
{!! Form::close() !!}
@endsection
Create an edit.blade.php
file to edit data.
@extends('layout')
@section('content')
{!! F::open(['action' =>['ContactController@update',$data->id], 'method' => 'PUT'])!!}
<div class="col-md-6">
<div class="form-group required">
{!! F::label("NAME") !!}
{!! F::text("name", $data->name ,["class"=>"form-control","required"=>"required"]) !!}
</div>
<div class="form-group required">
{!! F::label("EMAIL") !!}
{!! F::text("email", $data->email ,["class"=>"form-control","required"=>"required"]) !!}
</div>
<div class="form-group required">
{!! F::label("PHONE") !!}
{!! F::text("phone", $data->phone ,["class"=>"form-control","required"=>"required"]) !!}
</div>
<div class="well well-sm clearfix">
<button class="btn btn-success pull-right" title="Save" type="submit">Update</button>
</div>
</div>
{!! Form::close() !!}
@endsection
Now our Laravel 8 CRUD app is ready to use. To test the Laravel 8 CRUD app operation first, run the server by php artisan serve
command and then open your browser and browse 
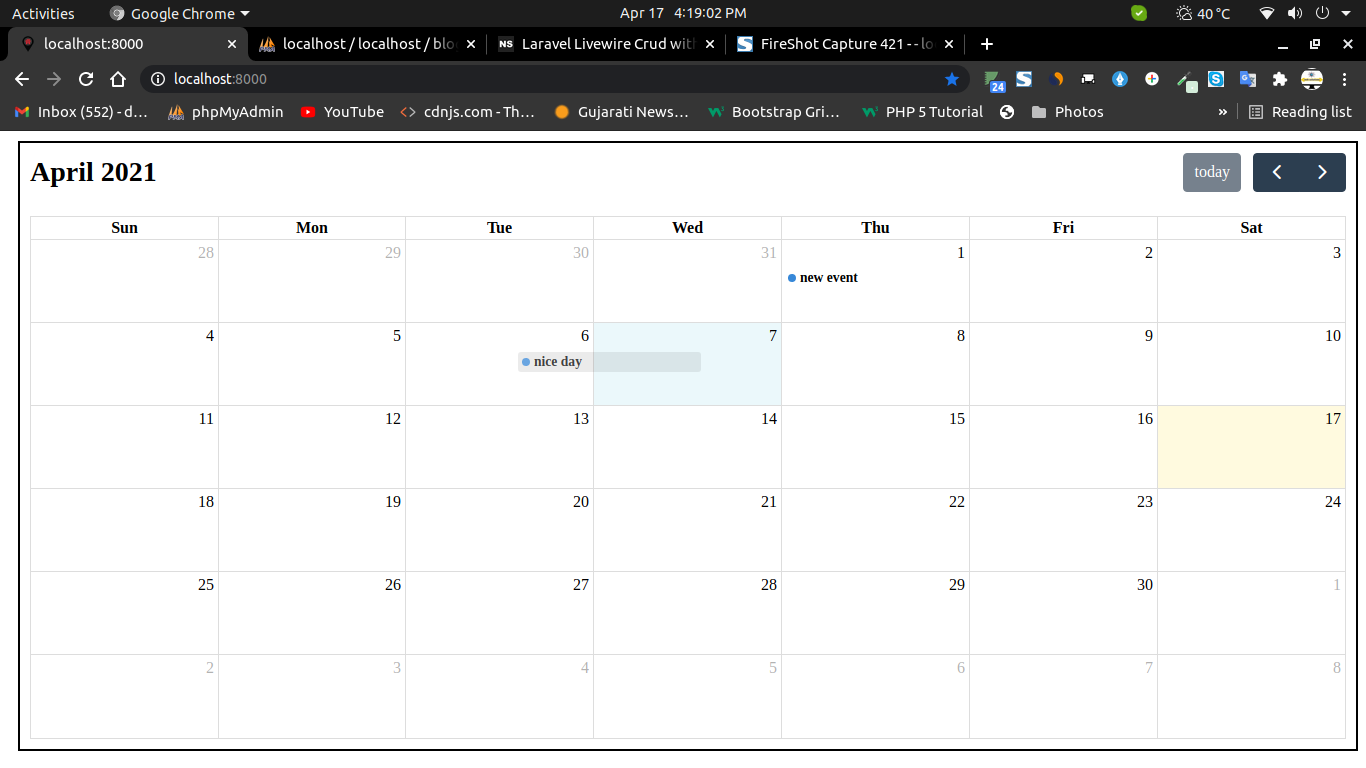
http://localhost:8000/contacts
Hope this step by step tutorial on Laravel 8 CRUD app will help you to make your won CRUD system using Laravel 8. If you find this tutorial helpful then please share this with others.
programming
via Laravel News Links https://ift.tt/2dvygAJ
September 15, 2020 at 08:15PM
How to fix ‘Target class does not exist’ in Laravel 8
https://ift.tt/2E5om9N
The problem here is that Laravel has no idea where to look for your controller, so all we have to do is let it know! There are 3 ways you can accomplish this:
This is fairly simple. Go into your RoutesServiceProvider.php file and you’ll see the following:
All you need to do is add the following three lines to this file and Laravel will go back to using the default namespace as in Laravel 7.x:
What did we just do? We declared the $namespace variable with the default Namespace for our controllers and told laravel to use that for our web and api routes.
If you try to run your app again, everything should be working.
This one involves changing all your route declarations, but the idea is simple: prepend your controller names with their namespace. See the following example for our PostsController inside the app/Http/Controllers folder.
If you try again, everything should be running smoothly.
This is the alternative I personally recommend as I find it more typo-proof and in my experience provides better IDE support as we are explicitly telling the code which class to use. Instead of using our usual string syntax, we can use the action syntax where we specify the class and method to use in an array:
Notice here we are not passing the PostsController within quotes but rather PostsController::class, which internally will return ‘App\Http\Controllers\PostsController’. The second value in the array is the method to call within that controller, meaning: “In PostsController.php call the ‘all’ method.
Again, if you try to run your app again, everything should be up and running.
By now, your app should be up and running again. If not, please feel free to ask for help. Everyone in the community is eager to give a hand.
Whether you added the namespace manually, specified the full namespace in your routes, or went with the action syntax, what you just did is tell Laravel in which namespace your controllers actually are, so now it actually knows where to look.
If you liked what you read or want to learn more cool stuff related to Laravel, you can follow me on Twitter, where I post about coding, entrepreneurship, and living a better life.
programming
via Laravel News Links https://ift.tt/2dvygAJ
September 15, 2020 at 08:15PM
Sadequl Hussain: 7 Best Practice Tips for PostgreSQL Bulk Data Loading
https://postgr.es/p/4U4
Sometimes, PostgreSQL databases need to import large quantities of data in a single or a minimal number of steps. This process can be sometimes unacceptably slow. In this article, we will cover some best practice tips for bulk importing data into PostgreSQL databases.
Postgresql
via Planet PostgreSQL https://ift.tt/2g0pqKY
September 15, 2020 at 11:21AM
Tuesday funny
https://ift.tt/3kk2J4T
This is just too perfect.
so this synced perfectly didn’t even have to edit pic.twitter.com/TREO1qFjgQ
— matt’s idea shop (@MattsIdeaShop) September 15, 2020
guns
via https://gunfreezone.net
September 15, 2020 at 10:08AM
The Mandalorian’s Season 2 Trailer Is Here, and It Brought Baby Yoda
https://ift.tt/3c1qN9L
This is the way to more episodes of The Mandalorian. And more Baby Yoda adorableness, of course.
Out of nowhere, Lucasfilm dropped our very first look at The Mandalorian’s sophomore season in action, picking up where season one left off: Din Djarin (Pedro Pascal), our titular bounty hunting hero, and his newly-inducted clanmate “The Child” jetting off on a quest to not just find the little green force-user’s people, but to keep themselves safe from the sinister grip of Imperial Remnant officer Moff Gideon (Giancarlo Esposito).
While the trailer doesn’t give too much away—just like season one’s cryptic footage sneakily hiding tiny Baby Yoda’s massive presence in the show—there have been plenty of rumors hinting to expect tons of familiar faces and major explorations of the Star Wars canon as we know it this season. From teases for the return of Clone Wars favorites like Ahsoka Tano and Mandalorian Death Watch agent Bo-Katan Kryze, there’s also the helmeted elephant in the room: Temuera Morrison’s alleged return as legendary Bounty Hunter Boba Fett.
How will all that factor in? Will Moff Gideon get his grubby hands on the baby? Will Din, indeed, find the way? We won’t have much longer to find out: The Mandalorian will return to Disney+ on October 30th.
G/O Media may get a commission
For more, make sure you’re following us on our Instagram @io9dotcom.
geeky,Tech
via Gizmodo https://gizmodo.com
September 15, 2020 at 10:21AM