https://media.notthebee.com/articles/a0547d6c-8d12-4b4f-81a2-e4fa1421e145.jpg
Can we just make this lady president, please?
Not the Bee
Just another WordPress site
https://media.notthebee.com/articles/a0547d6c-8d12-4b4f-81a2-e4fa1421e145.jpg
Can we just make this lady president, please?
Not the Bee
http://img.youtube.com/vi/fFjl65Sz4Xs/0.jpg
Reader Weetabix asked a most proper question:
Does Youtube just equip all cars in Russia with cameras so they don’t run out of these videos?
My response:
You’d think so. Russia had a gigantic rash of insurance scams in the mid 2000s IRRC. You can actually still find videos of people throwing themselves at cars stopped at lights and to say they got run over and collect big fat settlements. Russians started to install cameras as precaution and thus began the era of the Russian Vehicular Spectaculars.
And here are a couple of compilations.
And they are still at it.
I am thinking very seriously about installing a camera myself. It solves the “He said/ He said” arguments for the insurance.
https://media.notthebee.com/articles/fca296ec-5271-42e1-8d92-7f5729fa1225.jpg
This catch was so smooth even Thanos couldn’t wish it away:
Not the Bee
https://blog.finxter.com/wp-content/uploads/2018/10/CheatSheet-Python-4-Classes.png
A couple of years ago I fell into the habit of creating cheat sheets when exploring certain areas in the programming space. Over time, hundreds of thousands of Finxters have downloaded and used them in their own learning journeys. However, the cheat sheets are largely scattered around many different locations on the Finxter ecosystem. And even though I share all of them with my beloved Finxter community of ambitious coders and subscribers to my free computer science email academy, join us!  , they may not be accessible at all times for all Finxters. Time to change that!
In this article, I collect all Finxter cheat sheets and links to their PDF download locations. Feel free to share it with your hacker friends and coding mates!
 Click each image to open the high-resolution PDF in a new tab!
This is my absolute favorite cheat sheet because it teaches you the basics of three fundamental cheat sheets that I just condensed into this single one. Look for yourself:

Python keywords are reserved words with a special meaning. Make sure to understand all of them by heart!

Programming mastery comes from two things: data and functions. This cheat sheet is about the former!

The complex or container data types in Python are lists, sets, dictionary, and tuples. We’ve written an in-depth guide on each of those if the cheat sheet is too shallow for you:
And here’s the cheat sheet:

A big part of mastering lists is to master the methods provided by the list data structure. You can do this in the cheat sheet or in my in-depth course on Python list methods here.

Let’s move on to one of the most underutilized data structures in Python: sets. They’re far more efficient than lists—if you can handle the reduced expressiveness. You can find all set methods explained in detail in the Finxter Academy course.

We need to use the right words to communicate effectively with other programmers. This cheat sheet will show you all the words you need to know in object orientation!
Let’s really dive into two concepts of object-oriented programming: classes and objects. These things are must-knows for you as an effective programmer!


That’s it for now—I’ll keep updating new cheat sheets as I produce them. Stay tuned to make sure to be informed about each new Cheat Sheet I publish on the Finxter blog.
You can also check out these interesting blog articles about cheat sheets—many with videos:
Related Articles:
Thanks for checking out the whole article—let’s round this up with the standard Finxter “post footer”. 
The post 10 PDF Cheat Sheets for Programmers first appeared on Finxter.Finxter
https://theawesomer.com/photos/2021/05/hot_wheels_roller_coaster_t.jpg

Readers have commented that we called things roller coasters that are actually trains since they’re self-powered. Well, here’s a case where we’re using the term properly. This impressive Hot Wheels track by 5MadMovieMakers keeps cars moving with gravity, a handful of motorized booster stations, and… a leaf blower.
The Awesomer
https://discuss-cdn.tryton.org/uploads/default/optimized/2X/7/767d3c8cb2da36cbfd3eae39bc14aadc6bde349b_2_690x459.jpeg
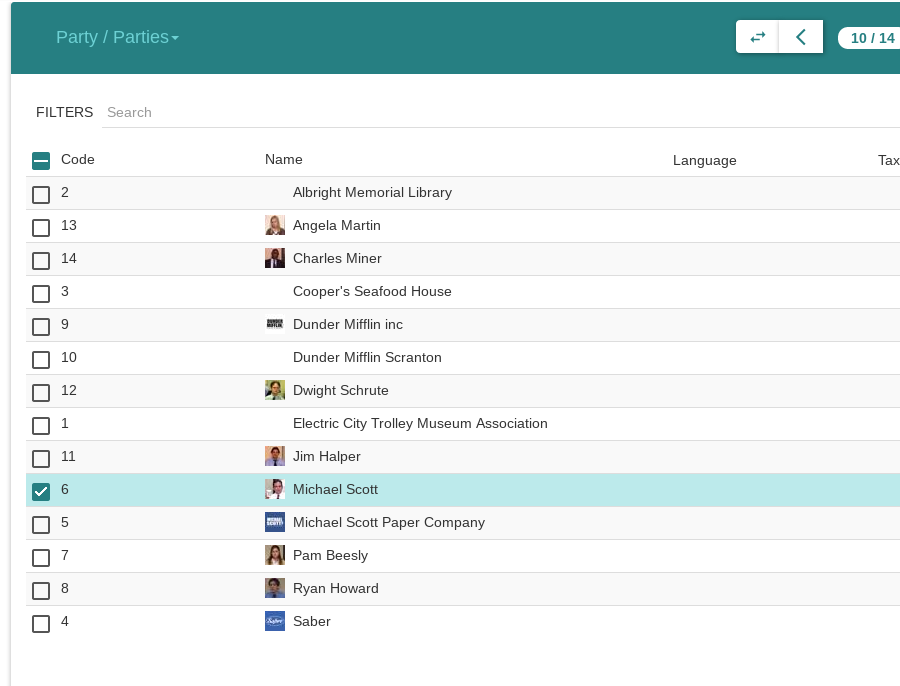
We are proud to announce the 6.0 Long Term Support release of Tryton .
This release provides many bug fixes and some significant improvements. Among other changes you will find the display of attached documents, reinforced security and many accounting improvements. There are also no more than 11 new modules that include support for things such as Incoterms, Avatars and Product kits. Tryton has now also been translated into Romanian which brings the number of languages to 24.
You can give it a try on the demo server, use the docker image or download it here.
As usual migration from previous series is fully supported. Some manual operations may be required, see Migration from 5.8 to 6.0.
Here is a list of the most noticeable changes:
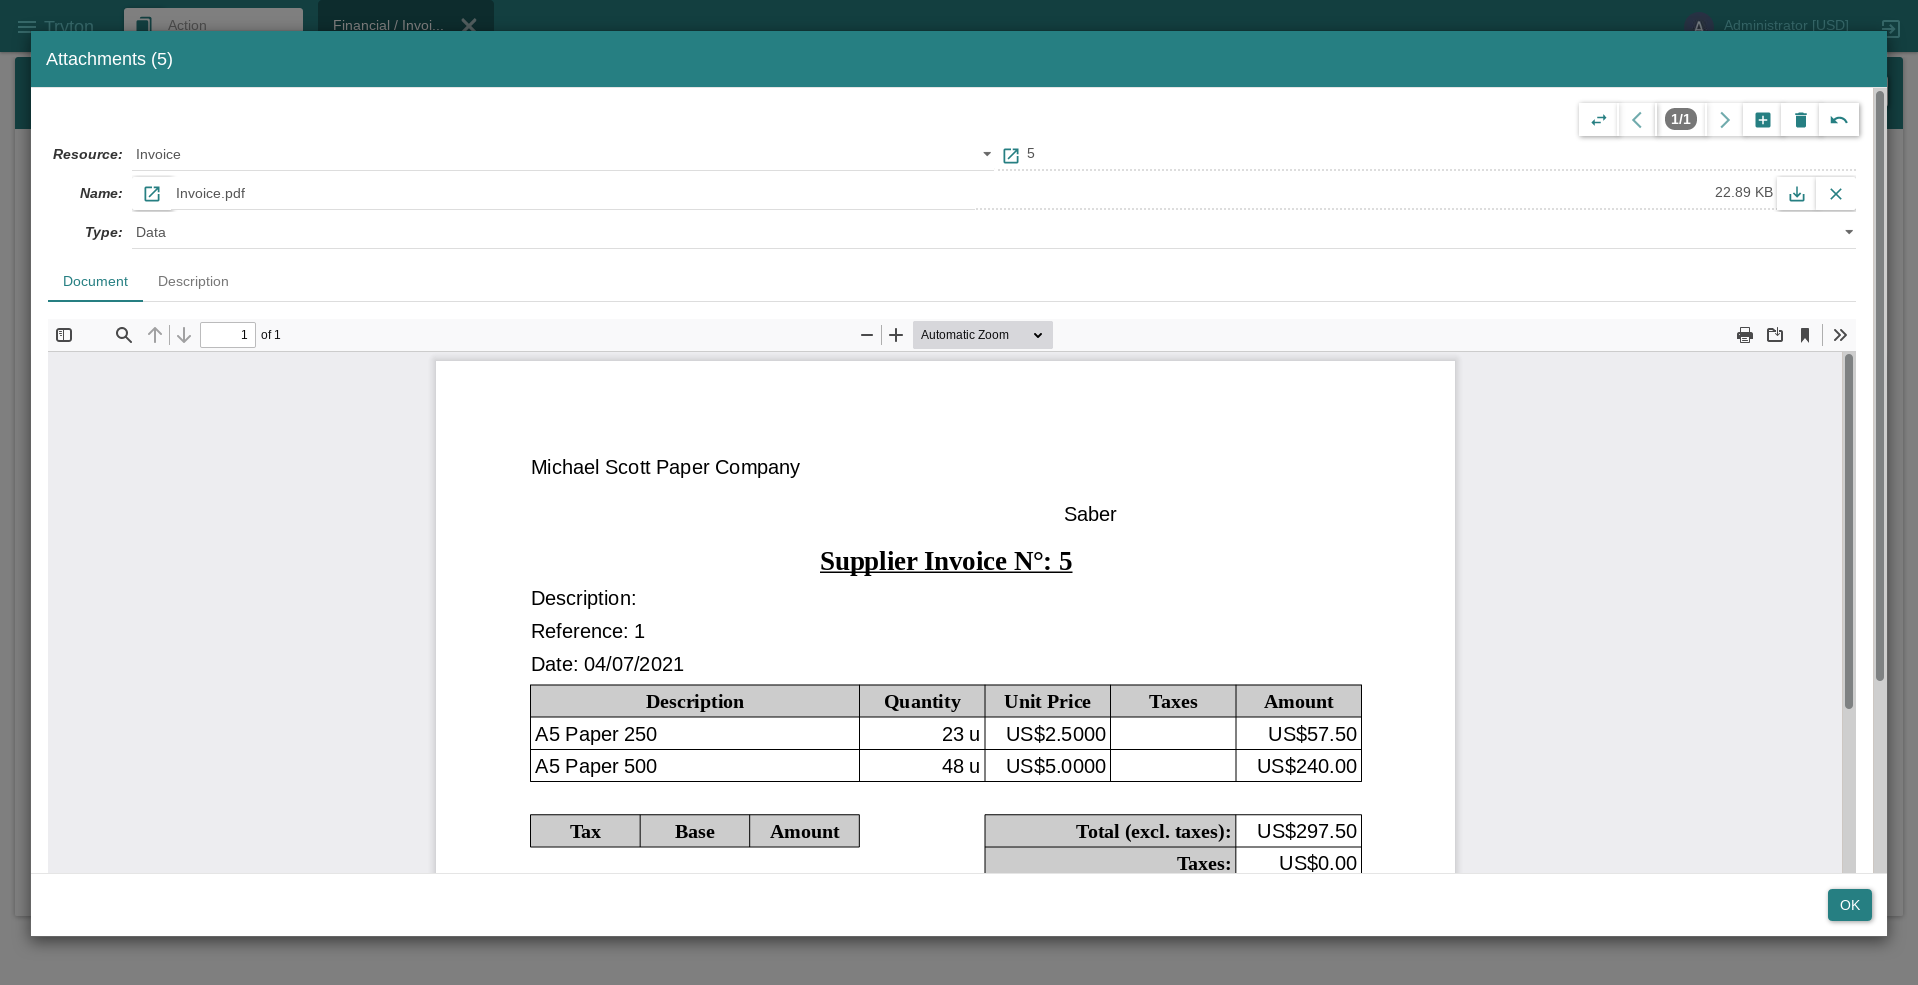
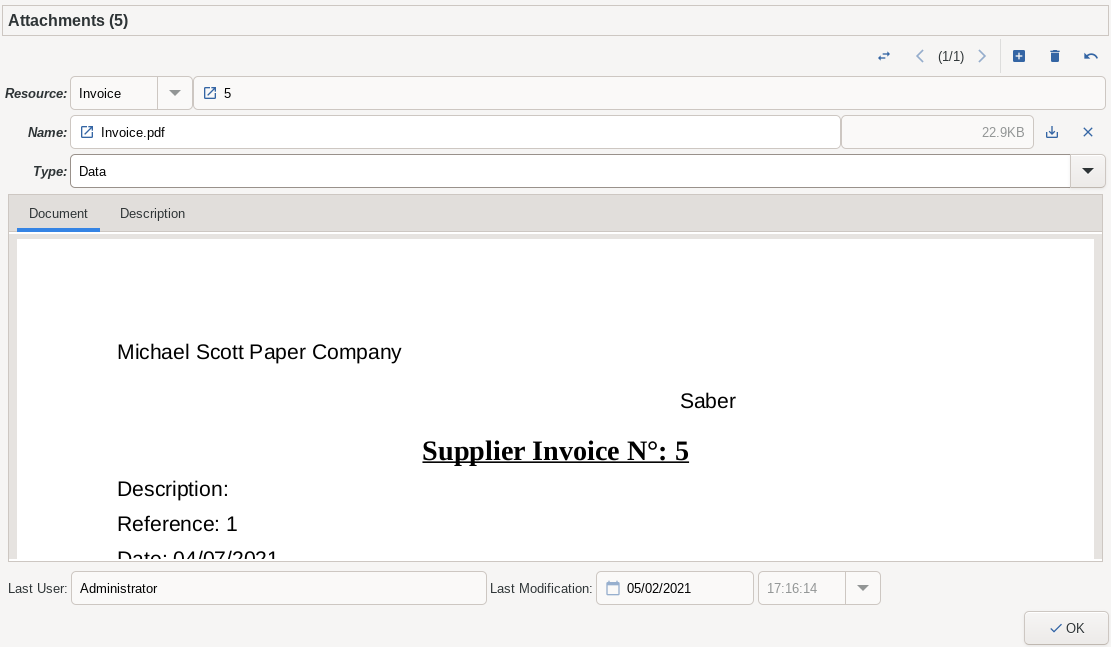
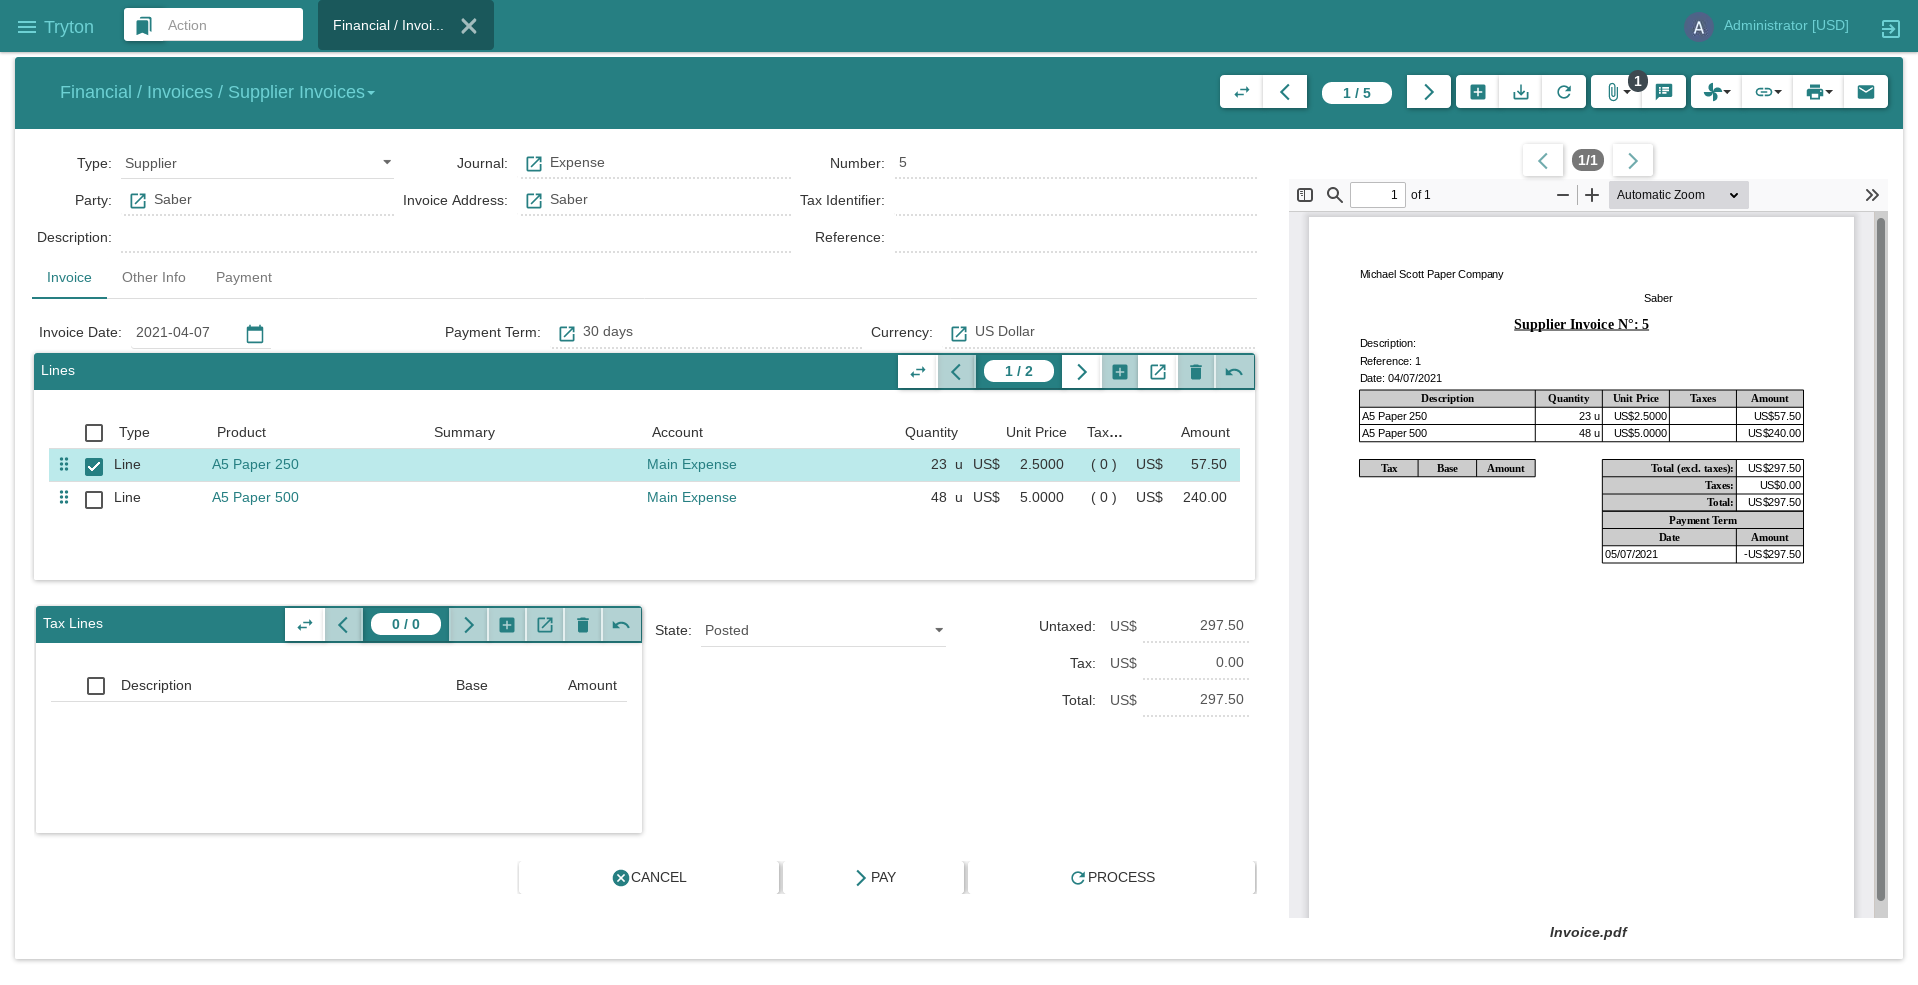
The clients can now display documents inside a form. The supported document formats are dependent on the client. For the web client it is the one supported by the browser (usually images and pdfs). And for the desktop client it is also images and the formats supported by Evince.
Thanks to the document widget, it is possible to display, next to any form, a preview of the attachments. This can be used, for example, when entering a supplier invoice from the attached PDF.
When sending an email from the client, in addition to being able to attach any report, it is now possible to also attach any of the record’s attachments.
More
The dialog opened under a revision show in their title the revision.
When exporting into CSV file a tree, the first column is indented according to its level in the tree.
When opening many dialog, the title is now composed of a breadcrumb trail of all the dialog opened before. This avoid to loose the user in his navigation.
The name of the tabs opened from the menu is now the name of the menu entry.
The CSV export and import dialog can now be reordered using drag and drop.
The web client can now also propose completion for the search input of the xxx2Many and Dict widgets.
The email and URL widgets now use the appropriate input type. So that mobile devices can display the best virtual keyboard.
More
Each selection entry can display its own help text.
When printing reports that are single (like the invoice), the server sends a zip file containing one document for each record. The client now recognizes these files and can send each file from the zip to the printer.
When running the client on UNIX platforms, it is now possible to use the direct print feature. The client will uses the lp or lpr commands and for OpenDocuments it uses soffice. (It continues to use the print command on Windows).
Some reports can take a long time to generate so the client runs them with an asynchronous request. This allows the user to still perform other operations while the report is being generated.
An interactive search has been added to the list and tree views. It pops up when you start to type on the list and puts the focus on the first line which matches the results. You can jump to the next matching entry with <CTRL>+↓ and previous with <CTRL>+↑.
The Income Statement and Balance Sheet can now be printed. Only the records that are open in the client are printed.
The general journal is now printed from a list of moves. This adds, as a nice side effect, the ability to print a single move if needed.
The General Ledger (accounts and lines) can now be filtered by journal. And from the lines it is also possible to perform a reconciliation.
The terms on the Aged Balance can now be expressed in weeks and years in addition to the existing days and months.
The Spanish accounting module now provides a report for the VAT book.
Companies can not always deduct the full amount of the taxes on supplier invoices. We now allow the accountant to set the deductible rate of each invoice line. You can set a default value for the rate on the product category.
Some companies can never deduct taxes, thus they can be configured to always use a 0% deductible rate.
It is now possible to make the link between invoice lines and stock moves after they have been posted and done. In these cases the unit price is also updated on the stock move, and if needed the cost price will be recalculated.
More
Account type from balance statement can be marked as debt. So they can be used directly to book invoices.
It is now possible to open directly from a party his general ledger accounts.
The balance of the general ledger lines start with the start value of the account.
The reconciliation sequence can now be set in the accounting configuration.
Once a move has been numbered, it is no more allowed to change its journal. This is because the numbering is based on the journal.
It is now possible to define an other date than the invoice date to use to compute the payment term for an invoice.
If you try to post a customer invoice with a maturity date in the past, Tryton will raise a warning.
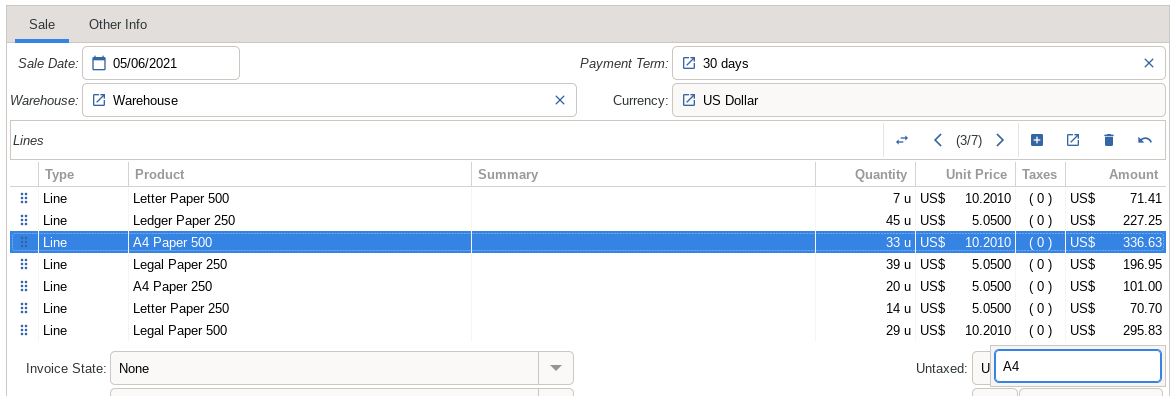
We added a summary field on the invoice line list that display the first line of the description.
It is now possible to define a default customer payment term for all parties that have no term defined.
When the supplier sent an invoice to correct a price, it is now possible to mark it as correction. In this case the quantity will not be counted to compute the cost price on the related stock moves.
The payments record now the employees who approved, noted as succeeded or failure them.
The customer record of Braintree and Stripe are now kept up to date.
We warn the user when he posts a statement linked to a cancelled or already paid invoice.
The origin of the move line are now filled with the statement line.
The analytic lines are now filled for the closing move of an asset.
The date of the commission now uses the invoice date if the method is “on posting” and the payment date if the method is “on payment”. This is more coherent than using the date when the commission was generated.
The users can now choose if they want to see only records for their current company or for all their companies.
It is now optional to define a number of hours in a working day, week, month and year.
You can configure a scheduled task to fetch currency rates at a specific frequency. By default it gets the rates from the European Central Bank.
The marketing emails can now use the same formatting methods as the report.
An specific contact mechanism can be used as email recipient. This is useful for example to send the sale order notifications to the email of the contact who placed the order instead to the generic one of the customer.
For that we added also an optional language to the contact mechanism to be used instead of the language of the linked party.
More
We added the new identifiers available from python-stdnum.
When you deactivate a product, its variants are also automatically deactivated.
From the category view, it is now possible to add or remove products. This is useful when you have a lot of products that needs to be categorized.
It is now possible to use the list price of the product form in the formula of the price list. This is useful for businesses that have regulated prices (e.g. books in France).
You can define a scheduled task that will try to automatically assign any productions that are planned for today. The productions that can not be fully assigned are listed in a new “Partially Assigned” tab.
More
The productions are now ordered by date.
When invoicing a project based on the time-sheets, it is now possible to define for each work a date that limits the time-sheets invoiced. This date can be set, for example, once the customer has accepted the work done up to that date.
When creating a return of a purchase, the original purchase is linked to the return.
You can now define a default lead time for each supplier. This is used when the product does not have a specific lead time set for that supplier.
The payment term and invoice method are now set by default based on the last purchases made from the supplier.
The amendment mechanism now supports changing lines without a product.
It is now easier to manually change the shipment cost of a purchase. A check box has been added to allow the price to be manually altered and to prevent any automatic re-calculation.
More
We added a summary field on the purchase and requisition line lists that display the first line of the description.
We added a relate to open purchase from a request and vice-versa.
The product supplier can now be deactivated.
You can now configure a global lead time. This is used for products that have no specific lead time.
The amendment mechanism now supports changing lines without a product.
The complaint action to credit the customer now make an invoice correction. This improves the product margin statistics.
The amount of the complaint action is now calculated automatically. This makes it easier to decide whether to validate the complaint, or not.
It is now possible to create promotions that are based on the total amount of the sale. The shipment cost can be excluded from these promotions.
We now only add the unsold shipment cost to the outgoing moves following the shipment cost method. The cost of the shipment for the company is calculated using the purchase price of the carrier. And the shipment cost for the sale can be free (price of zero).
It is now easier to manually change the shipment cost of a sale. A check box has been added to allow the cost to be altered and to prevent any automatic recalculation.
More
We added a summary field on the sale line lists that display the first line of the description.
The complaint type and product customer can now be deactivated.
It is now possible to set the sale line of a shipment cost to 0.
The carrier is now displayed on the shipment list. This is useful when you must prepare the shipment of a specific carrier in priority.
By default the shipment cost is now excluded from the promotion amount.
The effective date of drop shipment can now be defined.
It is now possible to open the drop shipments of a party from its form.
You can now define a scheduled task that tries to automatically assign all the shipments that are planned for today. The shipments that could not be fully assigned are listed in a “Partially Assigned” tab.
The graph that shows a product’s quantities over time of for each warehouse, can now display this for multiple products on the same graph. This is useful when comparing different products or if you want to analyze the scheduling of a shipment composed of multiple products.
We added a report that calculates the margin of goods by product or category.
As a counterpart to manually assigning a shipment, it is now possible to also manually unassign a shipment. The wizard asks, for each assigned move, the quantity to unassign and then restores an original move for this quantity.
When you use stock lots as a serial number, it can be time consuming to split the moves and add a lot for each unit. So we added a wizard to make this task easier. The wizard can also automatically generate the lot number using a sequence defined on the product.
You can now define the package used for a supplier shipment returns.
More
We added a relate from an assigned shipment that opens the quantities by warehouse for the products on the shipment.
The shipments are now ordered by default by date.
The contact mechanism can be defined for delivery usage.
When the storage and output zone are the same, the outgoing moves of customer shipments are now still editable in waiting and packed state.
The move list of the product quantities by warehouse display now the document from where they originate.
A sequence to automatically number lot can be configured on each product.
We now include the additional weight of the package to the total weight of a parcel.
The packages have now a field that contains the tracking URL.
The dimension of a package can be modified from the default value set for its type. This is useful to store for example the height of a pallet.
It is now possible to configure the product and format to use for a DPD carrier.
We added a tab on the time-sheet works to list the “Open” and “Closed” work.
More
The active field has been removed from the time-sheet work as it was redundant with the start and end dates.
The Account Invoice Defer Module allows an invoice line’s expenses or revenues to be deferred over many periods.
The Carrier Subdivision Module extends the carrier selection pattern with the subdivision and the postal code.
These can be used to restrict the usage of a carrier to a specific subdivision or specific postal code.
This Incoterm Model is used to manage the Incoterms on sales, purchases and shipments. The module contains the Incoterms versions 2010 and 2020.
The Party Avatar Module adds an avatar to each party.
The Product Cost Warehouse Module allows the cost price of products to be calculated separately for each warehouse.
The Product Kit Module adds kits and components to products. This enables a defined set of products to be sold or purchased using a single line.
The Purchase Price List Module allows price lists to be defined for suppliers.
The Sale Gift Card Module manages the selling and redeeming of gift cards.
The Stock Quantity Early Planning Module helps reduce stock levels by suggesting where stock can be consumed earlier.
The Stock Quantity Issue Module helps to solve stock quantity issues.
The Stock Shipment Cost Module adds a shipment cost on the outgoing moves. This cost is added to the product margin reports.
The Tryton server now includes protection of trusted devices against brute force attack mitigation. This means that these devices (which have been authenticated once) are not delayed by anonymous brute force attack.
A new curses command trytond-stat has been added which displays some statistics about the running trytond. For now it displays the running requests. This is useful to detect those that are taking too much time. It also displays how performant the caches are by showing the number of hits, misses and the ratio.
The user groups can now inherit access permissions from another group. This is used by the “Administrator” version of a group to extend the rights of the normal group.
More
It is now possible to define the email’s FROM per language.
The trytond-admin command has a new option --validate that can be used to validate all the records or a random percentage. This is useful to verify that a migration was correct.
We added a new parameter rate_decimal which defines the number of decimal places that are used to store currency exchange rates. This is useful when using currencies that needs more than 6 decimals places for conversion.
We received some feedback about users getting lost when selecting from the large list of identifiers available in Tryton when they were only interested in local identifiers. So we added a configuration option to define which types of identifiers are available for use.
The shipping labels can now be stored in the filestore instead of the database thanks to a configuration parameter. This helps reduce the size of the database.
Tryton supports now Python 3.9.
We unified the string format of PYSON between all the implementations.
It is now possible to use a URL as source for icon. The target image is then cached by the client. This is used to implement the avatar feature.
The data passed to ir.action now also contains the context model used and the paths (as a tree) of the selected records.
The actions can now define that they run on the selected records (default and historical behavior) or the listed records. The last one is used, for example, to print a tree structure as the user has it open.
We use now immutable data-structures for Dict and MultiSelection fields. This enforces good practice because the framework cannot detect modifications on those mutable values.
Thanks to the new context item _skip_warnings, non-interactive operations (like scheduled tasks, queue jobs etc.) are no longer blocked by warnings which have no user to ignore them.
The record rules are now only applied if _check_access is set in the context. This improves the multi-company support.
We added a new Mixin to add support for avatars on any ModelStorage. This exposes the avatar on a public but anonymized URL. This URL accepts a parameter to resize the image on request and automatically store the result in a cache. It can also generate a pseudo-random avatar using, by default, the record name.
The ORM now supports full text and similarity searches if the database back-end support it. This is used automatically for searches using ilike and a clause %…%. The similarity threshold is set by default to 0.3.
A new type of field has also been added – FullText. This stores, in the database, a list of strings representing the document as a vector so that indexes can be defined to improve searching and ordering on it.
We added the __access__ attribute to Model which contains a set of relation fields to which the access rights are delegated. This is used, for example, when a document is designed with multiple models like sale orders which are made up from Sale and SaleLine. Here the SaleLine delegates its access rights to the Sale.
More
The method to get the next sequence value is now an instance method.
The sequence type is now stored as a Many2One on the sequence.
A new route wrapper has been added to accept null as origin of a request. This is needed for add-ons application like Chronos.
The method ModelView.parse_view is now officially public.
Each value of a selection of multiselection can now have its own help text.
The trigonometric functions have been added to the SQLite back-end.
When a process change the list of activated modules, the others must refresh their pool.
A new method on Cache allows to clear all the cache instances.
The HTML editor supports now the Genshi element directives.
A new tool has been added firstline which return the first non empty line of a text.
When browsing ModelStorage instances, no access rights are enforced.
When multiple Function fields have the same getter we eagerly compute them.
The decorator button_change accepts now to depends on other methods like the other decorators.
It is now supported to use the standard Python copy method to copy Model instances.
When the server generates a default form view for a ModelView, it includes now automatically all the buttons.
All white spaces except space are forbidden on Char fields.
The Report can now group the rendering of a list of records by header keys. This is useful when OpenDocument templates the header and footer which are global for the whole document.
The URI to configure the database connection supports now parameters.
The table handler can not test the SQL type of a column. This is useful to decide to make a migration or not.
The timedelta converter supports now to have empty value for some keys.
We removed the dependency to tempusdominus. Instead we use the HTML standard date and date-time inputs.
The Move.query_get filter is now also based on the journal key in the context.
The method call_deposit now accepts an optional maximum amount to recall.
A new method has been added to Invoice to post invoices by batch. On large installations posting invoices can become a bottleneck due to the strict sequence constraint. With this batch method it is possible to speed up the process by reducing the time spent locking the invoice sequence.
More
We removed the foreign key constraint for the sequence link on Invoice. It creates new lock contention for no benefit.
The zip code in Stripe checkout has been removed because it was not used.
It is now possible to define the preferred locales to the Stripe Customer.
We do not create anymore account moves for the stock with a single empty line.
We removed the tree structure from Company and replaced it with a flat list of companies that user has access to.
We added a generic test which ensures the definition of record rules for company related models.
We also added another generic test that checks if fields targeting company multivalue models have a company context defined.
It is highly advised to use this test mixin if your custom module depends on company.
We now use the report header feature on the CompanyReport instead of relying on the contextual company value. This now means that records on which these reports are based, must have a company field.
We renamed the “Zip” model into “Postal Code” which is more generic.
We renamed the “Zip” field into “Postal Code” which is more generic.
We implemented a simple distance field on the party module which is fully extended in the party_relationship module. This allows for other modules to implement distance behavior without having to depend on party_relationship.
We added the TaxableMixin to the sale line. This is used to base promotions on an amount without or without taxes.
We added a dedicated model for the “Products by Locations” and “Lots by Location” reports which makes it easier to customize compared to using the product or lot model.
More
We renamed the quantity_added to quantity in the inventory counting wizard.
1 post – 1 participant
Planet Python
https://www.recoilweb.com/wp-content/uploads/2021/05/replacing-pistol-sights-11.jpg
Most handguns come with factory sights that are pretty rudimentary, and they’re often the first thing to be replaced. Perhaps you want to see your pistol sights better in diminished light, to acquire them quickly in bright daylight, to use them to rack the slide, or even to adjust them on the fly. There are many aftermarket options for most pistols; find one that best suits your intended use of your handgun.
If you plan on shooting competitions at your local outdoor range, a thin, front fiber-optic sight might work best. However, if you also want to take the gun to tactical shooting courses where you’ll be racking the slide off barricades and treating
your gun like a Harbor Freight tool, you might want something a bit beefier. Choose pistol sights that are a good fit for you, because even a great handgun can be ruined with a poor aiming system.
The majority of pistol sights are secured in a dovetail cut — an isosceles trapezoid shape cut from left to right with the long side at the bottom, creating two angled overhangs that prevent the sight from moving up and down or fore and aft. Let’s discuss how to remove your old sight and install or “drift” in new ones.

Most sights are considered “drop-in” parts, which can be installed without any customization. However, slight fitting is sometimes required. When removing material to install sights, fit the sight to the gun, not the gun to the sight. Also, never touch the bottom of the sight dovetail. There should always be a slight gap between the underside of the sight post and the top of the slide; removing material from the bottom of the dovetail will pull the post downward, interfering with the top of the slide.
There are many gadgets available to install sights. “Universal” sight pushers can be handy but also rather expensive (upward of $100), and often not quite universal. Dedicated sight pushers aside, you can remove and install sights with some basic tools:
Sturdy vise: If you intend to work on firearms, a good vise is a must, preferably with at least 4-inch jaws. It should be hefty, so that when you clamp it down on something and hit it with a hammer, the vise won’t flex. This ensures all the force is transmitted to the workpiece; otherwise, it’s like trying to crack walnuts with a hammer on a mattress. When mounting a vise to a bench, try to locate it on a corner, directly above the leg, for maximum rigidity. Most vises come with scored jaws that bite into wood and rough material but will damage your slide’s finish, and a couple layers of tape won’t protect your bluing or Cerakote. You can take the jaws to a machinist to smooth off the texture or use soft jaws.

A layer of masking tape gives a little protection to your slide’s finish, or in the case of a HiPoint, prevents it from getting crap on your vice.
4-ounce ball-peen hammer: This hammer might seem dainty, but it’s the preferred striking weapon of gunsmiths for a reason. It allows much more control and finesse while keeping you out of trouble. Keep the flat face dressed with a stone to ensure good perpendicular contact and to avoid glancing hits, which can lead to shattered punches or uneven contact on the punch face.
Drift punch set: There are many different types of drift punches for drifting sights, but it’s hard to beat a simple set of steel Starrett punches. Nylon-tipped, brass, and most aluminum punches are too soft and require extra force to finely control small movements of the sight, often causing them to flex or compress.

If you’re going to start messing with sights (and on stock Glocks, we should really put that in quotes), then you’re going to need a few basic tools.
Fine triangle file: Hopefully, your slide cuts and the sight’s dovetail will be the perfect size for a slight interference fit, allowing for hassle-free installation and solid retention. When fitting is needed, use a fine, single-cut triangle file that cuts smoothly while taking a minimum of material. Grind one side of the file smooth to use as your “safe” side. If the sight is a 60-degree dovetail, use the bottom of the sight post as a guide for a consistent, clean cut. If you have one, a triangle India stone is also handy for dressing the dovetail.
6-inch calipers: Dial or electronic calipers allow you to precisely position the pistol sights on the slide. While not as accurate as a depth micrometer, the depth rod on the tail of the caliper will get you within a couple thousandths.
Before you start, put on eye protection, then unload your pistol, making sure to remove the magazine and clear the chamber. Then, remove the slide, recoil spring, and barrel. Attach a strip of painter’s tape on the slide flats on each side just below the sight dovetails, to provide some protection.

If you care about your handgun, grind a safe edge on your triangle file so that it only cuts on one surface at a time.
Carefully inspect both the top and the bottom of the slide around the sights. Some factory sights are further retained in the dovetail with a set screw or vertical roll pin. If so, carefully remove them. If you have an elevation-adjustable rear sight, remove the adjustment screw and spring, tilt it up to check for additional set screws underneath, and remove those as well. Make sure to use the proper hex wrench to avoid stripping them. If you suspect there’s any threadlocker, apply heat to break it up.
Mount the slide in the vise with the right side toward the base of the vise and the bottom of the sights as close to the top of the jaws as possible. The closer they are to the jaws, the less flex you’ll get in the workpiece. The rear sights are a good place to start. They usually have a much larger flat area on the sides, so you can use a larger diameter punch to transfer more energy.

You might find that the dovetail cut on some slides is tapered; it’s easier to detect this and determine which direction it tapers on the rear sights. Pins are often installed from right to left, so it’s a good idea to first attempt to drift the sight out to the right. With the largest punch that fits inside the dovetail, place the face squarely against the sight. Full contact between the punch face and the workpiece spreads the load out and ensures maximum energy transfer.
While many people place the punch once and start wailing, try removing the punch between each strike to check for any damage (in the case of soft or cast sights), and then adjust your position or reset and hit it again. You don’t need to swing for the fences either; if you have a rigid setup, the sight should start to move quite easily. A firm 6- to 8-inch swing is typically all you need to break the static friction. If it doesn’t budge, increase your striking force gradually in small increments. If it doesn’t seem to get easier, or it doesn’t move at all, reverse the slide in the vise (so that you’re always hammering toward the base of the vise) and try from the other side.

This is what specialist aluminum punches look like after they’ve been used on handgun sights a few times. Save your money.
Once you get it moving, pay attention to the area that’s revealed as the sight moves to the side. On some pistols, there are small springs under tension beneath the rear sight. If you see the edge of a spring, move your pinky or ring finger over the hole while you push the sight to capture it.
The front sight will drift out in the same direction, but you’ll have less to work with, so you might need a smaller punch. The dovetail portion is typically quite shallow, so if you don’t feel comfortable striking it there, go as low as possible on the vertical portion of the sight. Avoid the inclination to place the edge of the punch on the dovetail, as it’ll usually swage the thinner material before it moves the sight. In this case, a flathead screwdriver might be better to increase the contact area on the dovetail or the bottom of the sight. The higher you strike the front sight, the more likely the sight post will bend or snap at the junction. Once the sights are removed, clean the dovetail slot with acetone and Q-tips.
Make sure you read the sight manufacturer’s documentation before you install them, in case there are any special instructions. Check the edges of the dovetails on the sights. If they seem sharp or don’t have a slight radius, you can hit them with a stone or some 320-grit sandpaper to achieve about a 0.005-inch radius. This will give the corners some clearance, so they don’t catch and gall in the dovetail cut.

Don’t try to remove your front sight until you’re certain any set screw has been backed out.
Test-fit the sights by hand to see if they start in the dovetail without issue. A rule of thumb is that the pistol sights should slide in under finger pressure between one-third to just about halfway. If they do, remove the sights and apply a small amount of lube on the dovetail surfaces to prevent galling, then install them as far as they’ll go under finger pressure. Using the same technique as removal, drift the sights in until they align with any secondary retention devices or until it looks reasonably centered.

That goes for your rear sight, too.
If you find that the sight slips all the way through with little resistance, but doesn’t seem to be loose, don’t worry! You have two options. You can liberally apply some blue threadlocker to the dovetail cut, install the sight, and take the edge of a punch or a small screwdriver with a broad edge and swage the slide material to crimp the slide material down on the sight. Select a spot that’ll be hard to notice, preferably on either side of the vertical post of the sight. Then, wipe away excess threadlocker. However, if intentionally denting your slide is a little too extreme, you can try the threadlocker by itself, though this can have mixed results. When the threadlocker hardens, the crystalline structure is susceptible to cracking from the shock of the slide going into and out of battery.

If your sight goes in less than one-fourth of the way or doesn’t go in at all, first double check you have the correct replacement sight. If so, it’s time to bust out your file. Using the safe side up against the bottom of the sight post, gradually begin to remove material on only one side of the dovetail. Remember that your file only cuts one way, so don’t saw back and forth — this will kick up burrs that’ll mislead you during fitting, and you’ll end up removing too much material. Focus on smooth, linear strokes and follow the line of the material. Take three to five good swipes, wipe it clean, and check fitment. Continue this process until you can push the sight in far enough using finger pressure.
Once you have both pistol sights installed and close to center, you can perform an initial alignment, assuming they aren’t constrained by some sort of secondary retention. Using the depth rod on your calipers, measure from the flat of the slide to the flat of the side of the sight. Then, take the same measurement on the other side of the slide. Calculate the difference between those two measurements and divide it by two. The result is how much farther you need to push the sight in from the side with the lesser measurement.

Use the tail of your caliper to ensure the sight is centered in its dovetail to get a working mechanical zero.
Small taps and a lot of patience are key. If your pistol sights seem like they stutter or jump when attempting small adjustments, apply localized heat with a propane torch. Concentrate the heat in front and behind the dovetail cut. Mechanical center is just an initial alignment because slides and barrels don’t always line up exactly when in full battery. Take a trip to the range to see where your rounds impact in order to make your final adjustments.
If rounds are landing left or right of where you’re aiming, you need to adjust windage, by drifting either the front or rear sight. Alternately, adjustable rear pistol sights may have a screw to adjust windage. If rounds hit high or low, adjust your elevation. With an adjustable rear sight, you can dial in the needed change. If it’s fixed, you’ll have to swap in a shorter or taller front sight to adjust your elevation.
If you’re good at math, you can calculate the necessary sight adjustments given your sight radius, distance to target, and deviation from point of aim to point of impact. Or just use the handy online sight calculators on Dawson Precision’s and Dillon Precision’s websites. During and after your first couple range trips, admire your handiwork and periodically check your pistol sights for any looseness or movement. Once you’re confident in your sights, grab some ammo and go get some!
Recoil
Larapi is a package thats offers you to do modern API development in Laravel with support for new versions of Laravel.Laravel News Links
BDE= knowing when to pull it out. pic.twitter.com/fLHDXtdUF4
— Knot the Agency Guy (@knot_agency) April 30, 2021
Fuck….
Only if he had flipped a lit cigarette at those motherfuckers as they drove off.
No word if they lit themselves on fire later but I wish they had.
https://photos5.appleinsider.com/gallery/41745-80948-wetbo-xl.jpg
ElevationLab will soon ship the the “TagVault,” a rugged, waterproof holder designed to keep your AirTag safe.
The TagVault is a two-piece AirTag holder that screws together with stainless Tox hardware, offering complete protection from bumps, scratches, and normal wear and tear. This makes it an attractive option for attaching to objects like keys and luggage.
Securing an AirTag inside will up the water-resistance of the AirTag to being completely waterproof. Should you drop your keys in a stream while hiking, for instance, it could offer more protection than a bare AirTag.
TagVault is designed to be nondescript, giving no indication that it holds an AirTag inside. This may dissuade someone from removing it and disposing of it. The manufacturer suggests clipping them on backpacks, luggage, purses, and more.
The TagVault is now available for preorder, priced at $12.95 for a single TagVault, or $29.95 for a set of three. ElevationLab will be shipping orders in June.
Stay on top of all Apple news right from your HomePod. Say, “Hey, Siri, play AppleInsider,” and you’ll get latest AppleInsider Podcast. Or ask your HomePod mini for “AppleInsider Daily” instead and you’ll hear a fast update direct from our news team. And, if you’re interested in Apple-centric home automation, say “Hey, Siri, play HomeKit Insider,” and you’ll be listening to our newest specialized podcast in moments.
AppleInsider News