A Left leaning US Army General getting a paycheck from CNN:
A Republican United States Senator from South Carolina:
In 1994, there was an Assault Weapons Ban – the evidence indicates that there was really no change at all in crime, because the crooks are going to get a gun!
In my opinion, Eloquent is one of the most powerful features of Laravel. It is an API for interacting with your database, and it has a very nice and easy-to-remember syntax. For example:
$post->author->name;
Will give you the name of the post’s author.
This is an example of an Eloquent relationship. Relationships define how your models (tables) are connected. Although most are easy to understand, there are a few more complicated ones.
In this post, I’m going to show how every relationship works.
One to one (has one)
For this example, we have two models: a User and an Address. The User model holds information such as name, email address, and password, and the Address model holds information like country, state, city, etc.
A User has one Address
An Address belongs to a User
We may have this table structure:
users
    id - integer
    name - string
    email - string
    password - string

address
    id - integer
    country - string
    city - string
    user_id - integer
You can define these relationships like this:
// app/Models/User.php

public function address()
{
    return $this->hasOne(Address::class);
}
Now you can access the user’s address using $user->address->city.
Note: for this to work, the Address model should have a user_id column.
Inverse (belongs to)
If you have an Address and want to find the corresponding User, then define this relationship:
// app/Models/Address.php

public function user()
{
    return $this->belongsTo(User::class);
}
One to many (has many)
In this example, we have two models: a Post and a Category.
A Post belongs to a Category
A Category has many Posts
And we have this table structure:
categories
    id - integer
    name - string

posts
    id - integer
    title - string
    category_id - integer
We can define this relationship like this:
// app/Models/Category.php

public function posts()
{
    return $this->hasMany(Post::class);
}
And you can access all the posts like this:
foreach($category->posts as $post) {
    //
}
Note: for this to work, the Post model should have a category_id column.
Many to one (belongs to)
In this example, we have two models: a Post and a Category.
A Post belongs to a Category
A Category has many Posts
And we have this table structure:
categories
    id - integer
    name - string

posts
    id - integer
    title - string
    category_id - integer
We can define this relationship like this:
// app/Models/Post.php

public function category()
{
    return $this->belongsTo(Category::class);
}
And you can access the Post‘s category like this:
$post->category->name;
Has many through
This relationship is a bit more difficult. In this example, we have three models: an Author, a Post, and a Language.
A Post belongs to an Author
An Author has many Posts
An Author “belongs” to a Language (speaks a language)
A Language has many Authors
For example, this is our table structure:
languages
    id - integer
    name - string

authors
    id - integer
    name - string
    language_id - integer

posts
    id - integer
    title - string
    author_id - integer
If we want to get all posts in a specific language, we can define this relationship:
// app/Models/Language.php

public function posts()
{
    return $this->hasManyThrough(Post::class, User::class);
}
Now, we can get all posts using:
foreach($language->posts as $post) {
    //
}
Inverse
If you now want to get the Language of a Post, you can just simply do this:
$post->user->language->name;
Many to many (belongs to many)
In this example, we have two models: a Product and a Tag.
A Product has many Tags
A Tag has many Products
And we may have this table structure:
products
    id - integer
    name - string
    price - integer

tags
    id - integer
    name - string

product_tag
    product_id - integer
    tag_id - integer
Note: in the table structure, we have a third table, product_tag. This table connects products to tags.
Now we can define the relationships like this:
// app/Models/Product.php

public function tags()
{
    return $this->belongsToMany(Tag::class);
}
// app/Models/Tag.php

public function products()
{
    return $this->belongsToMany(Product::class);
}
Now we can get all tags/products using:
foreach($product->tags as $tag) {
    //
}
foreach($tag->products as $product) {
    //
}
In the next post, I’m going to show what polymorphic relationships are and how to use them. Thanks for reading!
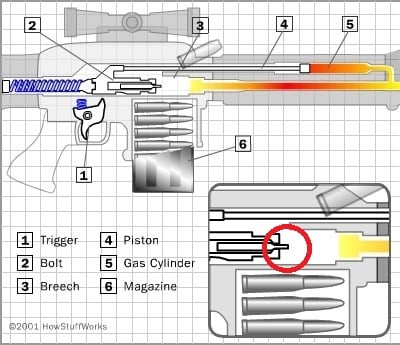
We’ll begin with the easy definition of what is a gun, different components of the bullet cartridge, some gun actions, and loading mechanisms.
Table of Contents
Loading…
What is a Gun?
At its core, guns are things that launch projectiles of some sort at high speed. The first guns were just tubes with explosives and a projectile…think cannons.
Cannon Blast, Smithsonian Channel
Modern guns have come a long way.
Cartridges
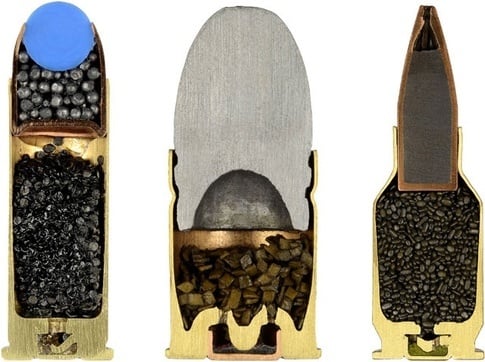
What most people think of as “bullets” are actually “cartridges” that include the bullet, a casing, powder, and a primer.
Deconstructed 9mm Cartridge
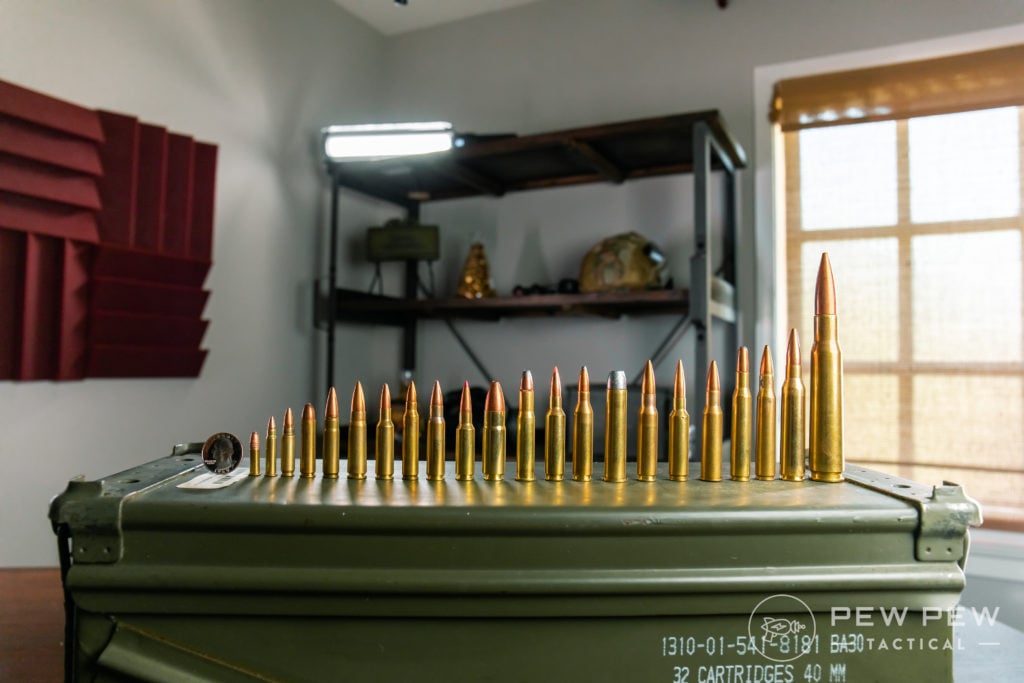
Of course there’s TONS of different calibers (size of bullets).
Common Calibers in Room
The primer is first ignited causing a small explosion, which then burns the rest of the powder, creating lots of pressure that moves the bullet out of the gun.
Rimfire vs Centerfire Cartridges
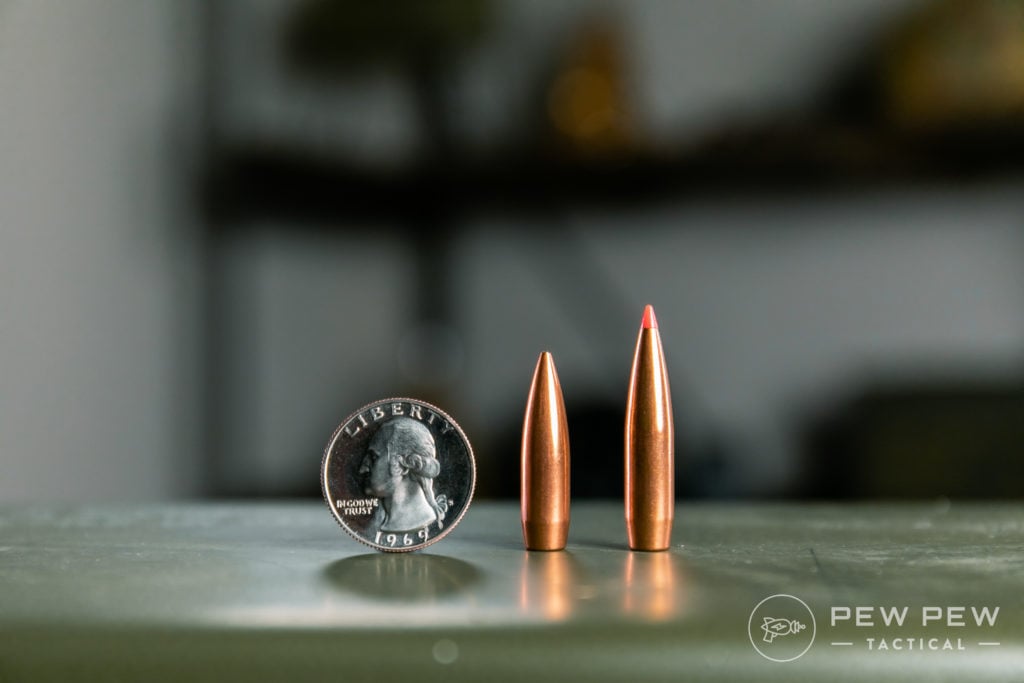
The bullet is just the projectile that shoots out of a gun, not the entire object.
Different types of guns have different mechanisms of how to ignite the primer to burn the gunpowder, but there is almost always a rounded metal object called the “firing pin” which strikes the primer and starts the process.
Burning Smokeless Powder
Modern smokeless powders don’t even burn that fast…it’s the pressure of the confined space of the chamber that gives it the oomph to move the bullet down the barrel.
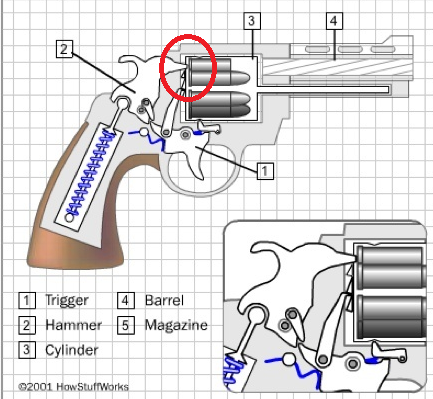
Below you can see that the firing pin is attached to a “hammer” in a revolver.
How a Revolver Works
While in a rifle it could be by itself and held in a “bolt.”
Gas System Gun
Here’s some of me shooting!
Loading Mechanisms
Most guns will have a mechanism that gets rid of the spent casing and moves in a fresh cartridge.
Some of these include manual actions, using the recoil from the explosion, or using expended gas from the explosion. We’ll go over these in detail in further lessons. But for now, here’s some slow-motion of guns in action.
Additional Learning
Looking for a comprehensive handgun video course that only goes over the most important stuff…with none of the attitude? Check out our very own Gun Noob to Gun Slinger course.
Automating deployments for your Laravel 8 project (or any other version) on your dedicated or shared hosting sounds daunting at first. I have been at that place. For my job board back when I launched it, I started looking at tools that I could use for deployment for free. If you don’t have a budget, or you’re keen on learning how to deploy automatically or you like setting up things yourself, this is a decent option.
Setup
Ubuntu 20.04
PHP 8 & PHP FPM
Laravel 8.x
Deployer 7 by Anton Medvedev (wonderful open source tool) – we will use the latest beta with support for PHP 8
On your terminal in the Laravel project, install the package (watch out for the latest releases of Deployer)
Once that is done, let’s initiate which will create a deploy.php ideally at the root of the project which we’ll edit
dep init
Most of the
<?php

namespace Deployer;
require 'contrib/rsync.php';

// Include the Laravel & rsync recipes
require 'recipe/laravel.php';

set('application', 'dep-demo'); //for your reference
set('ssh_multiplexing', true); // Speed up deployment

set('rsync_src', function () {
    return __DIR__; // If your project isn't in the root, you'll need to change this.
});

// Files you don't want in your production server.
add('rsync', [
    'exclude' => [
        '.git',
        '/storage/',
        '/vendor/',
        '/node_modules/',
        '.github',
        'deploy.php',
    ],
]);

task('php-fpm:restart', function () {
    run('service php8.0-fpm restart');
});


// Hosts
host('your_website_or_IP')
->setRemoteUser('your_SSH_user') // SSH user
->setDeployPath('/var/www/website')  // Deploy path
->setIdentityFile('~/.ssh/id_rsa'); // Your SSH key

after('deploy:failed', 'deploy:unlock'); // In case your deployment goes wrong

desc('Deploy the application');
task('deploy', [
    'deploy:info',
    'deploy:prepare',
    'deploy:lock',
    'deploy:release',
    'rsync',
    'deploy:secrets',
    'deploy:shared',
    'deploy:vendors',
    'deploy:writable',
    'php-fpm:restart',
    'artisan:storage:link',
    'artisan:view:cache',
    'artisan:config:cache',
    'artisan:optimize',
    'artisan:migrate',
    'deploy:symlink',
    'deploy:unlock',
    'deploy:cleanup',
]);
Deployer 7 has the recipes for most of your common tasks built-in, which is great. You can see the list of available recipes.
Once this is all setup, all you have to do is run and that should be do everything you’ve described
dep deploy
You should see a new folder structure in your host, where it has releases and a release folder. Deployer syncs your code to your server using rsync, runs your tasks and then creates a symlink to point to the release folder which contains your latest code.
So make sure that you point your webserver to /var/www/website/release, restart your webserver, and you should be good to go.
If you’re looking for automating this using GitHub Actions, take a look at this great guide by Atymic – it’s what helped me discover this tool and guided me on the entire process.
In this classic sketch from Key & Peele, a guy bumps into another guy on the playground and gets into an altercation. But will the baby that he’s carrying be a help or a hindrance as he takes on his foe? Click play and find out.
(Gore) You never want to stand directly in front of a jet engine, as its powerful vortex could suck you right into it. CG animator atomic marvel used a physics simulation to toss a particle-based digital body into an Airbus jet engine. We’re not sure about its accuracy, but the results are much like those Will It Blend? videos.
In this tutorial i show you how we can avoid pivot table and how we can do same stuff without making pivot table. Simply think we make many to many relationship then sometimes we need to make pivot table like one post has many categories and one categories has many post. That time we use pivot table like post_categories.
But in this table we will show our data like post with categories, or post according to category using json column in our post table. For avoiding pivot table we can reduce one table from our database schema and of course our database performance will be better than before.You will also learn how to insert json data into mysql using laravel.
Which one is better for connection? Pivot table or JSON? You will be clear from this article that laravel remove pivot from json in laravel. So let’s start our tutorial laravel model json column.
Preview : Post table after inerting data
Preview : Post with category name
Preview : Post according to category id
Step 1 : Create Model
In this we need two model. One is category model and other is post model. So let’s create it.
php artisan make:model Post -m
php artisan make:model Category -m
Now open both model and update like below image.
app/Post.php
namespace App;

use Illuminate\Database\Eloquent\Model;
use App\Casts\Json;

class Post extends Model
{
    protected $guarded = [];

    protected $casts = [
        'category_id' => Json::class
    ];

}
and open migration file and update it like below.
database/migration/create_posts_table.php
public function up()
 {
   Schema::create('posts', function (Blueprint $table) {
      $table->id();
      $table->json('category_id');
      $table->string('title');
      $table->timestamps();
   });
 }
Step 2 : Create Route
We need many route for creating post or showing post according to category. So open web.php and update it like below.
In this step we need to create post controller. So create it by the following command.
php artisan make:controller Admin/PostController
And update it like below.
app/Http/Controllers/Admin/PostController.php
namespace App\Http\Controllers\Admin;

use App\Category;
use App\Http\Controllers\Controller;
use App\Post;
use Illuminate\Http\Request;

class PostController extends Controller
{
    public function show_post_form()
    {
    	return view('admin.post.create');
    }

    public function store(Request $request)
    {
    	$request->validate([
          'category_id' => 'required',
          'title' => 'required'
    	]);

    	$post = new Post;
    	$post->category_id = json_encode($request->category_id);
    	$post->title = $request->title;
    	$post->save();

        return redirect()->back();

    }

    public function index()
    {
    	$post = Post::all();

    	return view('admin.post.index',['posts' => $post]);
    }

    public function category_post($id)
    {
      return Post::whereJsonContains('category_id',$id)->get();
    }
}
Step 4 : Create Blade File
Now we are in the final step. So how to insert json data into mysql using laravel we will know that now. No create below file and paste this code in your file.
If you’re looking at the popularity of certain firearms and wondering if you should buy what’s trending…
There’s an old saying that sometimes comes to mind, “If all your friends jumped off a bridge, would you jump, too?”
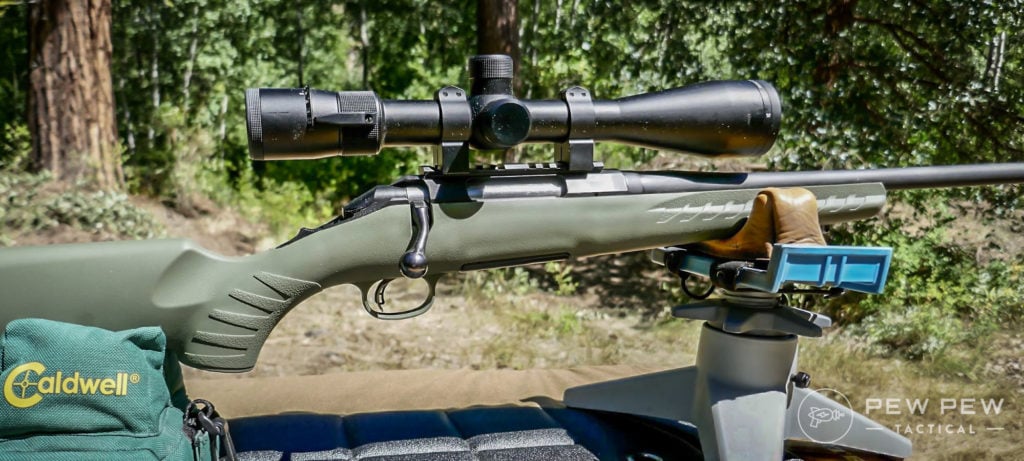
Remington 700…a popular gun you’ve probably heard name dropped.
It’s usually asked to make kids question the mob mentality of negative peer pressure.
Just because “everybody’s doing it” doesn’t automatically mean it’s the best decision for you.
But sometimes it does…
You just don’t understand, Mom!
In the world of firearms, and especially bolt guns, there are insanely popular guns everyone seems to jump to buy.
But you might ask yourself, “Should I jump into this model, too?”
If you’re in the market for a new bolt-action rifle and you’re wondering if you should follow the well-traveled path or forge your own, we’re here to help.
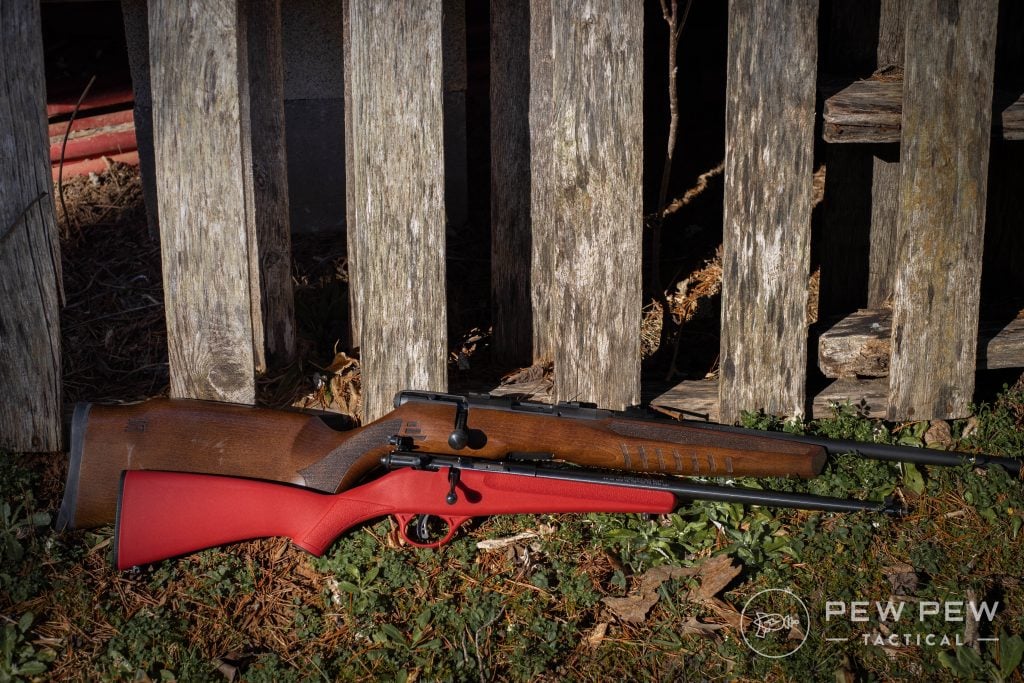
Savage Arms Rascal & B22 G — both bolt-actions.
We’re going to take a look at the most popular bolt-action rifles on the market, what they have to offer, what makes them so popular, and whether or not you should follow the crowd.
Table of Contents
Loading…
What is a Bolt-Action Rifle?
Before diving headfirst into the world of bolt-actions, let’s talk about what makes this style of firearms unique.
If you’ve ever watched a sniper movie, you’ve seen a bolt-action.
They’re commonly used in media for precision-like scenes because, well, they’re pretty precise.
Winning fanfare among military and SWAT snipers as well as hunters and long-range shooters, these rifles have been around the block a few times.
With a bolt-action, the user manually feed and ejects each round by manipulating the bolt on the side of the rifle. This bolt rotates, can be pulled to the rear, rotated, then pushed back into place.
Want to read up on the advantages and disadvantages (or learn more about other types of actions)? Head over to our Guide to Rifle Actions.
With that out of the way, let’s get to the most popular bolt-actions!
Most Popular Bolt-Action Rifles on the Market
1. Bergara B-14
The Remington 700 has been around for more than 60 years.
Although Remington created countless versions of the 700 over the years, they all share the iconic “Three Rings of Steel” cylindrical receiver.
The design provides a better bedding surface than previous bolt-action designs, which basically translates into repeatable downrange accuracy.
Remington 700
Sadly, Remington themselves just aren’t the brand they used to be. If you can find a pre-2008 Remington 700 — go for it! But otherwise… you might want to choose one of the outstanding clones on the market.
Rifles like the Bergara B-14 use the same action pattern as the R700, but have much higher quality control and produce an outstanding rifle!
Made in Bergara Spain, their whole B-14 line is a workhorse set of rifles that cover everything from hunting to long range precision shooting.
If you want to get an American made near custom rifle, Bergara offers their Premier line that is USA made and offers even higher quality.
The Mossberg Patriot has the classic look and feel of a hang-over-the-mantle, pass-it-down-to-your-grandson kind of rifle.
Since it’s built with Mossberg quality, it’s actually worthy of heirloom status, even if you decide to forego the glossy chestnut stock for a lightweight synthetic one.
Mossberg Patriot 30.06 with VX Freedom 3-9x
The Patriot uses a fluted, free-float barrel, a user-friendly adjustable trigger, and a spiral fluted bolt.
Although the Mossberg Patriot certainly doesn’t have the celebrity-level popularity of a Remington 700 or a Mauser M94, there are plenty of Patriots out there stocking freezers, protecting livestock, and plinking cans every single day of the year.
The Patriot’s quality build and economy price tag should be enough to land it solidly on a B-list of the most popular bolt actions.
Tried the Browning X-Bolt? Give it a rating below.
5. Weatherby Vanguard
Both of Weatherby’s bolt-action models, the Mark V and the Vanguard, are well-loved by hunters and target shooters the world over.
Both are high-quality rifles.
Weatherby Mark V Backcountry
While we’ll admit the Mark V performs better than its younger brother, we’re giving a slight popularity edge to the Vanguard for one reason — it’s cheaper.
While most of us would love an unlimited firearms budget — top of my wish list if I ever find an Aladdin-style lamp that needs polishing — the average American gun owner must make concessions, pinch pennies, and continue to scour thrift stores and flea markets for antique lamps.
The Vanguard is a great weapon, don’t get me wrong.
However, Weatherby cuts corners by outsourcing production, dropping four lugs in the action design, and using a two-stage trigger in place of the true zero-creep break of the Mark V’s TriggerTech.
There are a few other differences, but it’s really hard to notice them on the showroom floor.
Weatherby guarantees sub-MOA accuracy from both models.
Weatherby Vanguard (Aussie Hunter)
Honestly, both rifles are solid, dependable, and plenty accurate.
Is the Mark V a nicer rifle? You bet your britches it is.
However, the Vanguard is awesome in its own right, When held in skilled hands, it performs just as well as the Mark V in the hands of the average shooter.
My advice, buy the more popular and significantly cheaper Vanguard, and then work on improving your shooting skills.
The Savage 110 is “the oldest continuously manufactured bolt-action rifle in North America.”
Designed in 1958, the Model 110 occupied tens of thousands of deer stands across multiple generations.
Originally designed to provide the average American hunter with a strong, powerful hunting rifle, it also manages to be lightweight and relatively affordable.
Savage Model 110
Today, thanks to the Model 110, Savage is currently one of the largest bolt-action rifle makers in America.
One of the Savage 110’s best selling points comes in the form of its patented AccuTrigger — which was added to the design in 1966.
Plenty of other gun manufacturers have attempted to copy the AccuTrigger design, some with better success than others.
Savage 110 High Country (Photo: Savage Arms)
The Savage AccuTrigger definitely sets the bar for adjustable rifle triggers, and that bar is pretty freakin’ high.
Modern Model 110s also feature Savage’s AccuFit modular stock system, which allows you to adjust the stock for a perfect, personalized fit.
If you’re going to run with the crowd, your firearm should at least fit you, which is more than I can say for most fashion trends.
It offers a lightweight, affordable, and astonishingly accurate design. If those aren’t good reasons to jump onto a trend, I don’t know what will convince you.
However, not everyone loves the Tikka. It has its haters out there.
Haters
Most of them complain about Tikka’s penchant for adding plastic parts to an otherwise sturdy, dependable gun.
While plastic is certainly something to complain about, the T3 has plenty of shining features, including a crisp, adjustable trigger and a machined action with a reduced ejection port for improved accuracy.
Tikka T3X Black
The T3 series received an overhaul in 2016, and the newest models got an updated, although thoroughly unoriginal, new name – Tikka T3x.
The T3x promises MOA groups right out of the packaging, which means the T3x will definitely be carrying on the crazy popularity of its predecessor.
Although it’s difficult to find exact figures, somewhere between 91 million and 125 million Mauser M98 bolt-action rifles have been manufactured since 1898.
A fair portion were produced as military rifles. No other rifle in history (except for the AK-47) even begins to approach those numbers.
The fact that the M98 is still in production today, more than 120 years later, is a testimony to the awesomeness of this rifle.
The Mauser m98 is a fine gun for hunting or sport shooting.
There are also a ton of clones floating around out there, which also bolsters the M98’s celebrity.
But why does this rifle, with its century-old technology, continue to be one of the most popular bolt-actions on the market today?
One reason – it’s simple and it works.
In an age where we adore high-tech everything, the Mauser M98 reminds us that progress simply for progress’s sake isn’t necessarily progress.
As grandpa used to say, “If it ain’t broke, don’t fix it.”
Modern Mauser M98s are beautiful pieces of art, with elegant lines, black plasma- nitrided steel components, and gorgeous high-gloss wood stocks.
It isn’t always a good idea to do something just because everybody else is doing it. But in the case of these bolt-actions, following the crowd is a smart choice.
From Mausers to Weatherbys, these guns earn their hype.
(Or for your littlest shooter, try a popular youth bolt gun — the Savage Rascal.)
Did we leave off something you think deserves a spot on the A-list? Tell us about it in the comments below. For even more rifle action, check out the Best Sniper & Precision Rifles for Beginners.
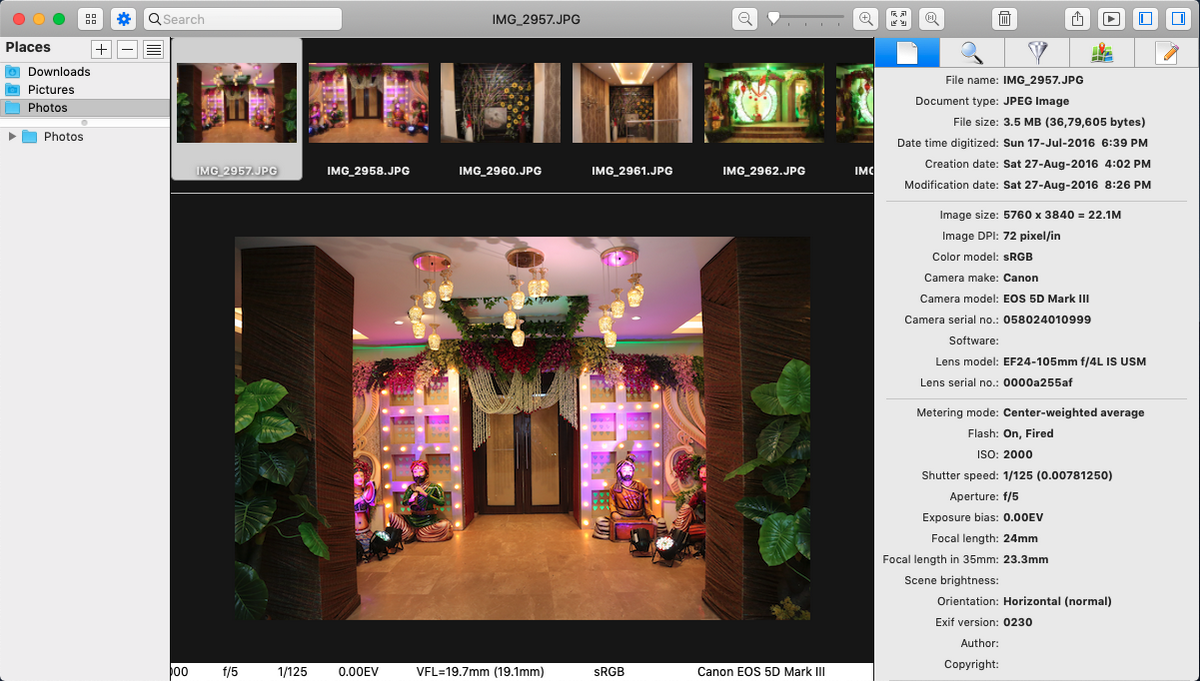
Finder’s Gallery view lets you scroll through folders of photos on your Mac with an enhanced preview pane and rich metadata. Preview works fine for basic use, but it lacks navigation controls, superior viewing experience, and other features.
You don’t need an app like Apple Photos, Adobe Lightroom, or one that supports databases to update and organize your collection while displaying images. We’ll show you some of the best photo viewer apps with unique features for Mac and how you can use them.
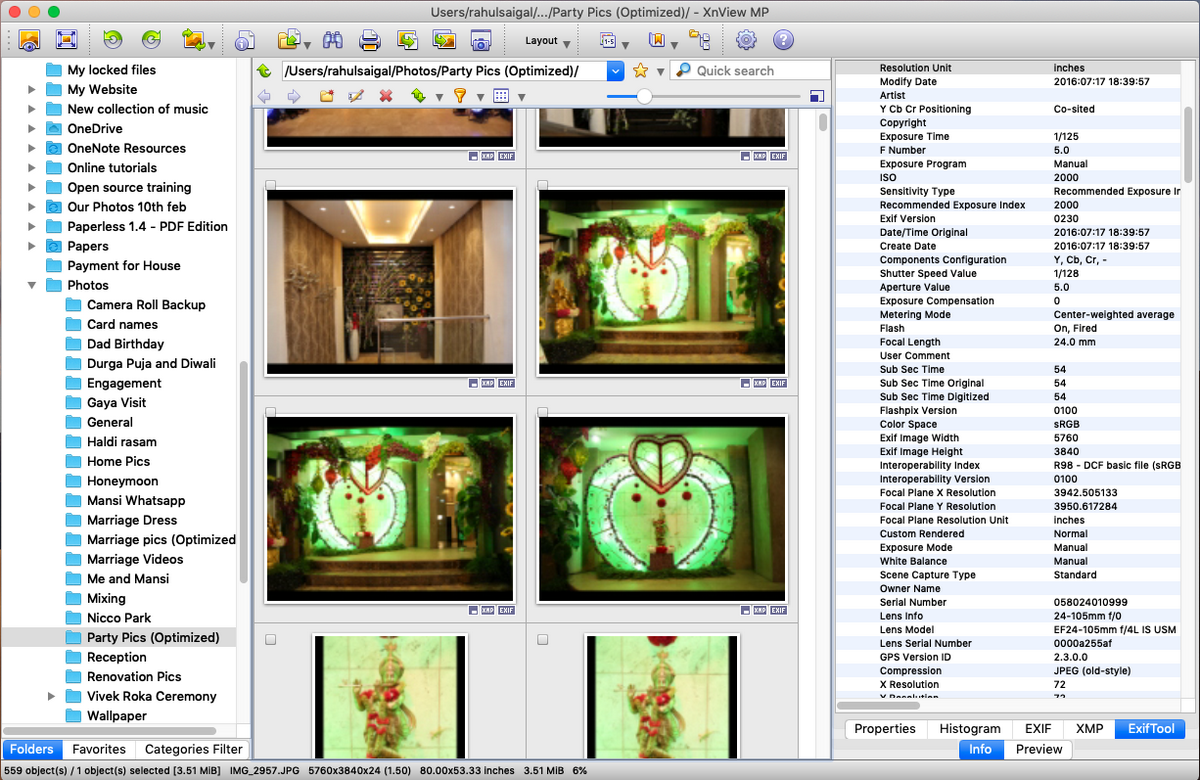
1. XnView MP
XnView MP is a photo viewer, manager, and resizer for Mac. The built-in tools let you organize images in multiple ways and process them with an arsenal of editing tools while offering batch conversion modules and support for numerous image formats.
When you launch the app, you’ll see three panels.
The left sidebar is the Finder file system, with a section tabs—Folders, Favorites, and Categories Filter. It consists of pre-configured categories to aggregate and label your images.
The center panel shows a thumbnail preview of each photo. Navigate to View > View As and select Thumbnails + Labels to show the details. You can sort images by name, file size, EXIF date taken or modified, or even filter them by rating, comments, or tags.
On the right side, you’ll see a preview panel. Info lets you see file properties, histograms, and EXIF data. Switch to the Preview panel to check out the image.
Unique Features of XnView MP:
Support of old, non-standard, Photoshop, Corel, Autodesk, and HEIF image formats. Click Create to split or join images and create multipage image files.
It can handle RAW file format and uses the GPU to improve performance, caching, and processing. It also supports a full internal bit depth picture of 8, 16, or 32 bits per component.
Customize the layout of the app as per your needs. Navigate to View > Layout, or select Free to create a custom layout.
Integrates with XnConvert to convert images, resize batches of images, and apply adjustments like rotation, watermarks, filters, fancy effects, and more.
Lets you create custom slideshows with parameters for setting up a timer (or keyboard press), changing screen size, adding transition effects, and adding background music.
ApolloOne is an image viewer app for Mac to view and organize photos. The built-in camera RAW decoder can generate a preview of an image directly from the RAW file. With the Lanczos filter, it can scale your image back to its original quality.
To access your photos, click the Browser button in the toolbar. Then click the plus (+) button and select Folder. You can group related folders by adding a separator.
Double-click a photo to open it. Then press the left or right arrow keys to see your photos. Thumbnails are generated on the fly using a multi-core processing engine. For Macs with a GPU, the app can speed up the display of images and quality.
Head to Preferences > Advanced and turn on High quality image scaling option. You can zoom in or out of the photo. Press the Control key to instantly zoom to a particular magnification.
The Inspector panel shows you detailed shooting info from a camera JPEG or camera RAW file. To inspect any image, press Cmd + I or click the Inspector button in the toolbar. On a supported camera, the info page can reveal the serial number, shutter count, and other specifications.
Unique Features of ApolloOne:
It provides a glance view of images at the top of the viewer—like a film strip (Tools > Show Filmstrip).
ApolloOne lets you set the source of the metadata. It supports both macOS extended attributes (used by Finder searches) and XMP. Turn on Spotlight indexing to search images by different EXIF parameters.
It offers you an adjustment panel to help with the assessment of a RAW image. This includes exposure compensation, highlights and shadows adjustment, and an Auto Tone curve.
The built-in contact sheet mode (View > Contact Sheet) displays the thumbnails in a grid fashion. With it, you can perform file operations in bulk.
You can add a Smart Folder created by Finder to access your photos according to your needs. It even supports Finder tags and lets you use a combination of tags for further filtering. Here’s how to use smart folders on a Mac.
Download:ApolloOne (Free, premium version available)
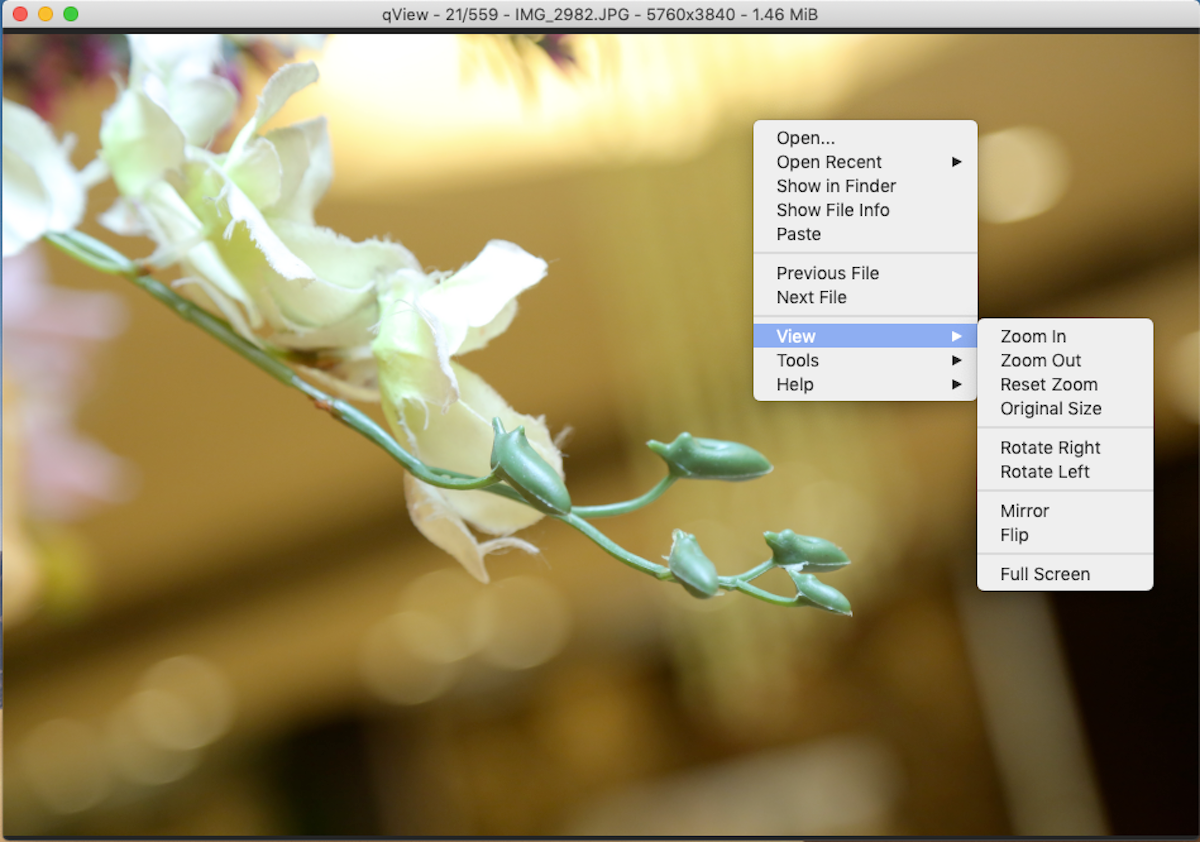
3. qView
qView is a cross-platform, minimal image viewer app for Mac. On launch, you’ll see a black window. Navigate to File > Open and choose a folder to display its contents. Then, press the left or right arrow keys to navigate between the photos.
Scroll to zoom in or out and control-click any picture to access more options. You can rotate images, flip images, or switch to the original size and view them in detail.
Unique Features of qView:
qView supports GIFs, allowing you to increase or decrease the speed or save a specific frame as a PNG or JPEG.
View photos in slideshow mode (Tools > Start Slideshow). You can customize the slideshow direction, timer, and preload settings.
It offers you shortcuts to navigate and access different options, and usability. Check the Shortcuts tab in preferences.
By default, the title bar shows the file name. Head to Preferences > Windows and check the Verbose option under the Titlebar text to show you more details.
Picturama is a modern-looking, electron-based, picture-viewing Mac app that lets you quickly view images. The app supports JPEG, PNG, TIF, WebP, HEIC, and HEIF. It also reads the RAW file for a bunch of cameras through the LibRaw libraries built into the app.
To get started, click the Settings button and choose a folder.
You can browse the photos by date using the stylish progress bar on the right. Choose a year and month, and directly navigate to your photos.
Press the i button to see the information and EXIF data of an image. Click the flag button to add that image to your favorites.
Unique Features of Picturama:
It can retrieve comprehensive EXIF, IPTC, MakerNotes, and XMP information of the detailed Info page.
You can add a tag, but it has no relation with the Finder.
Rotate and crop your photos. You can zoom in or out with the slider in the toolbar or mouse wheel.
Export photos in formats like JPEG, PNG, or WebP. When doing this, you can set the quality, size, and remove EXIF data.
Lyn is a Mac photo viewer and organizer. It supports non-standard, old, and RAW image formats. With the built-in support of camera models and multi-threading, it can progressively scale high-resolution images.
The left sidebar displays all your folders (including Smart Folders), photo libraries, devices, and mounted volumes.
The viewer displays the image and has view options like—Icon, Strip, List, and Map view mode. The map layout mode uses Apple Maps with GPS data to provide visual location information. And the list view mode shows the image thumbnail, detailed information, and metadata.
At the right, you’ll see the Inspector panel. It displays information like type, color space, EXIF, makernote, IPTC, GPS, and more.
Browse your photos either using strip view mode or by double-clicking a picture and using the left or right arrow keys. You can use different zoom methods and use shortcuts to magnify the image at the cursor level.
Lyn can also sort the photos in many ways, like name, date, color label, tags, and rating. Or it can filter them by name, extension, and tags in the search field.
Unique Features of Lyn:
This app uses ColorSync color management technology, from source to printing. It can detect the color profile (through ICC) from the image, embedded profile, EXIF, or camera makernote.
You can rate, assign keywords, or tags to your photos. It’s also possible to create a smart folder with tags, so you can easily find files. Under the Search For tag, you’ll find all your Smart Folders.
When you connect a camera, expand the Devices section and start importing your photos. It can even import from a card reader, hard disk, or NAS.
Lyn includes a non-destructive filtering engine to adjust color, exposure, contrast, enhance the shadows, apply a sepia filter, convert to black and white, and more. You can even straighten or crop an image and later revert them.
Publish your photos directly to Flickr, Dropbox, and SmugMug. The user interface is built into the app itself.
Although viewing images seems like a simple operation, people may have a variety of use cases for it. The apps discussed in this article cover a wide range of options for different professionals and edge cases. Try out these apps yourself to see which one fits your needs best.
If you’re looking to edit these images, then you require an image editor. All these image viewers have the option to Open with an image editor of your choice. If this interests you, take a look at the best free and paid image editors for Mac to find the best option.


 Dilbert Daily Strip