https://www.pythonguis.com/static/tutorials/nicegui/getting-started-nicegui/first-nicegui-app.png
NiceGUI is a Python library that allows developers to create interactive web applications with minimal effort. It’s intuitive and easy to use. It provides a high-level interface to build modern web-based graphical user interfaces (GUIs) without requiring deep knowledge of web technologies like HTML, CSS, or JavaScript.
In this article, you’ll learn how to use NiceGUI to develop web apps with Python. You’ll begin with an introduction to NiceGUI and its capabilities. Then, you’ll learn how to create a simple NiceGUI app in Python and explore the basics of the framework’s components. Finally, you’ll use NiceGUI to handle events and customize your app’s appearance.
To get the most out of this tutorial, you should have a basic knowledge of Python. Familiarity with general GUI programming concepts, such as event handling, widgets, and layouts, will also be beneficial.
Installing NiceGUI
Before using any third-party library like NiceGUI, you must install it in your working environment. Installing NiceGUI is as quick as running the python -m pip install nicegui command in your terminal or command line. This command will install the library from the Python Package Index (PyPI).
It’s a good practice to use a Python virtual environment to manage dependencies for your project. To create and activate a virtual environment, open a command line or terminal window and run the following commands in your working directory:
- Windows
- macOS
- Linux
PS> python -m venv .\venv
PS> .\venv\Scripts\activate
$ python -m venv venv/
$ source venv/bin/activate
$ python3 -m venv venv/
$ source venv/bin/activate
The first command will create a folder called venv/ containing a Python virtual environment. The Python version in this environment will match the version you have installed on your system.
Once your virtual environment is active, install NiceGUI by running:
(venv) $ python -m pip install nicegui
With this command, you’ve installed NiceGUI in your active Python virtual environment and are ready to start building applications.
Writing Your First NiceGUI App in Python
Let’s create our first app with NiceGUI and Python. We’ll display the traditional "Hello, World!" message in a web browser. To create a minimal NiceGUI app, follow these steps:
- Import the
niceguimodule. - Create a GUI element.
- Run the application using the
run()method.
Create a Python file named app.py and add the following code:
from nicegui import ui

ui.label('Hello, World!').classes('text-h1')

ui.run()
This code defines a web application whose UI consists of a label showing the Hello, World! message. To create the label, we use the ui.label element. The call to ui.run() starts the app.
Run the application by executing the following command in your terminal:
(venv) $ python app.py
This will open your default browser, showing a page like the one below:
First NiceGUI Application
Congratulations! You’ve just written your first NiceGUI web app using Python. The next step is to explore some features of NiceGUI that will allow you to create fully functional web applications.
If the above command doesn’t open the app in your browser, then go ahead and navigate to http://localhost:8080.
Exploring NiceGUI Graphical Elements
NiceGUI elements are the building blocks that we’ll arrange to create pages. They represent UI components like buttons, labels, text inputs, and more. The elements are classified into the following categories:
In the following sections, you’ll code simple examples showcasing a sample of each category’s graphical elements.
Text Elements
NiceGUI also has a rich set of text elements that allow you to display text in several ways. This set includes some of the following elements:
The following demo app shows how to create some of these text elements:
from nicegui import ui

# Text elements
ui.label("Label")

ui.link("PythonGUIs", "https://pythonguis.com")

ui.chat_message("Hello, World!", name="PythonGUIs Chatbot")

ui.markdown(
    """
    # Markdown Heading 1
    **bold text**
    *italic text*
    `code`
    """
)

ui.restructured_text(
    """
    ==========================
    reStructuredText Heading 1
    ==========================
    **bold text**
    *italic text*
    ``code``
    """
)

ui.html("<strong>bold text using HTML tags</strong>")

ui.run(title="NiceGUI Text Elements")
In this example, we create a simple web interface showcasing various text elements. The page shows several text elements, including a basic label, a hyperlink, a chatbot message, and formatted text using the Markdown and reStructuredText markup languages. Finally, it shows some raw HTML.
Each text element allows us to present textual content on the page in a specific way or format, which gives us a lot of flexibility for designing modern web UIs.
Run it! Your browser will open with a page that looks like the following.

Text Elements Demo App in NiceGUI
Control Elements
When it comes to control elements, NiceGUI offers a variety of them. As their name suggests, these elements allow us to control how our web UI behaves. Here are some of the most common control elements available in NiceGUI:
- Buttons
- Dropdown lists
- Toggle buttons
- Radio buttons
- Checkboxes
- Sliders
- Switches
- Text inputs
- Text areas
- Date input
The demo app below showcases some of these control elements:
from nicegui import ui

# Control elements
ui.button("Button")

with ui.dropdown_button("Edit", icon="edit", auto_close=True):
    ui.item("Copy")
    ui.item("Paste")
    ui.item("Cut")

ui.toggle(["ON", "OFF"], value="ON")

ui.radio(["NiceGUI", "PyQt6", "PySide6"], value="NiceGUI").props("inline")

ui.checkbox("Enable Feature")

ui.slider(min=0, max=100, value=50, step=5)

ui.switch("Dark Mode")

ui.input("Your Name")

ui.number("Age", min=0, max=120, value=25, step=1)

ui.date(value="2025-04-11")

ui.run(title="NiceGUI Control Elements")
In this app, we include several control elements: a button, a dropdown menu with editing options (Copy, Paste, Cut), and a toggle switch between ON and OFF states. We also have a radio button group to choose between GUI frameworks (NiceGUI, PyQt6, PySide6), a checkbox labeled Enable Feature, and a slider to select a numeric value within a range.
Further down, we have a switch to toggle Dark Mode, a text input field for entering a name, a number input for providing age, and a date picker. Each of these controls has its own properties and methods that you can tweak to customize your web interfaces using Python and NiceGUI.
Note that the elements on this app don’t perform any action. Later in this tutorial, you’ll learn about events and actions. For now, we’re just showcasing some of the available graphical elements of NiceGUI.
Run it! You’ll get a page that will look something like the following.

Text Elements Demo App in NiceGUI
Data Elements
If you’re in the data science field, then you’ll be thrilled with the variety of data elements that NiceGUI offers. You’ll find elements for some of the following tasks:
- Representing data in a tabular format
- Creating plots and charts
- Building different types of progress charts
- Displaying 3D objects
- Using maps
- Creating tree and log views
- Presenting and editing text in different formats, including plain text, code, and JSON
Here’s a quick NiceGUI app where we use a table and a plot to present temperature measurements against time:
from matplotlib import pyplot as plt
from nicegui import ui

# Data elements
time = [1, 2, 3, 4, 5, 6]
temperature = [30, 32, 34, 32, 33, 31]

columns = [
    {
        "name": "time",
        "label": "Time (min)",
        "field": "time",
        "sortable": True,
        "align": "right",
    },
    {
        "name": "temperature",
        "label": "Temperature (ºC)",
        "field": "temperature",
        "required": True,
        "align": "right",
    },
]
rows = [
    {"temperature": temperature, "time": time}
    for temperature, time in zip(temperature, time)
]
ui.table(columns=columns, rows=rows, row_key="name")

with ui.pyplot(figsize=(5, 4)):
    plt.plot(time, temperature, "-o", color="blue", label="Temperature")
    plt.title("Temperature vs Time")
    plt.xlabel("Time (min)")
    plt.ylabel("Temperature (ºC)")
    plt.ylim(25, 40)
    plt.legend()

ui.run(title="NiceGUI Data Elements")
In this example, we create a web interface that displays a table and a line plot. The data is stored in two lists: one for time (in minutes) and one for temperature (in degrees Celsius). These values are formatted into a table with columns for time and temperature. To render the table, we use the ui.table element.
Below the table, we create a Matplotlib plot of temperature versus time and embed it in the ui.pyplot element. The plot has a title, axis labels, and a legend.
Run it! You’ll get a page that looks something like the following.
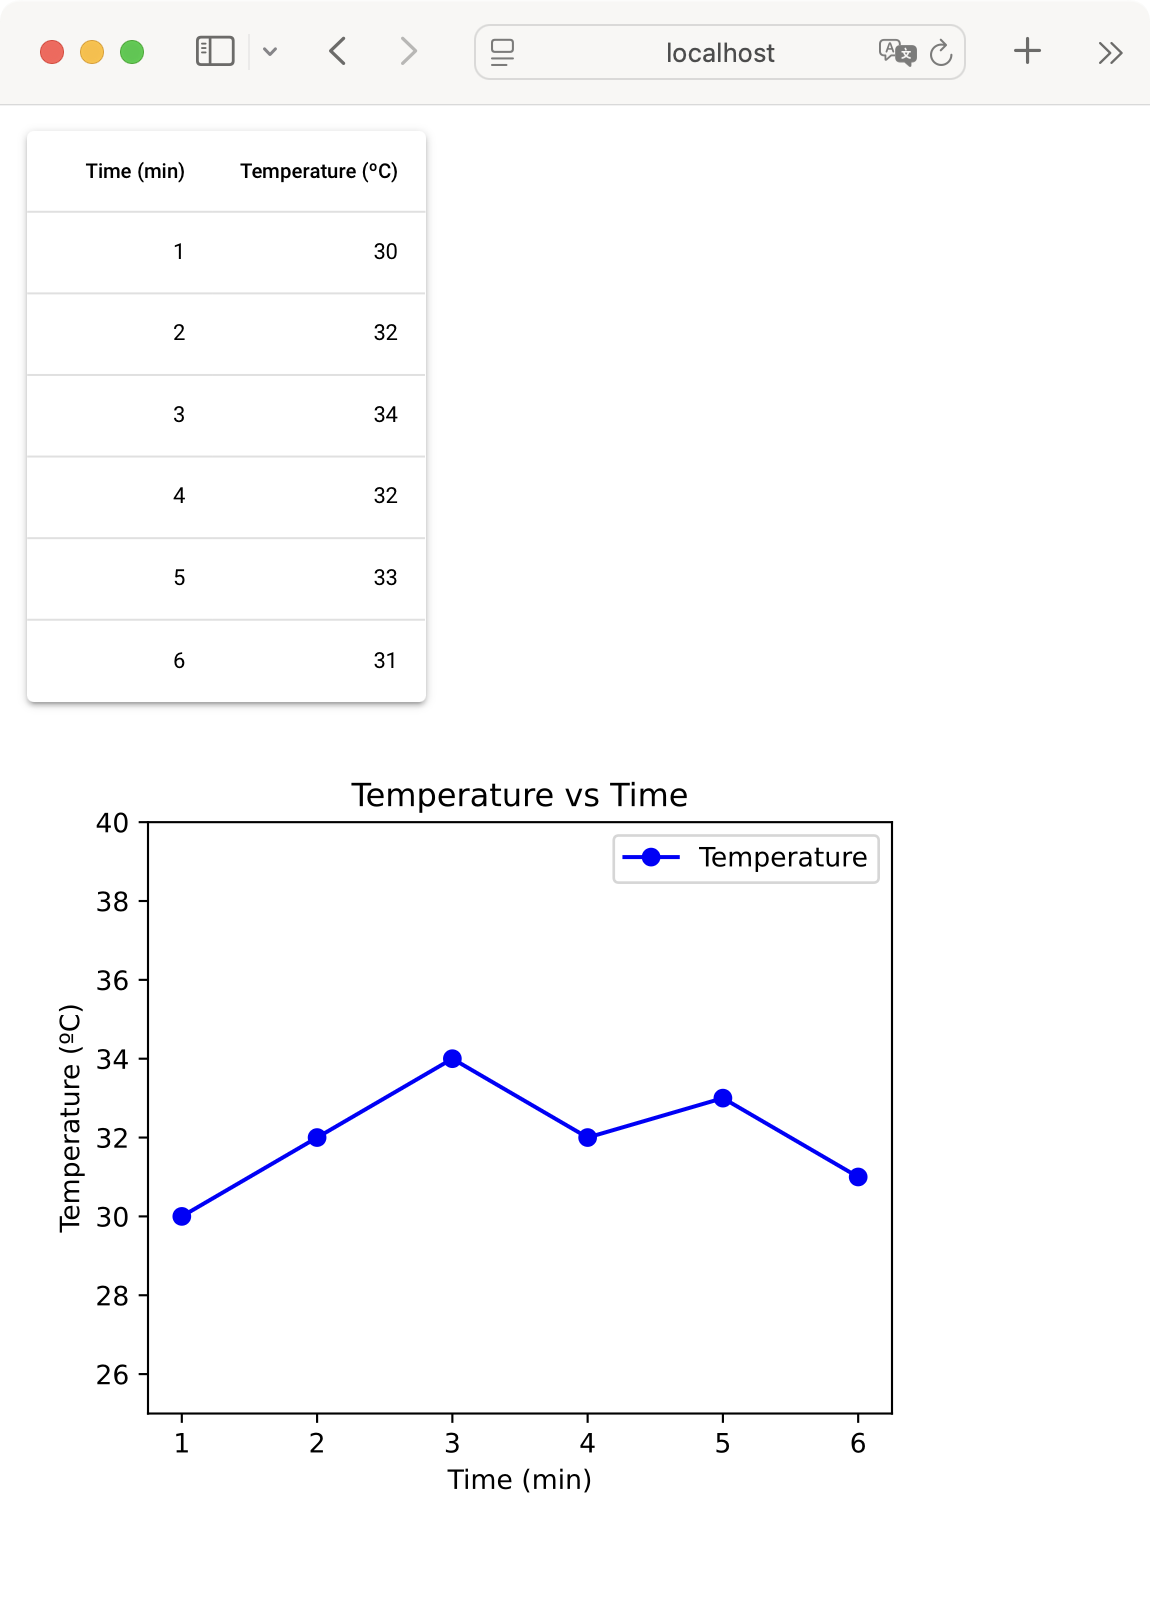
Data Elements Demo App in NiceGUI
Audiovisual Elements
NiceGUI also has some elements that allow us to display audiovisual content in our web UIs. The audiovisual content may include some of the following:
Below is a small demo app that shows how to add a local image to your NiceGUI-based web application:
from nicegui import ui

with ui.image("./otje.jpg"):
    ui.label("Otje the cat!").classes(
        "absolute-bottom text-subtitle2 text-center"
    )

ui.run(title="NiceGUI Audiovisual Elements")
In this example, we use the ui.image element to display a local image on your NiceGUI app. The image will show a subtitle at the bottom.
NiceGUI elements provide the classes() method, which allows you to apply Tailwind CSS classes to the target element. To learn more about using CSS for styling your NiceGUI apps, check the Styling & Appearance section in the official documentation.
Run it! You’ll get a page that looks something like the following.

Audiovisual Elements Demo App in NiceGUI
Laying Out Pages in NiceGUI
Laying out a GUI so that every graphical component is in the right place is a fundamental step in any GUI project. NiceGUI offers several elements that allow us to arrange graphical elements to build a nice-looking UI for our web apps.
Here are some of the most common layout elements:
- Cards wrap another element in a frame.
- Column arranges elements vertically.
- Row arranges elements horizontally.
- Grid organizes elements in a grid of rows and columns.
- List displays a list of elements.
- Tabs organize elements in dedicated tabs.
You’ll find several other elements that allow you to tweak how your app’s UI looks. Below is a demo app that combines a few of these elements to create a minimal but well-organized user profile form:
from nicegui import ui

with ui.card().classes("w-full max-w-3xl mx-auto shadow-lg"):
    ui.label("Profile Page").classes("text-xl font-bold")

    with ui.row().classes("w-full"):
        with ui.card():
            ui.image("./profile.png")

            with ui.card_section():
                ui.label("Profile Image").classes("text-center font-bold")
                ui.button("Change Image", icon="photo_camera")

        with ui.card().classes("flex-grow"):
            with ui.column().classes("w-full"):
                name_input = ui.input(
                    placeholder="Your Name",
                ).classes("w-full")
                gender_select = ui.select(
                    ["Male", "Female", "Other"],
                ).classes("w-full")
                eye_color_input = ui.input(
                    placeholder="Eye Color",
                ).classes("w-full")
                height_input = ui.number(
                    min=0,
                    max=250,
                    value=170,
                    step=1,
                ).classes("w-full")
                weight_input = ui.number(
                    min=0,
                    max=500,
                    value=60,
                    step=0.1,
                ).classes("w-full")

            with ui.row().classes("justify-end gap-2 q-mt-lg"):
                ui.button("Reset", icon="refresh").props("outline")
                ui.button("Save", icon="save").props("color=primary")

ui.run(title="NiceGUI Layout Elements")
In this app, we create a clean, responsive profile information page using a layout based on the ui.card element. We center the profile form and cap it at a maximum width for better readability on larger screens.
We organize the elements into two main sections:
-
A profile image card on the left and a form area on the right. The left section displays a profile picture using the
ui.imageelement with a Change Image button underneath. -
A series of input fields for personal information, including the name in a
ui.inputelement, the gender in aui.selectelement, the eye color in aui.inputelement, and the height and weight inui.numberelements. At the bottom of the form, we add two buttons: Reset and Save.
We use consistent CSS styling throughout the layout to guarantee proper spacing, shadows, and responsive controls. This ensures that the interface looks professional and works well across different screen sizes.
Run it! Here’s how the form looks on the browser.
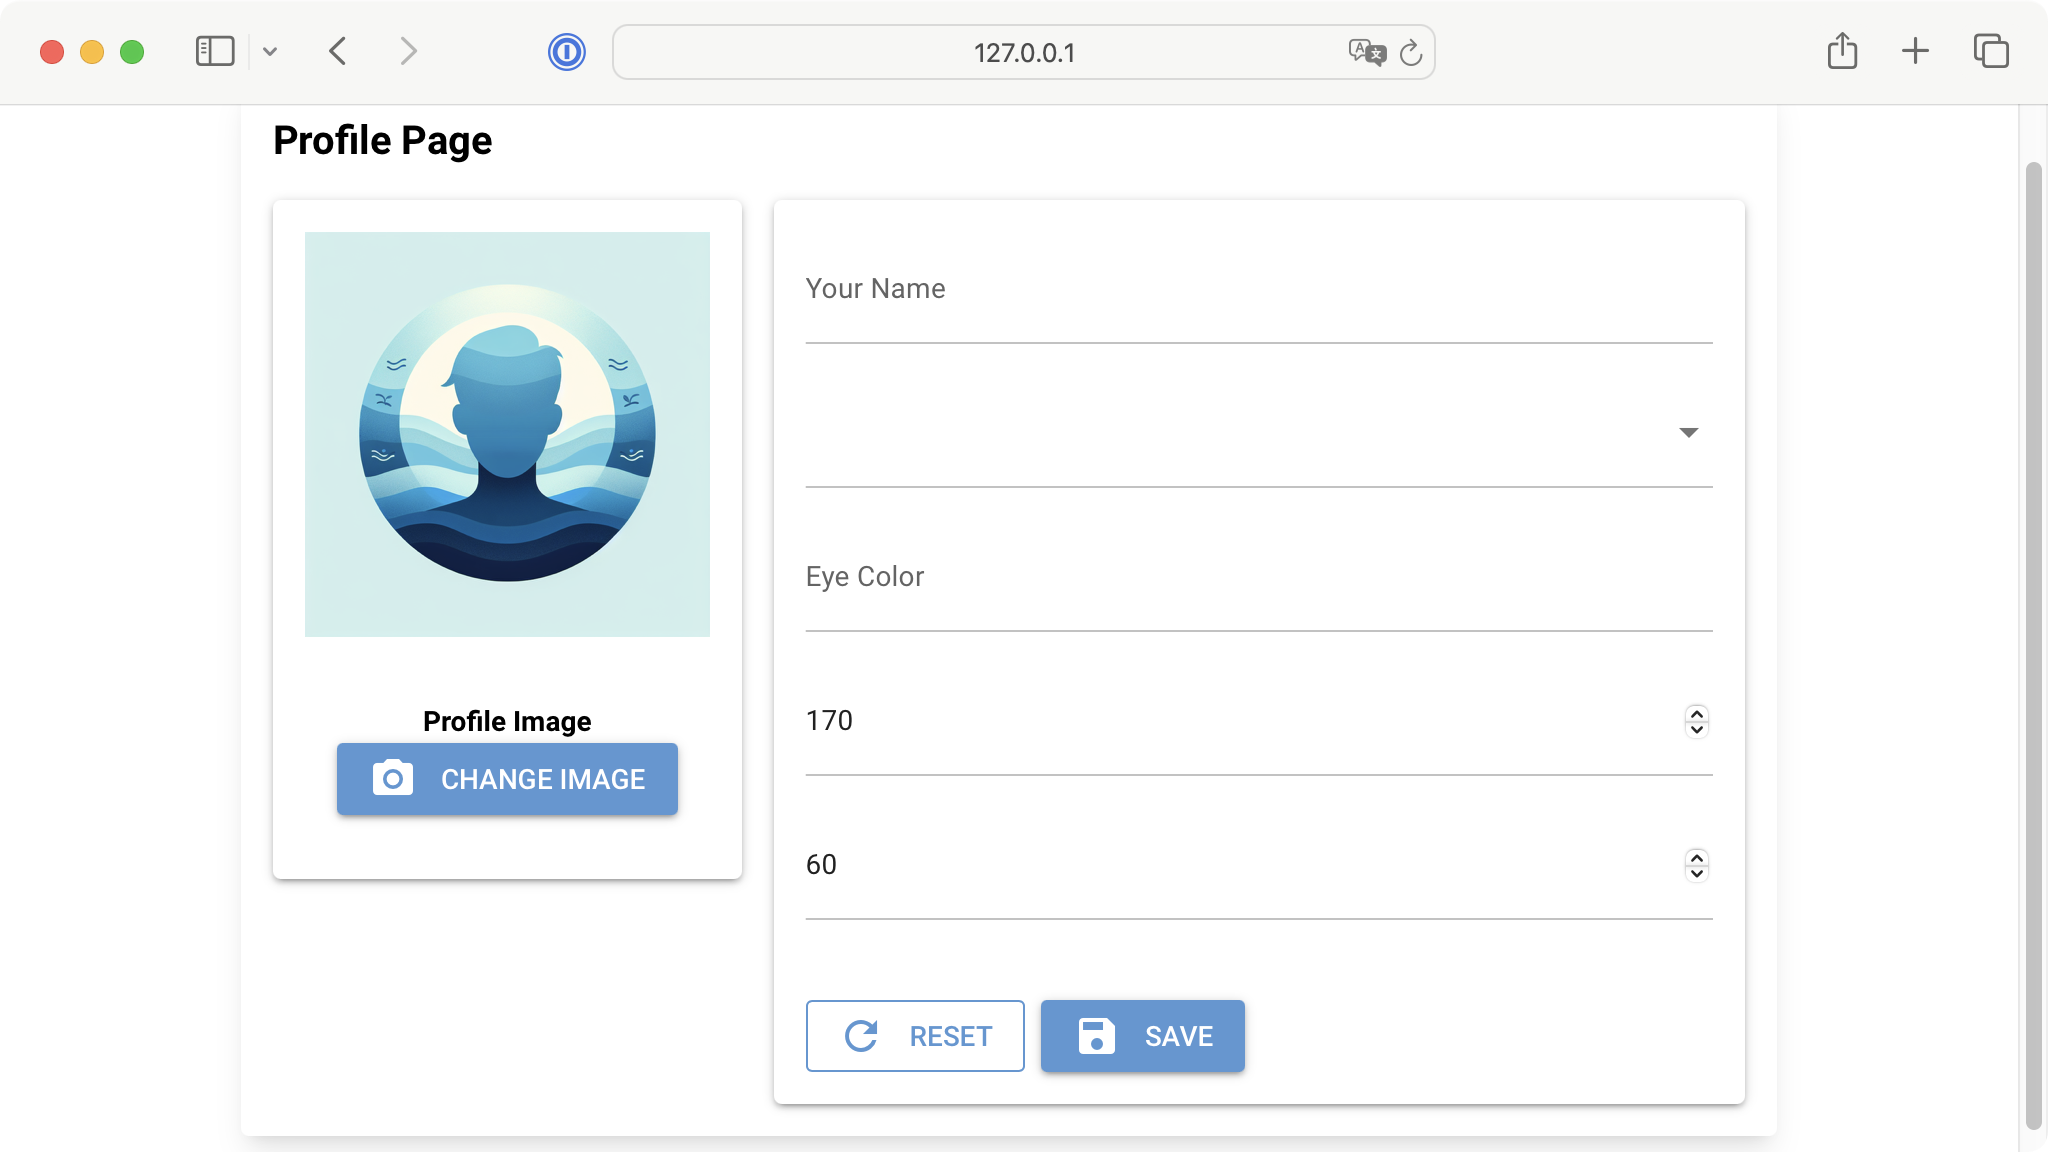
A Demo Profile Page Layout in NiceGUI
Handling Events and Actions in NiceGUI
In NiceGUI, you can handle events like mouse clicks, keystrokes, and similar ones as you can in other GUI frameworks. Elements typically have arguments like on_click and on_change that are the most direct and convenient way to bind events to actions.
Here’s a quick app that shows how to make a NiceGUI app perform actions in response to events:
from nicegui import ui

def on_button_click():
    ui.notify("Button was clicked!")

def on_checkbox_change(event):
    state = "checked" if event.value else "unchecked"
    ui.notify(f"Checkbox is {state}")

def on_slider_change(event):
    ui.notify(f"Slider value: {event.value}")

def on_input_change(event):
    ui.notify(f"Input changed to: {event.value}")

ui.label("Event Handling Demo")

ui.button("Click Me", on_click=on_button_click)
ui.checkbox("Check Me", on_change=on_checkbox_change)
ui.slider(min=0, max=10, value=5, on_change=on_slider_change)
ui.input("Type something", on_change=on_input_change)

ui.run(title="NiceGUI Events & Actions Demo")
In this app, we first define four functions we’ll use as actions. When we create the control elements, we use the appropriate argument to bind an event to a function. For example, in the ui.button element, we use the on_click argument, which makes the button call the associated function when we click it.
We do something similar with the other elements, but use different arguments depending on the element’s supported events.
You can check the documentation of elements to learn about the specific events they can handle.
Using the on_* type of arguments is not the only way to bind events to actions. You can also use the on() method, which allows you to attach event handlers manually. This approach is handy for less common events or when you want to attach multiple handlers.
Here’s a quick example:
from nicegui import ui

def on_click(event):
    ui.notify(f"Button was clicked!")

def on_hover(event):
    ui.notify(f"Button was hovered!")

button = ui.button("Button")
button.on("click", on_click)
button.on("mouseover", on_hover)

ui.run()
In this example, we create a small web app with a single button that responds to two different events. When you click the button, the on_click() function triggers a notification. Similarly, when you hover the mouse over the button, the on_hover() function displays a notification.
To bind the events to the corresponding function, we use the on() method. The first argument is a string representing the name of the target event. The second argument is the function that we want to run when the event occurs.
Conclusion
In this tutorial, you’ve learned the basics of creating web applications with NiceGUI, a powerful Python library for web GUI development.
You’ve explored common elements, layouts, and event handling. This gives you the foundation to build modern and interactive web interfaces. For further exploration and advanced features, refer to the official NiceGUI documentation.
Planet Python