Laravel News Links
Choosing the Right Key-Value Store: Redis vs Valkey
https://www.percona.com/blog/wp-content/uploads/2025/09/Redis-vs-Valkey-key-value-store-200×112.jpg Not long ago, picking an in-memory key-value store was easy. Redis was the default. Fast, simple, everywhere. Then the rules changed. Redis moved to a much more restrictive license. Suddenly, many companies had to rethink their plans, especially if they cared about staying open source or needed flexibility for the cloud. That’s when Valkey arrived. […]Percona Database Performance Blog
The Ultimate Super Mario Desk
https://theawesomer.com/photos/2025/09/nintendo_wood_desk_t.jpg
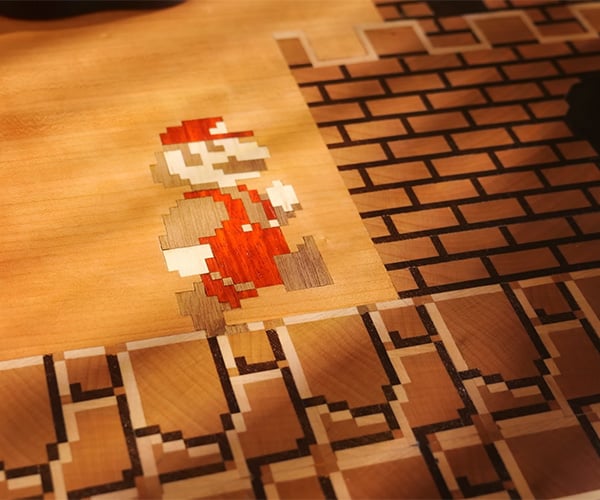
Wyrmwood Furniture created this stunning work of geek art to celebrate 40 years of Super Mario Bros. After putting together a digital montage of pixel art, they used that image to guide the build of roughly 2000 inlaid wood elements. They sliced multiple pieces from wood blocks for repetitive elements, and laser-cut the more detailed pieces from veneer.
The Awesomer
MySQL Basics: Table Manners – Setting up Your First Schema and Table
Take your first hands-on steps in MySQL! This post teaches you how to create schemas and tables using relatable library analogies, beginner-friendly SQL examples, and tips to avoid common pitfalls. Perfect for newcomers, it’s your foundation for all future data adventures.Planet MySQL
Laravel launches Laravel Learn with two free mini-courses
https://picperf.io/https://laravelnews.s3.amazonaws.com/featured-images/laravel-learn.png

Laravel launches Laravel Learn with two free mini-courses
The post Laravel launches Laravel Learn with two free mini-courses appeared first on Laravel News.
Join the Laravel Newsletter to get all the latest
Laravel articles like this directly in your inbox.
Laravel News
WaPo writer complains about being fired for making up fake Charlie Kirk quote
https://media.notthebee.com/articles/68c965700560768c9657005608.jpg
Today, I learned that it’s apparently unfair to be fired for being bad at your job. 👇
Not the Bee
MySQL Basics: Understanding the Building Blocks of Databases
Begin your hands-on MySQL adventure! This post guides newcomers through accessing and exploring their databases using MySQL Shell. Clear instructions, friendly guidance, and practical tips ensure a confident start for any data explorer eager to interact with tables and data in real time.Planet MySQL
★ Must-Know Laravel Packages Every Developer Should Have in Their Toolbox
Laravel News Links
Tuxedo Pizza Box
https://www.toxel.com/wp-content/uploads/2025/09/toxidopizzabox01.jpg
September 12th, 2025 | Inspiration |

Creative pizza box features tuxedo illustration printed on the inside that brings a touch of elegance and humor to your pizza eating.
Tuxedo Pizza Box designed by Pizza Bib offers a fun way to protect your outfit from cheesy spills and sauce drips.
Simply wear the pizza bib for a stylish and functional dining experience.

When opened, the inside of the pizza box reveals a black-and-white tuxedo design with crisp bow tie, buttons, and neatly folded pocket square.

Removable cut-out at the top allows people to wear the box front as a bib, instantly transforming their casual pizza night into a black-tie experience.

Also check out: Innovative Pizza Box Design
Toxel.com
‘I Hope Someone Names A Frozen Pizza After Me’ Thinks Red Baron While Being Shot Down In WWI Dogfight
https://media.babylonbee.com/articles/68c48ef790be668c48ef790be7.jpg
VAUX-SUR-SOMME — New evidence has led historians to suggest that Manfred von Richthofen — known as the "Red Baron" — briefly entertained the hope of someday having a line of frozen pizzas named after him as he was shot down in a World War I dogfight.
According to contemporary accounts, the infamous Red Baron was shot down over the River Somme when a single bullet struck his plane and passed through his chest. Before succumbing to his wounds, he safely landed his plane in a nearby field while hoping against hope that someone would both invent frozen pizzas and subsequently name them after him.
After landing, he was approached by nearby Australian troops who attended to him. Historians previously thought his final words, if he had any, were lost to time until the discovery of an Australian medic’s diary.
"Mein Leben ist kaputt! I hope someone names a frozen pizza after me," the Red Baron reportedly told the Australian troops who were with him. "Something tasty but… convenient so people don’t… have to fly to Italy for a decent pie. Not too thick. Not too thin. With just… the right amount… of crunch."
Shortly afterward, the Red Baron breathed his last. At the time, Australian forces dismissed his thoughts as incoherent death throes because they had no idea what pizza was, but we now know that he was an intelligent man who loved pizza and wanted to make it more accessible and simple to enjoy at home.
At publishing time, it was revealed that the Red Baron had also dreamed of one day dueling a cartoon dog piloting a flying doghouse.
Tony asks questions about everything in his life. Is he a crazy conspiracy theorist?
Babylon Bee