Laravel News Links
Snoop Dogg is in hot water because he doesn’t understand why we’re putting all this LGBTQ stuff into kids’ movies
https://media.notthebee.com/articles/68ac877aae52b68ac877aae52c.jpg
Snoop Dogg says he watched the Disney movie Lightyear with his grandson and had the same question we all had when it came out. He’s now in hot water for his opinion.
Not the Bee
Advanced Microservices Architecture in Laravel: High-Level Design Patterns
Laravel News Links
First Institute of Reliable Software: Best Code Rule: Always Separate Input, Output, and Processing
https://hel1.your-objectstorage.com/lms/img/2025-08-22/1755888701387-best_code_rule_1.pngStop writing glue-code scripts. Discover how one simple principle — separating input, output, and processing — transforms messy Python into professional-grade software.Planet Python
Speed Up Your Internet with This Simple DNS Tweak
https://static1.makeuseofimages.com/wordpress/wp-content/uploads/wm/2025/05/private-dns-settings-on-android-smartphone.jpg
There are all sorts of different ways to speed up your internet connection. Believe me, I’ve tried most of them, stuck on an aging internet connection that doesn’t get much more than 60Mbps across the whole household. So I was surprised to find that this small tweak actually made a real difference. Best of all, it was super simple to set up.
Why Your Internet Speed Is Slower Than It Should Be
When I think about "slow internet," I immediately imagine a poor Wi-Fi signal or my ISP throttling my incoming connection. And while those can be factors, there’s often more going on. Even with a good plan and a decent router, several bottlenecks can creep in:
- ISP speed vs. real speed: The speed you pay for and the speed you get can differ, especially at peak times.
- Router placement: Sticking your router in a corner, behind furniture, or inside a cabinet can hurt Wi-Fi range and speed.
- Network congestion: Too many devices streaming or downloading at once can slow down the network for everyone.
- Outdated settings: Your devices and router have default configurations that might not be optimal for performance.
Think of your connection like a motorway. Even if you have the fastest car (a good ISP package), a traffic jam (inefficient settings) can still slow you down. This internet speed tweak tackles one of those hidden jams waiting to snarl you up.
Change Your ISP’s DNS Settings
The tiny change is to ditch your ISP’s default DNS settings for a faster and more reliable alternative.
Now, DNS (Domain Name System) is like the phonebook of the internet. When you type in a website like makeuseof.com, your device asks a DNS server to find its matching IP address. See, computers don’t look up the specific website name, MakeUseOf.com. Each website name corresponds to a specific numerical address on the internet. And when you hit Enter and start the search, the Domain Name System translates that human-readable name into a numerical IP address, and begins to locate the specific server hosting the website.
It feels like magic. But if your DNS server is slow, which is frequently the case with default ISP settings, it adds tiny delays to every page you attempt to load. This also extends to gaming, streaming, sending files, and so on. Basically, if you’re using a slow DNS, everything about your internet connection will feel like a drag.
Switching to a faster DNS can cut down those lookup times and make your internet connection feel faster.
I’ll caveat this by saying that you won’t suddenly find multiple extra megabytes of connection speed. That’s not how it works. However, it can bring marked improvement in responsiveness and page loading times, which, at the end of the day, contribute to your internet feeling faster than before.
Try These Alternative DNS Providers for Faster Internet Speeds
You’re probably wondering how on Earth you find a new DNS provider. Well, don’t worry; I’ve got you covered. There are two ways of doing this.
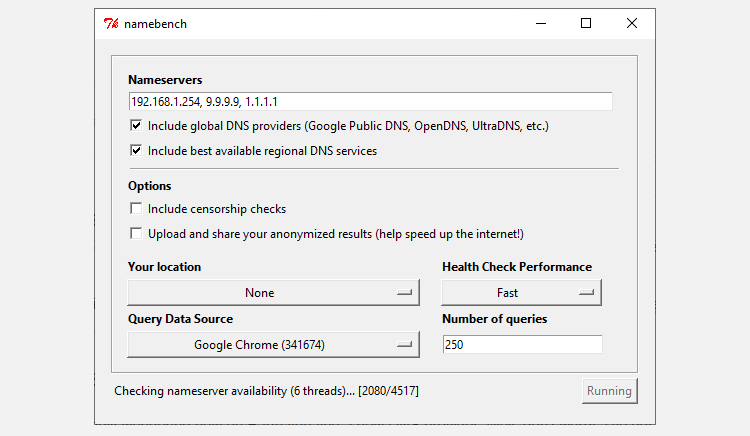
You could use a tool like Google’s Namebench to find out exactly which DNS provider will provide the absolute fastest DNS settings for your machine. It’s free and easy to use, but takes some time. However, it does provide the most accurate results. Namebench creates a unique list of DNS providers specific for your computer, which is super handy.
Alternatively, and this is the easy option, you can opt for one of the top alternative DNS providers that are known to be faster and more reliable, cutting out the testing phase. These alternative DNS providers include Google DNS, Cloudflare, and OpenDNS, and all frequently rank towards the top of DNS provider rankings. In that, you can’t go wrong using the following settings for your DNS provider:
|
Provider |
IPv4 DNS Addresses |
IPv6 DNS Addresses |
|---|---|---|
|
Google DNS |
|
|
|
Cloudflare |
|
|
|
OpenDNS |
|
|
|
Quad9 |
You’ll need some of these addresses to change your DNS settings in the next section.
How to Change Your DNS Settings
Thankfully, changing your DNS settings on almost any device is a straightforward process.
Take a screenshot of your existing settings in case you need them later or want to revert to your old DNS configuration.
How to Change Your Windows 11 DNS Settings
- Press Win + X to open the Power User Menu and select Network Connections.
- Select Advanced network settings. Then, select the network adapter you’re using, be that Wi-Fi or Ethernet.
- From the dropdown, alongside More adapter options, select Edit.
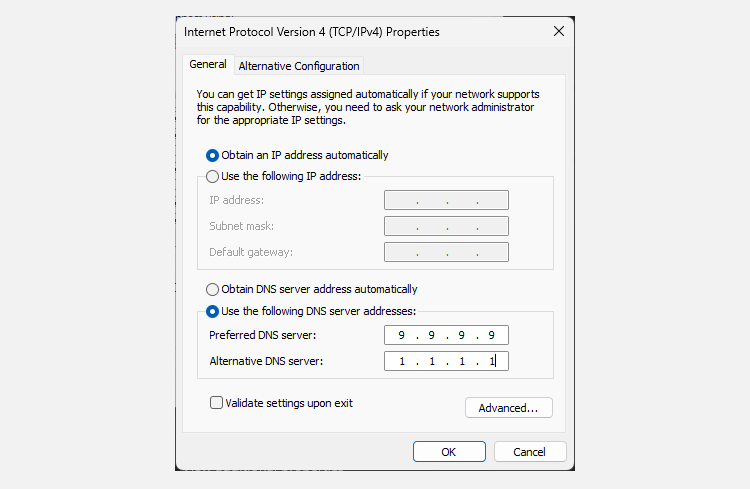
- Highlight Internet Protocol Version 4 (TCP/IPv4) and click Properties. Then, navigate to the Use the following DNS server addresses option. Now, enter one of the IP addresses from the section above, depending on which DNS provider you want to use. Once entered, click OK to save these settings.
- You’ll be returned to the Properties menu. From here, select Internet Protocol Version 6 (TCP/IPv6) and click Properties. Repeat the process for IPv6 DNS servers. Click OK to save your IPv6 DNS settings.
Once you’re done, close the settings window. You can start browsing the web once again.
How to Change Your macOS DNS Settings
To change your DNS on macOS:
- Open System Preferences.
- Click Network > Advanced.
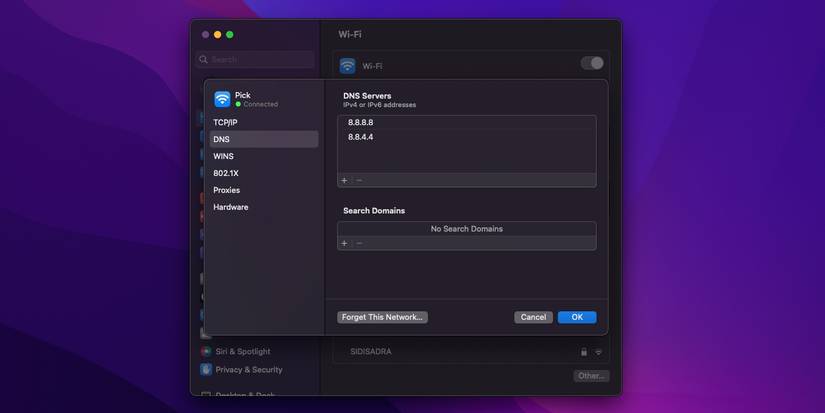
- Navigate to the DNS tab.
- Unlike on Windows, you can add and remove DNS servers using the + and – buttons on the window’s bottom left. Once you’ve clicked the + icon, you can enter the IP address of your desired provider.
Like Windows, once you confirm the settings, your new DNS provider will be in use.
How to Change Your DNS Settings on Linux
Given that there are so many Linux distros, the method for changing DNS varies. Furthermore, you can change your DNS settings on Linux via the user interface or through the command line, adding extra options. Considering this, I’m not going to delve into how to change DNS settings on each Linux distro; that would be a mammoth undertaking. However, you can check out how to change your Linux DNS settings in GNOME, KDE, and using the terminal, as well as how to change your DNS settings on Ubuntu.
How to Change Your iPhone DNS Settings
It’s similarly simple to change your DNS settings on an iPhone.
- First, head to Settings > Wi-Fi.
- Tap the ‘i‘ icon next to your connected network. This will open a settings page for the network you want to adjust. Scroll the page until you reach the DNS header.
- Tap the Configure DNS option. By default, this will be set to Automatic. Select Manual to enable further options. The Add Server field will appear Under DNS Server.
- Tap the button and enter the IP address of your desired provider.
Once complete, tap Save at the top right of the screen.
How to Change Your DNS Settings on Android Devices
The steps to change your DNS on Android vary depending on your device. However, for stock Android 9.0 and above, the steps are relatively similar (you may have to account for your specific version of Android, though).
- Open Settings > Network and Internet.
- Tap on the arrow to expand the Advanced settings. By default, the Private DNS field will be set to Automatic. Selecting that option will open an input window.
-
Tap Private DNS provider hostname. Here, you will need to use the DNS server’s hostname rather than the IP address, as below.
- Google DNS: dns.google.com
- Cloudflare: 1dot1dot1dot1.cloudflare-dns.com
- OpenDNS: doh.opendns.com
- Quad9: dns.quad9.net
Once you’re done and confirm the settings, your Android device will begin using the new DNS settings.
How to Change Your DNS Settings on Chrome OS
Chromebooks use Chrome OS. It’s a nimble, web-focused operating system frequently found in schools, but millions of people use it worldwide.
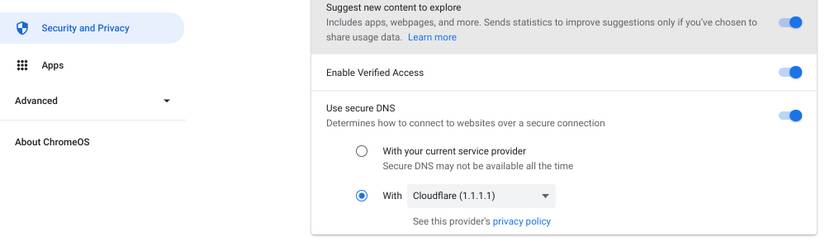
- Head to Settings > Security and Privacy.
- Find the Use Secure DNS setting and toggle it on.
- Now, select the With option, then use the dropdown menu to select either Cloudflare (1.1.1.1) or enter a custom DNS.
Your new DNS settings will work on any network you connect your Chromebook to.
As I’ve said, tweaking your DNS settings is a great way to optimize your internet settings and will definitely speed up your connection. Just don’t expect multiple-digit bandwidth increases.
MakeUseOf
Xbox Ally handhelds will be available October 16, but we still don’t know the price
Xbox gamers will have a new option for taking their library on the go this fall. During Gamescom 2025, ASUS revealed that the Xbox Ally handheld consoles will be on store shelves on October 16. We heard a thorough explanation of the specs and availability for the ROG Xbox Ally and ROG Xbox Ally X this summer, but the arrival date is the only new info to come from the major gaming event in Cologne.
There’s still no price available for these handhelds, but we expect to receive that critical detail along with pre-order information some time in the coming weeks. For comparison, the 2024 ROG Ally X costs $800 while the simpler ROG Ally Gaming Console from 2023 costs $500. So if we were hazarding guesses, the ROG Xbox Ally might come in at a price tag around $650, while the spiffier ROG Xbox Ally X could be more in the ballpark of $900.
The Official Xbox Podcast also included a segment about the upcoming handhelds, with a pair of Xbox execs talking about the devices and their experiences using them for titles like Tony Hawk’s Pro Skater, Clair Obscur: Expedition 33 and Balatro. The chatter is unsurprisingly very positive about the hardware, but it might have enough tidbits to hold you over if you’re super amped about getting your own hands on an Xbox Ally this fall.
This article originally appeared on Engadget at https://www.engadget.com/gaming/xbox/xbox-ally-handhelds-will-be-available-october-16-but-we-still-dont-know-the-price-134015698.html?src=rssEngadget
NASA and IBM Unveil AI That Helps Scientists Forecast Solar Storms
https://gizmodo.com/app/uploads/2025/08/Surya-model-output-1200×675.jpg
Earlier this year, local and national officials gathered for a first-of-its-kind tabletop exercise to test their readiness for a severe solar storm. The simulation exposed major gaps in scientists’ ability to forecast space weather, which threatens critical infrastructure on Earth and in orbit.
On Wednesday, August 20, IBM and NASA unveiled Surya: an open-source AI model that could begin to fill those gaps. Heliophysicists currently rely on complex computer models to monitor and predict the Sun’s activity. Surya improves upon the lead time and accuracy of existing solar forecasting technologies, allowing scientists to not only predict a solar flare two hours out but also visually pinpoint where it should occur on the Sun’s surface, according to IBM.
“It’s very important to have a mechanism to look into the Sun and understand how these events [are going to happen], when they’re going to happen, why they’re going to happen, and start predicting the occurrence so that we can be prepared,” Juan Bernabé-Moreno, director of IBM Research Europe for Ireland and the U.K., told Gizmodo.
The hazards of solar weather
The surface of the Sun is a violent place. Our host star is constantly emitting bursts of energy such as solar flares, high-speed solar winds, and coronal mass ejections. When Earth is in the line of fire during one of these events, the onslaught of high-energy particles can trigger a geomagnetic storm in the upper atmosphere. Such storms result from disturbances in Earth’s magnetic field and can damage or disrupt satellites, power grids, and radio communication systems, according to NASA.
Being able to anticipate these outbursts gives decision-makers critical lead time to protect vulnerable infrastructure, potentially avoiding billions of dollars in damage. According to a systemic risk analysis by Lloyd’s, a severe solar storm could result in losses to the global economy of $2.4 trillion over a five-year period.
Forecasting flares with Surya
Bernabé-Moreno thinks of Surya as a powerful AI telescope that also lets you look into the future. Whereas traditional solar weather prediction relies on partial satellite views of the Sun’s surface, Surya trained on nine years of high-resolution solar observation data gathered by NASA’s Solar Dynamics Observatory. This telescope launched in 2010 and has been continuously observing the Sun for the past 15 years, capturing images every 12 seconds at various wavelengths to take the temperature of its layers and map magnetic activity.
Heliophysicists will be able to use Surya in a variety of ways, but its most novel application is solar flare prediction, IBM senior research scientist and technical project lead Johannes Schmude told Gizmodo in an email. The model does this by generating an image of an event that the SDO satellite is likely to see, essentially predicting what the surface of the Sun will look like hours ahead.
Testing showed that Surya can predict a solar flare two hours in advance with a 16% improvement in flare classification accuracy, but IBM is exploring the accuracy of even longer lead time predictions, according to Schmude. It’s important to note, however, that Surya trained on data from the previous solar cycle. “Testing the model’s applicability to Solar cycle 25 is one of the post-release tasks on our list, but we plan to explore continuous training and other fine-tuning with data from Solar Cycle 25,” Schmude said.
Following the release of this open-source AI model, Bernabé-Moreno is excited for the scientific community to begin using it on a wider scale, identifying new applications and challenging its capabilities. “That is going to create utility,” he said. “That, for us, is the most important thing.”
Gizmodo
Ben Stiller will not be directing any ‘Severance’ season 3 episodes
https://photos5.appleinsider.com/gallery/64792-134986-62901-130560-000-lede-Stiller-and-Cue-xl-xl.jpgSeverance executive producer Ben Stiller won’t direct any episodes in the third season of the Apple TV+ hit "Severance" as he will be working on another big project.

Ben Stiller (left) and Apple’s Eddy Cue at SXSW
Ben Stiller was a major influence on the first two seasons of "Severance," but he will be less involved in the third season. The director and actor is simply too busy to keep it up.
Speaking to the Los Angeles Times on Monday, Stiller discusses the upcoming third season of the celebrated "Severance." He does so while also referencing a heavy workload and the ongoing passing of time.
Continue Reading on AppleInsider | Discuss on our ForumsAppleInsider News
Raspberry Pi intros new 5-inch $40 touchscreen for your next weird project
https://cdn.arstechnica.net/wp-content/uploads/2025/08/5-inch-display-2048×1390-1-1152×648.jpg
The folks at Raspberry Pi have just announced a new touchscreen component for people using boards to create miniature touchscreen appliances: the 5-inch Raspberry Pi Touch Display 2 is a 720p IPS multi-touch screen that’s natively supported by the Raspberry Pi OS and includes mounting holes on the back to make it easy to build integrated all-in-one devices.
The new screen will cost $40 and is available starting today from Pi resellers like CanaKit, Vilros, and PiShop (though some of those retailers already list it slightly above the MSRP).
"Its capacitive touch screen works out of the box with full Linux driver support—no manual calibration required, no hunting through device trees, and no wrestling with incompatible touch controllers," writes Raspberry Pi software CTO Gordon Hollingworth in the company’s blog post.
The 5-inch touchscreen is a smaller counterpart to the $60 7-inch Pi Touch Display 2 that the company launched late last year. The two screens have the same 720p resolution, but the 7-inch model has slightly wider viewing angles (85 degrees, compared to 80 degrees for the 5-inch screen). Both are compatible with all Pi boards from 2014’s Raspberry Pi 1 B+ onward—with the exception of the Raspberry Pi Zero—and they use power from the board’s GPIO header and a display signal delivered via a ribbon cable connected to the boards’ DSI port.
Ars Technica – All content
Maintaining Data Consistency with Laravel Database Transactions
https://picperf.io/https://laravelnews.s3.amazonaws.com/featured-images/15-08-2025-falcon-db-transaction-export.png
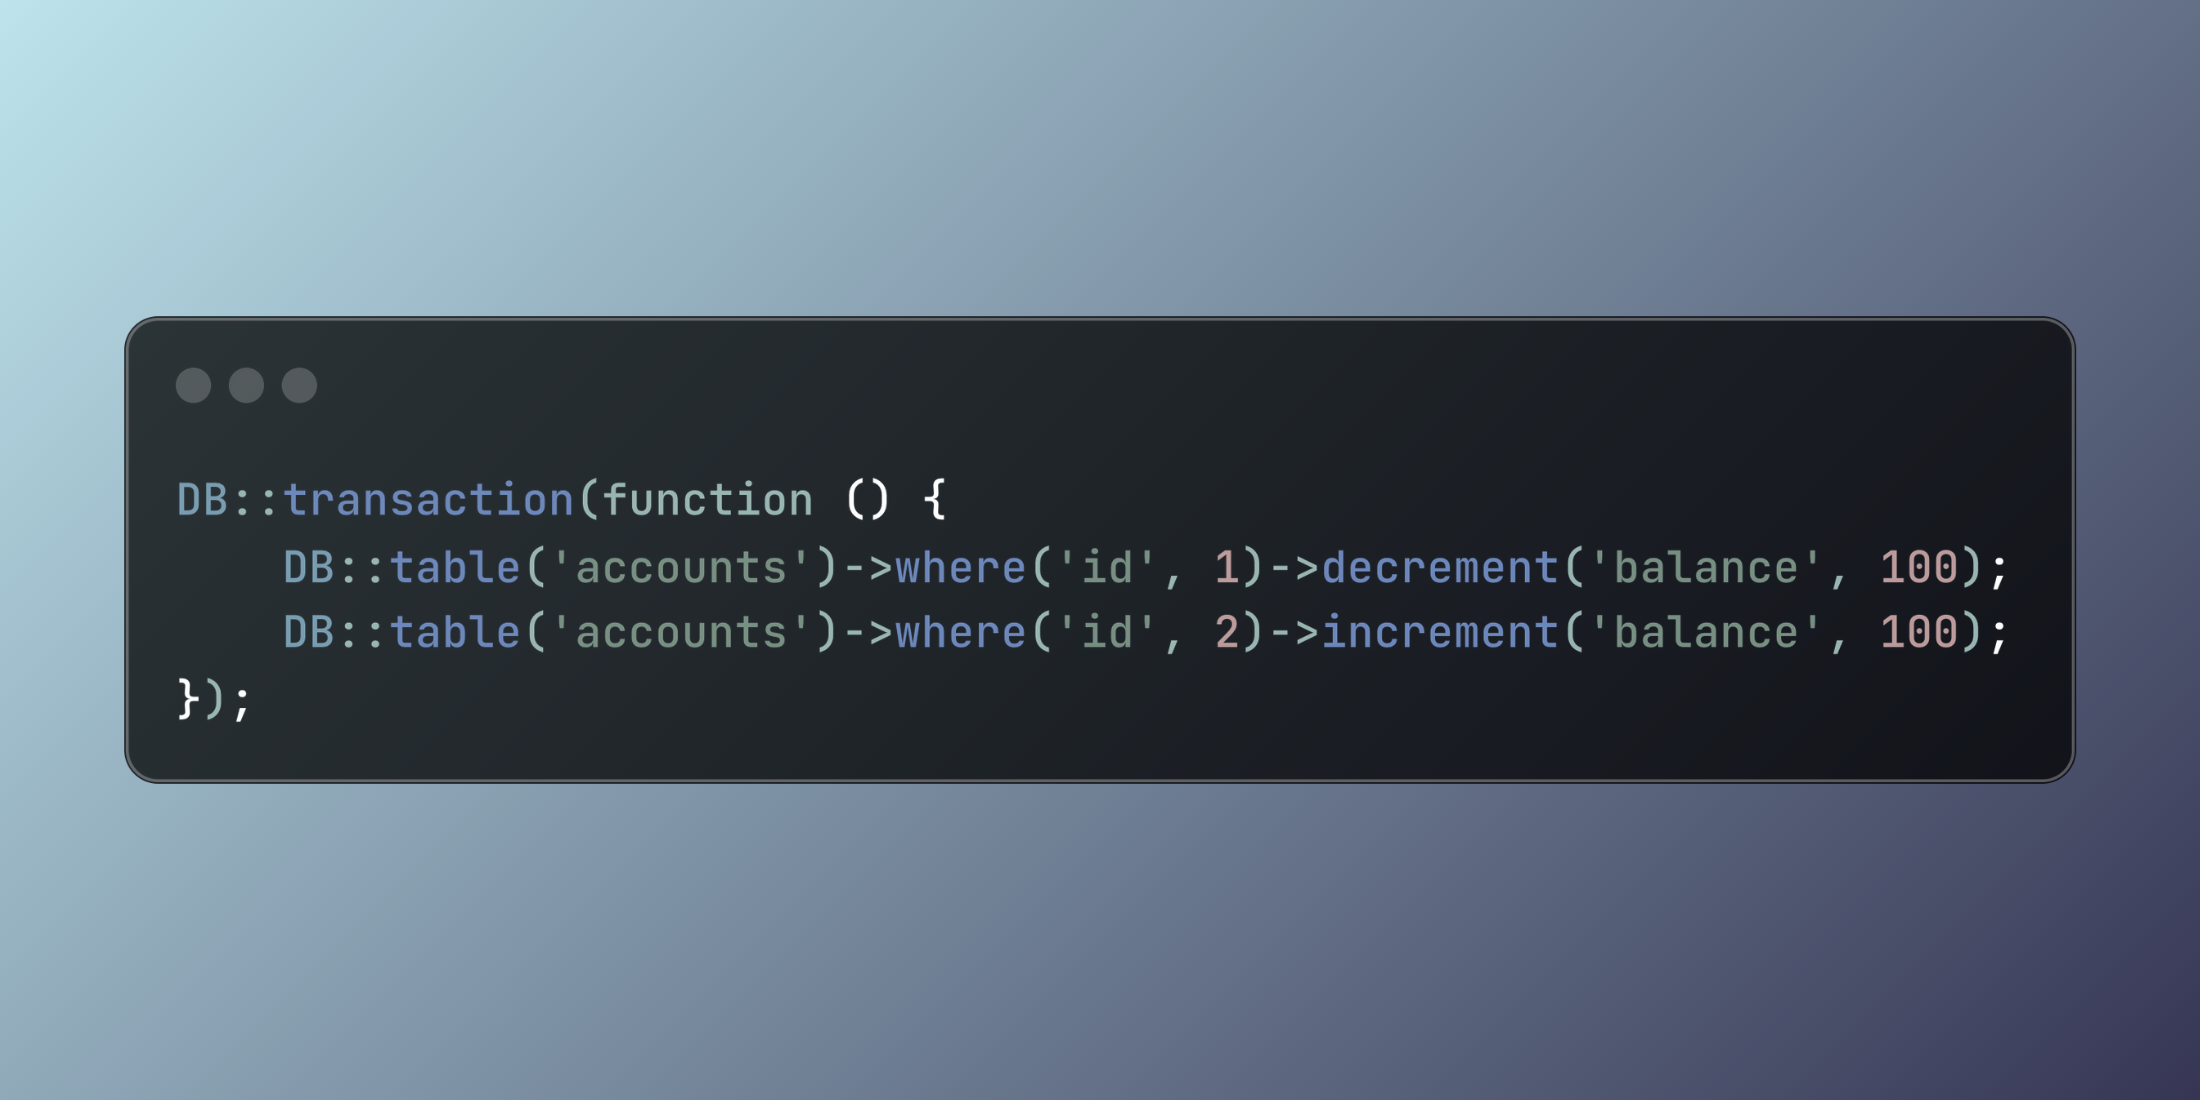
Ensure robust data integrity in Laravel applications using database transactions. These powerful tools guarantee atomic operations, automatically rolling back changes when errors occur, making your application resilient to data corruption scenarios.
The post Maintaining Data Consistency with Laravel Database Transactions appeared first on Laravel News.
Join the Laravel Newsletter to get all the latest
Laravel articles like this directly in your inbox.
Laravel News