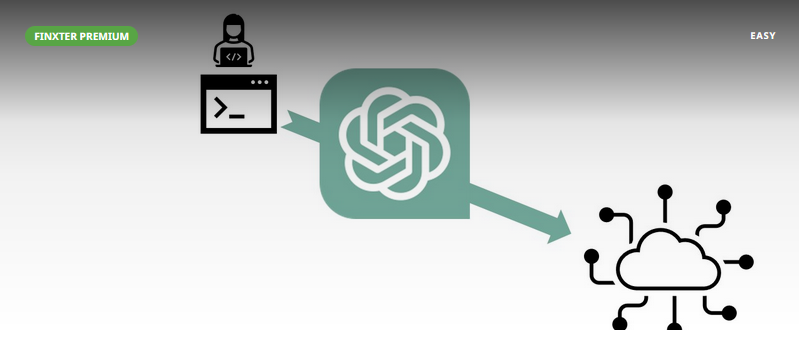
The digital landscape is on the brink of a revolutionary shift, thanks to OpenAI’s latest offering: the GPT Builder.
Anyone can leverage GPT Builder to create personalized AI models and potentially generate significant revenue with the launch of the OpenAI GPT store!
Step 1: Accessing GPT Builder
To begin with, access to GPT Builder is exclusive to ChatGPT Plus subscribers. Once you’re in, navigate to the Explore tab and select “Create a GPT”. This is your gateway to entering the world of custom AI creation.
Step 2: Conversational Drafting
The process starts with a simple conversation within the “Create” tab to create your desired AI model through a casual chat with ChatGPT. This interaction forms the foundation of your custom GPT. Simply describe the behavior you want your GPT to have in natural language. Focus on value creation for the user or fun projects!
Step 3: Configuring Your GPT
Now click the “Configure” tab to adjust and modify your GPT. Here, you can also connect with custom “Actions”, i.e., APIs that call external services. You can also set whether your GPT will allow web browsing or DALL-E Image Generation.
You can also fine-tune your GPT such as renaming, changing the profile photo, and most importantly, infusing the GPT with specific knowledge by uploading relevant data.
Step 4: Bringing Your GPT to Life
Now you can click “Save” and publish your GPT to the world — or just keep it private for now. Make sure to test your GPT properly.
The launch of the GPT Store is imminent, signaling a significant opportunity for early adopters. To put this in perspective, consider the revenue generated by platforms like Shopify Apps and the App Store. The potential for the ChatGPT Store is vast and largely untapped.
This revenue was shared by roughly 34 million Apple developers (cumulative). In other words, each App Store developer made $320 billion / 34 million = $10,000 on average. If you belong to the top 10% of developers, i.e., you didn’t only create an account but actually submitted an app, you can see why many early App Store developers became millionaires.
Conclusion
OpenAI’s GPT Builder is more than just a tool; it’s a gateway to innovation and entrepreneurship in the AI space.
With the ability to create and customize AI models easily, the possibilities are endless. There are at least as many possible apps as there are in the App Store — probably many more groundbreaking apps!
Be on the right side of change, stay ahead of the curve, and start experimenting with this transformative GPT Builder technology today!
Wind turbines are like skyscrapers: We’re just using engineering to make them bigger and bigger, and no one has re-thought the form factor with any concern for economics. Building a 500-foot tower and adding 400-foot blades can generate lots of megawatts, but they’re incredibly expensive to manufacture, difficult to transport, difficult to install, difficult to maintain, and limited in where they can be placed.
A company called Airloom Energyhas rethought the form factor. Their clever alternative design for a utility-scale wind-energy-capturing system features "unique geometry [that] generates the same amount of electricity as conventional turbines at a fraction of the cost."
Rather than a tower, Airloom has developed a sort of suspended NASCAR track. This track is mounted to 25-meter (82′) poles, and has a series of vertical 10-meter (33′) blades hanging from it. The blades are not attached directly to the track, but to a cable that runs the perimeter of the track. As the wind blows, the blades start to move around the track. The cable gets pulled through power take-off units that harvest the resultant energy.
Airloom’s system can be built using readily available and conventional materials; no fancy composites are required. They cost 1/10th of a turbine that generates the same amount of energy, and are far easier to transport; broken down, the system fits onto a standard tractor-trailer.
The company also says an Airloom wind farm costs less than 25% of the price of a turbine-based farm, and that the end result is an electricity price of $0.013/kWh—which is about a third of the $0.038/kWh price offered by a turbine wind farm.
Most interestingly, the Airloom system could be set up over actual farmland, or directly next to power lines to decrease transmission distance.
The company has raised seed funding and plans to launch a pilot project in 2025.
The Python program uses MySQL-Connector/Python 8.2.0.
This is the initial code:
import mysql.connector

cnx = mysql.connector.connect(user='python',
                              passowrd='Passw0rd!Python',
                              host='127.0.0.1',
                              port='6450')

cursor = cnx.cursor()

query = ("""select member_role, @@port port
            from performance_schema.replication_group_members
            where member_id=@@server_uuid""")

for (role, port) in cursor:
    print("{} - {}".format(role, port))

cursor.close()
cnx.close()
We can already test it:
$ python test_router.py
PRIMARY - 3310
Good, we can connect to the cluster using the read/write splitting port (6540) and execute the query…. oh ?! But why are we reaching the Primary instance ?
Shouldn’t we access a Read/Only instance (one of the Secondaries) ?
autocommit
Connector/Python disables autocommit by default (see MySQLConnection.autocommit Property). And the Read/Write Splitting functionality must have autocommit disabled to work properly.
We can see that there were no errors and that we wrote to the Primary node and read from all Secondaries.
Be careful if you set the query attribute for router.access_mode to read_only just before writing (line 16), you’ll get an error as writes are not allowed on a secondary:
_mysql_connector.MySQLInterfaceError: The MySQL server is running with the --super-read-only option so it cannot execute this statement
Transactions
Now we’re going to play with transactions. We create a new script that will perform several transactions:
a read operation in autocommit
a read operation in a transaction (by default, this is a read/write transaction)
a read operation in a read only transaction
a transaction with several inserts and rollback
This is the source of the program:
import mysql.connector

cnx = mysql.connector.connect(user='python',
                              password='Passw0rd!Python',
                              host='127.0.0.1',
                              port='6450',
                              database='test')
cnx.autocommit = True
cursor = cnx.cursor()
query = ("""select member_role, @@port port
            from performance_schema.replication_group_members
            where member_id=@@server_uuid""")
cursor.execute(query)

for (role, port) in cursor:
    print("{} - {}".format(role, port))


cnx.start_transaction()
query = ("""select member_role, @@port port
            from performance_schema.replication_group_members
            where member_id=@@server_uuid""")
cursor.execute(query)

for (role, port) in cursor:
    print("{} - {}".format(role, port))

cnx.commit()

cnx.start_transaction(readonly=True)
query = ("""select member_role, @@port port
            from performance_schema.replication_group_members
            where member_id=@@server_uuid""")
cursor.execute(query)

for (role, port) in cursor:
    print("{} - {}".format(role, port))


cnx.commit()

cnx.start_transaction()

for i in range(3):
    query = ("""insert into t1 values(0, @@port, (
          select member_role
            from performance_schema.replication_group_members
            where member_id=@@server_uuid), now())""")
    cursor.execute(query)

cnx.rollback()
cursor.close()

cnx.close()
Medical professionals use a special power saw to cut through casts when it’s time to remove them. While the high-speed saw blade slices effortlessly through a hardened cast, it does nothing to your body if it makes contact with your skin. Steve Mould investigates the physics that allows this ingenious device to work without causing bodily harm.
Honda announced the release of the Transalp 750 in the U.S. market last month. It then invited us to test the much-anticipated ADV bike on the Backcountry Discovery Routes (BDR) PA Wilds BDR-X route.
Transalp is a lauded monicker to motorcyclists who like to venture on the rougher surfaces of dirt and gravel back roads. The original Honda Transalp hit these less-traveled venues in 1986, and the 2024 Honda XL750R Transalp evoked nostalgia as soon as I saw it. Visually, the bike looked to possess the double personality of highway cruiser and dirt bomber that the original version introduced.
I rode the 2024 Honda Transalp 750over 2 days on varied terrain in rural central Pennsylvania, luckily catching the incredible fall hues. I rode smooth highways, windy blacktops, and dirt that ranged from tame two-track to challenging rocky sections made slick with puddles and mud. The Transalp and I covered nearly 300 miles of the 500-mile BDR-X route.
In short: The 2024 Honda Transalp 750’s dual purpose matched its dual personality. It was extremely easy to ride, allowing me to traverse more challenging sections without hesitation. The pairing of these alter egos made the Transalp a bike suitable to a wide range of abilities and styles, making the bike an appealing choice for the ADV masses.
The 2024 Honda Transalp 750 had impeccable street manners; (photo/American Honda Motor Co.)
2024 Transalp 750 Engine Characteristics
The heart of any bike is the engine, and Honda graced the 2024 Transalp 750 with one of the most agreeable motors I’ve ever ridden on an ADV bike.
The 755cc liquid-cooled, parallel twin powerplant amicably delivered torque and power. Twisting the fly-by-wire throttle elected a linear power curve that never surprised me, regardless of which of the four factory-set drive modes (Sport, Standard, Rain, Gravel) I chose. This amazingly tractable nature was partly due to the influence of the electronic traction control on the rear wheel.
The extremely tractable engine made riding in the wet and mud manageable; (photo/American Honda Motor Co.)
The single-cam engine (Unicam, borrowed from Honda’s MX lineup) produced a familiar feeling akin to the 1084cc Honda Africa Twin, which I’ve ridden extensively in Baja. The Transalp felt like I thought it should, given the roughly 250cc smaller displacement. And just like on the bigger cousin, the Transalp’s motor and EFI induction were smooth in all rpm ranges. I never felt any annoying vibrations or blips in power delivery.
This extremely linear and predictable motor characteristic made the 2024 Honda Transalp 750 easy to manage, but it did lack the excitement of other current ADV powerplants. There was no rpm to target for a power surge, even while nursing the clutch.
It was very “Honda-like,” in its delivery of 92 horsepower at 9,500 rpm and 53 foot-pounds of torque at 7,250 rpm, which some riders appreciated over the potential rush of riding a surge in power delivery.
Transalp 750 Suspension Performance
No appreciable fork dive with the stock suspension, it was good all-around; (photo/American Honda Motor Co.)
The Showa suspension on the 2024 Honda Transalp 750 felt on point for my 168-pound frame in off-road riding gear, without bags or luggage, while on the tarmac. I didn’t hesitate to push into turns, nor did I go out of my way to avoid potholes or wrecked pavement. I didn’t feel any bothersome fork dive upon braking, nor did I feel like I ate through much of my rear shock travel while accelerating.
Much like the engine, the suspension quietly and predictably managed the chassis. This allowed relaxed riding while cruising or on lean during spirited cornering. Again, it was very “Honda-like.”
I felt the same on winding two-track and tamer dirt and gravel on most of the first day along the PA Wilds BDR-X route. I didn’t notice any blaring shortcomings in damping or spring rate while standing on the pegs, which I do exclusively when off-road.
The front-to-rear balance felt fine, and the damping rate was appropriate for most terrains and speeds encountered that day. The off-road surfaces ranged from hardpacked and relatively smooth dirt to looser gravel roads and some sections of embedded and loose rocks up to tennis-ball size.
On the second day, there was an optional “expert” section of mud and wet rocks and roots of significant size. The rear shock was harsh, and the front fork blew through the middle of its travel too quickly. But it wasn’t anything I considered a shortcoming for an ADV bike.
Overall, I felt the Showa 43mm inverted fork and Pro-Link rear shock handled their respective 7.9″ and 7.5″ of travel well for the all-around usage pattern of an ADV bike.
2024 Honda Transalp 750 Electronics Package
A standout element of the Transalp 750 was the electronic rider assistance functions, especially given the four-digit MSRP.
The 5″ TFT display was easily readable regardless of light or dust conditions; (photo/Seiji Ishii)
Riding Modes
In addition to the four factory-programmed riding modes, there is a user-programmable mode. Every imaginable aspect can be molded to personal preference: engine output, engine braking, rear ABS on/off, and traction control (aided by a slipper clutch). A surprising OEM inclusion is a programmable quick shifter.
For the streets and tamer dirt and gravel roads, the stock riding modes worked fine for me. But anytime it got a bit rocky or loose, the traction control and ABS were intrusive, so I switched them to the lowest settings in the User mode, and all was well.
Speaking of ABS and braking, I found the dual front and single rear caliper brakes excellent from the start. I didn’t have to modulate my naturally occurring braking efforts in any way, and they were always met with predictable bite and progression, both on the road and off.
Quick Shifter & TFT Information Panel
I really enjoyed the programmable quick shifter. After I got over the ingrained habit of tapping the clutch on shifts, I really appreciated the stock addition. Others should follow suit, in my opinion. It added a lot to my riding experience and now that I’m back on a bike without one, I miss it. I found the factory setting to be fine for me, but the “softness” of engagement and other factors is user-modifiable.
The 5-inch color TFT screen was a winner. No matter the lighting conditions, the characters on the screen were clear and easily readable while riding. And as a notable side note, the windscreen was perfect for my 6-foot frame. I experienced little buffeting even at 80 mph.
With the appropriate riding mode chosen for road and gravel, and then the user mode when things got rough, the 2024 Honda Transalp got 53 mpg over the 2 days of riding the PA Wilds BDR-X route.
XL750 R Transalp Nitpicks
The MSRP of $9,999 is remarkable for what you get; (photo/Seiji Ishii)
It was hard for me to find notable negatives on the 2024 Honda Transalp 750, given the $9,999 price. But, alas, it is my job.
Transalp 750 Chassis
The first and foremost thing I wanted right away was clickers on top of the forks. The forks have 15 levels of preload adjustment, and the shock has seven, but compression and rebound adjusters are not part of the stock package. Given that the forks are Separate Fork Function (compression and rebound handled by one leg each), it even makes more sense to include them.
The programmable quick shifter was a welcome addition, but the diminutive stock footpegs were lacking; (photo/Seiji Ishii)
The next big thing to me was the stock footpegs. I know OEM pegs can be horrible, but I found the Honda ones especially so. They are tiny in every dimension and seem like they came off a kid’s bike. The tank is wider than motocross or single-cylinder dual sport machines.
So, combined with the narrow pegs, standing while squeezing the knees was awkward and uncomfortable. And, even with new Alpinestars Tech 10s, I had obvious pressure points on the bottom of my foot.
I stand almost 100% of the time on dirt. So, the lack of surface area was noticeable, especially on longer, rougher sections. Come on, Honda, give us some decent pegs!
Other Nitpicks
Another exclusion that is often found on ADV bikes is cruise control. I never use it, but others prefer to have it on long highway stints.
I would also prefer a higher exhaust routing. The muffler and mid-pipe felt and looked low. Although I didn’t damage them, they are more prone than a system with a higher exit point.
Lastly, there is a USB-C plug under the seat — not exactly a convenient location. It seems like putting it on the dash would be a default for an ADV bike, but not so on the Transalp 750.
And, the only color is the one you see here.
2024 Honda Transalp 750 Review: Conclusions
The Transalp looks so much better with a bit of dirt on it; (photo/Seiji Ishii)
I’ve had the incredible luxury of riding many modern ADV bikes. And I want a 2024 Honda Transalp 750 of my own.
For ADV riders that cruise tarmac most of the time to link dirt and gravel sections, lightly loaded, it’s hard to fault this bike at this price. The bike responds predictably to rider and terrain inputs, and the electronics package allows for optimizing these responses. The result is the ability to ride in these conditions with confidence.
I’m more of a 75% off-road guy, and the Transalp would still shine with a few minor tweaks. I would change the stock rubber to a more off-road-worthy set, which we did for our PA Wilds BDR-X route.
And, if I were carrying a camping load, I would increase the spring and damping rates. I have taken both steps on every ADV bike I’ve ever owned. So, this isn’t a shortfall of Honda on the 2024 Transalp 750.
But, what makes the 2024 Honda Transalp 750 irresistible is the price and legendary Honda reliability. A KTM 890 Adventure lists for just under $14,000, while an 890 Adventure R sits at over $15,000. The KTMs may be more off-road-ready in stock format, but I’d trade that for the reliability of a Honda. Then, use the extra $4-5K for upgrades if required.
I’ve had relatively substantial electronic and minor mechanical issues with every other ADV bike I’ve owned. But I’ve had zero issues with any Honda bike. And, I predict the same excellent reliability from the $9,999 2024 Honda XL750R Transalp.
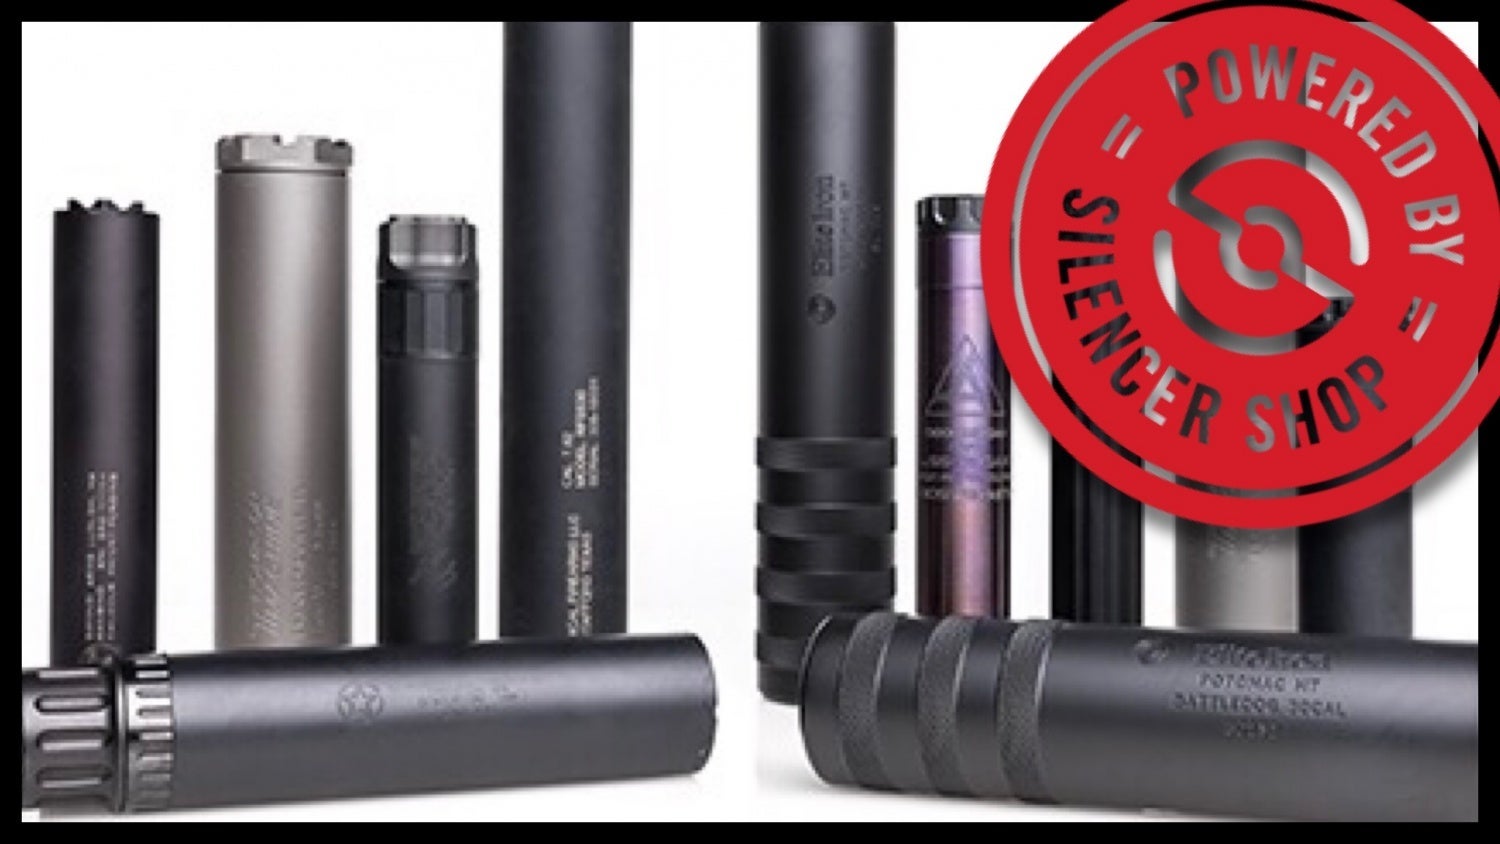
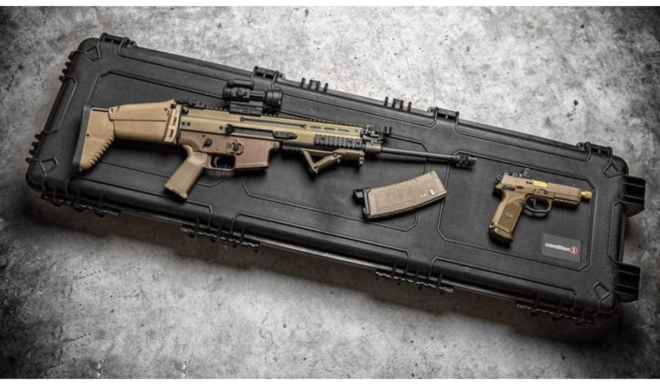
Suppressors are awesome. They make shooting way more enjoyable. Sometimes, depending on the cartridge, you don’t even need ear pro. Suppressors can even improve accuracy and, where legal, they’re great for hunting. But unless the Hearing Protection Act – which would deregulate suppressors – is ever passed, you’ll have to go through some hoops to get your hands on a muzzle muffler. Here’s a quick n’ dirty guide on the steps you need to take to become the proud owner of a new suppressor. Of note, though: some states have simply banned the ownership of suppressors – the steps below cover the steps you need to take under federal law. You’ll also need to check if your state even allows for the ownership of suppressors, and whether there are extra steps you need to take.
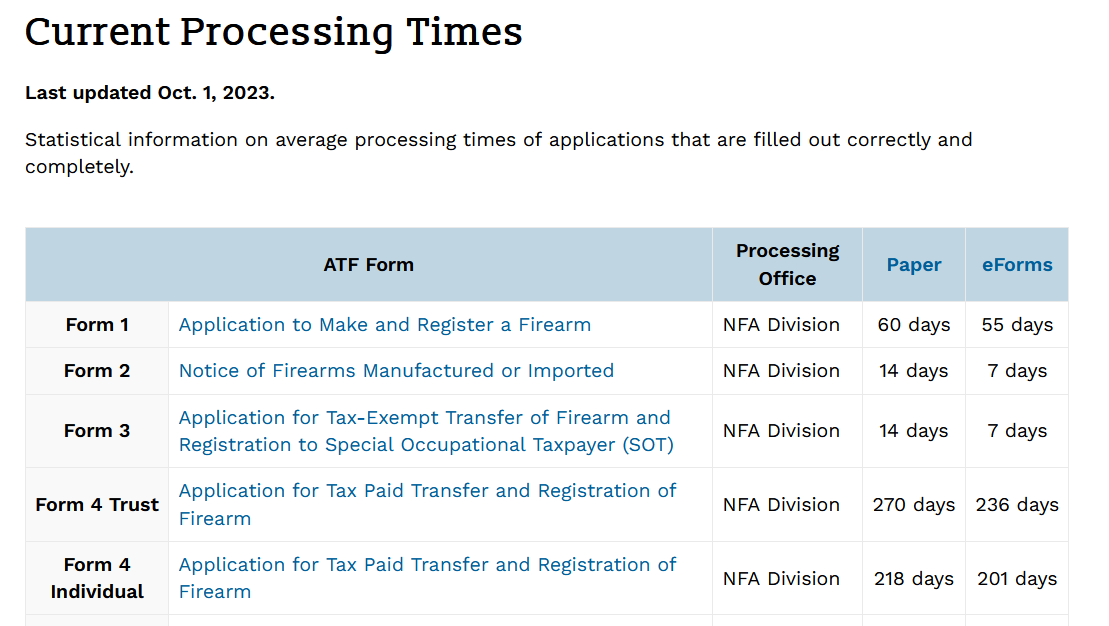
According to the ATF, the current lead time on processing the paperwork to buy a suppressor is about 270 days. That’s 38 weeks, or almost 10 months. Ouch. Indeed, buying a suppressor is a matter of patience. But, thankfully, the paperwork you need to fill out to own a suppressor is once-and-done. Once your application to buy a suppressor’s approved, you never need to renew any application, or pay any fees ever again (for that specific suppressor).
“Can I Do All the Suppressor Paperwork Online?”
Yes! And you definitely eForms should fill out your application to buy your suppressor online. Gone are the days of having to physically mail documents to some ATF field office – the feds have an online system that allows you to fill everything out on your phone or PC. It’s called , but we’ll talk about that more later.
“What’s a Gun Trust? Should I File as an Individual?”
There’s a lot of hot talk about using a gun trust to purchase an NFA item, especially suppressors. In truth, all a trust does is provide for easier transfer of ownership of your NFA items to a family member or designated beneficiary. There’s a matter of convenience, too. A gun trust allows any trustee to possess, transport, and use the NFA items within the trust at any point in time – with or without your physical presence.
Essentially, a trust allows multiple individuals to “stack on” to the application for your suppressor. Each trustee is considered an applicant, though – and that means they all have to provide personal information on your ATF application, including photos and fingerprints. Adding trustees and filing as a trust (instead of an individual) can also lead to delays if any one trustee’s background check or personal information gets caught up in any bureaucratic hurdles (like an incorrect social security number, a wrong home address, or your uncle’s old, unsightly DUI rearing its head).
To file as a trust, you have to actually make a trust, too. That means retaining an attorney to draft the paperwork, which costs extra. Personally, this writer always filed his ATF eForms applications as an individual. It’s quicker, more affordable, and less of a hassle trying to wrangle any would-be trustees to get me their requisite fingerprints, mugshots, and personal information. If you do want a gun trust, I highly recommend National Gun Trusts. They’re cheap – around $60 to $100 – and they’ve done thousands of trusts for gun owners, ensuring it’s quick and easy.
Step 1: Buy your Future Suppressor
Here’s the great news: You technically get to buy and “own” your suppressor before your application’s even approved. The only caveat is that you can’t actually take possession of it yet – your new can has to stay at the FFL you’re purchasing it from. But if your FFL happens to operate a shooting range, you can fire your new muzzle can all day long – or a rental that the FFL leases out for a fee. On that note, it’s a great idea to test out a few different models on your chosen firearm before you decide to purchase.
This is particularly important because once your application begins processing, you can’t back out: There is no option to change your chosen make or model, because the unique serial number of your suppressor is what ties your eForms application to the approval and ownership.
Step 2: Make an eForms Account
Once you’ve selected and paid for your suppressor, you’ll need to record the serial and register an account on the ATF’s eForms website. While registering, it’s important you accurately input your legal name and home address – it should match your home of record, not any business nor PO box. You can start filling out your application for your suppressor, but we recommend holding off until after step 3. You need to get your fingerprints ready, first. We’ll come back to the application process later.
Step 3: Roll your Fingerprints (Now Digital!)
Every eForms application for a suppressor requires a set of your fingerprints. This used to be a painful, mail-only process requiring the use of archaic FD-258 Fingerprint Cards. But now, you can get a digital set of fingerprints taken – and you can use that digital set for every eForms application you’ll ever submit!
To get digital prints for your eForms application, I recommend using PrintScan. They do digital printing for the FBI and various federal agencies, so they know what they’re doing. The cost is $45 (at the time of this publication). You can find a PrintScan location here, then schedule an appointment. After your appointment’s finished, simply download your prints from PrintScan, and then you’re ready to complete your eForms application.
ATF Form 4, “Application for Tax Paid Transfer and Registration of Firearm,” is the paperwork you must fill out on eForms. Many just call this a “form 4 application.” The process is pretty straightforward: Enter your personal information, the information pertaining to your suppressor – including the manufacturer, make, model, serial number, and caliber – and upload a picture of yourself, with your fingerprints.
The self-portrait is simple: Get someone to take a head-and-shoulders shot of you against a plain white background. You can even use your cellphone. Just make sure you’re not wearing glasses, jewelry, or any hats. If your photo looks like a passport or driver’s license portrait, you’re good to go.
Oh, you’ll also need to provide information about your local “chief law enforcement officer.” This is usually your local sheriff. You’ll want to record the name of the CLEO, and the address wherein he or she resides – usually the sheriff’s precinct. Have this info handy before filling out your application.
Step 5: Submit Application and Pay the $200 Tax
Once your application’s filled out, you’ll need to certify all the information contained therein is accurate, submit the application, and, sadly, pay our wonderful government $200 in the form of a tax. Yes, it’s dumb, but at least it’s a one-time fee. The eForms website accepts debit and credit card, which at least makes the humiliation a tad more convenient.
Step 6: Wait… and then Wait some more
Once you’ve submitted your Form 4 application, you’ll receive an email letting you know it’s in the pipeline for processing. At this point, comms will go dark for… quite a while. It’ possible your application could get approved more quickly than the advertised wait times, but expect to wait at least 8 to 9 months.
Step 7: Receive your Stamp, then Run to your FFL
Have faith, gunner: That fateful day will come. We’re talking about the day that you receive an email letting you know your ATF Form 4 application was approved, complete with your tax stamp showing you’re the proud, legal owner of a new suppressor. Print out your tax stamp and bring it to your FFL posthaste, so you can take ownership of your shiny (or matte) new muzzle muffler! There are loads of suppressor makers, and tons of models to pick from. Feeling overwhelmed? Start here, with our review of Dead Air’s new Mojave 9mm Suppressor.
The HK416 .22 LR is a Heckler & Koch firearm with the look and feel of the HK416 used by many of the world’s most elite fighting forces — including Seal Team VI. In fact, Seal Team VI members were carrying HK416s when they killed Osama Bin Laden.
HK partnered with Umarex to design and build a .22 version of the HK416 that is realistic in size and feel. It is made with the same quality standards that H&K is known for. Although the inner workings are obviously different, the externals of the .22 LR version are true to its big brother.
Controls, except for the slide lock, mimic those on the .556 HK416.
The HK416 .22 has an aluminum receiver — no plastic like so many other .22 lookalikes. It is equipped with the same M-LOK rail interface system that’s on the HK416 5.56 model. There’s a 90-degree manual safety, functional dust cover, threaded muzzle, and it’s compatible with most AR-style arm braces. The barrel is 8.5 inches long, and the total weight with a magazine is about 6 pounds.
The trigger pull is 7 pounds with less than .25-inch take-up and a crisp break. The sights are flip-up with the rear one being fully adjustable. They flip down (out of the way) should you want to mount an optic on the top rail. There is also the HK AR pistol grip that a lot of guys like to install on their ARs because of its angle, texture, and the built-in storage compartment.
There was a little tool packet with the gun. In it was a wrench for removing the flash hider. Off it went. In its place, I screwed on a Tactical Innovations suppressor. Now my grandkids and I had a tactical-looking machine pistol. Although it is a .22 LR and isn’t fully automatic, our imaginations make up the difference for fun afternoons at the range.
Shooting Fun for All Ages
When shooting a semi-automatic .22 for the first time, I choose my ammunition carefully. You can’t go wrong with CCI, so long as you choose some of its high-velocity rounds. I chose a box marked “Suppressor” along with some Mini-Mags, Stingers, and the new CCI clean rounds with the polymer coating. There is a bolt-speed adjustment screw that can be used to compensate between standard and high-velocity ammunition. In all my shooting, which must be more than 1,000 rounds by now, I’ve never had to make an adjustment.
The first crew to shoot with me included my middle son, his youngest son, and my grandson’s best friend. While they were getting guns laid out on the bench, I loaded the magazine for the HK416 with .22 Suppressor rounds. I handed the magazine to my son and waited for him to start shooting. I wondered if something was wrong because he seemed to be hesitating.
A red dot sight makes the .22 HK416 seem even more like a real combat weapon for training or fun.
Then, I noticed there were holes in the target. Sitting right behind him with hearing protection on, I was not hearing that gun go off due to the suppressor. It was just like in the movies… Phhht! Phhht! Now that was fun. Unfortunately, we only had one box of those rounds.
CCI Stingers are notoriously loud for a .22, but even they were pretty quiet through the HK416 with the suppressor. We had to adjust the sights a little, which was very easy with the twist knob on the sight. Our shots were going to the left before I made a quick adjustment.
Shooting first at 7 and then at 15 yards, none of us had any trouble putting our shots within a reasonable group. There was no shortage of smiles on faces, including mine. Maybe playing army could be just as much fun as playing cowboy.
With a Bushnell Red Dot sight installed, it was easier to put rounds on target. However, the HK416 was accurate regardless.
Cleaning the gun was simple. It has the standard AR pins for removing the upper from the lower, but that’s as far as the similarity goes. First off, the bolt lock on the side of the receiver is a dummy, and just there for looks. The only way to lock the bolt back is to insert an empty magazine and pull the charging handle back. You can then remove the magazine, and the bolt will stay back. By the way, the gun will shoot with the magazine removed. To put the gun into battery, pull the charging handle back and let it go.
The cleaning procedures (as described in the manual) require removing just the rear pin and pivoting the upper forward. This provides access to the barrel, which can be cleaned from the breech end using a rod or pull cord that allows a brush to be attached after inserting it in the barrel. The bolt is not removed for cleaning. In fact, I’m still trying to figure out how to get it out.
After cleaning the barrel, spray the bolt area with a good gun cleaner, brush away any dirt or grime, apply two drops of oil on the main spring, one drop of oil on the extractor, and you’re ready to pop the upper down. Then, reinstall the rear pin and you’re done. I like to cycle the bolt a few times to spread what little oil is in the receiver area.
Standard AR takedown bolts are there for cleaning, but the process is much simpler than that of the 5.56 version.
A Very Realistic “Little Brother”
I began reading everything I could on the HK416 5.56 version to understand its history. Noted firearms trainer and former Delta Force operator Larry Vickers happened to be at HK headquarters working on another project when he saw blueprints for the HK416 in the president’s office. He was able to get in on the project in its early days. I watched a video explanation he did on the differences in the short gas-stroke piston of the HK416 versus the gas operating system of the M4.
The HK416 runs cooler and cleaner, making it a favorite with military and law enforcement units around the world. Of course, this .22 version is not the same gun. However, it does make the same size holes in paper and handles the same. That makes it a good, inexpensive option for training tactical types — as well as a ton of fun for those of us who don’t clear houses and bust bad guys for a living.
I dug around and found a Bushnell Trophy Red Dot sight, which I installed on my gun. I did have to remove the existing sights to make this change, but that was no problem. I simply loosened a screw on each and slid them off the back of the rail.
HK Parts supplies a pistol brace adapter for this gun, and I found a stabilizing brace at Cheaper Than Dirt. There is also a 30-round magazine available. With the CCI suppressor ammo loaded in the HK416, my crew is ready to ping steel plates, pop Tannerite targets, and just have fun in general — with safety always the number one priority.
HK416 .22 LR Specifications
Action: Semi-automatic Barrel Length: 16.1inches Caliber: .22 LR Capacity: 10 rounds Frame Finish: Black Stock: Collapsible
A .22 For Home Defense?
I’ve been watching the introduction of new .22 guns, especially ones that are models of higher caliber firearms, and thinking not only about their use for training, but for defense. For years, I’ve heard stories about how hitmen preferred .22s. I’ve found documentation about the OSS using suppressed High Standard and Colt Woodsman pistols in .22 caliber for close-up elimination of enemies of state.
Thumb tabs on the 20-round magazine make it easy to load.
There’s no doubt a .22 with effective shot placement could be an effective defensive round. Of course, we all want bigger calibers because we aren’t all that good with a gun, are we? Up through my 50s, I was a .45 ACP man. In my 60s, I was still talking .45 ACP but shooting more 9mm. Now that I’m in my 70s, for some reason I’m shooting a lot of .22s, though still carrying a 9mm.
Will I ever carry a .22 for self-defense? I don’t think so, but I’m not making any promises. I do know that for home defense, the HK416 with .22 High-Velocity Hollow Points loaded would do the job. Knowing that gives me a reason to practice with it. Never mind that practicing with it is more fun than I could have imagined.
The HK416 is priced reasonably and uses cheap ammo. It might make a good addition to your .22 caliber gun arsenal; it sure did to mine. With a MSRP of $449, you’ll find it under $400.
What piques your interest in the HK416 .22 LR the most — plinking, militaria collecting, tactical training or something else? Share your answer in the Comment section.
With a Bushnell Red Dot sight installed, it was easier to put rounds on target. However, the HK416 was accurate regardless.
The HK416 .22 came packaged with tools that let you know it’s easy to upgrade.
The flash hider is fake and easily removed from the threaded barrel that has standard 1/2×28 threads to accept a suppressor.
The storage compartment in the pistol grip is representative of the 5.56 HK416.
With a Bushnell Red Dot sight installed, it was easier to put rounds on target. However, the HK416 was accurate regardless.
The open sights are adjustable for windage and elevation, tilt down flat, and are easily removed from the top rail to make room for other optics.
Standard AR takedown bolts are there for cleaning, but the process is much simpler than that of the 5.56 version.
The author enjoyed shooting the HK416 .22LR with open sights even before switching to the red dot sight.
A red dot sight makes the .22 HK416 seem even more like a real combat weapon for training or fun.
Controls, except for the slide lock, mimic those on the .556 HK416.
Thumb tabs on the 20-round magazine make it easy to load.
Before we jump into this, it’s important to clear something up: federal regulations say that you can check a firearm in your baggage by following certain steps – which we’ll cover here – but some state laws vary. The Firearm Owners Protection Act is supposed to allow gun owners to travel through states with a legally possessed firearm, even if that firearm is illegal in that state, under a provision called the Safe Passage Act. But in spite of this, You could still potentially face penalties, or be temporarily detained and questioned by some unfriendly authorities, if you fly into a state with restrictions on the guns you’re traveling with. That includes connecting flights. Yes, it’s terrible, but some gun owners have faced hurdles for flying with perfectly legal firearms and making connecting flights in restrictive states like New York.
In short, always check the local and state laws of all locales you plan on visiting – even those wherein you may simply sit in the airport waiting for your next flight. With that out of the way, let’s answer the common questions and bust some myths. Then we’ll go over how to properly store your guns and declare them at your departure for air travel.
Can I Really Fly with a firearm? – Yes, but under normal circumstances, only in the U.S. It is possible to fly internationally with guns, and plenty of hunters do it. But you need to comply with the Arms Export Control Act, and deal with the legalities of strict laws overseas. We’re only going over flying with your firearms in betwixt our 50 great states.
Can a Firearm be Carried-On a Plane? – Absolutely not and, if you try to stow your gun in a carry-on, you will most certainly not be going anywhere (besides a locked room, in handcuffs). All firearms must be transported in checked baggage and stored in the cargo hold. Importantly, though, firearm optics can be carried onboard any flight. Scopes and night vision devices can be delicate, and they’re expensive, so you might want to tuck yours in your overhead bag instead.
What if I’m Law Enforcement? – No go. All firearms must always be checked with TSA before you go through security. Only air marshals on duty can carry firearms aboard an aircraft.
Can I Fly with Ammo, too? – Yes, but you can’t travel with loose rounds. All live ammo must be stored inside a box or container, or magazines (more on that next), then stored inside a locking box.
How Exactly Do I Store my Firearm and Ammo?
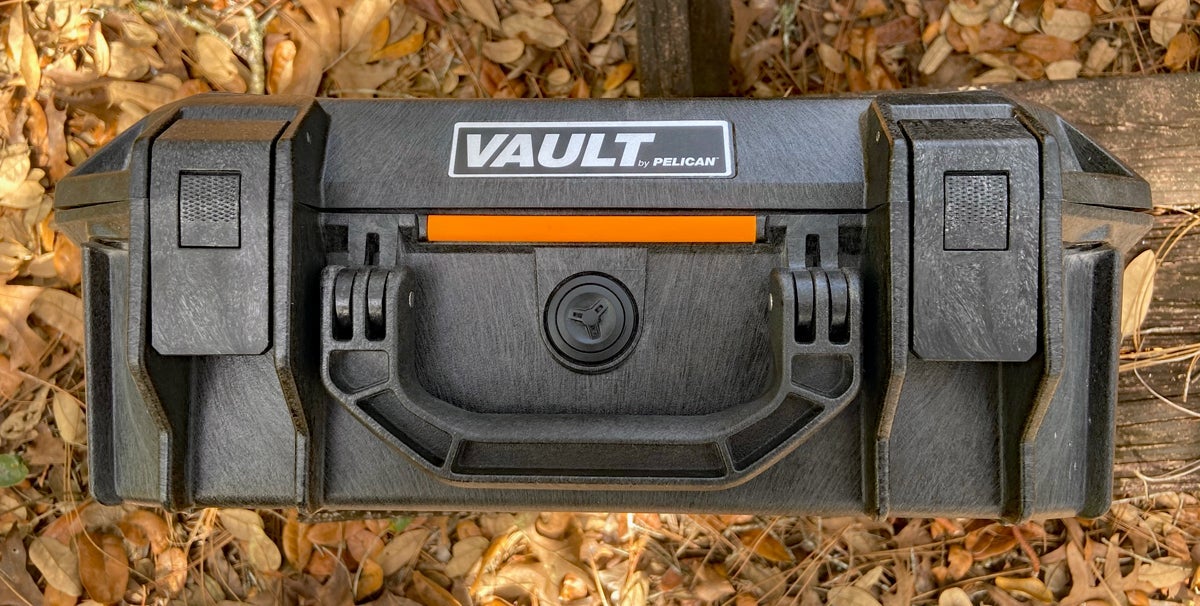
Easy! You can store your firearms inside a locking hard case. Of course, your case needs to be able to withstand the rigors of air travel and it must be able to withstand basic handling. That means no flimsy, $20 gun cases that you could easily pry open, or break the latches.
A Pelican case, like the Vault V200 Handgun Case, or any similar locking hard case sets the standard for what is considered air travel-worthy.
Your gun case needs to be hard-sided. No soft cases are allowed.
You case needs to be lockable, either with a key lock or padlock.
Your case needs to be impact- and weather-resistant.
Ideally, your case should have a pressure relief valve.
Ammo and firearms must be stored separately.
The TSA takes these guidelines seriously. If you show up and have even a single loose round bouncing around in your gun case, you’re probably going to miss your flight and you could even be on the hook for a $10,000 fine, if not jail time. Besides storing ammo and guns in separate locking containers, there are some extra guidelines to follow when it comes to ammo, too:
Ammo can’t be larger than .75 caliber. So, no mortars or rockets. Sorry.
Ammo can’t be left in magazines or stripper clips unless they’re capped.
Ammo can be stored inside a firearm case only if the ammo is first stored inside its own separate, locking hard case. That smaller case can then be placed inside the firearm case if there’s room.
Beyond these requirements, here are some tips and tricks you should consider when traveling with guns and ammo. This can make your travel easier and worry-free.
Contact info. Place it inside your gun case. If your case gets lost, TSA can more easily contact you if you get separated from your checked luggage.
TSA-approved locks. Some advocate for not using TSA-approved locks (they can be opened by TSA agents). But if your gun case does happen to get misplaced, the only choice agents have is to either 1. cut your locks, or 2. open them if possible.
Tell security you’re traveling with firearms at the curb. Virtually every single airport in the U.S. has security or law enforcement at the departure terminal curbside. Approaching security can make your check-in process easier. Usually, they’ll be happy to escort you to the separate screening area for checking your firearms. They’ll ensure your guns and ammo are stored correctly before entering the airport, helping you to avoid any issues later.
Don’t open your cases at your destination. Of course you want to check your firearms and kit after you land, but wait until you exit the airport. If you’re seen opening your cases after you collect them, you’re bound to get swarmed by security.
Call ahead and speak to your airline and airports. It’s a good idea to confirm your airline’s policy concerning checking firearms. Some are easier to deal with than others. The same goes for airport security: Call your departure and arrival points and confirm where you need to go for screening before the day you fly.
Are you interested in building your own firearms at home, but aren’t really sure how to get started? Not to worry; wethe New York State Policehas your back.
In an effort to crack down on so-called “ghost guns,” the NYSP inadvertently put together the perfect beginner’s how-to manual:
It has all the info you need to start. Descriptions of the technologies available (80% receivers, CNC milling, 3D printing), along with suppliers for the various tools, and complete parts lists and suppliers.
It tells you what hand tools you’ll be wanting. It even tells which types of plastic filament are best suited for firearms and the model of 3D printer you choose. It shows you basic steps you’ll be following.
NYSP didn’t mean it this way; it was supposed to be an internal tyranny tool. But someone leaked it, and we aim to keep it leaked.
In this tutorial, we will learn how to make web requests in Laravel 10 using Guzzle. We’ll explore the basics of making GET, POST, PUT, and DELETE requests with the Guzzle HTTP client library. It’s an essential skill in web development, and Guzzle makes it user-friendly in Laravel 10.
In the past, developers used cURL for similar tasks, but now we have more powerful tools like Guzzle, which we’ll look at here.
We’ll cover the following examples:
Laravel 10 HTTP Guzzle GET Request Example: How to perform a GET request using Guzzle in Laravel 10.
Laravel 10 HTTP Guzzle POST Request Example: Sending POST requests with Guzzle in Laravel 10.
Laravel 10 HTTP Guzzle PUT Request Example: Making PUT requests with Guzzle in Laravel 10.
Laravel 10 HTTP Guzzle DELETE Request Example: Sending DELETE requests with Guzzle in Laravel 10.
By the end of this tutorial, you’ll have a clear understanding of how to use Guzzle for different types of HTTP requests in Laravel 10. This knowledge will enable you to work more effectively with external APIs and web services.
Step 1: Download Laravel
Let us begin the tutorial by installing a new laravel application. if you have already created the project, then skip following step.
Step 2 : Laravel 10 HTTP cURL GET Request Example:
Here, we will see how to send curl http get request in laravel 10, let’s update route file code and controller file code. you can see output as well:
routes/web.php
<?php

use Illuminate\Support\Facades\Route;

use App\Http\Controllers\HttpPostController;

/*
|--------------------------------------------------------------------------
| Web Routes
|--------------------------------------------------------------------------
|
| Here is where you can register web routes for your application. These
| routes are loaded by the RouteServiceProvider within a group which
| contains the "web" middleware group. Now create something great!
|
*/

Route::get('posts', [HttpPostController::class, 'index']);
php artisan make:controller HttpPostController
app/Http/Controllers/HttpPostController.php
<?php

namespace App\Http\Controllers;

use Illuminate\Http\Request;
use Illuminate\Support\Facades\Http;

class HttpPostController extends Controller
{
    /**
     * Write code on Method
     *
     * @return response()
     */
    public function index()
    {
        $response = Http::get('https://jsonplaceholder.typicode.com/posts');

        $jsonData = $response->json();

        dd($jsonData);
    }
}
Step 3 : Laravel 10 HTTP cURL POST Request Example:
Here, we will see how to send curl http post request in laravel 10, let’s update route file code and controller file code. you can see output as well:
routes/web.php
<?php

use Illuminate\Support\Facades\Route;

use App\Http\Controllers\HttpPostController;

/*
|--------------------------------------------------------------------------
| Web Routes
|--------------------------------------------------------------------------
|
| Here is where you can register web routes for your application. These
| routes are loaded by the RouteServiceProvider within a group which
| contains the "web" middleware group. Now create something great!
|
*/

Route::get('posts/store', [HttpPostController::class, 'store']);
app/Http/Controllers/HttpPostController.php
<?php

namespace App\Http\Controllers;

use Illuminate\Http\Request;
use Illuminate\Support\Facades\Http;

class HttpPostController extends Controller
{
    /**
     * Write code on Method
     *
     * @return response()
     */
    public function store()
    {
        $response = Http::post('https://jsonplaceholder.typicode.com/posts', [
                    'title' => 'This is test from Nicesnippest.com',
                    'body' => 'This is test from Nicesnippest.com as body',
                ]);

        $jsonData = $response->json();

        dd($jsonData);
    }
}
Output:
Array
(
    [titile] => This is test from Nicesnippest.com
    [body]  => This is test from Nicesnippest.com as body
    [id] => 101
)
Step 4 : Laravel 10 HTTP Curl PUT Request Example:
Here, we will see how to send curl http put request in laravel 10, let’s update route file code and controller file code. you can see output as well:
routes/web.php
<?php

use Illuminate\Support\Facades\Route;

use App\Http\Controllers\HttpPostController;

/*
|--------------------------------------------------------------------------
| Web Routes
|--------------------------------------------------------------------------
|
| Here is where you can register web routes for your application. These
| routes are loaded by the RouteServiceProvider within a group which
| contains the "web" middleware group. Now create something great!
|
*/

Route::get('posts/update', [HttpPostController::class, 'update']);
app/Http/Controllers/HttpPostController.php
<?php

namespace App\Http\Controllers;

use Illuminate\Http\Request;
use Illuminate\Support\Facades\Http;

class HttpPostController extends Controller
{
    /**
     * Write code on Method
     *
     * @return response()
     */
    public function update()
    {
        $response = Http::put('https://jsonplaceholder.typicode.com/posts/1', [
                    'title' => 'This is test from Nicesnippets.com',
                    'body' => 'This is test from Nicesnippets.com as body',
                ]);

        $jsonData = $response->json();

        dd($jsonData);
    }
Output:
Array
(
    [titile] => This is test from Nicesnippest.com
    [body]  => This is test from Nicesnippest.com as body
    [id] => 1
)
Here, we will see how to send curl http delete request in laravel 10, let’s update route file code and controller file code. you can see output as well:
routes/web.php
<?php

use Illuminate\Support\Facades\Route;

use App\Http\Controllers\HttpPostController;

/*
|--------------------------------------------------------------------------
| Web Routes
|--------------------------------------------------------------------------
|
| Here is where you can register web routes for your application. These
| routes are loaded by the RouteServiceProvider within a group which
| contains the "web" middleware group. Now create something great!
|
*/

Route::get('posts/delete', [HttpPostController::class, 'delete']);
app/Http/Controllers/HttpPostController.php
<?php

namespace App\Http\Controllers;

use Illuminate\Http\Request;
use Illuminate\Support\Facades\Http;

class HttpPostController extends Controller
{
    /**
     * Write code on Method
     *
     * @return response()
     */
    public function delete()
    {
        $response = Http::delete('https://jsonplaceholder.typicode.com/posts/1');

        $jsonData = $response->json();

        dd($jsonData);
    }
}
Step 6 : Laravel 10 API with Response:
We will create very simple http request full example. we need to create simple route to call controller method. so let’s create it:
routes/web.php
<?php

use Illuminate\Support\Facades\Route;

use App\Http\Controllers\HttpPostController;

/*
|--------------------------------------------------------------------------
| Web Routes
|--------------------------------------------------------------------------
|
| Here is where you can register web routes for your application. These
| routes are loaded by the RouteServiceProvider within a group which
| contains the "web" middleware group. Now create something great!
|
*/

Route::get('posts', [HttpPostController::class, 'index']);
app/Http/Controllers/HttpPostController.php
<?php

namespace App\Http\Controllers;

use Illuminate\Http\Request;
use Illuminate\Support\Facades\Http;

class HttpPostController extends Controller
{
    public function index()
    {
        $response = Http::get('http://jsonplaceholder.typicode.com/posts');

        $jsonData = $response->json();

        echo "<pre> status:";
        print_r($response->status());
        echo "<br/> ok:";
        print_r($response->ok());
        echo "<br/> successful:";
        print_r($response->successful());
        echo "<br/> serverError:";
        print_r($response->serverError());
        echo "<br/> clientError:";
        print_r($response->clientError());
        echo "<br/> headers:";
        print_r($response->headers());
    }
}


 Recommended: I Made a Dan Peña GPT with OpenAI and Learned This

 Academy: Prompt Engineering with Python and OpenAI