https://miro.medium.com/max/1200/0*2RUTEy8YajDOBdEFThis article covers 4 PHP static analysis tools I use in practically all of my Laravel projects to improve the quality of code and fix legacy problems or silly mistakes.Laravel News Links
Waterline: Elegant UI for Laravel Workflows
https://miro.medium.com/max/1200/1*2FP4crjpM8C48kAnqAjv5A.pngThis is very useful to anyone using the previously announced Laravel Workflow package.Laravel News Links
Waterline: Elegant UI for Laravel Workflows
https://miro.medium.com/max/1200/1*2FP4crjpM8C48kAnqAjv5A.pngThis is very useful to anyone using the previously announced Laravel Workflow package.Laravel News Links
“Andor” nearly makes up for the Disney sequels and the finale was the masterpiece our nation needs right now. Let’s talk about it.
https://media.notthebee.com/articles/637e8b360f1b1637e8b360f1b2.jpg
I’m not going to give away the all the spoilers for people who haven’t seen it, but I can hardly believe that Andor is Star Wars.
Not the Bee
1000 Musicians Play Metallica
https://theawesomer.com/photos/2022/11/rockin_1000_metallica_t.jpg

During their October 2022 stadium show in São Paulo, Brazil, the Rockin’ 1000 assembled their informal band of musicians from around the world. Their performance of Metallica’s Enter Sandman brought down the house with infectious energy. You’ll want to crank up the volume all the way for this one.
The Awesomer
Comic for November 22, 2022
https://assets.amuniversal.com/0902d7e04406013bce11005056a9545d
Top Dilbert Searches
marketing, project, cloud, catbert, leadership, budget, birthday, engineer, time sheet, sales, wally, strategy, dogbert, powerpoint, project management, topper, leader, boss, change, meeting, data, management, mordac
Dilbert Daily Strip
PHPScraper now supports feeds
https://api.imageee.com/bold?text=PHP:%20Scraping%20Feeds%20Tags&bg_image=https://images.unsplash.com/photo-1542762933-ab3502717ce7
Scrape Feeds
PHPScraper can identify and process feeds (RSS feeds, sitemaps, etc.) for you. The following feed-specific features are implemented:
Websites can define RSS feeds in the head section of their markup. PHPScraper allows to identify the RSS feeds of the current page using rssUrls:
The rss()-method can be used to parse RSS feeds. If called without any parameter rssUrls will be used:
You can also parse RSS feeds by passing one or more URLs in:
This result contains an array-structure with selected properties. The array-structure contains instances of DataTransferObjects\FeedEntry with properties for link and title.
Complete Details
If you need all details, please fallback on $web->rssRaw(...). It can be called like $web->rss(...) and returns an array-structure.
Parse XML Sitemaps
You can parse XML sitemaps using sitemap():
This result contains only selected properties. It returns an array of DataTransferObjects\FeedEntry with the link property.
Complete Details
If you need all details, please fallback on $web->sitemapRaw(...). It can be called like $web->sitemap() and returns an array-structure.
Parse Static Search Indexes
You can parse static search indexes using searchIndex():
This result contains only selected properties. It returns an array of DataTransferObjects\FeedEntry with properties link, title, and description.
Complete Details
If you need all details, please fallback on $web->searchIndexRaw(...). It can be called like $web->searchIndex() and returns an array-structure.
Laravel News Links
Sharpie’s Stainless Steel Marker Case
https://s3files.core77.com/blog/images/1321714_81_117539_tRAgzyQpt.jpg
Remember that chunky stainless steel Sharpie case by Dango Products?
 Dango Products
 Dango Products
Perhaps in reaction to that, Sharpie is now offering their own Stainless Steel Marker Case.

A threaded collar locks your Sharpie into the barrel, and the stainless steel cap replaces the plastic cap (and has its own clip). It takes the standard Sharpie, not some special variant you have to buy.

It doesn’t appear to be sold as a standalone product, but is instead packaged with five markers. At press time I couldn’t find anyone who had these in stock, but they cost $18 per pack.

Anyone remember when Sharpie made refillable stainless steel Sharpies?

Core77
Introducing PHP 8.2: all new features and changes
https://freek.dev/og-images/e02ee09bf1c083028576d14244244726/2382.png
PHP 8.2 will be released on 8th December 2022, and is a minor release compared to 8.0 and 8.1. This can be partly attributed to the departure of Nikita Popov as one of the most significant contributors to the PHP language. The PHP language has a lot of maintainers and isn’t built by one person, but Nikita was one of the most active of them. Features like union types, typed properties, named arguments, and arrow functions, to name a few, were all added by Nikita.
This blog post is a slightly edited excerpt from Front Line PHP, a beautifully designed book by Spatie on how to build modern applications using PHP 8.2. It covers PHP’s type system, static analytics, how to use the latest features, and much more!
The news of the departure echoed through the PHP community, and a significant problem had to be acknowledged. Other languages like JavaScript/TypeScript, C#, and Java were backed by large companies with many assets at their disposal. In contrast to the PHP core team, which primarily relies on volunteers and a few small companies to pay some contributors.
The unclear future for the PHP language due to the recent news and a lack of paid core developers was the primary motivation to establish the PHP Foundation in November 2021. Their mission statement was as follows:
The PHP Foundation will be a non-profit organization whose mission is to ensure the long life and prosperity of the PHP language.
The PHP Foundation is backed by companies and individuals in the PHP community and will fund developers working on the PHP core to keep the language getting forward as it was in the past years.
I can proudly say that Spatie is sponsoring the PHP Foundation, and you can too, for as little as a cup of coffee!
The PHP 8.2 release falls right into the first year of the PHP Foundation, and some organizational structures had to be set up. The first developers were selected and eventually hired to work for the foundation during this period. These things take some time, so we consider the PHP 8.2 release one of the more minor releases because major things moved in the PHP core team. Luckily we know this is going to change thanks to the PHP Foundation. The future is looking bright for PHP!
Let’s go to a number of improvements included in PHP 8.2.
Dynamic properties
PHP has always had a dynamic nature. The community decided that some of the language’s earliest features were too dynamic of nature in the past years. An excellent example of such a dynamic feature are dynamic properties. It is currently allowed to set a property on any object that doesn’t exist in the class. For example, this is perfectly valid in PHP:
class User{}

$user = new User();
$user->email = 'info@spatie.be';
Dynamic properties provide an unseen amount of flexibility but also open the door to unexpected behavior and, thus, bugs that are difficult to fix. Let’s say you rename the property here. Then you should remember all the other places where this property is being used because it needs to be renamed. Static analysis and an IDE can assist you a bit here. But defining properties in your class will always provide more insight into these tools than dynamically setting them. And you’ll probably write a lot fewer bugs too!
Further, reading an undefined property will give you feedback that something went wrong because you’ll receive a warning. Whereas writing to an undefined property can be done without any warning. I always want to have a stable type system where I’m sure that properties exist because I strictly define them. Dynamic properties offend this rule, and that’s why I’m not using them.
Starting with PHP 8.2, dynamic properties were deprecated. The example above will now throw a deprecation warning. Notice that when you have implemented the magic __get() or __set() methods, getting and setting dynamic properties on an object is still perfectly valid.
Further, you can still enable the functionality of dynamic properties by adding the AllowDynamicProperties attribute to the class:
#[AllowDynamicProperties]
class User{}

$user = new User();
$user->email = 'info@spatie.be';
This attribute is inherited by all the children of the class and is added by default to the stdClass. So extending your class from stdClass will also enable this dynamic behavior:
class User extends stdClass{}

$user = new User();
$user->email = 'info@spatie.be';
Lastly, readonly classes can never have dynamic properties. Adding the AllowDynamicProperties attribute to a readonly class will result in an error.
Deprecations in string interpolation
String interpolation is a nifty feature that allows you to use variables in strings like this:
"Hello there, {$name}"
Did you know you could also do this:
"Hello there, ${name}"
I certainly did not. Though the syntax almost looks the same, it behaves quite differently. Due to these differences in semantics and enough options to use string interpolation, the feature was deprecated with the release of PHP 8.2.
Sensitive parameters
PHP allows you to look at the stack trace and all the parameters associated with each stack frame when something goes wrong. Which is extremely helpful for debugging but can be disastrous for sensitive data. Let’s say you have a function like this:
function login(
    string $name,
    string $password
) {
    throw new Exception('Whoops!');
}
The password is now included in the stack trace created by the exception, which means it is available for anyone to see when you’ve misconfigured your application. When you’ve configured an external bug tracking service to which you send your stack traces, the password will be sent to the external service with a bunch of debug data, which you want to avoid.
You can easily check this by catching the error and dumping the arguments from the first stack frame:
try {
    login('Freek', 'secret');
} catch (Exception $exception) {
    var_dump($exception->getTrace()[0]['args']);
}
Which will effectively output the following:
array(2) {
  [0]=> string(5) "Freek"
  [1]=> string(6) "secret"
}
In PHP 8.2, a SensitiveParameter attribute was added, replacing the parameter in stack traces. You can use it like this:
function login(
    string $name,
    #[SensitiveParameter]
    string $password
) {
    throw new Exception('Whoops!');
}
Now the output from catching the exception looks like this:
array(2) {
  [0]=> string(5) "Freek"
  [1]=> object(SensitiveParameterValue)#2 (0) {}
}
The PHP developers chose not to replace the parameter with a dubious string like ‘hidden’, but they created a new DTO, SensitiveParameterValue. This DTO allows you to retrieve the original sensitive value within your code when that would be required. Still, it makes it hard to expose the value accidentally to users of your application or an external service.
Constants in traits
Before PHP 8.2, it was not allowed to add constants to traits. Which was a language discrepancy since traits had access to the constants of the classes where they were being used. But you could strictly not define that a constant would exist in a class, luckily this has been fixed:
trait WithSpatieApi {
    protected const SPATIE_API_VERSION = 1;
}
PCRE no-capture modifier
A small addition to the PHP 8.2 regex extension is the no-capture modifier which will only capture named capture groups. You can add this modifier by appending n to the end of your regex. Let’s say you want to capture the abbreviation in these written numbers: 1st, 2nd, 3rd, and so on. You can write a regex like this:
// [0 => '5th',1 => '5', 2 => 'th']
preg_match('/([0-9]+)(st|nd|rd|th)/', '10th', $matches);
With named capture groups, you can easily name the desired group:
// [0 => '5th', 1 => 5, 'abbreviation' => 'th', 2 => 'th']
preg_match('/([0-9]+)(?P<abbreviation>:st|nd|rd|th)/', '5th', $matches);
Using the no-capture modifier, PHP will only include the named group:
// [0 => '5th', 'abbreviation' => 'th', 1 => 'th']
preg_match('/([0-9]+)(?P<abbreviation>:st|nd|rd|th)/n', '5th', $matches);
Random extension
PHP 8.2 is bundled with a new extension which adds a more OOP-friendly way to work with random number generation and other randomizing operations. A new Randomizer class was added to enable the functionality. You can, for example, shuffle a string like this:
use Random\Randomizer;

$randomizer = new Randomizer();

$randomizer->shuffleBytes('Hello World'); // example output: "eWrdllHoo l"
Or shuffle an array:
$randomizer->shuffleBytes(['a', 'b', 'c', 'd']); // example output: ['b', 'd', 'a', 'c']
Getting a number in a certain interval can be done as such:
$randomizer->getInt(0, 100); // example output: 42
An added benefit is that you can provide a pseudo-random number generator (PRNG) to the randomizer. PHP has several PRNG engines built-in: Mt19937, PcgOneseq128XslRr64, Xoshiro256StarStar, and Secure. Notice that only the last engine is suitable for cryptographic random number generation. This engine model allows more safe/fast engines to be added quickly in the future. You can even create your engine to be used with the randomizer.
You can set the engine for the randomizer as such:
use Random\Engine\Mt19937;
use Random\Randomizer;

$randomizer = new Randomizer(new Mt19937());
Closing, you can now also set the seed of the engine being used for the randomizer. The seed is mostly a random value from which the other random values are derived. When you run this example twice, the number generated will be different every time:
$randomizer = new Randomizer();

$randomizer->getInt(0, 100);
When you set a value for the seed by using the Mt19937 engine, then the randomly generated value will each time be the same:
$randomizer = new Randomizer(new Mt19937(42));

$randomizer->getInt(0, 100);
This behavior can be helpful within a test or local environment, where it will be helpful if restarting a piece of code during debugging will provide the same outcome every time. Even when randomizing operations are being used.
Disjunctive normal form types
Union and intersection types added lots of benefits to the language. With the introduction of disjunctive normal form types (DNF types), you can construct even more complex types. DNF types were added in PHP 8.2, allowing you to make intersection and single types unions. This allows you to add even more granular type-checking to your code.
Let’s take a look at the example we had earlier. What if we had an interface like this:
interface WithUrlSegments
{
    public function getUrlSegments(): array;
}
A class Page can now implement this class:
class Page implements WithUrlSegments { /* … */ }
We can now extend the type of our URL function as follows:
function url((WithUuid&WithSlug)|WithUrlSegments $object): string { /* … */ }
The function now allows objects which implement both the WithUuid and WithSlug or objects implementing the single <hljs type WithUrlSegments interface.
The most prominent use case for DNF types will probably be to make intersection types nullable:
function url((WithUuid&WithSlug)|null $object): ?string { /* … */ }
DNF types must adhere to the rules of the DNF form, which means that you can only construct types as a union of intersections and single types. This means that a type like this is not allowed:
interface A {}
interface B {}
interface C {}

function url((A|B)&C $object): string { /* … */ }
It can be rewritten into a union of intersections as follows:
function url((C&A)&(C&B)$object): string { /* … */ }
Readonly classes
Sometimes you want to create a complete immutable DTO which only contains readonly properties. You could, in this case, create a class and define all the properties as readonly:
class CustomerDTO
{
    public function __construct(
        public readonly string $name,
        public readonly string $email,
        public readonly DateTimeImmutable $birth_date,
    ) {}
}
Doing this can be quite time-consuming, and every time you add a new property, you should remember to make it readonly. PHP 8.2 introduced a significantly better solution to this problem: readonly classes. With readonly classes, you declare a class as readonly once, and all properties within it will be readonly from that point on:
public readonly class CustomerDTO
{
    public function __construct(
        string $name,
        string $email,
        DateTimeImmutable $birth_date,
    ) {}
}
The individual properties of the readonly class behave as readonly properties, so all the behavior we described earlier still applies. Further, it is also impossible to add static properties to a readonly class, resulting in a fatal error.
You can only create a readonly class that extends from a readonly class. This rule implies that it is prohibited to make a readonly class that extends from a non-readonly class and the other way around where you create a non-readonly class that extends from a readonly class. Both these cases will result in a fatal error.
Improvements to enums
When enums were introduced, it was impossible to fetch the name and value properties from an enum in a constant expression. We’ve summed up some cases of constant expressions where this was the case:
class Post
{
    #[DefaultValue(Status::Draft->name)]
    public string $status = Status::Draft->name;

    public function updateStatus(string $status = Status::Draft->name): void
    {
        /** … */
    }
}

const STATUS = Status::Draft->name;
As from PHP 8.2, all these syntaxes are valid and will not throw errors anymore.
Deprecations in partially supported callable syntax
PHP 8.2 will deprecate some callable syntaxes because they are inconsistent:
"self::method"
"parent::method"
"static::method"
["self", "method"]
["parent", "method"]
["static", "method"]
["Foo", "Bar::method"]
[new Foo, "Bar::method"]
These syntaxes could be used with the callable type and the functions is_callable() and call_user_func(). Oddly, these syntaxes could be used in some cases but not with the $callable() syntax like this:
class Manager
{
    public function execute(string $method)
    {
        $callable = "self::{$method}";

        $callable();
    }

    private function destruct(){ /** ... */ }
}
Further, these syntaxes are context-dependent. The types behind self and static can change depending on the location from where they were called, which could result in unexpected behavior when they call private methods.
That’s why they’ve been deprecated from being used with the callable type and is_callable() and call_user_func() functions. Updating the example above can be quickly done as such:
class Manager
{
    public function execute(string $method)
    {
        $callable = self::class . "::{$method}";

        $callable();
    }

    private function destruct(){ /** ... */ }
}
Other callable syntaxes like these are still valid to be used:
'function'
['SomeClass', 'someMethod']
'SomeClass:: someMethod']
[new SomeClass(), 'someMethod']
[$this, 'someMethod']
Closure::fromCallable()
function(...)
A function to reset the memory peak usage
In PHP, it has been possible to measure peak memory usage. It was previously never possible to reset this peak, so measuring a second peak after a first one was impossible.
For example, when you create two arrays and want to measure the memory peak usage for the second array, the value will be equal to the memory usage peak from the creation of the first array:
range(0, 100_000);

memory_get_peak_usage(); // 2509760

range(0, 100);

memory_get_peak_usage(); // 2509760
The memory_reset_peak_usage function was added in PHP 8.2 allows you to reset this peak so you can measure it again:
range(0, 100_000);

memory_get_peak_usage(); // 2509760

memory_reset_peak_usage();

range(0, 100);

memory_get_peak_usage(); // 398792
The mysqli::execute_query method
PHP 8.2 adds a new method to the mysqli extension allowing you to prepare, bind parameters, and execute the SQL statement in one method. In the past, a lot of operations were required to perform a query:
$query = 'SELECT * FROM posts WHERE id = ?';
$statement = $connection->prepare($query);
$statement->bind_param('i', $id);
$statement->execute();
$result = $statement->get_result();
This code can now be rewritten as such:
$result = $mysqli->execute_query('SELECT * FROM posts WHERE id = ?', [$id]);
In closing
Even though PHP 8.2 is a smaller release than usual, it still packs a few niceties and bugfixes. To learn more about modern PHP check out Front Line PHP, a beautifully designed book on how to build modern applications using PHP 8.2. It covers PHP’s type system, static analysis, how to use the latestest features, and much more.
We’ve also created a handy cheat sheet that showcases all modern PHP features.
If you are a visual learner, you can opt to watch this video on new PHP 8.2 by JetBrains.
Laravel News Links
How to Build a Live Search using Laravel, Livewire, and Meilisearch
https://www.iankumu.com/blog/wp-content/uploads/2022/10/Laravel-Search.png
Free Laravel Guide
Grab your free Laravel Guide today and see how to boost your Laravel Experience
One of the most powerful features of Laravel is its ability to integrate with many different services. By default, Laravel integrates with the Meilisearch service. This allows you to easily query your data using the Laravel Eloquent ORM. But what if you want to build a custom search page? Well, it’s easy to do with a couple of tweaks. This article will show you how to create a custom search page using Laravel, Livewire, and Meilisearch.
What is Meilisearch?
Meilisearch is an open-source search engine that is built using Rust and can be integrated into any application to provide Full-Text Search. It comes with a lot of features that we can use to our advantage as developers. Because it is built using Rust, it is blazing fast making it a useful utility for any application. Laravel, through Laravel Scout, comes with an already implemented solution for meilisearch making it easy to use.
But What is Laravel Scout?
Laravel Scout is a first-party Package developed by Taylor Otwell that can be used to add Full-Text Search to your Eloquent Models. It makes it easy to search through your Eloquent Models and return the search results in a clean fashion.
Let’s get started.
How to integrate Full-Text Search into Laravel
Before we start, we need a couple of things;
Once you have created a new Laravel Application and downloaded and installed Meilisearch, you can now follow these steps.
Install Laravel Breeze
If you have created a new Laravel Application, you can install a starter kit. I will install Laravel breeze in this tutorial.
composer require laravel/breeze Prepare Model and Migration
We now need a Model to work with. I am going to use an Article Model which will contain an article name, author name and article content
php artisan make:model Articles -mThis command will create an Article Model and its corresponding migration file.
//App/Models/Articles.php
<?php

namespace App\Models;

use Illuminate\Database\Eloquent\Factories\HasFactory;
use Illuminate\Database\Eloquent\Model;

class Articles extends Model
{
    use HasFactory;

    protected $fillable = [
        'name', 'author', 'content'
    ];
}
<?php
use Illuminate\Database\Migrations\Migration;
use Illuminate\Database\Schema\Blueprint;
use Illuminate\Support\Facades\Schema;
return new class extends Migration
{
/**
* Run the migrations.
*
* @return void
*/
public function up()
{
Schema::create('articles', function (Blueprint $table) {
$table->id();
$table->string('name');
$table->longText('content');
$table->string('author');
$table->timestamps();
});
}
/**
* Reverse the migrations.
*
* @return void
*/
public function down()
{
Schema::dropIfExists('articles');
}
};
Seed the Database
When testing, I usually use Factories and Seeders to speed up my development process. To do so, we can create an Article Factory
php artisan make:factory ArticleFactory We can use faker to seed the database and then register the factory in the Database seeder
//database/factories/ArticlesFactory.php
<?php

namespace Database\Factories;

use Illuminate\Database\Eloquent\Factories\Factory;

/**
 * @extends \Illuminate\Database\Eloquent\Factories\Factory<\App\Models\Articles>
 */
class ArticlesFactory extends Factory
{
    /**
     * Define the model's default state.
     *
     * @return array<string, mixed>
     */
    public function definition()
    {
        return [
            'name' => $this->faker->words(2, true),
            'content' => $this->faker->sentence(),
            'author' => $this->faker->name()
        ];
    }
}
//database/seeders/DatabaseSeeder.php
<?php

namespace Database\Seeders;

// use Illuminate\Database\Console\Seeds\WithoutModelEvents;

use App\Models\Articles;
use Illuminate\Database\Seeder;

class DatabaseSeeder extends Seeder
{
    /**
     * Seed the application's database.
     *
     * @return void
     */
    public function run()
    {
        Articles::factory(20)->create();
    }
}
To seed the database, db:seed command will be of help
php artisan db:seed Install and Configure Livewire
The next step is to install the livewire package. Livewire will be a major help in adding reactivity to our application.
composer require livewire/livewireWe then need to include the livewire Javascripts in the app.blade.php file in the resources/views/components folder.
...
    @livewireStyles
</head>
<body>
    ...

    @livewireScripts
</body>
</html>
Create Article Component
Livewire helps us scaffold components fast using the make:livewire command.
php artisan make:livewire ArticlesThis creates a Component which we can reuse in multiple places.
This command creates two files, one in the App/Http/Livewire Folder and another one in the resources/views/livewire folder. These two will be essential in creating our full-text search
Through laravel breeze, Laravel scaffolded authentication and a dashboard which we can now use to display the Articles.
We can fetch records from the database and display them using the Articles Component.
<x-app-layout>
    <x-slot name="header">
        <h2 class="font-semibold text-xl text-gray-800 leading-tight">

        </h2>
    </x-slot>

    <div class="py-12">
        <div class="max-w-7xl mx-auto sm:px-6 lg:px-8">
            <div class="bg-white overflow-hidden shadow-sm sm:rounded-lg">
                <div class="p-6 bg-white border-b border-gray-200">
                   @livewire('articles')
                </div>
            </div>
        </div>
    </div>
</x-app-layout>
Install and Set up Laravel Scout
The next step is to install the Laravel scout package using composer
composer require laravel/scoutWe can then publish the configurations
php artisan vendor:publish --provider="Laravel\Scout\ScoutServiceProvider" Laravel Scout allows us to use any search driver such as database, algolia or meilisearch etc Meilisearch is a popular search engine because it is open source and can be self-hosted. It makes search easy because it handles all the technical bits such as typos.
Laravel Scout helps with all the other factors in search including indexing, updating the index and returning the results in a Laravel Friendly way. Under the hood, Scout uses Model Observers to update the records and re-index the search results in Meilisearch.
To set up Scout in our Models, we will need to include the Searchable trait in our Model
//App/Models/Articles.php
<?php

namespace App\Models;

use Illuminate\Database\Eloquent\Factories\HasFactory;
use Illuminate\Database\Eloquent\Model;
use Laravel\Scout\Searchable; //import the trait

class Articles extends Model
{
    use HasFactory;
    use Searchable; //add this trait

    protected $fillable = [
        'name', 'author', 'content'
    ];
}
We also need to install a few packages to be able to interact with meilisearch
composer require meilisearch/meilisearch-php http-interop/http-factory-guzzleWe can then set the environment variables to now use Meilisearch
SCOUT_DRIVER=meilisearch
MEILISEARCH_HOST=http://127.0.0.1:7700
MEILISEARCH_KEY=masterKey
Add Search Logic
Before performing a Search, we need to index our records in meilisearch using the scout:import command
php artisan scout:import "App\Models\Articles"Now, we can use Eloquent to perform a search on our records
We can update our Livewire Component to include the Search Logic
//App/Livewire/Articles.php
<?php

namespace App\Http\Livewire;

use App\Models\Articles as ModelsArticles;
use Livewire\Component;


class Articles extends Component
{

    public $search = '';
    public $articles;

    public function render()
    {
        if (empty($this->search)) {

            $this->articles = ModelsArticles::get();
        } else {
            $this->articles = ModelsArticles::search($this->search)->get();
        }

        return view('livewire.articles');
    }
}
Add Search Input Field
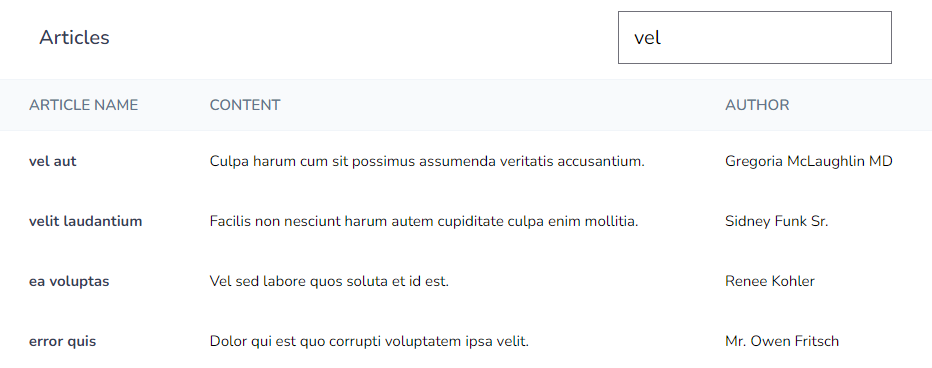
On the Articles Table, we can add a search input field that will receive the query and send it to the backend.
Livewire provides a cool way to perform data binding which we can use to our advantage. Using the wire:model property, we can pass the query onto the server and get the results back synchronously.
We can use one of the tailwind components templates to scaffold a view.
<!-- resources/view/livewire/articles.blade.php -->
<div>
     <!-- component -->
     <link rel="stylesheet" href="https://demos.creative-tim.com/notus-js/assets/styles/tailwind.css">
     <link rel="stylesheet" href="https://demos.creative-tim.com/notus-js/assets/vendor/@fortawesome/fontawesome-free/css/all.min.css">

       <section class="py-1 bg-blueGray-50">
           <div class="w-full xl:w-8/12 mb-12 xl:mb-0 px-4 mx-auto mt-24">
           <div class="relative flex flex-col min-w-0 break-words bg-white w-full mb-6 shadow-lg rounded ">
               <div class="rounded-t mb-0 px-4 py-3 border-0">
               <div class="flex flex-wrap items-center">
                   <div class="relative w-full px-4 max-w-full flex-grow flex-1">
                   <h3 class="font-semibold text-base text-blueGray-700">Articles</h3>
                   </div>
                   <div class="relative w-full px-4 max-w-full flex-grow flex-1 text-right">
                <input type="text" placeholder="Search..." wire:model="search">
                </div>
               </div>
               </div>

               <div class="block w-full overflow-x-auto">
               <table class="items-center bg-transparent w-full border-collapse ">
                   <thead>
                   <tr>
                       <th class="px-6 bg-blueGray-50 text-blueGray-500 align-middle border border-solid border-blueGray-100 py-3 text-xs uppercase border-l-0 border-r-0 whitespace-nowrap font-semibold text-left">
                                   Article name
                        </th>
                   <th class="px-6 bg-blueGray-50 text-blueGray-500 align-middle border border-solid border-blueGray-100 py-3 text-xs uppercase border-l-0 border-r-0 whitespace-nowrap font-semibold text-left">
                                   Content
                    </th>
                   <th class="px-6 bg-blueGray-50 text-blueGray-500 align-middle border border-solid border-blueGray-100 py-3 text-xs uppercase border-l-0 border-r-0 whitespace-nowrap font-semibold text-left">
                                   Author
                    </th>
                   </thead>

                   <tbody>
                        @if (!$articles->isEmpty())
                            @foreach ($articles as $article)

                                <tr>
                                    <th class="border-t-0 px-6 align-middle border-l-0 border-r-0 text-xs whitespace-nowrap p-4 text-left text-blueGray-700 ">

                                    </th>
                                    <td class="border-t-0 px-6 align-middle border-l-0 border-r-0 text-xs whitespace-nowrap p-4 ">

                                    </td>
                                    <td class="border-t-0 px-6 align-center border-l-0 border-r-0 text-xs whitespace-nowrap p-4">

                                    </td>
                                </tr>
                            @endforeach
                        @else
                            <td class="border-t-0 px-6 align-center border-l-0 border-r-0 text-xs whitespace-nowrap p-4">
                            No Results Found
                            </td>
                        @endif
                   </tbody>

               </table>
               </div>
           </div>
           </div>

       </section>
</div>
Livewire handles getting the query from the input field, makes an ajax request to the backend and returns the results back to the frontend.
This makes it easy to create a live search with minimal effort.
Display Results
Once Scout returns the results, Livewire takes care of displaying them on the table.
Conclusion
In this article, we have covered how to create a live search using Laravel Livewire and Meilisearch. We covered how to set up your application and include all the features needed for Full-Text Search. I hope this article was insightful. Thank you for reading
Free Laravel Guide
Grab your free Laravel Guide today and see how to boost your Laravel Experience
Laravel News Links