Chivalry is not dead and a Rhode Island middle school teacher is put on leave thanks to a student-created "pedo database" tracking him creeping on twelve-year-old girls.
Sometimes they’d laugh. Sometimes they just kind of just sit there awkwardly. Even the ones that said he was "creepy" laughed because they were obviously not trying to tick him off or anything. So they’re just fake laughing, awkwardly laughing.
When the students would speak up, no adults would take them seriously. Worse, the teacher himself is alleged to have "told the students that for nearly 30 years, he’s dealt with complaints from parents and there was nothing anyone could do to him."
The male students viewed that as a challenge. In January of 2021, they created a "pedo database" named after the teacher on Discord, a social media platform that allows users to communicate privately. The students would log the teacher’s creepy actions and bad touches as they happened in real-time so there was a record.
This is now the official chat that we will later use as evidence against (the teacher) about pedophilia in case anything does come up in the future and we do turn out to be right.
The database proved to be useful this year. The teacher was removed from the school over allegations he stalked one of the middle school girls and was "inappropriate" with others. Again, the school ignored complaints. That is until an attorney for one of the girls threatened to take out a restraining order against the teacher.
The public was asked to come forward with any information. One of the students came forward with their "pedo tracker." It’s now being shared with lawyers, the school district, and the US attorney’s office.
One more pedo teacher taken away. Well done, lads.
The Louder with Crowder Dot Com Website is on Instagram now!Follow us at @lwcnewswire and tell a friend!
Swedish Election PROVES The Left Is Engineering Racism! | Louder With Crowder
As developers, debugging apps is the task we do most of the time, and the essential part of it is accessing debug information, knowing what’s happening under the hood like seeing what queries are executed, knowing what commands are executed by your Laravel application will help you a lot to debug your application, and this is exactly what Laravel Telescope can do for you.
What is Laravel Telescope
Laravel Telescope is a first party Laravel package, its creators described it as:
An elegant debug assistant for the Laravel framework.
And this is exactly what it is, it’s your assistant while developing and debugging Laravel applications, it collects the important things you need to have an eye on like requests, database queries, queued jobs… basically everything’s happening in your application in one beautiful place so you can access them easily.
Laravel Telescope can also be helpful while improving the performance of your application, for example using its Queries feature that shows you all the database queries that are executed on every request, such thing can, for example, help you identify repetitive and unnecessary queries and fix them.
Laravel Telescope Installation
You can install it easily as any other Laravel package via composer:
composer require laravel/telescope
After installing it, you can publish its assets using the following command:
phpartisantelescope:install
Finally, you have to run migrations to create the tables needed by Laravel Telescope:
php artisan migrate
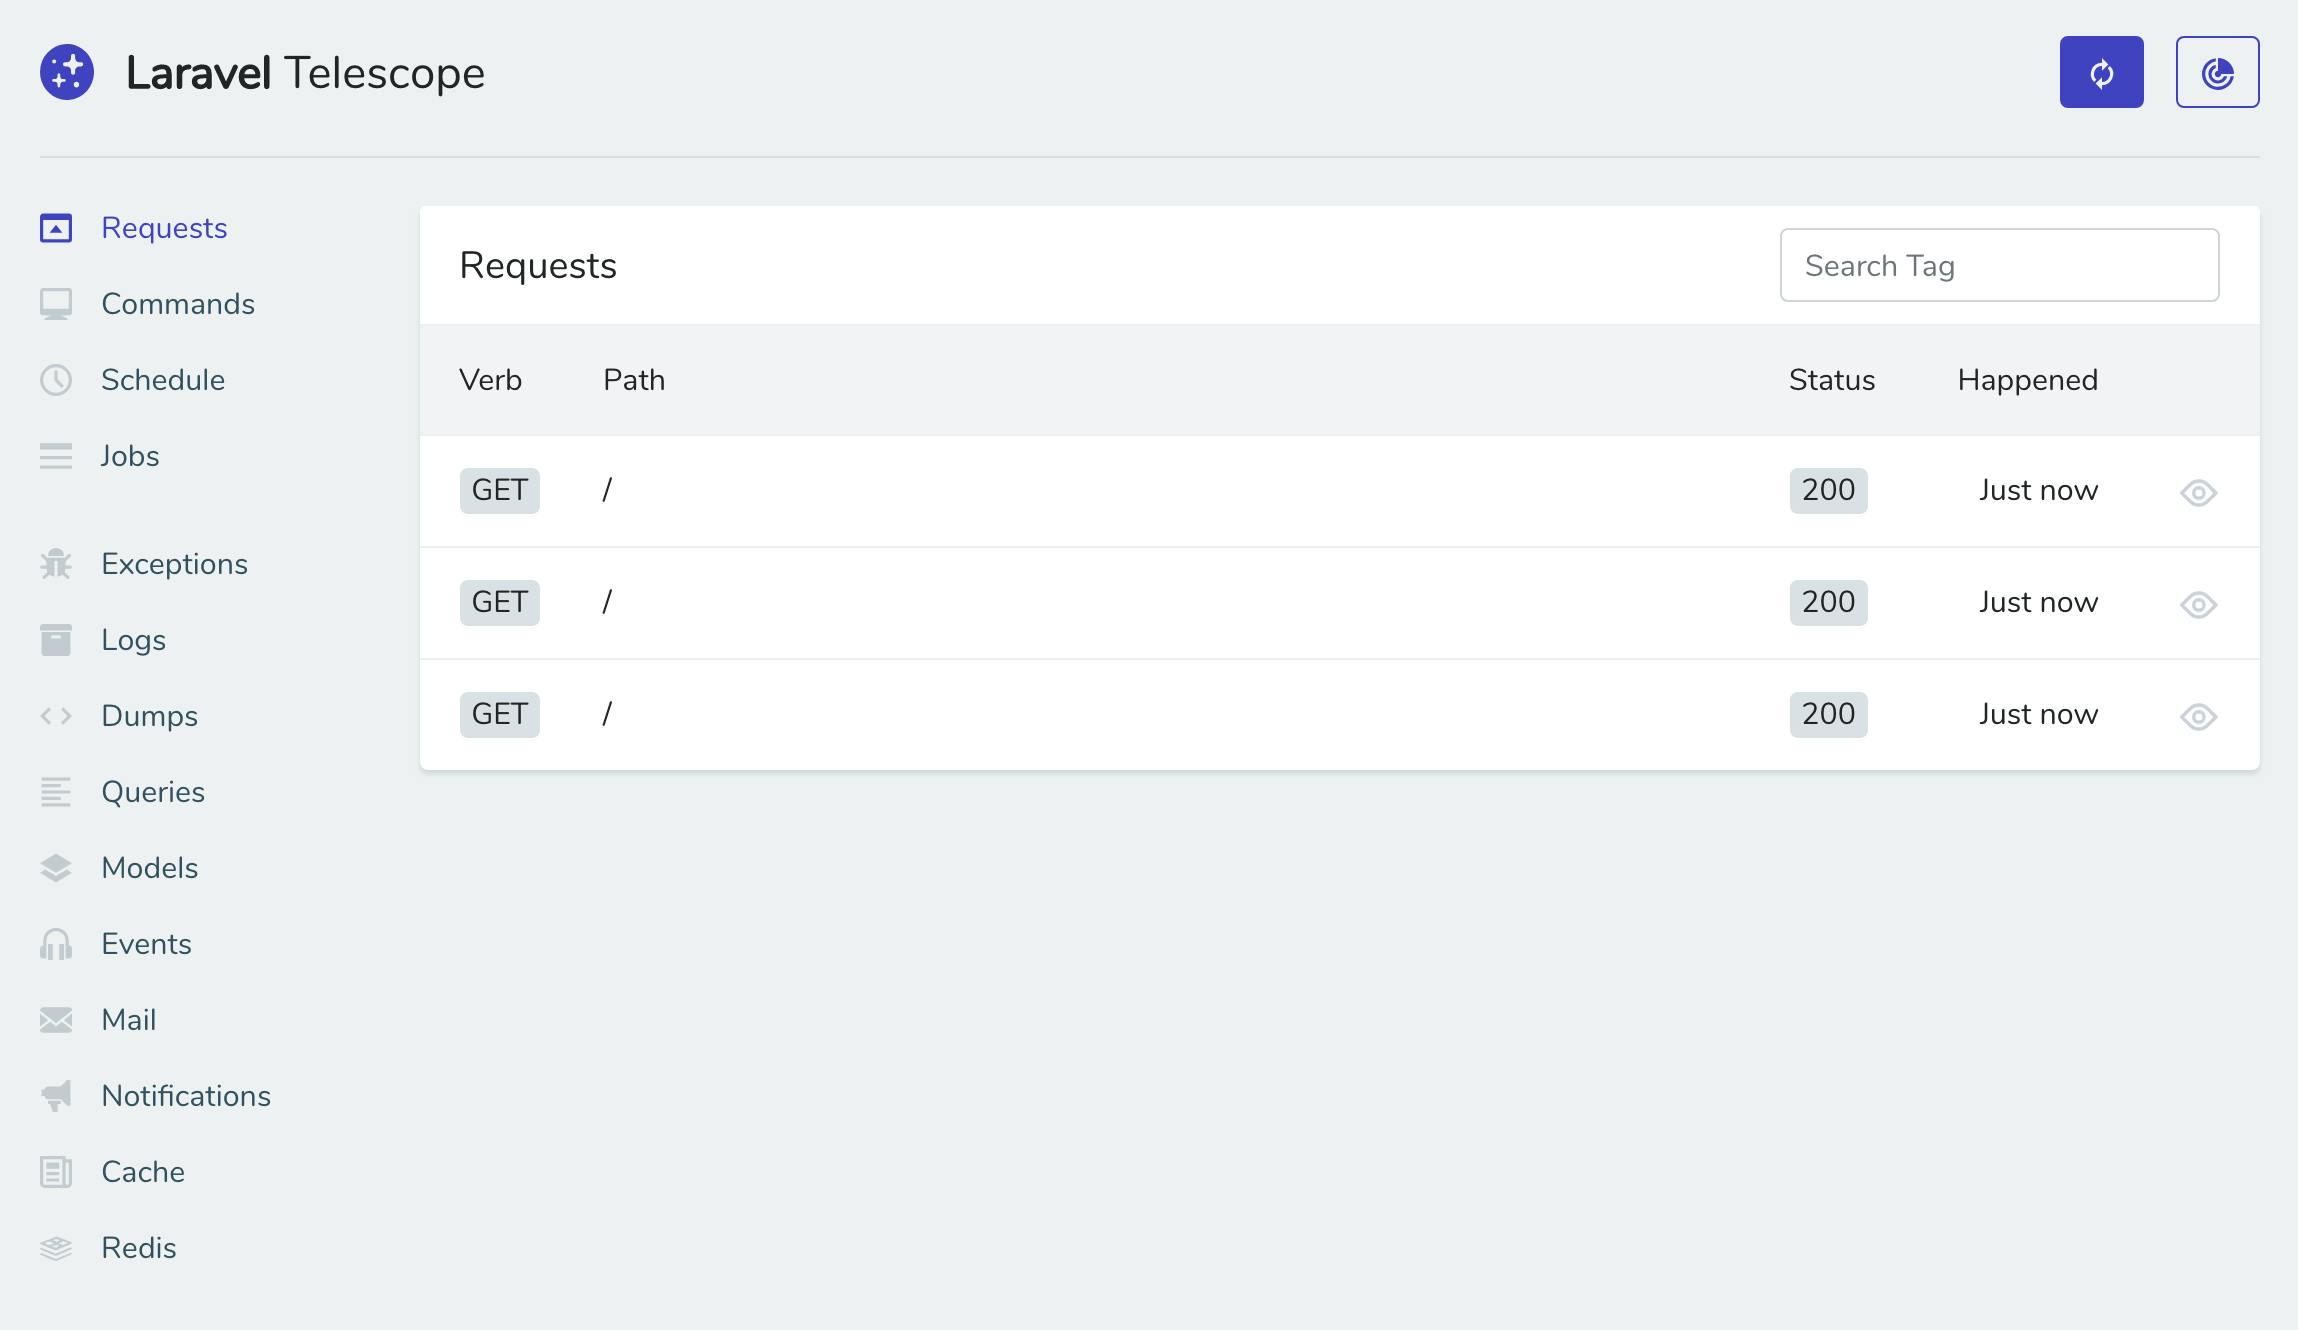
That’s it, to access Laravel Telescope’s dashboard and start using it, visit /telescope.
Laravel Telescope in the Production environment
Now this dashboard is accessible only in the Local environment, if you try to access it in the Production environment, you will get a 403 FORBIDDEN error and that’s because of the authorization gate defined in app/Providers/TelescopeServiceProvider.php and that’s for sure a good thing, you don’t want to let everyone access Laravel Telescope’s dashboard.
To access the dashboard in a Production environment, edit the authorization gate in the way you want it to be, for example:
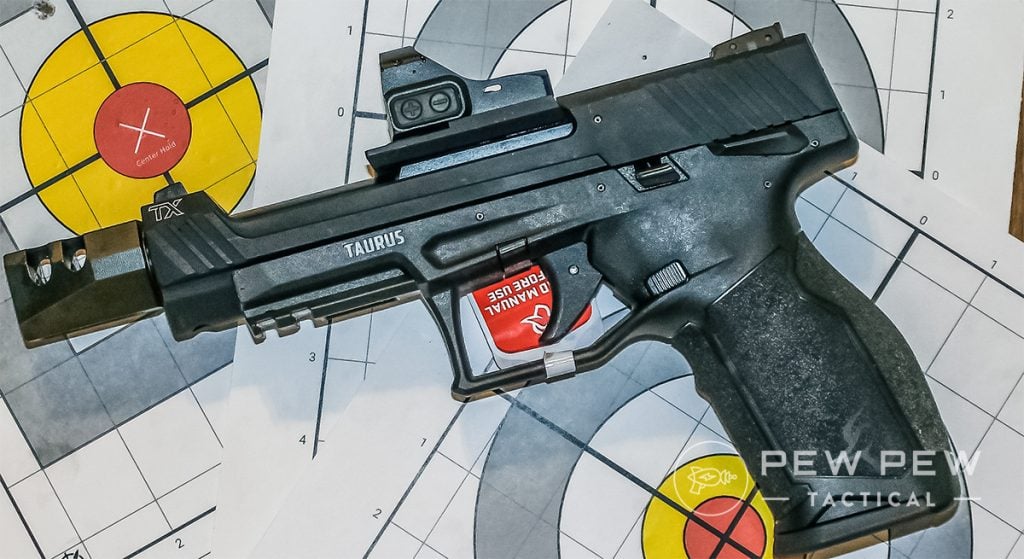
Taurus is known for making affordable, dependable guns. Yes, they’ve had their hiccups, but I believe those days are behind us.
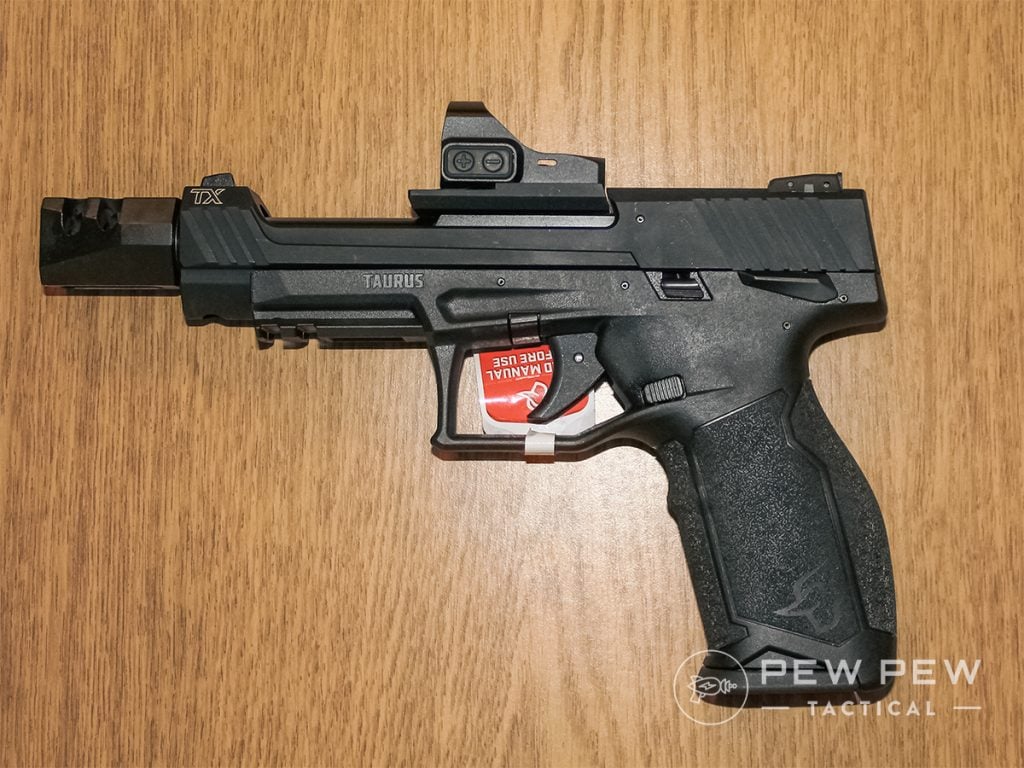
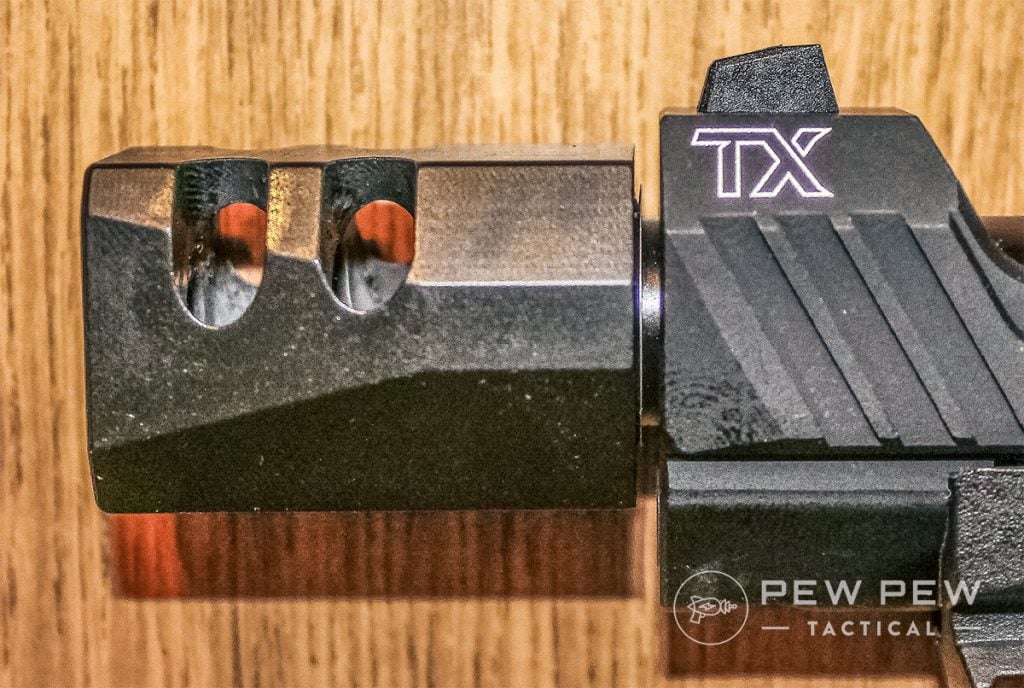
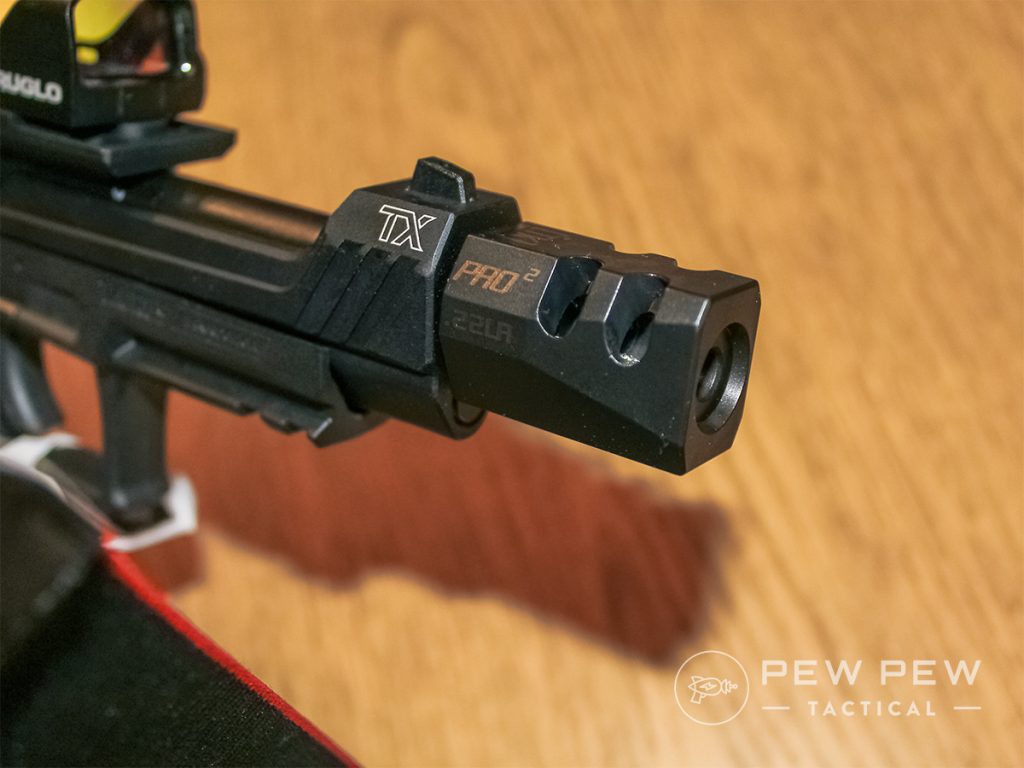
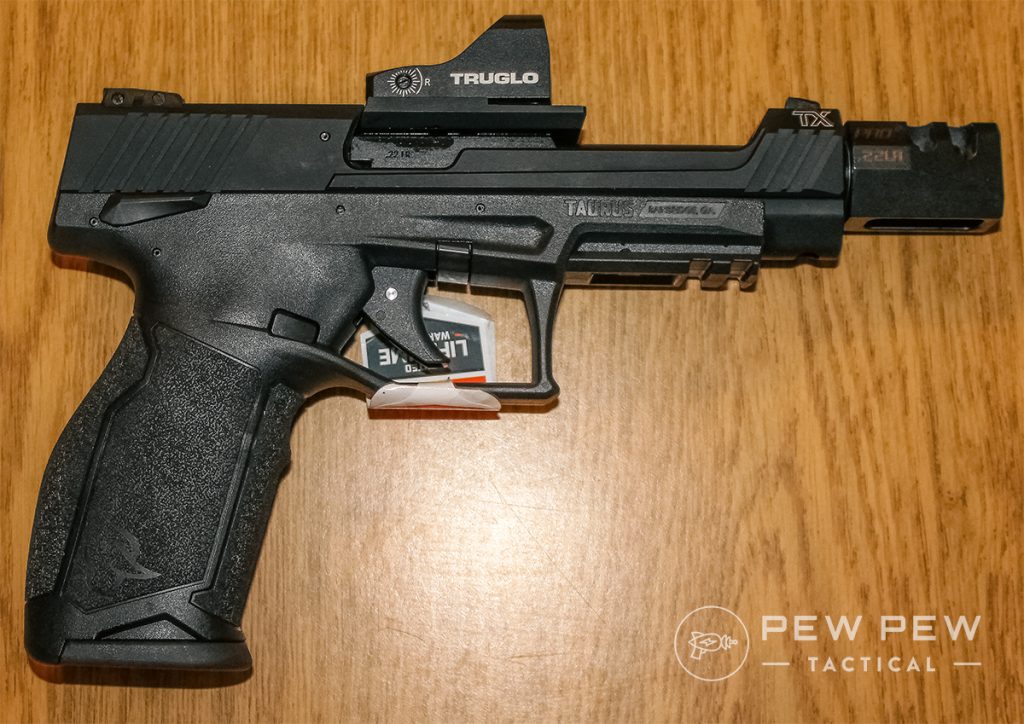
The red dot sight is not included with the gun, but the muzzle compensator is included in the box.
The company’s new TX22 has recently been issued in competition finery, with a relieved slide, 4-pound trigger, threaded barrel, and optics-ready slide.
But does this budget-friendly pistol really stack up on the stages? We’re going to walk you through the pros, cons, specs, and features to let you know.
So keep reading!
Table of Contents
Loading…
Taurus TX22 Competition Review at a Glance
Pros
The gun reliably spits lead with every pull of the trigger and shucked the empties clear.
You get three 16-round mags with loading pull-down tabs.
An optics base plate is installed at the factory, and adapter plates allow different red dot sights to be mounted.
Cons
Grip texturing is fairly non-existent, and the grip feels slippery.
The MSRP of $533 seems a bit pricy for a Taurus .22, even with the included accessories.
One of the included mags was missing its round pull-down tab that allows quick loading. The mag was still functional, but this was a QC miss.
The Bottom Line
For a street price of around $450, you get three 16-round mags, a red dot-ready slide, a muzzle compensator, and a very nice trigger. Add in the lightened slide, adjustable rear sight, plus locked-in reliability and accuracy, and you have a winner, winner chicken dinner!
The .22 handgun field is crowded. From super-expensive tack-driving target guns like the Smith & Wesson 41 to inexpensive plinkers like the Heritage Rough Rider, you can get just about whatever you desire in a rimfire pistol or revolver.
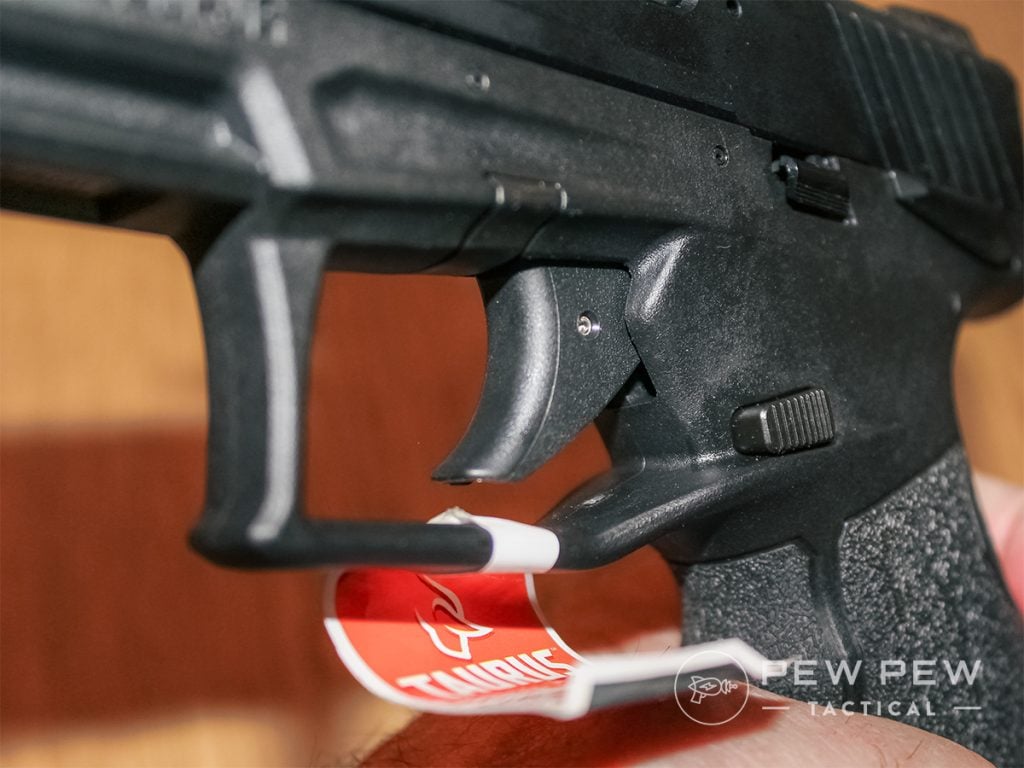
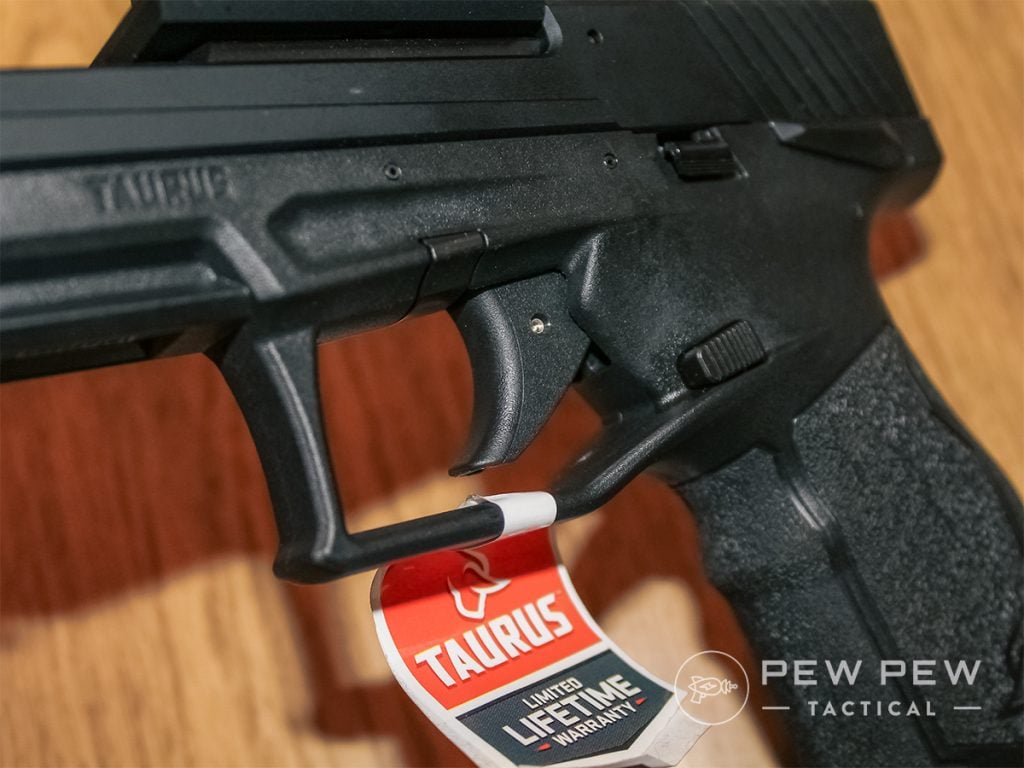
Regardless of whether you get a model with a manual safety or not, the TX22 does not have a Glock-style trigger safety blade.
In terms of pistols set up for competition, Taurus is a new player in the game.
The TX22 has been a steady seller for Taurus since its introduction. What sets the gun apart from most of its competition is reliability, accuracy, and capacity.
I mean, what other accurate .22 pistol holds 17 rounds and sells for what this pistol costs? There might be some out there, but Taurus seems to have nailed it with this gun. This is a company with its proverbial ear to the ground, listening to shooters and trying to supply our needs.
It may be a bit of a weird way to mount an optic, but having it secured to the barrel seems to work.
They decided to make a TX22 for competitors, so they modified the stock model and added some excellent features. Taurus’s recent releases seem to have been well received, and the TX22 Competition is no exception.
Who Is It For?
This Competition model is geared toward rimfire competitors. I know, duh…but it also is made for the casual shooter who may want to take their rimfire game to the next level.
You can easily customize this pistol.
On the Taurus Store, there are over 40 items you can buy for the TX22. This means that most shooters, from beginners to seasoned veterans, can modify the gun to fit their needs.
The Pro Squared Game Changer muzzle brake reduces the already low recoil of .22LR down to near zero.
Another segment of the shooting market I should mention is the small-game hunters out there, of which I am one. The TX22, with its adjustable rear sight or a red dot, would make a great squirrel-getter.
Overall, it is an extremely versatile pistol.
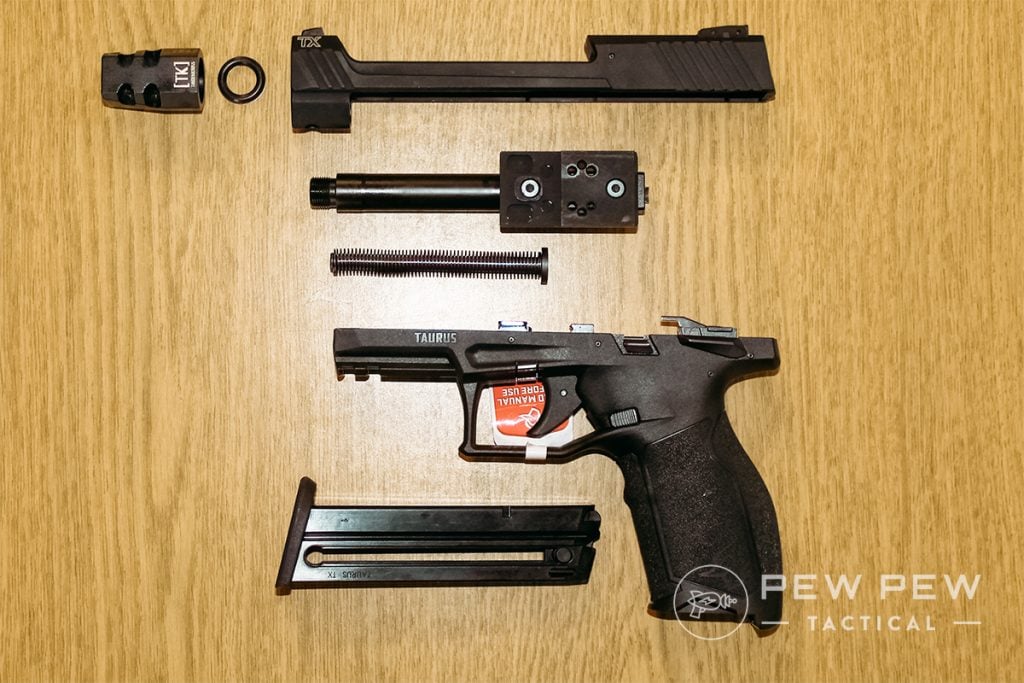
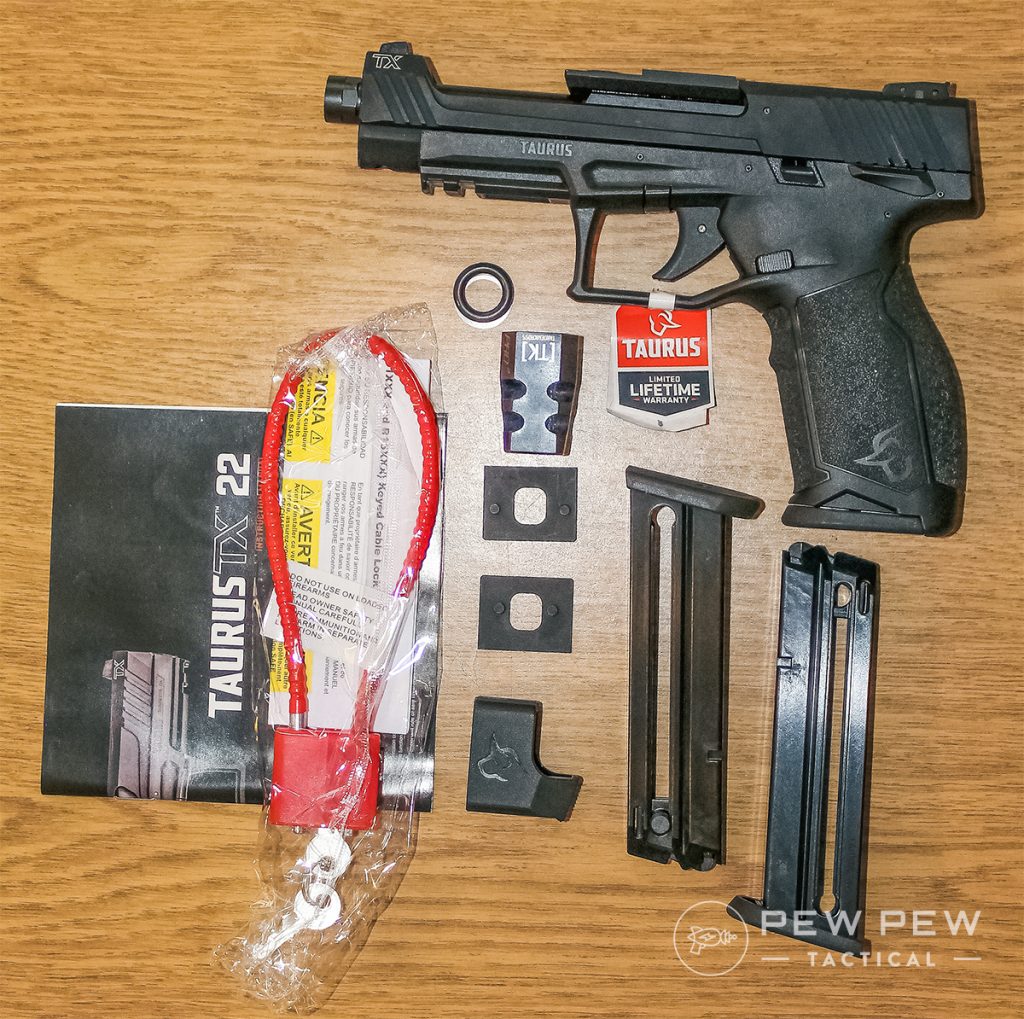
What’s In The Box?
In addition to the pistol, you have three magazines, two red dot adapter plates, the muzzle compensator with O-ring, a washer and barrel thread protector, a magazine loader, a lock, and a manual. The case is a hinged, hard-plastic type that is better than previous Taurus boxes.
Everything that is in the box with the TX22 Competition.
Fit & Feel
The gun felt like a full-size 9mm in my hand, except for the weight. It is pretty light, even with a full magazine and a red dot installed.
The grip texture is not very aggressive.
The only issue I had with it concerned the lack of grip texture. Now, I get it – I assume Taurus figures that this gun is “just” a .22 and won’t recoil like its brethren with larger holes in their barrels. They probably figure that a less-textured grip surface is OK and won’t rub new shooters the wrong way (literally).
If you are like me and prefer a more aggressive grip texture, this gun doesn’t have it. The first thing I’d do is plug in my trusty soldering iron and stipple the snot out of it or add some Talon Grips.
As for sights, they don’t co-witness, so the plain-ordinary-white-dot-ness isn’t much of a factor for red dot shooters. At least the rear sight is adjustable.
The optics plate is mounted directly to the top of the barrel, which means the sight does not reciprocate with the slide.
How Does It Shoot?
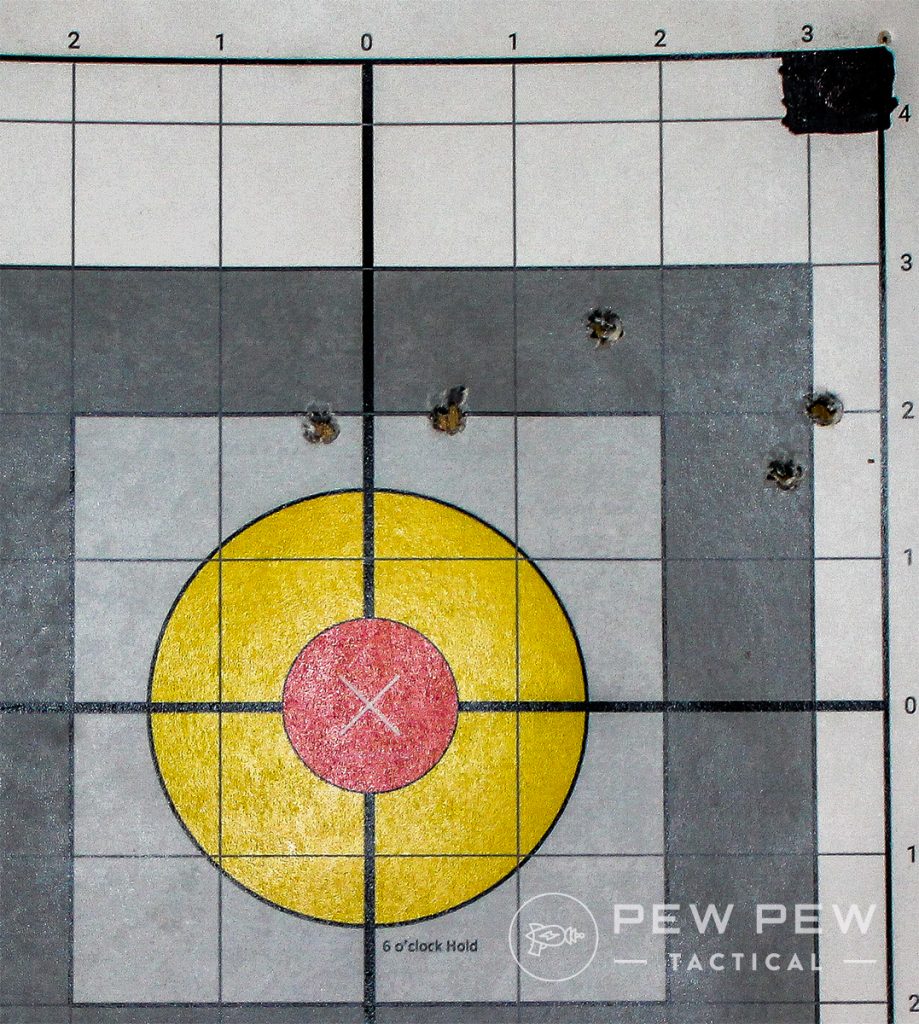
I took the gun to my backyard range and grabbed three boxes of .22 ammo — Remington Thunderbolt, Winchester Wildcat 40-grain HP, and Aguila 40-grain target.
The grouping at 20 yards with Remington Thunderbolt ammo.
It shot mostly low, so I used a high/right aiming point for the Remington. The other two allowed me to use a center hold on the orange dot and still keep the shots on the paper, about 2 inches low.
The Remington Thunderbolt spread itself a bit. Depending on the gun, this load is either very accurate or not at all.
The TX22 is somewhere in the middle…
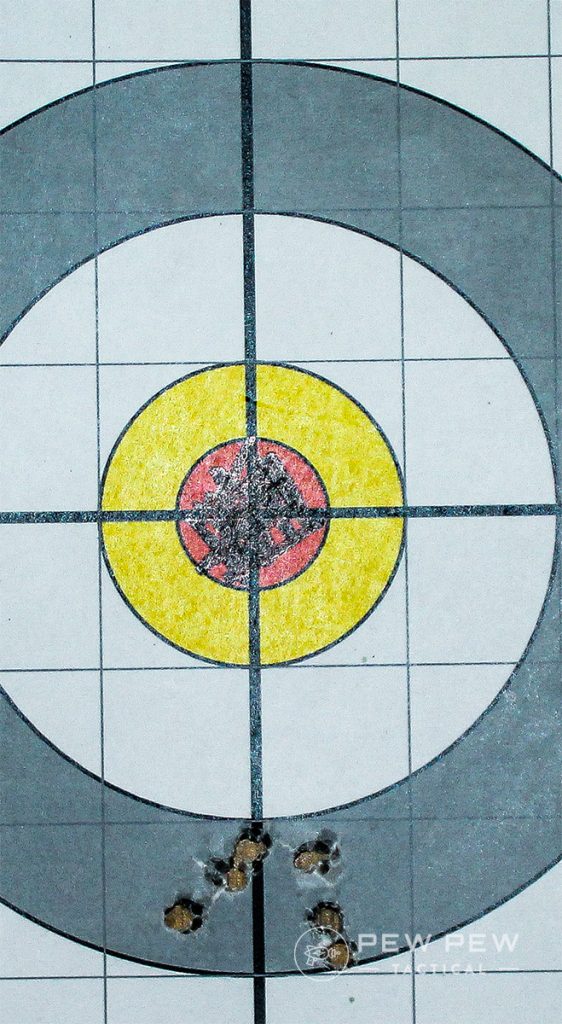
The group at 20 yards with Winchester Wildcat 40-grain ammo.
The Winchester and Aguila loads allowed the use of the center orange “dot” as an aiming point. Windage was right on, but the elevation was low.
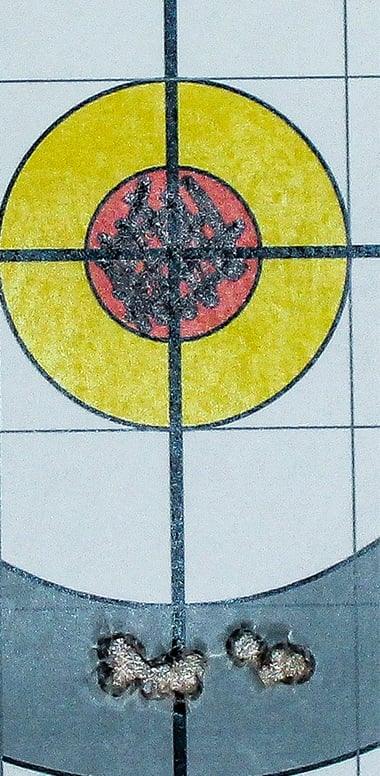
The group at 20 yards with Aguila Target 40 grain ammo.
As you can see, the gun would be worth working with to find that perfect load for it.
I only tried three, but it is well known that .22 ammo varies widely in its accuracy potential with different guns. If I had more time with this pistol, I’d try some CCI 40-grain standard and high-velocity loads, but the potential is there.
What Sets it Apart?
Why would you buy this TX22 when there are other capable .22 pistols in the same price range or less?
From my perspective, it feels different in my hand than S&W Victory. The grip offers a more “Glock-like” feel…like a full-size striker 9mm than most other .22s I’ve handled or shot.
A non-reciprocating optic and a muzzle brake are not things you normally find on a gun under $500.
The frame is very close to that used on the TH line of Taurus guns and also is close to the G3 series frames.
You could practice with the TX22, then go to your bigger blaster without much fuss. My Victory or my Diamondback Sidekick can’t do that.
By The Numbers
Reliability: 5/5
It shot whatever I put through it.
Ergonomics: 4/5
The slick grip makes it a 4, not a 5.
Accuracy: 5/5
No problems here!
Customization: 5/5
The Taurus Store and many other vendors have you covered here with plenty of accessories to add on.
Value: 4/5
Its street price of ~$450 is a bit steep, but if you want to keep it under $500, it will do.
The Taurus Store is a great place to start for accessories, but a quick search will turn up a bunch of other vendors that should scratch your TX22 modification itch.
How about a raised, red competition magazine release? Tandemkross sells one.
If you own a standard TX22, you can buy a Competition model conversion kit for a few more dollars. That gets you the slide, barrel, and recoil spring of the Competition model. It’s a simple plug-and-play setup.
To sum up, the .22 pistol market has just happily expanded, and the Taurus TX22 Competition pistol is a great addition to the neighborhood.
Taurus has come a long way with its innovation and quality control in the last few years. The result? Guns like the TX22 and GX4.
From its threaded muzzle, a great trigger, versatile optics base plate & adapters to its lightened slide and adjustable rear sight, the Comp has a lot going for it.
I wouldn’t hesitate for an instant to add this gun to my gun cabinet, and I don’t think you should, either.
What do you think of the Taurus TX22 Competition? Let us know below. Interested in the regular TX22 or .22 LR guns in general? Check out our article on the Best .22 LR Training Guns.
The sequel to The Legend of Zelda: Breath of the Wild is called Tears of the Kingdom and it’s due to hit Switch on May 12th, 2023. Nintendo revealed the release date, name and a short teaser for the game during today’s Direct showcase. The studio says Tears of the Kingdom will travel into the skies beyond Hyrule, to an expanded world among the clouds.
The Legend of Zelda: Breath of the Wild debuted in 2017, the same day the Switch came to market. It was a huge critical and commercial success, and the sequel has been hotly anticipated since. The new game was originally announced with a release window in 2022, but in March, Nintendo delayed it into spring 2023.
It wasn’t the only major game to be pushed out of 2022. A handful of titles from big publishers, including Starfield, Redfall, Hogwarts Legacy and Forspoken, were delayed into 2023 this year.
The third part of a code review of an open-source repository called Skuul. This time, we’re talking about roles and permissions, with seeders, controllers, and policies.Laravel News Links
https://i.ytimg.com/vi/DKd560Ps6xo/maxresdefault.jpgIn this video, we will be looking at 4 new things that are added to the latest version of Laravel which is v9.28.0Laravel News Links
To build the infrastructure you will both need an account and a tenancy within Oracle Cloud Infrastructure (OCI) account. If you do not have these, then please click here. Note the Oracle very often offers a free trial period which provides more than enough credits to complete the architecture described in this blog.Planet MySQL
Whilst not part of the LAMP stack per-se, you will need a MySQL client in order to be able to upload and make changes to your database schema. MySQL clients that could be used include: the traditional MySQL client; MySQL shell; MySQL Workbench as well as phpMyAdmin. At the stage the most efficient of these clients will be MySQL Shell.Planet MySQL