If you ever ask yourself, "Man, what would make me feel really good right about now?"—you’d be surprised at how often the answer is, "Watching the U.S. Air Force drop a big ol’ bomb on a big ol’ ship."
In the sixth part of this tutorial series on developing PHP on Docker we will setup git-secret
to store secrets directly in the repository. Everything will be handled through Docker and
added as make targets for a convenient workflow.
FYI:
This tutorial is a precursor to the next a part Create a CI pipeline for dockerized PHP Apps
because dealing with secrets is an important aspect when setting up a CI system (and later when
deploying to production) – but I feel it’s complex enough to warrant its own article.
If you want to follow along, please subscribe to the RSS feed
or via email
to get automatic notifications when the next part comes out 🙂
Table of contents
Introduction
Dealing with secrets (passwords, tokens, key files, etc.) is close to “naming things”
when it comes to hard problems in software engineering. Some things to consider:
security is paramount – but high security often goes hand in hand with high inconvenience
and if things get too complicated, people look for shortcuts…
in a team, sharing certain secret values is often mandatory
so now we need to think about secure ways to distribute and update secrets across multiple
people
concrete secret values often depend on the environment
inherently tricky to “test” or even “review”, because those values are “by definition”
different on “your machine” than on “production”
In fact, entire products have been build around dealing with secrets, e.g. HashiCorp Vault, AWS Secrets Manager or the GCP Secret Manager. Introducing those in a project comes
with a certain overhead as it’s yet another service that needs to be integrated and
maintained. Maybe it is the exactly right decision for your use-case – maybe it’s overkill.
By the end of this article you’ll at least be aware of an alternative with a lower barrier to entry.
See also the Pros and cons section in the end for an overview.
to reveal secrets in the codebase, make modifications to them if necessary and then run
make secret-encrypt
to encrypt them again so that they can be committed (and pushed to the remote repository). To
see it in action, check out branch part-6-git-secret-encrypt-repository-docker
and run the following commands:
# checkout the branch
git checkout part-6-git-secret-encrypt-repository-docker

# build and start the docker setup
make make-init
make docker-build
make docker-up

# "create" the secret key - the file "secret.gpg.example" would usually NOT live in the repo!
cp secret.gpg.example secret.gpg

# initialize gpg
make gpg-init

# ensure that the decrypted secret file does not exist
ls passwords.txt

# decrypt the secret file
make secret-decrypt

# show the content of the secret file
cat passwords.txt
Tooling
We will set up gpg and git-secret in the php base image, so that the tools become available in
all other containers. Please refer to Docker from scratch for PHP 8.1 Applications in 2022
for an in-depth explanation of the docker images.
Please note, that there is a caveat when using git-secret in a folder that is shared between
the host system and a docker container. I’ll explain that in more detail (including a workaround)
in section The git-secret directory and the gpg-agent socket.
gpg
gpg is short for The GNU Privacy Guard and is an open source implementation
of the OpenPGP standard. In short, it allows us to create a personal key file pair
(similar to SSH keys) with a private secret key and a public
key that can be shared with other parties whose messages you want to decrypt.
gpg installation
To install it, we can simply run apk add gnupg and thus update .docker/images/php/base/Dockerfile accordingly
# File: .docker/images/php/base/Dockerfile

RUN apk add --update --no-cache \
        bash \
        gnupg \
        make \
#...
Caution: If the secret key requires a password, you would now be prompted for it. We can
circumvent the prompt by using --batch --yes --pinentry-mode loopback:
The public key can be imported in the same way as private keys via
path="public.gpg"
gpg --import "$path"
Example:
$ gpg --import /var/www/app/public.gpg
gpg: key E1E734E00B611C26: "Pascal Landau <[email protected]>" not changed
gpg: Total number processed: 1
gpg:              unchanged: 1
git-secret
The official website of git-secret is already doing a great job of
introducing the tool. In short, it allows us to declare certain files as “secrets” and encrypt
them via gpg – using the keys of all trusted parties. The encrypted file can then by stored
safely directly in the git repository and decrypted if required.
We only need to do this once, because we’ll commit the folder to git later. It contains the
following files:
$ git status | grep ".gitsecret"
        new file:   .gitsecret/keys/pubring.kbx
        new file:   .gitsecret/keys/pubring.kbx~
        new file:   .gitsecret/keys/trustdb.gpg
        new file:   .gitsecret/paths/mapping.cfg
gpg uses a gpg-agent to perform its tasks and the two tools communicate through sockets
that are created in the --home-directory of the gpg-agent
the agent is started implicitly through a gpg command used by git-secret, using the .gitsecret/keys directories as a --home-directory
because the location of the --home-directory is shared with the host system, the socket
creation fails (potentially only an issue for Docker Desktop, see the related discussion in
Github issue Support for sharing unix sockets)
The corresponding error messages are
gpg: can't connect to the agent: IPC connect call failed

gpg-agent: error binding socket to '/var/www/app/.gitsecret/keys/S.gpg-agent': I/O error
FYI: This command was renamed to removeperson in git-secret >= 0.5.0
$ git secret killperson [email protected]
git-secret: removed keys.
git-secret: now [[email protected]] do not have an access to the repository.
git-secret: make sure to hide the existing secrets again.
User [email protected] will no longer be able to decrypt the secrets.
Caution: The secrets need to be re-encrypted after removing a user!
Reminder: Rotate the encrypted secrets
Please be aware that not only your secrets are stored in git, but who had access as well. I.e.
even if you remove a user and re-encrypt the secrets, that user would still be able to decrypt
the secrets of a previous commit (when the user was still added). In consequence, you need
to rotate the encrypted secrets themselves as well after removing a user.
But isn’t that a great flaw in the system, making it a bad idea to use git-secret in general?
In my opinion: No.
If the removed user had access to the secrets at any point in time (no
matter where they have been stored), he could very well have just created a local copy or simply
“written them down”. In terms of security there is really no “added downside” due to git-secret.
It just makes it very clear that you must rotate the secrets ¯\_(ツ)_/¯
The encrypted files are de-cryptable for all users that have been added via git secret tell.
That also means that you need to run this command again whenever a new user is added.
Decrypting files
You can decrypt files via
git secret reveal
Output:
$ git secret reveal
File '/var/www/app/.env' exists. Overwrite? (y/N) y
git-secret: done. 1 of 1 files are revealed.
the files are decrypted and will overwrite the current, unencrypted files (if they already exist)
use the -f option to force the overwrite and run non-interactively
if you only want to check the content of an encrypted file, you can use git secret cat $filename (e.g. git secret cat .env)
In case the secret gpg key is password protected, you must pass the password via the -p option. E.g. for password 123456
git secret reveal -p 123456
Show changes between encrypted and decrypted files
One problem that comes with encrypted files: You can’t review them during a code review in a
remote tool. So in order to understand what changes have been made, it is helpful to show the changes between the encrypted and the decrypted files. This can be done via
Note the +foo at the bottom of the output. It was added in the first line via echo "foo"> >> .env.
Makefile adjustments
Since I won’t be able to remember all the commands for git-secret and gpg, I’ve added them to
the Makefile at .make/01-00-application-setup.mk:
# File: .make/01-00-application-setup.mk

#...

# gpg

DEFAULT_SECRET_GPG_KEY?=secret.gpg
DEFAULT_PUBLIC_GPG_KEYS?=.dev/gpg-keys/*

.PHONY: gpg
gpg: ## Run gpg commands. Specify the command e.g. via ARGS="--list-keys"
    $(EXECUTE_IN_APPLICATION_CONTAINER) gpg $(ARGS)

.PHONY: gpg-export-public-key
gpg-export-public-key: ## Export a gpg public key e.g. via EMAIL="[email protected]" PATH=".dev/gpg-keys/john-public.gpg"
    @$(if $(PATH),,$(error PATH is undefined))
    @$(if $(EMAIL),,$(error EMAIL is undefined))
    "$(MAKE)" -s gpg ARGS="gpg --armor --export $(EMAIL) > $(PATH)"

.PHONY: gpg-export-private-key
gpg-export-private-key: ## Export a gpg private key e.g. via EMAIL="[email protected]" PATH="secret.gpg"
    @$(if $(PATH),,$(error PATH is undefined))
    @$(if $(EMAIL),,$(error EMAIL is undefined))
    "$(MAKE)" -s gpg ARGS="--output $(PATH) --armor --export-secret-key $(EMAIL)"

.PHONY: gpg-import
gpg-import: ## Import a gpg key file e.g. via GPG_KEY_FILES="/path/to/file /path/to/file2"
    @$(if $(GPG_KEY_FILES),,$(error GPG_KEY_FILES is undefined))
    "$(MAKE)" -s gpg ARGS="--import --batch --yes --pinentry-mode loopback $(GPG_KEY_FILES)"

.PHONY: gpg-import-default-secret-key
gpg-import-default-secret-key: ## Import the default secret key
    "$(MAKE)" -s gpg-import GPG_KEY_FILES="$(DEFAULT_SECRET_GPG_KEY)"

.PHONY: gpg-import-default-public-keys
gpg-import-default-public-keys: ## Import the default public keys
    "$(MAKE)" -s gpg-import GPG_KEY_FILES="$(DEFAULT_PUBLIC_GPG_KEYS)"

.PHONY: gpg-init
gpg-init: gpg-import-default-secret-key gpg-import-default-public-keys ## Initialize gpg in the container, i.e. import all public and private keys

# git-secret

.PHONY: git-secret
git-secret: ## Run git-secret commands. Specify the command e.g. via ARGS="hide"
    $(EXECUTE_IN_APPLICATION_CONTAINER) git-secret $(ARGS)

.PHONY: secret-init
secret-init: ## Initialize git-secret in the repository via `git-secret init`
    "$(MAKE)" -s git-secret ARGS="init"

.PHONY: secret-init-gpg-socket-config
secret-init-gpg-socket-config: ## Initialize the config files to change the gpg socket locations
    echo "%Assuan%" > .gitsecret/keys/S.gpg-agent
    echo "socket=/tmp/S.gpg-agent" >> .gitsecret/keys/S.gpg-agent
    echo "%Assuan%" > .gitsecret/keys/S.gpg-agent.ssh
    echo "socket=/tmp/S.gpg-agent.ssh" >> .gitsecret/keys/S.gpg-agent.ssh
    echo "extra-socket /tmp/S.gpg-agent.extra" > .gitsecret/keys/gpg-agent.conf
    echo "browser-socket /tmp/S.gpg-agent.browser" >> .gitsecret/keys/gpg-agent.conf

.PHONY: secret-encrypt
secret-encrypt: ## Decrypt secret files via `git-secret hide`
    "$(MAKE)" -s git-secret ARGS="hide"

.PHONY: secret-decrypt
secret-decrypt: ## Decrypt secret files via `git-secret reveal -f`
    "$(MAKE)" -s git-secret ARGS="reveal -f"

.PHONY: secret-decrypt-with-password
secret-decrypt-with-password: ## Decrypt secret files using a password for gpg via `git-secret reveal -f -p $(GPG_PASSWORD)`
    @$(if $(GPG_PASSWORD),,$(error GPG_PASSWORD is undefined))
    "$(MAKE)" -s git-secret ARGS="reveal -f -p $(GPG_PASSWORD)"

.PHONY: secret-add
secret-add: ## Add a file to git secret via `git-secret add $FILE`
    @$(if $(FILE),,$(error FILE is undefined))
    "$(MAKE)" -s git-secret ARGS="add $(FILE)"

.PHONY: secret-cat
secret-cat: ## Show the contents of file to git secret via `git-secret cat $FILE`
    @$(if $(FILE),,$(error FILE is undefined))
    "$(MAKE)" -s git-secret ARGS="cat $(FILE)"

.PHONY: secret-list
secret-list: ## List all files added to git secret `git-secret list`
    "$(MAKE)" -s git-secret ARGS="list"

.PHONY: secret-remove
secret-remove: ## Remove a file from git secret via `git-secret remove $FILE`
    @$(if $(FILE),,$(error FILE is undefined))
    "$(MAKE)" -s git-secret ARGS="remove $(FILE)"

.PHONY: secret-add-user
secret-add-user: ## Remove a user from git secret via `git-secret tell $EMAIL`
    @$(if $(EMAIL),,$(error EMAIL is undefined))
    "$(MAKE)" -s git-secret ARGS="tell $(EMAIL)"

.PHONY: secret-show-users
secret-show-users: ## Show all users that have access to git secret via `git-secret whoknows`
    "$(MAKE)" -s git-secret ARGS="whoknows"

.PHONY: secret-remove-user
secret-remove-user: ## Remove a user from git secret via `git-secret killperson $EMAIL`
    @$(if $(EMAIL),,$(error EMAIL is undefined))
    "$(MAKE)" -s git-secret ARGS="killperson $(EMAIL)"

.PHONY: secret-diff
secret-diff: ## Show the diff between the content of encrypted and decrypted files via `git-secret changes`
    "$(MAKE)" -s git-secret ARGS="changes"
Workflow
Working with git-secret is pretty straight forward:
initialize git-secret
add all users
add all secret files and make sure they are ignored via .gitignore
encrypt the files
commit the encrypted files like “any other file”
if any changes were made by other team members to the files:
=> decrypt to get the most up-to-date ones
if any modifications are required from your side:
=> make the changes to the decrypted files and then re-encrypt them again
But: The devil is in the details. The Process challenges section explains
some of the pitfalls that we have encountered and the Scenarios section gives some
concrete examples for common scenarios.
Process challenges
From a process perspective we’ve encountered some challenges that I’d like to mention – including
how we deal with them.
Updating secrets
When updating secrets you must ensure to always decrypt the files first in order to avoid
using “stale” files that you might still have locally. I usually check out the latest main
branch and run git secret reveal to have the most up-to-date versions of the secret files. You
could also use a post-merge git hook to do
this automatically, but I personally don’t want to risk overwriting my local secret files by
accident.
Code reviews and merge conflicts
Since the encrypted files cannot be diffed meaningfully, the code reviews become more difficult
when secrets are involved. We use Gitlab for reviews and I usually first check the diff of
the .gitsecret/paths/mapping.cfg file to see “which files have changed” directly in the UI.
In addition, I will
checkout the main branch
decrypt the secrets via git secret reveal -f
checkout the feature-branch
run git secret changes to see the differences between the decrypted files from main and the
encrypted files from feature-branch
Things get even more complicated when multiple team members need to modify secret files at the same
time on different branches, as the encrypted files cannot be compared – i.e. git cannot be smart
about delta updates.
The only way around this is coordinating the pull requests, i.e. merge the first, update the
secrets of the second and then merge the second.
Fortunately, this has only happened very rarely so far.
Local git-secret and gpg setup
Currently, all developers in our team have git-secret installed locally (instead of using it
through docker) and use their own gpg keys.
This means more onboarding overhead, because
a new dev must
install git-secret locally (*)
install and setup gpg locally (*)
create a gpg key pair
the public key must be added by every other team member (*)
the user of the key must be added via git secret tell
the secrets must be re-encrypted
And for offboarding
the public key must be removed by every other team member (*)
the user of the key must be removed via git secret killperson
the secrets must be re-encrypted
Plus, we need to ensure that the git-secret and gpg versions are kept up-to-date for everyone to
not run into any compatibility issues.
As an alternative, I’m currently leaning more towards handling everything through docker (as
presented in this tutorial). All steps marked with (*) are then obsolete, i.e. there is no need
to setup git-secret and gpg locally.
But the approach also comes with some downsides, because
the secret key and all public keys have to be imported every time the container is started
each dev needs to put his private gpg key “in the codebase” (ignored by .gitignore) so it
can be shared with docker and imported by gpg (in docker). The alternative would be using
a single secret key that is shared within the team – which feels very wrong 😛
To make this a little more convenient, we put the public gpg keys of every dev in the
repository under .dev/gpg-keys/ and the private key has to be named secret.gpg and put
in the root of the codebase.
In this setup, secret.gpg must also be added to the.gitignore file.
# File: .gitignore
#...
vendor/
secret.gpg
The import can now be be simplified with make targets:
# gpg

DEFAULT_SECRET_GPG_KEY?=secret.gpg
DEFAULT_PUBLIC_GPG_KEYS?=.dev/gpg-keys/*

.PHONY: gpg
gpg: ## Run gpg commands. Specify the command e.g. via ARGS="--list-keys"
    $(EXECUTE_IN_APPLICATION_CONTAINER) gpg $(ARGS)

.PHONY: gpg-import
gpg-import: ## Import a gpg key file e.g. via GPG_KEY_FILES="/path/to/file /path/to/file2"
    @$(if $(GPG_KEY_FILES),,$(error GPG_KEY_FILES is undefined))
    "$(MAKE)" -s gpg ARGS="--import --batch --yes --pinentry-mode loopback $(GPG_KEY_FILES)"

.PHONY: gpg-import-default-secret-key
gpg-import-default-secret-key: ## Import the default secret key
    "$(MAKE)" -s gpg-import GPG_KEY_FILES="$(DEFAULT_SECRET_GPG_KEY)"

.PHONY: gpg-import-default-public-keys
gpg-import-default-public-keys: ## Import the default public keys
    "$(MAKE)" -s gpg-import GPG_KEY_FILES="$(DEFAULT_PUBLIC_GPG_KEYS)"

.PHONY: gpg-init
gpg-init: gpg-import-default-secret-key gpg-import-default-public-keys ## Initialize gpg in the container, i.e. import all public and private keys
“Everything” can now be handled via
make gpg-init
that needs to be run one single time after a container has been started.
Unfortunately, I didn’t find a way to create and export gpg keys through make and docker. You
need to either run the commands interactively OR pass a string with newlines to it. Both things are
horribly complicated with make and docker. Thus, you need to log into the application
container and run the commands in there directly. Not great – but this needs to be done only
once when a new developer is onboarded anyways.
That’s it. We now have a new secret and private key for [email protected] and have exported it to secret.gpg resp. .dev/gpg-keys/alice-public.gpg (and thus shared it with the host system).
The remaining commands can now be run outside of the application container directly on the
host system.
Initial setup of git-secret
Let’s say we want to introduce git-secret “from scratch” to a new codebase. Then you would run
the following commands:
After restarting the containers, we need to initialize gpg, i.e. import all public keys from .dev/gpg-keys/* and the private key from secret.gpg. Otherwise we will not be able to en-
and decrypt the files.
make gpg-init
$ make gpg-init
"C:/Program Files/Git/mingw64/bin/make" -s gpg-import GPG_KEY_FILES="secret.gpg"
gpg: directory '/home/application/.gnupg' created
gpg: keybox '/home/application/.gnupg/pubring.kbx' created
gpg: /home/application/.gnupg/trustdb.gpg: trustdb created
gpg: key BBBE654440E720C1: public key "Alice Doe <[email protected]>" imported
gpg: key BBBE654440E720C1: secret key imported
gpg: Total number processed: 1
gpg:               imported: 1
gpg:       secret keys read: 1
gpg:   secret keys imported: 1
"C:/Program Files/Git/mingw64/bin/make" -s gpg-import GPG_KEY_FILES=".dev/gpg-keys/*"
gpg: key BBBE654440E720C1: "Alice Doe <[email protected]>" not changed
gpg: Total number processed: 1
gpg:              unchanged: 1
$ make secret-encrypt
"C:/Program Files/Git/mingw64/bin/make" -s git-secret ARGS="hide"
git-secret: done. 1 of 1 files are hidden.

$ ls secret_password.txt.secret
secret_password.txt.secret
Decrypt files
Let’s first remove the “plain” secret_password.txt file
rm secret_password.txt
$ rm secret_password.txt

$ ls secret_password.txt
ls: cannot access 'secret_password.txt': No such file or directory
and then decrypt the encrypted one.
make secret-decrypt
$ make secret-decrypt
"C:/Program Files/Git/mingw64/bin/make" -s git-secret ARGS="reveal -f"
git-secret: done. 1 of 1 files are revealed.

$ cat secret_password.txt
my_new_secret_password
Caution: If the secret gpg key is password protected (e.g. 123456), run
make secret-decrypt-with-password GPG_PASSWORD=123456
You could also add the GPG_PASSWORD variable to the .make/.env
file as a local default value so that you wouldn’t have to specify the value every time and
could then simply run
make secret-decrypt-with-password
without passing GPG_PASSWORD
Removing files
Remove the secret_password.txt file we added previously:
make secret-remove FILE="secret_password.txt"
$ make secret-remove FILE="secret_password.txt"
"C:/Program Files/Git/mingw64/bin/make" -s git-secret ARGS="remove secret_password.txt"
git-secret: removed from index.
git-secret: ensure that files: [secret_password.txt] are now not ignored.
Caution: this will neither remove the secret_password.txt file nor
the secret_password.txt.secret file automatically”
$ ls -l | grep secret_password.txt
-rw-r--r-- 1 Pascal 197121     19 Mar 31 14:03 secret_password.txt
-rw-r--r-- 1 Pascal 197121    358 Mar 31 14:02 secret_password.txt.secret
But even though the encrypted secret_password.txt.secret file still exists, it will not be
decrypted:
$ make secret-decrypt
"C:/Program Files/Git/mingw64/bin/make" -s git-secret ARGS="reveal -f"
git-secret: done. 0 of 0 files are revealed.
$ make secret-remove-user EMAIL="[email protected]"
"C:/Program Files/Git/mingw64/bin/make" -s git-secret ARGS="killperson [email protected]"
git-secret: removed keys.
git-secret: now [[email protected]] do not have an access to the repository.
git-secret: make sure to hide the existing secrets again.
If there are any users left, we must make sure to re-encrypt the secrets via
make secret-encrypt
Otherwise (if no more users are left) git-secret would simply error out
$ make secret-decrypt
"C:/Program Files/Git/mingw64/bin/make" -s git-secret ARGS="reveal -f"
git-secret: abort: no public keys for users found. run 'git secret tell [email protected]'.
make[1]: *** [.make/01-00-application-setup.mk:57: git-secret] Error 1
make: *** [.make/01-00-application-setup.mk:69: secret-decrypt] Error 2
easy to integrate in existing codebases, because the secrets are located directly in
the codebase
everything can be handled through docker (no additional local software necessary)
once set up, it is very easy/convenient to use and can be integrated in a team workflow
changes to secrets can be reviewed before they are merged
this leads to less fuck-ups on deployments
“everything” is in the repository, which brings a lot of familiar benefits like
version control
a single git pull is the only thing you need to get everything (=> good dev experience)
Cons
some overhead during onboarding and offboarding
the secret key must be put in the root of the repository at ./secret.gpg
no fine grained permissions for different secrets, e.g. the mysql password on production and
staging can not be treated differently
if somebody can decrypt secrets, ALL of them are exposed
if the a secret key ever gets leaked, all secrets are compromised
=> can be mitigated (to a degree) by using a passphrase on the secret key
=> this is kinda true for any other system that stores secrets as well BUT third parties
could probably implement additional measures like multi factor authentication
secrets are versioned alongside the users that have access, i.e. even if a user is removed at
some point, he can still decrypt a previous version of the encrypted secrets
Wrapping up
Congratulations, you made it! If some things are not completely clear by now, don’t hesitate to
leave a comment. You are now able to encrypt and decrypt secret files so that they can be stored
directly in the git repository.
Please subscribe to the RSS feed or via email to get automatic
notifications when this next part comes out 🙂
Wanna stay in touch?
Since you ended up on this blog, chances are pretty high that you’re into Software Development
(probably PHP, Laravel, Docker or Google Big Query) and I’m a big fan of feedback and networking.
So – if you’d like to stay in touch, feel free to shoot me an email with a couple of words about yourself and/or
connect with me on LinkedIn or Twitter
or simply subscribe to my RSS feed
or go the crazy route and subscribe via mail
and don’t forget to leave a comment 🙂
https://i.ytimg.com/vi/ZRdgVuIppYQ/maxresdefault.jpgIn this lesson, we go over what an active record pattern is & how Laravel implements it in its ORM package called Eloquent. This lesson also covers the basics of eloquent to get you familiar with it & show you the differences between the data mapper & active record patterns.Laravel News Links
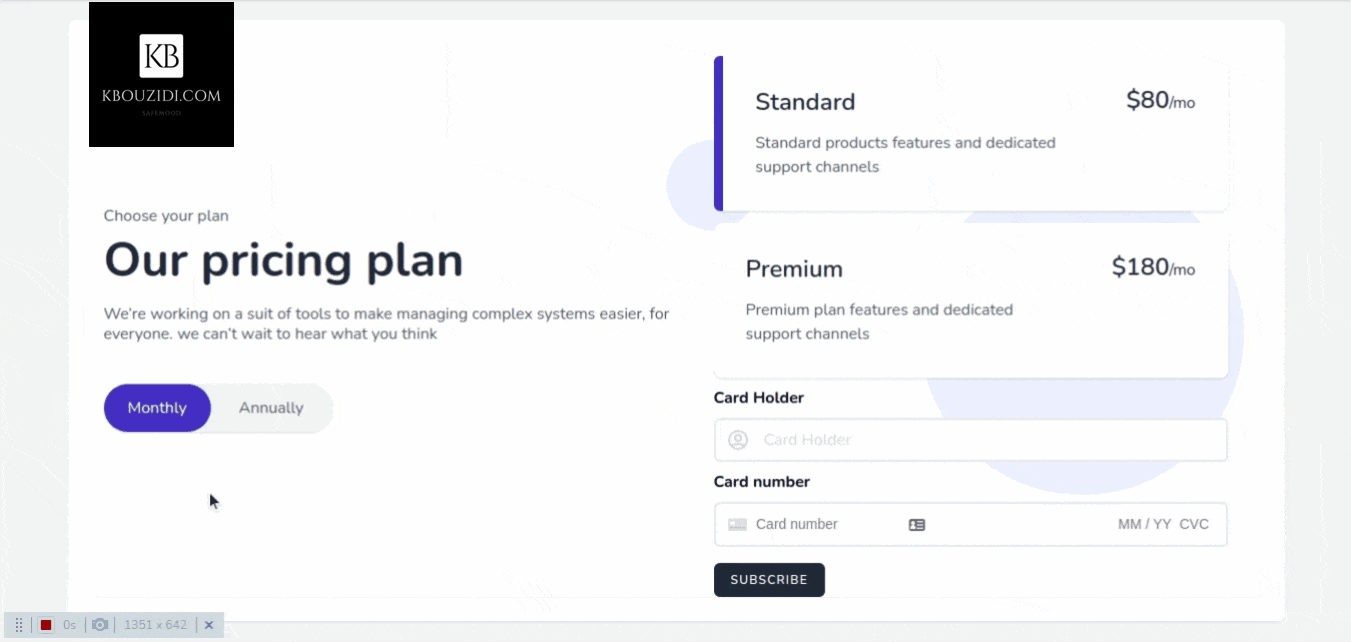
Most SaaS applications have plans that users can subscribe to, such as “Standard Plan” and “Premium Plan” and those plans can be on a yearly or monthly base. The idea is that when a user subscribes to a plan we give them the permission to access our restricted content or service so they can use it.
How We Will Approach That
Let’s say we have two plans in our application “Standard Plan” and “Premium Plan” then we will make two roles, one for standard customers and another for premium customers.
When our user buys a subscription, we give him that role so he can access the features associated with it.
Lets Code
First Part: Roles based access
composer require laravel/breeze --dev

php artisan breeze:install

npm install && npm run dev

php artisan migrate
composer require spatie/laravel-permission
Let’s add these to our $routeMiddleware array inside app/Http/Kernel.php
// you can move this to a database table
private $plans = array(
    'standard_monthly' => 'price_1KpyUHEpWs7pwp46NqoIW3dr',
    'standard_annually' => 'price_1KpyUHEpWs7pwp46bvRJH9lM',
    'premium_monthly' => 'price_1KpyYdEpWs7pwp46q31BU6vT',
    'premium_annually' => 'price_1KpyYdEpWs7pwp46iGRz3829',
);

public function subscribe(Request $request) {
  // this is a demo make sure to add some validation logic

  $user = auth()->user();


  $planeName =
      in_array($request->planId, ['standard_monthly', 'standard_annually']) ?
      'standard' :
      'premium';

  // check if the user already have subscribed to the plan
  if ($user->subscribed($planeName)) {
    return response()->json(
        ['message' => 'You have already subscribed to this plan!'], 403);
  }


  // get plan priceId
  $planPriceId = $this->plans[$request->planId];


  // It does what it says :p
  $user->createOrGetStripeCustomer();

  try {
    // subscribe user to plan
    $subscription = $user->newSubscription($planeName, $planPriceId)
                        ->create($request->paymentMethodId);


    if ($subscription->name == 'standard') {
      $user->assignRole('standard-user');

    } else {
      $user->assignRole('premium-user');
    }

    return response()->json(
        ['message' => 'Subscription was successfully completed!'], 200);


  } catch (IncompletePayment $exception) {
    return response()->json(['message' => 'Opps! Something went wrong.'], 400);
  }
}
I did use this Tailwindcss snippet Template with a bit of AlpineJs magic 🪄 we got this.
When the button is clicked we will call the subscribe method which will use the stripe SDK to call the confirmCardSetup method with the clientSecret as an argument so we can check the card information without they hit our server 🔒.
Stripe will then return a setupIntent if the card is valid, then we will be able to access the user payment_method id that we will send to our back-end to charge the customer.
After the post request to the subscribe route, we will trigger location.reload() to redirect the user to the appropriate section with the help of the isSubscribed middleware.
Last Part: Add Features
We have two features, standard users can manage tasks and premium users can manage tasks and events.
Now you can check if the user has that permission or not you can also use policies to have more control: like limiting standard users to create a certain number of tasks like 3 or 5 or whatever you got the idea 😉.
https://www.howtoforge.com/images/featured/aws-mysql-replica.pngAmazon RDS is an easy-to-set up AWS-managed database service. In this guide, we will see how to create a read replica of a MySql RDS database instance.Planet MySQL
Modern web frameworks teach you to take one group of related concepts and split it across multiple places throughout your codebase. Laravel is a robust framework with a big community behind it. Usually it’s standard structure is enough for most starting projects.
Building scalable applications, instead, requires a different approach. Have you ever heard from a client to work on controllers or review the models folder? Probably never – they ask you to work on invoicing, clients management or users. These concept groups are called domains.
Let’s make a practical exercise applying Domain Driven Design. Our goal is to create a boilerplate to be used universally as base of any Laravel project. Take advantage of the framework power at the same time we meet complex business requirements.
Prerequisites
Understanding of Domain Driven Design and some basic concepts:
We are going to use a fresh Laravel 9 installation for this guide, take a look on how to create your first Laravel project. To run Laravel locally a PHP setup is also required.
Keep in mind
We must keep in mind some important points planning the architecture of our software:
Clean-code design plays a key role in building highly scalable applications.
Follow unified business language that everyone in the company (not only developers) will understand and that will be used in our business/product development process.
Decoupling the application from the framework can be exhausting and pointless. We want to use the power of the framework having the code as much decoupled as possible.
Carefully choose your third-party services, otherwise, they might cause operational failure.
Architecture layers
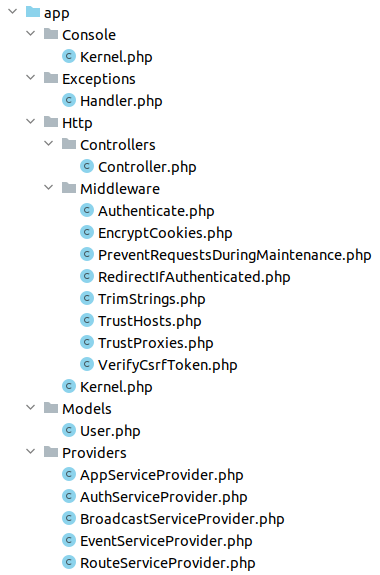
There are several ways in which the Laravel framework can be organized to serve as a template for large-scale projects. We will focus on the app (aka src) folder while keeping the framework features almost intact .
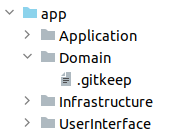
Initially, Laravel is structure looks as below:
With modified codebase structure, we are able to follow Domain Driven Design within our Laravel project which will support the future growth of our software. We also will be ready for the upcoming framework upgrades. We want it to be easy to upgrade to the next versions.
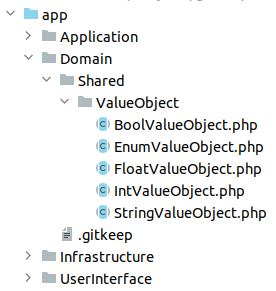
In first place, we should create a folder for each DDD layer:
app/Domain
app/Application
app/Infrastructure
app/UserInterface
Domain
Since this layer is where abstractions are made, the design of interfaces are included in the domain layer. It will also contain aggregates, value objects (VOs), data transfer objects (DTOs), domain events, entities, models, etc…
The only exception would be anything related to eloquent models. Eloquent makes very easy to interact with databases, tables and rows but the reality is that it’s not a DDD model. It’s an ambiguous definition of the concept of model with implementation of database connection. Does it mean that we can not use Eloquent? Yes we can, it can be used as repository implementation (infrastructure layer). We do have a significant advantage with this approach: we are no longer dependent on Laravel’s method names and we can use some naming that reflects the language of the domain.
Actually we have nothing in domain layer so we will keep it empty.
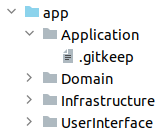
Application
Application layer provides the required base to use and manipulate the domain in a user-friendly way. It is where business process flows are handled, commands are executed and reactions to domain events are coded.
Actually we have nothing in application layer so we will keep it empty.
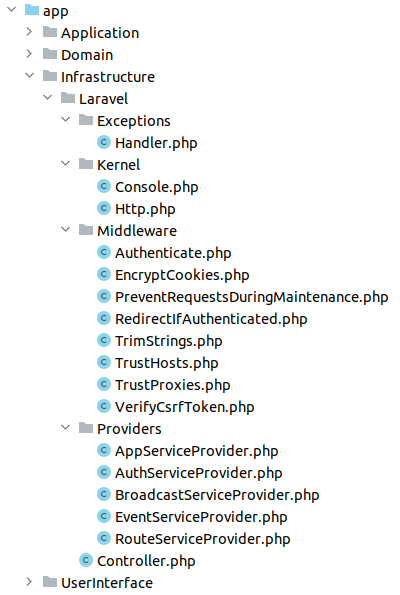
Infrastructure
Infrastructure layer is responsible for communication with external websites, access to services such as database (persistence), messaging systems and email services.
We are going to treat Laravel as a third-party service for our application. So all the framework files are going to be grouped inside the infrastructure folder.
What does it imply:
Note: make sure to update namespaces when moving files.
The final result look as following:
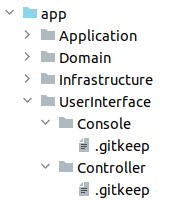
User Interface (UI)
User interface layer is the part where interaction with external world happens. The responsible of displaying information to the user and accepting new data. It could be implemented for web, console or any presentation technology.
Actually we have nothing in user interface layer so we will keep it empty.
Binding interfaces
One last thing that our architecture is lacking: the connection of concrete implementations with interfaces within our domain, e.g. repository interfaces.
For each module on the domain layer, we need a matching module in the infrastructure layer which takes responsibility for what the domain layer cannot afford to care about.
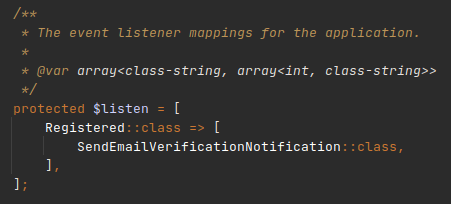
We recommend using EventServiceProvider.php to make these bindings:
Here you can define the abstract interface and the concrete implementation. It will be kind of class wiring configuration.
Bonus
As a small bonus, we’ve included shared domain VOs for basic types.
That classes provide an abstraction and shared methods for the final VO definition. An example of usage:
<?php namespace App\Domain\Post\ValueObject;

use App\Domain\Shared\ValueObject\StringValueObject;

class Message extends StringValueObject
{
}
Note: constructor, getters and additional shared methods can be included in the parent StringValueObject.
Conclusion
Note that so far nothing has changed in the way we use Laravel. We still have our Kernels, Providers, Exception Handlers, Rules, Mails and more inside the app folder.
Implementing Domain-Driven Design is always going to be a challenge no matter what framework we use, there is no unique way of defining things. Almost everything depends on the specific project you’re working on and it probably makes sense to apply a different structure or architecture in other cases.
Domain Drive Design is a continuous process that must be carried out according to specific needs that can be adapted over time. Also it’s a trade off: investing time on having a perfect structure or creating a starting base and improving with the time.
http://img.youtube.com/vi/gg8gjO5pLps/0.jpgI have created a video to explain Laravel ecosystem items on the website with good visualizations.
It was becoming so long, so I decided to publish the first part for now.Laravel News Links
Whether you’re planning to fix your iPhone screen, or you’re just curious to see what the new Self Service Repair program entails, you can now download Apple’s instructions to get all of the details.
Apple has launched its promised Self Service Repair program for iPhones, and if nothing else, it’s going to tell people just how involved repairing these devices is. In practice, it’s unlikely that many regular consumers will go through the process of repairing their devices.
But even if they don’t, it’s now possible for everyone to see what they’re paying for when they take an iPhone in to be fixed. It’s fascinating how detailed Apple’s instructions are, right down to when you cannot re-use a screw you’ve just taken out of an iPhone.
So whether it’s for actual, practical need because you’re going to do this, or it’s for a quite incredible look inside how finely engineered iPhones are, Apple has two new sets of documentation for you.
Both can be read online, but they are in PDF form so they can also be downloaded from the same link. In Safari, hover your cursor over the bottom middle of the page on screen, and controls including a download button appear.
Apple’s repair overview
Apple runs this new service, and it is promoting this ahead of any possible future legislation that requires manufacturers to provide a Right to Repair service. But it’s also distancing itself from the process.
So there’s no big banner headline on Apple’s official site about how you can save on repairs this way. Apple’s also running the whole operation through a new company.
In keeping with that slight distancing, the first documentation of the two that Apple has released spends much time telling you to use Apple Stores to get your repairs done.
“We believe customers should have access to safe and reliable service and repairs that do not compromise their security, their privacy, or the functionality of their device,” says Apple in its new “Expanding Access to Service and Repairs for Apple Devices” document.
“We also know that a repair is more likely to be done correctly when it’s performed by skilled, trained professionals,” it continues, “using genuine Apple parts engineered for quality and safety, and tools designed for the repair.”
Then it does undermine some of this by trying to make it sound impressive that every Apple repair technician has had “more than a dozen hours” of training.
Nonetheless, this manual is a wide-ranging guide to what Apple is doing, and how it’s hoping the service will be used. For a deeper, more specifically focused look, there’s the actual self repair service manual.
Apple Repair Manuals
The direct and store links both take you to the same list of all Apple manuals, whether for repair or not. Currently there are 130 listed, and they range from the Mac Studio Quick Start Guide, to the iPhone 13 Pro Repair Manual.
At present, there are nine such repair manuals, all for the iPhones that are included in the Self Service Repair program:
iPhone 12
iPhone 12 mini
iPhone 12 Pro
iPhone 12 Pro Max
iPhone 13
iPhone 13 mini
iPhone 13 Pro
iPhone 13 Pro Max
iPhone SE (3rd generation)
Each is broken down into sections starting a basic overview of the iPhone in question, followed by one about safety during repairs. Finally there are the procedures for conducting repairs, ranging from changing the battery or replacing a screen, to fixing cameras and the Taptic Engine.
Once you get into these procedures, you see detailed step-by-step instructions for the repair. And each step is accompanied by an annotated photo illustration.
Every step is illustrated, and there are very many warnings along the way
With around 80 pages per repair manual, a lot of the steps are the same or very similar across the different models. So if you are just curious to see what a repair entails, you could really read any of them.
Whereas, naturally, if you’re going to do such a repair, you need to find precisely the right manual, and study it.
“Read the entire manual first,” says Apple in the introduction to every repair manual. “If you’re not comfortable performing the repairs as instructed in this manual, don’t proceed.”