https://assets.amuniversal.com/52969ab078a3013a9a6f005056a9545d
Thank you for voting.
Hmm. Something went wrong. We will take a look as soon as we can.
Dilbert Daily Strip
Just another WordPress site
https://assets.amuniversal.com/52969ab078a3013a9a6f005056a9545d
Thank you for voting.
Hmm. Something went wrong. We will take a look as soon as we can.
Dilbert Daily Strip
https://www.toxel.com/wp-content/uploads/2022/03/infinitybicycle01.jpg
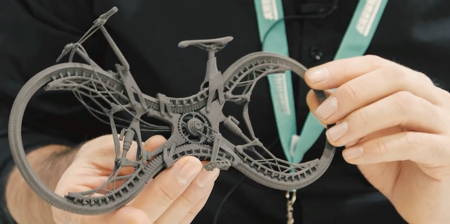
Extremely cool bicycle concept with futuristic all-wheel drive and hubless wheel design inspired by the infinity symbol. “The Infinity Bicycle” designed by Stephan Henrich features innovative monotire chain design that forms a temporary rim in the wheel area and a dented belt-drive in the center area. Monotire is propelled by a crank over a short […]Toxel.com
https://static.adevait.com/2022/02/A-Practical-Guide-to-Containerizing-Laravel-Applications-With-Docker.jpg
Due to its flexibility and ease of usage, Docker has become one of the most widely used, if not the most widely used, methods of distributing software.
In most cases, putting an application inside an OCI image and distributing it through one of the popular image registries is pretty easy. But not in the case of a Laravel application. When you’re packaging a Laravel or PHP application in general, it’s not just the application.
Depending on what your application is doing, it’ll depend on PHP-FPM, composer, a bunch of packages and NGINX, at the very least. Although spinning up separate containers for php-fpm and NGINX is not that much of a hassle in development, in a production environment, the best way is to combine PHP-FPM and NGINX in a single image and develop as close to production as possible.
In this article, I’ll walk you through the process of containerizing a Laravel application for both the development and the production environment.
For your convenience, I’ve uploaded my code to this repository, feel free to fork and modify it.
One more disclaimer before I begin: Things like containerizing or deploying an application can be done in several ways. This is just one of them that I’ve used in past. If you know a more optimized way of doing this, please share in the comments and take everything I say with a grain of salt.
When it comes to containerizing a PHP or Laravel application, it’s common practice to use the official php image as a base. Nothing’s wrong with that, but that image doesn’t come with NGINX pre-installed. Even if you manage to install NGINX on a PHP image, it can be tricky to keep both NGINX and PHP-FPM running.
There are a number of pre-built base images out there that come with both PHP-FPM and NGINX. One such image that I often use, is the webdevops/php-nginx image. This is an excellent image with tons of customization options and easy-to-follow documentation.
In this article, I’ll not use any pre-built base Laravel docker image. Instead, I’ll show you how I make my own base image. The method I follow is not original. Bret Fisher has created the php-docker-good-defaults repository quite some time ago. I’ve made a fork of the repository, ported it from Debian to Alpine, and made necessary modifications as per my needs.
To follow along, you’ll need a Laravel application. Feel free to clone mine from this repository. Once you’ve cloned the code base, open it using Visual Studio Code or whatever code editor you like and take a good look at the directory structure.
.
├── Dockerfile
├── Makefile
├── docker
├── docker-compose.yaml
├── php-nginx-base.Dockerfile
└── src
This is how the project directory should look. The src directory here contains the actual Laravel application code. The docker directory contains mostly configuration files needed by Docker. The php-nginx-base. Dockerfile is the code for the base image (you’ll learn about it in this section). The Dockerfile contains the code for the application image, derived from the aforementioned base image. The docker-compose.yaml file is for using Compose in development and finally, the Makefile contains easy-to-execute one-liners for substituting commonly used long commands. This structure is nothing mandatory. You can come up with your own structure. Feel free to experiment.
Open up the php-nginx-base.Dockerfile file. The code for this file is as follows:
FROM php:8.1.3-fpm-alpine3.15

ENV NGINX_VERSION 1.20.2
ENV NJS_VERSION   0.7.0
ENV PKG_RELEASE   1

# install necessary alpine packages
RUN apk update && apk add --no-cache \
    zip \
    unzip \
    dos2unix \
    supervisor \
    libpng-dev \
    libzip-dev \
    freetype-dev \
    $PHPIZE_DEPS \
    libjpeg-turbo-dev

# compile native PHP packages
RUN docker-php-ext-install \
    gd \
    pcntl \
    bcmath \
    mysqli \
    pdo_mysql

# configure packages
RUN docker-php-ext-configure gd --with-freetype --with-jpeg

# install additional packages from PECL
RUN pecl install zip && docker-php-ext-enable zip \
    && pecl install igbinary && docker-php-ext-enable igbinary \
    && yes | pecl install redis && docker-php-ext-enable redis

# install nginx
RUN set -x \
    && nginxPackages=" \
        nginx=${NGINX_VERSION}-r${PKG_RELEASE} \
        nginx-module-xslt=${NGINX_VERSION}-r${PKG_RELEASE} \
        nginx-module-geoip=${NGINX_VERSION}-r${PKG_RELEASE} \
        nginx-module-image-filter=${NGINX_VERSION}-r${PKG_RELEASE} \
        nginx-module-njs=${NGINX_VERSION}.${NJS_VERSION}-r${PKG_RELEASE} \
    " \
    set -x \
    && KEY_SHA512="e7fa8303923d9b95db37a77ad46c68fd4755ff935d0a534d26eba83de193c76166c68bfe7f65471bf8881004ef4aa6df3e34689c305662750c0172fca5d8552a *stdin" \
    && apk add --no-cache --virtual .cert-deps \
        openssl \
    && wget -O /tmp/nginx_signing.rsa.pub https://nginx.org/keys/nginx_signing.rsa.pub \
    && if [ "$(openssl rsa -pubin -in /tmp/nginx_signing.rsa.pub -text -noout | openssl sha512 -r)" = "$KEY_SHA512" ]; then \
        echo "key verification succeeded!"; \
        mv /tmp/nginx_signing.rsa.pub /etc/apk/keys/; \
    else \
        echo "key verification failed!"; \
        exit 1; \
    fi \
    && apk del .cert-deps \
    && apk add -X "https://nginx.org/packages/alpine/v$(egrep -o '^[0-9]+\.[0-9]+' /etc/alpine-release)/main" --no-cache $nginxPackages

RUN ln -sf /dev/stdout /var/log/nginx/access.log \
    && ln -sf /dev/stderr /var/log/nginx/error.log

# copy supervisor configuration
COPY ./docker/supervisord.conf /etc/supervisord.conf

EXPOSE 80

# run supervisor
CMD ["/usr/bin/supervisord", "-n", "-c", "/etc/supervisord.conf"]
At first glance, this may seem very complicated, but it isn’t. The base image uses the official php image as its base. To be precise, the 8.1.3-fpm-alpine3.15 version of the official image. The first line of the code, FROM php:8.1.3-fpm-alpine3.15 sets the desired image as the base. When choosing the base, make sure to use a fixed Alpine version such as alpine3.15 and not the edge version. Otherwise, the NGINX installation step may fail. To figure out which Alpine versions are supported, check out NGINX’s package index page. At the time of writing, Alpine 3.15 is the latest supported version, hence I’m using the php:8.1.3-fpm-alpine3.15 image.
Then there are three ENV instructions, setting three environment variables, NGINX_VERSION, NJS_VERSION, and PKG_RELEASE, needed for installing NGINX as you’ll see very soon.
After the environment variables, there is a single RUN instruction for installing some necessary packages into the base image. If you’ve worked with Ubuntu or Debian in the past, apk for Alpine Linux is what apt is for Ubuntu or Debian. It’s a package manager. The apk update command updates the package list. The apk add command is for installing packages and the --no-cache option instructs apk to not cache the downloaded packages. This will keep the image smaller in size.
The zip and unzip packages are self-explanatory. dos2unix is needed for converting CRLF line endings to LF. supervisor is a process control system that is used for keeping both NGINX and PHP-FPM running at the same time. libpng-dev, freetype-dev, and libjpeg-turbo-dev is needed for GD, a widely used graphics library. libzip-dev is needed for igbinary serializer support and $PHPIZE_DEPS is a collection of multiple packages needed for installing packages from PECL.
The second RUN instruction uses the docker-php-ext-install script to install some core PHP extensions. This is script included in all variants of the official PHP image and allows users to install any core PHP extensions. The bcmath package is required by Laravel. The other ones are required by most of my projects. If you use a different RDMS such as PostgreSQL or Oracle, feel free to swap mysqli and pdo_mysql packages with whatever you need.
The next RUN instruction uses the docker-php-ext-configure package to configure packages installed using the docker-php-ext-install script. The aforementioned GD package needs to be configured properly otherwise it may result in unexpected bugs. The docker-php-ext-configure package is part of the official PHP image.
Not all packages are available through the PHP core. Such packages will have to be installed from PECL. The next RUN statement installs some additional packages using pecl. The zip package is needed for working with archives. igbinary is required by Redis if you want to enable the igbinary serializer support. Finally, I use Redis in more or less all my projects for caching, hence the redis package is being installed. Any package installed from PECL has to be enabled manually using the docker-php-ext-enable script. This script also comes built into the official PHP images.
Packages installed in this article are the ones I usually need in more or less all my projects. Feel free to cut some of them off or add any additional packages that you may need. It’s your base image, so make it your way.
After the PHP packages are installed, the next step is to install NGINX. As you can see, there is a long RUN command that does the job of installing NGINX from the official website. Now, this code snipped here, is not written by me. This is how NGINX is installed in the official image. You can check out their repository for clarification. What this command does is determine the desired package versions from the environment variable you set at the top of the file, then based on the OS version, installs the appropriate NGINX package.
The next RUN instruction links sdtout and stderr to NGINX access and error logs so that you can see the logs flowing on our terminal. The COPY instruction copies the docker/supervisord.conf to /etc/supervisord.conf, the default configuration file location for supervisor.
The code for the configuration file is as follows:
[supervisord]
user=root
nodaemon=true
logfile=/dev/stdout
logfile_maxbytes=0
pidfile=/var/run/supervisord.pid
loglevel = INFO

[program:php-fpm]
command = /usr/local/sbin/php-fpm
autostart=true
autorestart=true
priority=5
stdout_logfile=/dev/stdout
stdout_logfile_maxbytes=0
stderr_logfile=/dev/stderr
stderr_logfile_maxbytes=0

[program:nginx]
command=/usr/sbin/nginx -g "daemon off;"
autostart=true
autorestart=true
priority=10
stdout_events_enabled=true
stderr_events_enabled=true
stdout_logfile=/dev/stdout
stdout_logfile_maxbytes=0
stderr_logfile=/dev/stderr
stderr_logfile_maxbytes=0
In this configuration file, the supervisord section defines default configuration for supervisor. Then the two sections, program:php-fpm and program:nginx, daemonize PHP-FPM and NGINX to keep running side-by-side. If you want to learn more about configuring supervisor, feel free to consult the official documentation.
The EXPOSE instruction is like documentation for services that need to know which ports are accessible in any Laravel docker container created from this image. NGINX runs in port 80 by default and that’s why it’s exposed. Finally, the CMD instruction sets the default command of this image to ["/usr/bin/supervisord", "-n", "-c", "/etc/supervisord.conf"] or in other words, starts supervisor by on startup. Supervisor then starts NGINX and PHP-FPM and you get a functional server.
That’s pretty much it for the base image. I don’t like to include composer in the base image because composer is likely to be updated more frequently than PHP or NGINX. I prefer installing composer in my derived images or application images.
Anyways, if you’re happy with your base image, you can build, tag, and upload the image to your Docker Hub account as follows:
docker image build -t <your-docker-hub-username>/<your-base-image-name>:<your-base-image-tag> .

docker image push <your-docker-hub-username>/<your-base-image-name>:<your-base-image-tag>
I’m assuming that you already know how to build Docker images. If you need help, feel free to check out my handbook on the topic. If you’ve successfully built, tagged, and uploaded your image, advance to the next section.
Now that you have a base image to use, let’s create an application image. The Dockerfile in my project contains the code for the application image. The code for the file is as follows:
FROM fhsinchy/php-nginx-base:php8.1.3-fpm-nginx1.20.2-alpine3.15

# set composer related environment variables
ENV PATH="/composer/vendor/bin:$PATH" \
    COMPOSER_ALLOW_SUPERUSER=1 \
    COMPOSER_VENDOR_DIR=/var/www/vendor \
    COMPOSER_HOME=/composer

# install composer
RUN curl -sS https://getcomposer.org/installer | php -- --install-dir=/usr/local/bin --filename=composer \
    && composer --ansi --version --no-interaction

# install application dependencies
WORKDIR /var/www/app
COPY ./src/composer.json ./src/composer.lock* ./
RUN composer install --no-scripts --no-autoloader --ansi --no-interaction

# add custom php-fpm pool settings, these get written at entrypoint startup
ENV FPM_PM_MAX_CHILDREN=20 \
    FPM_PM_START_SERVERS=2 \
    FPM_PM_MIN_SPARE_SERVERS=1 \
    FPM_PM_MAX_SPARE_SERVERS=3

# set application environment variables
ENV APP_NAME="Question Board" \
    APP_ENV=production \
    APP_DEBUG=false

# copy entrypoint files
COPY ./docker/docker-php-* /usr/local/bin/
RUN dos2unix /usr/local/bin/docker-php-entrypoint
RUN dos2unix /usr/local/bin/docker-php-entrypoint-dev

# copy nginx configuration
COPY ./docker/nginx.conf /etc/nginx/nginx.conf
COPY ./docker/default.conf /etc/nginx/conf.d/default.conf

# copy application code
WORKDIR /var/www/app
COPY ./src .
RUN composer dump-autoload -o \
    && chown -R :www-data /var/www/app \
    && chmod -R 775 /var/www/app/storage /var/www/app/bootstrap/cache

EXPOSE 80

# run supervisor
CMD ["/usr/bin/supervisord", "-n", "-c", "/etc/supervisord.conf"]
As you can see, this image uses my base image as it’s, well, base. Make sure to replace my base image name and tag with yours. The first thing you need is composer. The ENV instruction sets some necessary environmental variable for composer.
Setting COMPOSER_ALLOW_SUPERUSER to 1 lets you run composer as superuser without any warning. Setting COMPOSER_VENDOR_DIR to /var/www/vendor allows you to keep the installed packages in the /var/www/vendor directory instead of a vendor directory within the project.
Some Laravel developers prefer using a bind mount to protect the vendor directory from getting overwritten but I prefer simply moving it out of the project directory. However, going this route will require you to update the artisan and public/index.php files in your project.
Open the artisan file and update the require __DIR__.'/vendor/autoload.php'; line as follows:
require __DIR__.'/../vendor/autoload.php';By default, the vendor folder stays in the same directory as the artisan file. But now instead of /var/www/app/vendor it’s in the /var/www/vendor directory. Adding the additional .. will make artisan to go back one step in the directory tree. You have to make similar changes to the public/index.php file as well. Open the file and replace the require __DIR__.'/../vendor/autoload.php'; line as follow:
require __DIR__.'/../../vendor/autoload.php';Just like artisan, you’ll need to add an extra set of dots before the vendor directory path. If you think these changes are not ideal, feel free to use a bind mount instead or leave the vendor directory as-is.
After setting the environment variables, the RUN instruction uses curl to download the official composer installer and installs it inside the /usr/local/bin directory with the filename composer. These installation instructions are taken directly from the official download instructions.
You can now use composer to install the application dependencies. To do so, you’ll have to first change the working directory to /var/www/app, using the WORKDIR instruction. You can use some other directory if you want. Then, you’ll have to use a COPY instruction to copy the ./src/composer.json ./src/composer.lock* files to the working directory. Since you’ve already configured the working directory, ./ refers to the working directory. Next, execute the composer install --no-scripts --no-autoloader --ansi --no-interaction command with a RUN instruction to install the dependencies. The --no-scripts option will instruct composer to not execute any post-installation scripts. The --no-autoloader option will prevent composer from generating the autoload file. Since we don’t have all the application code yet, generating the autoload at this point will not be ideal. The --ansi option instructs composer to produce ANSI output and --no-interaction means you want the package installation to be unattended.
Once the dependencies are installed, you may set any necessary environmental variables. I’ve set a bunch of environmental variables related to PHP-FPM. These variables will be later written to the PHP-FPM configuration. Feel free to get rid of them if you want to. Set any application related environment variable here but do not set anything sensitive like application encryption key or database password. They can be passed when starting the Laravel app container.
Now you’ll have to copy the entrypoint script. The dos2unix utility converts the CRLF line endings to LF line ending. If you’re confused about the entrypoint, you can learn more from here. If you’re using my project, the entrypoint scripts should be docker/docker-php-entrypoint and the code for this file is as follows:
#!/bin/sh
set -e

# write the php-fpm config
{ \
    echo listen = /var/run/php-fpm.sock; \
    echo listen.owner = www-data; \
    echo listen.group = www-data; \
    echo pm.max_children = "$FPM_PM_MAX_CHILDREN"; \
    echo pm.start_servers = "$FPM_PM_START_SERVERS"; \
    echo pm.min_spare_servers = "$FPM_PM_MIN_SPARE_SERVERS"; \
    echo pm.max_spare_servers = "$FPM_PM_MAX_SPARE_SERVERS"; \
} > /usr/local/etc/php-fpm.d/zzz-app.conf

exec "[email protected]"
This script writes the default configuration file for PHP-FPM. Setting listen to /var/run/php-fpm.sock; will instruct PHP-FPM to use the given UNIX socket for listening to requests. The listen.owner and listen.group options indicate the user and user group PHP-FPM should listen to. www-data user and user groups exist in any Linux distribution by default. You can skip the rest of the four configuration options if want to.
There’s another file docker/docker-php-entrypoint-dev but we’ll discuss that file later. The default location for the entrypoint script is /usr/local/bin/ so the COPY ./docker/docker-php-* /usr/local/bin/ will copy the entrypoint files and replace the default one.
Next, you’ll have to copy the NGINX configuration files. The docker/nginx.conf file is the default NGINX configuration file. The code for the file is as follows:
user  www-data;
worker_processes  auto;

error_log  /var/log/nginx/error.log notice;
pid        /var/run/nginx.pid;

events {
    worker_connections  1024;
}

http {
    include       /etc/nginx/mime.types;
    default_type  application/octet-stream;

    log_format  main  '$remote_addr - $remote_user [$time_local] "$request" '
                      '$status $body_bytes_sent "$http_referer" '
                      '"$http_user_agent" "$http_x_forwarded_for"';
    access_log  /var/log/nginx/access.log  main;

    sendfile        on;
    #tcp_nopush     on;

    keepalive_timeout  65;

    #gzip  on;

    include /etc/nginx/conf.d/*.conf;
}
This is more or less entirely the same as the default NGINX configuration file. The only change I’ve made is in the first line. By default, it says user nginx; but you want it to be user www-data;. Next, the docker/default.conf file is the configuration for the application itself. The code for this file is as follows:
server {
    listen 80;

    root /var/www/app/public;

    add_header X-Frame-Options "SAMEORIGIN";
    add_header X-Content-Type-Options "nosniff";

    index index.php;

    charset utf-8;

    location / {
        try_files $uri $uri/ /index.php?$query_string;
    }

    location = /favicon.ico { access_log off; log_not_found off; }
    location = /robots.txt  { access_log off; log_not_found off; }

    error_page 404 /index.php;

    location ~ \.php$ {
        fastcgi_pass unix:/var/run/php-fpm.sock;
        fastcgi_param SCRIPT_FILENAME $realpath_root$fastcgi_script_name;
        include fastcgi_params;
    }
    location ~ /\.(?!well-known).* {
        deny all;
    }
}
This code is copied from the official Laravel documentation. Make sure to change the root /var/www/app/public; line as per your directory. Also, make sure fastcgi_pass unix:/var/run/php-fpm.sock``; line matches the socket file location according to your entrypoint script.
The default location for the nginx.conf file inside the image should be /etc/nginx/nginx.conf and the default.conf should be /etc/nginx/conf.d/default.conf and that’s what the COPY instruction does.
Finally, you can copy the application code. As you can see in the code, I’ve set the working directory once again. This is to make sure that the working directory is still what it should be and has not been overwritten. The COPY instruction copies everything from the src directory into the working directory.
Then the RUN instruction executes the composer dump-autoload -o command to generate the autoload file. Then the chown -R :www-data /var/www/app command changes the directory owner group to www-data and the chmod -R 775 /var/www/app/storage /var/www/app/bootstrap/cache makes the /var/www/app/storage, /var/www/app/bootstrap/cache directories writable. These permission changes are necessary and you can learn more from this Guide to Deploying Laravel Applications on Virtual Private Servers. You should copy the application code as late as possible because it’s most likely to change.
After that, you just EXPOSE the port 80 and set ["/usr/bin/supervisord", "-n", "-c", "/etc/supervisord.conf"] as the default command. That’s pretty much it. Build the image and try to spin a new container to make sure everything’s working fine.
Your project is now containerized. The image you built in the previous section is production-ready. The only thing that’s left to do is write a docker-compose.yaml file for development. Open the docker-compose.yaml file and the code for this file is as follows:
version: "3.8"

services:
    db:
        image: mysql:8.0
        volumes:
            - db-data:/var/lib/mysql
        environment:
            - MYSQL_ROOT_PASSWORD=root
            - MYSQL_DATABASE=question_board
    app:
        build: .
        entrypoint: /usr/local/bin/docker-php-entrypoint-dev
        command: ["/usr/bin/supervisord", "-n", "-c", "/etc/supervisord.conf"]
        volumes:
            - ./src:/var/www/app
        environment:
            - APP_ENV=local
            - APP_KEY=base64:tLmYfUrrZITzLIkSjFnV+PCAFxkdU+duUxjVSIlrrHo=
            - APP_DEBUG=true
            - DB_CONNECTION=mysql
            - DB_HOST=db ## same as the database service name
            - DB_PORT=3306
            - DB_DATABASE=question_board
            - DB_USERNAME=root
            - DB_PASSWORD=root
        restart: unless-stopped
        ports:
            - 8000:80
        depends_on:
            - db

volumes:
    db-data:
This is a regular docker-compose.yaml file that you may have written in the past. There are two services. The db service and the app service. The db service uses the mysql:8.0 image to create a new database container. It uses the db-data named volume for persisting data. Since the volume is named, it’ll hang around between ups.
The app service uses the Dockerfile to build an image and start a container. The entrypoint: /usr/local/bin/docker-php-entrypoint-dev line will override the default entrypoint script with the development entrypoint script. The code for this script is as follows:
#!/bin/sh
set -e

# run last minute build tools just for local dev
# this file should just be used to override on local dev in a compose file

# run default entrypoint first
/usr/local/bin/docker-php-entrypoint

# ensure bind mount permissions are what we need
chown -R :www-data /var/www/app

chmod -R 775 /var/www/app/storage /var/www/app/bootstrap/cache

# run last minute build tools just for local dev
cd /var/www/app
composer dump-autoload
cd /var/www/app/public

exec "[email protected]"
This script runs the default entrypoint script first. Then it resets the directory permissions because in development, you’ll mount your local src directory inside the container and it may mess up the permissions. After that, the script just regenerates the autoload. Since you’ve overridden the entrypoint, you’ll have to write the command once again.
The rest of the code mounts the src directory to the /var/www/app directory, sets the environment variables, exposes port 80 from inside the container to port 8000 on your host system. That’s it. You can use this file to start the containers in development mode.
There is a file Makefile that contains the following code:
stop:
    docker-compose stop
shell:
    docker-compose exec app sh
start:
    docker-compose up --detach
destroy:
    docker-compose down --volumes
build:
    docker-compose up --detach --build
seed:
    docker-compose exec app php artisan db:seed
migrate:
    docker-compose exec app php artisan migrate:fresh
You can use any of these commands like make start to execute the attached docker-compose command. Make may not be available on Windows but you can always use WSL for that.
I would like to thank you for the time you’ve spent reading this article.
I hope you’ve enjoyed it and have learned some useful stuff regarding PHP, Laravel, and Docker.
If you want to learn Docker from the ground up, consider checking out my open-source Docker Handbook with tons of fun content and several practical projects.
Or, if you are more interested about node.js, here is an article on how to do containerizing Node.js applications with Docker.
Laravel News Links
https://media.notthebee.com/articles/6227c0e2b9bde6227c0e2b9bdf.jpg
Perhaps no aspect of the pandemic has been as bitterly and relentlessly debated as the question of mask-wearing.
Not the Bee
https://opengraph.githubassets.com/e6160907e12387e0dfc32f03979df89b1707fa8fb48f4fc8f4ebc613d2e29ed8/josezenem/laravel-make-migration-pivot
This will allow you to create pivot table migration files using the new Laravel 9 closure migration format by simply passing two models. Under the hood the system will inspect the two models to generate the pivot table and foreign key names.
php artisan make:pivot Category Blog
Will generate the following migration
return new class extends Migration {
    /**
     * Run the migrations.
     *
     * @return void
     */
    public function up()
    {
        Schema::create('blog_category', function (Blueprint $table) {
            $table->foreignIdFor(Blog::class)->constrained()->onDelete('cascade');
            $table->foreignIdFor(Category::class)->constrained()->onDelete('cascade');
            $table->primary(['blog_id', 'category_id']);

            $table->index('blog_id');
            $table->index('category_id');
        });
    }
You can install the package via composer:
composer require josezenem/laravel-make-migration-pivot
php artisan make:pivot Category Blog
Optionally, you can publish the stubs using
php artisan vendor:publish --tag="laravel-make-migration-pivot-stubs"
Please see CHANGELOG for more information on what has changed recently.
Please see CONTRIBUTING for details.
Please review our security policy on how to report security vulnerabilities.
The MIT License (MIT). Please see License File for more information.
Laravel News Links
https://s3.amazonaws.com/images.gearjunkie.com/uploads/2022/02/ORCA-Walker-Tote-cooler.jpg
Ideal for that quick, spur-of-the-moment day trip or tailgating party, the ORCA Walker Tote is an ultralight soft-sided cooler that offers great durability and ice retention.
These days there is a glut of coolers on the market. It can be hard to tell the difference between various kinds and what makes them worth the price tag. The ORCA Walker Tote is an ultralight option, weighing 3.6 pounds dry, that is versatile, holds 18 cans, and is very easy to use for a variety of trips from camping to backyard barbecues.
So, out of all the coolers, why this one?
In short: ORCA’s big brother, the Walker 20 Cooler, made GearJunkie’s Best Soft Coolers list, so we were intrigued to see a new Walker cooler hitting the shelves. This is a slightly smaller version, for those looking for the same level of cold storage in a more compact form. And aside from boasting a tote style, this Walker has an updated, slimmer design and new volume.

While touted as a soft-sided cooler, the ORCA is very stout and well built. From top to bottom, the cooler is crafted with durability in mind. The zipper is a Master Seal #10 waterproof zipper, ensuring the ORCA is leakproof and will keep contents cold for 24 hours and beyond.
The sides are heavily insulated, and the underside has tough, rubberized padded skin for added protection when you set the cooler down on sand and rocks. The bottom line, it is ready to rock right out of the box.
Opening and carrying the ORCA Walker Tote cooler is a breeze with the easy-open magnetic split handle. Rather than clasping together, the two-sided handles interlock and hold in place easily with strong magnets.
It’s an intuitive and simple mechanism to carry the cooler. The opposing magnets also stay open when unzipping the cooler, making access to the interior a breeze.
Compared to the Walker 20, the Walker Tote is a bit smaller: ½-inch shorter in length, 2 inches shorter in height, and 1½-inch shorter in width. They share similar designs, materials, and features.

With a trip set for Arizona, I loaded up the cooler with some beer — 16 cans, to be exact — and set out on the road. The just over foot-high cooler fit snugly in the trunk of my car as I headed to the desert.
The cooler started about a quarter full of ice, and I let it sit in the trunk for the 2-day drive in some 70-degree weather. When I arrived, I opened the cooler to find most of the ice melted, but the drinks were still cold.
I restocked the ice and brews and tested out the ORCA poolside. And here is where it excels. This is what the ORCA Walker Tote is made for: a grab-and-go poolside session. The exterior side pocket held a paperback book and my sunglasses, while the cooler transported the canned brews with ease. (There’s an interior waterproof pocket as well.)
The detachable padded shoulder strap made it simple to carry the cooler to and from the pool, and the tote fits nicely by a chair or table without getting in the way. It really is an ideal size for a day out.

Overall, I was impressed by the ORCA Walker Tote. However, during my trip, the metal clasp holding the shoulder harness to the Tote broke, rendering the shoulder carry option useless. For the price of the cooler and the “durability” tag, I was disappointed to see this during the use of a normal road trip.
ORCA stated that this is an issue they are aware of and that clasps have broken from time to time. ORCA has a 3-year warranty that includes manufacturer defects such as a break like this. It’s worth noting that ORCA does expect to have the issue fixed in updated versions of both the Walker Tote and Walker 20 slated for fall 2022. (We’ll keep you updated.)
The other drawback is that the mouth of the cooler has difficulty staying open and, as a result, can be hard to fill with ice. Aside from this, the cooler performed well.
The Walker Tote’s body is strong, it keeps its contents cold, it’s easy to transport, and it looks good. (You may even get some jealous glances of cooler envy!) If it were not for the broken shoulder strap clasp and small guarded entry, it’d be the ideal tote for nearly any road trip or waterfront adventure.
Overall, this is a durable light cooler that looks good and offers great ice retention for a day trip. It’s compact, capable, and tough — throw it in the back of your vehicle, and beverages or food will be good to go when you hit the beach or pool.
Check Price at ORCA CoolersCheck Price at AmazonCheck Price at Walmart

We tested the best electric coolers of 2022 with options for every budget and need. Top picks include Dometic, ARB, Engel, and more! Read more…
The post (Almost) Perfect: ORCA Walker Tote Ultralight Soft Cooler Review appeared first on GearJunkie.
GearJunkie
https://i.kinja-img.com/gawker-media/image/upload/c_fill,f_auto,fl_progressive,g_center,h_675,pg_1,q_80,w_1200/460aa26097c46a15db4eb0c00a5513d1.jpg
Back when it was first released, we called Live Text the best new feature in iOS 15, and it’s not hard to see why—the tool can recognize any text in any photo (or within the camera view) so you can copy and share it. But the more we use it, the more annoying we find it can be. When you’re in the camera view, for example, and you point your camera toward something that you want to capture, you tap the subject to focus, and instead, your iPhone selects some text. Similarly, when you’re browsing your photo library, you may try to zoom into a picture, and instead, you get a pop-up asking if you’d like to navigate to an address instead.
If you’re similarly annoyed, you can disable the Live Text feature in the camera view, in the Photos app, and everywhere on the Mac, as well.
Let’s deal with the most annoying part first. If Live Text gets in the way of your photography, you can disable it only for the Camera app. Go to Settings > Camera and disable the “Show Detected Text” feature.
If you want to disable the text recognition feature across the board, there’s a separate setting. This option will disable the feature in the Photos app, and in places like Safari, or the screenshot editor (where you can use Live Text on any image). To do this, go to Settings > General > Language & Region and disable the “Live Text” feature.
Once you disable the Live Text feature from here, it’s disabled everywhere, including the Camera app.
macOS Monterey brought Live Text to the Mac, helping you simply select and copy text from any image. But if you’re not a fan, you can disable it across the entire OS: Click the Apple icon from the top menu bar, go to “System Preferences” > Language & Region > General, and from the “Live Text” section, disable the “Select Text in Images” feature.
If you change your mind, you can always go back to System Preferences to enable the feature.
Lifehacker
https://assets.amuniversal.com/4db8fdf078a3013a9a6f005056a9545d
Dilbert Daily Strip
https://i.ytimg.com/vi/tRpWTYTUCfM/maxresdefault.jpgHere, we will be looking at what are the 5 new things that are added in Laravel version 9.1.0Laravel News Links
http://img.youtube.com/vi/TW5FPOfIOvc/0.jpgThree new Blade directives that would help our edit forms to get a bit shorter. Let me show you a demo.Laravel News Links