https://gunfreezone.net/wp-content/uploads/2022/02/you-are-our-russians-2.jpg


Gun Free Zone
Just another WordPress site
https://gunfreezone.net/wp-content/uploads/2022/02/you-are-our-russians-2.jpg
Gun Free Zone
https://www.percona.com/blog/wp-content/uploads/2022/02/MySQL-Restore-Backup-Comparison.png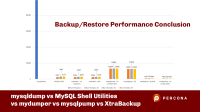
 A little bit ago, I released a blog post comparing the backup performance of different MySQL tools such as mysqldump, the MySQL Shell feature called Instance Dump, mysqlpump, mydumper, and Percona XtraBackup. You can find the first analysis here:
However, we know the backups are just the first part of the story. What about the restore time? And which tool performs better for the complete operation (backup+restore)?
Let’s see the results and the conclusion in the following sections.
I ran the benchmark on an m5dn.8xlarge instance, with 128GB RAM, 32 vCPU, and two io1 disks of 600GB (one for backup and the other one for MySQL data) with 5000 provisioned IOPS. The MySQL version was 8.0.26 and configured with 89Gb of the buffer pool, 20Gb of redo log, and a sample database of 96 GB (more details below).
When we sum the backup time and the restore time, we can observe the results in the chart below:

And if we analyze the chart without mysqldump to have a better idea of how the other tools performed:

The backup size created by each tool:

Note that the backup size of XtraBackup (without compression) is the size of the datadir without the binary logs. Next, we can see the backup time:

And the restore time:

When we sum backup and restore times, we observe that the fastest tool is Percona XtraBackup. The main point of XtraBackup is not even the speed but its capacity to perform PITR backups. Also, the tool supports compression and encryption.
We can also observe that mydumper/myloader and MySQL Shell utilities produce good results in both phases. The difference from Xtrabackup is that both tools perform logical backups, which means that these tools connect to MySQL and extract the data to dump files. Because they have to extract data from MySQL, these tools are more sensitive for the MySQL configuration and backup/restore parametrization. For example, MyDumper/MyLoader has some extra options that can improve the backup and restore performance, such as --rows, --chunk-filesize, and --innodb-optimize-keys.
Note that XtraBackup, MyDumper, and mysqldump support stream restore, reducing overall timing to perform the backup and restore operation.
The tool that has the most inconsistent behavior is mysqlpump where the tool can make speedy backups, but the restore performance is terrible since it is single-threaded the same way as mysqldump.
Based on the tests, we can observe that compression, TLS, socket, or TCP/IP do not significantly impact the time needed to perform the whole operation. Because there is no significant impact, tools that can perform compression and use TLS like MySQL Shell, mydumper/myloader, and XtraBackup have a good advantage since their backups are safer and use less disk space (less disk space = fewer costs). The trade-off between the features of these tools and the time spent to backup and restore the database is something that all DBAs should evaluate.
And to answer some questions/comments about this topic:
The difference you see between MySQL Shell and mydumper can be explained by the use of SSL in one and clear transfer in the other. Encryption has a cost, unfortunately.
A: Indeed, SSL has a cost. However, when we put the security benefits of the SSL and consider the whole process, it is a small cost (in the same way as compression).
Does XtraBackup support ZSTD?
A: At this moment, no. However, there is a feature request for this (you can follow the JIRA ticket to receive updates about it):
https://jira.percona.com/browse/PXB-2669
Is there any difference substituting mysqldump | gzip with a different compression tool?
A: The difference is neglectable piping with gzip or sending the uncompressed dump to the disk. The mysqldump tool is the most inefficient option due to its single-thread nature, severely impacting performance. Because of its single-thread nature, the tool cannot extract maximum performance from hardware resources (in particular I/O).
How is the performance impact on MySQL when running the backups?
A: Unfortunately, I did not measure this. Based on my experience, there is a dedicated replica server for backup most of the time. If the MySQL community is interested in this test, I can write another post about this (leave in the comments your opinion).
It is possible to squeeze more juice from MySQL in the restore phase. We can take some actions like disabling the binary log and making asynchronous writes. You can check the advice (pros and cons) in these two blog posts:
https://www.percona.com/blog/2020/05/14/tuning-mysql-innodb-flushing-for-a-write-intensive-workload/
https://www.percona.com/blog/2014/05/23/improve-innodb-performance-write-bound-loads/
To conclude, this blog post is intended to give an overall idea of how these tools perform. I tried to stick with the default options of each tool (except the number of threads) to keep the test as fair as possible. Also, time is not the only thing that companies consider to adopt a backup method (security, encryption, and data protection are very important). In my daily tasks, I use mydumper/myloader and XtraBackup because I’m more familiar with the commands, and I have used them for a long time. However, I would advise keeping an eye on the MySQL Shell utilities since it is becoming a fascinating tool to perform many tasks (backup and restore have excellent results).
These are the specs of the benchmark:
Finally, you can reach us through the social networks, our forum, or access our material using the links presented below:
Planet MySQL
A question from the audience about caching the paginated data, I’m sharing my opinion in this video. What would you add?Laravel News Links
Laravel Octane can drastically boost your application’s performance and response time by serving it through high-performance PHP…Laracasts
https://lh4.googleusercontent.com/vD-dRHvXKOGoUhzenRC4PFEy0rKu-ajEi-SsFgYkEljZYRsGrQ15J4ly4lzFRKw_9boxt6uFGyp_mD83azXJg_0frzBn9HaYOR8SxTrzNzWXg8opxtV248AfyaBWXh-R9WZ0P0o0
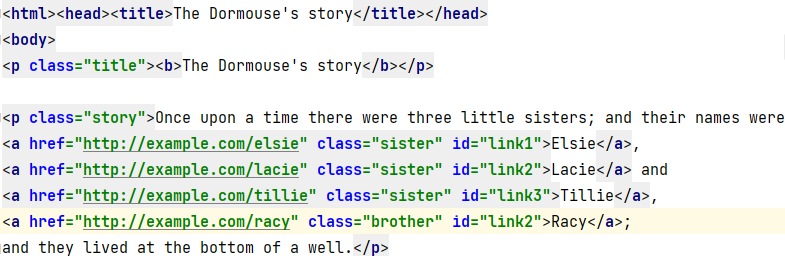
When we browse through a webpage, we see some blue text with an underline underneath. These are called anchor texts. That’s because when you click on these texts, they take you to a new webpage.
The anchor tags, or the <a> tags of HTML, are used to create anchor texts, and the URL of the webpage that is to be opened is specified in the href attribute.
Refer to the below image to understand it better.

In almost all web scraping projects, fetching the URLs from the href attribute is a common task.
In today’s article, let’s learn different ways of fetching the URL from the href attribute using Beautiful Soup.
To fetch the URL, we have to first find all the anchor tags, or hrefs, on the webpage. Then fetch the value of the href attribute.
Two ways to find all the anchor tags or href entries on the webpage are:
soup.find_all()SoupStrainer classOnce all the href entries are found, we fetch the values using one of the following methods:
tag['href']tag.get('href')Throughout the article, we will use the requests module to access the webpage and BeautifulSoup for parsing and pulling the data from the HTML file.
To install requests on your system, open your terminal window and enter the below command:
pip install requests
More information here:
To install Beautiful Soup in your system, open your terminal window and enter the below command:
pip install bs4
To install Beautiful Soup, open the terminal window and enter the below command:
import requests
from bs4 import BeautifulSoup
More information here:
The href entries are always present within the anchor tag (<a> tag). So, the first task is to find all the <a> tags within the webpage.
Soup represents the parsed file. The method soup.find_all() gives back all the tags and strings that match the criteria.
Let’s say we want to find all the <a> tags in a document. We can do as shown below.
import requests
from bs4 import BeautifulSoup

url = "https://www.wikipedia.org/"
# retrieve the data from URL
response = requests.get(url)

# parse the contents of the webpage
soup = BeautifulSoup(response.text, 'html.parser')

# filter all the <a> tags from the parsed document
for tag in soup.find_all('a'):
   print(tag)
Output:
<a class="link-box" data-slogan="The Free Encyclopedia" href="//en.wikipedia.org/" id="js-link-box-en" title="English â Wikipedia â The Free Encyclopedia"> <strong>English</strong> <small><bdi dir="ltr">6 383 000+</bdi> <span>articles</span></small> </a> . . . <a href="https://creativecommons.org/licenses/by-sa/3.0/">Creative Commons Attribution-ShareAlike License</a> <a href="https://meta.wikimedia.org/wiki/Terms_of_use">Terms of Use</a> <a href="https://meta.wikimedia.org/wiki/Privacy_policy">Privacy Policy</a>
We can also use the SoupStrainer class. To use it, we have to first import it into the program using the below command.
from bs4 import SoupStrainer
Now, you can opt to parse only the required attributes using the SoupStrainer class as shown below.
import requests
from bs4 import BeautifulSoup, SoupStrainer

url = "https://www.wikipedia.org/"
# retrieve the data from URL
response = requests.get(url)

# parse-only the <a> tags from the webpage
soup = BeautifulSoup(response.text, 'html.parser', parse_only=SoupStrainer("a"))
for tag in soup:
   print(tag)
Output:
<a class="link-box" data-slogan="The Free Encyclopedia" href="//en.wikipedia.org/" id="js-link-box-en" title="English â Wikipedia â The Free Encyclopedia"> <strong>English</strong> <small><bdi dir="ltr">6 383 000+</bdi> <span>articles</span></small> </a> . . . <a href="https://creativecommons.org/licenses/by-sa/3.0/">Creative Commons Attribution-ShareAlike License</a> <a href="https://meta.wikimedia.org/wiki/Terms_of_use">Terms of Use</a> <a href="https://meta.wikimedia.org/wiki/Privacy_policy">Privacy Policy</a>
Once we have fetched the required tags, we can retrieve the value of the href attribute.
All the attributes and their values are stored in the form of a dictionary. Refer to the below:
sample_string="""<a href="http://example.com/elsie" class="sister" id="link1">Elsie</a>"""
soup= BeautifulSoup(sample_string,'html.parser')
atag=soup.find_all('a')[0]
print(atag)
print(atag.attrs)
Output:
<a class="sister" href="http://example.com/elsie" id="link1">Elsie</a>
{'href': 'http://example.com/elsie', 'class': ['sister'], 'id': 'link1'}
As seen in the output, the attributes and their values are stored in the form of a dictionary.
To access the value of the href attribute, just say
tag_name['href']
Now, let’s tweak the above program to print the href values.
sample_string="""<a href="http://example.com/elsie" class="sister" id="link1">Elsie</a>"""
soup= BeautifulSoup(sample_string,'html.parser')
atag=soup.find_all('a')[0]
print(atag['href'])
Output:
http://example.com/elsie
Alternatively, we can also use the get() method on the dictionary object to retrieve the value of ‘href’ as shown below.
sample_string = """<a href="http://example.com/elsie" class="sister" id="link1">Elsie</a>"""
soup = BeautifulSoup(sample_string,'html.parser')
atag = soup.find_all('a')[0]
print(atag.get('href'))
Output:
http://example.com/elsie
Now that we know how to fetch the value of the href attribute, let’s look at some of the real-time use cases.
Let’s scrape the Wikipedia main page to find all the href entries.
from bs4 import BeautifulSoup
import requests

url = "https://www.wikipedia.org/"
# retrieve the data from URL
response = requests.get(url)
if response.status_code ==200:
   soup=BeautifulSoup(response.text, 'html.parser')
   for tag in soup.find_all(href=True):
       print(tag['href'])
Output:
//cu.wikipedia.org/
//ss.wikipedia.org/
//din.wikipedia.org/
//chr.wikipedia.org/
.
.
.
.
//www.wikisource.org/
//species.wikimedia.org/
//meta.wikimedia.org/
https://creativecommons.org/licenses/by-sa/3.0/
https://meta.wikimedia.org/wiki/Terms_of_use
https://meta.wikimedia.org/wiki/Privacy_policy
As you can see, all the href entries are printed.
Let’s say we need to find only the outbound links. From the output, we can notice that most of the inbound links do not have "https://" in the link.
Thus, we can use the regular expression ("^https://") to match the URLs that start with "https://" as shown below.
Also, check to ensure nothing with ‘wikipedia’ in the domain is in the result.
from bs4 import BeautifulSoup
import requests
import re

url = "https://www.wikipedia.org/"
# retrieve the data from URL
response = requests.get(url)
if response.status_code ==200:
   soup=BeautifulSoup(response.text, 'html.parser')
   for tag in soup.find_all(href=re.compile("^https://")):
       if 'wikipedia' in tag['href']:
           continue
       else:
           print(tag['href'])
Output:
https://meta.wikimedia.org/wiki/Special:MyLanguage/List_of_Wikipedias
https://donate.wikimedia.org/?utm_medium=portal&utm_campaign=portalFooter&utm_source=portalFooter

.
.
.

https://meta.wikimedia.org/wiki/Terms_of_use
https://meta.wikimedia.org/wiki/Privacy_policy
Consider a file as shown below:
Let’s say we need to fetch the URL from the class=sister and with id=link2. We can do that by specifying the condition as shown below.
from bs4 import BeautifulSoup

#open the  html file.
with open("sample.html") as f:
   #parse the contents of the html file
   soup=BeautifulSoup(f,'html.parser')
   # find the tags with matching criteria
   for tag in soup.find_all('a',{'href': True, 'class' : 'sister' ,'id' : 'link2' }):
       print(tag['href'])
Output:
http://example.com/lacie
That brings us to the end of this tutorial. In this short tutorial, we have learned how to fetch the value of the href attribute within the HTML <a> tag. We hope this article has been informative. Thanks for reading.
Finxter
https://media.notthebee.com/articles/62150675b86de62150675b86df.jpg
There are about 100 cases of "uncombable hair" in the world, and this toddler is one of them:
Not the Bee
https://opengraph.githubassets.com/7a32e2a07c8bc450619e5de7ef0d00f65b4dada54b28026615b518879acf43fb/coderflexx/laravisit
![]()
A clean way to track your pages & understand your user’s behavior
You can install the package via composer:
composer require coderflexx/laravisit
You can publish the config file with:
php artisan vendor:publish --provider="Coderflex\\Laravisit\\LaravisitServiceProvider"
then, run database migration
This is the contents of the published config file:
return [
    /*
    |--------------------------------------------------------------------------
    | User Namespace
    |--------------------------------------------------------------------------
    |
    | This value informs Laravist which namespace you will be
    | selecting to get the user model instance
    | If this value equals to null, "\Coderflex\Laravisit\Models\User" will be used
    | by default.
    |
    */
    'user_namespace' => "\Coderflex\Laravisit\Models\User",
];
HasVisits TraitThe first thing you need to do is, to use HasVisits trait, and implement CanVisit interface.
namespace App\Models\Post;

use Coderflex\Laravisit\Concerns\CanVisit;
use Coderflex\Laravisit\Concerns\HasVisits;
use Illuminate\Database\Eloquent\Factories\HasFactory;
use Illuminate\Database\Eloquent\Model;

class Post extends Model implements CanVisit
{
    ...
    use HasFactory;
    use HasVisits;
    ...
}
After this step, you are reading to go, and when you need to track a page, do it like this:
You can chain methods to the visit method. Here is a list of the available methods:
| METHOD | SYNTAX | DESCRIPTION | EXAMPLE |
|---|---|---|---|
withIp() |
string $ip = null |
Set an Ip address (default request()->ip()) |
$post->visit()->withIp() |
withData() |
array $data |
Set custom data | $post->visit()->withData(['region' => 'USA']) |
withUser() |
Model $user = null |
Set a user model (default auth()->user()) |
$user->visit()->withUser() |
By default, you will have unique visits each day using dailyInterval() method. Meaning, when the users access the page multiple times in the day time frame, you will see just one record related to them.
If you want to log users access to page with different timeframes, here are a bunch of useful methods:
| METHOD | SYNTAX | DESCRIPTION | EXAMPLE |
|---|---|---|---|
hourlyInterval() |
void |
Log visits each hour | $post->visit()->hourlyIntervals()->withIp(); |
dailylyInterval() |
void |
Log visits each daily | $post->visit()->dailylyIntervals()->withIp(); |
weeklyInterval() |
void |
Log visits each week | $post->visit()->weeklyIntervals()->withIp(); |
monthlyInterval() |
void |
Log visits each month | $post->visit()->monthlyIntervals()->withIp(); |
yearlyInterval() |
void |
Log visits each year | $post->visit()->yearlyIntervals()->withIp(); |
customInterval() |
mixed $interval |
Log visits within a custom interval | $post->visit()->customInterval( now()->subYear() )->withIp(); |
After the visits get logged, you can retrieve the data by the following method:
| METHOD | SYNTAX | DESCRIPTION | EXAMPLE |
|---|---|---|---|
withTotalVisitCount() |
void |
get total visit count | Post::withTotalVisitCount()->first()->visit_count_total |
popularAllTime() |
void |
get popular visits all time | Post::popularAllTime()->get() |
popularToday() |
void |
get popular visits in the current day | Post::popularToday()->get() |
popularLastDays() |
int $days |
get popular visits last given days | Post::popularLastDays(10)->get() |
popularThisWeek() |
void |
get popular visits this week | Post::popularThisWeek()->get() |
popularLastWeek() |
void |
get popular visits last week | Post::popularLastWeek()->get() |
popularThisMonth() |
void |
get popular visits this month | Post::popularThisMonth()->get() |
popularLastMonth() |
void |
get popular visits last month | Post::popularLastMonth()->get() |
popularThisYear() |
void |
get popular visits this year | Post::popularThisYear()->get() |
popularLastYear() |
void |
get popular visits last year | Post::popularLastYear()->get() |
popularBetween() |
Carbon $from, Carbon $to |
get popular visits between custom two dates | Post::popularBetween(Carbon::createFromDate(2019, 1, 9), Carbon::createFromDat(2022, 1, 3))->get(); |
This package is coming with helpful decorate model properties, and it uses Laravel Presenter package under the hood.
| METHOD | SYNTAX | DESCRIPTION | EXAMPLE |
|---|---|---|---|
ip() |
void |
Get the associated IP from the model instance | $post->visits->first()->present()->ip |
user() |
void |
Get the associated User from the model instance | $post->visits->first()->present()->user->name |
Please see CHANGELOG for more information on what has changed recently.
Please see CONTRIBUTING for details.
Please review our security policy on how to report security vulnerabilities.
The MIT License (MIT). Please see License File for more information.
Laravel News Links
https://www.bacancytechnology.com/blog/wp-content/uploads/2022/01/Top-Laravel-Packages-min.jpg
Quick Summary:
The most popular PHP framework- Laravel becomes handicapped if you eliminate its crucial part- the best Laravel packages. Yeah, sure, I’m not here to eliminate or miss out on these precious gems from the framework. Rather, in this post, I’m going to amalgamate the top Laravel packages altogether in place for your easy access.
I’m sure you will bookmark this blog for your future references! Pin it now.
In a short span of time, Laravel has taken the PHP community by storm, and it hasn’t slowed down since its introduction. This is why Laravel does not need any introduction, as it is recognized as one of the fastest-growing backend frameworks.
I love this PHP-based framework more than any other framework as it makes the process of software development easier to implement modules, packages, plugins, and components.
I am writing this blog post to get you through the top Laravel packages to enhance your web application and performance.
Packages are one of the great ways to accelerate web application development and save your valuable time from the tedious task of writing the code from scratch. It can be freely reused anywhere in the code. Laravel has different-different kinds of packages; some of them standalone – Behat and Carbon are the best examples of such pages as they can be freely used with all the frameworks requesting COMPOSER.JS file.
In layman’s terms, Laravel Packages, also known as laravel plugins or bundles, are ready-to-use written scripts that you can plug and play into your application at your convenience.
Laravel’s packages deserve special attention because they minimize the code and improve the application’s maintainability.
The best Laravel packages can be divided into two main categories: Laravel specific packages and framework-independent packages. Laravel specific packages work exclusively with the Laravel framework, whereas framework-independent packages also work with other PHP-based frameworks.
Composer for Laravel is what NPM is to JavaScript. When installing the package or plugin, it’s a straightforward process- write a one-line code in the composer.json file, and your job is done because the composer automatically pulls its package from packagelist.org.
To install the Laravel package, the syntax for installing the command line goes like this;

composer require packageowner/packagename
Use the below command to fetch the updated package
php artisan update
To use the installed package, instantiate a new object
$package = new Package;
If the package is namespaced then;
$package = new PackageNamespace\Package;
To ensure validation at vendor/composer/autoload_* files. You can also ensure it from the main package source file.
vendor/vendorName/packageName/[src or lib or whatever]/Package.php
Buckle up your tech stack with the latest trending updates in Laravel!
Develop a low-maintenance, flexible & secure website in minimal costs and adorn it with 3rd party plugins. Hire Laravel Developer from us and pose at the demanding nerve of the market edge.
Let’s have a look at the best Laravel packages to optimize the performance of your Laravel application.

One of my favorites among the top Laravel packages is Debugbar that I mostly use to audit the code. It adds a dev toolbar to display exceptions, debug messages, routes, open views, and DB queries for the application. It will also show the rendered templates and parameters that you have passed.
Usage: Add using the Façade and PSR-3 levels
Debugbar::info($object);
Debugbar::error('Error!');
Debugbar::warning('Watch out…');
Debugbar::addMessage('Another message', 'mylabel');

And start/stop timing:
Debugbar::startMeasure('render','Time for rendering');
Debugbar::stopMeasure('render');
Debugbar::addMeasure('now', LARAVEL_START, microtime(true));
Debugbar::measure('My long operation', function() {
    // Do something…
});
Source: Github– 13.5k stars, 1.3k fork
This package comes in handy when it comes to adding role-based permissions to your Laravel 5 application. Entrust is divided into 4 different categories: Store role records, store permission records, store relations between roles and users and store various relations between roles and permission.
Concept

$admin = new Role();
$admin->name         = 'admin';
$admin->display_name = 'User Administrator'; // optional
$admin->description  = 'User is allowed to manage and edit other users'; // optional
$admin->save();
Next, assign them to the user.
$user = User::where('username', '=', 'michele')->first();

// role attach alias
$user->attachRole($admin); // parameter can be an Role object, array, or id

// or eloquent's original technique
$user->roles()->attach($admin->id); // id only
Add role-based permissions:
$createPost = new Permission();
$createPost->name         = 'create-post';
$createPost->display_name = 'Create Posts'; // optional
// Allow a user to...
$createPost->description  = 'create new blog posts'; // optional
$createPost->save();

$editUser = new Permission();
$editUser->name         = 'edit-user';
$editUser->display_name = 'Edit Users'; // optional
// Allow a user to...
$editUser->description  = 'edit existing users'; // optional
$editUser->save();

$admin->attachPermission($createPost);
// equivalent to $admin->perms()->sync(array($createPost->id));

$owner->attachPermissions(array($createPost, $editUser));
// equivalent to $owner->perms()->sync(array($createPost->id, $editUser->id))
Source: GitHub– 6.2k stars, 1.3k fork

I am pretty sure that you are familiar with the Laravel error tracking service. Sentry has its own Laravel integration. For any unexpected error, you will receive an email outlining what’s wrong with the ongoing app. To inspect the entire block of code and track group errors, it’s a convenient feature for the dashboard.
Source: GitHub– 1k stars, 149 forks

To manage the expectations and monitor the errors, it is another cross-platform tool. Just like the Sentry, it offers fully customizable filtering and reporting. Instead of email, you will receive notification through Slack and Pagerduty
Source: GitHub– 780 stars, 111 forks

One of the simplest and easiest ways to handle OAuth authentication. Where users can sign in with the help of the most popular social networks like Facebook, Gmail, Twitter, BigBucket, and GitHub.
redirect();
    }
    /**
     * Obtain the user information from GitHub.
     *
     * @return \Illuminate\Http\Response
     */
    public function handleProviderCallback()
    {
        $user = Socialite::driver('github')->user();
        // $user->token;
    }
}
Source: Laravel
GitHub: 5k stars, 807 forks

Laravel Mix is known as Laravel Elixir, widely used to create an interactive API for webpack-build steps for your project. This tool is commonly used for optimizing and compiling assets in Laravel application similar to the gulp and Grant.
GitHub: 4.9k stars, 796 forks
The purpose of this package is to provide a unique slug – a simplified version of string – that eliminates ampersands, accented letters, and spaces converting it into one case, and this package aims to make users happier with automatic and minimal configuration.
use Cviebrock\EloquentSluggable\Sluggable;

class Post extends Model
{
    use Sluggable;

    /**
     * Return the sluggable configuration array for this model.
     *
     * @return array
     */
    public function sluggable()
    {
        return [
            'slug' => [
                'source' => 'title'
            ]
        ];
    }
}
Source: GitHub– 3.3k stars, 424 forks
There’s an avalanche of Laravel Packages!
Only the expert Laravel developers will find out the best Laravel packages for your project. Get in touch with the best Laravel Development Company!

Laravel Heyman lets you validate, authenticate and authorize rest of your application’s code.
            ./tests/


            ./src
Source: GitHub– 768 stars, 37 forks

Charts is a PHP Laravel library to handle unlimited combinations of the charts. It is specifically designed to be loaded over AJAX and can be used without any external efforts. Laravel charts package makes use of simple API to create JS logic for your web application.
Installation:
composer require consoletvs/charts
Source: GitHub– 274 stars, 66 forks
Laravel form builder is inspired by Symfony’s form builder to create forms that can be easily modified and reused at our convenience. This package provides external support for Bootstrap3.
To install: Via Composer
composer require kris/laravel-form-builder
To use bootstrap 4
composer require ycs77/laravel-form-builder-bs4
Source: GitHub– 1.6k stars, 297 forks
The sole purpose of creating a Spatie package is to allow you to embed roles and permissions within your application. Setting up different roles and admin permission on various activities within your website or the application is essential, considering the security and viability. While you can do it manually, the Spatie Laravel Packages gives you the ease to push roles right from the database.
Installing the package
composer require spatie/laravel-permission
Push Migration
php artisan vendor:publish --provider="Spatie\Permission\PermissionServiceProvider" --tag="migrations"
Migrate to Database
PHP artisan migrate
Publishing Configuration Files
php artisan vendor:publish --provider="Spatie\Permission\PermissionServiceProvider" --tag="config"
Source: GitHub– 10k stars, 1.5k forks
Setting up a website and registering users, and you would need to have an email validation form embedded. The Laravel User Verification Package does the same. It is designed in a way that can store as well as handle validation tokens every time a user clicks for verification.
Installing the package
composer require jrean/laravel-user-verification
Edit the RegisterController.php file
public function register(Request $request)

{

   $this->validator($request->all())->validate();

   $user = $this->create($request->all());

   event(new Registered($user));

   $this->guard()->login($user);

   UserVerification::generate($user);

   UserVerification::send($user, 'My Custom E-mail Subject');

   return $this->registered($request, $user)

       ?: redirect($this->redirectPath());

}
Source: Github– 759 stars, 108 forks
Having multiple database tables isn’t something new. Instead, every website has two or more tables to store different forms of data. The Migration Generator Laravel Packages is one that allows you to initiate migrations from one table to another. These include foreign keys, indexes, and further allows you to make a pick of tables involved in the migration.
Installing the package
composer require –dev “kitloong/laravel-migrations-generator”
Source: Github– 871 stars, 107 forks
Create a robust backup of all your data files with this exclusive package, Laravel Back-up. Keeping in mind the need to have the data stored and backed up, developers have designed the Laravel Backup package that creates a zip file of the application along with the data stored within it. The package gives the flexibility to store them at any of the systems.
Installing the package
composer require spatie/laravel-backup
To take backup, execute the following command:
php artisan backup: run
Source: GitHub– 4.8k stars, 675 forks
The No Captcha Laravel Packages is designed, keeping in mind the need to avoid spamming activities. What the package does is implement the protection and validation of Google reCaptcha. The sole purpose here is to prevent all sorts of spamming and render the website error-free.
To initiate the package, you are first required to get access to the API key. This is available free from reCaptcha, and once obtained, you can then run the following.
Add the following in app/config/app.php
Anhskohbo\NoCaptcha\NoCaptchaServiceProvider::class,
'NoCaptcha' => Anhskohbo\NoCaptcha\Facades\NoCaptcha::class,
php artisan vendor:publish --provider="Anhskohbo\NoCaptcha\NoCaptchaServiceProvider"
Source: GitHub– 1.5k stars, 217 forks
If you have been accustomed to the concept of using traditional REST architecture, you will love the way Laravel’s GraphQL package behaves. Designed as the data query language, GraphQL makes it easier for developers to define their server structure and embed GraphQL within their apps.
Installing The GraphQL Package
composer require rebing/graphql-laravel
In case you are using Laravel 5.5 or above, the package would be detected automatically. However, for versions below 5.5, you need to add the following:
Rebing\GraphQL\GraphQLServiceProvider::class
and,
GraphQL' => 'Rebing\GraphQL\Support\Facades\GraphQL',
Publish and View The Configuration File:
$ php artisan vendor:publish --provider="Rebing\GraphQL\GraphQLServiceProvider"

config/graphql.php
Create Schemas For Designing The Endpoints of GraphQL
'schema' => 'default_schema',

'schemas' => [
    'default' => [
        'query' => [
            'example_query' => ExampleQuery::class,
        ],
        'mutation' => [
            'example_mutation'  => ExampleMutation::class,
        ],
    ],
    'user' => [
        'query' => [
            'profile' => App\GraphQL\Queries\ProfileQuery::class
        ],
        'mutation' => [

        ],
        'middleware' => ['auth'],
    ],
],
Source: GitHub– 1.7k stars, 221 forks
Tinker is exceptionally useful and one of the top Laravel packages that helps developers test and try certain features without actually writing a script. In other words, the package allows debugging in real-time. Suppose that you want to check a few records in the database or perform specific operations.
The Tinker Laravel Packages would enable you to test and debug on your browser screen in a matter of clicks. The Tinker Laravel plugin has Laravel framework embedded within and hence, eliminates the need to manually install the same when using it with your application.
app instanceof LaravelApplication && $this->app->runningInConsole()) {
            $this->publishes([$source => config_path('tinker.php')]);
        } elseif ($this->app instanceof LumenApplication) {
            $this->app->configure('tinker');
        }

        $this->mergeConfigFrom($source, 'tinker');
    }

    /**
     * Register the service provider.
     *
     * @return void
     */
    public function register()
    {
        $this->app->singleton('command.tinker', function () {
            return new TinkerCommand;
        });

        $this->commands(['command.tinker']);
    }

    /**
     * Get the services provided by the provider.
     *
     * @return array
     */
    public function provides()
    {
        return ['command.tinker'];
    }
}
Souce: GitHub– 7k stars, 105 forks
Intervention/Image is one Laravel Packages that allows developers to create, edit, and appealingly modify images. The package is open-source, and developers can use it as per their requirement. In order to install the said package, run the following:
composer require intervention/image
Source: GitHub– 12.3k stars, 1.4k forks
An easy to use package enabling one-click addition of emails within the Laravel application, Beautymail has a huge repository of inbuilt templates that can be used for sending emails. Developers have the freedom to create their own HTML template and use it along with Beautymail.
publishes([
            __DIR__.'/../../config/settings.php' => config_path('beautymail.php'),
        ], 'config');

        $this->publishes([
            __DIR__.'/../../../public' => public_path('vendor/beautymail'),
        ], 'public');

        $this->loadViewsFrom(__DIR__.'/../../views', 'beautymail');

        try {
            $this->app['mailer']->getSwiftMailer()->registerPlugin(new CssInlinerPlugin());
        } catch (\Exception $e) {
            \Log::debug('Skipped registering SwiftMailer plugin: CssInlinerPlugin.');
        }
    }
Source: GitHub– 995 stars, 173 forks
With Laravel, you can quickly push all your notifications to the standard slack Channel. However, with the onset of the Laravel Slack package, you now have the ease to simplify things the way you want them to be. The package allows you to send messages directly from the platform to different channels.
class HelloMessage extends SlackMessage
{
    public $content = "Hey bob, I'm a sending a custom SlackMessage";
    public $channel = '@bob';
}
\Slack::send(new SlackMessage());
If needed, a dummy can be created to test the feature and functionality of the package.
Source: GitHub– 275 stars, 35 forks
With this, we come to an end to the list of top packages for Laravel applications. It is seen that these top Laravel packages are extremely helpful in cutting down the time of development while enhancing the end to end productivity. So, if you are planning to optimize your applications or build a new one, the packages, as mentioned above, would be a great help to take into consideration.
If you are looking for the experts who can do the needful, then hire php developers from us as we are a globally renowned Laravel development company and have helped all the shapes and sizes of businesses to succeed in today’s digital world.
Go check out our helpful Laravel Tutorial page that depicts the expertise and community service of our dedicated Laravel Developers.
More than 500 Laravel packages are available on CodeCanyon.
Here are the step that you must follow to create a package in laravel:
1. Install the latest Laravel version
2. Create Folder Structure
3. Create Composer File
4. Load Package from the Main Composer.JSON File
5. Create service Provider for Package
6. Create Migration
7. Create Model for the Table
8. Create Controller
9. Create Routes File
10. Create Views
11. Update Service Provider to Load the Package
12. Updating Composer File
Compared to the other PhP frameworks, Laravel has the best ORM (object-relational mapper). Interaction with Database objects and relationships is easy using this ORM with the help of expressive syntax. Laravel comes with the inbuilt Blade Template Engine.
A middleware helps you to inspect and filter HTTP requests that come through your application. For an instance, Laravel includes a middleware that verifies user authentication of your Laravel app. The middleware is located in the directory: app/Http/Middleware.
Laravel includes built-in authentication and session services which are typically accessed via the Auth and Session. The web browser-initiated requests are supported by cookie-based authentication. You can verify the authenticity of a user and their credentials.
Laravel News Links
https://s3files.core77.com/blog/images/1241349_81_112490_b5iDkvhSL.jpg
Fourteen years ago, we covered a brilliantly-designed pair of eyeglasses with water-filled lenses. Created for users in developing nations by British inventor and Oxford professor Joshua Silver, the glasses obviate the need for opticians (who are in short supply in poor countries), as the user can tune their own prescription.

The way the glasses work is, a water-filled syringe is temporarily mounted on each stem and plugged into the lenses:

The user rotates the syringes back and forth, which adjusts the amount of water within each lens, until they can see perfectly.


Once the user’s got their prescription dialed in, the syringes are removed, and the user’s got 20-20.


It looks pretty cool in action:
<pundefined< em="">
Today Silver runs an organization called the Centre for Vision in the Developing World, which has provided 100,000 pairs of his adaptive glasses to people in over 30 countries. They reckon they will have to multiply that a bit, as "More than 2 billion people in the world today need glasses but don’t have them." They also cite that "100 million school-aged children cannot read the blackboard in class."
CVDW ran a crowdfunding campaign in 2017 to raise the funds to distribute 50,000 pairs of glasses to children in developing nations. The funding target was $67,971, but they wound up with a paltry $4,671–just 6% of their goal.

According to CBC Radio, the adaptable glasses cost just $1 to produce. So I’m wondering:
Might a retooled campaign succeed if they appealed to people’s selfishness, rather than just the ability to donate? What if it was "Buy a pair for yourself, pay enough to send some multiple of pairs to children"?
For instance, I would happily buy a pair of these glasses to use as reading glasses at home or in my shop, where I need to wear a different prescription in order to do woodworking, and I’d pay for an extra 50 or 100 pairs to send to the countries that need it. (I might even leave the syringes on, to fine-tune for detailed work.)
Similarly, I bet you could get people to pay anywhere from $20 to $100 for a pair of these to use as a backup/emergency set of eyeglasses. Target disaster preppers.
I personally wouldn’t wear these out in public, for fear of drawing attention (I’m a minority and I live in a rural area where let’s just say, there is no one who looks like me). But if you could give these glasses a hash-taggable name and get Kanye to wear a pair, perhaps people more carefree in their appearance would find them hip enough to wear outside of the house, and buy themselves a pair and pay for many multiples.

I do hope that Silver re-tools the campaign and re-launches it at some point.
Speaking of crowdfunding, don’t forget that this week Craighton Berman, serial crowdfund-ee, is giving a free crash course in how designers can tackle it. It’s on Wednesday, Feb. 23rd at 2pm EST and you can sign up here. Professor Silver, if by some chance you’re reading this, do tune in–I can guarantee the information will be worth your time, and your invention is too good to not fulfill its ambition.
Core77
https://assets.amuniversal.com/6f3b3250558e013a91c0005056a9545d
Dilbert Daily Strip