American culinary traditions are not very well-regarded throughout much of the world—we’re mostly known for things like ketchup and chicken nuggets, not exactly a Michelin-star lineup.
http://img.youtube.com/vi/m4CcU6GK6I8/0.jpgThere are features in the framework that allow setting something globally, and that is potentially harmful to future developers. I’ve picked 4 of them, would you add more?Laravel News Links
BIRMINGHAM, AL—According to sources, local dad Dave Manheart recently completed a project that will help enable his family to save money on groceries. After much research and 10 weekends of hard labor, Dave has succeeded in constructing a backyard chicken coop. With a small investment of just $3000 on lumber and supplies, he now can get 16¢ eggs for free.
“With the supply chain issues and inflation, it’s important to be independent,” said Manheart. “Plus, this new chicken coop will look really great on my wife’s Instagram feed, which is what this whole thing is really about.”
Local witnesses described Manheart’s pride in the newly constructed chicken coop as “really cute.” His wife assured reporters that they will enjoy eating ten eggs a day since they are free.
After leveling a spot in the backyard with a backhoe Dave rented for just $500, putting together the coop was fairly easy and only resulted in two trips to the emergency room with accidental injuries. “Dave says his back will be fine now that he’s no longer lifting lumber, and the doctors had no problem re-attaching his finger,” said his appreciative wife Deb.
“Daddy bought the cutest little baby chicks!” said his little girl. “But then our dog Buster ate them so we had to get new chicks.” The dog now has an $800 invisible fence to keep him away from the chicken coop.
“That was totally worth it,” said Dave as he proudly surveyed his handiwork.
At the time of publication, the homeowners association had issued a fine of $500 for the unapproved chicken coop.
A Babylon Bee subscriber contributed to this report. If you want to get involved with the staff writers at The Babylon Bee, check out our membership options here!
Watch as this Joe Rogan fan fruitlessly tries to get Alexa to play the Joe Rogan Experience.
It’s a good thing the media and former Vice President Joe Biden haven’t gotten their way when it comes to snatching everyone’s guns away. If this mother hadn’t had a pistol to ward off this criminal, there’s no telling what might have transpired.
Charise Taylor of New Orleans, mother and United States Air Force veteran, was driving to pick her husband up on Friday when she became stuck in gridlocked traffic. A man rushed up to the door and began to aggressively attempt to pull open her passenger side door. With her 2-year-old son in the car with her, she had to act fast. So she pulled out her handgun and pointed it at the man.
‘It’s locked and loaded’: Mother, Iraq veteran pulls gun on man trying to get into car
She says she told him, “It’s locked and loaded,” threatening the man as he tried to gain access to the vehicle. She didn’t have to fire. Like most crooks, they aren’t exactly the bravest of people, and when confronted with their own mortality, they often take off with their tails between their legs.
Taylor says, “You shouldn’t have to navigate your own city like a war zone. It’s un-American. The crime is out of control and it’s terrifying. At this point, having to use the same tactics in an American city that you use in Iraq and Afghanistan simply to navigate through the city it’s scary and I’m not the only mom feeling this way.”
As a fellow Iraq War veteran, I wish I could use an M240B mounted on my truck. I bet it would prevent a lot of this kind of stuff from happening, especially seeing as how police in some liberal cities have all but given up trying to control the rampant crime.
While using editors like CKEditor, it’s quite easy to miss the protection from XSS vulnerability, because editors save the code in HTML. How to deal with that? A few tips from me.Laravel News Links
October 14, 2025, marks the end of support and security updates for the Home and Pro versions of Windows 10. That means it’s also the end of official guaranteed feature and security updates for Windows PCs that don’t meet Windows 11’s hardware requirements.
Viewed from early 2022, that date is still comfortably far off. Lots of Windows 10 PCs will break over the next 3.5 years, and plenty of people who actually want to upgrade to nicer or faster hardware will have opportunities to do so. But as someone who enjoys repairing, maintaining, and upgrading older hardware to keep it useful, we’ll be peering over the edge of that Windows 10 update cliff before we know it.
The question is: what happens to that hardware when Windows 10 goes away? Running Windows 11 on unsupported hardware is one possible solution, but we have no idea for how long Microsoft will actually allow installing, running, and updating Windows 11 on older PCs; the company could cut off these computers’ security updates tomorrow, or it could allow them to run the new OS indefinitely, and that uncertainty is hard to plan around.
A Linux distribution is another option, particularly the more user-friendly distributions like Ubuntu, Mint, or Elementary OS. But “user-friendly” is relative, and any Linux distribution can have parts that are obtuse and difficult for newcomers to learn. And, let’s face it, if a Linux distribution was going to truly compete with and succeed against Windows on consumer desktops and laptops, it probably would have by now.
Enter ChromeOS Flex, a Google-blessed and Google-supported version of its lightweight Linux operating system that will run on most standard PC hardware. It’s a successor to CloudReady, a ChromiumOS-based product that Google purchased in late 2020 and that we’ve covered since its very early days as a way to make aging PCs into ersatz Chromebooks.
ChromeOS (also Linux-based, but mostly trying to hide it) has managed to find a toehold in the Windows-and-macOS-dominated world of consumer PCs thanks in part to its simplicity, the backing of a large and well-resourced company, and easy-to-use management tools for schools and businesses. And with Flex, Google is offering those organizations the opportunity to switch their Windows laptop fleets to ChromeOS fleets virtually overnight, while also offering users of aging PCs an alternative OS to try.
We’ve downloaded and installed the first developer version of ChromeOS Flex and read through all of its documentation to figure out the kind of hardware it will run on and how it’s different from the CloudReady operating system it’s replacing.
Beware: Beta
Enlarge/ The same tool you use to make ChromeOS recovery media will also make ChromeOS Flex media. And this one USB drive can cover all PCs.
Andrew Cunningham
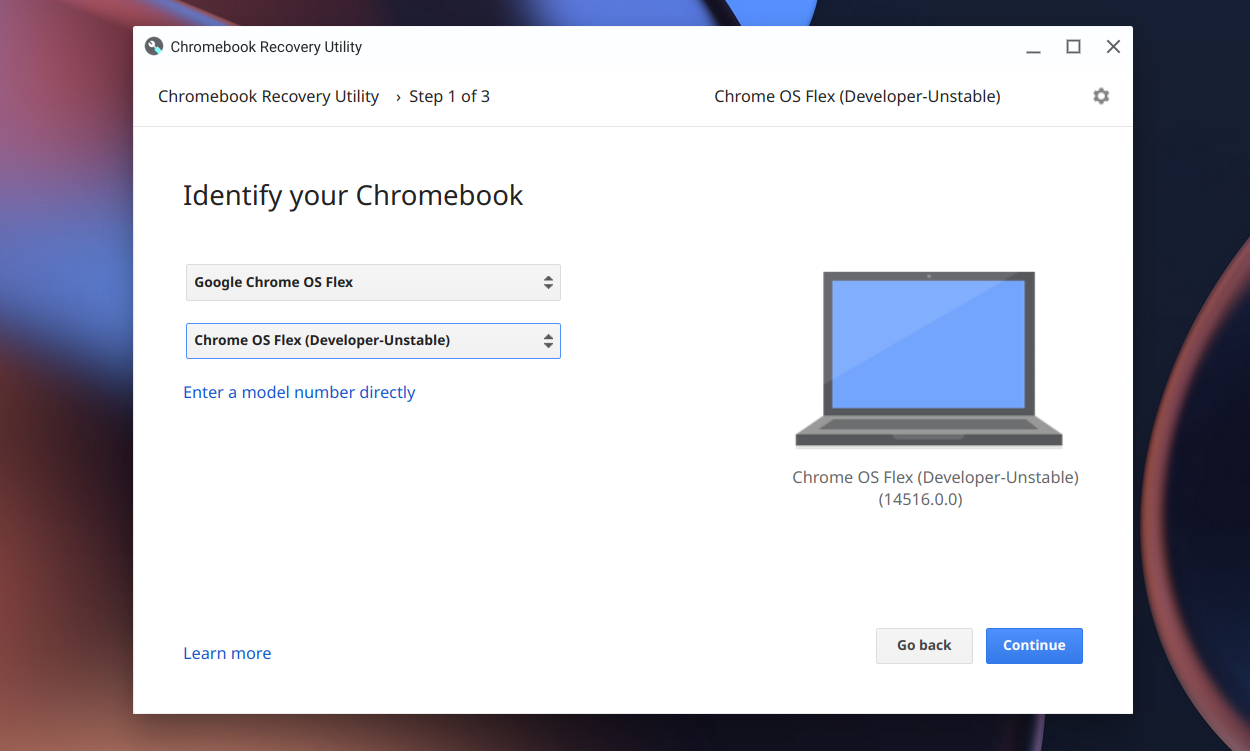
You’ll find ChromeOS Flex listed among all the “real” Chrome hardware in the official Chromebook Recovery Utility. Select ChromeOS Flex as your device manufacturer and the dev channel build of Flex will show up. There’s no need to download different images for different devices or CPU types. The installation documentation is pretty clear and has lots of details if you need them.
The dev channel build of Flex, based on ChromeOS version 100, is clearly a pretty early version of the operating system. It’s still labeled as “CloudReady” in more than one place, and Google’s list of certified models is filled with reminders to expect minor or major issues. As with CloudReady, it’s possible to run ChromeOS Flex entirely from the USB install drive if you want to try the OS without formatting your internal storage, and that’s what we’d recommend for now.
System requirements and “supported hardware”
At a very bare minimum, ChromeOS Flex doesn’t need much to install and boot, especially compared to Windows 11:
A 64-bit x86 processor (ARM isn’t supported, nor are 32-bit CPUs)
4GB of RAM
16GB of internal storage
USB booting support and full administrator access to the BIOS
Google does note that “components made before 2010 might result in a poor experience.” And if you’re trying to install the OS on an old Intel Atom PC, you might also be out of luck—Intel’s GMA 500, 600, 3600, and 3650 integrated GPUs “do not meet Chrome OS Flex performance standards.” Broadly, though, if a PC runs the 64-bit version of Windows 10 reasonably well, then it should at least boot and run.
To get the best, most Chromebook-like experience—and to be eligible for Google-provided software and hardware support—Google will maintain a list of certified hardware models that it will individually test, troubleshoot, and optimize for. Google’s list of certified models looks pretty similar to Neverware’s list of certified models for CloudReady, which means that it’s heavily weighted in favor of business laptops and desktops. But it includes hardware going all the way back to first-generation Intel Core PCs (and even a handful of Core 2 Duo models), which casts a pretty wide net. Unlike Neverware, Google hasn’t published end-of-support dates for any of these models. But assuming it continues to use Neverware’s timeline, most certified models can expect software support for 13 or 14 years after they were originally introduced.
Google doesn’t require either Secure Boot support or a TPM to install or run ChromeOS Flex, but it recommends that you enable both on PCs that support them. Without the Google-sanctioned security hardware, ChromeOS Flex PCs don’t support ChromeOS’s Verified Boot feature, but enabling Secure Boot “maintain[s] the same boot security as Windows devices.” And having an enabled and working TPM 1.2 or 2.0 module allows for more secure device encryption and support for hardware-backed certificates, among other things. If you’re switching to ChromeOS Flex from Windows, you may need to clear your TPM and then re-enable it so that ChromeOS can use it.
For testing, I used many of the same aging PCs that I used when testing Windows 11 on unsupported hardware. I had the best experience on the newest of those PCs, a 2016-era Dell Latitude 3379 two-in-one with a Core i3-6100U and 8GB of RAM. But Flex also installed and ran OK on an older Windows 7-era HP Pavilion dv5 with a Core i3-540 and 4GB of RAM, albeit with some graphical artifacts and no audio coming out of the speakers (admittedly, this laptop is nowhere on the certified hardware list, though a few other systems of the same vintage are listed).
Hardware limitations
Even assuming that you’re running it on certified hardware, Google has a list of PC features that Flex won’t support and hardware functionality that it isn’t guaranteeing. This includes biometric login devices like fingerprint scanners and IR cameras, SD card readers, display outputs, optical drives, FireWire and Thunderbolt ports (though Thunderbolt 3 and 4 ports should work fine in USB-C mode), and stylus and pen input. External Wi-Fi dongles “often work,” but Google isn’t testing them specifically.
Google also says that boot speed, power-saving features, and battery life might be affected when you install ChromeOS Flex, even on fully certified models. This is par for the course for Linux running on most PCs or Macs, which generally works fine but can reduce battery life because the software hasn’t been optimized for the particular hardware you’re running it on.
Before you take your sluggish old computer down to the e-waste disposal site, try bringing it back to usefulness by installing a Chrome operating system. Google has opened the downloading gates to Chrome OS Flex, a new iteration of its versatile OS, and it might be the perfect solution if your older Mac or PC is having trouble swallowing updates to its native operating system.
Flex is designed to modernize older computers by installing a leaner, cloud-focused OS. While it doesn’t have all of Chrome’s features, Google promises it will basically make your Mac or PC look and feel like a Chromebook running Chrome OS.
Google says Chrome OS Flex will provide a “fast, modern work experience from anywhere” that will make your gear boot faster, access VDI (virtual desktop interface) and web apps quickly, and prevent it from slowing down over time. Plus, it’s free.
While overhauling your computer with Chrome OS isn’t a new hack—CloudReady came out in 2015—Flex OS provides more flexibility that warlier options by offering dual-booting, allowing users to easily switch between operating systems with a simple restart.
Before you install Chrome OS Flex, know that it is in early access mode, so there could be bugs/instability. Also, it won’t do everything Chrome OS does—some features are dependent on the hardware you’re using to run the OS, and Google Play and Android apps aren’t supported at all. (Here’s Google’s list of the differences between Chrome and Chrome OS Flex if you need more details.)
How to install Google OS Flex on your laptop or desktop
Read (and follow) the instructions for creating a Chrome OS Flex USB boot stick.
Reboot your computer with Chrome OS Flex USB inserted.
Enjoy your Chrome-based computer.
I tried this out, and installation was as easy as promised. I offer you the above photographic proof that my 12 year-old iMac is now an iChromeFlexMac (or something.)