https://packalyst.com/assets/img/logo.pngA Laravel theme manager, that will help you organize and maintain your themes inside Laravel projects.Packalyst :: Latest Packages
MariaDB Developer – Income and Opportunity
https://blog.finxter.com/wp-content/uploads/2022/02/image-49.png
Annual Income
The average annual income of a MariaDB Developer is $85,000 according to Payscale (source).
Hourly Rate
If you decide to go the route as a freelance MariaDB Developer, you can expect to make between $20 and $99 per hour on Upwork (source). Assuming an annual workload of 2000 hours, you can expect to make between $40,000 and $198,000.

 Note: Do you want to create your own thriving coding business online? Feel free to check out our freelance developer course — the world’s #1 best-selling freelance developer course that specifically shows you how to succeed on Upwork and Fiverr!
Industry Demand
But is there enough demand? Let’s have a look at Google trends to find out how interest evolves over time (source):

Work Description
So, you may wonder: MariaDB Developer – what’s the definition?
MariaDB Developer Definition: MariaDB is a database framework focusing on relational databases that are compatible with Oracle. MariaDB developers provide value to clients by integrating their applications with new or existing MariaDB databases. (Source)
Learning Path, Skills, and Education Requirements
Do you want to become a MariaDB Developer? Here’s a learning path I’d propose in three steps to get started:
- Step 1: Introduction to Computer Science (~40 hours)
- Step 2: Introduction to Databases (~20 hours)
- Step 3: Introduction to MariaDB (~10 hours)
You can find many courses on the Finxter Computer Science Academy (flatrate model).
But don’t wait too long to acquire practical experience!
Even if you have little skills, it’s best to get started as a freelance developer and learn as you work on real projects for clients — earning income as you learn and gaining motivation through real-world feedback.
 Tip: An excellent start to turbo-charge your freelancing career (earning more in less time) is our Finxter Freelancer Course. The goal of the course is to pay for itself!
Related Video
Related Income of Professional Developers
The following statistic shows the self-reported income from 9,649 US-based professional developers (source).
 The average annual income of professional developers in the US is between $70,000 and $177,500 for various programming languages.
Question: What is your current total compensation (salary, bonuses, and perks, before taxes and deductions)? Please enter a whole number in the box below, without any punctuation. If you are paid hourly, please estimate an equivalent weekly, monthly, or yearly salary. (source)
The following statistic compares the self-reported income from 46,693 professional programmers as conducted by StackOverflow.
The average annual income of professional developers worldwide (US and non-US) is between $33,000 and $95,000 for various programming languages.
Here’s a screenshot of a more detailed overview of each programming language considered in the report:

Here’s what different database professionals earn:

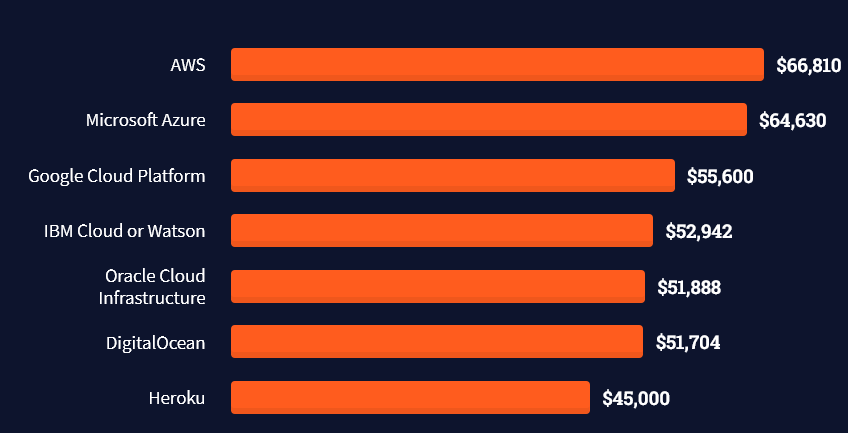
Here’s an overview of different cloud solutions experts:
Here’s what professionals in web frameworks earn:

There are many other interesting frameworks—that pay well!

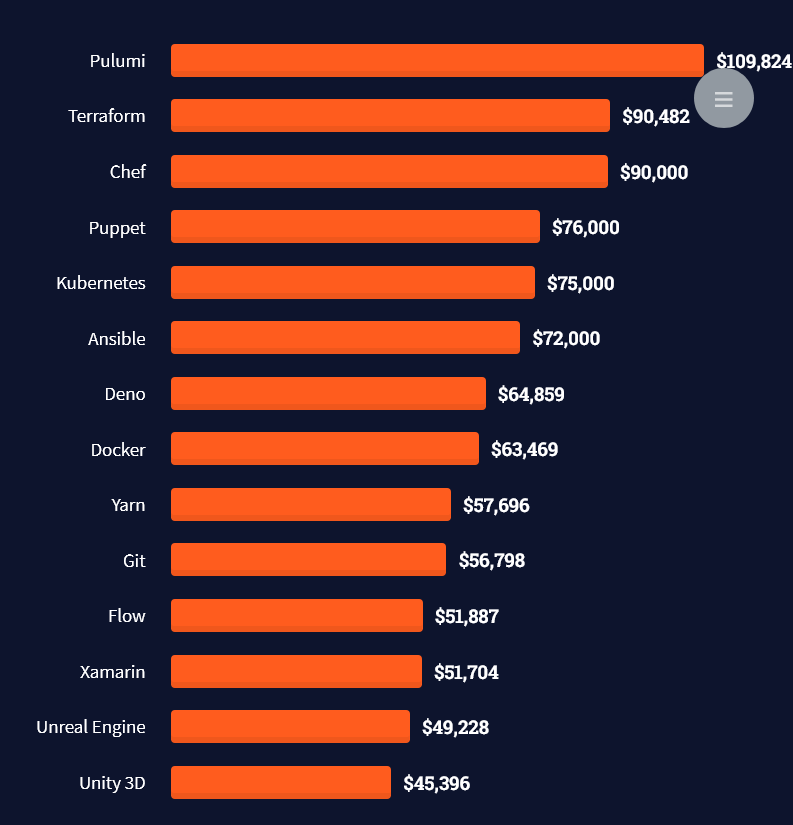
Look at those tools:
Okay, but what do you need to do to get there? What are the skill requirements and qualifications to make you become a professional developer in the area you desire?
Let’s find out next!
General Qualifications of Professionals
StackOverflow performs an annual survey asking professionals, coders, developers, researchers, and engineers various questions about their background and job satisfaction on their website.
Interestingly, when aggregating the data of the developers’ educational background, a good three quarters have an academic background.
Here’s the question asked by StackOverflow (source):
Which of the following best describes the highest level of formal education that you’ve completed?

However, if you don’t have a formal degree, don’t fear! Many of the respondents with degrees don’t have a degree in their field—so it may not be of much value for their coding careers anyways.
Also, about one out of four don’t have a formal degree and still succeeds in their field! You certainly don’t need a degree if you’re committed to your own success!
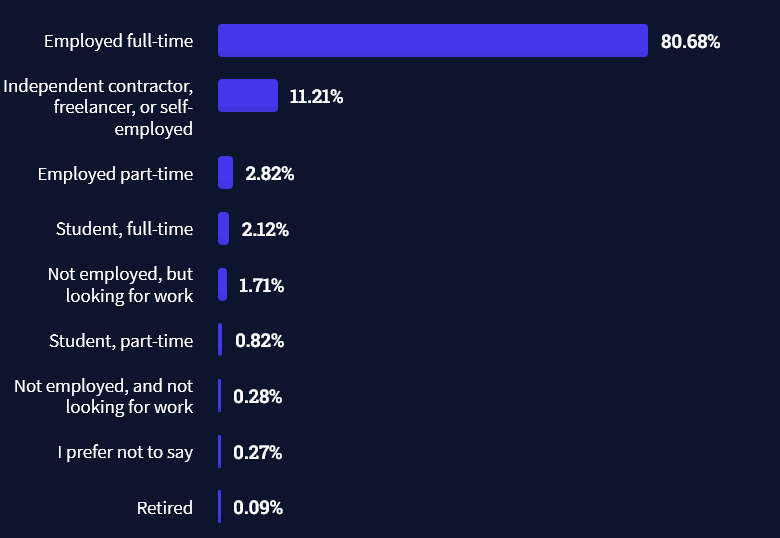
Freelancing vs Employment Status
The percentage of freelance developers increases steadily. The fraction of freelance developers has already reached 11.21%!
This indicates that more and more work will be done in a more flexible work environment—and fewer and fewer companies and clients want to hire inflexible talent.
Here are the stats from the StackOverflow developer survey (source):
Do you want to become a professional freelance developer and earn some money on the side or as your primary source of income?
Resource: Check out our freelance developer course—it’s the best freelance developer course in the world with the highest student success rate in the industry!
Other Programming Languages Used by Professional Developers
The StackOverflow developer survey collected 58000 responses about the following question (source):
Which programming, scripting, and markup languages have you done extensive development work in over the past year, and which do you want to work in over the next year?
These are the languages you want to focus on when starting out as a coder:

And don’t worry—if you feel stuck or struggle with a nasty bug. We all go through it. Here’s what SO survey respondents and professional developers do when they’re stuck:
What do you do when you get stuck on a problem? Select all that apply. (source)

Related Tutorials
To get started with some of the fundamentals and industry concepts, feel free to check out these articles:
- Freelance Developer – How to Code From Home and Earn Six Figures [Industry Report]
- How to Become a Python Freelancer—and Earn $1,000 on the Side? [A Step-by-Step Tutorial]
- How Adam Earns $5000 per Month as a Python Freelancer on Upwork [Month 4]
- MariaDB Wikipedia
- Learn MariaDB Google
- MariaDB official website with tutorials
Where to Go From Here?
Enough theory. Let’s get some practice!
Coders get paid six figures and more because they can solve problems more effectively using machine intelligence and automation. To become more successful in coding, solve more real problems for real people. That’s how you polish the skills you really need in practice. After all, what’s the use of learning theory that nobody ever needs?
You build high-value coding skills by working on practical coding projects!
Do you want to stop learning with toy projects and focus on practical code projects that earn you money and solve real problems for people?
If your answer is YES!, consider becoming a Python freelance developer! It’s the best way of approaching the task of improving your Python skills—even if you are a complete beginner.
Join my free webinar “How to Build Your High-Income Skill Python” and watch how I grew my coding business online and how you can, too—from the comfort of your own home.
Finxter
Laravel 9 is Now Released!
https://laravelnews.imgix.net/images/laravel9.png?ixlib=php-3.3.1
Laravel 9 is now released and includes many new features, including a minimum PHP v8.0 version, controller route groups, a refreshed default Ignition error page, Laravel Scout database engine, Symfony mailer integration, Flysystem 3.x, Improved Eloquent accessors/mutators, and many more features.
Before we jump into the new features, we’d like to point out that starting with Laravel 9, Laravel will release a new major version about every twelve months instead of the previous six-month schedule:
Laravel uses a variety of community-driven packages as well as nine Symfony components for a number of features within the framework. Symfony 6.0 is due for release in November. For that reason, we are choosing to delay the Laravel 9.0 release until 2022.
By delaying the release, we can upgrade our underlying Symfony components to Symfony 6.0 without being forced to wait until September 2022 to perform this upgrade. In addition, this better positions us for future releases as our yearly releases will always take place two months after Symfony’s releases.
From the releases support policy documentation, here’s what you can expect going forward with tentative dates of upcoming releases:
| Version | PHP (*) | Release | Bug Fixes Until | Security Fixes Until |
|---|---|---|---|---|
| 6 (LTS) | 7.2 – 8.0 | September 3rd, 2019 | January 25th, 2022 | September 6th, 2022 |
| 7 | 7.2 – 8.0 | March 3rd, 2020 | October 6th, 2020 | March 3rd, 2021 |
| 8 | 7.3 – 8.1 | September 8th, 2020 | July 26th, 2022 | January 24th, 2023 |
| 9 (LTS) | 8.0 – 8.1 | February 8th, 2022 | February 8th, 2024 | February 8th, 2025 |
| 10 | 8.0 – 8.1 | February 7th, 2023 | August 7th, 2024 | February 7th, 2025 |
Laravel 9 is the next long-term support version (LTS) and will receive bug fixes until February 2024 and security fixes until February 2025. Here are some of the major features that we’ve covered in detail in our A look at what is coming to Laravel 9 post:
- PHP 8 is the minimum version in Laravel 9
- New Design for routes:list
- New test
--coverageoption displays coverage directly in the terminal - Anonymous Stub Migrations are now the default
- New Query Builder Interface
- PHP 8 String Functions
- Moved mailer functionality from SwiftMailer to Symfony Mailer
- Flysystem 3.x
- Improved Eloquent Accessors/Mutators
- Implicit Route Bindings With Enums (PHP 8.1)
- Controller Route Groups
- Enum Eloquent Attribute Casting
- Forced Scoped Bindings
- Laravel Breeze API & Next.js
- Laravel Scout Database Engine
- Full-Text Indexes / Where Clauses
- Rendering Inline Blade Templates
- Soketi Echo Server
- Optional Bootstrap 5 Pagination Views
- Improved Ignition Exception Page
- New
str()andto_route()helper functions
Find out more about Laravel 9.x
These are just a few of the new features in Laravel 9 and to see a complete list check out the Laravel 9 release notes as well as the upgrade guide. Also, don’t forget about Laravel Shift if you want an easy way of updating.
If you prefer video format, check out Laracasts: What’s New in Laravel 9 also has free videos about this release.
Finally, we’d like to thank everyone who contributes, submits PR’s, shares ideas, and uses the framework. Laravel is genuinely a global team effort.
Laravel News
CalDigit’s TS4 Thunderbolt 4 Dock offers 18 ports for your Mac
https://photos5.appleinsider.com/gallery/46904-91425-caldigit-ts4-xl.jpg
The CalDigit TS4 dock can add a lot of connectivity to a Mac with its 18-ports, as well as being able to recharge a MacBook Pro with 98W of power delivery.
Launched on Tuesday, the latest addition to CalDigit’s Thunderbolt Station lineup follows up from its predecessor, the TS3 Plus. While the TS4 reuses the same boxy dock shape, it does so while also providing a lot more utility.
The TS4 has a total of 18 ports and slots, starting with a trio of Thunderbolt 4 and USB 4 connections at the back, up from two on the previous model. The Thunderbolt 4 port destined for the host offers up to 98W of power delivery, while the other two can go up to 15W.
The back also includes four USB-A 3.2 Gen 2 ports, a USB-C 3.2 Gen 2 connection, DisplayPort 1.4, a pair of audio ports, 2.5GbE Ethernet, and a security slot, as well as power.
Around the front are two USB-C 3.2 Gen 2 ports, with one having 7.5W of power and the other with 20W. There’s an additional USB-A 3.2 Gen 2 port, an audio combo jack, a microSD UHD-II card slot, and an SD UHS-II card slot.
In terms of video support, the dock can handle a pair of dual 6K 60Hz monitors on the 14-inch MacBook Pro and 16-inch MacBook Pro using the M1 Pro or M1 Max. With the exception of the Mac mini, earlier M1 MacBooks don’t support dual displays, but can still use the dock to connect a single 6K 60Hz display.
The CalDigit TS4 is available in the U.S., U.K., and EU stores today, priced at $359.95, with global availability expected in mid-March.
AppleInsider News
How to Start Your Own Business While Working a Full-Time Job
https://static1.makeuseofimages.com/wordpress/wp-content/uploads/2022/01/Side-Business-Concepts-Featured-Image.jpeg
More people, including those doing a nine-to-five job, are becoming interested in entrepreneurship. If you are currently employed and want to start your own business, quitting your job is not a good idea.
Instead, it’s better to start the business while already having a job. Go through this article to know how to kickstart a business while working as an employee.
1. Identify Your Desire for It
Do you really want to start your own business, or is it just a momentary fling? Before you even consider starting a business seriously, make sure you know whether you really want to be in this venture.
Being an entrepreneur means becoming responsible for all the tough decisions. Write down all the activities you need to do as a business owner and the time you need to invest. Also, consider the sacrifices you have to make and see if the business is worth it or not.
2. Go for a Suitable and Legal Business Idea
Starting a business while being employed by another company involves added risk. Go through the NDA, terms and conditions, or any other employment document that has your signature in it to check if you’re allowed to be part of a side business during full-time employment.
Even if the document does not mention any such restrictions, it’s better not to start a business that might have a conflict of interest with the present job.
MAKEUSEOF VIDEO OF THE DAY
To be on the safe side legally, you can hire a lawyer from the platform online Legably to take care of your legal issues.
3. Assess Your Skill and Drawback
When you think of a business idea, you should also discover your strengths and weaknesses. Choose a business where you can leverage your skills and won’t need to utilize your weak points.
Use the SWOT analysis app to find out your strength, weakness, opportunities, and threats in one place.
Related: The Best SWOT Analysis Apps for Project Planning
Hopefully, you have some skills necessary to make your preferred business happen. If you don’t, identify the skills and learn them through courses.
4. Set Measurable and Realistic Goals
Before starting a business, you must know what you want to achieve. If you don’t have realistic and attainable goals for your business, you’ll have difficulty becoming successful.
Select short-term and long-term objectives and work to attain them, depending on your business type. Way of Life is an app that helps select relevant, attainable, and specific goals for your business.
5. Consider the Business Cost
When you want to become a business owner as a full-time employee of another company, choosing a business that does not need financial investment upfront is a safe decision. It’ll safeguard you from financial losses even if the business doesn’t go as expected.
While any business may fail, capital-intensive businesses have a higher chance of failure. Businesses you’re about to start as a side-hustle should not need an office, storefront, inventory, employees, or costly equipment.
6. Save Initial Incomes From the Business
When you start getting profit from your business, don’t be foolish enough to spend that or think it’s time to quit your office job. Try to save most of the money you get from your business.
You can invest it later to grow your business, or spend it when you make this business your primary occupation after leaving your job. Using the personal finance app Mint, you can keep track of your income and expenditure.
7. Don’t Blur the Line Between Work and Business
While you’re doing a job and a business side-by-side, remember that both are your responsibilities. At the same time, draw a clear line between these two professions. Never work on your own business during office hours or use the company system or any other resources.
Related: How to Balance Freelance Work With Your Full-Time Job: Tips
Also, learn to say no whenever necessary. Don’t accept every opportunity that you get along the way. Choose your clients carefully, so it does not hamper your office job.
How to Find Time for Your Business Besides the Full-Time Job
Being employed in a nine-to-five job means you’re investing a minimum of 40 hours of a week in your office work. It indicates you’re already juggling your personal and professional tasks. If you want to start a business on top of these, it’s crucial to know how to find the time for it.
1. Audit Schedule to Locate Free Time Windows
Before starting a business, take a good look at your current daily schedule and find out when you are free from professional and personal responsibilities. You can use Google Calendar to list down the time you need to invest for the day job and your family.
Once you can locate the free time windows, consider your energy level at that time. Don’t schedule a business immediately after coming from work; instead, plan it after a break.
2. Choose a Side Business Based on Available Time
Now that you have a clear idea about your available time for side-business, choose a feasible business model as per the available time. If you have less time to offer your business, select a business model with a low time commitment.
If you have more free time, you might opt for a business where you need to invest a significant amount of time every week.
3. Utilize the Time You Commute and Weekends
If your job involves a long commute, why don’t you use that time for your business? Instead of sitting idly during your journey, you can outline a blog post you’re planning to write next using Microsoft OneNote.
If you drive to and from your office, spend the time listening to an educational podcast or voice notes left by your client. Weekends are also a good time to work on your business. You can relax on Friday nights and wisely spend your Saturdays and Sundays for business purposes.
Become an Entrepreneur Today
Every business comes with certain risk factors. If you’re already doing a day job, it’s better to start your own business side-by-side. By following the tips mentioned in this article, you can easily start your business initiative and find time for that.
Furthermore, you can create the logo for your business using free online logo makers without any cost.
The 8 Best Free Online Logo Makers That Anyone Can Use
Need a logo to represent your brand? Check out these free online logo makers.
Read Next
About The Author
Tamal Das
(318 Articles Published)
Tamal is a freelance writer at MakeUseOf. After gaining substantial experience in technology, finance, and business processes in his previous job in an IT consulting company, he adopted writing as a full-time profession 3 years ago. While not writing about productivity and the latest tech news, he loves to play Splinter Cell and binge-watch Netflix/ Prime Video.
MUO – Feed
Seattle VC says this startup is the ‘fastest growing company I’ve seen’ in 23 years of investing
https://cdn.geekwire.com/wp-content/uploads/2022/02/CarbonRobotics_2022LaserWeeder_poster-16×9-basic-whitebg.jpg

Weeds may be a fast-growing headache for farmers, but a startup building machinery powered by artificial intelligence to zap them is growing pretty quickly, too.
Seattle-based Carbon Robotics unveiled its latest piece of agtech equipment on Monday, the 2022 LaserWeeder, a robotic implement that can be pulled behind a tractor and uses computer vision and AI to quickly identify and target weeds in fields, and thermal energy to eliminate them.
“Carbon is the fastest growing company I’ve seen in 23 years of VC,” Erik Benson, managing director of Voyager Capital in Seattle, told GeekWire. “This is a future $50 billion company.”
Founded in 2018, Carbon is led by Isilon Systems co-founder Paul Mikesell, who sold Isilon for $2.25 billion in 2010 and spent time at Uber and Facebook before heading for the farm.
The company took in $27 million in a funding round last September, and has raised $36 million to date.
Voyager Capital, Anthos Capital, Ignition Capital and Fuse are among those who invested in the company.
Carbon Robotics employs 35 people and plans to grow to 50 this year.
The updated LaserWeeder uses 30 industrial CO2 lasers, more than three times the amount in the company’s previous self-driving Autonomous LaserWeeder, which was released in April 2021. The new machine can cover an average of two acres per hour.
“We’ve proven the effectiveness of our laserweeding technology and the immense benefits it offers farmers, including healthier crops and soil, decreased herbicide use, and reduced chemical and labor costs,” Mikesell said in a news release.
The new LaserWeeder is already sold out, thanks to orders from a number of farms, and Carbon is currently accepting pre-orders for 2023.
GeekWire
New Helper Functions
Upon installing Laravel 9, you’ll notice two new global helper functions – str() and to_route(). Let’s quickly…Laracasts
How a Coin Counting Machine Works
https://theawesomer.com/photos/2022/02/how_a_coin_sorting_machine_works_t.jpg

This Cummins Allison Jetsort coin sorter machine can count and separate 10,000 coins per minute, yet its sorting mechanism has just a single moving part. YouTuber Herb-O-Matic shows how its centrifugal action and precision-cut grooves ensure the right coins go into the right slots and bags. Full video here.
The Awesomer
Loafing Around
https://theawesomer.com/photos/2022/02/loafing_around_t.jpg

Sit back and enjoy this 14-minute video from a bread factory in Korea, where ingredients are combined, then kneaded into dough and baked in industrial ovens. Then the freshly-baked loaves of white and chestnut bread glide along an assembly line, tumble out of their pans, and head to the cooling racks before slicing.
The Awesomer
Using S3 with Laravel
https://laravelnews.imgix.net/images/aws-s3-1644204940.jpg?ixlib=php-3.3.1
AWS S3 provides a place for us to store files off of our servers. There are some big benefits to this:
- Backup/redundancy – S3 and similar have built-in backups and redundancy
- Scaling – Savings files off-server becomes necessary in modern hosting, such as serverless or containerized environments, as well as in traditional load-balanced environments
- Disk usage – You won’t need as much disk space when storing files in the cloud
- Features – S3 (and other clouds) have some great features, such as versioning support for files, lifecycle rules for deleting old files (or storing them in a cheaper way), deletion protection, and more
Using S3 now (even in single-server setups) can reduce headaches in the long run. Here’s what you should know!
Configuration
There’s two places to configure things for S3:
- Within Laravel – usually via
.envbut potentially also withinconfig/filesystem.php - Within your AWS account
Laravel Config
If you check your config/filesystem.php file, you’ll see that s3 is an option already. It’s setup to use environment variables from your .env file!
Unless you need to customize this, then you can likely leave it alone and just set values in the .env file:
1# Optionally Set the default filesystem driver to S3
2FILESYSTEM_DRIVER=sqs
3
4# Add items needed for S3-based filesystem to work
5AWS_ACCESS_KEY_ID=xxxzzz
6AWS_SECRET_ACCESS_KEY=xxxyyy
7AWS_DEFAULT_REGION=us-east-2
8AWS_BUCKET=my-awesome-bucket
9AWS_USE_PATH_STYLE_ENDPOINT=false
The config/filesystem.php file contains options like the following:
1return [
2 'disks' => [
3 // 'local' and 'public' ommitted...
4
5 's3' => [
6 'driver' => 's3',
7 'key' => env('AWS_ACCESS_KEY_ID'),
8 'secret' => env('AWS_SECRET_ACCESS_KEY'),
9 'region' => env('AWS_DEFAULT_REGION'),
10 'bucket' => env('AWS_BUCKET'),
11 'url' => env('AWS_URL'),
12 'endpoint' => env('AWS_ENDPOINT'),
13 'use_path_style_endpoint' => env('AWS_USE_PATH_STYLE_ENDPOINT', false),
14 ],
15 ],
16];
There’s a few options there we didn’t use in the .env file. For example, the AWS_URL can be set, which is useful for using other file storage clouds that have an S3 compatible API such as CloudFlare’s R2 or Digital Ocean’s Spaces.
AWS Configuration
Within AWS, you need to do 2 things:
- Create a bucket within the S3 service
- Create an IAM User to get a Key/Secret Key, and then attach a Policy to that user that allows access to the S3 API.
Like anything in AWS, creating a bucket in S3 involves looking at a ton of configuration options and wondering if you need any of them. For most use cases, you don’t!
Head to the S3 console, create a bucket name (it has to be globally unique, not just unique to your AWS account), choose the region you operate in, and leave all the defaults (including the ones that labeled “Block Public Access settings for this bucket”).
Yes, some of these options are ones you may want to use, but you can choose them later.
After creating a bucket, we need permission to do things to it. Let’s pretend we created a bucket named “my-awesome-bucket“.
We can create an IAM User, select “programmatic access”, but don’t attach any policies or setup anything else. Make sure to record the secret access key, as they’ll only show it once.
I’ve created a video showing the process of creating a bucket and setting up IAM permissions here: https://www.youtube.com/watch?v=FLIp6BLtwjk
The Access Key and Secret Access Key should be put into your .env file.
Next, click into the IAM User and add an Inline Policy. Edit it using the JSON editor, and add the following (straight from the Flysystem docs):
1{
2 "Version": "2012-10-17",
3 "Statement": [
4 {
5 "Sid": "Stmt1420044805001",
6 "Effect": "Allow",
7 "Action": [
8 "s3:ListBuckets",
9 "s3:GetObject",
10 "s3:GetObjectAcl",
11 "s3:PutObject",
12 "s3:PutObjectAcl",
13 "s3:ReplicateObject",
14 "s3:DeleteObject"
15 ],
16 "Resource": [
17 "arn:aws:s3:::my-awesome-bucket",
18 "arn:aws:s3:::my-awesome-bucket/*"
19 ]
20 }
21 ]
22}
This allows us to perform the needed S3 API actions on our new bucket.
Laravel Usage
Within Laravel, you can use the file storage like so:
1# If you set S3 as your default:
2$contents = Storage::get('path/to/file.ext');
3Storage::put('path/to/file.ext', 'some-content');
4
5# If you do not have S3 as your default:
6$contents = Storage::disk('s3')->get('path/to/file.ext');
7Storage::disk('s3')->put('path/to/file.ext', 'some-content');
The path to the file (within S3) gets appended to the bucket name, so a file named path/to/file.ext will exist in s3://my-awesome-bucket/path/to/file.ext.
Directories technically do not exist within S3. Within S3, a file is called an “object” and the file path + name is the “object key”. So, within bucket
my-awesome-bucket, we just created an object with keypath/to/file.ext.
Be sure to check out the Storage area of the Laravel docs to find more useful ways to use Storage, including file streaming and temporary URL’s.
Pricing
S3 is fairly cheap – most of us will spend pennies to a few dollars a month. This is especially true if you delete files from S3 after you’re done with them, or setup Lifecycle rules to delete files after a set period of time.
The pricing is (mostly) driven by 3 dimensions. The prices vary by region and usage. Here’s an example based on usage for a real application in a given month for Chipper CI (my CI for Laravel application), which stores a lot of data in S3:
- Storage: $0.023 per GB, ~992GB ~= $22.82
- Number of API Calls: ~7 million requests ~= $12
- Bandwidth usage: This is super imprecise. Data transfer for this was about $23, but this excludes EC2 based bandwidth charges.
Useful Bits about S3
- If your AWS setup has servers in a private network, and uses NAT Gateways, be sure to create an S3 Endpoint (type of Gateway). This is done within the Endpoints section in the VPC service. This allows calls to/from S3 to bypass the NAT Gateway and thus get around extra bandwidth charges. It doesn’t cost extra to use this.
- Considering enabling Versioning in your S3 bucket if you’re worried about files being overwritten or deleted
- Consider enabling Intelligent Tiering in your S3 bucket to help save on storage costs of files you likely won’t interact with again after they are old
- Be aware that deleting large buckets (lots of files) can cost money! This is due to the number of API calls you’d have to make to delete files.
Laravel News