https://media.notthebee.com/articles/6195608e813826195608e81383.jpg
I could watch this all day.
Not the Bee
Just another WordPress site
https://media.notthebee.com/articles/6195608e813826195608e81383.jpg
I could watch this all day.
Not the Bee
https://miro.medium.com/max/1400/0*VFhtt1EqVqqbqvQaA guide that explains how guards in Laravel work and that you can implement new authenticatables for them by explaining implementing a system for authenticating using a signed url.Laravel News Links
https://jcergolj.me.uk/assets/img/me.jpg
In my opinion, at least. 🙂
As a Laravel developer, I’ve spent a lot of time learning from some of the best Laravel developers. Do names such as Adam Wathan, Colin DeCarlo, Jason McCreary ring a bell? They should. If they don’t, here is a quick fix. My list of 12 fantastic talks that you could learn a ton from.
Test-Driven Laravel
by Adam Wathan
An excellent intro into TDD. TDD seems easy until you need to talk or test DB queries, generate PDF, deal with APIs and so on. He will lear you how to do all those stuff. Even better and more it depth is his course. A must-watch for every developer who doesn’t know where to start practising TDD.
Lies You’ve Been Told About Testing
by Adam Wathan
Jet another great talk from Adam about testing. Stop worrying about architecture. Start emphasising the details.
Patterns That Pay Off
by Matt Stauffer
Matt talks about different patterns that we don’t think about when building an application. Then, he dives into picking better code patterns by reviewing code bases.
Writing code that lasts
by Raphael Dohms
Writing code that survives the test of time and self-judgment is a matter of clarity and simplicity. This is a talk about growing, learning and improving our code with calisthenics, readability and good design.
Everything I Ever Needed To Know About Web Dev, I Learned From My Twitter Timeline
by Colin DeCarlo
Somehow lengthy title, however still worth watching. Colin DeCarlo talks about some ideas on cleaning up code in your application gained from “fire tweets” on twitter.
Cruddy by Design
by Adam Wathan
There is never enough controllers. From @dhh tweet: More controllers doing less work obviates the need for any other fancy patterns. In this talk, Adam shows how you can move code from one controller into multiple ones.
Design Patterns with Laravel
by Colin DeCarlo
Colin talks entertainingly about three patterns: adapter, strategy and factory one.
Resisting Complexity
by Adam Wathan
Why is it OK that a User can be saved? Because according to Adam, methods are affordances.
Furthermore, don’t be afraid of facades, he says. But, to be fair, I think this statement was more relevant in 2018 than today. I think facades are well accepted nowadays.
LaraconUs 2018
by Colin DeCarlo
Having the correct tools is not the same as using the tools correctly. Learn how to use Laravel tools correctly. Some more tips on how your code could be better and more readable.
Practicing YAGNI
by Jason McCreary
This talk is about how to avoid overengineering and why you ain’t gonna need it is good.
Jason also has a BaseCode course. It is about code refactoring. Do check it out.
A field guide containing real-world practices to help you write code that’s less complex and more readable.
Laracon US
by Sandi Metz
She is one of the gurus in the Rails world. Different language, same rules. Do you know what a code smell is?
Really, name 5? Spoiler, nobody can.
Eloquent Performance Patterns
by Jonathan Reinink
If MySql and not your thing, you can learn a lot here. Even better, Jonathan shows how to write more complex and optimised queries with Laravel Eloquent. Finally, if you like the talk, here is an entire course dedicated to it.
Happy watching & learning.
Disclaimer: nobody paid me to promote those courses here. I bought and watched all of them. And I learned a lot. I generally think those courses are worth paying for.
Laravel News Links
https://cdn0.thetruthaboutguns.com/wp-content/uploads/2021/11/Diamondback-Sidekick-22LR-revolver.jpeg
The last few years have seen the introduction of a number of interesting .22 caliber revolvers. Among them are the Ruger Wrangler and the Heritage Barkeep. These affordable wheel guns are well suited to general carry and recreational use.
The latest entrant in the affordable .22 revolver race is slightly more expensive, but this one is a double action revolver with an interchangeable swing out cylinder.
The Diamondback Sidekick was announced in August. It appears to be a clone of the High Standard Double Nine. It will probably also remind many of the old H&R 929 Sidekick.
When I was growing up it seemed almost everyone including my grandfather owned a Double Nine. When you wanted protection, but didn’t want a center fire with its greater expense and recoil, the High Standard Double Nine was a popular choice.
Designed to look like a traditional single action or cowboy gun with its plow handle grip and large trigger spur, the Double Nine was a double action revolver with a swing out cylinder. It was immensely popular and missed by old time shooters.
Today we have an alternative that may be a better gun. Modern manufacturing has given us an improved .22 revolver with much to recommend it.
The Diamondback Sidekick may be a clone, but it stands strong on its own merits. The revolver features a swing out cylinder with nine chambers. The cylinder release doubles as the ejector rod. Pull the ejector rod forward to release the cylinder. Load, close the cylinder, and you are ready to fire.
The double action revolver may be fired double action with a simple pull of the trigger or in single action by cocking the hammer and applying a light trigger press.
The Sidekick is smooth enough in double action for an economy revolver. The best means of managing the double action pull is to stage he trigger; press until the hammer almost falls, pause to get a solid sight picture, and then fire.
The single action trigger pull breaks at a very clean, crisp four pounds. That invites single action shooting and most shots fired with a Sidekick will probably be while plinking or informal target practice. The double action trigger is pleasant enough to make for good double action training.
The traditional plow handled grip with GFN checkered scales fits most hands well. There is no step in the handle required to stabilize the hand for double action fire with the .22’s modest recoil. The hammer spur allows for easy thumb cocking.
The barrel is 4.5 inches long, but expect other options to be offered down the road. The sights are the usual post front blade and grooved rear sight as you’d expect on a six nine shooter like this. The sights are well regulated for the six o’clock hold at ten yards. The finish is Cerakote.
A great option the Sidekick gives you is the use of interchangeable cylinders, one in .22 long rifle and one in .22 Magnum. Both will ship with the revolver. This isn’t something that’s been offered often with double action revolvers as fitting the crane is more difficult than simply using a base pin in a single action revolver.
The bolt holding the cylinder crane is spring-loaded. I used an old pen shaft to depress the latch and pull the cylinder away. Depress the shaft again and snap the other cylinder in place. The system is simple. After changing the cylinders headspace remains tight.
A simple groove in the top strap and a post front sight may not makes for gilt edged accuracy, but the sights are properly regulated for 40 grain loads. I used a mix of various makers 40 grain RNL loads to test the wheel gun. Five Remington Thunderbolts produced a 2.0-inch group at 15 yards. The Sidekick is more than accurate enough for informal target practice, plinking, and small game hunting.
The .22 Magnum cylinder offers a crackerjack option for larger pests. I wont get into the .22 Magnum for personal defense debate, but if you want a rimfire for easy critter control at a relatively low expense, the Sidekick is as good as any.
A natural comparison most will make here is the Ruger Wrangler, but the comparison isn’t really fair. The Wrangler and the Sidekick are about equally accurate. The Ruger, however, doesn’t have a .22 Magnum option. It’s also a single action gun with a six shot cylinder that loads via a loading gate.
The question then becomes, are those difference worth the extra outlay for the Diamondback revolver. I would gladly pay the difference for the Sidekick. They won’t hit retailers until next week, but I think Diamondback has a winner in this revolver.
Caliber: .22 LR/.22 Mag convertible
Action: Single/Double
Grips: Checkered, glass-filled polymer
Capacity: 9 rounds
Front Sight: Blade
Rear Sight: Integral
Overall Barrel Length: 4.5 inches
Overall Length: 9.875 inches
Frame & Handle Finish: Black Cerakote
Overall Weight: 32.5 ounces
MSRP: $320 (expect about $290 retail)
Ergonomics * * * * *
The heft and balance are excellent. This classic revolver handles well and the grip is comfortable. There’s a reason the Colt SAA has been so popular for the last century and a half.
Accuracy * * * * *
For the price and compared to the Ruger Wrangler and Heritage Rough Rider the Sidekick is quite accurate. Soda cans and milk jugs should be afraid. Very afraid.
Reliability * * * * *
The Sidekick never failed to crack off 240 .22 Long Rifle cartridges and 27 .22 Magnum. The only problem you may have in terms of reliability with this gun will be due to the rimfire ammo that goes into it.
Value * * * * ½
There are less expensive similar guns that are also fine for plinking and taking small game. But they don’t have all the features of the Sidekick. You pays your money and takes your choice.
Overall * * * * *
I love the Sidekick. It’s a fun gun that will take game and guard the homestead quite well and it’s very high on the fun-to-shoot scale.
The Truth About Guns
https://cdn0.thetruthaboutguns.com/wp-content/uploads/2021/11/2021-11-16_17-02-30.png

While jurors deliberate inside the courthouse in Kenosha, Wisconsin in the Kyle Rittenhouse case – the outcome of which promises to be important for gun owners everywhere – Mark McCloskey is outside arguing with protestors. Why? Because there’s never a dull moment in what has been a circus of a two-week trial.
Mark McCloskey, the St. Louis lawyer who made national headlines last year when he carried a gun on his property near a social justice protest in his neighborhood, argued with a protester outside the Kenosha County Courthouse on Tuesday afternoon.
“It really hurts me that you would have that much hatred,” the protester told McCloskey.
“There is absolutely no hatred involved in what I did,” McCloskey responded. “They came in, storming through my gate, broke down my gate, stormed toward my house, and I was afraid for my life.”
If the jurors can’t reach a decision in the case, Judge Bruce Schroeder will be polling them to find out if they want to continue deliberating. Is McCloskey helping by grabbing another fifteen minutes of fame – or would that be infamy? – on the courthouse steps? Seems unlikely.
Here’s part of the exchange between McCloskey and a protestor.
The Truth About Guns
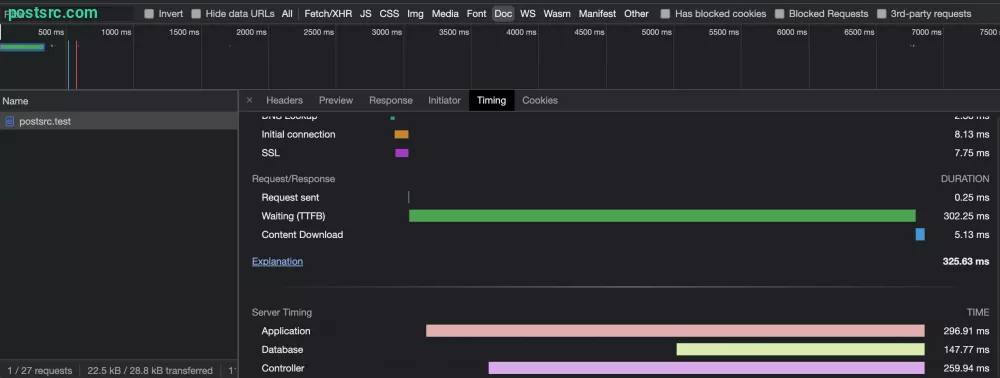
https://postsrc.com/storage/images/snippets/how-to-add-server-timing-header-information-for-laravel-application.jpeg
To get the server timing information and pass it in the response header in the Laravel application you can make use “
” package by beyondcode. This package allows you to get the total number of milliseconds the application takes to bootstrap, execute and run.
Add Server-Timing header information from within your Laravel apps.
First, you will have to install it using composer using the command below.
composer require beyondcode/laravel-server-timing
To add server-timing header information, you need to add the \BeyondCode\ServerTiming\Middleware\ServerTimingMiddleware::class, middleware to your HTTP Kernel. In order to get the most accurate results, put the middleware as the first one to load in the middleware stack.
\BeyondCode\ServerTiming\Middleware\ServerTimingMiddleware::class
To view the timing you can view your browser inspect window and see the Server Timing tabs.
Sometimes you might also add additional requirements by using the code below. By doing so you will be able to know how long the codes take to execute and whether it requires more optimization for speedy performance.
ServerTiming::start('Running expensive task');

// do something

ServerTiming::stop('Running expensive task');
You can also publish the configuration by running the code below.
php artisan vendor:publish --tag=server-timing-config
In addition to the default configuration, you can add the value of the timing.php is as follows to ensure it syncs with the .env variable.
<?php

return [
    'enabled' => env('SERVER_TIMING', false),
];
Laravel News Links
https://protone.media/img/header_social.jpg
In this series, I show you new features and improvements to the Laravel framework since the original release of version 8. Last week, I wrote about the Collection class. This week is about the Database and Eloquent features in Laravel 8. The team added so many great improvements to the weekly versions that I split the Database and Eloquent features into two blog posts. Here is part one!
I got most code examples and explanations from the PRs and official documentation.
Add a subquery cross join to the query.
use Illuminate\Support\Facades\DB;

$totalQuery = DB::table('orders')->selectRaw('SUM(price) as total');

DB::table('orders')
    ->select('*')
    ->crossJoinSub($totalQuery, 'overall')
    ->selectRaw('(price / overall.total) * 100 AS percent_of_total')
->get();We can now do model comparisons between related models, without extra database calls!
// Before: foreign key is leaking from the post model
$post->author_id === $user->id;

// Before: performs extra query to fetch the user model from the author relation
$post->author->is($user);

// After
$post->author()->is($user);If you would like to perform multiple “upserts” in a single query, then you may use the upsert method instead of multiple updateOrCreate calls.
Flight::upsert([
    ['departure' => 'Oakland', 'destination' => 'San Diego', 'price' => 99],
    ['departure' => 'Chicago', 'destination' => 'New York', 'price' => 150]
], ['departure', 'destination'], ['price']);The explain() method allows you to receive the explanation from the builder (both Query and Eloquent).
User::where('name', 'Illia Sakovich')->explain();

User::where('name', 'Illia Sakovich')->explain()->dd();If you are eager loading a morphTo relationship, Eloquent will run multiple queries to fetch each type of related model. You may add additional constraints to each of these queries using the MorphTo relation’s constrain method:
use Illuminate\Database\Eloquent\Builder;
use Illuminate\Database\Eloquent\Relations\MorphTo;

$comments = Comment::with(['commentable' => function (MorphTo $morphTo) {
    $morphTo->constrain([
        Post::class => function (Builder $query) {
            $query->whereNull('hidden_at');
        },
        Video::class => function (Builder $query) {
            $query->where('type', 'educational');
        },
    ]);
}])->get();This method allows you to directly order the query results of a BelongsToMany relation:
class Tag extends Model
{
    public $table = 'tags';
}

class Post extends Model
{
    public $table = 'posts';

    public function tags()
    {
        return $this->belongsToMany(Tag::class, 'posts_tags', 'post_id', 'tag_id')
            ->using(PostTagPivot::class)
            ->withTimestamps()
            ->withPivot('flag');
    }
}

class PostTagPivot extends Pivot
{
    protected $table = 'posts_tags';
}

// Somewhere in a controller
public function getPostTags($id)
{
    return Post::findOrFail($id)->tags()->orderPivotBy('flag', 'desc')->get();
}
The sole method will return the only record that matches the criteria. If no records are found, a NoRecordsFoundException will be thrown. If multiple records were found, a MultipleRecordsFoundException will be thrown.
DB::table('products')->where('ref', '#123')->sole()The after method may be used to add columns after an existing column in the schema:
Schema::table('users', function (Blueprint $table) {
    $table->after('remember_token', function ($table){
        $table->string('card_brand')->nullable();
        $table->string('card_last_four', 4)->nullable();
    });
});Laravel automatically assign a class name to all of the migrations. You may now return an anonymous class from your migration file:
use Illuminate\Database\Migrations\Migration;
use Illuminate\Database\Schema\Blueprint;
use Illuminate\Support\Facades\Schema;

return new class extends Migration {
    public function up()
    {
        Schema::table('people', function (Blueprint $table) {
            $table->string('first_name')->nullable();
        });
    }
};The new chunkMap method is similar to the each query builder method, where it automatically chunks over the results:
return User::orderBy('name')->chunkMap(fn ($user) => [
    'id' => $user->id,
    'name' => $user->name,
]), 25);Since the array cast returns a primitive type, it is not possible to mutate an offset of the array directly. To solve this, the AsArrayObject cast casts your JSON attribute to an ArrayObject class:
// Within model...
$casts = ['options' => AsArrayObject::class];

// Manipulating the options...
$user = User::find(1);

$user->options['foo']['bar'] = 'baz';

$user->save();If you would like to override all items within the $with property for a single query, you may use the withOnly method:
class Product extends Model{
    protected $with = ['prices', 'colours', 'brand'];

    public function colours(){ ... }
    public function prices(){ ... }
    public function brand(){ ... }
}

Product::withOnly(['brand'])->get();Cursor-based pagination places a “cursor” string in the query string, an encoded string containing the location that the next paginated query should start paginating and the direction it should paginate. This method of pagination is particularly well-suited for large data sets and “infinite” scrolling user interfaces.
use App\Models\User;
use Illuminate\Support\Facades\DB;

$users = User::orderBy('id')->cursorPaginate(10);
$users = DB::table('users')->orderBy('id')->cursorPaginate(10);In addition to the withCount method, Eloquent now provides withMin, withMax, withAvg, and withSum methods. These methods will place a {relation}_{function}_{column} attribute on your resulting models.
Post::withCount('comments');

Post::withMin('comments', 'created_at');
Post::withMax('comments', 'created_at');
Post::withSum('comments', 'foo');
Post::withAvg('comments', 'foo');
Under the hood, these methods use the withAggregate method:
Post::withAggregate('comments', 'created_at', 'distinct');
Post::withAggregate('comments', 'content', 'length');
Post::withAggregate('comments', 'created_at', 'custom_function');

Comment::withAggregate('post', 'title');
Post::withAggregate('comments', 'content');In addition to the new with* method above, new load* methods are added to the Collection and Model class.
// Eloquent/Collection
public function loadAggregate($relations, $column, $function = null) {...}
public function loadCount($relations) {...}
public function loadMax($relations, $column)  {...}
public function loadMin($relations, $column)  {...}
public function loadSum($relations, $column)  {...}
public function loadAvg($relations, $column)  {...}

// Eloquent/Model
public function loadAggregate($relations, $column, $function = null) {...}
public function loadCount($relations) {...}
public function loadMax($relations, $column) {...}
public function loadMin($relations, $column) {...}
public function loadSum($relations, $column) {...}
public function loadAvg($relations, $column) {...}

public function loadMorphAggregate($relation, $relations, $column, $function = null) {...}
public function loadMorphCount($relation, $relations) {...}
public function loadMorphMax($relation, $relations, $column) {...}
public function loadMorphMin($relation, $relations, $column) {...}
public function loadMorphSum($relation, $relations, $column) {...}
public function loadMorphAvg($relation, $relations, $column) {...}Add a polymorphic relationship count / exists condition to the query.
public function hasMorph($relation, ...)

public function orHasMorph($relation,...)
public function doesntHaveMorph($relation, ...)
public function whereHasMorph($relation, ...)
public function orWhereHasMorph($relation, ...)
public function orHasMorph($relation, ...)
public function doesntHaveMorph($relation, ...)
public function orDoesntHaveMorph($relation,...)
Example with a closure to customize the relationship query:
// Retrieve comments associated to posts or videos with a title like code%...
$comments = Comment::whereHasMorph(
    'commentable',
    [Post::class, Video::class],
    function (Builder $query) {
        $query->where('title', 'like', 'code%');
    }
)->get();

// Retrieve comments associated to posts with a title not like code%...
$comments = Comment::whereDoesntHaveMorph(
    'commentable',
    Post::class,
    function (Builder $query) {
        $query->where('title', 'like', 'code%');
    }
)->get();
Laravel News Links
https://www.thefirearmblog.com/blog/wp-content/uploads/2021/11/unnamed-6-180×180.jpg
 With increasing restrictions in regards to firearms on YouTube and other social media platforms, new gun owners and those who are interested in building out their first AR are finding it harder and harder to find reliable and simple instructions for their first AR-15 build. Brownells and the living legend Roy Hill are excited to […]
The post Brownells Launches the Interactive “How to Build an AR-15” Video Series appeared first on The Firearm Blog.
The Firearm Blog
https://i.ytimg.com/vi/W39CpdCeByE/maxresdefault.jpg
AboutPressCopyrightContact usCreatorsAdvertiseDevelopersTermsPrivacyPolicy & SafetyHow YouTube worksTest new features
Laravel News Links
https://media.notthebee.com/articles/618aa3342edac618aa3342edad.jpg
Let’s take a stroll down memory lane as we enter into the media clown zone.
Not the Bee