https://media.notthebee.com/articles/61897ebd7a64f61897ebd7a650.jpg
I must’ve watched this entire 40-second long clip a dozen times already [language warning]:
Not the Bee
Just another WordPress site
https://media.notthebee.com/articles/61897ebd7a64f61897ebd7a650.jpg
I must’ve watched this entire 40-second long clip a dozen times already [language warning]:
Not the Bee
https://i.kinja-img.com/gawker-media/image/upload/c_fill,f_auto,fl_progressive,g_center,h_675,pg_1,q_80,w_1200/b51c94948a959bb1e7201b72f83226f2.jpg
io9’s seen Ghostbusters: Afterlife, and our own movie maven Germain Lussier called it “great until it’s derailed by gratuitous fan service” in his spoiler-free review. But if you’d like to know exactly what he was talking about, Sony Pictures has very helpfully released a final trailer for the film which makes it abundantly clear what the fan service is.
Seriously, the trailer deserves a spoiler bar merely on principle.
The most obvious reveal (glimpsed in an earlier trailer) is the two Terror Dogs from the first Ghostbusters movie. Fans of the original 1984 film will recognize them as the demons who possessed Dana Barrett (played by Sigourney Weaver) and Louis Tully (Rick Moranis) and transformed them into Zuul the Gatekeeper and Vinz Clortho the Keymaster, respectively, the two heralds of the ancient Sumerian god of destruction Gozer (Slavitza Jovan). You shouldn’t need the arrival of the original three surviving Ghostbusters there at the end (which Sony very annoyingly plays coy by not showing their faces, as if we somehow wouldn’t know who they are) to figure out what the film’s climax is going to be. But if you do, don’t worry because this trailer also spoils this at the 0:43 mark by revealing a rather familiar sleeve and hairdo emerging from the depths.
I’m honestly less upset at the spoilers than I am by discovering the movie is just going to replicate the end of the original Ghostbusters rather than do anything new—yet another film made for nostalgic 40-somethings. To be fair, many people have enjoyed Afterlife’s fixation on nostalgia over creativity, but I hope any kids who end up watching the movie end up being able to understand it, let alone enjoy it.
Speaking of nostalgia, Ghostbusters: Afterlife stars Bill Murray, Dan Aykroyd, Ernie Hudson, Annie Potts, and Sigourney Weaver, all reprising their roles from the first two films, and if Weaver turns into a Terror Dog again and then Rick Moranis shows up as Tully to become the other one I’ll plotz. The new stars include Mckenna Grace, Finn Wolfhard, Carrie Coon, Paul Rudd, and more. Afterlife premieres in theaters on November 19.
Also, not as a complaint, but as a side note: Who would read the Book of Revelation with less gravitas than Dan Aykroyd? Please discuss.
Wondering where our RSS feed went? You can pick the new up one here.
Gizmodo
http://img.youtube.com/vi/Qj0GLZJzDLY/0.jpgThis package allows you to build a Livewire-powered data table with search, sort, filtering, and even inline editing. Let’s see how it works.Laravel News Links
https://www.pewpewtactical.com/wp-content/uploads/2016/07/12.-Start-Roll-Pin-with-Hammer-1024×769.jpg
New to the world of guns?
Find out the most essential gunsmithing tools you’ll need to keep your firearms running in great shape or to make easy modifications.
We’ll go in order from the most basic kit (some of which you’ll probably already have) to some more specialized tools as you progress in your gunsmithing journey.
Table of Contents
Loading…
The great thing is that modern firearms are designed to be stripped/cleaned with minimal tools. Some don’t even require anything but your hands and the gun itself.
Sometimes you want a little more force but not with something that could mar any of your finishes…
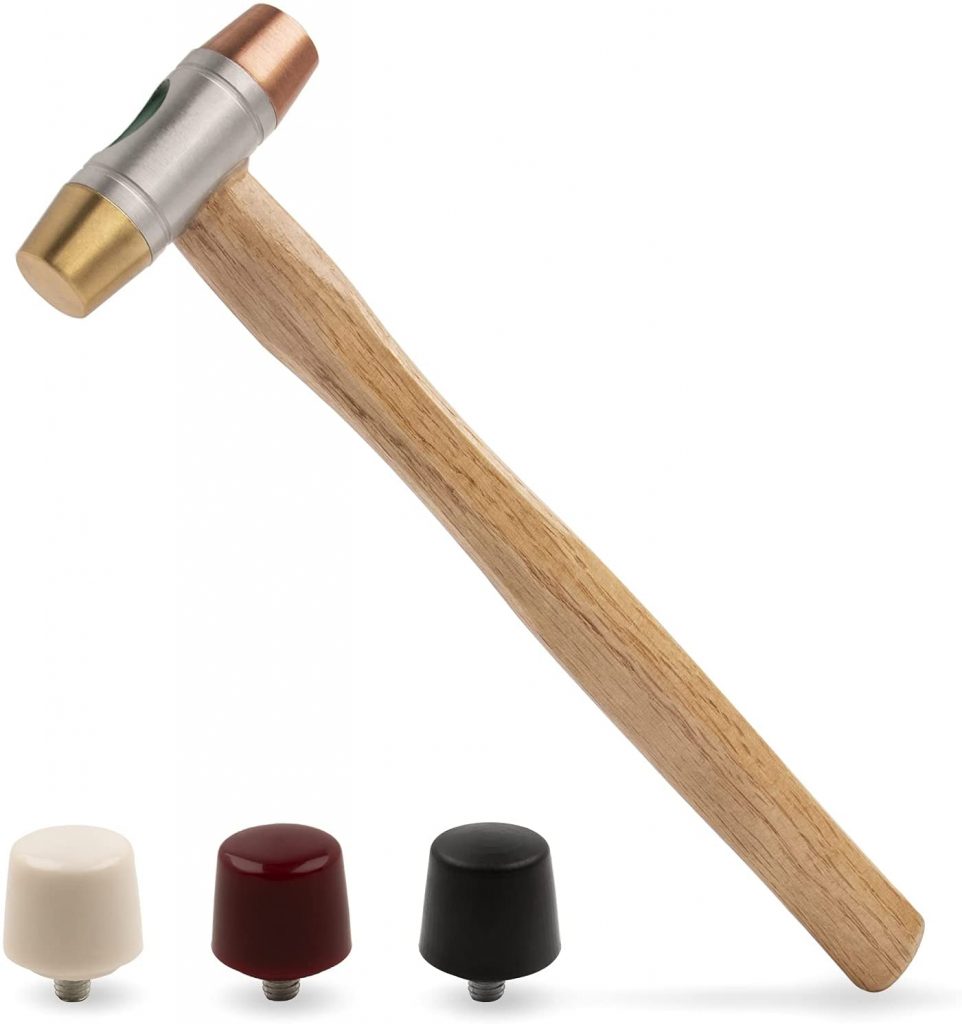
A brass hammer gives you the heft needed but doesn’t mar the normally much harder steel of a firearm. This hammer has interchangeable heads of brass, plastic, rubber, and even copper.
And I also keep a standard Rubber Mallet for some more forceful jobs.
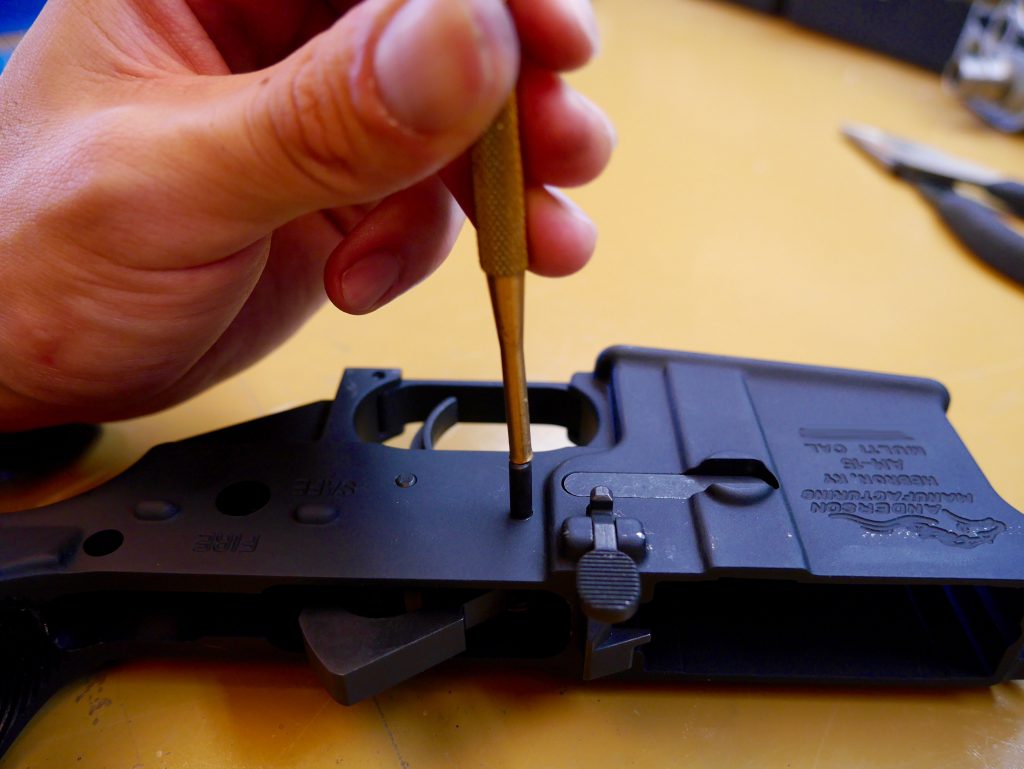
Punches let you drive pins that hold together many types of guns. Again, we go with brass punches so they do not mar up the gun. We use and love the Starrett Brass Punch Set since they have longer punches than normal gunsmithing sets.
Or you can go with the combination hammer and punch sets from Wheeler which should be more than enough for introductory gunsmithing.
A lot of firearm screws utilize hex or Allen key patterns. To make it harder, there are metric and U.S. standards that roughly correlate to the origin of your gun. This long arm wrench set makes it easy for both standards.
I’ve probably bought half a dozen sets to place everywhere since they are never around when I need them!
And of course screwdrivers, you’ll need a sturdy multi-purpose one as well as a precision kit.
Screws in a gun go through an immense amount of stress due to recoil and some will actually start backing out. That’s where threadlocker or Loctite (brand) comes in.
There are a couple of varieties but the two most used are blue (medium) which is great for vibration issues (such as handguard screws) and can be easily removed.
And red (high strength) ($6) which is when you want to lock something for almost forever (such as scope rings) since it requires heat to remove.
If you’re doing anything with precision involved like putting on optics…you’ll want a torque wrench combined with threadlocker.
Torque wrenches make sure you’re in spec with the in-lb force and that all the screws have equal tension.
And the industry standard (and our go-to for years) is the Wheeler FAT Wrench.
Prices accurate at time of writing
Prices accurate at time of writing
It comes with useful bits that will do for most jobs…and it’s super easy to dial in the appropriate force.
Looking for the top-of-the-line gunsmithing kit? Check out Fix It Sticks.
The Works is truly the works and even has its own super nice torque wrench. Pricey but the best shooters out there (and most of the Pew Pew Tactical team) has one in their range bag.
Prices accurate at time of writing
Prices accurate at time of writing
Want to learn more about the kit? Check out our complete Fix It Sticks Review and also our coupon PEWPEW10 that will save you 10%.
Also…don’t have a range bag yet…check out our Best Range Bags article.
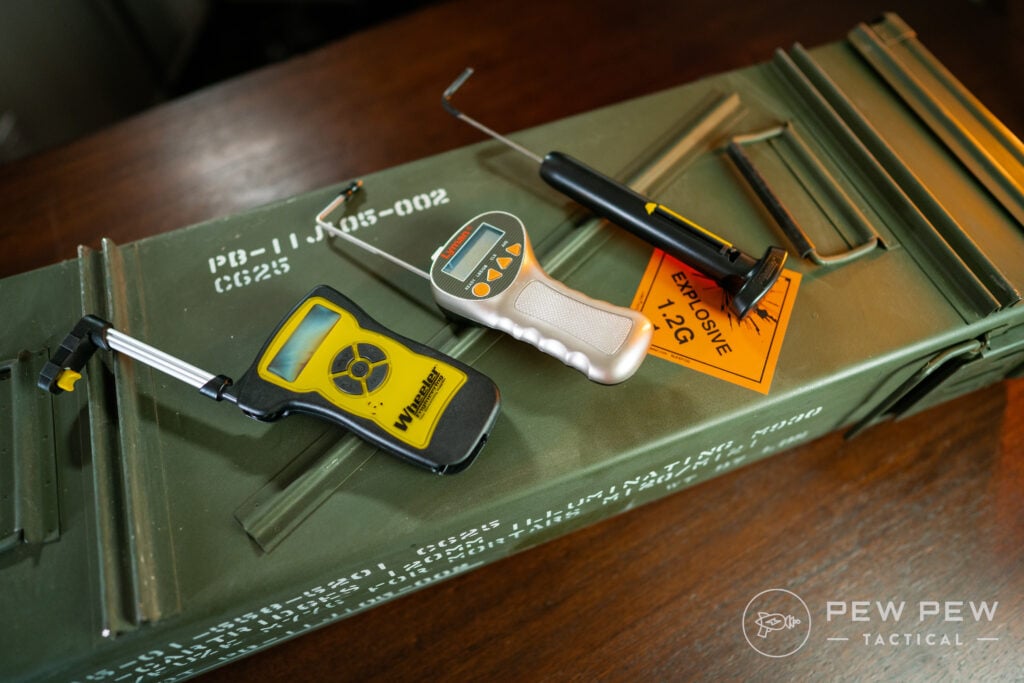
Doing some trigger mods?
You’ll want to make sure you’re actually doing something instead of going by pure feel.
We have an in-depth guide to the Best Trigger Pull Gauges.
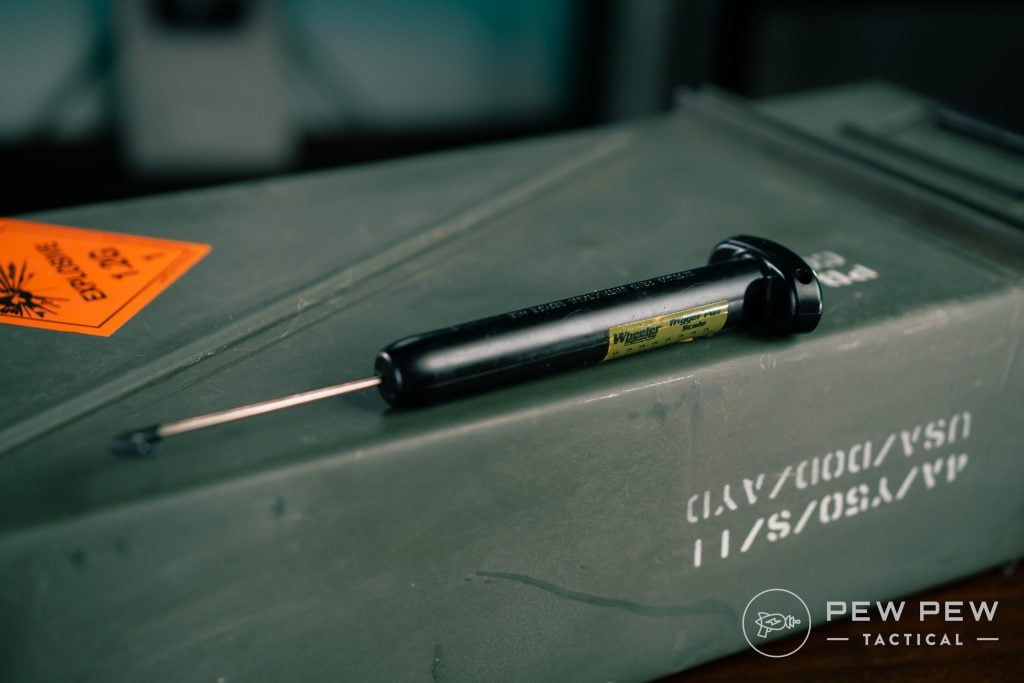
But the simplest one that will work for all but the most OCD is the Wheeler Trigger Pull Scale.
Prices accurate at time of writing
Prices accurate at time of writing
There are tons of gun-specific tools, but here are the main ones that you’ll likely use for your Glock and AR-15.
This tool is actually really useful to get the pins in and out without marring the polymer frame, and also to disassemble magazines.
There’s a lot of versions of the AR-15 Armorer’s Wrench…so much so that we have our own dedicated article.
However our go-to is the Magpul Version.
Prices accurate at time of writing
Prices accurate at time of writing
There are versions on Amazon but we haven’t had the greatest of luck with them breaking little bits when torquing important AR-15 parts.
If you’re adding a barrel (or taking one off)…you’ll need a special vise to make sure you don’t warp the upper receiver.
The current one we use is the Obsidian Arms.
Prices accurate at time of writing
Prices accurate at time of writing
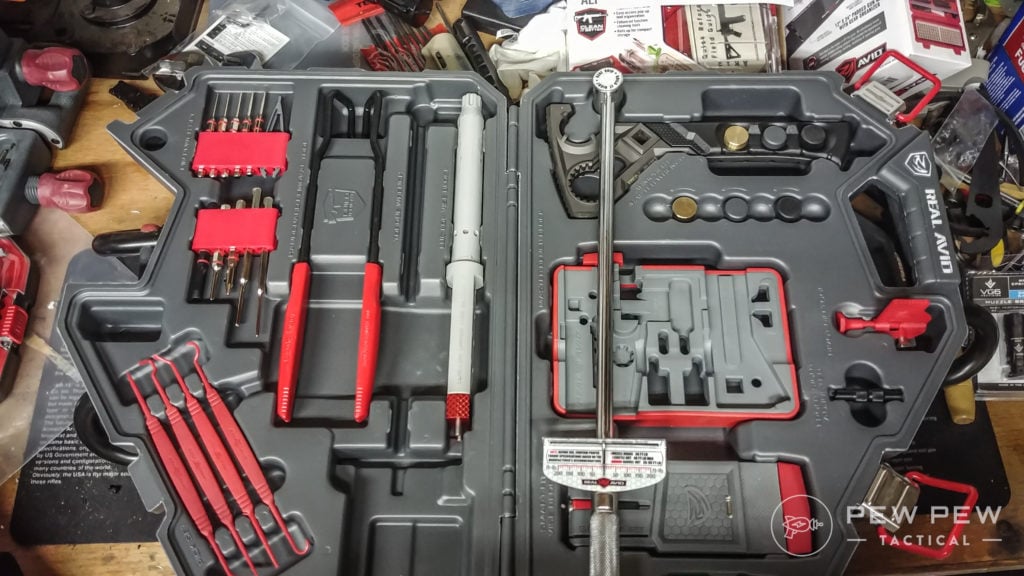
If you want a one-and-done situation for your AR-15…check out the Real Avid Armorer’s Master Kit.
It’s ginormous and has everything you need. And we have a full review.
Prices accurate at time of writing
Prices accurate at time of writing
There are too many to list here but they all depend on your specific application. If you want to fit 1911 parts, you’ll need some files and a polishing compound. But if you’re just looking to drift your AK sight, you’ll need a special tool.
Check out our DIY Gunsmithing Tutorials where we cover all the steps and necessary tools.
Looking for more gear we’ve tested to get you started? Start with these:
There you have! The tools we recommend when starting your firearm journey.
All of these should get you where you’re going, but know that certain tasks might require more specific tools. So, it’s always recommended to do a little research before you jump into a project.
(Lest you be like us and make 25 trips to Home Depot or Lowes…)
What tools do you use the most? Let us know in the comments below. Are you building an AR-15? Make sure to read up on the parts and tools you need to do the job at our AR-15 Parts & Tools List.
The post Essential Gunsmithing Tools: Bare Minimum to Gun Specific appeared first on Pew Pew Tactical.
Pew Pew Tactical
https://static1.makeuseofimages.com/wordpress/wp-content/uploads/2021/10/set-up-secure-email-server-featured.jpg
Major email service providers such as Google and Microsoft occasionally scan your emails to provide targeted ads and other services. You may be concerned by this as it does violate your privacy. One of the easiest ways to prevent this breach of your privacy is to set up your own secure email server.
Setting up your private email server is fairly easy and once the initial set up is complete, you can further customize it according to your preferences.
Whenever you receive an email, it is first stored on an email server before being downloaded to your email client or browser. These email servers are usually managed by the same companies that provide you with email addresses, such as Google, Yahoo, and Microsoft.
While these services do provide you with a lot of convenience, they can easily scan confidential and regular emails to provide targeted ads and improve services such as Google Assistant. Additionally, government entities and law enforcement agencies can ask your email provider to reveal your inbox.
On the other hand, you have complete control over your emails when you use a private email server. This is because the server is located at your own house, on a computer you own.
The glaring advantage of having your own secure email server is privacy. Your emails are completely your own. You can also use one to send completely anonymous emails.
Your ISP and your employers are completely devoid of any access to your emails. This provides a peace of mind that no third-party email providers can match. A private email server allows you to set up filters that are simply not possible when using a regular email service.
However, all this does come at a cost. You are completely responsible for the security of your email server. While your emails can no longer be snooped upon by companies, the server can still be compromised by a determined hacker.
Email providers have dedicated teams that look for security flaws in their servers. However, in the case of a private email server, you are completely responsible for making sure that the server is secure.
Setting up your private email server shouldn’t be a problem at all, provided you follow the steps listed below accurately.
However, before getting started, ensure that you have all the things needed to set up the server. These include:
The first thing you need to get started is an email server software. There are plenty of programs available. However, most of them are paid.
For this tutorial, let’s make use of an open-source and free email server called hMailServer. To download the application, simply go to hMailServer’s download page and click on the file under “Latest Release”.
Related: IMAP vs. POP3: What’s the Difference? Which One Should You Use?
After downloading the app, simply follow these steps to install it:
The actual set up process for your private email server is also fairly easy. The following steps should give you a clear idea on how to set up your email server, and some good practices while doing the same:
After following the aforementioned steps, your private email server is ready to run.
All you need to receive and send emails is a client such as Thunderbird or Outlook. Use the domain credentials you created earlier to log in.
Related: The 5 Best Free Email Clients for Your Desktop PC
Additionally, you can also enable and customize features such as antivirus and spam protection by running the hMailServer Administrator utility. Look for these features on the navigation bar.
As is evident, setting up your own email server is not that difficult. In fact, it should take you less than an hour to get it up and running, if you don’t run into any unexpected issues. However, in case you’re looking for more advanced features, it is advisable to hire an IT professional to set it up for you.
And if it isn’t possible for you to set up your own email server, using alternative, secure email services is the next best option.
Fed up with government and third-party surveillance of your emails? Protect your messages with a secure encrypted email service.
Read Next
About The Author
Manuviraj Godara
(136 Articles Published)
Manuviraj is a Features Writer at MakeUseOf and has been writing about video games and technology for over two years. He is an avid gamer who also spends his free time burning through his favourite music albums and reading.
MUO – Feed
Columbia University put out this video on why pronouns are important pic.twitter.com/UK48Qxeisc
— Libs of Tik Tok (@libsoftiktok) November 5, 2021
It’s a threat to my mental health to make me do this.
I believe that 2 + 2 = 4.
Two plus two always equals four.
I will not deny reality.
I will not be forced to subjugate myself to someone else’s fantastical whims.
To violate that, to force me to acquiesce to someone else’s delusion is a threat to my mental health and I will not do it.
There are four lights.
https://static1.makeuseofimages.com/wordpress/wp-content/uploads/2021/10/set-up-a-free-minecraft-server-2.jpg
Minecraft is one of the best survival games played by millions of gamers worldwide. But unlike other multiplayer titles, you need to set up your own private Minecraft server to play the game with your friends. And having a server up and running 24/7 can be expensive, not to mention the hefty price you paid for the game in the first place.
But do you really have to empty your pockets and buy a server to enjoy Minecraft with your friends? Not at all. Luckily, websites like Minehut and Aternos allow you to set up your own “free” Minecraft server, with no hidden costs whatsoever.
To set up a free game server with Minehut, head over to minehut.com and click the Sign Up in Seconds button. On the next screen, enter your name and other credentials. Then click Sign Up to finish account registration. Finally, verify your email address and Minehut will automatically log you into your account.
On the account dashboard, click on the Add Server button, type the desired server name, and hit Create. Once the screen loads, click on the Activate Server button to start using your free Minecraft server.
Minehut will ask you to wait for 30 seconds as it prepares the server for you. Click on the Continue button when the DDOS-protected server transfer prompt appears.
The server dashboard gives you options to start and stop the server, access the console, view game files using the file manager, add and configure Minecraft addons, manage the current game world, and create backups.
You can also change the server “Message of the day” or play around with the server properties by scrolling down the page.
As you can see, the free server plan allows a maximum of 10 players to join the server. Also, you can create up to two servers with a free account. Minehut also supports cross-platform play, which means both Java and Bedrock Edition players can join your server.
Minecraft Java players can directly join the server by adding the server address to the game (servername.minehut.gg).
On the other hand, Bedrock or Pocket Edition players need to go through an additional step to join the server. First, you’ll have to join the bedrock.minehut.com server on port 19132. Then in the chat, type “/join servername.minehut.gg” to access the server. If the server is up, you’ll be automatically teleported to that particular world.
For example, if your Minehut server address is “random.minehut.gg“, you’ll first join “bedrock.minehut.com“, then type “/join random.minehut.gg” in chat to join the server.
Aternos is another free platform that offers private Minecraft servers to players. Just like Minehut, setting up a server with Aternos is a breeze. All you have to do is create a free account, add a server, and configure it up to your liking.
To get started, first visit aternos.org. Then click on the Play button located in the bottom-right corner.
Here, you can sign up for a free account or log in to an existing one. You can also sign in using your Google account if you want. Note that specifying an email address is optional, and you can create your account using just a username and password.
Once you have logged in to your account, click on the Create a server button.
Next, specify the server name and the description. You can also choose between Java Edition and Bedrock/Pocket Edition here. Note that, unlike Minehut, Aternos doesn’t support cross-platform play and you’ll have to create separate servers for both editions. Click on the Create button to continue.
On the server dashboard, you’ll have the option to start your server. To manage your server, select an option from the left sidebar. You can switch between Bedrock and Java editions by switching to the Software tab.
Likewise, the Console and File options allow players to access the console and file manager respectively. You can generate new worlds or backup your existing world using the Worlds and Backups option.
In Aternos, a server can be controlled by multiple users. This is to ensure that other players can also start or stop your server in case you’re unavailable. To add another moderator, click on the Access tab from the left sidebar and specify the Aternos username of the user.
Related: How to Make Your Own Minecraft Server: Things You Need to Know
It is great you can get your own private server for playing Minecraft without spending any extra bucks. Online services like Aternos and Minehut are inclusive of some limitations though. First of all, there’s a cap on the number of players that can join the game. You also get limited memory, which might not be enough if you’re planning to establish a full-fledged community server.
Apart from private servers, you also have the choice to join realms, play on a public server, or start a new single-player world in Minecraft.
Want to party up and craft with your crew? Here’s how you can enjoy Minecraft multiplayer with your friends.
Read Next
About The Author
Deepesh Sharma
(95 Articles Published)
Deepesh is the Junior Editor for Linux at MUO. He writes informational guides on Linux, aiming to provide a blissful experience to all newcomers. Not sure about movies, but if you want to talk about technology, he’s your guy. In his free time, you can find him reading books, listening to different music genres, or playing his guitar.
MUO – Feed
https://theawesomer.com/photos/2021/11/alien_power_loader_complete_t.jpg

It’s taken three years, but the guys at Hacksmith Industries have finally completed their working replica of the Power Loader from Aliens. In this final build video, they tidy up the cabling and put on finishing touches before taking it for an all-too-brief spin. We can’t wait to see them take down a xenomorph with this thing.
The Awesomer
https://assets.amuniversal.com/8e93dad01343013a7fd8005056a9545d
Earlier in the week, I posted an article in which I postulated that the widespread use of Hydroxychloroquine and Ivermectin in Africa to treat other diseases was inhibiting the spread of COVID-19 in that continent.
Thanks to a comment by reader Nahanni on another post yesterday, I was led to an article at NOQReport titled "Shocking Conclusions from Africa Study Expose Why Big Pharma’s Puppets are Suppressing Ivermectin Data". It predates my article, but I hadn’t been aware of the study until Nahanni drew it to my attention. In so many words, the long article confirms my hypothesis. Here are a few excerpts. Bold, underlined text is my emphasis.
A graph made its rounds on social media yesterday that raised some eyebrows. It showed the clear difference between countries in Africa that use Ivermectin regularly versus those that do not. The differences were startling as the Ivermectin-nations showed unambiguous advantages against Covid-19. The mortality rates were very low compared to countries that do not use Ivermectin on a wide scale … Universal Ivermectin use seems to be the only factor preventing these nations from a full-blown Covid-19 catastrophe.
. . .
The final and arguably most important “hidden” takeaway from the study is that recovery and fatality rates for Covid-19 cases were not statistically significantly different between Ivermectin countries and non-Ivermectin countries. That means that once a person was tested and officially declared a Covid-19 case, they recovered or died at essentially the same rates across the board.
This tells us that other factors such as medical proficiency, environmental differences, or access to vaccines do not contribute to whether someone lives or dies once they have become sick with the disease. Since overall mortality rates per capita are significantly lower in Ivermectin nations but case fatality rates are the same, Ivermectin is clearly effective as an early treatment and perhaps even as a preventative measure.
Remember, the people in the Ivermectin nations are already taking the drug. They aren’t waiting for a positive Covid test and likely aren’t even very concerned about the disease at all. Many if not most who do end up becoming Covid-19 cases in Ivermectin nations were likely among those who were not taking Ivermectin as an antiparasitic.
There’s more at the link, including statistics, charts, etc.
I’m very glad to have independent confirmation of what was basically just a theory of mine, based on experience in Africa, but not supported by medical evidence. The latter is now available, and seems to support my theory. It’s a warm fuzzy feeling to find that I was pretty much on the money.
I’d like to find out whether anyone’s done a similar study on Hydroxychloroquine as a COVID-19 suppressant in Africa. So many millions of people take it there as an anti-malarial prophylactic medication that I’m certain it must be having that effect; but as yet I haven’t found any investigations looking into whether that’s affecting COVID-19 infection rates. I’m willing to bet that it is, as discussed in my earlier article.
Peter
Bayou Renaissance Man