https://assets.amuniversal.com/b557a1e0fa1b0139793a005056a9545d
Thank you for voting.
Hmm. Something went wrong. We will take a look as soon as we can.
Dilbert Daily Strip
Just another WordPress site
https://assets.amuniversal.com/b557a1e0fa1b0139793a005056a9545d
Thank you for voting.
Hmm. Something went wrong. We will take a look as soon as we can.
Dilbert Daily Strip
ADMIN UUMV
PSA – If you are ever lost while hiking, get stranded with a broken down car, etc and you notice your cell phone is either low on juice or has no signal, here is a tip that very well may save your life.Change the voicemail on your phone to a message that gives your approximate location, the time, the date, your situation (lost, out of gas, car broken down, injured, etc) and any special instructions such as you are staying with the car, you are walking toward a town, etc…. The best part of this is that even if your cell phone dies or stops working, voicemail still works, so anyone calling your phone looking for you will hear the message and know where to find you or where to send help.
https://content.artofmanliness.com/uploads/2021/10/Campfire-Lays-1.jpg

Every man should know how to build a fire. But every outdoor situation requires different types of campfire lays (set-ups in the firewood), so it’s imperative to know how to make more than one kind.
Here we highlight six of the most common and useful fire lays.
There’s a reason this is the go-to campfire lay for most outdoorsmen: it’s very easy to get a fire going with a teepee lay. It’s also a great fire for cooking and warmth. The one downside of a teepee fire lay is that it burns quickly, requiring a lot of fuel to keep it going.
Many other fire lays rely on a teepee lay to initially get going, so it’s a vital lay to master.
How to make: Place your tinder bundle on the ground. Above your tinder bundle, use kindling to build a small teepee. Start with small twigs and build up to large sticks. Leave an opening in your teepee on the side the wind is blowing against. This will ensure that your fire gets the air it needs for effective combustion. Light your tinder bundle. As the fire gets going, add increasingly thick sticks, and eventually large fuel logs, in the same teepee shape.
If you’ve watched old Western movies, you’ve likely seen a star fire lay. It’s the fire lay of choice for cowboys ranging in areas where there isn’t much wood. The star fire lay doesn’t make a very big or hot fire, but it’s economical in terms of fuel and easy to set up.
How to make: Lay five or six logs on the ground like the spokes of a wheel. The arrangement will look like a star. Inside the hub of your wheel/star, start a small fire with a teepee lay. As the main logs of the star lay burn, push them towards the center.
The lean-to fire lay creates a protective canopy under which you can place your tinder bundle. As such, it’s a good fire lay to use in windy or rainy conditions. The trade-off is that this set-up does restrict airflow a little, so it can sometimes make getting a fire going a bit harder.
How to make: Place your tinder against a large log. Lean small twigs and sticks against the log and above your tinder pile. Now you see why it’s called a “lean-to.” Light your tinder bundle.
One glance at its structure and it’s easy to see how the log cabin lay got its name. You’re going to build a small log cabin with fuel logs around a small teepee fire lay. The resulting fire burns big and hot and doesn’t require as much tending once you light it, as the flames start burning the big logs which form the log cabin shape.
How to make: Start off by building a small teepee fire lay. Get large pieces of fuel wood and place them on opposite sides of the teepee. Lay other pieces of wood across the first set of fuel wood, parallel on the other sides of the teepee. Think of the way you build with Lincoln Logs. Build your log cabin until it’s the same height as your teepee, more or less. Light the teepee on fire.
The structure of the parallel/long lay funnels air into the fire, creating a hotter burn, which can come in handy for cooking. Because the structure blocks the wind from the sides, it can also be a good fire lay for windy conditions.
How to make: Place two large long green logs parallel to each other about six inches apart. Start a small teepee fire in between the logs. You can also dig a long trench in the ground and start a fire inside the trench. Rest pots and pans across the logs or trench to create a makeshift cooking range.
The ultimate “set it and forget it” fire lay, this campfire will last for hours without tending. While it does take more work to set it up and get it going, if you need a fire that will keep you warm through the night, without you having to frequently arise to fuel it, this is the lay for you.
How to make: Stack your fuel logs in a pyramid shape, each layer perpendicular to the next. Start with the largest logs on the bottom. With each new layer, use smaller pieces of wood. Position logs so there’s minimal spacing between them. On top of your pyramid, place your tinder and build a small teepee fire. Light your tinder bundle. As each layer of the pyramid burns, it sinks and falls, igniting the layer below it. The fire feeds itself.
The post The 6 Fire Lays Every Man Should Know appeared first on The Art of Manliness.
The Art of Manliness
https://production.ams3.digitaloceanspaces.com/2021/07/Social-Sharing-photo-Template-1-4.png
Among all the features that Laravel provides out of the box, the authentication packages get the most attention from any newcomer. The fact that one can get functional authentication flow by executing a single command seems like magic.
Apart from the traditional form-based authentication approach, Laravel comes with two dedicated packages for API authentication. They are Laravel Passport and Laravel Sanctum.
Between the two packages, Sanctum is easier to work with, targeted at SPAs, and uses a cookie-based approach. Passport on the other hand provides a full OAuth2 server implementation for your applications.
According to Wikipedia – “OAuth is an open standard for access delegation, commonly used as a way for Internet users to grant websites or applications access to their information on other websites but without giving them the passwords.”
Consider a situation where you want to use a third-party email application like Blue Mail where you don’t submit your login credentials to the client application itself. Instead, the client application redirects you to the official Gmail login page and gets hold of your account once you’ve logged in. That’s OAuth at a basic level.
OAuth was first introduced in 2007 and OAuth2 was introduced in 2012 as a revision to the previous version. Before diving into the implementation of OAuth2 using Passport, you’ll have to understand some fundamental concepts.
Don’t worry if you don’t understand these clearly. Everything will become much clearer as you start implementing them. Also, this is not a definitive list. I’ve only mentioned the concepts that I think you should know right away.
The authorization code grant type is probably the most common flow when it comes to OAuth and can be broken into two phases:
Phase 1: The client redirects the user to a special route on the authorization server with a certain set of parameters. In the case of Laravel Passport, this special route is /oauth/authorize and the required parameters are as follows:
Once the client makes a successful request with all the above-mentioned parameters, the server lets the user login and redirects back to the client application with an authorization code in the query string.
Phase 2: The second phase begins with the extraction of the authorization code from the query parameter. The client then has to make a second request to another special route on the authorization server.
This time the request has to be a POST request and contain another set of parameters in the request body. In the case of Laravel Passport, this second special route is /oauth/token and the required parameters are as follows:
If the request is successful, the server will respond with an access token and a refresh token. The access token is your key to the protected data on the resource server and it expires after a certain period. The refresh token can be used for requesting a new access token once the current one expires.
All these functionalities will become much clearer as you implement the authorization grant type by yourself. So, without further ado, let’s jump in.
I usually use the laravel/installer package to bootstrap my projects. As long as you know what you’re doing, you may use any other approach.
laravel new auth-serverOnce the bootstrapping process is finished, open the project directory in your code editor of choice. If you have MySQL installed on your computer, then you can use that. But for the sake of simplicity, I’ll configure SQLite as the default database connection.
To do so, open up the .env file and replace all the database related variables with the following single line:
# ...
DB_CONNECTION=sqlite
# ...
Now create an empty file database/database.sqlite inside your project directory.
This is the default database name and path for SQLite in Laravel. The final step is to migrate the database by executing the php artisan migrate command.
Like any other PHP package, Laravel Passport can be pulled in using Composer. To do so, open your terminal inside the project directory and execute the following command:
composer require laravel/passportDepending on your internet speed, the installation process may take a few seconds. The package comes with some migration scripts of its own. So, once it’s pulled in, the next step is to migrate your database once again.
php artisan migrate:freshThe migrate:fresh command, as you may already know, drops all your database tables and re-runs the migrations. Now if you open your database using a tool like DB Browser for SQLite, you’ll see that five new database tables have been created with oauth_ prefix.
The third and final step is to generate encryption keys needed to generate secure access tokens. The documentation at this point instructs you to execute the php artisan passport:install command.
This command creates the aforementioned encryption keys and also creates two OAuth clients which we aren’t going to use. So, instead of executing the passport:install command, execute the passport:keys command which skips the client creation step.
php artisan passport:keysNow that the package is installed, you can start modifying your code to utilize it. First, make sure your App\Models\User class is using the Laravel\Passport\HasApiTokens trait.

This trait implements the relationship between a user and the clients and tokens. Next, open up your App\Providers\AuthServiceProvider class and in the boot method, add a call to the Laravel\Passport\Passport::routes() method.
This method registers a bunch of new routes necessary for performing Passport-related actions. To make sure that the routes have been registered successfully, execute the following command:
php artisan route:list | grep oauthAs long as you see a bunch of routes prefixed with oauth/ you’re good to go. Finally, you’ll have to change the driver for the api guard inside the config/auth.php file.
Inside the guards array, the default driver for the api guard is token in any new Laravel project. Change that to passport and now your application will use Passport’s TokenGuard when authenticating incoming API requests. Any route that uses the auth:api middleware is now protected by Laravel Passport.
Apart from Laravel Passport, you’ll also need login and register pages for the redirected users to interact with. You can either make your custom register and login routes or use the Laravel Breeze starter kit.
Laravel Breeze will provide you with beautiful-looking auth scaffolding accompanied by the necessary controllers and routes. Execute the following command to install Laravel Breeze in your project:
composer require laravel/breeze --devNext, execute the breeze:install command to publish all the resources that come with Laravel Breeze.
php artisan breeze:installOnce the assets have been published to your project, you’ll have to compile the CSS file. To do so, execute the following commands inside the project directory:
npm install
npm run dev
Finally, migrate your database by executing php artisan migrate:fresh and you’re ready to register a new user.
To create a new user, start the project by executing php artisan serve and visit the http://localhost:8000/register route:
Create a new account using whatever name, email address, and password combination you want. I usually use characters from books I’ve read as dummy users. Now that you have a user, all that is left is creating a new client that can act on behalf of this user.
Clients, as I’ve already said in a previous section, are websites or applications that can act on behalf of a user. For a client to be able to ask for authorization, it has to register with the authorization server. Usually, it’s done through user interfaces, but in this case, we’ll use the terminal.
To create a new client on the auth server, execute the php artisan passport:client command:
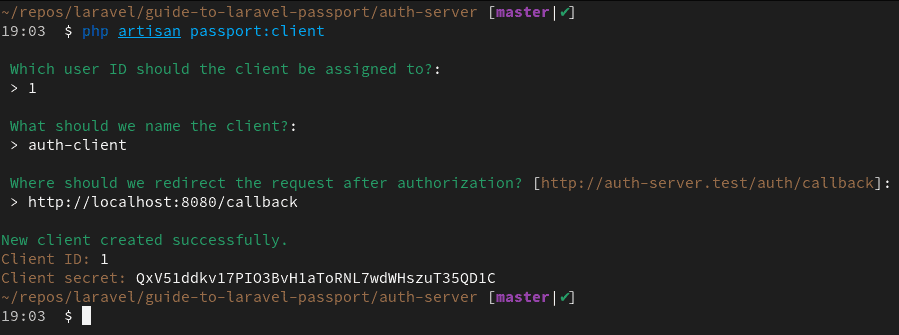
You’ll be asked a bunch of questions. The user ID refers to the owner of this client. In my case, this is 1 because Athelney Jones is the only user I have in my database. The client name can be anything. This is only needed for easy identification of the client.
Finally, the callback URL is where the user will be redirected after they’ve logged in. This is usually a route on the client application. My client application will run on port 8080. That’s why I’ve used http://localhost:8080/callback as the redirect URI. Copy the client ID and client secret somewhere safe – you’ll need them soon.
The server is now ready to handle requests from clients. So in the next section, you’ll learn about creating a client application.
For creating a new project, I usually use Vue CLI 3 for bootstrapping my Vue.js projects. If you want to use something else like React, you may do so. I’ll try my best to keep the explanations simple and easily replicable.
vue create auth-clientIn the next step, manually select features and make sure to select Router from the list of features. Also, make sure that you pick version 2.x and not 3.x to be completely in line with this article. I’m using version 2 of Vue.js as many people are not yet familiar with version 3.
Once the project has been bootstrapped, you’ll have to install axios/axios for making HTTP requests to the server and ljharb/qs for building/parsing query strings. You’ll also have to install the Bulma CSS framework. All these packages can be installed in a single command.
npm install axios qs bulmaThat’s all in terms of package installation for this project. Next, you’ll have to create a .env file on the project root.
Open up the file and add the following environment variables to it:
VUE_APP_OAUTH_CLIENT_ID=
VUE_APP_OAUTH_CLIENT_SECRET=
VUE_APP_OAUTH_CLIENT_REDIRECT=
VUE_APP_OAUTH_AUTH_SERVER=
Make sure you prefix all the variable names with VUE_APP_ or else they won’t be embedded in the client bundle. Populate the VUE_APP_OAUTH_CLIENT_ID, VUE_APP_OAUTH_CLIENT_SECRET, and VUE_APP_OAUTH_CLIENT_REDIRECT fields with the values according to the client you created earlier.
Don’t worry if you didn’t save them somewhere safe – you can retrieve the ID, secret, and redirect URI from the oauth_clients table in your database.
The value of VUE_APP_OAUTH_AUTH_SERVER will be the URL of the authorization server. The authorization server runs on port 8000 by default, so you can put http://localhost:8000 here.
In terms of the user interface, it’ll be a very simple one. I’ll not get into components and other stuff to keep this article simple. Begin by updating the src/App.vue file as follows:
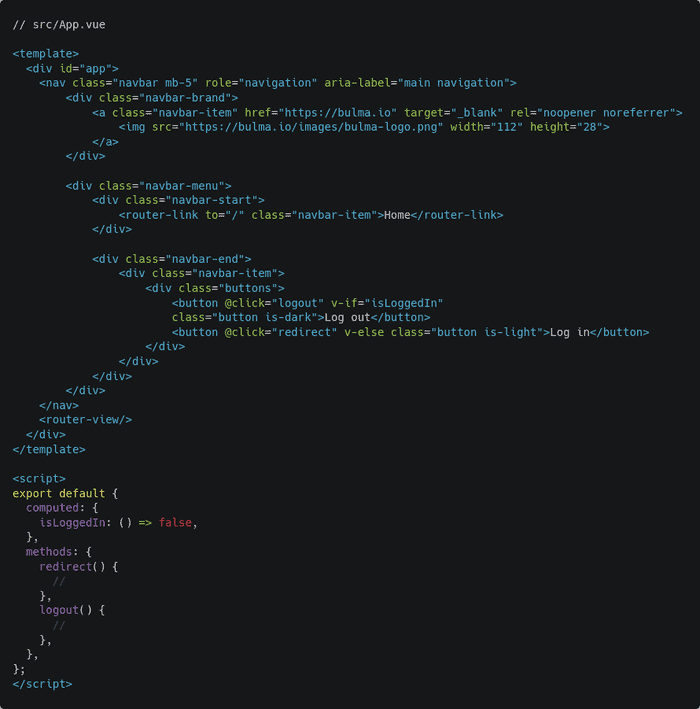
This is the code for a simple navigation bar with a Bulma logo and a log-in button. That isLoggedIn boolean will be replaced by a proper computed property later on. Also, the code for the redirect() and logout() methods will be written later. Next, open the src/views/Home.vue file and update its code as follows:
This code renders a simple message on the screen depending on whether the user is logged in or not. Just like the navigation bar, the isLoggedIn boolean will be replaced by a proper computed property later on.
The views are almost ready to use, but there is only one last thing to do. Open the src/main.js file and add the following line of code in there:
import 'bulma/css/bulma.min.css';Now start the application by executing npm run serve and visit http://localhost:8080 in your browser.
That’s good enough for this article. You’ll have to create one more view for the application to work. Create a new file src/views/OAuthCallbackHandler.vue and put the following code in there:
Finally, open the src/router/index.js file and map this view to /callback route.
You can delete unnecessary files like src/views/About.vue and src/components/HelloWorld.vue from the project. Now that the necessary views are ready, let’s begin implementing the functionalities.
I hope that you remember that in the first phase of the authorization process, the client redirects the user to the /oauth/authorize route on the authorization server.
I’ve also mentioned that the client will have to send a bunch of parameters in the query string. The required parameters are client_id, redirect_uri, and response_type.
Open your src/App.vue file and update the code for the redirect() method as follows. Most of the changes are in the script section and there is a minor change in the template section.
The qs.stringify() function converts objects into URL encoded query strings. So the `${process.env.VUE_APP_OAUTH_AUTH_SERVER}/oauth/authorize?${qs.stringify(queryString)}` statement will translate to http://localhost:8000/oauth/authorize?client_id=1&redirect_uri=http%3A%2F%2Flocalhost%3A8080%2Fcallback&response_type=code during runtime. Setting this value to window.location.href causes a redirect. This is basic JavaScript stuff, nothing fancy.
Let’s test it out. Start the auth-server project on port 8000 by executing php artisan serve – port 8000 and start the auth-client project on port 8080 by executing npm run serve commands.
Now open http://localhost:8080 on the browser and you should see something as follows:
Click on the log-in button and you should be redirected to the authorization server running on port 8000 automatically by the client. Put in your email address, password combination, and hit log in.
You should see a pretty nasty-looking page, but don’t worry, that’s completely fine.
This happens because the Laravel Passport package still uses Bootstrap but the new Laravel projects don’t come with Bootstrap built-in. I’ll show you how to fix this later on, but for now, click on the authorize button and you should be presented with the following page:
This means that the server has authorized the request and sent the user back to the client. The callback URL was http://localhost:8080/callback and that’s what you’ll find in the browser’s address bar. You’ll also find a long string of code in the query parameter.
The second phase, as I’ve already explained, begins by extracting the authorization code received as a query parameter.
http://localhost:8080/callback?code=def5020090a4967a72ee90c96309c39238622e4f92b7d1801efaf3b38b49dc5f9e00bca0ad249aa5181aeac3d5fb9462104aa28c2daf41c6d7f6412eb45f3c518c183e60656974892c2f430da24699bfde42a0e6f23ad9a10fe8feb239dbf9483cee9f223ee87aa1c74378592597786429e69885a3042783d23932cbed4a06a0dc68143d2162ce5bb82bf7d2038d2069f33984d99fd7acc9bbabeb804f0c0f7ddeb722d6b16dc5aad46199e11457b639b7eb2f07876b087279dfb8cc65a2dac3bc59939812c60b5b13ec9bc42f559ad1a3006eff9c791ee5523bc5c7f3812584c577e646ede4739e0a291fd8203bc23fb4518be06b79f4bcc15c8c4be4899bfdeea7518ac1c1116ca9921c20a124421ff6094e567e4006fe9af0fc432acb6a2d74f5ac1276f0b573f90ee14d9348129aa173d262aaa5068b9c25edb7f25032f6d91cef36e73ca0f270d931b74ec2f3d29f436099ec9e9a6969ade3ce5565This long string labeled as code in the query parameter is the authorization code. The client application will have to make a second request to the /oauth/token route on the authorization server.
Open up the src/views/OAuthCallbackHandler.vue file and add a new mounted hook as follows:
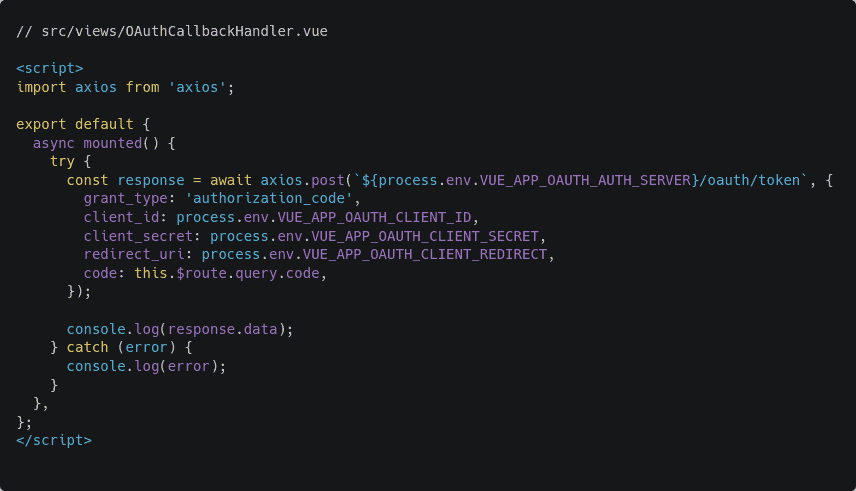
As you can see, the view makes a POST request to the authorization server with a set of parameters in the request body. The client_id and redirect_uri are the same as the previous request.
Three new additional parameters have been added. They are the client_secret, the grant_type, and the code. The code parameter is the authorization code that came back from the authorization server.
To test out the new functionality, restart the client application and perform the entire authorization flow once again. This time, after the server redirects you back to the client, you should see the following output in the browser console:
The server has responded with token_type, an access_token, a refresh_token, and an expires_in variable. This access token is what you need for accessing protected information on the server.
Now that the client has received an access token from the server, it has to be persisted. In this article, I’ll save the access token and the refresh token in local storage. Although this approach is not liked by a lot of people, it’s good enough for an article like this.
Open up the src/views/OAuthCallbackHandler.vue file once again and update the mounted hook as follows:
Instead of logging the response to the console, tokens are now saved in the local storage. The router.push() statement sends you to the home page. Restart the application and do the authorization flow from the beginning. This time, you should be redirected to the home page instead of being stuck at the “Logging you in…” message.
Also, check the browser’s local storage and you should see the access token and the refresh token there.
Persisting the access token in the local storage alone is not enough. The access token is a shared piece of data. That means multiple views are dependent on it. Such data should be served from a single source of truth such as Vuex. but using Vuex for a project as simple as this one seems like overkill. A simple DIY store pattern should do the trick. Create a new file src/store.js and put the following content in it:
The Vue.observable() function makes a variable reactive. Assuming that you’re familiar with the concepts of getters, mutations, and actions in Vuex, this code should be pretty self-explanatory. The setToken() mutation sets a given token value in the store. The isLoggedIn() getter returns true or false depending on the existence of a token.
Now go back to the src/views/OAuthCallbackHandler.vue file and update its mounted hook as follows:
The only change I’ve made is importing the mutations from the store and calling the setToken() mutation with the received access token passed as the parameter.
Also, now that you’ve implemented a store, open src/views/Home.vue and src/App.vue files and update the isLoggedIn computed property as follows:
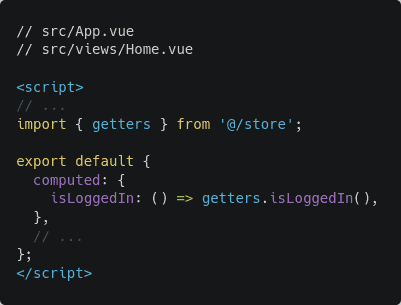
Manually clear the tokens from local storage and perform the entire authentication flow one more time. This time you should be redirected to the home page just like before, but the home page may look a bit different.
Due to the access token being present in the local storage, the isLoggedIn computed variable becomes true. I hope you remember that the “You’re not logged in!” message only shows up if the computed variable is false.
However, this message was supposed to be “Welcome back Athelney Jones!” but you haven’t yet requested the user information from the server. In the next section, I’ll show you how you may use the access token to request such information from the server.
Every Laravel project comes with a protected API route registered inside the routes/api.php file. The /api/user route returns information about the currently authenticated user. In this section, you’ll request the aforementioned route and retrieve the user information.
Open up the src/views/Home.vue file and update its mounted hook as follows:
Once mounted, the home view checks if a user is logged in or not. If yes, the client requests the aforementioned protected route. The client also sends the access token in the Authorization header. Appending Bearer before the access token is required – this is the token type.
Once the data has been fetched, the client then fills the previously defined empty user object with the values from the server. You can look at the user data by simply adding a console.log(response.data); statement somewhere in the function.
Restart the client application and try performing the authentication flow again. This time you should see the user’s name on the home page.
Congratulations if you do see the name. If you don’t, you can always look at the reference repository that comes with this article. Now that you’ve completed the entire authentication flow, the only thing that’s left is implementing a log-out functionality.
Open up the src/store.js file and add the following snippet of code at the end of the file:
This is a simple logout action that wipes out the tokens from local storage and sets null as the token value in the store.
Now open the src/App.vue file and update the code for the logout() method as follows:
Try hitting the log-out button now and you should be back where you were before logging in.
Also, check the local storage and you should see the tokens disappear. With that, you’ve successfully implemented a complete authentication system with Laravel Passport. In the next sections, I’ll show you some additional functionalities that you should know about.
I’ve already mentioned in a previous section that all the access tokens and the refresh tokens have a validity period. This plays a big role in your application’s security.
By default Laravel Passport issues tokens with a validity period of 1 year. What if someone manages to steal one of your access tokens and wreaks havoc in your account?
To prevent this from happening, you should issue tokens with much shorter validity periods. When a token expires, you can use the refresh token and the client secret to request a new access token from the server.
Open the App\Providers\AuthServiceProvider file in the authorization server project and update the code for the boot() method as follows:
For this example, I’m configuring my access tokens to be valid for 15 days and the refresh token for 30 days. You can increase or decrease as per your needs. The refresh token can have a longer period of validity. Even if someone manages to steal the refresh token, it’ll be of no use without the client secret.
Next, you’ll have to write an Axios interceptor in your client application project. Create a new file services/http.js file in your client application project and put the following code in there:
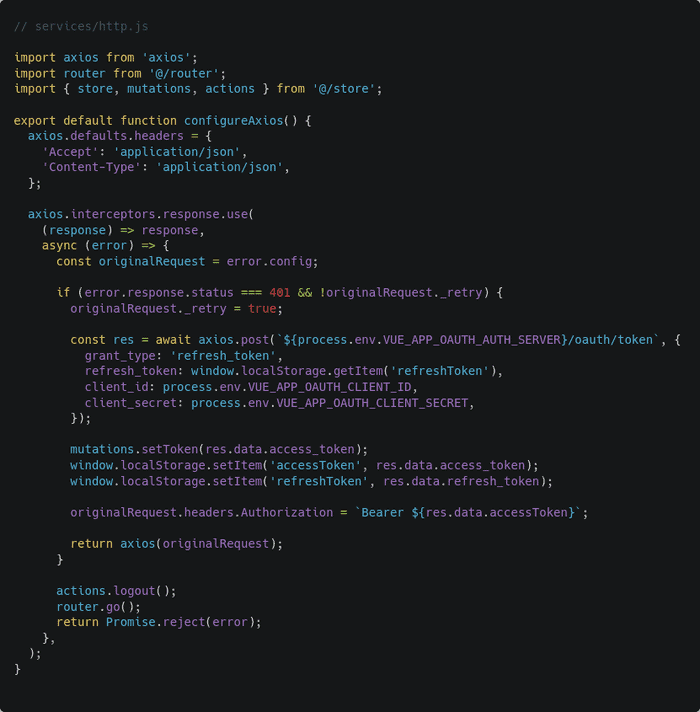
An interceptor, as the name suggests, is capable of intercepting an ongoing request or incoming response. In the code above, I’ve written a very simple response interceptor for refreshing expired tokens automatically.
The axios.interceptors.response.use() function takes two callback functions as parameters. The first one is triggered if the response is successful and the second one is triggered if the response is a failure.
In case of a failure, the failed request configuration is saved inside the originalRequest constant. The originalRequest._retry boolean indicates if the request has already been retried or not.
Laravel Passport returns 401 status code for expired token. So if the error code is 401 and Axios hasn’t retried the request yet, the client sends a request to /oauth/token in the authorization server just like in the callback route. This time, however, the grant_type is refresh_token instead of authorization_code.
The client receives a set of new tokens from the server. It then saves the tokens to the local storage, updates the access token in the failed request, and returns the updated request for Axios to retry.
If the request fails again then the client will fire the logout action and refresh the page. The router.go() function, when called without any parameter, refreshes the current view.
To use this interceptor in your application, add following lines code in the /src/main.js file:
Rest of the code remains unchanged. That’s it. Axios is now globally configured to use the interceptor.
Let’s test out this functionality. First, go back to App\Providers\AuthServiceProvider file in the authorization server project and replace the Passport::tokensExpireIn(now()->addDays(15)); line with Passport::tokensExpireIn(now()->addSeconds(15)); line. This will reduce the validity of access tokens from 15 days to 15 seconds.
Now restart the client application. Clear any previous tokens from the local storage and do the entire authentication flow. Make sure that you keep the browser console open.
Once you’re logged in, wait for 15 seconds on the home page. Once the token has expired, refresh the page. If everything goes fine, you should see the user name appear on the home page just like before but, pay attention to the console window.
As you can see, the request failed with a code of 401. But then the refresh functionality kicked in, refreshed the token, and resent the request to the server with the new access token.
You can look at the network tab as well and you should see something as follows:
As you can see, the fourth request from the top has received a 401. The seventh request then fetched a new token from the server. Finally, the last request has successfully fetched the user information using the new access token.
In a previous section, you saw that the authorization page’s design was completely broken.
This can be fixed very easily. Open a terminal window inside your authorization server project and execute the following command:
php artisan vendor:publish --tag=passport-viewsThis publishes a file resources/views/vendor/passport/authorize.blade.php on your project directory. Open that file and replace the following line:
<link href="" rel="stylesheet">With the following line:
<link href="https://cdn.jsdelivr.net/npm/[email protected]/dist/css/bootstrap.min.css" rel="stylesheet" integrity="sha384-+0n0xVW2eSR5OomGNYDnhzAbDsOXxcvSN1TPprVMTNDbiYZCxYbOOl7+AMvyTG2x" crossorigin="anonymous">This is the link to the latest Bootstrap CSS file. That’s it, now the design should be fixed.
Apart from the authorization code grant type, Laravel Passport supports some other grant types. These are as follows:
On oauth.net, the password grant tokens and the implicit grant tokens are labeled as legacy types and should be avoided. The client credential grant type, on the other hand, has very small use cases.
There is another concept called proof key code exchange, or PKCE for short, that can be useful when you don’t want to use a client secret. If you’ve understood the general authorization grant type properly, you should be capable of understanding PKCE from the official docs.
I would like to thank you for the time you’ve spent reading this article. I hope you’ve enjoyed it and have learned all the essentials of API authentication with Laravel Passport.
You can find the reference code for this article on this GitHub repository – https://github.com/fhsinchy/guide-to-laravel-passport. Although the code is almost the same as the article, there may be some minor changes here and there.
Laravel News Links
https://laravelnews.imgix.net/images/amazon-sqs-leader.jpg?ixlib=php-3.3.1
When it comes to queues, the AWS SQS service is a great option. It’s super cheap, super reliable, and can scale higher than most of us will ever need.
In general, I’m a fan of any service I don’t have to manage myself. Most managed services in AWS are rather expensive. SQS is one of the few very useful services that is extremely affordable.
However, there are a few key differences you need to know about it! Each of the following details have bitten me before. Here’s the little details about SQS that you should know!
One unique part of SQS queues is the Visibility Timeout.
Most of us are probably used to not having to think about this – when we get a job in our Laravel queue worker, no other queue worker will pick up that job.
SQS works a bit differently. Let’s say our Visibility Timeout is set for 10 seconds. If our queue worker takes more than 10 seconds to process the job, SQS will make the job visible again. This means another queue worker may pick that job up!
So we need to be careful that our Visibility Timeout is set HIGHER than it will take to get a job completed.
Visibility Timeout can be set to a default value for each SQS queue, or it can be set for each individual job. You can even extend a visibility timeout on a job that already exists.
Laravel won’t set a Visibility Timeout for you, so it’s best to set a default value that’s higher than it takes to process your jobs.
There is a “hack” you can use to extend a job’s Visibility Timeout, however! You can call the release() method, making sure to set a delay.
For the SQS queue driver, this sets the visibility timeout. If you have a specific job that likely needs more time than the default Visibility Timeout, you can call this method early in your job (with a delay!!) to increase the Visibility Timeout. This will give your job more time to process before being made visible for another queue worker to pick up.
1public function handle() {
2 // Increase visibility timeout for this job
3 // to one minute
4 $this->release(60);
5
6 // Continue on with the job...
7}
If you don’t set a delay, the Visibility Timeout will be zero, which makes the job visible in the SQS queue immediately – likely not what you want!
SQS’s API is all HTTP based. This means that when our queue workers poll SQS for a new job, it’s making an HTTP request to the SQS API.
By default, this does “short polling” – if no job is available when the HTTP request is made, SQS immediately returns an empty response.
Long polling allows you to keep an HTTP request open for a certain amount of time. While the HTTP request is open, SQS may send a job to the queue worker at any time.
Laravel doesn’t do any long polling, but there is something important to know here.
If you use the SQS queue driver, you may see that some jobs take a while to get processed – as if the queue worker can’t find a new job. This is related to how SQS is scaled within AWS.
Here’s the relevant thing to know, from the SQS docs:
With short polling, the ReceiveMessage request queries only a subset of the servers (based on a weighted random distribution) to find messages that are available to include in the response. Amazon SQS sends the response right away, even if the query found no messages.
With long polling, the ReceiveMessage request queries all of the servers for messages. Amazon SQS sends a response after it collects at least one available message, up to the maximum number of messages specified in the request. Amazon SQS sends an empty response only if the polling wait time expires.
It turns out that with long polling, we’re likely to get jobs more quickly as it polls all of the SQS servers that may contain our jobs!
However, Laravel doesn’t support long-polling out of the box. Luckily, we can do something about that. There’s a little note in the bottom of the docs linked above:
Short polling occurs when the WaitTimeSeconds parameter of a ReceiveMessage request is set to 0 in one of two ways:
- The ReceiveMessage call sets WaitTimeSeconds to 0.
- The ReceiveMessage call doesn’t set WaitTimeSeconds, but the queue attribute ReceiveMessageWaitTimeSeconds is set to 0.
Laravel won’t do the first bullet point there – it doesn’t explicitly enable long polling by setting the WaitTimeSeconds when polling for new jobs.
However, if we set the SQS Queue’s default ReceiveMessageWaitTimeSeconds parameter to be greater than 0, long polling is enabled on SQS’s end! While the Laravel queue worker won’t wait for the full value of ReceiveMessageWaitTimeSeconds (it waits for whatever timeout is set by default for making HTTP requests by the AWS PHP SDK), this still triggers SQS to check all servers as if it’s long polling, which means we’re more likely to get jobs from our SQS queue more quickly.
It’s a small thing, but certainly has helped me resolve my occasional annoyance with SQS queues!
There are 2 flavors of SQS:
Standard SQS is the one most of us use. It guarantees “at least once delivery”, and nothing else. This means 2 things:
There’s no de-duplication – if you send the exact same job into SQS more than once, it will get processed more than once. This likely isn’t a surprise. If you send the exact same job into any Laravel queue, you’ll end processing that job more than once!
There’s no guaranteeing message order – You won’t necessarily get the jobs processed in the same order that you send them in, even if you only use a single queue worker.
This is different from other Laravel queue drivers, such as Database and Redis drivers.
Note that Standard SQS attempts to send jobs in the order they are received, but it’s not always possible due to the scale and architecture of SQS. That’s noted in the SQS FAQ here.
FIFO queues have 2 guarantees:
FIFO queues will remove duplicate jobs. You can allow SQS to determine if a job is a duplicate based on the job data, or you can set a Deduplication ID to a value of your choosing. SQS uses that value to compare against other jobs. If it finds a job with the same content or Deduplication ID, it will delete the duplicate job.
So, this helps you ensure that you don’t process the same job more than once.
FIFO also guarantees message order. FIFO queues deliver jobs in the order they are sent in (first in, first out – the oldest job/message get processed first).
No job is sent to be processed until the one before it is completed (deleted). This, however, means that having more than one queue worker is useless. How then, do you scale our FIFO queues to handle more than one job at a time?
You can use Message Groups. Order is only guaranteed within a message group, so you can get concurrency in FIFO queues by assigning a unique message group to jobs that should be processed in order.
For example, you may want to assign a message group per user in your application, in which case you Message Group ID might be set to something like “user-x” where x is the user ID.
There’s a bit more to FIFO queues. To read more about them, see our article on Using FIFO Queues!
Laravel News
https://www.csrhymes.com/img/multi-worksheet-hero.jpg
Published: Oct 13, 2021 by C.S. Rhymes
Recently I had to create a large data export for a project. I like using Spatie’s Simple Excel package to do this as it is very simple to use and works well when exporting large amounts of data to a CSV or Excel file with the ability to stream a download to the browser. This particular project had an additional requirement though, exporting multiple worksheet’s of data at once. Luckily, this package allows you to do this too.
The Simple Excel package uses the box/spout package under the hood. In the readme it states that you can get to the underlying writer using ->getWriter().
$writer = SimpleExcelWriter::create($pathToCsv)->getWriter();
If we jump to the box/spout package docs, there is a section on Playing with sheets. The docs show we can see how to get the current sheet, set a name for the current sheet and how to create a new sheet.
To name a worksheet we can use getCurrentSheet() to get the current sheet with the writer and then use setName() to set the name.
$writer = SimpleExcelWriter::streamDownload('your-export.xlsx')->getWriter()
$nameSheet = $writer->getCurrentSheet();
$nameSheet->setName('Names');
To create a new sheet we can use addNewSheetAndMakeItCurrent() and we can then use setName() once more to set the name of this new sheet.
$addressSheet = $writer->addNewSheetAndMakeItCurrent();
$addressSheet->setName('Addresses');
Now we know how to do the individual tasks we can bring it all together.
use Spatie\SimpleExcel\SimpleExcelWriter;

$stream = SimpleExcelWriter::streamDownload('your-export.xlsx');

$writer = $stream->getWriter();

// Set the name of the current sheet to Names
$nameSheet = $writer->getCurrentSheet();
$nameSheet->setName('Names');

// Add rows to the Names sheet
$stream->addRows([
    ['first_name' => 'Boaty', 'last_name' => 'Mc Boatface'],
    ['first_name' => 'Dave', 'last_name' => 'Mc Dave'],
]);

// Create a new sheet and set the name to Addresses
$addressSheet = $writer->addNewSheetAndMakeItCurrent();
$addressSheet->setName('Addresses');

// Manually add header rows to the Addresses sheet
$stream->addRow(['house_number', 'postcode']);

// Add rows to the Addresses sheet
$stream->addRows([
    ['house_number' => '1', 'postcode' => 'AB1 2BC'],
    ['house_number' => '2', 'postcode' => 'AB1 2BD'],
]);

return $stream->toBrowser();
For more information on creating exports in Laravel, check out Using Laravel Resource Collections with exports.
When creating a single worksheet, the Simple Excel package normally creates the header row for us, but it seems when you create a new sheet you need to define the new headers for your data.
Here are a couple of screenshots of the outputted Excel file:
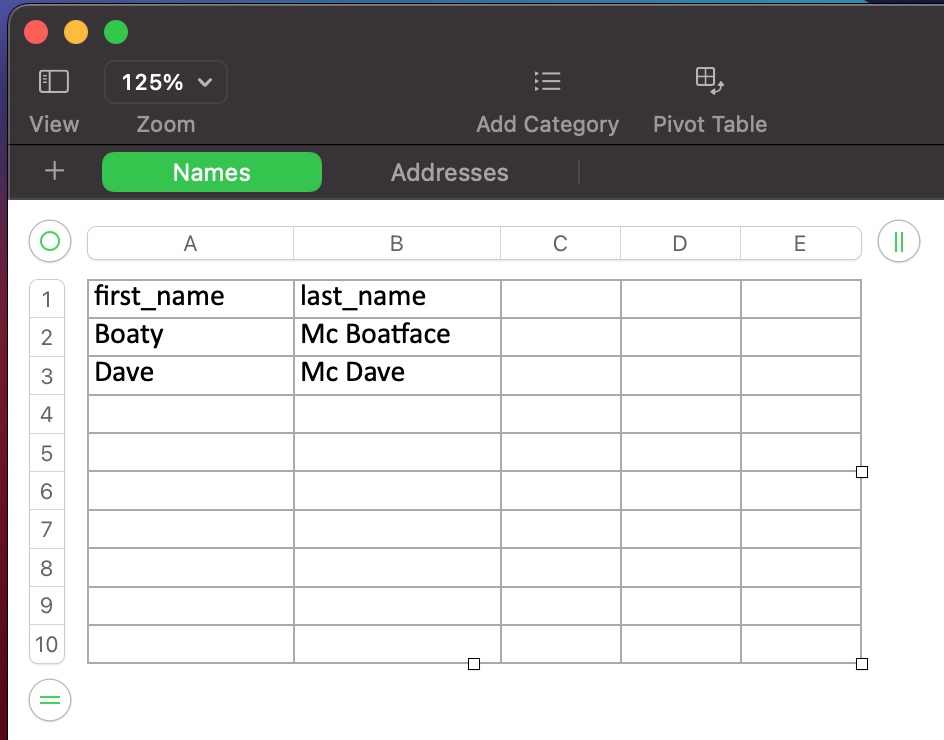
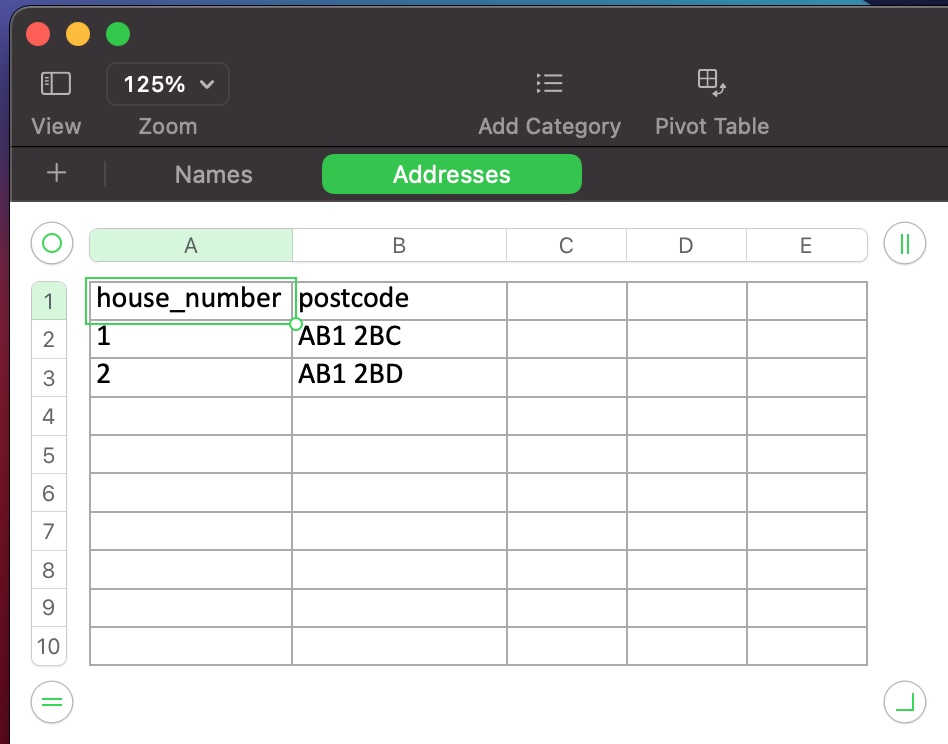
Photo by Wilfred Iven on StockSnap
Laravel News Links
https://42coders.com/storage/88/big_data_sets.jpg
Laravel
Max Hutschenreiter –

Sometimes you need to update the data in your Database. The easiest possibility is to just run an update in your MySQL Database. This is not always working. Especially when you use events or you also want to update relations ….
Commands
In this case, I recommend creating a Command. Even for just one-time changes.
php artisan make:command YourCommandNameProgress Bar
The first tip would be to use a progress bar. In long-running commands, it’s helpful to see that there is progress.
To show you how I just copy the example from the
.
$users = App\Models\User::all();

$bar = $this->output->createProgressBar(count($users));

$bar->start();

foreach ($users as $user) {
    $this->performTask($user);

    $bar->advance();
}

$bar->finish();
Chunking
This works fine until a couple of hundred entries with easy changes. If you want to change more entries with more complexity you should use chunking results.
The problem is if you load everything in your eloquent collection your ram will be a limitation. To avoid it you can use the build-in laravel function chunk on your queries to iterate through the table in sequences.
App\Models\User::chunk(200, function ($users){
    foreach($users as $user){
        $user->name .= ' :)';
        $user->save();
    }
});
One important thing to understand about the chunk function is to understand how the queries run. In this example after the 200 users got iterated through, the base query is being executed with the LMIT function on the table again.
Imagine you have this case
App\Models\User::where('active', true)
    ->chunk(200, function ($users){
        foreach($users as $user){
            $user->active = false;
            $user->save();
        }
    });
In this code, it would go over the 200 users changing the active value to false. In the second run, it would ask the Database again for the users which have active true. The problem is since we just changed the active status of 200 users we would get the list without them. But the Limit function would limit the result to start from 200 to 400 in the results. That means we would skip 200 users which we actually wanted to change.
Laravel has a function to overcome the problem it’s just important to understand when to use it. So the solution in this situation would be.
App\Models\User::where('active', true)
    ->chunkById(200, function ($users){
        foreach($users as $user){
            $user->active = false;
            $user->save();
        }
    });
Database Transactions
Now we are able to execute a lot of changes to our Models and we avoid the problem that our Eloquent collections becoming too big.
But in our last example, we would execute an updated Statement for every single user in our DB. To avoid this I found it a good tactic to use Transactions.
This allows us to reuse our chunks and update the DB per chunk.
App\Models\User::where('active', true)
    ->chunkById(200, function ($users){
        try {
            DB::beginTransaction();

            foreach($users as $user){
                $user->active = false;
                $user->save();
            }

            DB::commit();

        } catch (\Exception $e) {
            //handle your error (log ...)
            DB::rollBack();
        }
    });
In this code example, we combine the chunkById with Database Transactions. This can save a lot of time in updating the DB. You can read more about the
Database Transactions in the Laravel Documentation
.
Transactions can cause trouble if not used correctly. If you forget to commit or rollBack you will create nested transactions. You can read more in the Blogpost
Combine it together
To finalize this code example we can bring in again the progress bar.
$count = App\Models\User::where('active', true)->count();

$bar = $this->output->createProgressBar($count);
$bar->start();

App\Models\User::where('active', true)
    ->chunkById(200, function ($users){
        try {
            DB::beginTransaction();

            foreach($users as $user){
                $user->active = false;
                $user->save();
                $bar->advance();
            }

            DB::commit();

        } catch (\Exception $e) {
            //handle your error (log ...)
            DB::rollBack();
            $bar->finish();
        }
    });

$bar->finish();
So this is my strategy to handle updates on bigger data sets. You can change the Chunk size by your needs and experiments that get you good results. In my experience something from 200 – 1000 is ok.
Sometimes especially when the calculation for the single entry is more complicated I see the whole process getting slower after each processing. It starts with around 2sec per bar advance up to 30 or 40 seconds. Since I experienced it across different commands I am not sure if it’s a general topic. If anyone has any info on it let me know.
Hope this article helps you.
Laravel News Links
https://www.ammoland.com/wp-content/uploads/2021/10/Shield-Plus-OR-THUMB2.jpg
AmmoLand News can’t get enough of the Kel-Tec CP33 Pistol and soon neither will you.
U.S.A. -(AmmoLand.com)- I always try to be objective in my reviews, but I was obsessed with the Kel-Tec CP33 the moment I saw it; From its Robocop pseudo-subgun/PDW appearance to its capacious 33-round magazine, it was everything the 18-year-old-me ever wanted in a 22 handgun. But now that I’ve had a chance to fire nearly 1,000-rounds through the futuristic little gun, is the honeymoon over, or is the CP33 everything I’ve ever wanted?
If you’re read your fair share of gun reviews in the past, it will likely come as no surprise that the answer isn’t a simple yes or no. But if you’re sitting at the gun counter right now, money in hand, and wondering if you should buy one, I’d say go for it if you’re looking for a fun range toy. But if you have a different role in mind for the CP33, read on.

Before I get into the details of the review, let’s first take a look under the hood to see how the Kel-Tec works. First off, the CP33 is a standard direct blowback-operated, semi-automatic magazine-fed pistol chambered in .22lr. If you know anything about rimfire auto-loaders, this should come as no surprise. Virtually all semi-automatic rimfire guns are blowback-operated because it’s very simple to produce and generally less ammunition-sensitive than locked-breech firearms. So does this mean the Kel-Tec CP33 is no different than a more traditional-looking rimfire pistol like a Ruger MKIV or Browning Buckmark?
Absolutely not. It may share the same method of operation, but by that same measure, all bolt-action rifles are identical. But it’s not how the mechanics of the actual firearm that separates the Kel-Tec from other handguns, but rather its magazine.
It’s not just that the CP33’s magazine holds more rounds than virtually any other traditional rimfire handgun, but how the magazine accomplishes this that makes the new Kel-Tec pistol so interesting.
Most rimfire pistols utilize a single stack magazine to feed cartridges to the chamber. By this, I mean literally, a spring-loaded box that situates a straight row of rounds directly beneath one another, not unlike say an M1911. Higher-capacity centerfire pistols like the Glock utilize a staggered column of rounds inside of a magazine whose internal space is roughly 50% wider than the cartridges themselves, but this isn’t practical for rimfire rounds.

Why? Because the rims themselves tend to snag on each other, leading to a malfunction referred to as rim-lock. This is why the Soviets utilized a pan magazine on their DP-28 LMG chambered in the rimmed 7.62x54r cartridge, and why the capacity of the British Bren gun is limited to 30-rounds. (Although the British did field a 100-round pan magazine like the Soviets in limited numbers.)
So how did Kel-Tec solve this issue? With a coffin-style, dual-staggered column magazine. It’s basically two staggered column magazines combined into one.
But wait, you just said rimfire rounds don’t play well with staggered column magazines!
Indeed I did. And the solution by the engineers at Kel-Tec was to add open side walls to the magazine to allow shooters to properly align any rounds that tend to work themselves into a rim lock situation.
If that seems like a bandaid solution to a much bigger issue, you’re not wrong. It definitely doesn’t completely prevent the issues of rimfire rounds in a stagger column magazine, but it should allow a shooter to alleviate the problem before it becomes one.
But does it actually work?

When loaded properly, absolutely. But that’s a bigger caveat than it sounds. It’s very easy for an inexperienced shooter to load the magazine in such a way that it looks like it’s properly aligned, only to find out 20-rounds in, that some of the lower rounds aren’t quite line up. And because the alignment of one round affects all the rest, performing a standard tap rack bang malfunction clearing procedure will result in another failure to chamber. Truth be told, getting all the rounds perfectly lined up is more difficult than it looks, but with practice becomes pretty simple. The best source for how to do so is in the Kel-Tec CP33’s user manual and spare Kel-Tec CP33 22LR 33rd Magazines are readily available.
But enough about the magazine, let’s get a rundown of all the CP33’s features.
Starting at the business end, the Kel-Tec CP33 ships with a 5.5-inch, 1/2×28 threaded stainless steel barrel. I tested this barrel with several muzzle devices, and everything from flash-hiders and linear compensators to my favorite new rimfire suppressor (The Rugged Suppressor Mustang 22 from SilencerShop fit and ran flawlessly.
Behind the muzzle, the CP33 includes a set of fiber-optic super-low-profile post and notch iron sights that are clearly designed to get out of the way of any mounted optics. This is because the entire top of the CP33 features a monolithic Picatinny rail. I found that if a shooter isn’t running a brace, then a pistol optic like a Holosun HE507C or Trijicon RMR on the lowest possible mount made for the most natural-feeling setup.
Under the front sight, the Kel-Tec CP33 features an M-Lok slotted dust cover that appears to be the perfect length to not fit any of the M-Lok rail segments I had on hand. So I needed to modify one by cutting off one of the alignment notches and only using a single mounting bolt. This is something I wouldn’t normally advise since it does compromise the mounting strength of the rail. But since the CP33 is only chambered in .22lr, I took that risk and it paid off handsomely. The Streamlight TLR-10 Flashlight I mounted on the handgun never budged, and its laser held zero after a few hundred rounds.

Alternatively, a shooter could simply buy a super short rail segment or an accessory that directly mounts to the M-Lok slot.
But be advised, a hand-stop or angled grip are completely fine, but a vertical grip can get you in hot water with the ATF if you don’t have a tax stamp for the little polymer pistol.
Behind the dust cover, the CP33 features the iconic Kel-Tec molded grip pattern on its oblong grip. Despite the grip’s appearance, it’s actually fairly comfortable to hold, and it positions the shooter’s hands perfectly to toggle the ambidextrous safety lever behind and above it. But there’s one thing conspicuously absent between the grip and the trigger – a magazine release.
That’s because the engineers at Kel-Tec decided to depart from the gun’s overall very futuristic appearance and incorporate an old-school European-style heel release at the bottom of the grip. (Not unlike the one found on the Walther PPK.) I’m not normally a fan of this setup, but given that the CP33 isn’t a combat pistol, it doesn’t bother me.

Above the grip, the CP33 features an ambi bolt-release that some shooters have reported issues with. But the example I reviewed – which wasn’t a T&E from the factory, but a gun I bought at a local shop – never had an issue with the release whatsoever.
At the very back of the handgun is the charging latch that takes more than a few notes from both the AR-15 and the HK MP7 PDW. It’s non-reciprocating, which is awesome, but it is made of very thin steel with polymer handles at the rear. And to be honest, its construction doesn’t inspire a tremendous amount of confidence. And if that really bothers you, there’s a cottage industry of aftermarket parts makers who now offer more robust all-aluminum charging latches.
Now that you know everything about the gun and its features, let’s talk about how the gun actually ran.
After 1,000 rounds of various types of .22lr ammo, including a half dozen different varieties of standard and high-velocity 22LR ammunition, the Kel-Tec CP33 encountered around 30 malfunctions in my testing. Half of these were first-round failures to chamber either during the first 200 rounds fired through the gun, or after a hundred or so rounds fired suppressed. The former is because the gun needs a little break-in period, while the latter is 100% due to excess carbon build-up from running the gun suppressed.

On an interesting side note, the gun never malfunctioned on the first round when using the bolt release.
Accuracy was good bordering on great, with the Kel-Tec CP33 easily capable of hitting targets out to 100 yards with a reflex sight attached. Though I suspect the gun would be infinitely more capable with a low-powered magnified optic and a stabilizing brace attached. But as it comes, the CP33 makes short work of tin cans, squirrels, and clay pigeons out to 50 yards.

So, is the futuristic polymer pistol worth a buy? With an MSRP of $475 (and in my experience street prices are much lower), the Kel-Tec CP33 Pistol is a solid deal that when babied a little bit, runs like a champ. Yes, the magazine can be problematic if not loaded properly, but with some practice, the CP33 makes a solid plinking pistol that would work well in a role as a hiking gun or varment pistol. Its looks might not appeal to everyone, but for those of us who dream of blasting cyborgs beneath neon signs in a rain-soaked Neo-Tokyo, the CP33 is pretty damn slick.
About Jim Grant
Jim is one of the elite editors for AmmoLand.com, who in addition to his mastery of prose, can wield a camera with expert finesse. He loves anything and everything guns but holds firearms from the Cold War in a special place in his heart.
When he’s not reviewing guns or shooting for fun and competition, Jim can be found hiking and hunting with his wife Kimberly, and their dog Peanut in the South Carolina low country.

AmmoLand.com
https://assets.amuniversal.com/24447c80ff7f01397aa1005056a9545d
Thank you for voting.
Hmm. Something went wrong. We will take a look as soon as we can.
Dilbert Daily Strip
https://assets.amuniversal.com/1f02c2b0ff7f01397aa1005056a9545d
Thank you for voting.
Hmm. Something went wrong. We will take a look as soon as we can.
Dilbert Daily Strip