http://img.youtube.com/vi/A3-p3psej_w/0.jpgHow to create Complex headers in DatatableLaravel News Links
MySQL 101: Basic MySQL Server Triage
https://www.percona.com/blog/wp-content/uploads/2021/04/MySQL-101-Server-Triage.png
 So your MySQL server has crashed. What do you do now? When a server is down, in my opinion, there are two steps that are essential and both are extremely important and neither should be neglected:
- Save diagnostic information for determining the root cause analysis (RCA).
- Get the server back up and running.
Too many people rush to Step #2 and lose pertinent diagnostics from Step #1. Likewise, too many people will spend too much time on Step #1 and delay getting to Step #2 and restoring service. The goal is to collect diagnostics as quickly as possible for later review while getting service restored as fast as possible.
As a Technical Account Manager (TAM) and assisting on server restoration calls, I have seen both issues at play. Technical resources have a tendency to get so bogged down in trying to understand the cause of the server outage that they forget that the downtime is costing the business money. The desire to crawl through server logs, review metrics, pour-over system metrics, and so on, can be too tempting for some who are concerned that important diagnostic data will be lost when service is restored. This is a valid concern, but there must be a middle ground.
Conversely, many, especially those in management, will demand service is restored immediately to continue business functions. Of course, after the service is back up, the demand for an RCA will come. Sadly, many metrics, and some logs, are lost when a server is bounced. Below are basic guidelines on what metrics to collect for MySQL. The steps are in no particular order.
- Save a copy of the MySQL Error Log.
sudo cp /path/to/datadir/*.log /some/where/safe
- Make a copy of the MySQL configuration file.
sudo cp /path/to/my.cnf /some/where/safe
- Make a copy of system logs and save them somewhere on persistent storage in a location that will not be overwritten. Consider doing something like the following on Linux:
sudo cp /var/log/syslog /some/where/safe/syslog
sudo cp /var/log/messages /some/where/safe/messages
sudo journalctl -e > /some/where/safe/journalctl.txt
- If MySQL is running still and you can log in, get some MySQL metrics. You will want to save the output into files somewhere.
sudo mysqladmin -i10 -c10 proc > /some/where/safe/mysql_procs.txt
mysql> SHOW GLOBAL VARIABLES;
sudo mysqladmin -i10 -c10 ext > /some/where/safe/mysql_ext.txt
mysql> SHOW ENGINE INNODB STATUS\G
- If MySQL is running and you have Percona Toolkit, you should collect some pt-stalk output.
sudo ./pt-stalk --no-stalk --iterations=2 --sleep=30 --dest=/some/where/safe -- --user=root --password=<mysql-root-pass>;
- If you have space and time, a copy of the database files (data directory in MySQL) could be helpful. Certainly, for many installations, getting all of the data files will be impossible. If it is a small database and space and time allow, it can be best to get all the files just in case.
sudo cp -R /path/to/datadir /some/where/safe/datadir
- Copy database logs and save them somewhere safe for later review. Systems like Percona XtraDB Cluster (PXC) will create GRA files during an issue which can be really helpful to look at to determine the root cause. By combining the GRA header file with the contents of the GRA log files, you can use the mysqlbinlog command to get the records of transactions causing issues. More information can be found in one of our older blogs here
Percona XtraDB Cluster (PXC): what about GRA_*.log files?.sudo cp /path/to/data/dir/GRA* /some/where/safe/datadir/
- Save system metrics pertaining to CPU, I/O, and memory usage:
sudo mpstat -a 1 60 > /some/where/safe/mpstat.txt
sudo vmstat 1 60 > /some/where/safe/vmstat.txt
sudo iostat -dmx 1 60 > /some/where/safe/iostat.txt
- Save system info.
sudo cat /proc/cpuinfo > /some/where/safe/cpuinfo.txt
- If you have Percona Toolkit, the following would be very helpful:
sudo pt-summary > /some/where/safe/pt-summary.txt
sudo pt-mysql-summary > /some/where/safe/pt-mysql-summary.txt
- Get hardware diagnostics.
# disk info
sudo df -k > /some/where/safe/df_k.txt
sudo lsblk -o KNAME,SCHED,SIZE,TYPE,ROTA > /some/where/safe/lsblk.txt
sudo lsblk --all > $PTDEST/lsblk-all;

# lv/pv/vg only for systems with LVM
sudo lvdisplay --all --maps > /some/where/safe/lvdisplau-all-maps.txt
sudo pvdisplay --maps > /some/where/safe/pvdisplay-maps.txt
sudo pvs -v > /some/where/safe/pvs_v.txt
sudo vgdisplay > /some/where/safe/vgdisplay.txt

# nfsstat for systems with NFS mounts
sudo nfsstat -m > /some/where/safe/nfsstat_m.txt
sudo nfsiostat 1 120 > /some/where/safe/nfsiostat.txt

# Collect hardware information
sudo dmesg > /some/where/safe/dmesg.txt
sudo dmesg -T free -m > /some/where/safe/dmesg_free.txt
sudo dmesg -T > /some/where/safe/dmesg_t.txt
sudo ulimit -a > /some/where/safe/ulimit_a.txt
sudo cat /proc/sys/vm/swappiness > /some/where/safe/swappiness
sudo numactl --hardware > /some/where/safe/numactl-hardware.txt
It goes without saying, it would be best to script the above into a useful bash script you can run when there is an issue. Just be sure to test the script in advance of an issue.
Again, the goal is to preserve useful diagnostic data that could be useful for determining the root cause of the issue at a later time after the service is restored. Just don’t get caught up in looking through the above diagnostics! Certainly, more data is better but the above is a great starting point. As time goes on, you may realize you wish you had other metrics and can add them to your script or Standard Operating Procedure (SOP).
Naturally, adding monitoring like Percona Monitoring and Management (PMM) would be a great option that can save you a lot of time and collect even more trends over time which can be extremely helpful.
With the above diagnostics, you would have a ton of information in the event of an issue to find the root cause. Now, you can sort through the diagnostics. Of course, if you need help with that, Percona can help you here as well.
Planet MySQL
Carry a Concealed Firearm Because You Can Stop Mass Murder and Save Lives
https://www.ammoland.com/wp-content/uploads/2018/10/Concealed-Carry-500×282.jpg

U.S.A.– -(AmmoLand.com)- Doctor John Lott is the president and one of the principal researchers at the Crime Prevention Research Center. Dr. Lott recently reminded us that guns save lives and stop mass murder. I’d forgotten about a few of these incidents, though I’m sure I read a little about them at the time. In contrast, the news media covers mass murderers for days on end. To help offset that media bias, let’s look back only 10 months to see what we did.
You might have forgotten, but you saved lives.
- Do you remember the armed attack at a shooting range/ gun store in Metairie, Louisiana that happened only a few months ago? The murderer was carrying a loaded gun in his hands. The staff at the store asked him to put his gun away. Instead, the murderer attacked staff and customers. Two victims were killed before staff members and customers shot the murderer and ended the attack. Then, staff and customers called 911.
- It was back in August of 2020 when an armed man saved lives in a Walmart in Weslaco, Texas. Our armed good guy saw another man walk into the store dressed in black and carrying a rifle. The armed citizen drew his firearm and pointed it at the intruder. A security guard also helped hold the would-be attacker. The attacker was furious because you stopped him from killing people. Police arrived and took the rifle. The attacker was shot by law enforcement officers when he drew his handgun and threatened the police.
- You saved lives again last July in a sports bar in Dallas, Texas. A man was turned away from the bar due to restricted seating during the Covid epidemic. The angry customer came back and started shooting into the crowd. Four people were injured before armed patrons shot back and the attacker ran away. Police arrived minutes later.
- It was the middle of July when you were stopped at a traffic light in Brownsburg, Indiana. You saw two men run across the intersection. These two men were being chased by a man with a gun. The attacker shot them. You stepped out of your car and then the attacker shot at you. You shoot back and ended his attack. Emergency medical services are able to save one of the attacker’s intended victims.
- You saved lives in early July as you waited to get into a restaurant in Hummels Wharf, Pennsylvania. A stranger stopped his pickup truck in the middle of the parking lot. The driver got out and shot two people standing in line near. You draw your firearm and shoot back ending his attack. You call 911.
The list of armed defense incidents is much longer, but those are the ones that happened in the last 10 months. I suspect you are like me and forgot how often guns save lives. You forget the virtue of an armed society.
Give Dr. Lott a read.
About Rob Morse
The original article is posted here. Rob Morse writes about gun rights at Ammoland, at Clash Daily, and on his SlowFacts blog. He hosts the Self Defense Gun Stories Podcast and co-hosts the Polite Society Podcast. Rob was an NRA pistol instructor and combat handgun competitor.
The post Carry a Concealed Firearm Because You Can Stop Mass Murder and Save Lives appeared first on AmmoLand.com.
AmmoLand.com
Project Appleseed Announces 2021 Schedule of Ohio Events
https://www.buckeyefirearms.org/sites/buckeyefirearms.org/files/styles/slideshow/public/field/image/project-appleseed.jpg?itok=e3-2hg3Q

by Steve Branam
As spring approaches, the Appleseed trail will soon start back up and we will begin building another group of Riflemen here in Ohio.
For those who don’t know about the Appleseed Project, we are a national 501(c)(3) non-profit organization that teaches the fundamentals of rifle marksmanship and combines this with a series of presentations on our shared heritage as Riflemen and Riflewomen.
Appleseed started thirteen years ago with the goal to reawaken America to the fading art of rifle marksmanship. We do that by teaching the fundamentals of field marksmanship and by sharing with our attendees the story of April 19, 1775.
Paul Revere’s ride, the events on Lexington Green, the engagement at the North Bridge, all have profound lessons for all of us on our shared marksmanship heritage and the price of liberty. Attending an Appleseed event will reacquaint you with our shared heritage and provide you with the rifle skills necessary to pass this heritage on to the next generation.
Our two-day events are staffed by skilled instructors who will share with you the skills needed to consistently hit targets out to 500 yards. Bring what you want to shoot. Open sights, scopes, centerfire or rim fire, we work with what our students bring.
Most of our work is done at 25 meters. Saturday at an Appleseed is heavy on instructions and drills. All this leads up to the Appleseed Qualification Test, the infamous AQT.
Our AQTs are a four-stage test to challenge your skills. We put you under some time pressure and ask you to execute 40 shots on targets that simulate ranges from 100-400 yards. It takes 210 points out of a possible 250 for you achieve your Rifleman’s patch and to leave with the pride of knowing that you are carrying on the great American Rifleman tradition.
Our events are open to all regardless of your skill levels. Youth are welcome as long as they can be safe on our line. We have worked with attendees from 8 to 80. Whether you are new to rifle marksmanship or are looking for a tune-up on your skills, we encourage you to join us for a weekend.
I can guarantee you will leave with a new appreciation for your skills, your country and the value of liberty.
Our 2020 schedule is available at appleseedinfo.org and we encourage you to come check us out. If you have any questions, feel free to contact me at ohio@appleseedinfo.org.
All of us at Appleseed would like to thank the Buckeye Firearms Association for supporting our program.
Buckeye Firearms Association
Female Firearms Ownership: Why Women Buy Guns
https://www.pewpewtactical.com/wp-content/uploads/2021/04/AGAG-New-Shooter-Survey-2020.png
If you’ve wandered into the gun store recently, you might have noticed it looks a little different.
Among the rows of black handguns and FDE colored rifles, pinks, purples, and teals peer out from the gun case. Bedazzled ear pro, lacey holsters, and other feminine accessories line the shelves.
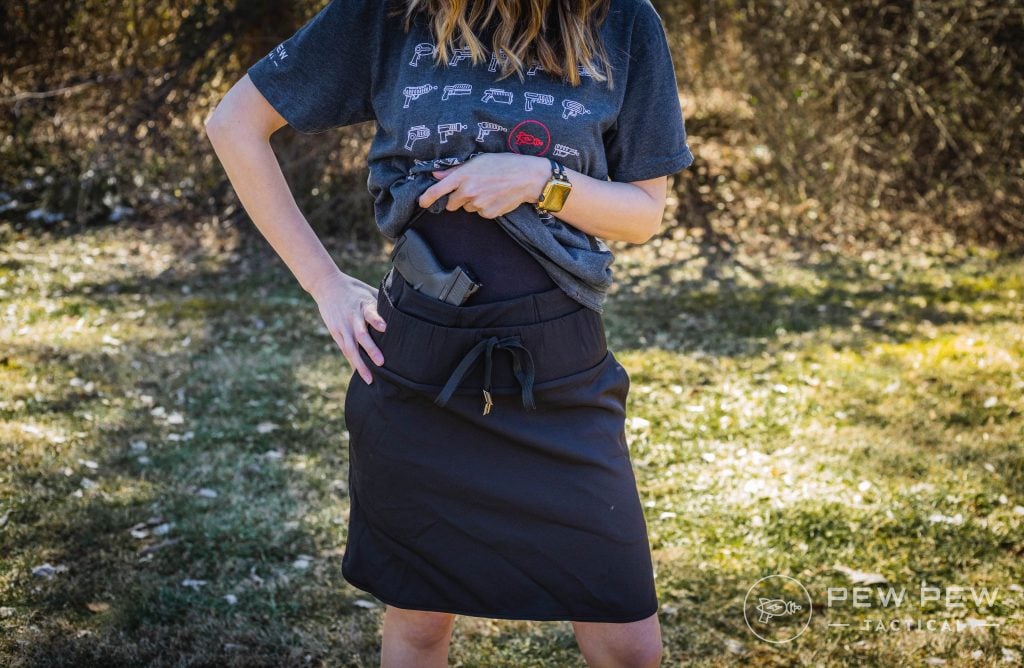
While the gun industry often looks to capitalize on new shooters, one demographic in particular is getting a lot of attention — women.
But what shaped this dramatic increase in female gun owners?
Gun Ownership Among Women
According to a Pew Research Center survey, in 2005, women accounted for only 13% of American gun owners.
By 2020, that number almost doubled, with women representing nearly 25% of gun owners in the United States.
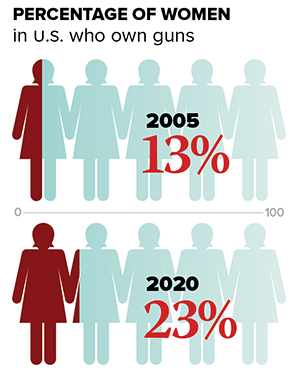
Female gun owners are considered the fastest-growing demographic in the gun world.
But female gun ownership looks different than that of men.
On average, women opt into guns later in life. Women, on average, buy their first gun around the age of 27. In contrast, the average age for a man’s first gun is 19.
Self-defense is the most cited reason for gun ownership for both sexes. However, men typically list recreation, competition, or hunting alongside defense as reasons for purchasing firearms.
On the other hand, self-defense can often be the only reason for gun ownership among women. 27% of female gun owners say they have no further interest in firearms outside of personal protection.
In the U.S., 19.3% of women experience rape while 43.9% face sexual violence other than rape. With more than half of adult women living alone in the U.S., it’s no surprise women stock up on safety tools.
And firearms offer a solution.

“It’s a very helpless feeling knowing you can’t protect yourself or your family,” Terry Marsh told News & Observer after an intruder almost entered her home at 1 a.m. “If I had a gun or a way to protect myself, it would have given me a little bit of power, and I’d have felt secure.”
Marsh later went out and purchased her first handgun.
She’s not alone.
Women’s centric shooting organizations like The Well Armed Woman and A Girl & A Gun aim to encourage new shooters. They offer an alternative to all-male ranges and classes. Ultimately, these organizations emphasize safety thorugh training and education.
A Girl & A Gun boasts over 6,000 members with chapters in almost every state. The group noted a significant increase in interest and participation…especially in 2020.
Pandemic, Protests, and 2020
2020, a year renowned for COVID-19 and heightened social tensions introduced more Americans to guns, gear, and ammo.
The FBI recorded over 39 million background checks for firearms in 2020. Just months into 2021, that number already sits at 12 million.
But in a time where gun sales remained at an all-time high, not all gun purchases were made by men.
In fact, women accounted for 40% of gun purchases in 2020.
Even gun organizations experienced this influx, with A Girl & A Gun’s membership spiking over 150% just by July 2020.

An examination of its new members showed that while most grew up in a home without guns, the fear of civil unrest pushed them to reconsider a gun-free home.
Kathryn, a woman from Texas, was one such gun owner. A trauma surgeon and admittedly anti-gun, she said the pandemic and unrest was a contributing factor in her decision to purchase a firearm for the first time.
“I’m a trauma surgeon and have treated a fair share of gunshot victims in Chicago and Houston. I have been pretty ‘anti-gun’ as a result up until COVID,” she told surveyors with A Girl & A Gun. “At that point, I figured I might as well get comfortable with at least handling firearms in case I had to use one.”

Instructors and educators also faced an influx of new shooters signing up for classes, including the female demographic.
“We are seeing single moms, the elderly, and most surprising is middle age couples that have never seen the need to be armed,” said GW Ayers III, chief operating officer at Rainier Arms Firearms Academy, the training unit of Wichita, Kansas-based Rainier Arms Group.
In 2020, Rainier says enrollment for its CCW courses jumped 50%.

Cherie Hicks, a 58-year-old mother and yoga instructor from California told Pew Pew Tactical that though she is an experienced shooter, she plans on “amping up” her training.
“After the rioting and the looting started, that was it,’’ Hicks explained.
Though COVID-19 vaccinations are rolling out and riots have calmed, gun sales haven’t slowed down — nor does it look like they will.

The National Shooting Sports Foundation’s Mark Oliva said with enhanced gun laws potentially on the horizon, Americans continue to stock up — women included.
“It is clear that firearm sales in March were driven by gun control calls from politicians to ban entire classes of firearms and enact onerous gun laws,” Oliva told CNN Business.
Evolving Industry
With estimates in the millions, more and more American women are entering the gun community. While some bemoan the use of pinks and purples in gun stores, experts say it’s imperative the industry encourages ladies.
“Women are making a difference in the world of firearms,” Carrie Lightfoot, founder of The Well Armed Woman, said. “I believe there is no denying that women are here to stay and, therefore, need the industry to continue to understand who they are and what they want.”

And the industry seems to be trying. Every day more accessories aimed at women sprout up in online stores. Even more encouraging, women-owned brands continue to enter the firearms landscape. These niche businesses specialize in firearm-themed gear apparel and accessories for women.
This approach is smart, according to Lightfoot’s data. Her small sampling of 5,000 women revealed ladies poured over $3.5 million into guns in 2019.
“The female market offers enormous potential and dollars to the firearms industry,” Lightfoot said.
The earning potential for gear, guns, and accessories marketed towards women is endless, so long as the industry is willing to provide intelligent, safety-conscious designs.
Conclusion
Armed with cash and willing to invest in their safety, female gun owners represent a fast growing subset of the gun community.

As long as the industry continues to support women through education, training, and gear, there are no indications lady shooters will slow down any time soon.
What are your thoughts on female gun ownership? Share your comments below. And make sure to check PPT every Wednesday for a new women-friendly article. In the meantime, check out our guide on the Best EDC Items for Women or read up on why gun publications should be including women.
The post Female Firearms Ownership: Why Women Buy Guns appeared first on Pew Pew Tactical.
Pew Pew Tactical
MySQL and UUIDs
In ALTER TABLE for UUID we discuss currently proper way to store and handle UUID in MySQL. Currently it works, even in a performant way, but it still hurts. It should not.
Definition of UUID
The RFC 4122 defines various types of UUID, and how they are being formatted for presentation and as a bit field on the wire. As this document was written bei Leach and Salz, among others, RFC 4122 UUIDs are also called “Leach-Salz UUIDs” (for example in the Java Documentation).
There are other UUID variants, used in other systems (NCS, and Microsoft “backwards compatibility”).
A RFC 4122 UUID is a special 128 bit long value (“16 octets”). It is supposed to be laid out like this:
 0 1 2 3
0 1 2 3 4 5 6 7 8 9 0 1 2 3 4 5 6 7 8 9 0 1 2 3 4 5 6 7 8 9 0 1
+-+-+-+-+-+-+-+-+-+-+-+-+-+-+-+-+-+-+-+-+-+-+-+-+-+-+-+-+-+-+-+-+
| time_low |
+-+-+-+-+-+-+-+-+-+-+-+-+-+-+-+-+-+-+-+-+-+-+-+-+-+-+-+-+-+-+-+-+
| time_mid | time_hi_and_version |
+-+-+-+-+-+-+-+-+-+-+-+-+-+-+-+-+-+-+-+-+-+-+-+-+-+-+-+-+-+-+-+-+
|clk_seq_hi_res | clk_seq_low | node (0-1) |
+-+-+-+-+-+-+-+-+-+-+-+-+-+-+-+-+-+-+-+-+-+-+-+-+-+-+-+-+-+-+-+-+
| node (2-5) |
+-+-+-+-+-+-+-+-+-+-+-+-+-+-+-+-+-+-+-+-+-+-+-+-+-+-+-+-+-+-+-+-+
The high bits in clk_seq_hi_res define the variant, and anything starting with the bit sequence 10 is a RFC 4122 compliant UUID.
The high nibble in time_hi_and_version defines the RFC 4122 Type (or version), the algorithm used. RFC 4122 itself defines versions 1 to 5 (version 0 is unused).
There is an expired draft that defines a version 6, which is specifically designed to use a primary key for databases. It uses the same timestamp value as Type 1, but stores the bytes so that ordering by creation time is preserved. It also relaxes the requirements on the node field, officially allowing different sources for bits than the MAC address. Sample implementations are available in various languages.
UUIDs are all over the place in Windows and also in Java. Databases have to handle them as “application generated primary keys”. That’s why they are important and should be treated with some attention.
Handling UUID in MySQL 8
MySQL provides functions to generate UUIDs, to check if a thing is a validly formatted string that looks like a UUID, and to convert UUIDs to 128 bit bitstrings and back.
The latter two functions have a special flag to improve performance with InnoDB. This flag is by default off. No attempt is made to automatically do the right thing dependent on the UUID type.
UUID function
The MySQL function UUID() returns a RFC 4122 Type 1 UUID.
mysql> select uuid_to_bin(uuid()) as uuid;
+------------------------------------+
| uuid                               |
+------------------------------------+
| 0x80462D3C96AB11EB94BBBA2278F258E1 |
+------------------------------------+
1 row in set (0.00 sec)
Formatted like in the RFC, we get the following values:
80462D3C
96AB 1 1EB
9 4 BB B A22
78F258E1
Specifically, the clk_seq_hi_res contains the variant value, 9, and the time_hi_and_version contains the version, 1.
According to the RFC, the variant 9 = 1001 = 10x (a RFC 4122 compliant UUID).
Of the Versions defined in RFC 4122, it is Version 1 or Type 1, “The time-based version in this document”. The generation algorithm is defined in section 4.2 of that RFC.
So a MySQL generated UUID is always a RFC 4122 Type 1 (time based) UUID.
Java generated UUID values
Compare with the Java UUID Class:
We have randomUUID(), returning a Type 4 UUID and nameUUIDFromBytes() for Type 3 and a generic Constructor that takes any 128 bit value. So what we get from Java is likely name based or random UUIDs generated by the application.
Name based UUIDs are fixed for a fixed name, so they pose no problem when used with MySQL as a primary key.
Random UUIDs are completely random. There is nothing to optimize for MySQL here.
Neither is a good choice to use as a kind of application controlled distribiuted primary key.
Based on the reasoning in ALTER TABLE for UUID, Java developers that are using UUID for this purpose would be well advised to implement and use a Type 1 UUID. It seems that such an implementation is not available by default as part of java.lang.util, but other implementations exist.
IS_UUID() function
The IS_UUID() predicate returns 1 for all strings that can be parsed as a UUID.
That is, it checks for one of three ways to write the UUID, and that it contains only valid hex digits in the places that actually contain data. No attempt is made to validate any of the bits. Code is here, and the actual parsing happens here.
UUID_TO_BIN() function
MySQL allows three ways to write UUIDs, as a 128 bit hex string (6ccd780cbaba102695645b8c656024db), as a 128 bit hex string with dashes in the right places (6CCD780C-BABA-1026-9564-5B8C656024DB) and as a 128 bit hex string with dashes in the right places and enclosed in curly braces ({6CCD780C-BABA-1026-9564-5B8C656024DB}).
This is not a particular dense packing of data for storage. The UUID_TO_BIN() function takes any of these strings and returns a VARBINARY(16) for storage.
The function has an optional second parameter, the swap_flag. When applied to a Type 1 UUID, the time bytes are being swapped around so that chronological ascending UUIDs from the same node are also having numerically ascending values. This optimizes storage with InnoDB.
- Type 1 UUID: It is recommended you define UUID columns as
VARBINARY(16)and use theUUID_TO_BIN(uuid_string, 1)function to store data. - Type 6 UUID: You should use
UUID_TO_BIN(uuid_string, 0)to store Type 6 UUIDs, because Type 6 has been specifically created to avoid the swapping of time bytes around. - Other types: These do not profit from swapping, so also use
UUID_TO_BIN(uuid_string, 0).
BIN_TO_UUID function
The inverse function to UUID_TO_BIN is BIN_TO_UUID(). It needs the same swap_flag value as has been used at write time in order to unpack the data correctly.
It should hurt less
This all should hurt less.
- MySQL should have a native
UUIDcolumn type, which stores data internally in aVARBINARY(16)(orBINARY(16)). - It should accept all three notations as input (hex string, with dashes, with curly braces and dashes). It should return a hex string without dashes or curlies.
- It should validate variant and type (version), allowing Types 1 to 6.
- It should auto-convert (swap) data for Type 1, but not for any other type.
- There should be a formatting function that turns a hex string without dashes into a UUID string with dashes, or a UUID string with dashes and curlies.
That is, I want to be able to
mysql> create table u ( u uuid not null primary key, dummy integer );
mysql> insert into u values (uuid(), 1);
mysql> select u from u\G
u: 6ccd780cbaba102695645b8c656024db
mysql> select format_uuid(u, 0) as u from u\G
u: 6CCD780C-BABA-1026-9564-5B8C656024DB
mysql> select format_uuid(u) as u from u\G
u: 6CCD780C-BABA-1026-9564-5B8C656024DB
mysql> select format_uuid(u, 1) as u from u\G
u: {6CCD780C-BABA-1026-9564-5B8C656024DB}
and internally, this is stored as 0x1026BABA6CCD780C95645B8C656024DB, because variant is RFC 4122 and Type is 1.
For any other Type of the RFC 4122 the internal swapping does not happen.
Trying to store anything that is not a RFC 4122 variant is an error. Trying to store anything that is a RFC 4122 variant but not a Type 1 to 6 is an error.
Planet MySQL
Treadmill Demolition Derby
https://theawesomer.com/photos/2021/04/treadmill_demolition_derby_t.jpg
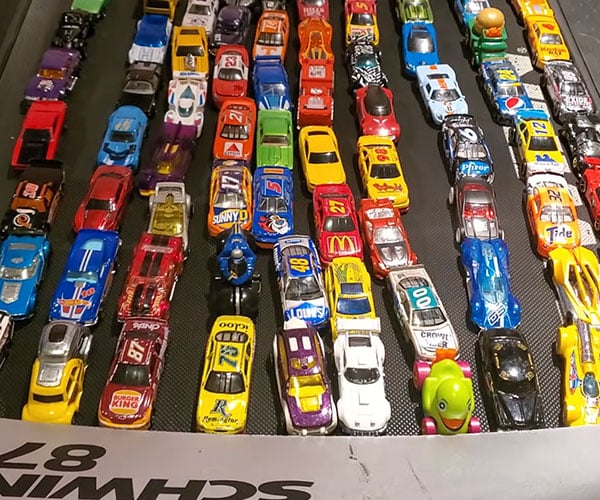
“This is gonna be a quick race, folks.” YouTuber Steve Wilkins and his young sidekicks Tyler and Dylan have been posting a series of videos in which he races toy cars on his treadmill. In this clip, they put 100 cars on the belt, then cranked up the speed, resulting in a chaotic start that quickly culls the field.
The Awesomer
Chris Schwarz’ Latest Woodworking Workbench Book is FREE (PDF)
https://i1.wp.com/toolguyd.com/blog/wp-content/uploads/2021/04/Chris-Schwarz-Anarchist-Workbench-Book-Hero-Woodworking-Table-Image.jpg?resize=600%2C409&ssl=1

Christopher Schwarz is well-known in the woodworking industry, from his articles at Popular Woodworking, to his Lost Art Press publishing company.
You might have seen some of his books before, such as his book on workbench design, theory, construction, and use, which is available via Amazon.
I wrote about some of Schwarz’ “Anarchist” books before, and they’re quite good. They’re unlike any other woodworking or how-to books I’ve ever read before, and are somehow as conversational as they are informative.
Schwarz came out with a new book last year – The Anarchist’s Workbench. It seems I missed this news, as I only first learned of this book last night.
He describes The Anarchists’ Workbench as:
a detailed plan for a simple workbench that can be built using construction lumber and basic woodworking tools. But it’s also the story of Christopher Schwarz’s 20-year journey researching, building and refining historical workbenches until there was nothing left to improve.
There are two versions of The Anarchist’s Workbench – a hardcover copy, priced at $27, and a digital copy that Lost Art Press is giving away for free. That’s right, free, as in $0, and without any DRM or catches of any kind.
Why would Schwarz give this book away for free? In a blog post, he says that 1) he could afford to, 2) some people might hesitantly believe this new book too closely resembles his previous books, and so the free copy can serve as a sort of preview for them, and lastly:
Finally, I want this information – my last book on benches – to be free and widely available to everyone today and in the future. By putting it out there for free, I hope people will be inspired to build a bench, even if it’s not the bench in this book.
I’ve purchased some of the other books published by Lost Art Press, by the same and different authors, and they are very well-made. Even with a free PDF copy, I might eventually buy a hard copy (once I’m done with my currently very long reading list), and I imagine others will to.
I’ve read through some parts of The Anarchist’s Workbench already, and it’s an enjoyable book.
In this book, Schwarz discusses the how and why behind his design for a woodworking workbench sourced from home center lumber, and he also shares details about the personal and woodworking journey that has brought him here.
What is always refreshing about Schwarz’s writings these days is that he isn’t shackled by popular opinion, or the need to stay within anyone else’s lines.
This is a good book, and if it’s not quite your style, keep it in mind. Personally, I’m leaning towards a woodworking workbench direction I never would have thought I’d go in, and so never say never. If you like what you read, consider buying a physical copy.
Hardcover Book
Price: $25-27
Buy Now via Lee Valley
Buy Now via Lost Art Press
Where are the books made?
All of our books are printed in the United States on the best materials we can obtain. We manufacture all of our books to last at least a century. That means using expensive sewn bindings, fiber tape and thick hardbacks (when possible).
Digital Copy
Price: FREE
Related Posts:


ToolGuyd
30-year-old Soviet TV adaptation of The Lord of the Rings surfaces on YouTube
https://cdn.arstechnica.net/wp-content/uploads/2021/04/Fellowship-980×565.png
-
The Council of Elrond discusses the fate of the One Ring.
-
Gollum hams it up in a cave.
-
Unlike the Peter Jackson film, the mysterious Tom Bombadil plays a pivotal role in this interpretation.
-
Frodo and Aragorn are ready for battle.
-
Gandalf battles his enemies. It’s impossible to capture how wild the battle scenes are with a still image; you’ll have to watch for yourself.
-
Boromir monologues into the camera.
-
A narrator smokes a pipe as he frames the story.
After 30 years, a TV adaptation of J.R.R. Tolkien’s The Lord of the Rings long thought lost has resurfaced. The 1991 Soviet television adaptation has been uploaded to YouTube, in two one-hour videos.
The film focuses on the events of the first book in the trilogy, The Fellowship of the Ring, and features many elements that were excluded from the popular global theatrical release by director Peter Jackson, including an extended sequence featuring the character Tom Bombadil—one of the biggest omissions by the bigger-budget 2001 film far more of us have seen.
Originally broadcast on TV in 1991 (and then never aired again), the film was thought lost to time by those who had seen it. But as
in The Guardian, Leningrad Television successor Channel 5 uploaded the film to its YouTube page with little fanfare, surprising fans who had given up on seeing the production again. It is believed to be the only adaptation of these books produced in the Soviet Union.
For better or for worse, the primitive special effects and low budget are very apparent—moreso than in many other B movies of the time you may have seen. Grainy characters’ arms are cropped out in the middle of the frame as they are set against fuzzy fake backgrounds. And the film employs a visual language that is altogether alien to modern cinema, with sets and costumes that look more at home in a low-budget theatrical production and characters who gaze into the camera directly when they speak with eerie commitment.
In other words, an Andrei Tarkovsky masterwork it is not. But the nostalgia is strong, in particular thanks to the soundtrack by Andrei Romanov, who performed with the popular Russian rock group Akvarium.
Titled Khraniteli (“Keepers”), the film is believed to be based on a Russian-language translation of Tolkien’s work by Vladimir Muravyov and Andrey Kistyakovsky, and it is of course in Russian. But if you don’t speak Russian, fret not: YouTube’s autogenerated English closed captioning is adequate enough to give you the gist of what’s happening.
Part 1
Part 2
Listing image by 5TV
Ars Technica
Soviet TV Version of Lord of the Rings Rediscovered After 30 Years
A Soviet television adaptation of The Lord of the Rings thought to have been lost to time was rediscovered and posted on YouTube last week, delighting Russian-language fans of JRR Tolkien. From a report: The 1991 made-for-TV film, Khraniteli, based on Tolkien’s The Fellowship of the Ring, is the only adaptation of his Lord of the Rings trilogy believed to have been made in the Soviet Union. Aired 10 years before the release of the first instalment of Peter Jackson’s movie trilogy, the low-budget film appears ripped from another age: the costumes and sets are rudimentary, the special effects are ludicrous, and many of the scenes look more like a theatre production than a feature-length film. The score, composed by Andrei Romanov of the rock band Akvarium, also lends a distinctly Soviet ambience to the production, which was reportedly aired just once on television before disappearing into the archives of Leningrad Television. Few knew about its existence until Leningrad Television’s successor, 5TV, abruptly posted the film to YouTube last week [part one | part two], where it has gained almost 400,000 views within several days.
Read more of this story at Slashdot.
Slashdot