Before we dive into the new features in Laravel 8, let’s first pull in the latest version of the Laravel Installer tool. This new version includes the ability to generate the necessary Jetstream scaffolding when creating a Laravel app. Next, we’ll install a fresh copy of Laravel 8.
Westminster Abbey’s Hidden Gallery Space, Sealed to the Public for 700 Years
https://ift.tt/31zyVKY
Westminster Abbey is perhaps the UK’s most famous Gothic cathedral, with instantly-recognizable interior views like this:
One area of the church, however, may not look so familiar. The triforium, a walled interior space located 52 feet above the cathedral floor, was closed off to the public for some 700 years. The Abbey’s administrators used it for storage, and for seven centuries the space was unseen by the masses.
Recently, however, the decision was made to repurpose the triforium as a gallery, open to the public. Two years ago the space was rechristened the Queen’s Diamond Jubilee Galleries, hosting a rotation of 300 historical artifacts.
Providing physical access was initially an issue. Westminster Abbey’s construction began over 1,000 years ago, and because wheelchair access was not a design consideration in the year 960, in 2018 a modern exterior tower was constructed to house an elevator and stairs that the public could use to access the triforium. Designed by Ptolemy Dean Architects and fabricated by contractors McNealy Brown, the Weston Tower was the first structural element added to the building in 300 years.
And while Westminster Abbey was around for the Bubonic Plague back in the 14th century, it is of course currently closed on account of the current COVID pandemic. Once it, and London, opens back up, add the hidden gem of the triforium to your sightseeing bucket list.
Consider using subdomains for your app areas and also splitting routes in files. It’s not that difficult! 1. Put your domains in your “hosts” file 2. All route groups with respective domains 3. Session domain 4. php artisan serve –port=80@laravelphp@laravelnewspic.twitter.com/SnTuMSZYAk
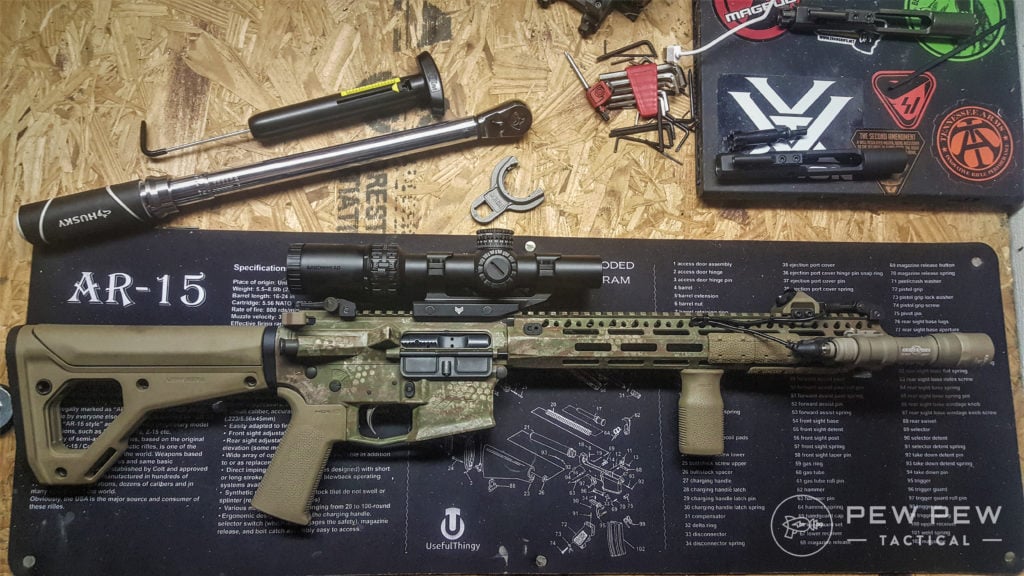
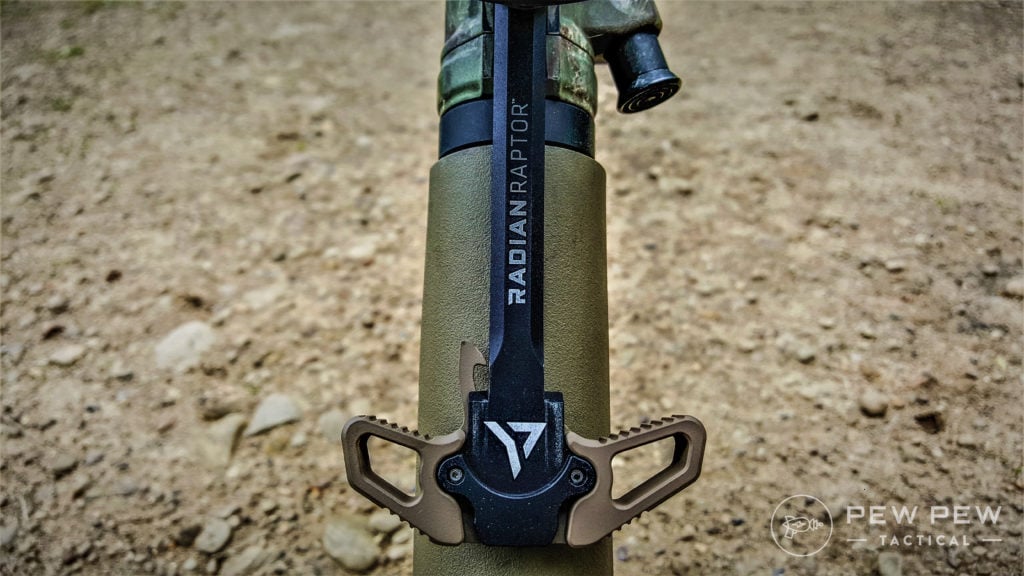
If you’ve been on any social media page devoted to the AR, you’re seeing a lot of hype over 13.7-14” barrels lately. The hype is real. It’s a versatile length for an AR for multiple reasons.
The final product!
But why would someone go with that size of barrel?
How can you run a sub-16” barrel with a stock, and not have to worry about NFA legislation and the $200 donation to the crown?
Let’s dig into my new favorite build, all the DIY “gunsmithing” options I performed, and how to pin and weld a muzzle device to bypass unconstitutional gun legislation like the National Firearms Act.
Table of Contents
Loading…
Reasons to Go Short
First and foremost, why go under 16” of barrel?
Simple.
Shorter is lighter, handier, and with a permanently attached muzzle device, you can keep the overall length of the barrel to legal minimum lengths. Velocity is still effective for a 300+ meter carbine as well.
A 16” barrel with a typical muzzle device adds length to the rifle overall. It may not seem like much, but shaving off 2”+ is noticeable when handling a rifle.
With a shorter handguard, it makes the rifle balance well while using a thumb over bore grip with your support arm.
It may not seem like much, but in your hands, there is a huge difference.
With the plethora of muzzle devices on the market that doubles as a suppressor mount, you can permanently attach a muzzle device to add overall length to a barrel that is 13.7-14.0”. The SOLGW NOX, the Dead Air Flashhider and Brake, and FCD options are just a few that will work.
If you plan on using a can on your rifle, this efficiently keeps the overall length shorter since most QD cans have the muzzle device inside of the blast chamber. For example, running a Sandman S becomes more manageable than a 16” barrel with a Key Mount from Dead Air.
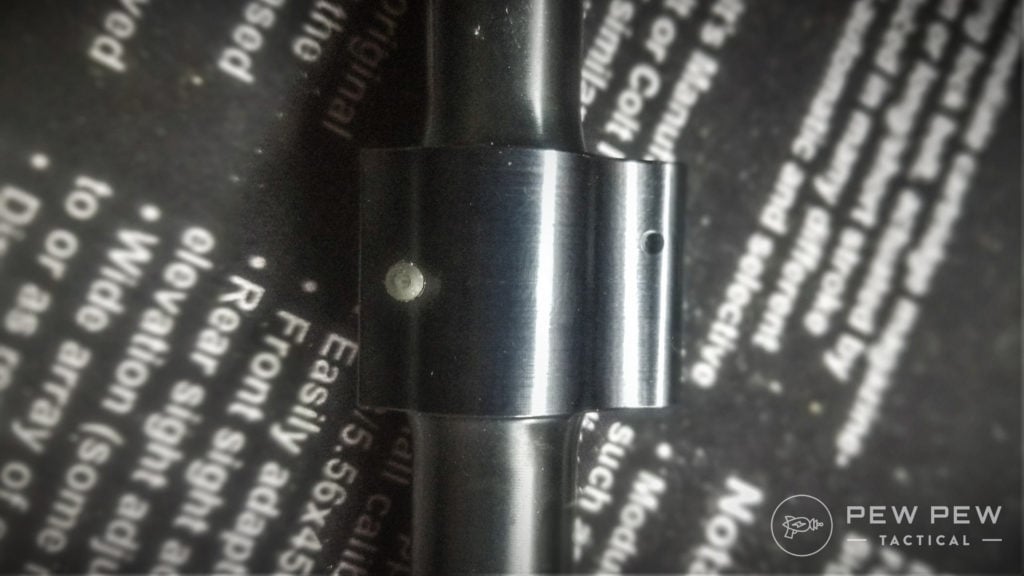
The barrel has a QPQ (nitride) finish with a FailZero nickel boron coated M4 barrel extension. It has a carbine gas length and comes predrilled to pin the gas block that is included.
Speaking of the predrilled and included gas block, I decided to take it a step further.
While the included roll pin would serve well in fixing the gas block to the barrel, I typically can’t leave well enough alone.
Nothing screams bomb-proof like a taper pinned gas block.
I decided to dimple the barrel for the gas block set screws and ream the drilled hole out with a 2/0 taper pin reamer. It’s easy to do with thejigs I purchased from Black Rifle Engineering.
If you build a few rifles, they are worth adding to your gunsmithing tools and make the process quick.
Dimpling a barrel is quick and painless with a BRD Engineering jig.
Like most BA Hanson barrels, accuracy is everything you’d expect. Its typically a sub-2MOA barrel, and when I do my part with match grade ammunition, the rifle will shoot consistently 1 MOA or under. It happens to prefer Mk262, and Remington 62 grain BTHPs.
Typical group at 100 yards with 77 grain SMKs.
The Pin and Weld
The dimpling didn’t end there.
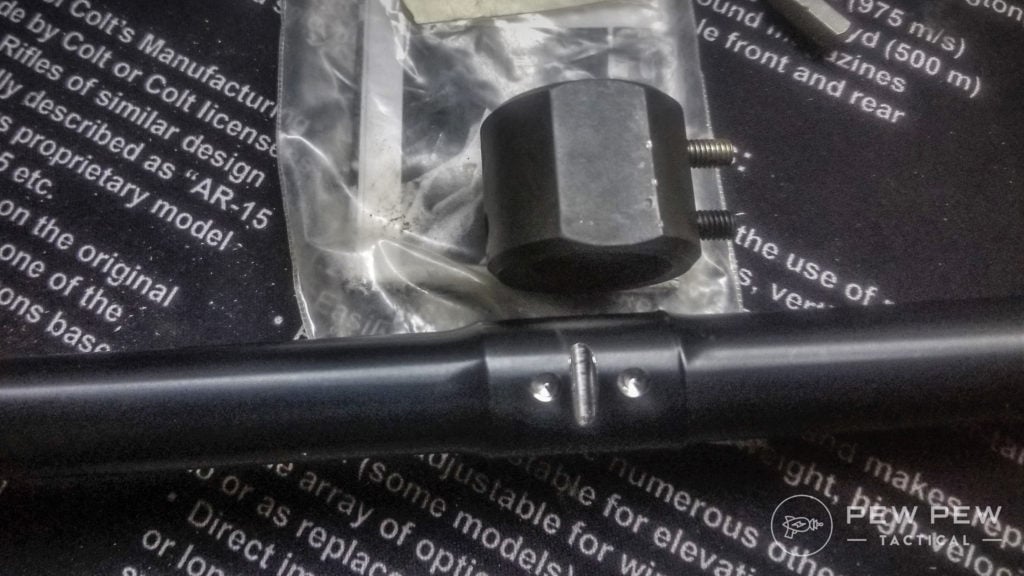
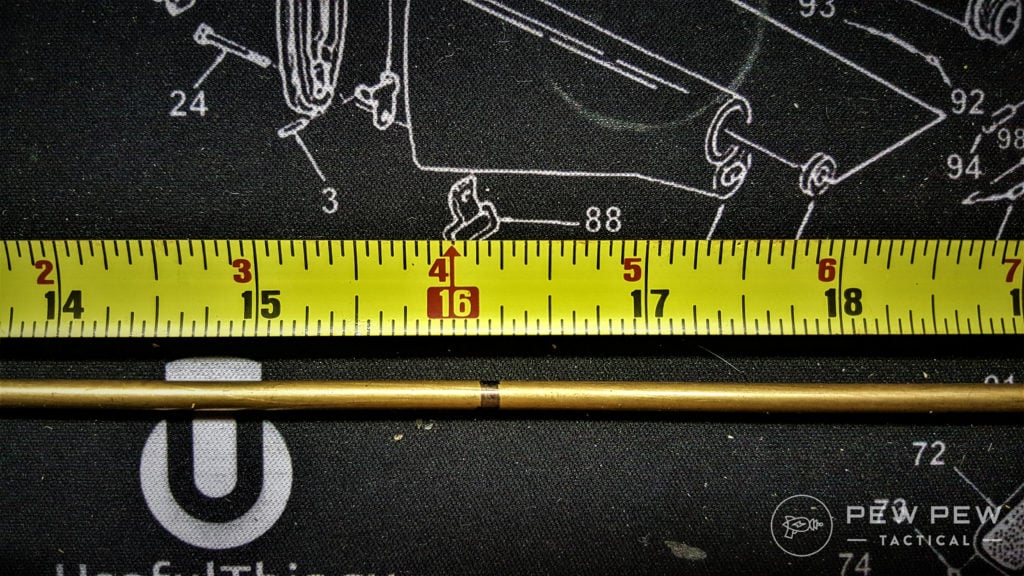
To make the 14” BA Hanson barrel legal to use with a stock, I needed to make the overall length at a minimum of 16”. I decided to go with the tried and true Dead Air Key Mount Flash Hider.
Before anything else is done, you need to verify that the overall barrel length is at least 16” to legally be a rifle. To measure the overall length, you must install the muzzle device and any shims needed for proper timing.
Muzzle device properly installed and timed with shims.
A simple cleaning rod pushed up against the bolt face and marked with a marker can give you an accurate measurement to verify a 16” overall length.
This is the ONLY WAY to measure overall length per ATF guidelines.
It must be measured from the BOLT FACE. Mine happened to measure at 16.125” with the shims.
Over 16” with a little wiggle room to be safe.
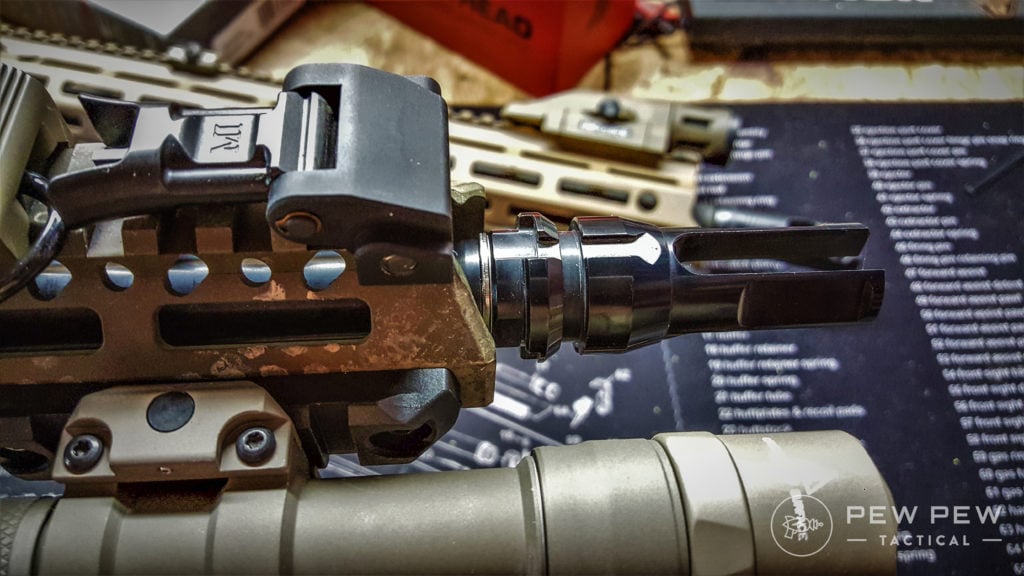
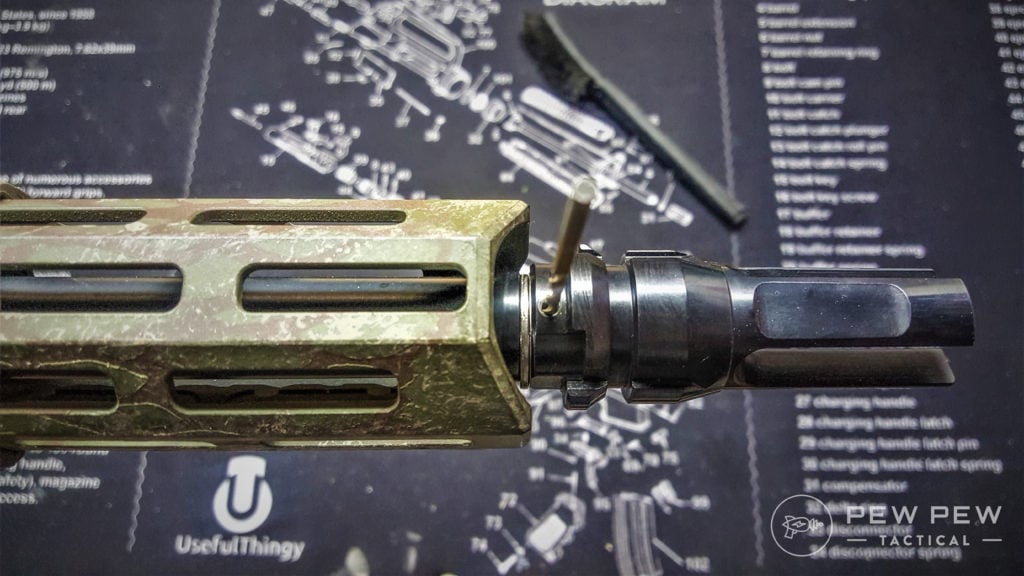
The Dead Air FH has a hole predrilled at the bottom of the muzzle device specifically for pinning. It is also sized perfectly to use a takedown pin detent to act as the pin.
The detent works perfectly since it is beveled, and you will need to dimple the threads of the muzzle for the pin.
Admit it. You have a bunch of these lying around because they are so easy to lose.
Dimpling the threads of the muzzle should be done slowly and methodically. The last thing you want to do is punch through the muzzle and create a hole. Just like a golfball, you only want to make a small dimple in the material for the pin to properly lock into place.
Using the predrilled hole as a guide, dimpling is easy if you take your time.
Once you have dimpled the barrel’s muzzle, all that is required for prep work is to size the pin. Dropping the pin into the hole will give you an idea of how short it needs to be. It’s a good idea to take a hammer and give the pin a few taps to make sure it’s fully seated into the dimple.
Sizing the pin is easy to do. Taking your time yields a cleaner result.
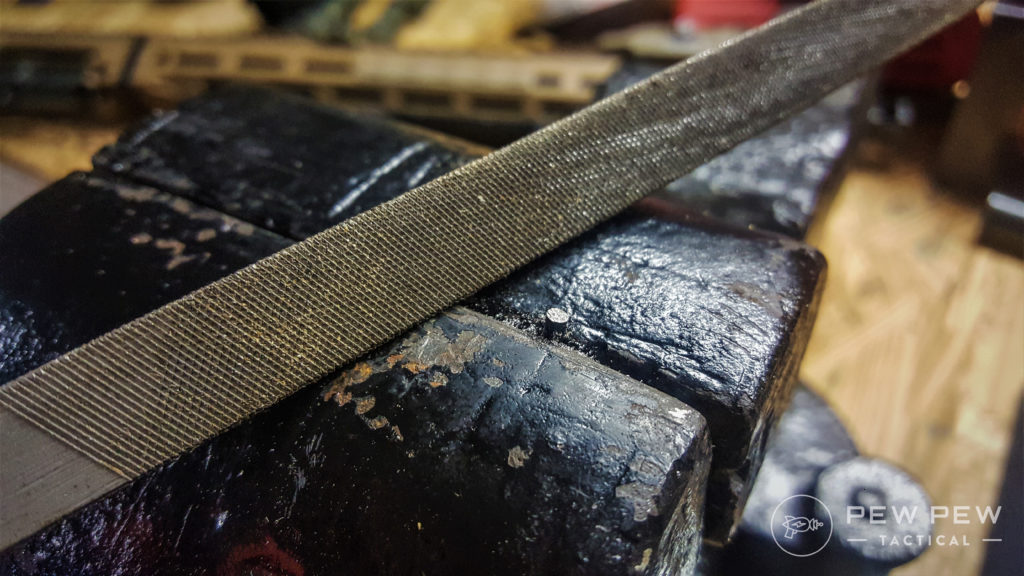
After marking for a cut, you can either file the pin down or use a small cut off wheel. I took my time and filed the pin down for a proper size. It takes a little extra time, but it makes for a perfectly sized pin for your weld. You want the pin barely shorter than flush with the outside of the muzzle device.
A properly sized pin, beveled nicely for the dimple, just before welding
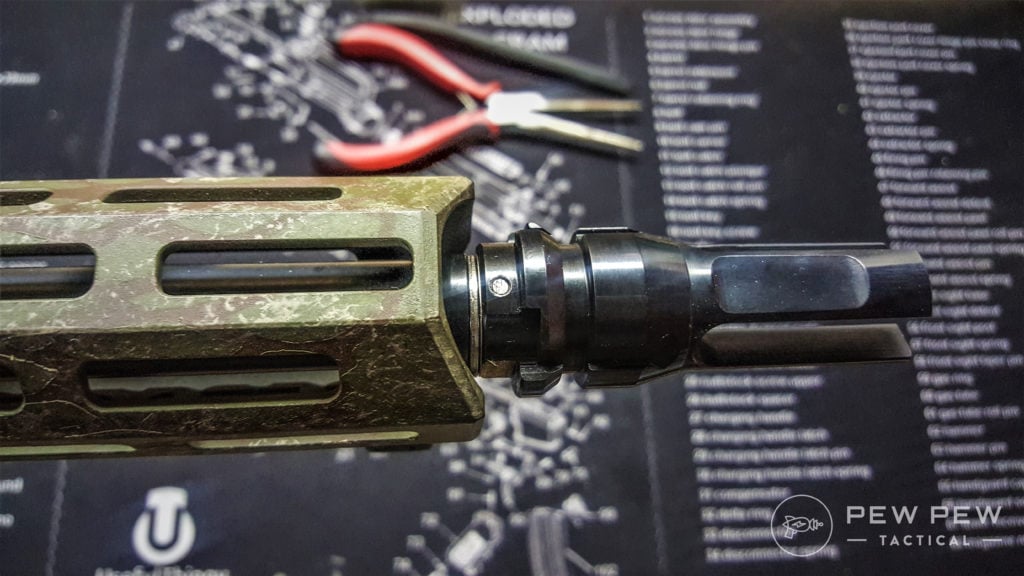
I would also recommend countersinking around the hole. This allows the weld to pool which gives a cleaner look and won’t require as much grinding or clean up. I am by no means a welder, so I still cleaned the weld up a little. Some cold blue, or even some spray paint, will protect the exposed weld.
It won’t win any beauty awards, but my muzzle device is now permanently attached and legal.
For an excellent resource, check out IraqVeteran8888’s channel. They go through step by step on how to properly pin and weld a muzzle device, which helped me out a lot.
There are other ways to permanently fix a muzzle device. I prefer a pin and weld, but you can also silver solder the threads, or weld the seam where the muzzle device meets the shoulder of the barrel towards the muzzle.
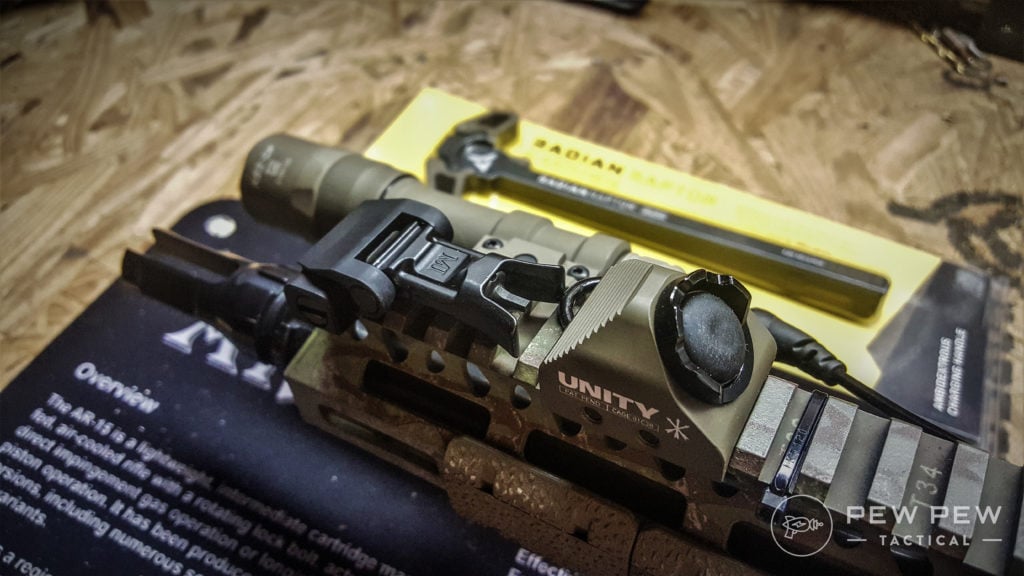
Receivers and Handguard
To stick with the blue-collar approach, I went with an Aero Precision M4E1 receiver set. I have yet to be disappointed with these receivers and they look great. When these receiver sets go on sale, it’s a great value for a budget-minded AR build.
The upper and lower receivers have a small amount of play between the two. It’s not enough to worry about, but a nice touch with the M4E1 lower is it has a tension screw to take out any slop between the receivers. I tightened mine up a little and it locks up like a bank vault.
For my handguard, I decided to go with a 13” Bravo Company MCMR. It measures at 13.4” to the end of the flare of the handguard, which should work perfectly for a near flush fit once I finally buy a Dead Air Sandman-S.
BCM MCMR handguards just might be my favorite go-to handguard. Installation can be a pain because of the tight tolerances for fitment, but in the end, it gives a shooter an impressively solid handguard for almost any condition. The hardware and anti-rotation tab provide for a perfect lock up at the barrel nut.
If you don’t rattle can an AR, do you even oper8?
To finish off the receivers, I played around with some templates and did a rattle can job. The stencil I used looked like a mixture of reptile scales and tree bark. I thought it was too dark at first, so I used a honeycomb pattern with desert sand to lighten it up.
The Guts
For a rifle you want to rely on, the guts are important. I went with a Sons of Liberty Gunworks Blaster Kit for all the small parts. Their detents and takedown pins are some of the smoothest I have used when building ARs. I chose a BCM PNT trigger and hammer and I have been happy with it at about 5.5 lbs pull weight.
The BCG that I chose was a Brownell’s phosphate model that is individually HPT and MPI. It uses a C158 steel bolt that is shot-peened. After lubing it up, this bolt hasn’t missed a beat.
I even sent it to Instructor Chad of the School of the American Rifle. Check out his video!
Properly buffering a carbine length gas system is important. I decided to go with the best and ordered a VLTOR A5H2 buffer using a green rifle length spring from Sprinco. These two go together like peanut butter and chocolate.
Best buffer in the business, the A5 system from VLTOR.
Overall, that pair housed in my Magpul UBR stock makes for a flat shooting rifle.
For a proper bang-around rifle, its settled science on three things to have on your rifle.
A weapon light must be mandatory for any defensive use.
You can’t shoot what you can’t identify.
An optic, whether red dot or LPVO provides a consistent aiming point regardless of lighting conditions. And lastly, a sling is like a holster to a handgun.
While you can get more candella with better throw from Modlite or Arisaka Defense, Surefire has been battle-tested and is an excellent light for defensive use.
The M600DF in conjunction with a Unity Hot Button makes for an ergonomic setup.
The optic I currently have on my rifle is the Swampfox Optics Arrowhead in a 1-8x. I tested, reviewed, and beat up the optic. Its FOV is excellent and works well on a defensive rifle set up with its bright reticle. Check out my review of the Arrowhead!
There are a lot of great slings out there, but I prefer the Blue Force Gear Vickers 2-to-1 Red sling. It’s quick to adjust, can convert into a 1-point sling if you like smashing your grapes, and comes with QD sling swivels. It’s simple, and that’s exactly why I love it.
There are A LOT of great choices on the market to build your own blue-collar defensive rifle. These are just a few great choices to use.
Have you ever built a rifle for defensive use with a practical budget? Have you ever tried to pin and weld a muzzle device? Let us know in the comments below! Trick out your gat with the Best AR-15 Upgrades, stem to stern!
How to establish a startup and draw up your first contract
https://ift.tt/3je9Lb0
Founders are encouraged, incentivized and pressured to begin transacting with customers as quickly as possible to drive growth and revenue. But making legal mistakes early in the game can create costly liabilities down the road.
That’s why we invited James Alonso from Magnolia Law and Adam Zagaris from Moonshot Legal to join us at TechCrunch Early Stage to give us a 360 overview of the legal side of running a startup. We’ve shared highlights from their presentations below, along with a video of the entire panel discussion.
Corporate law 101 for startup founders
James Alonso gave us a presentation on company formation and getting funding. Maybe you’ve already created your startup, but if you’re still working on your own and don’t have any clients or employees yet, these tips are essential before you get your startup off the ground.
When you’re setting up a new company, it forces you to have a discussion about capital structure — who owns shares, how many shares and what kind of shares. There isn’t a single way to design a company on this front and we’ll look at some options later in this article. And because you’re starting a startup, you want to structure your company in a way that makes future financing easy.
Setting up a company also lets you put your IP in a single entity that you’re sharing with other shareholders. “One of the key things you’re doing when you’re forming a company is assigning the IP related to that company into a single entity that holds it all,” Alonso said.
Charged with moving the pistons in and out, a crankshaft is like the beating heart of an engine. While crankshafts need to be finished by machining, they start by forging and stamping steel, then twisting the molten metal to form the journals and counterweights that comprise this critical car part.
How to Protect Your Laravel Web Application Against the OWASP Top 10 Security Risks
https://ift.tt/321qsQ0
I remember the first time one of my sites got hacked.
The client emailed saying their website was taking ages to load. I jumped online as soon as I got home from college and noticed somebody had used SQL injection to inject a <script> tag into all the product titles.
The script attempted to redirect visitors to a malicious website. I was devastated.
This was back in 2004, and I had just taught myself ASP and SQL Server. It was a sobering moment and one that brought home the realisation that any website could be a target, no matter how small.
It also taught me about the importance of web security, and it’s been at the forefront of my development process ever since.
No site can ever be completely safe — the sheer number of high-profile breaches are a testament to this. But you can follow some best practices to make your site less of a target for a casual malicious actor or automated script.
OWASP & Laravel
The Open Web Application Security Project (OWASP) is an international non-profit organisation dedicated to creating awareness about web application security.
The OWASP Top Ten is a standard awareness guide about web application security and consists of the topmost critical security risks to web applications.
Laravel is one of my favourite PHP frameworks. I’ve used it extensively over the years for anything from small business sites to large fintech and e-commerce applications demanding security at the core.
The great thing is, Laravel takes care of many of these security features out the box.
I’ll run through the OWASP Top Ten and note how you can harden your Laravel web applications with some basic security best practices.
“Injection flaws, such as SQL, NoSQL, OS, and LDAP injection, occur when untrusted data is sent to an interpreter as part of a command or query. The attacker’s hostile data can trick the interpreter into executing unintended commands or accessing data without proper authorisation.” — OWASP Top 10
The Laravel query builder uses PDO parameter binding to protect the application against SQL injection attacks. This means you don’t have to sanitise values being passed as bindings.
Be aware that Laravel also allows you to run raw SQL queries. You should avoid this if possible. Stick to Eloquent instead.
Bear in mind that PDO does not support binding column names. You should never use input from users to dictate the table column name, including columns used in an ORDER BY statement.
If you do need some flexibility, ensure you check the column names against a whitelist.
“Application functions related to authentication and session management are often implemented incorrectly, allowing attackers to compromise passwords, keys, or session tokens, or to exploit other implementation flaws to assume other users’ identities temporarily or permanently.” — OWASP Top 10
There are several strategies you can use to protect your application from this type of attack.
Use CAPTCHA for any endpoints that can be exploited using brute-force techniques. This includes login, registration, and forgot password forms. CAPTCHA will stop most automated attacks. Go with something like Google’s reCAPTCHA rather than developing your own implementation.
Rate-limit login attempts. If used in conjunction with CAPTCHA, it allows for a great defence-in-depth strategy. Laravel has a middleware that can be used straight away in your routes or controllers to throttle requests.
Build multi-factor authentication for your member and admin accounts. There are great packages available that you can use to generate QR codes and validate one-time password codes upon login. Avoid other means of delivering this code, such as email or SMS. It simply isn’t secure enough.
Never commit any default login details or sensitive API credentials to your code repository. Maintain these settings in the .env file in the project root.
Configure sessions securely: they should be sent over HTTPS only and never display in your application. The secure setting can be enabled in the session.php config file of your Laravel application.
“Many web applications and APIs do not properly protect sensitive data, such as financial, healthcare, and PII. Attackers may steal or modify such weakly protected data to conduct credit card fraud, identity theft, or other crimes. Sensitive data may be compromised without extra protection, such as encryption at rest or in transit, and requires special precautions when exchanged with the browser.” — OWASP Top 10
Not a week goes by without news about another high-profile data breach. And most concerning of all is that at times, these breaches reveal how the company used weak security practices. Weak password hashes and unsecured S3 buckets are common occurrences.
Here are a few ways you can combat this:
Ensure you serve the entire application over HTTPS with a TLS certificate. If users try to access the HTTP equivalent, redirect them to the secure route instead and make use of HSTS headers.
Hash all passwords using an adaptive salted hashing function. These are hash functions where the work factor can be increased over time as processor power increases. Laravel supports both Bcrypt and Argon2 by default.
Encrypt all sensitive data stored at rest. Never use your own developed encryption functions. Instead, use Laravel’s built-in encryption functions that use OpenSSL to provide AES-256 and AES-128 encryption.
If you use enumeration for files or primary keys to identify records, you could be inadvertently be exposing information about your system. Using a URL like /member-profile/23 will reveal you have (at least) 23 members on your system. If you include uploaded files like /user-images/45.jpg, you could open yourself to an enumeration attack where a malicious actor could try all number combinations and extract all user images from your website. To combat this, use a different scheme like UUIDv4 to identify records that are public and might require protection. For files, use automatically generated file names or a hashed folder structure to prevent enumeration.
Never trust user-uploaded files. If these uploaded files are not validated or handled correctly, they can allow access to your entire system. The OWASP Unrestricted File Upload page includes several precautions to take. You can implement most of these using Laravel’s validation functionality:
Only allow specific file types by checking their MIME.
Rename all files upon upload.
Upload files to a non-public directory or third-party object storage like AWS S3. You don’t want somebody uploading a PHP shell script, allowing them to run commands directly on your server.
Best of all, you can wrap this all into a Laravel rule and simply call this rule as part of your validation flow.
“Many older or poorly configured XML processors evaluate external entity references within XML documents. External entities can be used to disclose internal files using the file URI handler, internal file shares, internal port scanning, remote code execution, and denial of service attacks.” — OWASP Top 10
This vulnerability applies to any system that parses XML. A security researcher found this vulnerability in Facebook a few years ago. This SensePost article goes into more detail about how this was accomplished.
The quickest way to prevent this attack is to disable external entity resolution when using the default PHP XML parser. This is done by setting libxml_disable_entity_loader to true.
If you cannot disable this functionality, make sure that your XML parser is updated and that you’re using at least SOAP v1.2 or higher where applicable. Always be vigilant when it comes to user-uploaded or third-party XML.
“Restrictions on what authenticated users are allowed to do are often not properly enforced. Attackers can exploit these flaws to access unauthorised functionality and/or data, such as access other users’ accounts, view sensitive files, modify other users’ data, change access rights, etc.” — OWASP Top 10
In 2011, attackers made off with details of over 200,000 Citigroup customers after discovering an exploit in the way they handled customer account numbers. Once they logged into an account, all they had to do was change the customer number in the URL to jump to the record of another customer.
This allowed them to create an automated process that would cycle through all possible numbers and capture all the confidential data.
The system didn’t have any authorisation checks in place to ensure the account number being accessed belonged to the logged-in user.
Always perform authorisation checks on any operations that are only available to logged-in users. This includes the page (for example, allowing you to update details), as well as the destination of the form submit.
There are popular RBAC (Role-Based Access Control) packages that can be used with Laravel allowing you to manage user permissions and roles. You can also use Laravel’s built-in authorisation services.
“Security misconfiguration is the most commonly seen issue. This is commonly a result of insecure default configurations, incomplete or ad hoc configurations, open cloud storage, misconfigured HTTP headers, and verbose error messages containing sensitive information. Not only must all operating systems, frameworks, libraries, and applications be securely configured, but they must be patched/upgraded in a timely fashion.” — OWASP Top 10
When configuring your web application, always consider the principle of least functionality. Harden your installation by removing or disabling all services you don’t need.
Back in 2001, the Nimda worm wreaked worldwide havoc by exploiting several IIS (Internet Information Server) vulnerabilities.
Many systems had IIS installed by default, even though they didn’t use the Microsoft web server at all. The result was a high infection rate that could have been prevented by hardening the system and uninstalling any services not required by the system or network.
Keep all server software and any dependencies in your web application up to date.
Disable directory listing for your web server.
Disable debugging on production servers. Even on staging servers, debugging can reveal sensitive server information by outputting all your environment variables. Make use of the debug_hide app configuration option in Laravel to prevent this.
“XSS flaws occur whenever an application includes untrusted data in a new web page without proper validation or escaping, or updates an existing web page with user-supplied data using a browser API that can create HTML or JavaScript. XSS allows attackers to execute scripts in the victim’s browser which can hijack user sessions, deface web sites, or redirect the user to malicious sites.” — OWASP Top 10
Never display user-supplied input without escaping the data. Laravel’s template engine, Blade, automatically escapes content rendered using the default syntax. This sends it through PHPs htmlspecialchars function.
Escaping all output this way will reduce your website visitors’ exposure to XSS and CSRF (Cross-Site Request Forgery) attacks.
Unfortunately, it’s not always as simple as that. If you’ve ever included WYSIWYG HTML editors in your application such as TinyMCE or CKEditor, you know this poses a risk (especially since escaping the output would result in a bunch of HTML tags rather than the formatted content).
In these instances, use a package like HTMLPurifier to remove any potentially malicious code.
“Insecure deserialisation often leads to remote code execution. Even if deserialisation flaws do not result in remote code execution, they can be used to perform attacks, including replay attacks, injection attacks, and privilege escalation attacks.” — OWASP Top 10
Be wary of unserialising anything from untrusted sources. This includes cookies your application might create. A malicious user can edit that cookie in their browser and use this as an attack vector against your application.
By default, all cookies created by Laravel are encrypted and signed. This means they’ll be invalid if a client tampers with them.
“Components, such as libraries, frameworks, and other software modules, run with the same privileges as the application. If a vulnerable component is exploited, such an attack can facilitate serious data loss or server takeover. Applications and APIs using components with known vulnerabilities may undermine application defenses and enable various attacks and impacts.” — OWASP Top 10
Because most of the dependencies you may be using in Laravel are open source, it allows malicious users to analyse the packages and find ways to exploit vulnerabilities. A few ideas to mitigate this problem:
Ensure you keep all dependencies up to date.
Remove any dependencies not in use. This will reduce the potential number of attack entry points.
Subscribe to security bulletins and include a security scanner (such as Snyk) as part of your CI/CD pipeline.
Consider using an LTS (Long Term Support) version of Laravel rather than the latest version. LTS versions receive security fixes for three years rather than the one year for non-LTS releases.
“Insufficient logging and monitoring, coupled with missing or ineffective integration with incident response, allows attackers to further attack systems, maintain persistence, pivot to more systems, and tamper, extract, or destroy data. Most breach studies show time to detect a breach is over 200 days, typically detected by external parties rather than internal processes or monitoring.” — OWASP Top 10
When it comes to your application and server, log everything, including failed login attempts and password resets.
Laravel comes with Monolog out of the box. You can even integrate it with a third party logging service like Papertrail and receive alerts for specific log events.
Conclusion
Thank you for reading, I hope this has proven useful! Sign up to my newsletter or visit my blog where I’ll share insightful web development articles to supercharge your skills.
Resources
The OWASP website is a brilliant source of information, and they provide several in-depth guides about many of the security issues mentioned above.
Making Good Great: Upgrading the Ka-Bar BK-16, Coating Removal
https://ift.tt/3j9ew5t
The Ka-Bar Becker BK-16 is a great knife with two glaring issues that you can easily remedy and upgrade yourself. Here’s how to fix one of them.
In addition to being a Le Cordon Bleu-trained chef, Ethan Becker is also a master knife designer. The brains behind many of Ka-Bar’s best designs, Becker’s insights result in some of the best fixed blades available, all at a very reasonable price.
Of the knives in his stable, my favorite, and perhaps the internet’s favorite, is the BK-16, a midsize knife with excellent ergonomics and the ability to do just about anything you ask of it. The BK-16 is an excellent blade, but there were two glaring issues for me.
First, a cake frosting-thick coating inhibits good slicing and clean cutting. Second, the sheath really leaves a lot to be desired.
Here, I give solutions to the first problem, detailing how to remove the coating. This will work on many coated blades, especially those in the Ka-Bar lineup. If the knife’s coating is a spray-on as opposed to a PVD coating, this has a chance of working (though always test in an inconspicuous spot first).
We’ll talk more about making Kydex sheaths in an article coming soon.
First, make sure it’s not paint thinner or mineral spirits. While these can take off a small bit of paint or thin coatings, they can’t get rid of the coatings here.
I used a gel-based stripper available at both Home Depot and Lowe’s called CitriStrip. It lacks some of the high-powered solvents that other strippers do but worked just as well. Not worrying about fumes or the disposal of hazardous chemicals is a good thing.
Although CitriStrip won’t burn your skin off at the slightest contact, it’s still a powerful solvent and will cause skin irritation. Avoid touching it if you can. Plus, with all of us quarantining, you probably already have some disposable gloves.
For all its orangey goodness, CitriStrip in the eyes would still be a major problem.
Other Stuff That’s Nice to Have
To make the process even easier, use an old toothbrush, a Q-tip, a wire brush, a small screwdriver, and a magnetic parts tray.
All but the magnetic parts tray will help you get rid of the last flecks of the coating. While technically only the coating on the blade needs to be removed, those of us who like to unlock completeness achievements in video games will try to get rid of coating even in the screw holes under the handle scales.
A magnetic parts tray keeps your parts in the same place. If you don’t have one, get one. It’s incredibly handy, and you’ll use it for a myriad of other things.
Upgrading the Ka-Bar BK-16: Starting the Process
First, you need to disassemble your knife completely, removing the handle scales, any lanyard you may have on the knife, and the hardware attaching the handle scales. When you’re finished, the knife should look like this:
After you have the knife completely naked, set up a container for the stripping agent. Here, I used a disposable lasagna tray, but anything made of glass should also work (please wash thoroughly if the container is not disposable).
Once the knife is stripped, pour out enough stripper until the bottom of the tray is mostly covered. After that, you can just lay the knife in there and make sure the entire knife is covered. To aid in retrieval, I bent a nail and put it through the lanyard hole:
Once the knife is coated, let it sit in the stripper. I let my BK-16 soak for 24 hours despite the recommended 8-hour period. The end result was glorious; the coating all but fell off the knife. Here it is about 30 seconds into the stripping process:
And here’s the knife 15 seconds after that:
After the flats are cleared off, it’s time for detail work. I needed a wire brush to clean up the plunge lines (I should have taped up the edge; working on a knife like this without the edge taped is a safety hazard):
I then used a small flathead screwdriver to clean up the interior steel from the milled holes in the handle. This is entirely unnecessary, but again, I’m a completist.
Finally, I used a Q-tip to rid the screw holes of the coating. This was the last thing I did before reassembling the knife, and I’m convinced there’s not a single speck of coating left on my BK-16.
Coating Removal: Results
Here’s what the knife looks like nude, post-strip. The grind lines are very visible, which I suppose will bother some people, but the laser marking and the stone washing look nice to me.
Overall, I’m very pleased with how the stripping went, and the knife definitely slices better now. But it does mean that I have to be more cognizant of rust and more religious in coating my knife with an anti-rusting agent (I like EDCi or WD40).
Coming soon, I’m going to show you step by step how to keep upgrading your Ka-Bar BK-16 by making a Kydex sheath.
Good News: Vaccine Shows Promise In Clinical Trials. Bad News: It Also Resurrected Hitler As A Zombie
https://ift.tt/3aPmI7Z
Good News: Vaccine Shows Promise In Clinical Trials. Bad News: It Also Resurrected Hitler As A Zombie
ATLANTA, GA—A recent attempt at making a vaccine for the COVID-19 virus has shown mixed results. The latest tests have shown that the trial vaccine does cause an increased immune response to the novel coronavirus. On the other hand, the corpse of Adolf Hitler somehow got exposed to the vaccine, and it has resurrected him as an evil zombie.
“It feels like we’re on the right path,” said researcher Shelly Weaver as she nailed boards to the research facility window. “The results on the immune response are exactly what we wanted to see. At the same time, we probably should have kept the test vaccine away from the corpses of genocidal dictators. Still, it’s better to know it could resurrect them as zombies now rather than find that out later.”
If further tests show the same results, the vaccine could be an important step in getting the nation back to normal, allowing people to go out again without fear of contracting the virus. There may be a new fear, though, of being attacked by a zombie Nazi army led by one of the most evil men in history.
“It’s a mixed bag, for sure,” said pharmaceutical executive Ron Sanders, “but we’re trying to focus on the positive. Sure, there are side effects, but we think they’re manageable.” He then loaded a shotgun.
Breaking: PayPal Now Available
Many of you told us you wouldn’t subscribe until we offered PayPal as a payment option. You apparently weren’t bluffing, so we finally caved and added PayPal. Now — like the unbeliever faced with God’s invisible qualities displayed in nature — you are without excuse.
Chinese Advertisers Might Have Monetized Your Period
https://ift.tt/3gcKX1b
Image: Ian Waldie (Getty Images)
In a cruel but totally predictable twist, an app that all but guaranteed pregnancy within nine months or-your-money-back was too good to be true.
A data privacy watchdog has found that a top ovulation tracker Premom has been secretly sharing users’ location data, advertising IDs, and multiple device identifiers from Android devices with Chinese data providers for advertising companies. Some of the information is impossible to revoke unless you destroy your device. Data from the app analytics firm Sensor Tower shows that Premom’s ovulation tracker has been downloaded over 120,000 times from the Google Play store and iTunes in July 2020 alone.
The Washington Post has reported that the International Digital Accountability Council (IDAC), which conducted an investigation, has found no evidence that Premom shared health-related information, but persistent, non-resettable hardware identifiers are nearly as bad. With the aforementioned location, device and advertising data, the companies could have inferred users’ identities, tracked browsing activity and use of other apps—and, in doing so, might well have developed behavioral profiles, which can include users’ believed sexual identities, religious affiliations, political preferences, health status, education level, and income bracket. Premom’s privacy policy states that it would “will keep your personal data confidential and we will not give or sell your information to any third parties or non-affiliated companies without your consent.”
Premom, which is free in the Apple App and Google Play stores, appears to generate revenue from its sister brand Easy@Home: an Illinois-based online depot for home medical supplies, including drug tests and ovulation test strips, the latter of which are marketed as complementary products for the app. The first red flag, though, was the litany of data Premom said it collected, up until a recent update in its privacy policy:
name, age, gender, birth date, health-related information, email address, fertility information, social media account names, authentication information, inventory of installed applications on Your device, phonebook or contact data, microphone and camera sensor data, sensitive device data, and other information that you link with our Application.
G/O Media may get a commission
It adds that users may “and may be required to” share information and give Premom access to third-party services. (Now, it says that users can opt out by emailing Premom, something an average user is not likely to know they can do.) It’s especially suspect, IDAC notes, that Premom would supposedly need a list of users’ other apps, which can be used to profile users for ad targeting.
In a letter to Google, the FTC, and the Illinois Attorney General, IDAC identifies Chinese companies Jiguang, UMSNS, and Umeng as Premom data recipients. The Alibaba-owned company Umeng analyzes and publishes reports on app usage statistics, ostensibly for developers. Jiguang, also an analytics company, provides push notification software for apps, which IDAC claims aggressively sucks up data without users’ knowledge or any clear method for stopping it. Not particularly reassuringly, a Jiguang spokesperson said in a statement shared with the Washington Post that it was “100% in compliance with Chinese laws” and also Apple App store and Google Play guidelines. Gizmodo was unable to locate any pertinent information on UMSNS.
Data privacy protection is a mess in the United States, and as of now, there are no federal data privacy regulations. But Illinois, where Premom’s parent company Easy Healthcare Corporation is based, has been working to pass data privacy legislation which would give consumers the right to delete data and know whom it’s been shared with, similar to the landmark policy California enacted this year.
Google also explicitly forbids the extent of data hoovering alleged in IDAC’s letter, particularly the collection of advertising IDs together with device identifiers, without consent. According to the Washington Post, Google briefly removed the app from its store on August 6th, after an inquiry from the paper, but soon restored it.
Supposedly, Premom updated the app and removed the Chinese companies’ access to data, so now you can rest easy in the knowledge that Google Analytics and Facebook will take good care of you. Gizmodo has reached out to Premom and the IDAC and will update the post if we hear back.