Movie Finder: semantic search over 1M films, inside MySQL

https://askdba.net/wp-content/uploads/2026/10/myvector_movies-Large.jpeg

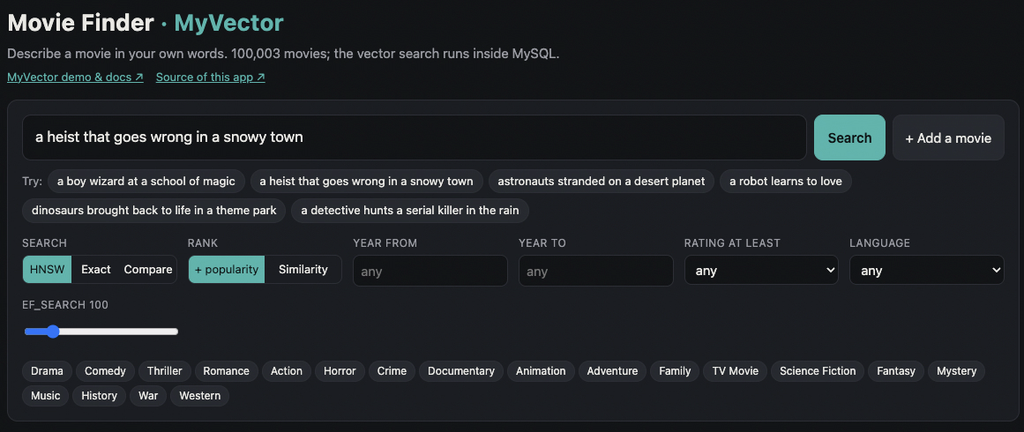
Type “a heist that goes wrong in a snowy town” and get back real films, with posters, in a few milliseconds. The vector search behind it runs inside MySQL, with no separate vector database.

Movie Finder is the new demo app that ships with MyVector. It searches up to 1,035,695 TMDB movies by meaning, not keywords. One docker compose up gives you the whole thing: MySQL 9.7 with the MyVector component, a loader, and a small web app.

Try it live: https://demo.myvector.online/
We built it to answer the questions people ask us most. Does vector search in MySQL hold up at a million rows? Can I mix it with ordinary WHERE filters? What happens when I insert a new row? The demo shows the answers on the page, with the SQL that ran under every result.

Live: What you can do on the page

Every feature on the page maps to a MyVector capability, and every result panel shows its SQL.

  • Describe a movie in your own words and get the nearest films. Ask for “a boy wizard at a school of magic” and Harry Potter comes back first.
  • Filter by genre, year, rating and language. These are plain SQL predicates combined with the vector search, and the page tells you which filtered-search path ran and why.
  • Rank by similarity alone, or with a small boost for films many people have rated, so the famous match beats an obscure one at almost the same distance. Both are ordinary ORDER BY expressions.
  • More like this: a film’s stored vector becomes the next query, in pure SQL.
  • HNSW vs exact: run both side by side and compare speed and recall.
  • Add a movie: a plain INSERT, searchable within about a second, with no index rebuild. (Not on live demo)
  • Under the hood: live index details from myvector_index_status, a bar showing where each query’s time went, and a speed-vs-recall chart that sweeps ef_search from 10 to 640 against an exact scan.

How it works
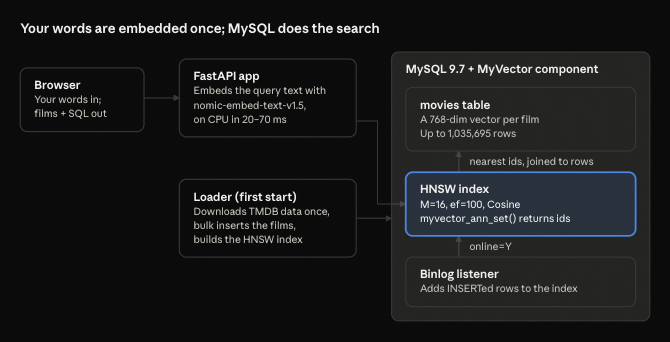
The app embeds only your query text; every movie’s vector already sits in MySQL, so a search is one SQL round trip. The movie vectors come with the dataset, made by nomic-embed-text-v1.5 from each film’s title, tagline, and overview. The app uses the same model locally on the CPU, so there is no API key, and nothing leaves your machine.

New rows need no rebuild. Adding a movie is a plain INSERT; MyVector’s binlog listener picks it up and adds it to the HNSW index, usually within a second.

The SQL

The whole index is declared in a column comment. This is the movies table’s vector column:

embedding VARBINARY(3080) COMMENT
  'MYVECTOR COLUMN type=HNSW,dim=768,size=...,M=16,ef=100,dist=Cosine,online=Y,idcol=id,threads=N'

The loader inserts the rows, then builds the HNSW index with one call:

CALL mysql.myvector_index_build('movies.movies.embedding', 'id');

A search turns the query vector into a nearest-first list of ids with myvector_ann_set(), then joins back to the table. JSON_TABLE keeps the order:

SELECT m.title, myvector_distance(m.embedding, @q, 'Cosine') AS distance
FROM (SELECT myvector_ann_set('movies.movies.embedding', 'id', @q,
                              'nn=10,ef_search=100') AS js) src,
     JSON_TABLE(src.js, '$[*]' COLUMNS (rank_no FOR ORDINALITY, id INT PATH '$')) nn
JOIN movies.movies m ON m.id = nn.id
ORDER BY nn.rank_no;

“More like this” needs no embedding at all. It reads a film’s stored vector into the query variable:

SELECT embedding INTO @q FROM movies.movies WHERE id = @movie_id;

Filters pick one of two paths. The app counts each filter on its own index and takes the smallest count as an upper bound:

  • 50,000 matches or fewer: it passes the matching keys as the fifth argument of myvector_ann_set, so HNSW searches only among them.
  • More than that: it calls MYVECTOR_ANN_FILTERED, which takes the nearest candidates and keeps those that pass the filter.

Run it yourself

To run your own copy, from a clone of the repository:

cd examples/movie-finder
MOVIES=100k docker compose up      # then open http://localhost:8080

The first start downloads the TMDB data, about 7 GB, once. MOVIES picks how many films to load, most-voted first: 10k, 100k (the default) or full. Measured on a 16-core Arm (Neoverse-N1) Linux host with MySQL 9.7.2:

Step 10k 100k full (1,035,695)
Insert 7 s 41 s 407 s
Build the HNSW index (16 threads) 29 s 33 s 545 s
HNSW search 3–5 ms 4–7 ms 5–20 ms
Exact search (scans every row) 30 ms 280 ms 3 s warm
Recall@10, HNSW vs exact 100% 100% 100%

At a million movies, HNSW answers in 5–20 ms where a full scan takes 3 seconds, with the same top 10. Recall is for the unfiltered test query; a broad genre filter (Drama) at full size gave 80% at ef_search 100, and the page lets you raise ef_search to trade time for recall. For the full profile, give Docker about 12 GB of memory and set MYSQL_BUFFER_POOL=6G.

Running it on a remote server? The page and MySQL listen on localhost only. Forward the port instead of opening it: ssh -N -L 8080:127.0.0.1:8080 <server>.

Version note: the demo uses features newer than the v1.26.9 images: filtered search, MYVECTOR_ANN_FILTERED, per-query ef_search, and online updates that survive a restart. Until the next release ships, the README shows how to build a local image from main.

Data: the movie metadata and posters come from TMDB via a Hugging Face mirror. Your machine downloads it; it is not in the repository or any image. This is a non-commercial demo, not endorsed by TMDB.

Try it and tell us

Try the live demo first. To run your own, start with MOVIES=10k for a quick first look, then go to full to watch a million rows answer in milliseconds. The demo guide has screenshots and the other demos; the Movie Finder README has the full details.

If a query surprises you, or you want a feature the page doesn’t show yet, open an issue on GitHub. A star helps other MySQL users find the project.

Planet MySQL

Dumb down your Mac: Save 12GB by removing Apple Intelligence

https://media.appleinsider.com/gallery/69213-146000-siriremove-xl.jpg

Mac users who don’t want Apple Intelligence to take up precious drive space can free up capacity thanks to a new command-line tool.

Apple Intelligence is generally a good set of features for Apple’s ecosystem of devices. However, not everyone particularly wants to use it.

That is especially a problem for Mac users with small drives and constrained spare capacity. For those stuck with a 256GB SSD, recovering 12GB can be extremely useful.

While the answer for this particular segment of Mac users would be to uninstall or remove Apple Intelligence, it’s not that simple.

Mac settings window open to Spotlight preferences, showing sidebar categories on the left and options for extensions, automatic visual lookup, excluded apps, and accessibility suggestions on a dark abstract desktop background

You can turn off Siri, but you can’t delete the Apple Intelligence models in the macOS Settings at all.

Under macOS 27, there’s no option to turn off Apple Intelligence at all. You can turn off Siri, but there’s no single point in the menu to disable Apple Intelligence completely.

Even if you manage to disable Apple Intelligence, there’s still data hanging around and no direct option to remove it. There are about 12 gigabytes of models that Apple Intelligence relies on, and that’s storage users could find other uses for, if they were allowed to delete it.

Without a single Apple-sanctioned option to remove AI in the Settings, Mac users will have to look elsewhere for a solution.

RemoveMacAI

A project by Om Lahore called RemoveMacAI aims to clean up your Mac of Apple Intelligence. It’s a free project, released on GitHub under the MIT license.

RemoveMacAI is a script that installs a configuration profile to disable Apple Intelligence features on a Mac. That includes features like Siri AI, Writing Tools, Genmoji, Image Playground, and more.

Mac desktop with a dark abstract wallpaper, showing a terminal window running a shell script that installs or configures Apple Intelligence, ending with a prompt asking to turn Apple Intelligence off

The start of running RemoveMacAI on a Mac mini.

As well as disabling features, it also removes the Apple Intelligence foundation models, as well as those for image generation, Spatial Photos, Photos Clean Up, and Xcode code completion.

The script’s configuration profile works on restriction keys for Apple Intelligence, as well as for settings that don’t have a restriction key. The models are removed using Apple’s asset service, with System Integrity Protection enabled and System files kept intact.

Once deleted, the profile also redirects attempts to download each removed model to a closed local port. This prevents macOS from redownloading the models again.

However, you can remove the configuration profile to restore previous settings and allow the models to redownload.

How to use RemoveMacAI

AppleInsider recommends that users check out the project and ensure they are aware of what RemoveMacAI does before running it.

While there are a few ways to run RemoveMacAI, the easiest is from a single line, pasted into Terminal. At the time of publication, that line is:

curl -fsSL https://raw.githubusercontent.com/omlahore/RemoveMacAI/main/install.sh | bash

Ran in Terminal, it downloads RemoveMacAI to a temporary folder and automatically runs. It shows how many features are active, how much storage space the models consume, and warns you about what happens if you proceed further.

At the prompt to "Turn Apple Intelligence off? [Y/N]" type Y, then enter.

A Device Management pop-up will appear, asking if you want to install the configuration profile. Click Install, and the script will continue to delete the models.

To revert the process, use this similar line in Terminal:

curl -fsSL https://raw.githubusercontent.com/omlahore/RemoveMacAI/main/install.sh | bash -s revert

AppleInsider News

Long-Time Slashdot Reader Announces New Open Source Web Browser ‘Northstar’

Long-time Slashdot reader Andreas(R) announces Northstar, a "minimalist" web browser written entirely from scratch in C — now available in version 1.0.11:
One window, one page, one process — about 160,000 lines of original C, small enough for one person to read and audit end-to-end. It carries no upstream browser engine: no Gecko, no WebKit, no Blink. It is free software under the GNU General Public License, version 3 or later, and it runs on Linux, macOS and Windows… Compliance is not inherited from an upstream engine; it is measured, section by section, against the specification text… Private by construction. No telemetry, no update pings, and no AI assistant or AI-style web APIs. Safe browsing checks a top-level navigation’s host against a local SHA-256 blocklist before it is fetched — the check never leaves your machine. Cookies, storage and the cache are partitioned by origin. It’s logo reminds me of the old Netscape logo. (And I love the "Best viewed in…" GIF at the upper-right of its web site.)


Read more of this story at Slashdot.

Slashdot

Someone got Doom in an SQL database

https://cdn.arstechnica.net/wp-content/uploads/2026/10/doomsql-1152×648-1790974550.png

“Rendering Doom in a database is obviously a bad idea,” Lukas Vogel writes in a lengthy blog post explaining how exactly he managed to render Doom using an SQL database.

OK, that’s not entirely accurate. The SQLDoom project uses a small Python client to handle input and output, drive the game’s timing, and display each frame to the screen. Behind that, a series of CedarDB tables tracks the game geometry and state, while about 1,300 lines of SQL queries spread across 89 common table expressions implement the game logic and generate 35 bitmap framebuffers per second.

In this, SQLDoom is a major improvement over Vogel’s previous DoomQL project, which last year set out to build “a multiplayer Doom-like shooter entirely in SQL.” Unfortunately, that effort ended up with raycasting-based, grayscale ASCII graphics that were more akin to the simplistic 90-degree-angled maps of Wolfenstein 3D. The newer SQLDoom, on the other hand, generates full-color 640×480 frames that look like they could have come from the original Doom executable.

It’s all just data, man

Converting Doom‘s classic WAD files to a relational database was relatively simple and straightforward, Vogel writes, because of the way the original game broke levels down into vertices, lines, sectors, and so on. Even Doom‘s famous binary-space partition trees can be broken down into SQL using a sort_key for objects that’s pre-computed for each position at load time. With this set in your table, a simple “ORDER BY” statement can determine which parts of walls to display and which to ignore every frame, vastly improving performance.

Ars Technica – All content

What’s new in dbForge 2026.2: New PostgreSQL Debugger, visual editors, broader context for AI Assistant, and much more

https://www.devart.com/blog/wp-content/uploads/2026/08/dbforge-2026-2-release.jpg

Here comes dbForge 2026.2, a new release of our ever-evolving ecosystem of AI-powered database lifecycle management solutions—and it’s packed with useful updates you definitely shouldn’t miss! These include a brand-new embedded PostgreSQL Debugger in dbForge Studio, handy visual object editors for PostgreSQL, broader context awareness in dbForge AI Assistant, enhanced SQL development and schema comparison capabilities, and a new, simplified product activation flow. It’s all here to make the daily work of developers, architects, and analysts much easier.

Without further ado, let’s get started!

What’s in the box?

Embedded PostgreSQL Debugger in dbForge Studio

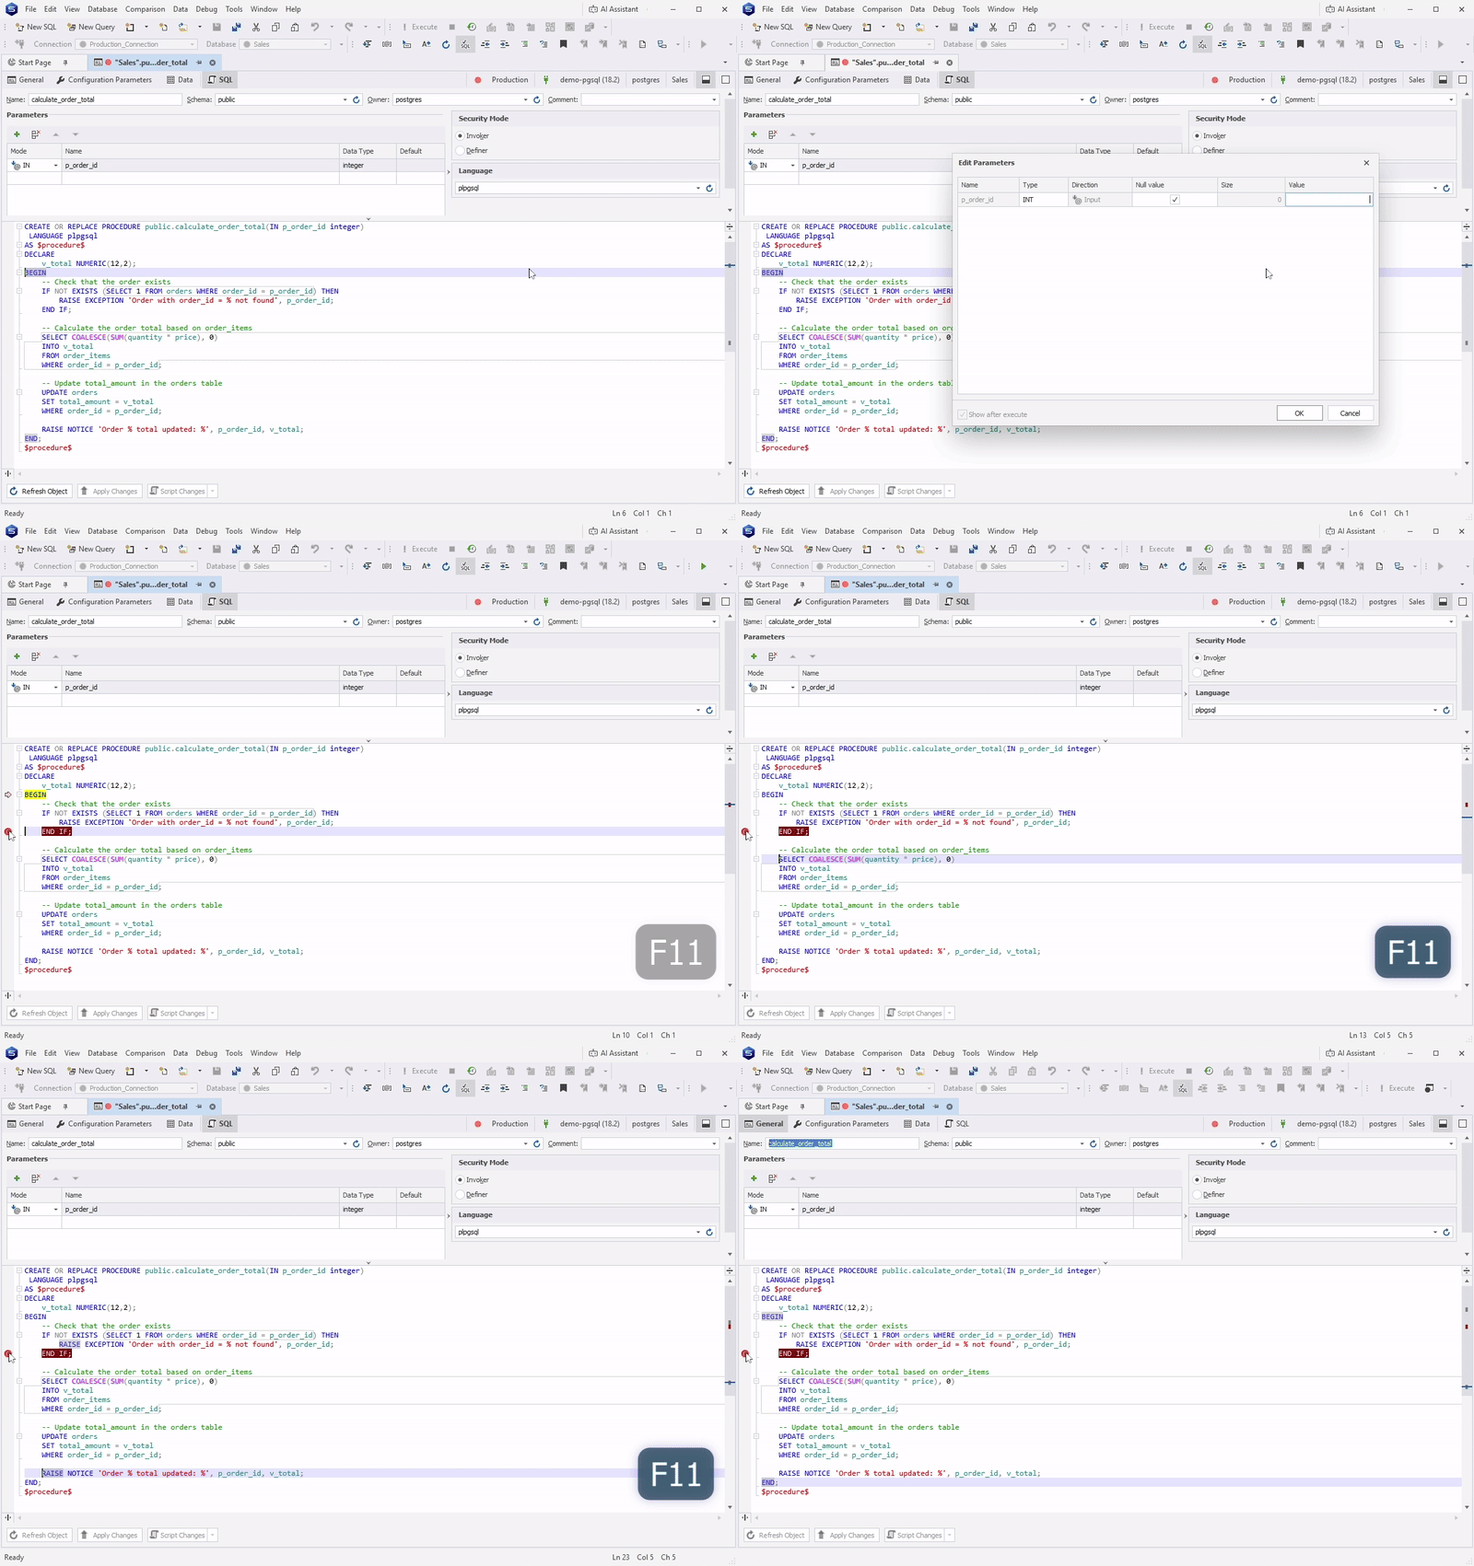
First and foremost, we’re glad to introduce a brand-new PostgreSQL Debugger in dbForge Studio. With its help, you will no longer need to scrutinize your code in order to find potential performance bottlenecks and other possible issues. The Debugger will help you do the following:

  • Set breakpoints in your code to pause the execution at specific lines
  • Step through code line by line to see how each line is executed
  • Monitor the current values of variables, expressions, and query results to analyze how data changes during the execution process
  • Handle exceptions by highlighting the exact line where the error occurs

One of the best things about our new PostgreSQL Debugger is that it’s integrated into dbForge Studio, so you won’t have to deal with any extensions or manual setups at all.

New visual object editors for PostgreSQL

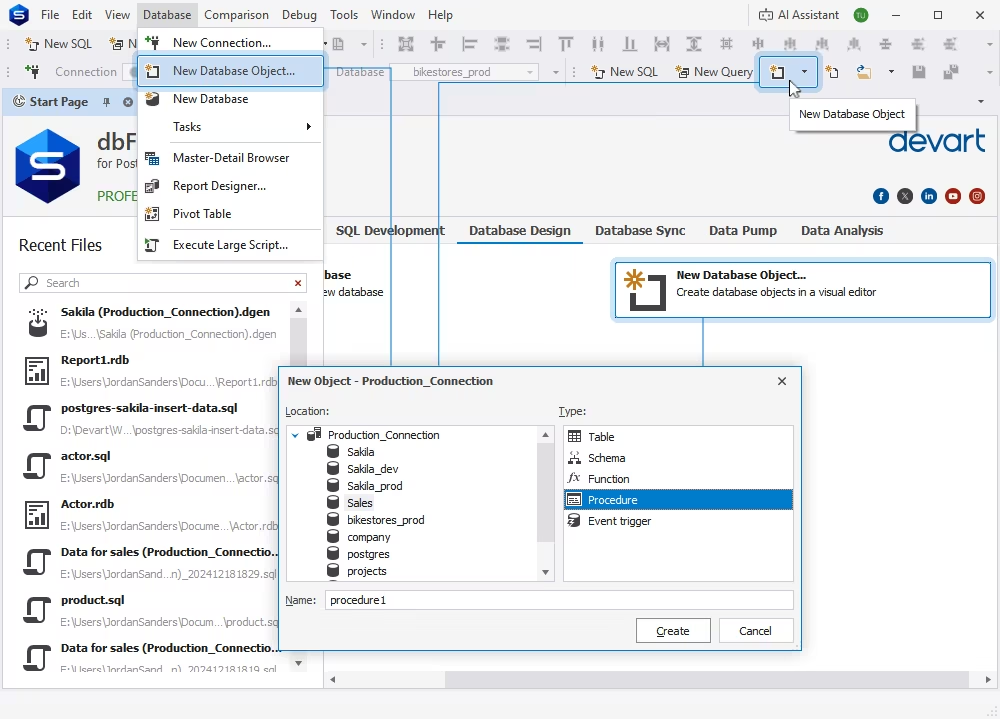
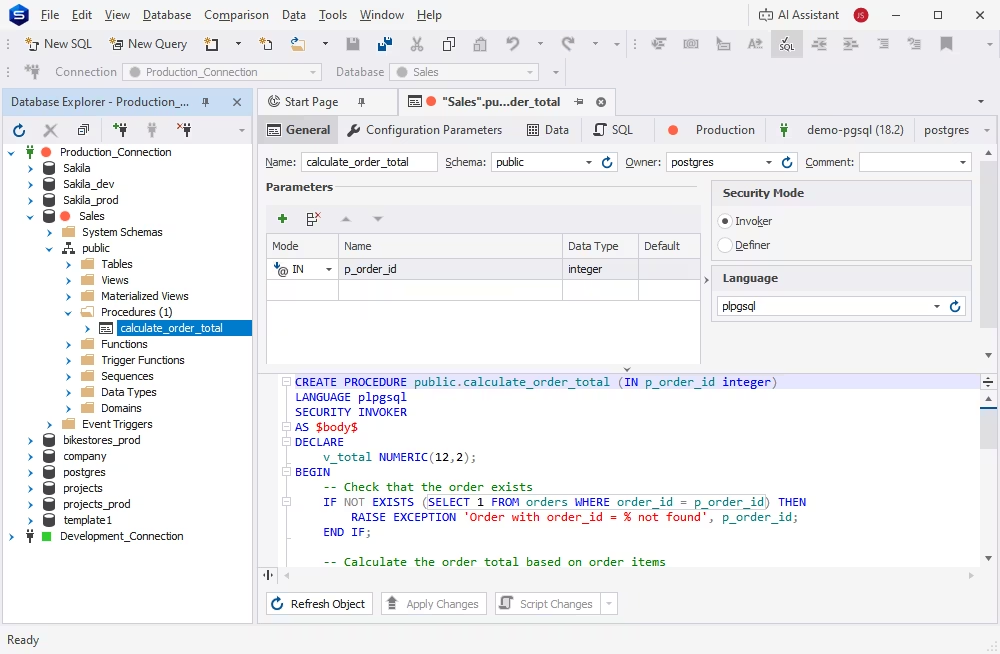
The same dbForge Studio for PostgreSQL has received new visual object editors for event triggers, functions, and procedures. These editors eliminate the need to manage these objects with raw code, bringing the convenience of a visual interface into your daily operations.

You can invoke them in multiple ways:

  • On the Start Page, go to the Database Design tab > New Database Object
  • Go to the Database menu > New Database Object
  • Click the New Database Object icon on the application toolbar
  • In Database Explorer, double-click the required object to open it in the editor
  • In Database Explorer, create a new event trigger/function or open the existing one from the context menu

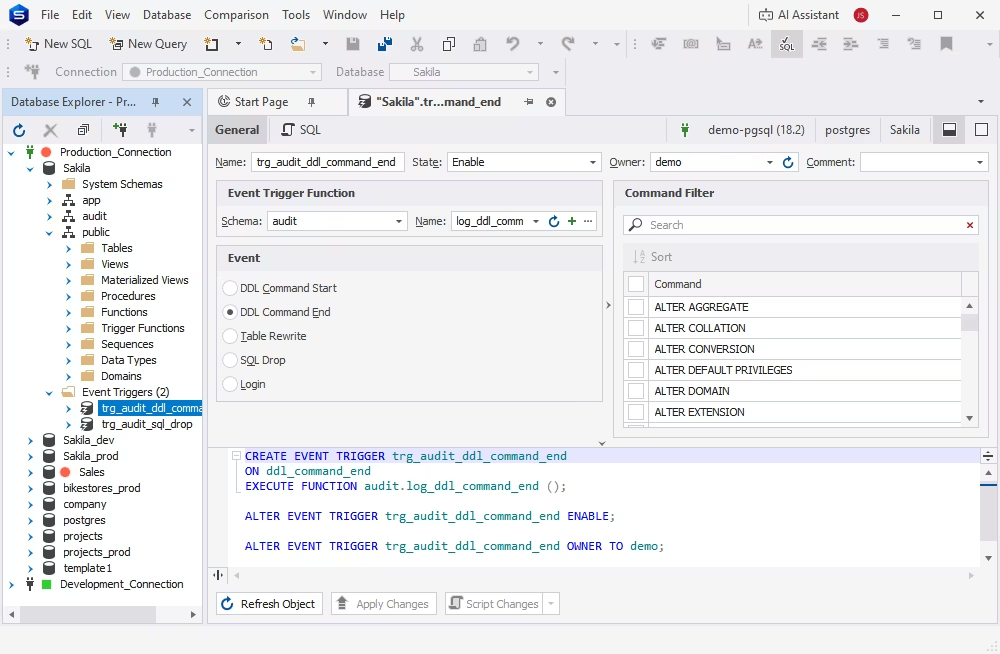
This is what the editor looks like for event triggers.

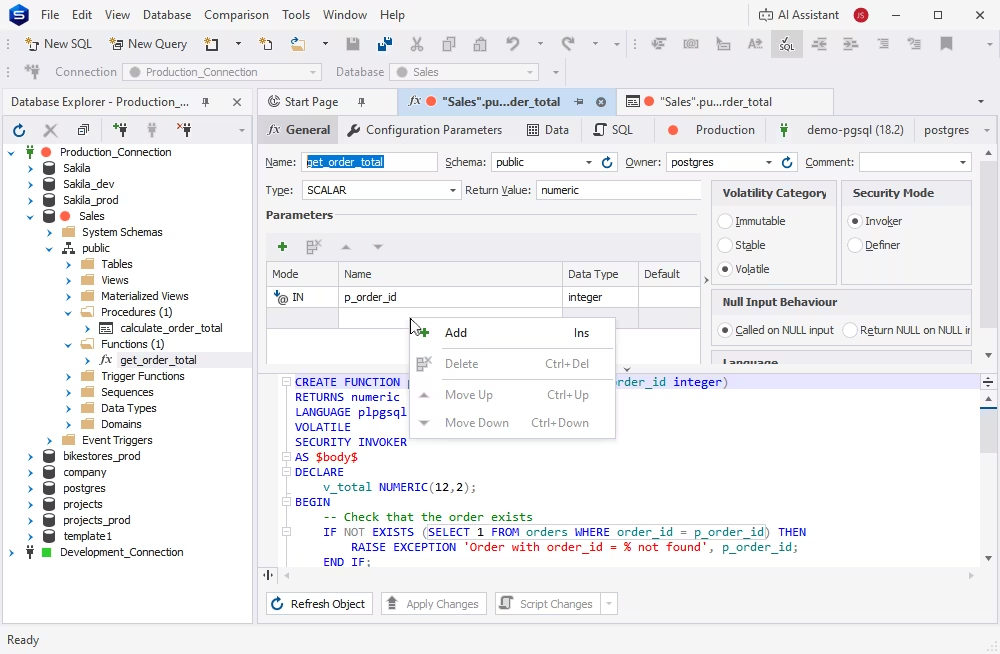
This is what the editor looks like for functions.

This is what the editor looks like for procedures.

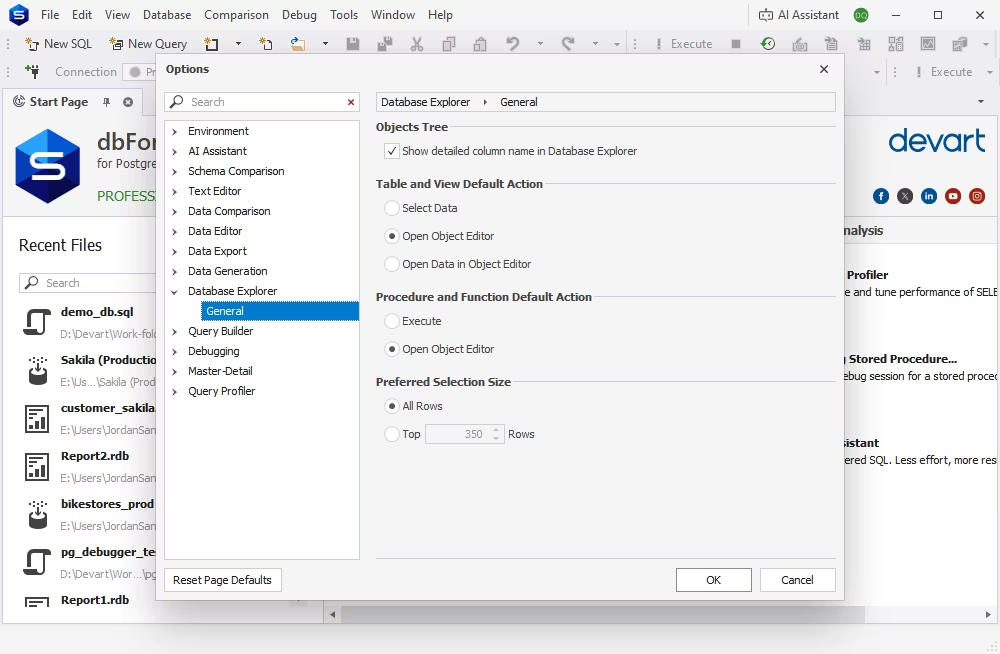
Also note that dbForge Studio for PostgreSQL now lets you configure the default action performed when you double-click database objects in Database Explorer. Separate default actions can be set for tables and views, and for procedures and functions. You can do it in Tools > Options.

Broader context awareness in dbForge AI Assistant

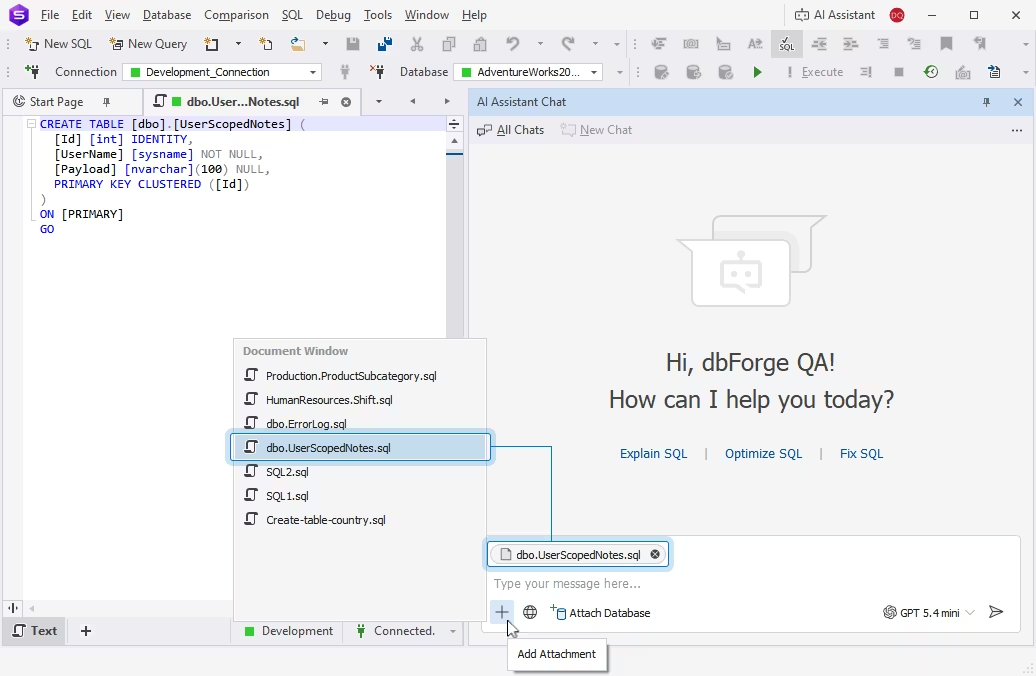
Another key goal of this release was to make dbForge AI Assistant smarter and more flexible than ever, allowing you to tailor it to your workflows and standards as precisely as possible. To achieve this, your control over the context has been greatly expanded, most notably with the ability to attach files. For instance:

  • You can freely select to auto-attach your currently active document to the AI chat
  • You can attach ready-made files instead of manually copying SQL code into your prompts
  • You can provide the Assistant with sample code to help it learn your coding style and standards—and thus generate code that consistently adheres to them
  • You can attach two scripted databases and have the Assistant compare them
  • You can attach multiple databases to the same chat
  • Generally, you can give the Assistant any files (e.g., application code, database projects/diagrams, or custom instructions) as an additional source of context

Another useful addition to the AI Assistant is the ability to select an AI model to be used. Now you can configure it from the Tools menu > Options > AI Assistant > General. The available models include the following:

  • Anthropic: Claude Haiku 4.5, Claude Sonnet 4.6, Claude Sonnet 5
  • OpenAI: GPT-5.4, GPT-5.5

Free Express edition of dbForge AI Assistant

This release makes dbForge AI Assistant even more accessible by introducing a long-awaited free Express edition. It provides a limited number of tokens and 14-day storage of chat history, which is still a great way to explore the Assistant’s capabilities and try it out in your daily work.

In case you need more extensive AI assistance, with a considerably larger token allowance and unlimited chat history, you can upgrade to a paid plan at any moment.

SQL development enhancements

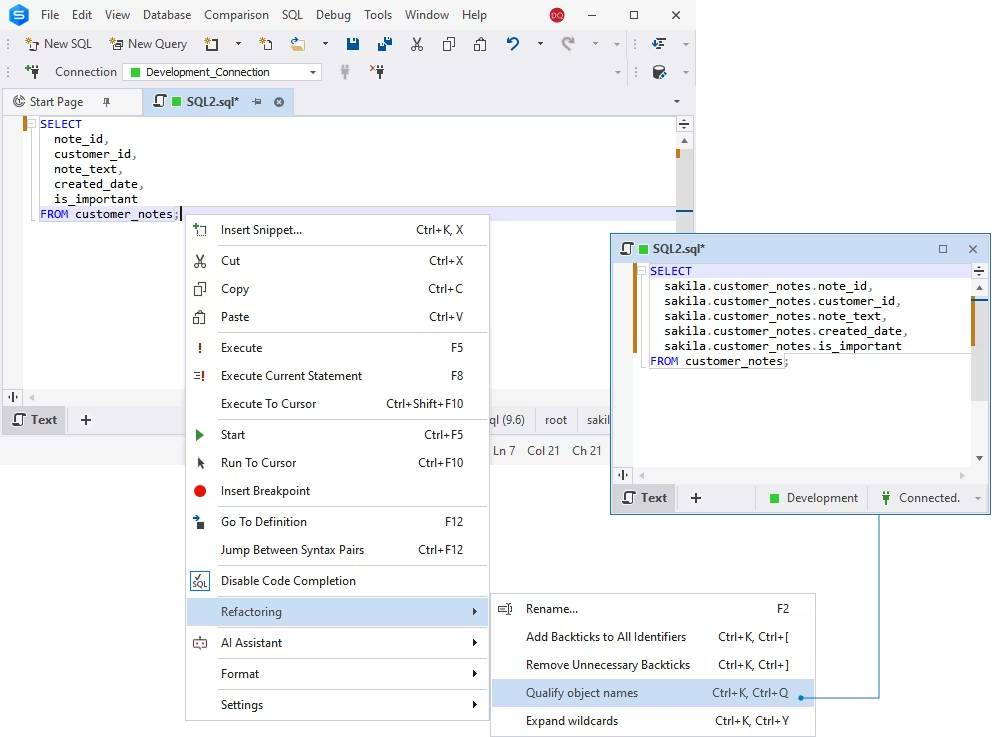
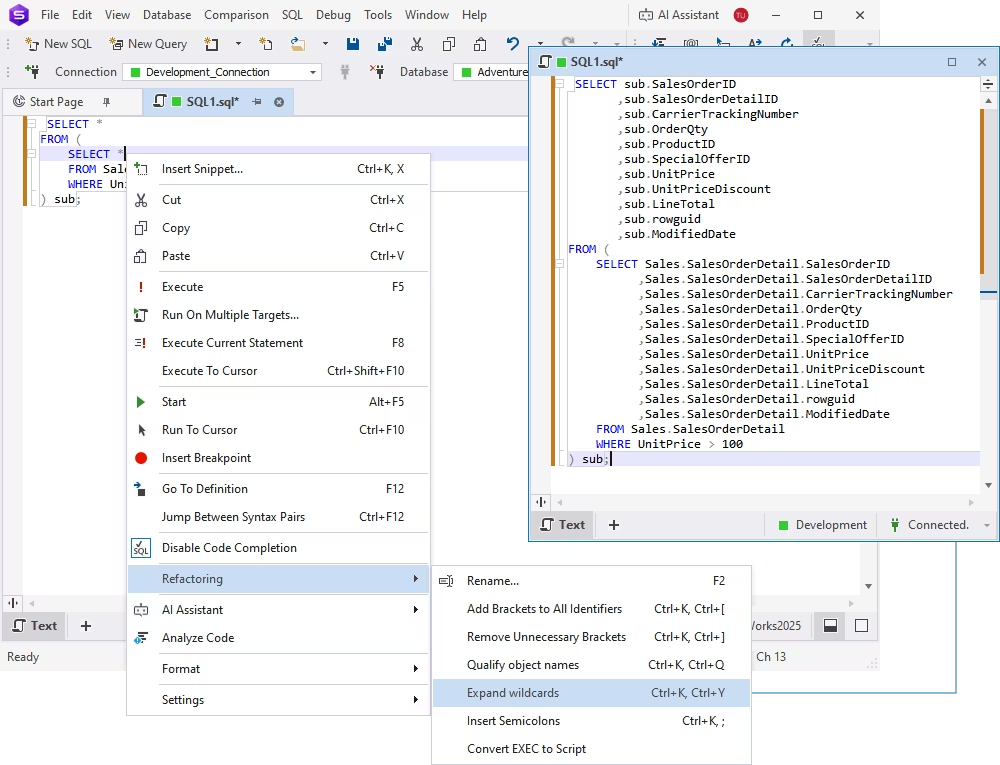
From now on, you can apply object and column name qualification to code that is already written. Previously, the qualification settings in Options > Text Editor > Code Completion > Advanced applied only while you typed. Now, the new refactoring command uses the same settings and qualifies names in an entire pre-written SQL document or a selected fragment of code.

We have also implemented wildcard expansion for all supported contexts, whether in the entire SQL document or in a selected fragment of code.

These enhancements have been implemented in dbForge SQL Complete and three dbForge Studios: for SQL Server, MySQL, and Oracle. And if you’re dealing with multiple database systems on different projects, you may want to try dbForge Edge, a suite of four Studios that works across a huge number of databases and cloud services.

Quick data generation from Database Explorer

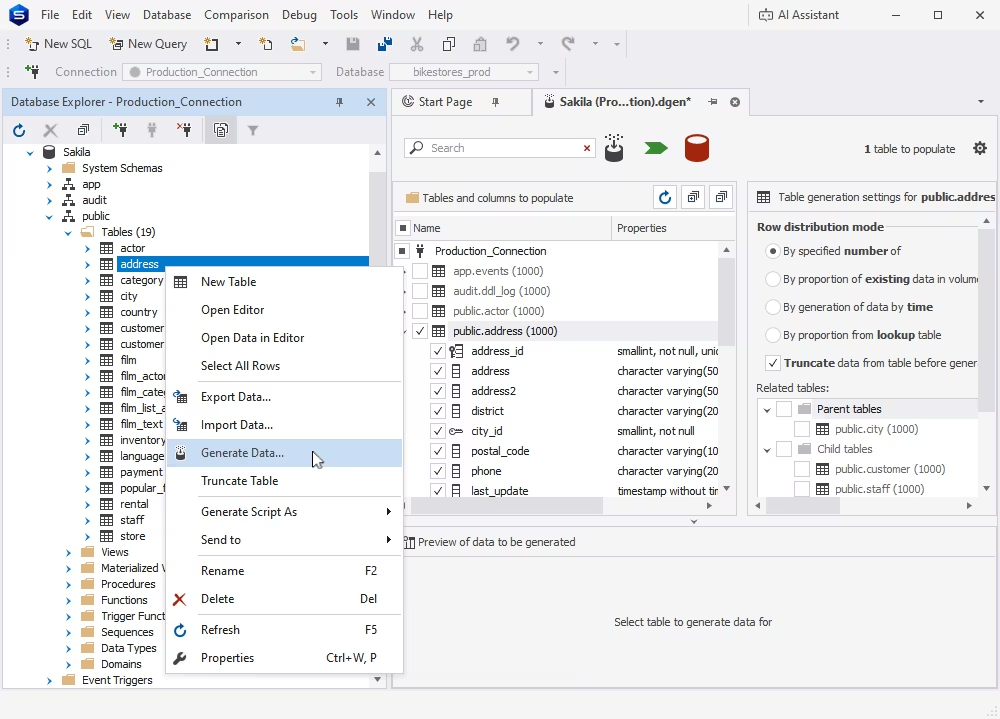
If you need to generate data for a table (or several tables) quickly, just go to Database Explorer, right-click the required table(s), and select Generate Data from the shortcut menu. You will immediately proceed to configure your generation without any unnecessary steps.

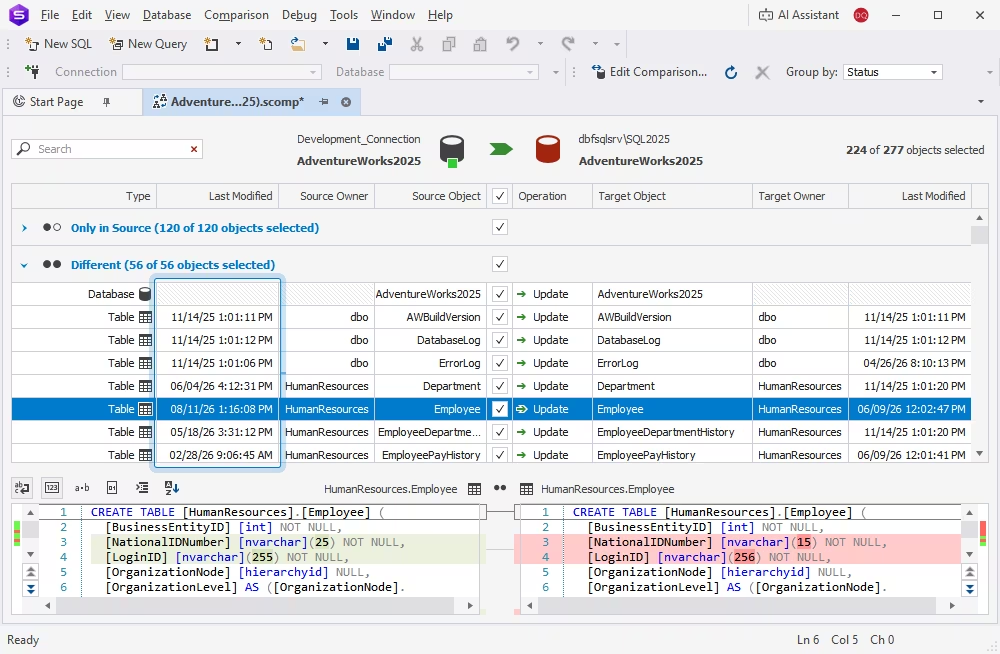
New “Last modified” column in schema comparison documents and reports

Schema comparison documents, as well as all three types of comparison reports, now include a handy Last modified column.

This feature has been implemented across dbForge for SQL Server and dbForge for Oracle.

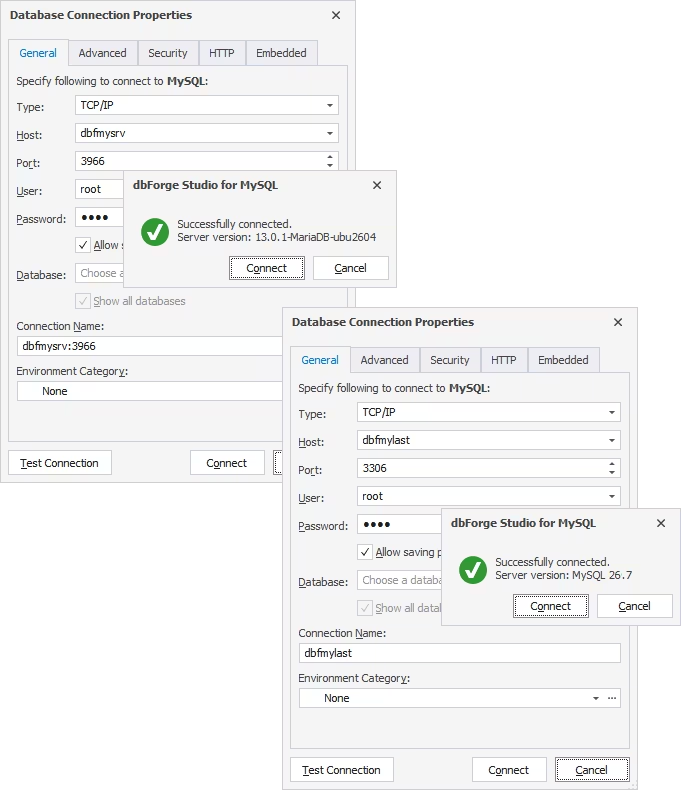
Support for MySQL 26.7 and MariaDB 13.x

Finally, all dbForge tools for MySQL are now seamlessly compatible with MySQL 26.7 and MariaDB 13.x.

Get your dbForge 2026.2 update today!

The update is already available, so you can open your dbForge product, proceed to Help > Check for Updates, and get your dbForge 2026.2 right away.

If you’re not a user of dbForge yet, we gladly invite you to download any product for a free trial and give it a go in your daily work.

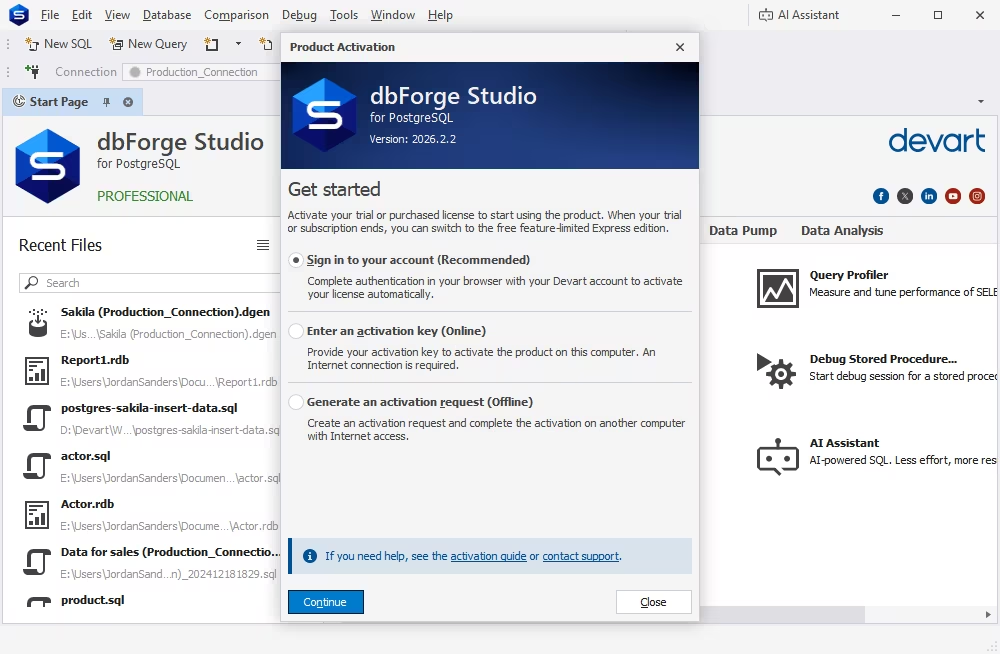
For extra convenience, we have introduced product activation via a simple sign-in, now available alongside the traditional methods: entering an activation key and generating an activation request.

And, like we said previously, if you’re dealing with multiple database systems on different projects, you can try dbForge Edge, an AI-powered multidatabase solution that helps you cover the entire database lifecycle—including database design, development, management, and administration—across SQL Server, MySQL, MariaDB, Oracle, PostgreSQL, and a vast number of related database systems and cloud services.

Planet for the MySQL Community