In the 1936 movie Modern Times, a blindfolded Charlie Chaplin rollerskates around on the fourth floor of an under-construction department store. As he skates backwards and hits the staircase trim, he nearly topples to his death.
By reconstructing the entire scene in CG, this GIF reveals the camera trick–called a "glass shot," as that’s what the painting substrate is–the filmmakers used to pull the shot off and keep Charlie safe:
Databricks is a SaaS business built on top of a bunch of open-source tools, and apparently it’s been going pretty well on the business side of things. In fact, the company claims to be one of the fastest growing enterprise cloud companies ever. Today the company announced a massive $400 million Series F funding round on a hefty $6.2 billion valuation. Today’s funding brings the total raised to almost a $900 million.
Andreessen Horowitz’s Late Stage Venture Fund led the round with new investors BlackRock, Inc., T. Rowe Price Associates, Inc. and Tiger Global Management also participating. The institutional investors are particularly interesting here because as a late-stage startup, Databricks likely has its eye on a future IPO, and having those investors on board already could give them a head start.
CEO Ali Ghodsi was coy when it came to the IPO, but it sure sounded like that’s a direction he wants to go. “We are one of the fastest growing cloud enterprise software companies on record, which means we have a lot of access to capital as this fundraise shows. The revenue is growing gangbusters, and the brand is also really well known. So an IPO is not something that we’re optimizing for, but it’s something that’s definitely going to happen down the line in the not-too-distant future,” Ghodsi told TechCrunch.
The company announced as of Q3 it’s on a $200 million run rate, and it has a platform that consists of four products, all built on foundational open source: Delta Lake, an open-source data lake product; MLflow, an open-source project that helps data teams operationalize machine learning; Koalas, which creates a single machine framework for Spark and Pandos, greatly simplifying working with the two tools; and, finally, Spark, the open-source analytics engine.
You can download the open-source version of all of these tools for free, but they are not easy to use or manage. The way that Databricks makes money is by offering each of these tools in the form of Software as a Service. They handle all of the management headaches associated with using these tools and they charge you a subscription price.
It’s a model that seems to be working, as the company is growing like crazy. It raised $250 million just last February on a $2.75 billion valuation. Apparently the investors saw room for a lot more growth in the intervening six months, as today’s $6.2 billion valuation shows.
this is a laravel package to extract and access visitors’ information such as browser, ip, device and etc.
in this package, you can recognize online users and determine if a user is online or not
Install
via composer
composer require shetabit/visitor
Configure
If you are using Laravel 5.5 or higher then you don’t need to add the provider and alias.
# In your providers array.'providers'=> [...Shetabit\Visitor\Provider\VisitorServiceProvider::class,],# In your aliases array.'aliases'=> [...'Visitor'=>Shetabit\Visitor\Facade\Visitor::class,],
then, run the below commands to publish migrations and create tables
php artisan vendor:publish php artisan migrate
How to use
you can access to visitor's information using $request->visitor() in your controllers , and you can access to the visitor’s information using visitor() helper function any where.
we have the below methods to retrieve a visitor’s information:
device : device’s name
platform : platform’s name
browser : browser’s name
languages : langauge’s name
ip : client’s ip
request : the whole request inputs
useragent : the whole useragent
isOnline : determines if current (or given) user is online
$request->visitor()->browser(); // firefox$request->visitor()->visit($post); // create log for post$request->visitor()->setVisitor($user)->visit($post); // create a log wich says $user has visited $post
Store Logs
you can create logs using the visit method like the below
visitor()->visit(); // create a visit log
use Shetabit\Visitor\Traits\Visitable trait in your models, then you can save visit’s log for your models like the below
// or you can save log like the belowvisitor()->visit($model);// or like the below$model->createVisitLog();// you can say which user has visited the given $model$model->createVisitLog($user);// or like the belowvisitor()->setVisitor($user)->visit($model);
model views can be loaded using visits relation. you can count model visits like the below
$model->visitLogs()->count();
use Shetabit\Visitor\Traits\Visitor in your User class, then you can run below codes
$user->visit(); // create a visit log$user->visit($model); // create a log which says, $user has visited $model
Retrieve and Determine Online users
use Shetabit\Visitor\Traits\Visitor in your User class at first.
then you can retrieve online users which are instance of User class and determine if a user is online.
visitor()->onlineVisitors(User::class); // returns collection of online usersUser::online()->get(); // another wayvisitor()->isOnline($user); // determines if the given user is online$user->isOnline(); // another way
Automatic logging
your application can store visitor’s log automatically using LogVisits middleware.
add the Shetabit\Visitor\Middlewares\LogVisits middleware if you want to save logs automatically.
the middleware will store logs for models which has binded in router (router model binding) and has used Shetabit\Visitor\Traits\Visitable trait.
Researchers have created a new way to classify arrogance on different levels across a spectrum.
“We were surprised at the limited amount of modern research we found on arrogance,” says Nelson Cowan, professor of psychological sciences at the University of Missour, says of the findings. “Furthermore, we found it didn’t all come from one specific area. So we created a one-stop resource to inspire further research, including, but not limited to, possible medical diagnoses of personality disorders.”
The team acknowledges everyone seems to have some degree of arrogance, so in addition to the literature review, the researchers suggest a way to classify the different levels of arrogance a person could exhibit.
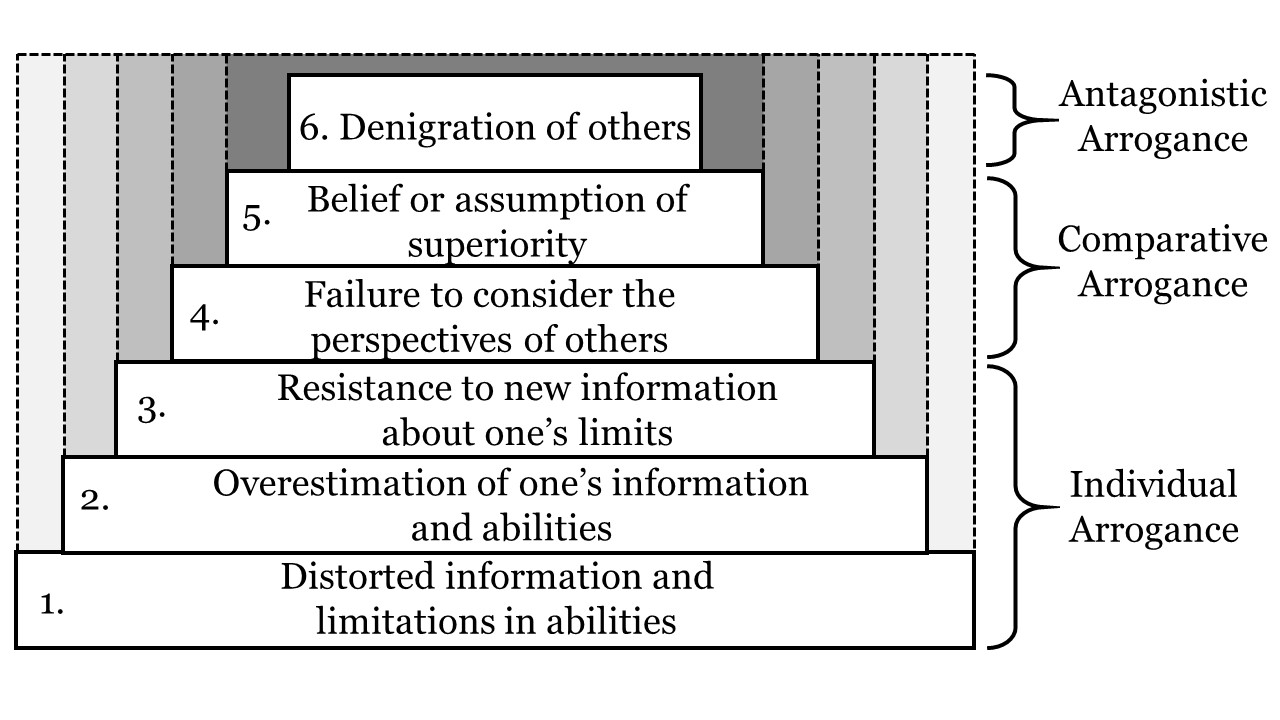
The research team devised a system that identifies three types of arrogance. (Credit: U. Missouri)
The team devised a system that identifies three types of arrogance:
Individual arrogance—an inflated opinion of one’s own abilities, traits, or accomplishments compared to the truth.
Comparative arrogance—an inflated ranking of one’s own abilities, traits, or accomplishments compared to other people.
Antagonistic arrogance—the denigration of others based on an assumption of superiority.
The three levels provide a foundation for future descriptions of arrogance.
“Our system cannot offer a complete scientific understanding, rather it is intended to provide an analytical perspective on arrogance to help guide future psychological research,” Cowan says. “It could be applied to all types of relationships, such as interpersonal relationships, or even dialogues between nations and political groups.”
The review appears in the Review of General Psychology. Funding for the work came from a NIAAA grant. The content is solely the responsibility of the authors and does not necessarily represent the official views of the funding agencies.
Here’s a short video about how to sharpen an axe. Like all sharpening, it’s not complicated to sharpen an axe… but there are right and wrong ways to do anything.
An axe is a beautiful tool. It deserves to be treated with respect. Be nice to your axe.
From files and oil stones to belt grinders and polishing wheels, this guy covers the basics in less than 8 minutes. He also provides tips on filing steel,cleaning files, and making sure you don’t get your axe head too hot if you use power tools.
He advises users of power tools to sharpen their axes bare-handed so they can touch the edge often to make sure it’s not getting too hot. Personally, I prefer to wear gloves to protect my hands from clumsy mistakes, and use water frequently to ensure the steel is cool.
return [/** * Position of icon. * * Supported: "bottom-right", "bottom-left", "top-left", "top-right" * */'icon_position'=>'bottom-right',/** * Show Impersonate button. * * Trying to save some clicks? * Then this is the option for you! Select a user and BOOM - * form submited - user impersonated. No need to click any * pesky buttons. * */'show_button'=>true,/** * Globaly include laravel-impersonate-ui. * * Or use this view: @include('impersonate-ui::impersonate-ui') * */'global_include'=>true,/** * The URI/Route to redirect after taking an impersonation. * * Use 'back' to redirect to the previous page **/'take_redirect_to'=>'back',/** * The URI/Route to redirect after leaving an impersonation. * * Use 'back' to redirect to the previous page **/'leave_redirect_to'=>'back',];
The BizPappa co-founders, from left to right: Aravind Namasivayam, Shan Sundaram and Aimee Zhang. (BizPappa Photo)
When Shan Sundaram tried to purchase a boutique consulting shop, he was frustrated by how inefficient and outdated the process was.
Likewise when Aravind Namasivayam was trying to buy a restaurant. He found that existing online platforms weren’t up to the job; sending buyers and sellers to Craigslist wasn’t built for this sort of transaction. The process was slow and lacked transparency.
In Aimee Zhang‘s role helping found and launch a snack company, she met numerous business owners with thriving companies and product lines who didn’t know how to sell their enterprises or take them to the next level.
This year the trio came together to launch BizPappa, a Bellevue, Wash.-based startup trying to help people buy and sell their small businesses.
In addition to these experiences, Sundaram and Namasivayam have both worked at Microsoft as program managers; Namasivayam is currently a senior program manager at the company. Zhang works as a real estate broker, with experience in commercial real estate.
“All three founders come from different backgrounds,” said Sundaram, who is BizPappa’s CEO. “That makes us very unique to execute our vision.”
An initial version of the platform launched in July, but the team has big ideas for how to improve and expand it. That includes using machine learning to create more targeted listings and provide information specific to a user’s needs.
“We don’t want to just be a platform for a broker to just upload a listing,” Sundaram said.
Ultimately, the site could provide additional information and services to meet a suite of needs experienced by new small business owners. That concierge-type service could differentiate BizPappa from existing platforms including Craigslist, BizBuySell and Tresle.
The startup generates revenue by charging sellers 7-to-8 percent per transaction, with the goal of reducing that to around 5 percent as the company grows. Sundaram would also like to offer some sort of rebates for buyers to encourage them to use the platform.
Entrepreneurs looking to buy a business can browse local listings. (BizPappa Website)
The company’s biggest challenge, Sundaram said, is the lengthy amount of time that it takes to complete a sale. Often the mom-and-pop shops have less than perfect bookkeeping and it takes time to share information on the business.
“We see a potential opportunity there,” he said. “We’re trying to help the sellers put all of the information together.”
We caught up with Sundaram for this Startup Spotlight, a regular GeekWire feature. Continue reading for his answers to our questionnaire.
What does your company do? We’re building a marketplace to help people buy and sell small local businesses such as restaurants and salons, and we plan to eventually provide concierge services such as food safety licenses, business licenses, insurance, finding a CPA and other areas. We want to be the small local business market’s Redfin plus Zenefits (a company providing support in HR and other business operational needs for startups).
Inspiration hit us when: We realized that buying and selling small businesses followed an antiquated model that hasn’t changed with the times. Given the availability of new technology and a fast-moving market, this process needs a new platform that is entrepreneur friendly. There are plenty of improvements in residential real estate, but there isn’t the same sort of resources for small business owners pursuing their dreams of becoming entrepreneurs. We can launch more entrepreneurs by using the latest tools and technology because our platform was created with problem solving in mind for small businesses.
VC, Angel or Bootstrap: Bootstrap. We are self-funded and focusing on getting traction before we raise any seed funding.
Our ‘secret sauce’ is: We’re the first in the market for building a platform that uses artificial intelligence to help people buy and sell small businesses. This helps target the business listing category, location and price that buyers and sellers receive, and eliminates needless communication between buyers and sellers. We also have dedicated in-house brokers to assist buyers and sellers throughout the transaction and make it transparent and professional.
Our founders come from the technology sector, commercial real estate, restaurants and the food and beverage industry. It’s the perfect combo to solve this problem.
The smartest move we’ve made so far: The first thing we did was break the problem into single blocks and tackle our challenges according to a philosophy of solving them one by one. As part of this exercise, we decided to focus solely on the fast moving, restaurant buy-and-sell category. We have partnered with the CBA (Commercial Business Association) and integrated their listings to discover local businesses available for sale.
Given that last year Forbes ranked Seattle as the No.1 place in the U.S. to run a business, we’re launching with restaurants in Seattle and the greater Puget Sound area to prove our business model before expanding to other markets and categories.
The biggest mistake we’ve made so far: We’ve waited to launch the MVP to kick start our content strategy, which includes informational posts about how to start a business, the pros and cons of buying a business versus starting from scratch, etc. We quickly realized that we could have started producing the content while simultaneously talking to customers and building the platform.
Some of the services provided by startup BizPappa. (BizPappa Website)
Which leading entrepreneur or executive would you most want working in your corner? Amazon CEO Jeff Bezos. Amazon started as an e-commerce company, but has diversified into areas such as Amazon Web Services (AWS), Echo personal assistants, etc. The company fails fast and moves quickly into new areas to become first in a field. We’re following the same concept to move fast and test the market quickly — while still using strong data points — along with talking to customers.
Our favorite team-building activity is: Frequent coffee meetups
The biggest thing we look for when hiring is: Passion, integrity, being a go-to person, and looking for opportunities with every problem, rather than whining about challenges.
What’s the one piece of advice you’d give to other entrepreneurs just starting out: Don’t rush to build the technology. Do thorough customer research, talking to potential customers to understand the landscape before building the product.
This package provides control to check if user session dead before submit forms. If the session is dead, a modal will reveal and ask password to re-login.
Installation
Require this package with composer.
composer require spiderwebtr/isauth
Laravel 5.5+
If you don’t use auto-discovery, add the ServiceProvider to the providers array in config/app.php
Add this code to the footer in your blade. user object provides information in login modal.
<script> let user={ name:"", email:"", photo:""//edit this up to your system or just remove this line. }; </script> <style> .swal-icon--custom>img{max-height: 250px;border-radius: 50%; } </style> <scriptsrc="/assets/SpiderWebtr/isAuth/isAuth.js"></script>
Extras
Translate
In isAuth.js file there is texts object which provides texts to package. You can modify them to translate.
isAuth Function
isAuth function takes a callback parameter so you can call isAuth in your code.
isAuth(function(){ //do something });
Login modal will reveal if the session is dead. When you re-login, your code will work with callback.
The FBI recently released its annual report Crime in the United States. For the second consecutive year, the estimated number of violent crimes in the country decreased. In 2018, violent crime fell 3.3 percent, while property crime dropped 6.3 percent. This marks the 16 consecutive year those estimates declined.
RELATED STORY
Personal Defense World Brings Facts: More Guns, Less Crime
FBI Crime Report on Guns
The violent crime rate fell 3.9 percent when compared with the rate in 2017. Meanwhile, property crime declined 6.9 percent in the same comparison.
While crimes fell in most areas and categories, non-negligent manslaughter offenses fell 6.2 percent. Meanwhile, the estimated volume of aggravated assault offenses decreased by 0.4 percent.
But interestingly, for gun owners, how guns came to be used by murderers proves even more interesting. In 2018, 14,123 murders occurred, 10,265 which used a firearm. Of those 10,265 murders, 6,603 reportedly took place with a handgun. Meanwhile, only 297 murders utilized a rifle. A shotgun was used 235 times to commit a murder.
In the national discourse on firearms currently taking place, the semi-auto “assault rifle” gets portrayed as the scourge of American society. But the FBI data simply doesn’t support that claim. While even one murder is too many, the data shows that gun control advocates aren’t proposing to save lives. It’s something else entirely. Otherwise, enemy number one would be the handgun. That’s what the data says.
Or possibly they should turn their attention to knives. Criminals used knives to murder 1,515 victims in 2018. Meanwhile, blunt objects, listed as “clubs, hammers, etc.” took 443 lives. Stunningly, personal weapons, “hands, fists, feet, etc.” killed 672 lives in 2018.
We live in a data-driven, analytical age. From stocks to sports, to the news you read, analytics drives the decision making. Except when it comes to gun control. Because even though handguns, knives, clubs, hammers and even feet take more lives than rifles, it’s the “assault rifle” that must be banned.
It’s not about saving lives for gun control advocates. And it never has been.
Primary Arms’ Bargain Bin Highlights, AR Gun Parts Deal
USA –-(Ammoland.com)- Primary Arms has some great buys on useful gun parts for rifle builders with AR rifles parts starting at just $3.99 while inventory lasts. Check out the highlights below and jump on multiples of ones you use over and over while prices are inexpensive. Primary is buying these in bulk from Radical Firearms and passing along the savings, many of these are exclusive deals only found at Primary Arms. Below is our top eight picks. If you don’t like our selection you can check out the rest at the buy now button.
Daily Gun Deals: Primary Arms’ Bargain Bin Highlights, AR Gun Parts Starting at $3.99
Radical Firearms backstory videos:
Daily Gun Deals are short-term bargains that will often expire or sell out fast! The AmmoLand News Team publishes these deals that are available from our trusted partners and well-known industry retailers. AmmoLand does not stock inventory or have a shopping cart, we simply bring you up-to-date information on deals as a way to help you the reader get the most bang for your buck. As always we try and bring you the best information possible but these are fast-moving deals and details change quickly so be sure and check prices and product information for yourself by following the above links.
Ammoland Editors are scouring the web to find you the deal that will save you money. So good are these deals that they do not last long so pay attention to the publish date and do not delay, take advantage of this deal as soon as we publish it for our readers.
Consider checking our Gun Deals Coupon page and our past featured Daily Gun Deals page for additional savings from your favorite industry partners. Thank you very much for your support and I hope we save you some money by highlighting these sweet daily deals. Enjoy!